
![]()
level 1
· 5 yr. ago
If you insert page number and untick the show number on the first page it will not show on the first page. The next step is to click on format and make the page numbers start at 0, then on your first page you will see p.1, same thing for the running head. Go into Header & Footer options to change them
1
Dual multilevel numbering in Word is where you have two independent multilevel numbering systems running through your document. It requires a bit of extra setup, but if you get this step right, you will reap the rewards later.
In this post, I explain why the conventional way of setting up your numbering will not work.
Then, with that context, I’ll explain step-by-step how to set things up correctly.
Clickable Table of Contents
1. What does ‘Dual Multilevel Numbering’ look like?
Take a look at this example.
This is an overly simplified dual-language contract that will be used throughout this post.
The left-hand column contains the English portion of the contract and the right-hand column contains the corresponding foreign language portion.
The content is organised inside a table with invisible borders so that everything remains aligned.
The colour has been added to help to visually distinguish between each level.

Notice how the numbering of the top-level headings are in sync.
As are the 1.1 … 1.2 … 1.3 content on level 2 and the (a) (b) (c) content on level 3.
I’ll circle around to how this has been set up, but first, let’s look at …
2. How NOT to set up dual multilevel numbering in Word
If you’re not sure how to set up multilevel numbering or styles, check out these links first. They will provide context for the next section.
When you define a conventional multilevel list style, each numbering level is linked to the built-in Heading 1, Heading 2 and Heading 3 styles, like this …

… and you can define the ‘look’ of each numbering level (fonts, colours etc.) by modifying the style definitions.
For example:

But this results in the numbering flowing from one column the other, in a left-to-right, top-to-bottom sequence. Therefore the numbering between the left and right columns does not align correctly.

You can see that using the same style on both the left and right columns is a mistake.
So now, let’s take a look at …
3. How to set up dual multilevel numbering in Word (correctly)
Step 1: Define custom styles
Instead of a common set of styles — Heading 1, Heading 2 and Heading 3, it is necessary to set up an independent set of styles and associated numbering system for each column.
For this scenario, I have set up 6 new custom styles. You can use the attributes of the existing styles to save some time. The new styles are:
- AA Left Level 1
- AA Left Level 2
- AA Left Level 3
- AA Right Level 1
- AA Right Level 2
- AA Right Level 3
Each pair of styles, left and right, have been set up with identical styling.

Step 2: Create two independent numbering systems
I defined two separate numbering systems, again with identical settings, except for the styles that each level links to.

Step 3: Apply the appropriate styles where needed
In the left column, I applied the styles AA Left Level 1/2/3.
In the right column, I applied the styles AA Right Level 1/2/3.

And that’s it. No need to overcomplicate it. This technique works on documents of any size.
I hope you found plenty of value in this post. I’d love to hear your biggest takeaway in the comments below together with any questions you may have.
Have a fantastic day.


About the author
Jason Morrell
Jason loves to simplify the hard stuff, cut the fluff and share what actually works. Things that make a difference. Things that slash hours from your daily work tasks. He runs a software training business in Queensland, Australia, lives on the Gold Coast with his wife and 4 kids and often talks about himself in the third person!
SHARE
This tutorial shows two ways to create numbered lists in Microsoft Word. We will also look at how to change list levels, start with a different list number, and change the font, size, and color of list numbers.
Do you want to create bulleted lists? Please see my previous tutorial “How to Create Bulleted Lists in Microsoft Word.”
What about Lists Ordered by Letters?
For simplicity, this tutorial refers to “numbered lists” because Word organizes all ordered (hierarchical) list options in the Numbering Library. However, all the steps shown here also apply to lists organized by letters.
If you would like to learn more about ordered and unordered lists, please see “How to Write Vertical Lists (Ordered and Unordered).”
Table of Contents
- How to Create a Numbered List — Basic Method 1
- How to Create a Numbered List — Basic Method 2
- How to Change Numbered List Levels
- How to Start a List with a Different Number
- How to Change the Font, Size, and Color of List Numbers
Watch all the steps shown here in real time!
Explore more than 200 other writing-related software tutorials on my YouTube channel.
The images below are from Word for Microsoft 365. These steps also apply to Word 2021, Word 2019, Word 2016, and Word 2013.
The basic steps are similar in Word for Mac. However, the more advanced steps, such as starting a list with a different number, are different on Mac. So, we will cover this topic for Word for Mac in a separate tutorial.
How to Create a Numbered List — Basic Method 1
This is the basic method to create a numbered list in Word. This method requires you to type each item as you create the list. If you have already typed your list items, see Method Two below.
- Place your cursor where you want to start your list.
- Select the Home tab in the ribbon.

- Select the menu arrow next to the Numbering button.
![]()
- Choose a number style from the Numbering Library.

The number one will appear in your document.

- Type your first list item after the number, and then press the Enter key on your keyboard. The next number will appear.

Continue typing your list items and pressing the Enter key until your list is complete.
- After typing the final item, press the Enter key twice to remove your cursor from the list.
How to Create a Numbered List — Basic Method 2
This method is for existing text formatted vertically as a list.
- Select the text.

- Select the Home tab in the ribbon (see figure 1).
- Select the menu arrow next to the Numbering button (see figure 2).
- Choose a style from the Numbering Library (see figure 3).
Your selected items should become a numbered list.

How to Change Numbered List Levels
Word lets you create numbered lists with up to nine nested levels. Here are two ways to change the level of list items.
Change List Levels — Method 1
Important note: This method won’t work for the first item in your list.
- Select one or more list items (other than the first item).

- Select the Home tab in the ribbon (see figure 1).
- Select the Increase Indent button in the Paragraph group.

Each time you select the Increase Indent button, the item(s) will move one level and take on the appropriate format for that level (e.g., lowercase letters, roman numerals, etc.).

Pro Tip: To return the selected text to a previous level, select the Decrease Indent button to the left of the Increase Indent button.
Change List Levels — Method 2
- Select one or more list items (see figure 8).
- Select the Home tab in the ribbon (see figure 1).
- Select the menu arrow next to the Numbering button (see figure 2).
- Select Change List Level from the drop-down menu.

- Select a list level from the list-level menu.

Your list item(s) should move to the next level.
How to Start a List with a Different Number
You can start a list with a number other than one or continue the numbering from the previous list.
- Select the first list number or place your cursor within the first list item. If you select the list number, all numbers on that level should also be selected.

- Select the Home tab in the ribbon (see figure 1).
- Select the menu arrow next to the Numbering button (see figure 2).
- Select Set Numbering Value from the drop-down menu.

5.a. Enter the number you want to start with in the Set value to text box in the Set Numbering Value dialog box.

5.b. (Alternative Option) Select Continue from previous list if you want to continue the numbering from a previous list in your document.

- Select the OK button.

Your list should be renumbered according to your selections in the Set Numbering Value dialog box.
How to Change the Font, Size, and Color of List Numbers
By default, the font, size, and color of your list numbers will be the same as your normal text style. However, you can manually change the appearance of list numbers by selecting them separately from the text.
- Select one list number. All numbers on that level should also be selected.

- Select the Home tab in the ribbon (see figure 1).
- Select a new font, size, or color from the Font group.

Your list numbers should change to the new formatting. Repeat these steps for each level in your list, as necessary.

Related Resources
How to Write Run-In Lists
How to Create and Update a List of Tables or Figures in Microsoft Word
How to Create Numbered Lists in PowerPoint (PC & Mac)
Updated February 12, 2023
Word for Microsoft 365 Word 2021 Word 2019 Word 2016 Word 2013 Word 2010 Word 2007 More…Less
Word can automatically count the lines in a document and display the appropriate number beside each line of text. This is useful when you need to refer to specific lines in a document, such as a script or a legal contract.
By default, Word numbers every line in a document (except those in tables, footnotes, endnotes, text boxes, and headers and footers). However, you can choose which line numbers to display. For example, you can display line numbers in all or part of the document. Or you can display line numbers at intervals, such as every tenth line (10, 20, 30, and so on).
What do you want to do?
-
Add line numbers
-
Remove line numbers
Add line numbers
You can add line numbers to all or part of a document. To view line numbers, you must be in Print Layout view (click the View tab to check).
Notes:
-
A table is counted as one line.
-
A figure is counted as one line.
-
A text box is counted as one line if it is positioned inline with the text on the page. If text on the page wraps around the text box, the lines of text on the page are counted. Lines of text inside a text box are not counted.
Add line numbers to an entire document
-
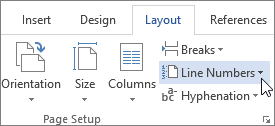
On the Layout tab, in the Page Setup group, click Line Numbers.

Note: If your document is divided into sections and you want to add line numbers to the entire document, you first need to select the document. Click Select in the Editing group on the Home tab, and then click Select All. Or press CTRL+A.
-
Do one of the following:
-
To number consecutively throughout the document, click Continuous.
-
To start with number 1 on each page, click Restart Each Page.
-
To start with number 1 after each section break, click Restart Each Section.
-
For more advanced line numbering options, such as numbering at different intervals, click Line Numbering Options, and then click Line Numbers on the Layout tab.
-
Add line numbers to a section or to multiple sections
-
Click in a section or select multiple sections.
-
On the Layout tab, in the Page Setup group, click Line Numbers.
-
Click Line Numbering Options, and then click the Layout tab.
-
In the Apply to list, click Selected sections.
-
Click Line Numbers.
-
Select the Add line numbering check box, and then select the options that you want.
Top of Page
Remove line numbers
You can remove line numbers from the entire document, from a section, or from a paragraph.
-
Click in the document, or click in the section or paragraph from which you want to remove line numbers. If you want to remove line numbers from multiple sections, select the sections.
-
On the Layout tab, in the Page Setup group, click Line Numbers.
-
Do one of the following:
-
To remove line numbers from the entire document or section, click None.
-
To remove line numbers from a single paragraph, click Suppress for Current Paragraph.
-
Top of Page
What do you want to do?
-
Add line numbers
-
Remove line numbers
Add line numbers
You can add line numbers to all or part of a document. To view line numbers, you must be in Print Layout view (click the View tab to check).
Notes:
-
A table is counted as one line.
-
A figure is counted as one line.
-
A text box is counted as one line if it is positioned inline with the text on the page. If text on the page wraps around the text box, the lines of text on the page are counted. Lines of text inside a text box are not counted.
Add line numbers to an entire document
-
On the Page Layout tab, in the Page Setup group, click Line Numbers.
Note: If your document is divided into sections and you want to add line numbers to the entire document, you first need to select the document. Click Select in the Editing group on the Home tab, and then click Select All. Or press CTRL+A.
-
Do one of the following:
-
To number consecutively throughout the document, click Continuous.
-
To start with number 1 on each page, click Restart Each Page.
-
To start with number 1 after each section break, click Restart Each Section.
-
For more advanced line numbering options, such as numbering at different intervals, click Line Numbering Options, and then click Line Numbers on the Layout tab.
-

Add line numbers to a section or to multiple sections
-
Click in a section or select multiple sections.
-
On the Page Layout tab, in the Page Setup group, click Line Numbers.
-
Click Line Numbering Options, and then click the Layout tab.
-
In the Apply to list, click Selected sections.
-
Click Line Numbers.
-
Select the Add line numbering check box, and then select the options that you want.
Top of Page
Remove line numbers
You can remove line numbers from the entire document, from a section, or from a paragraph.
-
Click in the document, or click in the section or paragraph from which you want to remove line numbers. If you want to remove line numbers from multiple sections, select the sections.
-
On the Page Layout tab, in the Page Setup group, click Line Numbers.
-
Do one of the following:
-
To remove line numbers from the entire document or section, click None.
-
To remove line numbers from a single paragraph, click Suppress for Current Paragraph.
-
Top of Page
Need more help?
![]()
Written by Allen Wyatt (last updated March 15, 2021)
This tip applies to Word 2007, 2010, 2013, and 2016
Denis frequently uses tables in his documents. In those tables, he has a need to add a series of sequential numbers to the cells in the first column. Denis wonders if there is a way to pick a starting number in a cell and then have Word add the sequential numbers for all the cells under that starting number.
There are a couple of ways you could go about this. One way is to use Word’s built-in numbering, in this manner:
- Insert your table as you normally would.
- Select the cells in the table that you want to have numbered.
- Display the Home tab of the ribbon.
- Click the Numbering tab, in the Paragraph group. Word adds numbering, automatically, to the selected cells.
If you want to modify the starting number for the cells, right-click the number in the first cell and then choose Set Numbering Value from the resulting Context menu. Word displays the Set Numbering Value dialog box. (See Figure 1.)
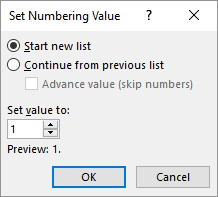
Figure 1. The Set Numbering Value dialog box.
Enter the value you want to start with, and when you click OK, Word updates the numbers in the cells. You’ll also note that if you insert any rows in the middle of your numbered sequence, Word automatically adds a number to that inserted row.
Noting this behavior, you might appreciate a simple variation on the above process that works well when you are inserting a brand new table:
- Insert a single-row table.
- Add the automatic number to the desired column and change its starting value, if desired. (In other words, follow the steps above for the single cell in the row.)
- When entering data in the table and you get to the last column, press Tab and Word inserts a new row that is automatically numbered.
Another powerful way to add your numbering is to use the SEQ field. Follow these general steps:
- Insert the insertion point at the place in the table where you want the first number.
- Press Ctrl+F9 to insert an empty set of field braces.
- Inside the field braces, type SEQ followed by a space, then a name you want used for this particular sequence, then another space, then r, then the number you want the sequence to start with. Here’s an example of how the field code would appear if you wanted to start counting with the number 4:
- With the insertion point still within field code, press Shift+F9. Your number should appear.
- Repeat steps 2 through 4 for each of the other cells where you want a number, but make sure you leave off the r switch in these others.
{ SEQ table1 r4 }
Finally, if you prefer to use a macro to insert numbers in a sequence of cells, you could use one similar to this:
Sub AddNumbersToTable()
    Dim RowNum As Long
    Dim ColNum As Long
    Dim iStartNum As Integer
    Dim J As Integer

    If Selection.Information(wdWithInTable) Then
        RowNum = Selection.Cells(1).RowIndex
        ColNum = Selection.Cells(1).ColumnIndex

        iStartNum = Val(Selection.Cells(1).Range.Text)
        If iStartNum <> 0 Then
            iStartNum = iStartNum + 1

            For J = RowNum + 1 To ActiveDocument.Tables(1).Rows.Count
                ActiveDocument.Tables(1).Cell(J, ColNum).Range.Text = iStartNum
                iStartNum = iStartNum + 1
            Next
        Else
            MsgBox "Cell doesn't contain a non-zero starting number."
            Exit Sub
        End If
    Else
        MsgBox "Not in table"
    End If
End Sub
To use the macro, just put a starting sequence value into a cell of the table and leave the insertion point in that cell. When you then run the macro, all the cells under that starting cell are filled with sequential values. (Anything previously in those cells is deleted.)
If you would like to know how to use the macros described on this page (or on any other page on the WordTips sites), I’ve prepared a special page that includes helpful information. Click here to open that special page in a new browser tab.
WordTips is your source for cost-effective Microsoft Word training.
(Microsoft Word is the most popular word processing software in the world.)
This tip (89) applies to Microsoft Word 2007, 2010, 2013, and 2016.
Author Bio
With more than 50 non-fiction books and numerous magazine articles to his credit, Allen Wyatt is an internationally recognized author. He is president of Sharon Parq Associates, a computer and publishing services company. Learn more about Allen…
MORE FROM ALLEN
Inserting a Watermark Behind Merged Cells
If you have a group of merged cells into which you want a user to enter information, you may want some sort of …
Discover More
Adding a Little Animation to Your Life
Tired of the same old boring Excel look? You can add some life to your worksheets by introducing some animation. Here’s …
Discover More
Managing Comments
If you frequently add comments to cells in a worksheet, Excel provides a variety of tools you can use to manage those …
Discover More