
Excel for Microsoft 365 Excel for Microsoft 365 for Mac Excel 2021 Excel 2021 for Mac Excel 2019 Excel 2019 for Mac Excel 2016 Excel 2016 for Mac Excel 2013 Excel 2010 Excel 2007 Excel Starter 2010 More…Less
There are several ways to run a macro in Microsoft Excel. A macro is an action or a set of actions that you can use to automate tasks. Macros are recorded in the Visual Basic for Applications programming language. You can always run a macro by clicking the Macros command on the Developer tab on the ribbon. Depending on how a macro is assigned to run, you might also be able to run it by pressing a combination shortcut key, by clicking a button on the Quick Access Toolbar or in a custom group on the ribbon, or by clicking on an object, graphic, or control. In addition, you can run a macro automatically whenever you open a workbook.
Before you run macros
Before you start working on macros you should enable the Developer tab.
-
For Windows, go to File > Options > Customize Ribbon.
-
For Mac, go to Excel > Preferences… > Ribbon & Toolbar.
-
Then, in the Customize the Ribbon section, under Main Tabs, check the Developer check box, and press OK.
-
Open the workbook that contains the macro.
-
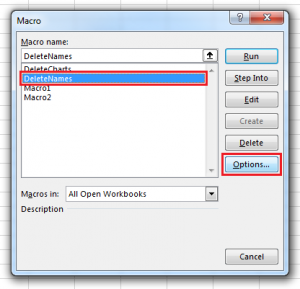
On the Developer tab, in the Code group, click Macros.
-
In the Macro name box, click the macro that you want to run, and press the Run button.
-
You also have other choices:
-
Options — Add a shortcut key, or a macro description.
-
Step — This will open the Visual Basic Editor to the first line of the macro. Pressing F8 will let you step through the macro code one line at a time.
-
Edit — This will open the Visual Basic Editor and let you edit the macro code as needed. Once you’ve made changes, you can press F5 to run the macro from the editor.
-
You can add a combination shortcut key to a macro when you record it, and you can also add one to an existing macro:
-
On the Developer tab, in the Code group, click Macros.
-
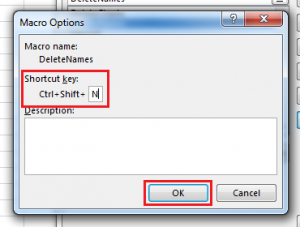
In the Macro name box, click the macro that you want to assign to a combination shortcut key.
-
Click Options.
The Macro Options dialog box appears.
-
In the Shortcut key box, type any lowercase or uppercase letter that you want to use with the shortcut key.
Notes:
-
For Windows, the shortcut key for lowercase letters is Ctrl+letter. For uppercase letters, it’s Ctrl+Shift+Letter.
-
For Mac, the shortcut key for lowercase letters is Option+Command+letter, but Ctrl+letter will work as well. For uppercase letters, it’s Ctrl+Shift+Letter.
-
Be careful assigning shortcut keys, because they will override any equivalent default Excel shortcut key while the workbook that contains the macro is open. For example, if you assign a macro to Ctrl+z, you’ll lose the ability to Undo. Because of this, it’s generally a good idea to use Ctrl+Shift+Uppercase letter instead, like Ctrl+Shift+Z, which doesn’t have an equivalent shortcut in Excel.
For a list of Ctrl combination shortcut keys that are already assigned in Excel, see the article Excel shortcut and function keys.
-
-
In the Description box, type a description of the macro.
-
Click OK to save your changes, and then click Cancel to close the Macro dialog box.
To run a macro from a button on the Quick Access toolbar, you first have to add the button to the toolbar. To do that, see Assign a macro to a button.
You can create a custom group that appears on a tab in the ribbon, and then assign a macro to a button in that group. For example, you can add a custom group named «My Macros» to the Developer tab, and then add a macro (that appears as a button) to the new group. To do that, see Assign a macro to a button.
Run a macro by clicking an area on a graphic object
You can create a hotspot on a graphic that users can click to run a macro.
-
In the worksheet, insert a graphic object, such as a picture, or draw a shape. A common scenario is to draw a Rounded Rectangle shape, and format it so it looks like a button.
To learn about inserting a graphic object, see Add, change, or delete shapes.
-
Right-click the hotspot that you created, and then click Assign Macro.
-
Do one of the following:
-
To assign an existing macro to the graphic object, double-click the macro or enter its name in the Macro name box.
-
To record a new macro to assign to the selected graphic object, click Record, type a name for the macro in the Record Macro dialog box, and then click OK to begin recording your macro. When you finish recording the macro, click Stop Recording
 on the Developer tab in the Code group.
Tip: You can also click Stop Recording
on the left side of the status bar. -
To edit an existing macro, click the name of the macro in the Macro name box, and then click Edit.
-
-
Click OK.
 on the Developer tab in the Code group.
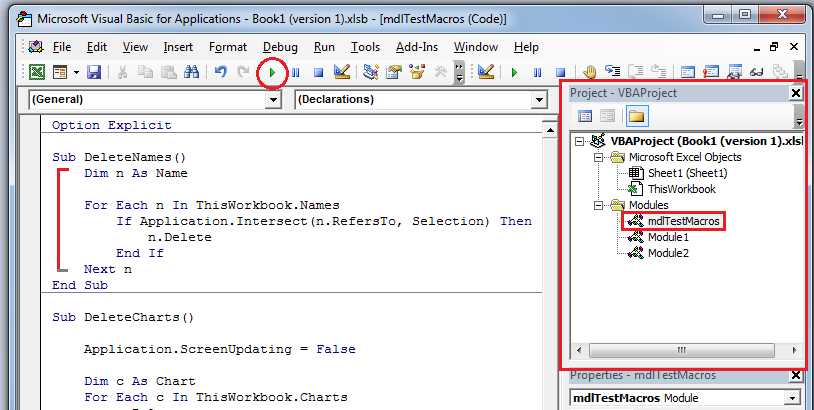
On the Developer tab, click Visual Basic to launch the Visual Basic Editor (VBE). Browse the Project Explorer to the module that contains the macro you want to run, and open it. All of the macros in that module will be listed in the pane on the right. Select the macro you want to run, by placing your cursor anywhere within the macro, and press F5, or on the menu, go to Run > Run Macro.
Create a Workbook_Open event.
The following example uses the Open event to run a macro when you open the workbook.
-
Open the workbook where you want to add the macro, or create a new workbook.
-
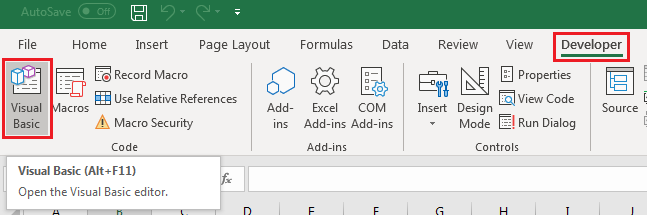
On the Developer tab, in the Code group, click Visual Basic.
-
In the Project Explorer window, right-click the ThisWorkbook object, and then click View Code.
Tip: If the Project Explorer window is not visible, on the View menu, click Project Explorer.
-
In the Object list above the Code window, select Workbook.
This automatically creates an empty procedure for the Open event, such as this:
Private Sub Workbook_Open()
End Sub
-
Add the following lines of code to the procedure:
Private Sub Workbook_Open()
MsgBox Date
Worksheets(«Sheet1»).Range(«A1»).Value = Date
End Sub -
Switch to Excel and save the workbook as a macro-enabled workbook (.xlsm).
-
Close and reopen the workbook. When you open the workbook again, Excel runs the Workbook_Open procedure, which displays today’s date in a message box.
-
Click OK in the message box.
Note: The cell A1 on Sheet1 also contains the date as a result of running the Workbook_Open procedure.
Need more help?
You can always ask an expert in the Excel Tech Community or get support in the Answers community.
Top of Page
See Also
Automatically run a macro when opening a workbook
Automate tasks with the Macro Recorder
Record a macro to open specific workbooks when Excel starts
Create and save all your macros in a single workbook
Save a macro
Need more help?
Want more options?
Explore subscription benefits, browse training courses, learn how to secure your device, and more.
Communities help you ask and answer questions, give feedback, and hear from experts with rich knowledge.
Although running a macro in Excel isn’t hard, there are lots of ways to run them. Some ways are meant to make using macros easier, while other ways can change the way a user interacts with your workbook entirely. In this article we’ll cover some obvious ways to run macros run like the Macros List and Button controls, and some more obscure ways like the VB Editor and Events.
First: Ensure Macros are Enabled
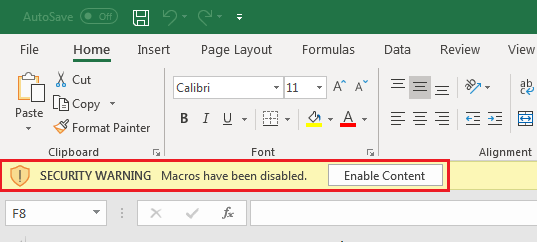
Excel’s security features will disable macros by default. When opening a macro-enabled workbook, users are typically prompted if they’d like to enable macros.
If you’re not able to run macros, try following these instructions:
- Save the workbook
- Close the workbook, then open it again
- When the workbook loads, you’ll see a Security Warning prompt (pictured below). Click Enable Content.
Run a Macro from the Macro List
A list of macros can be accessed from the View tab. To view this list:
- Select the View tab
- Click the button labelled Macros to bring up the Macro list
- Select the macro you want to run from the list, then click the Run button
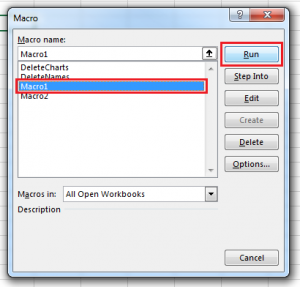
You can also show the Macro List at any time by pressing ALT+F8.
Run a Macro using a Keyboard Shortcut
You can assign a keyboard shortcut to a macro that you use often, in the form of CTRL+<letter> or CTRL+SHIFT+<letter>. To do this:
- Bring up the Macro List (View > Macros, or ALT+F8)
- Select the macro you want to apply a shortcut to
- Click Options… to show the Macro Options sub-dialog
- In the textbox under Shortcut Key, type a single letter and then click OK. If you hold the SHIFT key while typing the letter, the label next to the box will show SHIFT as part of the shortcut
NOTE: it is highly recommended that you use SHIFT when creating a shortcut key! Excel uses CTRL+ shortcuts for itself, e.g. CTRL+C to Copy, or CTRL+V to Save. If you create a macro shortcut using these or other Excel shortcuts, you’ll overwrite the Excel shortcut until you re-assign the macro shortcut.
Run a Macro from the VB Editor
Macros can also be run from the VB Editor. The VB Editor allows you to review a macro’s code and make any changes you want before running it.
To run a macro in the VB Editor:
- Open the VB Editor (Developer tab > Visual Basic, or ALT+F11)
- In the Project window, double-click the module containing the macro you want to test
- In the module’s code window, place the cursor anywhere on the macro’s code between “Sub” and “End Sub”
- Click the Run button on the toolbar, or press keyboard shortcut F5
Run a Macro using a Button or Shape
It’s often useful to have a control on the worksheet that a user can click to run a macro, like a Button control or a Shape. This is much quicker for end-users than opening lists of macros or digging through macro code in the VB Editor.
Information about how to create a clickable Button or Shape can be found here: Add a Button and Assign a Macro in Excel.
Auto-Run a Macro using Events in VBA
It’s possible to make a macro run when something happens in Excel – for example, when a workbook is opened or when a cell value is changed. These are called Events, and you can write VBA code for them to call macros or perform other operations.
To write code for an event, you’ll need to use the VB Editor. For example, to view events for the workbook:
- Open the VB Editor (ALT+F11)
- Double-click the ThisWorkbook object in the VB Editor’s Project Window
- Choose “Workbook” from the dropdown on the top-left of the code window
- Click the dropdown on the right to see a list of events
The following are a small, but useful sample of Excel Events that you could run macros from.
Workbook_Open()
The Workbook_Open() event fires when a workbook is opened. If you get the Security Warning after opening a workbook, this event fires after clicking “Enable Content”.
Private Sub Workbook_Open()

    MsgBox "Workbook Opened!"

End Sub
Workbook_BeforeClose(Cancel as Boolean)
Workbook_BeforeClose() fires when the user tries to close the workbook. It happens before any checks are done to see if the workbook needs to be saved.
The Cancel parameter can be set to True to stop the workbook from closing.
Private Sub Workbook_BeforeClose(Cancel As Boolean)

    If MsgBox("Are you sure?", vbYesNo + vbQuestion, "Close") = vbNo Then

        Cancel = True

    End If

End Sub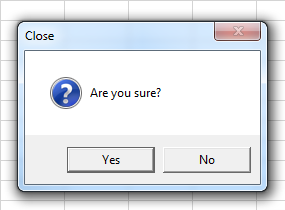
Worksheet_Change(ByVal Target As Range)
Worksheet_Change() fires when the value of a cell is changed – whether it’s changed by a macro, by a copy/paste operation, or by an external link. It does not fire when a value is recalculated via a formula, though.
The Target parameter represents the cells whose value have changed.
If you change the value of other cells inside this event, the event will fire again. This can possibly cause an infinite loop. If you need to change cell values without triggering this event, consider setting Application.EnableEvents to False first, and then set it back to True at the end of the event procedure.
Private Sub Worksheet_Change(ByVal Target As Range)

    MsgBox "Cells changed: " & Target.Address

    Application.EnableEvents = False
    Range("A2").Value = Range("A2").Value + Target.Cells.Count
    Application.EnableEvents = True

End Sub
Worksheet_SelectionChange(ByVal Target As Range)
This event fires whenever different cells are selected with the targeting reticle. The Target parameter represents the new cells that have been selected.
You can trigger this event with code as well, i.e. “Range(“A1”).Select”. As with Worksheet_Change(), you should be careful about selecting other cells inside this event, since you can cause an infinite loop. Use Application.EnableEvents.
Private Sub Worksheet_SelectionChange(ByVal Target As Range)

    If Target.Address = "$A$1" Then

        MsgBox "Cursor in home position."

    End If

End Sub
Stop a Running Macro
A running macro can be interrupted by pressing ESC or CTRL+BREAK. By default, an interrupted macro will show the following dialog:
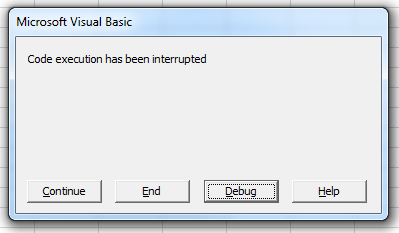
Clicking End will stop the macro, while Continue will resume it. Clicking Debug will open the macro in the VB Editor and focus the line of code that execution was paused on. (Inside the VB Editor you can stop or resume the macro using the Run or End buttons on the toolbar.)
Application.EnableCancelKey
You can disable the ability to stop a macro with ESC or CTRL+BREAK by setting the Application.EnableCancelKey property. This property has three possible values:
- xlInterrupt – this is the default value, which makes Excel show the dialog above
- xlDisabled – removes the ability to stop a running macro
- xlErrorHandler – when an interrupt attempt is made, an error is thrown that can be handled in code
Whenever code execution stops, Excel always resets the value of Application.EnableCancelKey back to xlInterrupt.
A good reason for using this property is security. For example, if you had a macro that temporarily unprotected parts of your workbook, a user could potentially stop the macro right after the unprotect and gain access to content you didn’t intend them to have. By setting Application.EnableCancelKey, you can completely disable their ability to do this, or handle their interruption gracefully with an Error Handler that re-protects the workbook.
Sub UpdateBaseData(ByVal NewData As Range, ByVal Target As Range)
Application.EnableCancelKey = xlDisabled
Target.Worksheet.Unprotect "MyPassword"
NewData.Copy Target
Target.Worksheet.Protect "MyPassword"
Application.EnableCancelKey = xlInterrupt
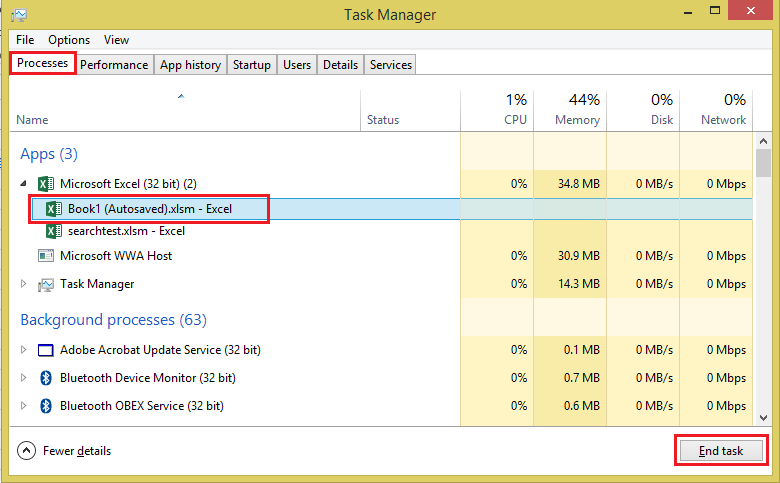
End SubForce-Close Excel with the Windows Task Manager
If the macro has ‘hung’, or Excel has become too busy to acknowledge an interrupt attempt, you may need to force-close Excel itself with the Windows Task Manager. (NOTE: if you do this, you may lose any unsaved work, and have to rely on an auto-recover version of your workbook.)
- Open the Task Manager directly using CTRL+SHIFT+ESC
- Select the “Processes” tab
- Expand the “Microsoft Excel” item to show all workbooks
- Select the workbook you want to close, then click End Task in the bottom-right corner
Watch Video – How to Run a Macro in Excel
In Excel, you can create a macro by recording it or by writing code in the VB editor.
Once created, you need to run the macro.
In this tutorial, I’ll show you different ways to run a macro in Excel.
If you’re interested in learning VBA the easy way, check out my Online Excel VBA Training.
How to Run a Macro in Excel
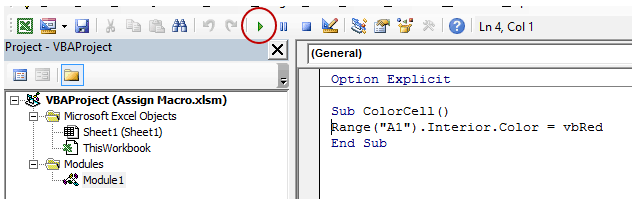
For the purpose of this tutorial, let’s say we have a macro named ‘ColorCell’ with the following code:
Sub ColorCell()
Range("A1").Interior.Color = vbRed
End Sub
This one line code would fill the cell A1 of the active sheet with red color.
Now let’s see various ways to run this macro in Excel.
Run the Macro by Clicking on a Shape
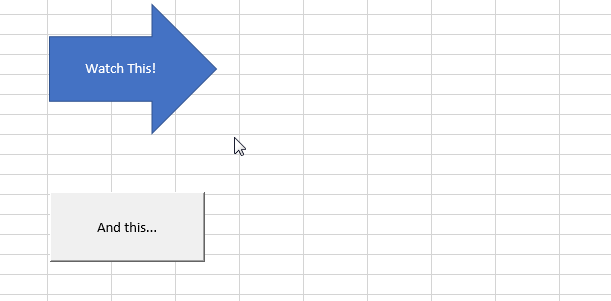
One of the easiest ways to run a macro is to have a button in the worksheet and click that button to execute the macro.
It’s easy and intuitive.
The benefit of this method is that it makes it really easy and intuitive for anyone to run the macro. Even if you share the workbook with someone who has no knowledge of VBA, he/she can just click on the button and see the actions take place (without even knowing what happens in the back end).
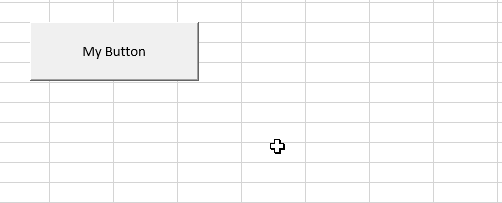
Something as shown below:

Here are the steps to do this:
That’s it! Now the shape would work as a button and whenever you click on it, it will run the assigned macro.
Run Macro By Clicking a Button
While the shape is something you can format, a button has a standard format.
Here is how it looks:

You can assign a macro to a button and then can run the macro by simply clicking that button.
Here are the steps to assign a macro to a button:
The button inserted using this technique is a standard one and you can’t change the formatting of the button (unlike shapes, where you can change practically everything).
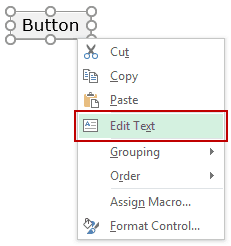
However, you can change the text of the button. To do this, right-click on it and select Edit Text.
Note: You can also assign a macro to other interactive controls, such as a checkbox or scrollbar.
Run a Macro from the Ribbon (Developer Tab)
If you have multiple macros in the workbook, you can see a list of all the macros in the Macros dialogue box. It makes it easy to run multiple macros from a single place.
Here are the steps:
Run a Macro from the VB Editor
If you are the one writing and testing macros, then instead of inserting buttons, you can directly run a macro from the VB Editor.
Here are the steps:
- Select any line within the code in the code window. If you have multiple macros/subs, make sure your cursor is in the macro that you want to run.
- Go to the toolbar and click on the Green triangle icon (you can also use the keyboard shortcut – F5).

As soon as you do this, the macro would be executed.
If you only have the VB Editor open (and you can’t see the worksheet), you may not see the change happening in the worksheet. You can minimize the VB Editor screen and then run the macro to see the changes in real-time.
You May Also Like the Following Excel VBA Tutorials:
- Working with Cells and Ranges in Excel VBA.
- Working with Worksheets in VBA.
- Working with Workbooks in VBA.
- Using Loops in Excel VBA.
- Using IF Then Else Statement in Excel VBA.
- Creating User-Defined Functions in Excel.
- Excel VBA Events – An Easy (and Complete) Guide.
- How to Create and Use Personal Macro Workbook in Excel.
- 24 Useful Excel Macro Examples.
- How to Create and Use an Excel Add-in.
- Guide to Using For Next Loop in Excel VBA
- How to Enable Macros in Excel?
Written by Puneet for Excel 2007, Excel 2010, Excel 2013, Excel 2016, Excel 2019, Excel for Mac
1. Run a Macro from the List
From the Developer Tab, you can access the list of the MACROS, which you have in your workbook or in PERSONAL.XLSB. To run a macro in Excel, you can use the below steps:
- Click on the macro button from the “Developer Tab” and open the list of macros.

- In this list of MACROS, you will have all the macro you have in the open workbooks, including the Personal Macro Workbook.

- Just select the macro you want to run and click on the “RUN” button.


When you click on the run button, it executes the macro and closes the dialog box.
2. Run a Macro with a Shortcut Key
You can also run a macro using a keyboard shortcut key. Usually, when you record a macro, it asks you to define a shortcut key that you can use to run that macro.

And if you are writing a macro, you can define a shortcut key from the list of macros.
- Select the name of the macro for which you want to define the shortcut key and click on the options.

- After that, click within the input box and press the shortcut key that you want to define.


3. Add a Macro Button to Quick Access Toolbar
You can also add a button to the Quick Access Toolbar to run a macro. You can use the below steps:
- First, click on the small dropdown that you have on the quick access toolbar and select more commands, and it will take you to the actual options to customize the quick access toolbar.

- Now from here, select the macros from the truth command from and select the macro that you want to add, after that click on the add button and it will add that macro to do quick access toolbar.

- In the end, click, OK.


And you will have a button for the macro that you have added.

4. Add Macro to a Shape
Let’s say you have a VBA code which you need to use frequently in your work. In this situation, you can create a button and assign that macro to it.
- First, insert a simple shape from Insert Tab ➜ Illustrations ➜ Shapes. Select any of the shapes which you want to use as a button.

- After that, right-click on that shape and select “Assign Macro”.

- Now from the list of macros, select the macro which you want to assign to the shape.


Now, whenever you click on that shape, the macro which you assigned will execute.
5. Assign a Macro to a Form Control Button
Apart from using a shape, you can also use a control button to run a macro.
- First, go to the Developer tab and in the controls group and then click on insert. And from the insert drop-down, click on the button to insert it.

- After that, it will show you the macros list from where you can select it.

- Once you select the macro and click OK, you will get a button in the worksheet (you can change the text of the button to give it a meaningful name).


6. Opening and Closing a Workbook
You can also make a macro to run while opening and closing a workbook. That means when you open or close a workbook, the macro you have assigned will get executed. For this, you need to use “auto_open” and “auto_close”.
Let’s suppose you want to assign a macro to run while opening the workbook. You need to use auto_open as the name of that macro.
Sub auto_open()
Range("A1").Value = Now
End Sub
Now, this micro will run when you open the workbook and enter the current date, and type in the cell A1 of the active sheet.
In the same way, you can also use “auto_close” to make this macro while closing the workbook.
7. Activating and Deactivating a Worksheet
Just like the workbook can also run a macro on activating and deactivating a worksheet. And in this case, you need to add that macro into the code window of that worksheet.
- First, right-click on the worksheet tab and click on the “view code”.

- Now in the code window, select the worksheet from the left drop-down. The moment you chose deactivate; you’ll get a new sub with the name “Worksheet_Deactivate”.

- Now you need to add the code in this procedure that you want to run when you deactivate the worksheet.


Private Sub Worksheet_Deactivate()
Range(“A1”).Value = Now
End Sub
And if you want to run a macro when you activate a worksheet, select activate instead of deactivated from the drop-down.

Private Sub Worksheet_Activate()
Range(“A1”).Value = Now
End Sub
8. Run a Macro When a Change in Worksheet
You can also run a macro when you make changes to a worksheet. For example, when you enter a value in a cell or delete a value from a cell.
For this, you, again, need to enter the good in the code window of the worksheet and select “Selection Change” from the drop-down.

Private Sub Worksheet_SelectionChange(ByVal Target As Range)
Range(“A1”).Value = “Last Updated: ” & Format(Now, “dd-mmm-yy hh:mm:ss Am/pm”)
End Sub
9. Within Another Procedure
You can run a macro from another procedure by using the call statement. Use the keyword Call and then the name of the macro.

Sub myStrikeThrough()
If Selection.Value = “Yes” Then
Selection.Value = “No”
Else
Selection.Value = “Yes”
End If
End Sub

Sub markDone()
Call myStrikeThrough
Selection.Font.Bold = True
End Sub
When you run “markDone” macro, it first runs “mystrikethrough” macro and then makes the selection font bold.
10. Schedule a Macro
You can also schedule a macro to run at a specific time. Let’s suppose if you want to run a macro in the morning at 8:30, you can specify the time, and we will run it.
For this, you need to use an Application.OnTime method. Let’s suppose you have a macro “myCode”, you can write the code like below to run it at 8:30 AM.
Application.OnTime TimeValue("08:30:00"), "myCode"[icon name=”bell” class=”” unprefixed_class=””] VBA is one of the Advanced Excel Skills
Do you want to learn how to run a VBA macro in Microsoft Excel? This guide will show you all the methods you can use to run your VBA code.
Microsoft Excel is a powerful spreadsheet application that offers users a variety of features and capabilities. One of the most popular features of Excel is the ability to create and run VBA macros.
A macro is a small scripts written in the VBA (Visual Basic for Applications) programming language that can be run in your desktop Excel app.
Macros can save you a lot of time and energy when working in Excel. They can be used to automate tedious tasks and save you hours of work each week.
But in order to leverage this time saving tool, you will need to know how to run your VBA macros.
Follow this guide and you’ll be able to start running macros like a pro in no time!
Run VBA Macro from the Developer Tab
The most common method for running a macro is from the Developer tab in the Excel ribbon.
This tab is hidden by default, so you will need to enable the Developer tab in your desktop Excel app first.
Follow these steps to run a VBA macro from the Developer tab.
- Go to the Developer tab.
- Press the Macros command in the Code section.
This will open the Macro menu which lists all the macros available to run.
- Select the macro which you want to run.
- Press the Run button.
That’s it! Your chosen macro code will now execute!
💡 Tip: Use the Macros in dropdown option to select the location of macros to run. You can select a specific workbook, All Open Workbooks, or This Workbook.
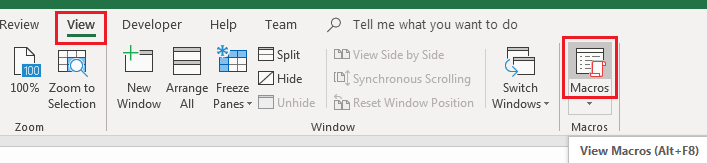
Run VBA from the View Tab
The Macro command is also available in the View tab.
Go to the View tab and press the Macros button to launch the Macros menu.
This opens the same Macro dialog box as before and you can select the macro and press the Run button.
Run VBA Macro from Macro Menu with a Keyboard Shortcut
There is an easier way to open the Macro menu! There’s no need to use the Developer or View tab since there is a dedicated keyboard shortcut to open the Macro menu.
You can use the Alt + F8 keyboard shortcut to open the Macro menu.
Run VBA Macro from a Keyboard Shortcut
You can entirely bypass the Macro dialog box by assigning a keyboard shortcut to your desired Macro.
If this is a macro that you want to use a lot, then assigning a shortcut is a good way to avoid the many clicks needed when running a macro through the Macro menu.
Follow these steps to assign your macro a dedicated keyboard shortcut.
- Open the Macro menu.
- Select the macro to which you want to assign a keyboard shortcut.
- Press the Options button.
This will open up the Macro Options menu where you can add a description for the macro and assign a keyboard shortcut.
- Add a character into the Shortcut key input box.
- Press the OK button in the Macro Options menu.
- Press the Cancel button in the Macros menu.
⚠️ Warning: This chosen shortcut key will override any existing keyboard shortcut, so you should avoid using keys taken by commonly used shortcuts such as copy, paste etc.
A lot of Ctrl and single key combinations are already taken with commonly used commands, so you might want to create a Ctrl + Shift shortcut instead.
💡 Tip: Hold the Shift key while entering a key in the Shortcut key input to create a Ctrl + Shift shortcut.
Run VBA Macro from a Form Control Button
If other people are using your spreadsheet solution, they might not realise they can run your macros to help complete their work.
This is where a button is the preferred choice to run a macro. It makes the act of running your macro easy and obvious!
You can create a Form Control Button to run the macro when you click the button. This can be placed anywhere in the spreadsheet since is floats over top of the grid. This means it won’t interfere with the rest of your data or formulas.
Follow these steps to insert a Form Control Button and assign a macro to it.
- Go to the Developer tab.
- Click on the Insert command.
- Choose the Button option found in the Form Controls section.
This will not actually insert a button yet. You will notice your cursor has now turned into a small black plus sign. This will allow you to draw a button in your sheet.
- Left click and drag anywhere in the sheet.
When you release the click and drag action, the Assign Macro menu will immediately pop up and you will be able to assign your macro to the button.
- Select your macro.
- Press the OK button.
Now you have a button in your sheet which will run your select VBA macro when clicked.
💡 Tip: Righ click on the button and select Edit Text to change the text displayed on the button.
Run VBA Macro from any Shape, Icon, or Image
Form Control buttons are pretty ugly and outdated. They also don’t have many options to customize the look, but thankfully they aren’t the only way to make a button to run your macros!
There are some much more stylish options like using an image, shape, or icon as a button to run your macros.
Follow these steps to assign a macro to any object such as an image, shape, or icon.
- Right click on the object.
- Select Assign Macro option from the menu.
- Select the macro from the Assign Macro menu.
- Press the OK button.
Now when you click on the shape, image, or icon it will execute the macro code!
Run VBA Macro from a Quick Access Toolbar Command
Another option is to add your most frequently used macros to the Quick Access Toolbar.
The Quick Access Toolbar is a customizable set of commands that are always visible so you can easily use them at any time. You can even add a macro so it can be run with a click.
Follow these steps to add a macro to your Quick Access Toolbar.
- Right-click anywhere on the Quick Access Toolbar.
- Select the Customize Quick Access Toolbar option from the menu.
This will open the Excel Options menu on the Quick Access Toolbar section.
- Select Macros from the Choose commands from dropdown.
- Select the macro you want to add to your Quick Access Toolbar.
- Press the Add button.
- Press the OK button.
When you press the Add button you will see the selected macro gets added to your list of commands. You can use the Up and Down arrow buttons to adjust the order this macro will appear in your commands.
💡 Tip: Press the Modify button in the Excel Options to change the icon and label of the macro that will appear in your Quick Access Toolbar!
Now you should have a new icon available in the Quick Access Toolbar. Click on this to run your select macro.
💡 Tip: An easy way to use the commands in your Quick Access Toolbar is with the Alt hotkey shortcuts. In this example, the command is in the 8th position starting from the undo command, so you can press the Alt + 8 to run the macro.
Run VBA Macro from a Custom Ribbon Command
If you have an entire repertoire of macros and you’re running out of room in the Quick Access Toolbar, then adding a custom ribbon tab to organize your macros could be the ideal solution.
Excel allows you to add your own custom ribbons and fill them with your favorite macros as well as any other commands you frequently use.
Follow these steps to add a macro to the Excel ribbon.
- Right click anywhere on the Excel ribbon.
- Select the Customize the Ribbon option from the menu.
This will open the Excel Options menu on the Customize Ribbon section.
- Press the New Tab button to create your new ribbon tab.
- Press the Rename button to give your tab a name.
Each tab will need at least one group, and this is automatically created when you create a new tab. You can also rename the group. Both of these names will be displayed in your Excel ribbon.
Now you will be able to add a macro into the new tab and group.
- Select the Macros option from the Choose commands from dripdown.
- Select the macro which you want to add into the ribbon.
- Press the Add button.
- Press the OK button.
💡 Tip: Select the tab and use the Up or Down arrow buttons to adjust the position of the new tab in your ribbon.
You now have a new custom tab that can hold all your most frequently used macros. 😃
Run VBA Macro from Visual Basic Editor Run Menu
The visual basic editor (VBE) is the environment where you write VBA code, so it makes sense that you should be able to also run your code from it.
A lot of people like to test their code as they develop their solutions and this means frequently running your macros from the the editor. Your current code can always be run from the Run menu in the VBE.
Follow these steps to run your macro from the Run menu in the visual basic editor.
- Select the macro you want to run.
You can select the macro by either placing the cursor in the code or selecting the macro name from the dropdown menu in the top right.
- Go to the Run menu.
- Select the Run Sub/UserForm option from the menu.
This will run your selected macro!
Run VBA Macro from Visual Basic Editor Toolbar
The visual basic editor comes with a toolbar for easy access to the most frequently used commands.
Follow these steps to run your macro from the toolbar.
- Select the macro you want to run.
- Press the Play button in the toolbar.
This will run your selected macro!
📝 Note: If you don’t see this toolbar you might need to enable it. Go to the View menu then Toolbars and check the Standard option.
Run VBA Macro from Visual Basic Editor Keyboard Shortcut
There are a lot of very useful keyboard shortcuts for using the visual basic editor.
Running a macro from the VBE is a very common task, so it’s no surprise there is also a keyboard shortcut available for this.
Press the F5 key while in the VBE and the currently selected macro will run!
Run VBA Macro from Another Macro
You can easily run a macro from a macro in Excel.
This is a good practice when it comes to programming. Creating smaller procedures and then reusing them within your main macro can be more efficient to run and easier to maintain the code.
Sub ExampleCode()
    MsgBox ("Hello world!")
End Sub

Sub MainCode()
    Call ExampleCode
    MsgBox ("Goodbye!")
End Sub
You can easily run any macro from within a macro using a single line of code. The above example will run the ExampleCode macro from the MainCode macro.
Run VBA Macro from a Worksheet Event
Did you know you can automatically run a macro?
You can automatically run a macro based on events that happen in your Excel worksheet!
For example, you can have a macro run anytime someone changes a value in the sheet.
Follow these steps to create a worksheet event-driven macro.
- Select the Sheet in which you want to trigger the macro. All your workbook sheets will be listed in the Microsoft Excel Object folder of the VBE Projects.
- Select the Worksheet options from the dropdown menu.
- Select the event type that should trigger your macro.
Private Sub Worksheet_Change(ByVal Target As Range)

End Sub
When you select the type of event, it will insert a bit of code into the editor. For example, the Change event trigger will insert the above code.
- Place any code you want to run when the event occurs inside the generated code.
If you have an existing macro that you want to run, you can call it using a Call YourMacroName single line of code.
This macro will now run anytime you make changes in any cell within Sheet1.
Private Sub Worksheet_Change(ByVal Target As Range)
    If Target.Address = "$A$1" Then Call ExampleCode
End Sub
You might want to limit the macro to only running when the change event occurs in a particular cell or range. This is possible by setting conditions for the Target in your code.
In the above example, the ExampleCode macro will only be called when changes are made to cell A1.
Run VBA Macro from a Hyperlink
Did you know you can trigger your macros to run when you click on a hyperlink in Excel?
This is particular worksheet event method is worth its own mention!
Private Sub Worksheet_FollowHyperlink(ByVal Target As Hyperlink)
    If Target.Address = "B2" Then Call ExampleCode
End Sub
The above code will run every time you click the hyperlink in cell B2 in Sheet2.
The code will execute and then take you to the hyperlinked address!
Run VBA Macro from a Workbook Event
There is also the possibility to automatically run a macro based on workbook events such as when you open or close the file.
This is a great option to make sure a task is performed before you do anything else in your workbook.
Follow these steps to run a macro automatically when you open your Excel file.
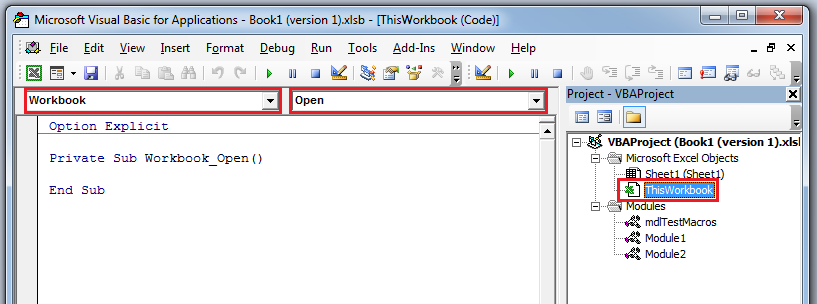
- Select ThisWorkbook found in the Microsoft Excel Object folder of the VBE Projects.
- Select Workbook from the dropdown menu.
- Select Open from the event type dropdown menu.
Private Sub Workbook_Open()

End Sub
This will insert the above code into the code editor. You can then add any code inside which you want run when you open the file. You can also call any macro here with the Call YourMacroName single line of code.
Conclusions
VBA macros can be used to automate your tasks in Excel, so it’s important you know how to run them.
There are many methods to run your desired macros depending on your situation.
You can use the Excel ribbon, a keyboard shortcut, or a customized quick access command when you want to manually run a macro. Also, you can attach your macros to run from buttons in the workbook to make it more user friendly.
You might need to occasionally run your VBA macros while developing your solutions to test them. This can be done several ways in the visual basic editor.
You can even trigger your macros based on certain worksheet or workbook events for the ultimate in automation.
Are you using macros in Excel. Did you know all these methods to run your macros? Do you know any others? Let me know in the comments below!
About the Author
John is a Microsoft MVP and qualified actuary with over 15 years of experience. He has worked in a variety of industries, including insurance, ad tech, and most recently Power Platform consulting. He is a keen problem solver and has a passion for using technology to make businesses more efficient.