
Page breaks are dividers that break a worksheet into separate pages for printing. Microsoft Excel inserts automatic page breaks based on the paper size, margin settings, scale options, and the positions of any manual page breaks that you insert. To print a worksheet with the exact number of pages that you want, you can adjust the page breaks in the worksheet before you print it.
Tips:
-
Although you can work with page breaks in Normal view, we recommend that you use Page Break Preview view to adjust page breaks so that you can see how other changes that you make (such as page orientation and formatting changes) affect the automatic page breaks. For example, you can see how a change that you make to the row height and column width affects the placement of the automatic page breaks.
-
To override the automatic page breaks that Excel inserts, you can insert your own manual page breaks, move existing manual page breaks, or delete any manually-inserted page breaks. You can also quickly remove all the manually-inserted page breaks. After you finish working with page breaks, you can return to Normal view.
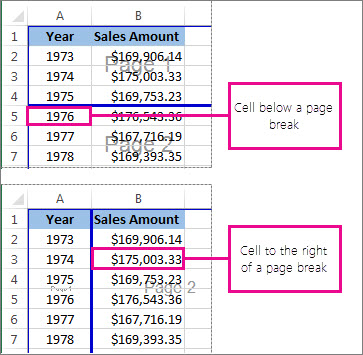
In Page Break Preview, dashed lines are page breaks Excel automatically added. Solid lines are page breaks that were added manually.

Insert a page break
-
Click the worksheet that you want to print.
-
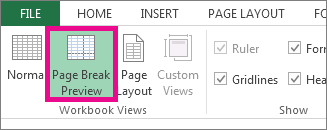
On the View tab, in the Workbook Views group, click Page Break Preview.

You can also click Page Break Preview
on the status bar. -
Do one of the following:
-
To insert a vertical page break, select the row below where you want to insert the page break.
-
To insert a horizontal page break, select the column to the right of where you want to insert the page break.
-
-
On the Page Layout tab, in the Page Setup group, click Breaks.
-
Click Insert Page Break.
 on the status bar.
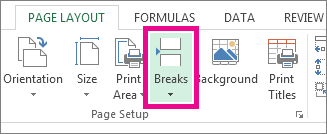
You can also right-click the row or column below or to the right of where you want to insert the page break, and then click Insert Page Break.
If manual page breaks that you insert do not take effect, it may be that the Fit To scaling option has been selected on the Page tab of the Page Setup dialog box (Page Layout tab, Page Setup group, Dialog Box Launcher  ). To use the manual page breaks, change the scaling to Adjust to instead.
Move a page break
Important: To enable dragging of page breaks to another location in a worksheet, make sure that the cell drag-and-drop feature is enabled. If this feature is not enabled, you may not be able to move any page breaks.
-
To verify that drag-and-drop is enabled, do the following:
-
Click the File tab > Options. In Excel 2007, click Microsoft Office Button
, and then click Excel Options. -
In the Advanced category, under Editing options, select the Enable fill handle and cell drag-and-drop check box, and then click OK.
-
-
Click the worksheet that you want to modify.
-
On the View tab, in the Workbook Views group, click Page Break Preview.
You can also click Page Break Preview
on the status bar. -
To move a page break, drag the page break to a new location.
Note: Moving an automatic page break changes it to a manual page break.
 , and then click Excel Options.
Delete a page break
-
Select the worksheet that you want to modify.
-
On the View tab, in the Workbook Views group, click Page Break Preview.
You can also click Page Break Preview
on the status bar. -
Do one of the following:
-
To delete a vertical page break, select the column to the right of the page break that you want to delete.
-
To delete a horizontal page break, select the row below the page break that you want to delete.
Note: You cannot delete an automatic page break.
-
-
On the Page Layout tab, in the Page Setup group, click Breaks.
-
Click Remove Page Break.
You can also remove a page break by dragging it outside of the page break preview area (to the left past the row headers, or up past the column headers). If you cannot drag page breaks, make sure that the drag-and-drop feature is enabled. For more information, see Move an existing page break.
Remove all manually-inserted page breaks
Note: This procedure resets the worksheet to display only the automatic page breaks.
-
Click the worksheet that you want to modify.
-
On the View tab, in the Workbook Views group, click Page Break Preview.
You can also click Page Break Preview
on the status bar. -
On the Page Layout tab, in the Page Setup group, click Breaks.
-
Click Reset All Page Breaks.
Tip: You can also right-click any cell on the worksheet, and then click Reset All Page Breaks.
Return to Normal view
-
To return to Normal view after you finish working with the page breaks, on the View tab, in the Workbook Views group, click Normal.
You can also click Normal
on the status bar.-
After working with page breaks in Page Break Preview view, you may still see the page breaks in Normal view because page breaks have been turned on automatically. To hide the page breaks, close and reopen the workbook without saving it.
-
Page breaks remain visible when you close and reopen the workbook after saving it. To turn them off, click the File tab, click Options, click the Advanced category, scroll down to the Display options for this worksheet section, and clear the Show page breaks check box. For more information, see Display or hide page breaks in Normal view.
-
 on the status bar.
Display or hide page breaks in Normal view
-
Click the File tab > Options. In Excel 2007, click the Microsoft Office Button
, and then click Excel Options. -
In the Advanced category, under Display options for this worksheet, select or clear the Show page breaks check box to turn page breaks on or off in Normal view.
A line break in Excel can be used to end the current line and start a new line in the same cell (as shown below).

Notice that in the pic above, Morning is in the second row in the same cell.
You may want to insert a line break in Excel when you have multiple parts of a text string that you want to show in separate lines. A good example of this could be when you have an address and you want to show each part of the address in a separate line (as shown below).

In this tutorial, I will show you a couple of ways to insert a line break in Excel (also called the in-cell carriage return in Excel)
Inserting a Line Break Using a Keyboard Shortcut
If you only need to add a couple of line breaks, you can do this manually by using a keyboard shortcut.
Here is how to insert a line break using a keyboard shortcut:
- Double-click on the cell in which you want to insert the line break (or press F2). This will get you into the edit mode in the cell
- Place the cursor where you want the line break.
- Use the keyboard shortcut – ALT + ENTER (hold the ALT key and then press Enter).
The above steps would insert a line break right where you had placed the cursor. Now you can continue to write in the cell and whatever you type will be placed in the next line.
Note that you need the cell to be in the ‘Wrap text’ mode to see the content appear in the next line. In case it’s is not applied, you will see all the text in a single cell (even if you have the line break). ‘Wrap Text’ option is available in the Home tab in the ribbon.
The keyboard shortcut is a quick way to add a line break if you only have to do this for a few cells. But if you have to do this a lot of cells, you can use the other methods covered later in this tutorial.
Inserting Line Breaks Using Formulas
You can add a line break as a part of the formula result.
This can be useful when you have different cells that you want to combine and add a line break so that each part is in a different line.
Below is an example where I have used a formula to combined different parts of an address and have added a line break in each part.

Below is the formula that adds a line break within the formula result:
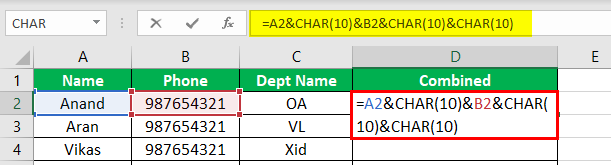
=A2&CHAR(10)&B2&(CHAR(10)&C2)
The above formula uses CHAR(10) to add the line break as a part of the result. CHAR(10) uses the ASCII code which returns a line feed. By placing the line feed where you want the line break, we are forcing the formula to break the line in the formula result.
You can also use the CONCAT formula instead of using the ampersand (&) symbol:
=CONCAT(A2,CHAR(10),B2,CHAR(10),C2)
or the old CONCATENATE formula in case you’re using older versions of Excel and don’t have CONCAT
=CONCATENATE(A2,CHAR(10),B2,CHAR(10),C2)
And in case you are using Excel 2016 or prior versions, you can use the below TEXTJOIN formula (which is a better way to join cells/ranges)
=TEXTJOIN(CHAR(10),TRUE,A2:C2)
Note that in order to get the line break visible in the cell, you need to make sure that ‘Wrap Text’ is enabled. If the Wrap Text is NOT applied, adding Char(10) would make no changes in the formula result.
Note: If you are using Mac, use Char(13) instead of Char(10).
Using Define Name Instead of Char(10)
If you need to use Char(10) or Char(13) often, a better way would be to assign a name to it by creating a defined name. This way, you can use a shortcode instead of typing the entire CHAR(10) in the formula.
Below are the steps to create a named range for CHAR(10)
Now you can use LB instead of =CHAR(10).
So the formula to combine address can now be:
=A2&LB&B2&LB&C2
Using Find and Replace (the CONTROL J Trick)
This is a super cool trick!
Suppose you have a dataset as shown below and you want to get a line break wherever there is a comma in the address.

If you want to insert a line break wherever there is a comma in the address, you can do that using the FIND and REPLACE dialog box.
Below are the steps to replace the comma with a line break:
- Select the cells in which you want to replace the comma with a line break
- Click the Home tab

- In the Editing group, click on Find and Select and then click on Replace (you can also use the keyboard shortcut Control + H). This will open the Find and Replace dialog box.

- In the Find and Replace dialog box, enter comma (,) in the Find What field.

- Place the cursor in the Replace Field and then use the keyboard shortcut – CONTROL + J (hold the Control key and then press J). This will insert the line feed in the field. You may be able to see a blinking dot in the field after you use Control + J
- Click on Replace ALL.
- Make sure Wrap text is enabled.


The above steps remove the comma and replace it with the line feed.
Note that if you use the keyboard shortcut Control J twice, this will insert the line feed (carriage return) two times and you will have a gap of two lines in between sentences.
You can also use the same steps if you want to remove all the line breaks and replace it will a comma (or any other character). Just reverse the ‘Find What’ and ‘Replace with’ entries.
You may also like the following Excel tutorials:
- Insert a watermark in Excel.
- Excel AUTOFIT: Make Rows/Columns Fit the Text Automatically
- Insert Picture in an Excel Cell.
- Add Bullet Points In Excel
- Insert a Check Mark Symbol in Excel
- 200+ Excel Keyboard Shortcuts.
- How to Create Named Ranges in Excel
Page breaks are dividers that break a worksheet into separate pages for printing. Microsoft Excel inserts automatic page breaks based on the paper size, margin settings, scale options, and the positions of any manual page breaks that you insert.
Contents
- 1 How do I insert a page break in an Excel spreadsheet?
- 2 What indicates a page break?
- 3 Why is my Excel sheet broken into pages?
- 4 How do you insert a page break?
- 5 How do I insert a page break in a column in Excel?
- 6 What are the types of page break?
- 7 How do I get rid of page breaks in Excel?
- 8 How do I remove page breaks?
- 9 What is the shortcut key for page break?
- 10 What is a column break?
- 11 What is the difference between a soft page break and a hard page break?
- 12 How do I insert a page break between two rows in Excel?
- 13 Can you do a vertical page break in Excel?
- 14 When working in page break Preview you can?
- 15 How do I use page breaks and section breaks?
- 16 What is break word?
- 17 How will you create a page break Why is it needed?
- 18 How do I remove a page break in a WPS spreadsheet?
- 19 How do I replace a line break in an Excel comma?
- 20 What is the code for a line break in Excel?
How do I insert a page break in an Excel spreadsheet?
Insert a horizontal or vertical manual page break
Select the row that is underneath the row where you want the page to break. Select the column that is to the right of the column where you want the page to break. On the Layout tab, under Page Setup, click Breaks, and then click Insert Page Break.
What indicates a page break?
A page break defines where one page ends and another one begins. You can see the range of cells that will be printed by selecting (View > Page Break Preview). This lets you see the print area clearly with all the page breaks identified. The White area denotes the area that will be printed.
Why is my Excel sheet broken into pages?
In Excel, page break marks are inserted automatically according to the paper size, margin and scale options. If the default settings don’t work for you, you can easily insert page breaks in Excel manually.
How do you insert a page break?
Go to Layout > Breaks > Page.
- Click or tap in the document where you want a page break.
- Go to Insert > Page Break.
How do I insert a page break in a column in Excel?
Select the column to the right of the column where you want the page to break. On the Page Layout tab, click Breaks, and then click Insert Page Break.
What are the types of page break?
Among the kinds of page breaks, there are simple page breaks, column breaks, and text wrapping breaks. The different kinds of section breaks include next page, continuous, even page, and odd page breaks.
How do I get rid of page breaks in Excel?
If you want to remove a vertical page break, select the any cell of the column which is right to the page break you want to remove, and click Page Layout > Breaks > Remove Page Break.
How do I remove page breaks?
To remove a page break you added in manually, click the Home tab. Click Show/Hide ¶ to display the page breaks in your document. Find the manual page break you want to remove and double click the page break to highlight it. Finally, hit the Delete or Backspace key to remove it.
What is the shortcut key for page break?
Ctrl+Enter
To insert a page break, press Ctrl+Enter.
What is a column break?
A column break places a hard break, much like a page break or section break, in the inserted location and forces the rest of the text to appear in the next column. In a document that includes columns, place the cursor where you want the column to break.
What is the difference between a soft page break and a hard page break?
A “hard” page break, inserted by the user, breaks the page at that location. “Soft” page breaks are created by word processing and report programs based on the current page length setting.
How do I insert a page break between two rows in Excel?
Select the row below where you want the page break to appear. For example, if you want to insert a page break between rows 28 and 29, select row 29. Click the Page Layout tab on the Ribbon, select the Breaks command, then click Insert Page Break. The page break will be inserted, represented by a dark blue line.
Can you do a vertical page break in Excel?
If you want to insert a vertical line break between columns C and D, for example, select column D. Insert the vertical page break. On the “Page Layout” tab, click the arrow beneath the “Breaks” icon, then select “Insert Page Break.” A thick vertical line will indicate the location of your new break.
When working in page break Preview you can?
While in Page Break Preview, you can use the mouse to adjust page breaks, or insert/remove them. Click View > Page Break Preview. You can see your worksheet divided into separate pages for printing.
How do I use page breaks and section breaks?
You need to place a Next Page section break wherever you want to change something in the document such as page numbering, margins or orientation.
- Place your insert point where you want the section break to be.
- On the Page Layout ribbon, select Breaks and then Next Page under Section Breaks.
Section breaks create a barrier between different parts of a document, allowing you to format each section independently. For example, you may want one section to have two columns without adding columns to the entire document. Word offers several types of section breaks.
How will you create a page break Why is it needed?
Insert a page break when you want to move to the beginning of the next page in your document.Using page breaks, your text will retain the formatting of the previous page in your document. Using a page break will also ensure that the space between pages remains intact, whatever changes you make.
How do I remove a page break in a WPS spreadsheet?
Graphic skills
After Page Break is displayed, we can place the mouse cursor behind the Page Break and press the Delete key to remove the Page Break in WPS Writer.
How do I replace a line break in an Excel comma?
Below are the steps to remove line breaks using Find and Replace and replace it with a comma:
- Select the dataset from which you want to remove the line breaks.
- Click the Home tab.
- In the Editing group, click on ‘Find & Select’
- In the options that show up, click on ‘Replace’
What is the code for a line break in Excel?
10
The character code for a line break in Excel varies depending on the platform. On Windows, the code is 10 and on a Mac it’s 13. Note: make sure you have Wrap Text enabled on cells that contain line breaks. In Excel 365, both Win and Mac versions of Excel use CHAR(10) as a line break.
If you feel your data is crowding the page it is to be printed on and dividing the data would help with clarity, you can insert page breaks on your sheet. Page breaks are more for the print aesthetic than anything else, as you wouldn’t want to unnecessarily see gray lines on the worksheet if it wasn’t going to be printed.
Page breaks aren’t just dependent on manual insertion. According to the formats in the sheet (empty column/row causing a gap in the dataset, borders, etc.), Excel will have automatically set page breaks. If you check any worksheet in Print Preview or Page Break Preview (how-to explained later), you will see how Excel has distributed the data into multiple pages. That is Excel’s doing; this tutorial will be about your doing and how you can work with page breaks.
Let’s start by understanding the types of Page Breaks in Excel.

What are Automatic and Manual Page Breaks
Page breaks are the separators that determine where one-page ends and the next one begins while printing a worksheet. Excel, by default, adds page break marks automatically at regular intervals according to paper dimensions, margin, and scale options selected while printing.
These default page breaks that Excel automatically inserts are known as automatic page breaks. Automatic page breaks are denoted by a dotted/dashed line.

However, if you want to have more control over the way your worksheet gets printed, you can create your own page breaks and insert them manually. Such page breaks are known as manual page breaks. Manual page breaks are denoted by a solid line.

In Page Break Preview mode, manual page breaks are depicted by a solid blue line while automatic ones are shown by dashed blue lines as shown above. Do not worry if you are not aware of the Page Break Preview mode, we are going to see that in the subsequent sections.
Let’s try finding out how we can add a page break manually.
How to Insert Manual Page Breaks in Excel
Manually you can add the following three types of page breaks to your worksheet:
- Horizontal
- Vertical
- Double (horizontal and vertical)
We will walk you through each of them. However, before you insert any page breaks, try checking the Page Break Preview. Maybe Excel’s automatic page breaking is similar to your idea of page breaks which can also be adjusted (read below for details). If you’d rather add your own touches first, here’s how to add page breaks.
The keyboard shortcut to insert a page break:
Alt + P + B + I
It might be helpful to remember the shortcut with its initials i.e. PBI (page break insert).
How to Manually Insert a Horizontal Page Break
The steps to add a horizontal page break on the worksheet are:
- Select the row where you want to add the page break. The page break will be inserted just above the selection. In our example, we want a page break between rows 11 and 12 so we have selected row 12.

- Go to Page Layout tab > Page Setup section > Breaks button > Insert Page Break

- And that inserts the page break in a gray line which is slightly darker than gridlines.

If the page break didn’t quite make the statement you wanted it to, you can remove the gridlines to see it better but it is very much there. One of the few ways to blank out the gridlines: in the Page Layout tab, Sheet Options section, uncheck the View checkbox for Gridlines.

Now the page break is more visible.
Note – The page break can also be previewed in Page Break Preview (Alt + WI). Press (Alt + WN) to revert to Normal view.
How to Manually Insert a Vertical Page Break
The process of adding a vertical page break is very similar to that of adding a horizontal page break. Here we have the steps to add a vertical page break on the worksheet:
- Select the column where you want to add the page break. The page break will be inserted on the left of the selection. We want a page break between columns B and C so we have selected column C.

- Go to Page Layout tab > Page Setup section > Breaks button > Insert Page Break

These steps add the vertical page break which is a gray line slightly darker than gridlines:

If the page break isn’t up to your level of visibility, you can remove the gridlines to see it better.
How to Manually Insert Double Page Breaks (Horizontal & Vertical)
Here we will show you how to add a crisscross page break. With this method, Excel will add a horizontal and vertical page break simultaneously. Instead of selecting a row and a column, you need to select the cell, combining selection criteria of both horizontal and vertical page break selection. The crisscross page break will appear on the top left corner of the selected cell. Let us show you:
- Select the cell where you want to insert the page break. The page break will appear above and on the left of the selection. We want the page break between rows 11 and 12 and between columns B and C so we have selected C12.

- Go to Page Layout tab > Page Setup section > Breaks button > Insert Page Break

These steps add the horizontal and vertical page breaks which is a gray crisscross line slightly darker than gridlines:

With gridlines removed the page breaks can be seen clearly.
Recommended Reading: All About Named Ranges in Excel
View All Page Breaks
By default, the workbook is in normal view. You can view all the page breaks in the Page Break Preview from:
- Page Break Preview icon in the Status Bar.
- Page Break Preview button on the ribbon menu.
- Keyboard shortcuts.
Let’s go over all three.
Page Break Preview Using Status Bar
A single-click option lies at the bottom of the workbook in the Status Bar in the form of these icons:

The left one is by default the Normal view and the rightmost one is the Page Break Preview icon. The Page Break Preview will look like this:
The page breaks in the Page Break Preview are represented by blue lines and the pages will appear numbered. The zoom level will automatically shrink to 60% to allow maximum page breaks to be seen.
The page breaks can be adjusted (explained in the next segment). Click on the Normal icon to go back to the normal view.
Page Break Preview Using Ribbon Menu
Another way to see the Page Break Preview is from the top ribbon. Click on the View In the Workbook Views section, you will note that the Normal option is selected.
Select the Page Break Preview option next to it.

Here also the Page Breaks are represented by solid blue lines for manual page breaks and dashed blue lines for automatic page breaks. The pages are numbered. You can click on the Normal button to go back to the normal view.
Page Break Preview Using Keyboard Shortcuts
Press (Alt + WI) for Page Break Preview.
Page breaks to some extent can also be seen in the Print Preview. The difference between viewing page breaks in Print Preview and Page Break Preview is that the Print Preview will only show the contents of a single page and though you may understand the distribution page by page, the Page Break Preview will display all the pages and page breaks showing the complete distribution.
And of course, the page breaks can be adjusted by moving them in Page Break Preview. Let’s show you how.
Move a Page Break in Excel
Page breaks can be adjusted by moving them in Page Break Preview. It’s as simple as accessing the Page Break Preview by any one of the three ways above and adjusting the blue lines.
In this section, we will try to see how to move both manual as well as automatic page breaks in Excel.
Adjust a Manual Page Break
Let’s say we want to adjust the manual page break from being between columns B and C to being between A and B:

- Click on the Page Break Preview icon on the Status Bar or navigate to it from the Ribbon View > Page Break Preview.
- Hover the cursor to the page break you want to adjust. The cursor will change to a double-headed arrow, indicating the directions in which the page break can be moved. For our case, we will drag the page break to the adjacent column.

We have adjusted the page break to the next column.
Adjust an Automatic Page Break
Like Manual Page Breaks, Automatic Page Breaks can also be moved and adjusted. However, after moving an automatic page break (with dashed line) it transforms into a manual page break (with solid line).
Let’s see this in action:

We are trying to move the automatic page break between columns B and C to be between A and B.
- Click on the Page Break Preview icon on the Status Bar or navigate to it from the Ribbon View > Page Break Preview.
- Hover the cursor to the page break you want to adjust. The cursor will change to a double-headed arrow, indicating the directions in which the page break can be moved. For our case, we will drag the page break to the adjacent column.

- You will notice that the page break changes its position as intended but also changes its style from a dashed blue line to a solid blue line. This change in style signifies that the page break has now become a manual page break.
Remove Page Breaks in Excel
Manual page breaks can be deleted in the Page Break Preview. Let’s see how to:
- Remove a manual page break
- Reset all manual page breaks
Note: Automatic page breaks cannot be removed, you can just reposition them.
Remove a Manual Page Break
Manual page breaks can be removed by selection but since a page break itself cannot be selected, we have to select the row below the page break (for a horizontal page break) or the column on the right of the page break (for a vertical page break).
Let’s try to do it:
- Click on the Page Break Preview icon on the Status Bar or navigate to it from the Ribbon View > Page Break Preview.
- Next, you need to select the appropriate row, column, or cell in order to delete the page break.
- To delete a horizontal page break select the row just beneath the page break that you want to remove.
- To delete a vertical page break select the column just next (rightwards) to the page break that you want to remove.
- To delete a criss-cross page break select the cell in the bottom right of the page break as shown.

- After selecting the appropriate cell, row, or column. Navigate to the Page Layout tab > Page Setup section > Breaks button > Remove Page Break option.

- Alternatively, you can also, right-click the selection and select Remove Page Break from the context menu. Or you can also use the keyboard shortcut ALT + P + B + R
Reset all Manual Page Breaks
With this method, all the manual page breaks can be removed from the worksheet. This option will basically reset all the manually inserted page breaks.
Let’s show you how to make use of this feature.
- Click on the Page Break Preview icon on the Status Bar or navigate to it from the Ribbon View > Page Break Preview.
- Navigate to Page Layout tab > Page Setup section > Breaks button > Reset all Page Breaks option.

- Alternatively, you can also, right-click anywhere on the sheet and select Reset all Page Breaks from the context menu. Or you can also use the keyboard shortcut ALT + P + B + A
Hide or Show Page Break Marks
If the page break marks are bothering you while working on the sheet, you can hide the marks from Excel options. Here’s how:
This is what the page breaks are looking like on the worksheet with the gridlines removed.

- Click on the File tab and select Options from the left panel.

- Select Advanced from the left pane and scroll below to Display options for this worksheet Uncheck the Show page break checkbox.

- Click OK and close the Excel Options dialog box.
Coming back to your worksheet, the page break marks have disappeared.

Use the same steps and tick the Show page break checkbox to make the page break marks visible again.
Page Break along with Subtotal
Now here’s one of the nifty things about Excel; the control over the data. You can have Excel automatically adding page breaks to group categories in a dataset by using the Subtotal feature. Let’s see how to make it happen:
We have sales data regarding a hair salon.

The data can be arranged to group the performance of branches or even the services to highlight which services are the cash cows in the salon. For now, we will check the performance of the branches.
First, we filter the data according to the Branch. Then we apply the Subtotal feature. Find the steps below:
- Filter the data, sorting it from smallest to largest.

- This will filter the data branch-wise.

- Now, let’s add the Subtotal feature. To do this, navigate to the Data tab > Outline section > Subtotal

- This will launch the Subtotal dialog box. From the At each change in: menu, select Branch as we want to focus on the changes related to the Branch. Tick the Sales checkbox to add the subtotals for Sales. Tick the Page break between groups checkbox for the page breaks to be added.

Neat isn’t it? Conveniently, each branch’s data can be printed on separate pages with the totals of each branch and the page breaks added, thanks to the page break option in the Subtotal feature.
We should call the end now. That was really interesting, learning how things can be controlled around the humble page break. Looks like page break got its big break today. Next time you’re having trouble with what to print on your sheets, try taking pointers from this tutorial instead of having a breakdown over page breaks. We always have more from Excel ready for you and we’ll keep it coming.
What is a Line Break in Excel Cell?
Line break in Excel means inserting a new line in any cell value. Simply pressing the “Enter” key can take us to the next cell. We can use the keyboard shortcut, “ALT + Enter,” to insert a new line inside a cell to insert a line break. As we insert a line break, the cell’s height also increases as it represents the data in the cell.
Table of contents
- What is a Line Break in Excel Cell?
- How to Insert Line Break in Excel Cell?
- Method #1 – Line Break with Excel Formula (& Function)
- Method #2 – Line Break with Excel Formula (Concatenate)
- Method #3 – Line Break in Excel Cell (Conventional way)
- Things to Remember
- Recommended Articles
- How to Insert Line Break in Excel Cell?
How to Insert Line Break in Excel Cell?
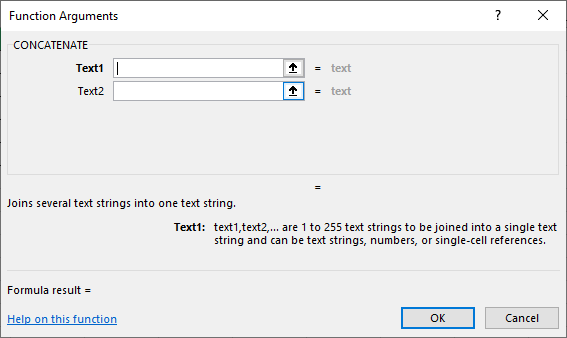
- Concatenate Function in excelThe CONCATENATE function in Excel helps the user concatenate or join two or more cell values which may be in the form of characters, strings or numbers.read more.
- AND function
- Use of Alt + Enter Method.
You can download this Line Break Excel Template here – Line Break Excel Template
Method #1 – Line Break with Excel Formula (& Function)
Suppose we have the name, phone number, and department name in a column. We want them in a single cell combined, but a line separates all three. The data is as follows:
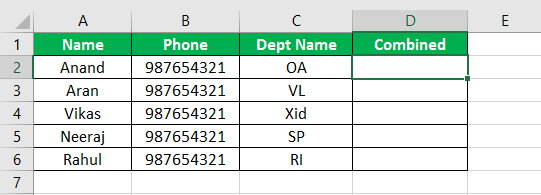
We want all the three data combined in one column D column and want each data to be separated by a line. We will learn the method of using the AND function in this example. But, first, we need to understand what a CHAR function is. Char function in excelThe character function in Excel, also known as the char function, identifies the character based on the number or integer accepted by the computer language. For example, the number for character «A» is 65, so if we use =char(65), we get A.read more: returns the character specified by our computer, a specific code.
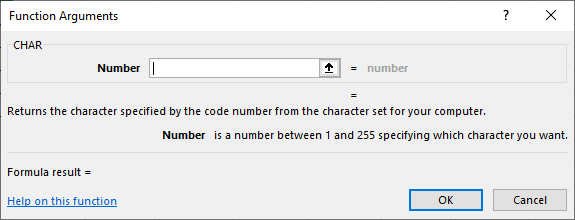
Char(10) returns a line break in the cell.
Below are the steps of inserting line break in Excel:
- Now, we need to wrap the text D column to see all the data in the D column.

- Select the blank cells opposite to the data in the D column.

- Click on the Excel Wrap Text in the Alignment section of the Home tab.

- Now in cell D2, we must write the following formula:

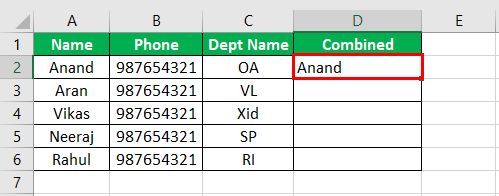
- Now, press the Enter key to see the result.

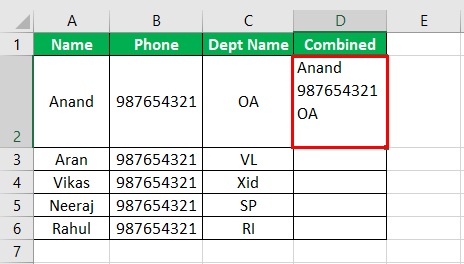
- We currently do not see the whole data; we need to expand the row by clicking on the expand row button by hovering our mouse between the two cells, A2 and A3.

- Now, drag the formula to cell D6.

We can see that we have successfully inserted a line break in cells using the AND formula.


Method #2 – Line Break with Excel Formula (Concatenate)
In the above example, we used the AND formula to insert a line break in a cell. We will learn to insert a line break in the cell using the CONCATENATE function. But first, what is a CONCATENATE function? The CONCATENATE function joins several strings or numbers, or values into a single string.
Also, we know what a CHAR function does, but for our revision, let us look again at what a char function does. The CHAR function returns the character specified by our computer, a specific code.

The CHAR(10) inserts a line break in a cell. Now, have a look at the below data:
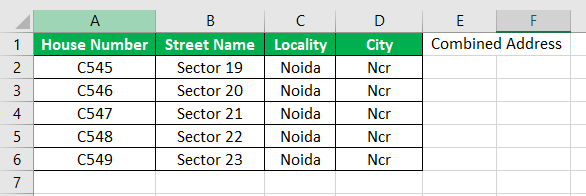
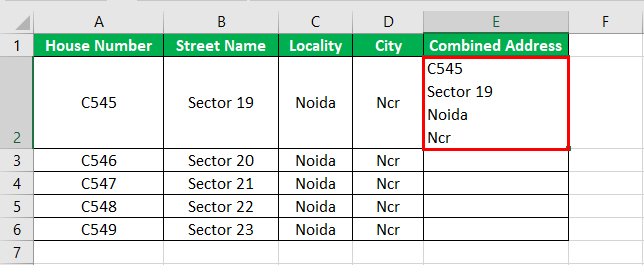
We have a house number, street name, locality, and city in columns A, B, C, and D. Like we fill out forms, it is the same. However, we want the combined address in the E column. We will use the CONCATENATE formula and the CHAR function to insert a line break in the cell.
- Step #1 – First, we need to wrap the text to see all the data.

- Step #2 – Select all the cells parallel to data in the E column.
- Step #3 – Now, click on “Wrap text” under the “Alignment” section in the “Home” tab.

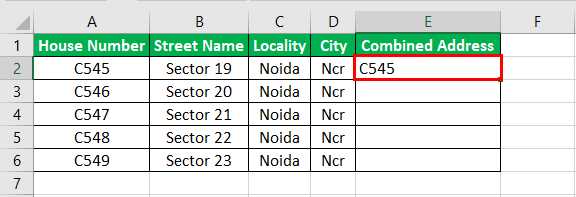
- Step #4 – In cell E2, we must write the following formula:

- Step #5 – When we press the “Enter” key, we can see the following result:
- Step #6 – We currently do not see the whole data. We need to expand the row by clicking on the expand row button by hovering our mouse between the two cells, A2 and A3.
- Step #7 – Now, we must drag the formula to cell E8 and see the result.

We have successfully inserted a line break using the concatenate excel formulaThe CONCATENATE function in Excel helps the user concatenate or join two or more cell values which may be in the form of characters, strings or numbers.read more.
Method #3 – Line Break in Excel Cell (Conventional way)
We will use the last and the most convenient way of using a line break in a cell while working on data. We need to keep in mind that this method only works in a cell. For the next cell, we need to repeat the process. We cannot copy the same formula to other cells like a formula.
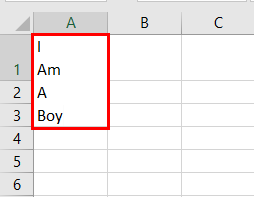
We will try to insert a line break in the sentence “I am a Boy” and insert a line break after every word.
- Step #1 – In any cell, double click on the cell or press the F2 button to get in the cell.
- Step #2 – Write I and press the “Alt + Enter” keys.

- Step #3 – We can see that it inserted a line break after I. Now, do this for every word.
- Step #4 – Press the “Enter” key and see the result.
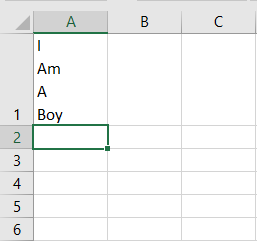
We have successfully inserted a line break using the “Alt + Enter” method.
Things to Remember
There are a few things we need to remember in line breaks:
- To use AND and CONCATENATE functions, we must wrap text to view the whole data.
- We must expand the rows after wrapping the text.
- The CHAR (10) function inserts a line break.
- The “Alt + Enter” method works in a single cell. However, for it to work in another cell, we must repeat the process.
Recommended Articles
This article is a guide to Line Break in Excel Cell. We discuss how to insert a line break in Excel using 1) AND Formula, 2) CONCATENATE Formula, and 3) Alt + Enter method, along with practical examples and a downloadable template. You may learn more about Excel from the following articles: –
- BreakPoint in VBA
- Excel Concatenate Columns
- Concatenate Function in VBA
- Format Phone Numbers in Excel