
 Please Note:
This article is written for users of the following Microsoft Word versions: 2007, 2010, 2013, 2016, 2019, Word in Microsoft 365, and 2021. If you are using an earlier version (Word 2003 or earlier), this tip may not work for you. For a version of this tip written specifically for earlier versions of Word, click here: Inserting the Document Revision Number.
![]()
Written by Allen Wyatt (last updated July 9, 2022)
This tip applies to Word 2007, 2010, 2013, 2016, 2019, Word in Microsoft 365, and 2021
Every time you save a document in Word, the information in the document properties is updated. Part of the information is a count of how many times the file has been saved. This is referred to as the revision number. You can insert the revision number in your documents and have it updated automatically, if you so desire. To insert the revision number in your document, follow these steps:
- Position the insertion point where you want the revision number to appear.
- Display the Insert tab of the ribbon.
- Click Quick Parts (in the Text group) and then click Field. Word displays the Field dialog box.
- Choose Numbering from the Categories list. Word updates the choices in the Field Names list. (See Figure 1.)
- In the Field Names list choose RevNum.
- Click on OK to close the dialog box and insert your field.
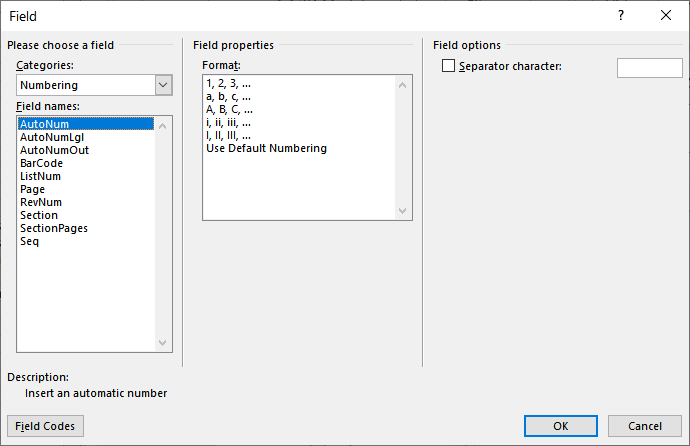
Figure 1. The Field dialog box.
WordTips is your source for cost-effective Microsoft Word training.
(Microsoft Word is the most popular word processing software in the world.)
This tip (6062) applies to Microsoft Word 2007, 2010, 2013, 2016, 2019, Word in Microsoft 365, and 2021. You can find a version of this tip for the older menu interface of Word here: Inserting the Document Revision Number.
Author Bio
With more than 50 non-fiction books and numerous magazine articles to his credit, Allen Wyatt is an internationally recognized author. He is president of Sharon Parq Associates, a computer and publishing services company. Learn more about Allen…
MORE FROM ALLEN
Quickly Displaying the Page Setup Dialog Box
The Page Setup dialog box is indispensable in setting up the overall look of your document. You can display the dialog …
Discover More
Unhiding Multiple Worksheets
You can hide a bunch of worksheets at the same time, but Excel makes it impossible to unhide a bunch at once. You can, …
Discover More
Removing Fingernail Ridges
If you are trying to get the look of glamorous or sophisticated natural nails, you may be foiled in your attempts by …
Discover More

Comprehensive VBA Guide Visual Basic for Applications (VBA) is the language used for writing macros in all Office programs. This complete guide shows both professionals and novices how to master VBA in order to customize the entire Office suite for their needs. Check out Mastering VBA for Office 2010 today!
More WordTips (ribbon)
Calculating Dates with Fields
Can you calculate dates using fields? Yes, but you probably don’t want to except as a learning experience. An easier way …
Discover More
Inserting the User’s Name
Word keeps track of a name for the person using the program. If you want to add this person’s name into the document, …
Discover More
Date Last Edited
You can insert several dynamic dates into your document. One you may want is to add the date when the last edit was …
Discover More
Subscribe
FREE SERVICE: Get tips like this every week in WordTips, a free productivity newsletter. Enter your address and click «Subscribe.»
View most recent newsletter.
Videos
Links and Sharing
Track changes in Word
Note: If a document has been shared with you for review, you may not be able to turn off Track Changes. If you want to edit the document without tracking changes, you’ll need to either save a copy or ask the person who sent it to you to share it again with review mode turned off.

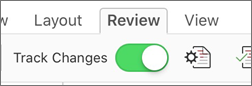
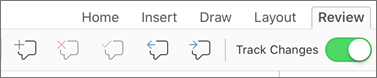
Turn Track Changes on and off
On the Review tab, select Track Changes.
-
When Track Changes is on, the section is highlighted. Deletions are marked with a strikethrough, and additions are marked with an underline. Different authors’ changes are indicated with different colors.
-
When Track Changes is off, the section is not highlighted. Word stops marking changes, but the colored underlines and strikethroughs are still in the document.
Tip: You also can add a Track Changes indicator to the status bar. Right-click the status bar and select Track Changes.
View tracked changes
Note: When a document is in Editing or Reviewing mode, you can select a tracked change to view a collaborator’s full, suggested change in a card that displays. Hover over the Accept or Reject button to see a preview of what that action would do to your final document.
Choose whose changes to track
You can choose to track only your own changes or everyone’s changes.
-
To track only your own changes — On the Review tab, select Track Changes > Just Mine.
-
To track everyone’s changes — On the Review tab, select Track Changes > For Everyone.
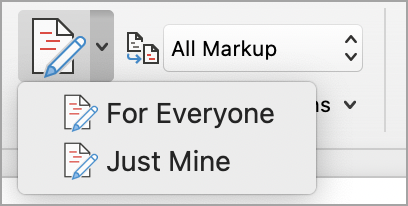
Tip: to use a password to keep others from turning off Track Changes — On the Review tab, select Track Changes > Lock Tracking.
Choose how you would like to see the changes in the document
You can choose the type of markup you want to see.
-
On the Review tab, select Tracking.
-
Select All Markup for the drop-down list to display.
-
Select one of the following options.
-
Simple Markup displays tracked changes with a red line in the margin.
-
All Markup displays tracked changes with different colors of text and lines for each reviewer
-
No Markup hides the markup to show the document with changes incorporated
-
Original displays the original document without tracked changes and comments showing. However, any tracked changes or comments in the document that have not been accepted, rejected, or deleted remain in the document.
Choose the way track changes display
You can choose the types of revisions that display and the way they display. If you choose to show revisions as balloons, they display in the margins of the document. If you choose to display them directly within the document in line. In line revisions display all deletions with strikethroughs instead of inside balloons.
-
On the Review tab, select Track > Show Markup.
-
Select Balloons and then select the type of display you want.
-
Show Revisions in Balloons
-
Show All Revisions Inline
-
Show Only Formatting in Balloons
Note: If you want to see tracked changes in balloons, you must be in Print Layout view or Web Layout view.
Display changes by type of edit
-
On the Review tab, select Track Changes > Show Markup.
-
Select the type of edit.
-
Insertions and Deletions
-
Formatting
The check mark next to the item indicates that it’s selected.
Note: Even if you hide a type of markup by clearing it on the Show Markup menu, the markup automatically displays each time the document is opened by you or a reviewer.
Display changes by reviewer(s)
-
In Review > Tracking, select Show Markup.
-
Select Specific People.
-
Select to clear all check boxes except the ones next to the names of the reviewers whose changes you want to show.
Note: To select or clear all check boxes for all reviewers in the list, select All Reviewers.
Navigate tracked changes in Changes menu section
You can navigate from one tracked change to another.
-
In Review > Changes, select Next to view the next tracked change.
-
In Review > Changes, select Previous to view the previous tracked change.
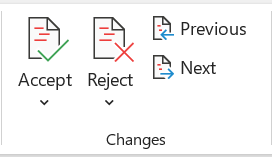
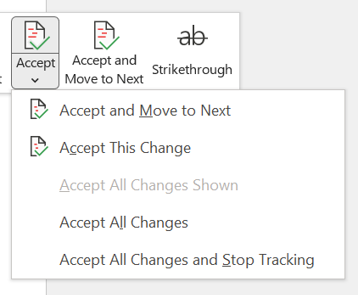
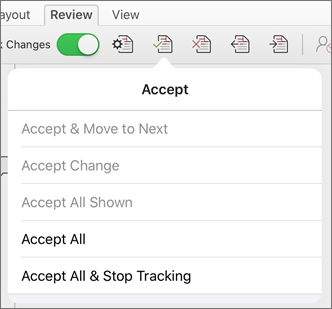
Accept or Reject tracked changes
There are multiple ways to address tracked changes. The most proficient method is to identify the commentor and respond to the tracked change is through the card display when you click the marked change. The card displays the commentor name and the option to accept or reject the suggestion.

Accept or reject tracked changes in sequence using the main menu
You can resolve teach tracked change from the beginning of the document to the end of the document in sequence.
-
Select Review > Changes > Next.
-
Select Accept or Reject. The next sequential tracked change is highlighted for your review and action.
Note: You can also accept or reject individual tracked changes using the main menus’ drop-down menus. This method is often used as a methodical approach to reviewing tracked changes.
Accept changes using the main menu
-
In Review > Changes, select Accept.
-
Select one of the options.
-
Accept and Move to Next
-
Accept This Change
-
Accept All Changes
-
Accept All Changes and Stop Tracking
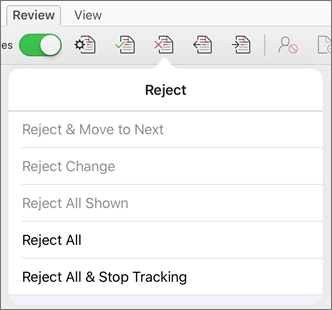
Reject changes using the main menu
-
In Review > Changes, select > Reject.
-
Select one of the options.
-
Reject and Move to Next
-
Reject This Change
-
Reject All Changes
-
Reject All Changes and Stop Tracking
Accept or reject changes within a document with a right click
Working within a document, you can right-click on a tracked change to accept or reject the change. Using the right-click method displays a banner menu option and a drop-down menu option.
Accept changes in-line with the right-click banner option
-
Right-click a tracked change in the document to review a single suggestion.
-
On the banner, select one of the following.
-
Accept > Accept and Move to Next
-
Accept > Accept This Change
-
Accept > Accept All Changes
-
Accept > Accept All Changes and Stop Tracking
-
Accept and Move to Next
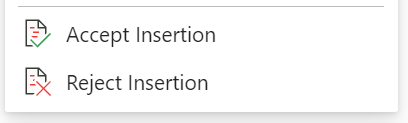
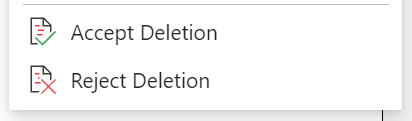
Accept changes in-line with the right-click drop-down menu option
-
Right-click a tracked change in the document to review a single suggestion.
-
In the drop-down menu, select one of the following.
-
Accept Insertion (or Accept Deletion)
-
Reject Insertion (or Reject Deletion)
Accept or reject all tracked changes at once on the main menu
Accept all tracked changes
-
In Review > Changes, select Accept.
-
Select one of the options.
-
Accept All Changes Shown
-
Accept All Changes
-
Accept All Changes and Stop Tracking
Reject all tracked changes
-
In Review > Changes, select Reject.
-
Select one of the options.
-
Reject All Changes Shown
-
Reject All Changes
-
Reject All Changes and Stop Tracking
Note: When Review>Tracking>Show Markup>Specific People>All Reviewers is selected, the Accept All Changes Shown and Reject All Changes Shown options do not display.
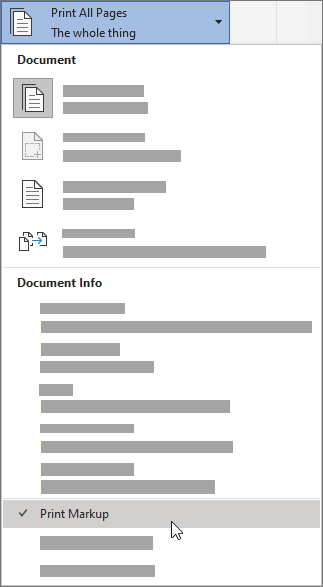
Hide tracked changes and comments when printing
Hiding changes doesn’t remove them from the document. You must use the Accept and Reject commands in the Changes group to remove markup from your document.
-
Go to File > Print > Settings > Print All Pages.
-
Under Document Info, select Print Markup to clear the check mark.

View all your changes in a summary list on the Reviewing Pane
-
In Review > Tracking, select Reviewing Pane.
-
Choose if you want to see the Reviewing Pane next to or below your document.
-
Select Reviewing Pane Vertical to see a list of all changes next to your document.
-
Select Reviewing Pane Horizontal to see a list of all changes below your document.
You can use the Reviewing Pane as a handy tool for to check that all tracked changes have been removed from your document so that they show up to others who might view your document. The summary section at the top of the Reviewing Pane displays the exact number of visible tracked changes and comments that remain in your document.
The Reviewing Pane also allows you to review long comments that don’t fit within a comment bubble.
Note: The Reviewing Pane, unlike the document or the comment balloons, is not the best tool for making changes to your document. Instead of deleting text or comments or making other changes in the Reviewing Pane, make all editorial changes in the document. The changes will then be visible in the Reviewing Pane.
Important: Comments are no longer part of the Track Changes function.
Turn on Track Changes
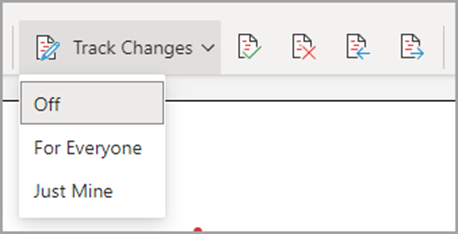
You can set Word for the Web to track changes for all users who are collaborating on the document or to track only your changes.
-
On the Review tab, select Track Changes.
-
In the Track Changes drop-down list, select one of the following:
-
To track only the changes that you make to the document, select Just Mine.
-
To track changes to the document made by all users, select For Everyone.
-
Turn off Track Changes
-
On the Review tab, select Track Changes.
-
In the Track Changes drop-down list, select Off.
Select the Markup view
-
On the Review tab, select Markup view.
-
Select one of the markup options.
-
Markup in margin (Simple Markup) — See suggestions in the margin
-
Markup on page (All Markup) — See suggestions on the page
Review, accept, or reject changes
Accept or reject tracked changes in sequence
You can review each tracked change in sequence and decide whether to accept or reject the change.
-
Click or tap at the beginning of the document.
-
On the Review tab, select Track Changes.
-
Select Accept or Reject. As you accept or reject changes, Word will move to the next change.
Tip: To move through changes in the document without accepting or rejecting them, select Next or Previous.
-
Repeat until you’ve reviewed all of the changes in your document.
Accept or reject a single change
Rather than move through changes in sequence, you can accept or reject a single change. When you accept or reject the change, Word will not move to the next change in the document.
-
Click the change.
-
Select the option to accept or reject it.
When tracked changes are turned on, Word marks any changes made by any authors of the document. This is useful when you’re collaborating with other authors because you can see which authors made a particular change.
Turn Track Changes on
-
On the Review tab, select Track Changes.
-
Select to track only your own changes or everyone’s change.
-
To track only your own changes — On the Review tab, select Track Changes > Just Mine.
-
To track everyone’s changes — On the Review tab, select Track Changes > For Everyone.
Note: To turn Track Changes off, select Track Changes again.
Accept or reject all tracked changes at once on the main menu
Accept all tracked changes
-
Select Reviewing > Accept.
-
Select one of the options.
-
Accept All Changes Shown
-
Accept All Changes
-
Accept All Changes and Stop Tracking
Reject all tracked changes
-
Select Reviewing > Reject.
-
Select one of the options.
-
Reject All Changes Shown
-
Reject All Changes
-
Reject All Changes and Stop Tracking
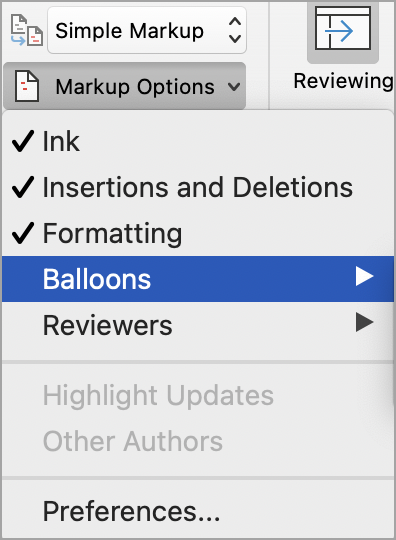
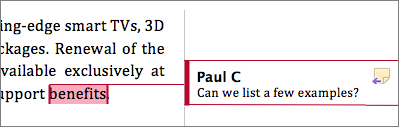
Word shows changes in the document by displaying a line in the margin. If you switch to All Markup view, you’ll see changes inline and in balloons.
Anytime someone adds a comment, it’ll show up in a balloon.
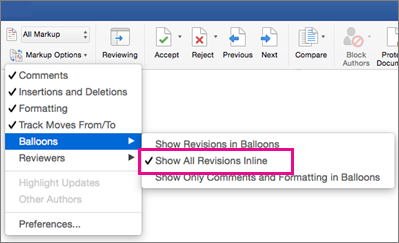
Review changes inline
To see changes inline instead of in balloons, do the following:
-
On the Review Tab, select Markup Options
-
Point to Balloons and select Show All Revisions Inline.
Keep Track Changes on
To prevent others from turning off Track Changes, lock Track Changes on with a password.
Important: Be sure to remember the password so you can turn Track Changes off when you’re ready to accept or reject the changes.
Lock Track Changes with a password
-
On the Review tab, select Protect > Protect Document.
-
In the Password box, enter a password.
-
Re-enter your password and select OK.
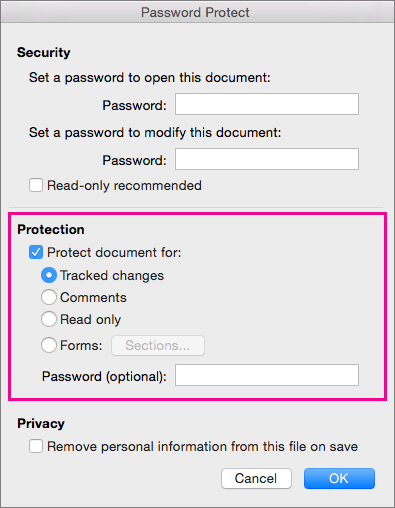
While tracked changes are locked, you can’t turn off change tracking, and you can’t accept or reject changes.
Unlock Track Changes
-
On the Review tab, select Protect > Protect Document.
-
Under Protection, uncheck Protect document for.
-
Enter your password and select OK.
For more info, see
remove the tracked changes and comments.
Turn Track Changes on or off (Word for iPad)
-
Tap the Review tab.
-
Tap the control next to Track Changes to turn Track Changes on or off.
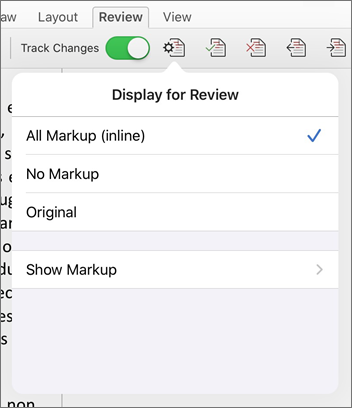
Show or hide markup (Word for iPad)
-
On the Review tab, tap the Display for Review icon.
-
In the Display for Review list, tap the option you want:
-
All Markup (inline) shows the final document with tracked changes visible inline
-
No markup shows the final document without tracked changed
-
Original shows the original document with no tracked changes
-
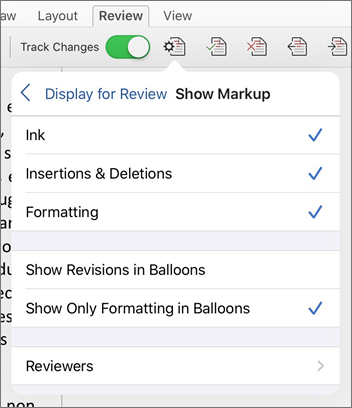
Show tracked changes by type (Word for iPad)
-
On the Review tab, tap the Display for Review icon.
-
In the Display for Review list, tap Show Markup.
-
In the Show Markup list, tap the option you want:
-
Ink shows or hides any marks made by digital inking in the document.
-
Insertions & Deletions shows or hides inserted or deleted text.
-
Formatting shows or hides formatting changes.
-
Show Revisions in Balloons shows changes in balloons in the right margin.
-
Show Only Formatting in Balloons shows only formatting changes in balloons and keeps the other changes as inline tracking.
-
Show tracked changes by reviewer (Word for iPad)
If there are multiple reviewers for the document, Word will show all changes by default. However, you can choose to show only changes made by specific viewers.
-
On the Review tab, tap the Display for Review icon.
-
In the Display for Review list, tap Show Markup.
-
In the Show Markup list, tap Reviewers.
-
In the Other Authors list, tap the names of the reviewers whose changes you want to see or tap All Reviewers.
Accept changes (Word for iPad)
-
Tap twice on a change in the document to select it.
-
On the Review tab, tap the Accept icon.
-
Do one of the following:
-
Tap Accept & Move to Next to accept the change and move to the next change in the document.
-
Tap Accept Deletion, Accept Insertion, or Accept Change to accept the selected change, identified contextually by type, and not move to the next change in the document.
-
Tap Accept All Shown to accept all changes that are visible, but not changes that are hidden. For example, if you’re viewing only changes made by a specific reviewer, tapping Accept All Shown accepts only the changes made by that reviewer.
-
Tap Accept All to accept all changes in the document.
-
Tap Accept All & Stop Tracking to accept all changes in the document and turn off Track Changes.
-
-
To move to another change without accepting or rejecting it, tap the Previous or Next icon.
Reject changes (Word for iPad)
-
Tap twice on a change in the document to select it.
-
On the Review tab, tap the Reject icon.
-
Do one of the following:
-
Tap Reject & Move to Next to reject the change and move to the next change in the document.
-
Tap Reject Deletion, Reject Insertion, or Reject Change to reject the selected change, identified contextually by type, and not move to the next change in the document.
-
Tap Reject All Shown to reject all changes that are visible, but not changes that are hidden. For example, if you’re viewing only changes made by a specific reviewer, tapping Reject All Shown rejects only the changes made by that reviewer.
-
Tap Reject All to reject all changes in the document.
-
Tap Rejects All & Stop Tracking to reject all changes in the document and turn off Track Changes.
-
-
To move to another change without accepting or rejecting it, tap the Previous or Next icon.
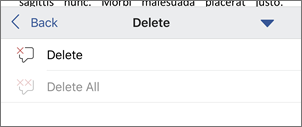
Delete comments (Word for iPad)
-
Tap twice on a comment in the document to select it.
-
Tap the Review tab.
-
Tap the Delete icon to delete the comment or press and hold the Delete icon until the Delete list appears, and then do one of the following:
-
Tap Delete to delete only the selected comment.
-
Tap Delete All to delete all comments in the document.
-
-
To move to another comment without deleting it, tap the Previous or Next icon.
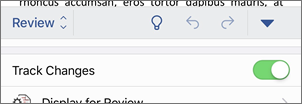
Turn Track Changes on or off (Word for iPhone)
-
Tap the pen icon at the top to open the ribbon.
-
Tap the Review tab.
-
Tap the control next to Track Changes to turn Track Changes on or off.
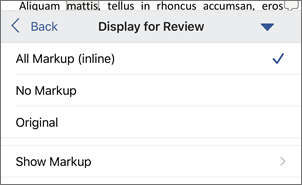
Show or hide markup (Word for iPhone)
-
On the Review tab, tap Display for Review.
-
Tap the option you want:
-
All Markup (inline) shows the final document with tracked changes visible inline
-
No markup shows the final document without tracked changed
-
Original shows the original document with no tracked changes
-
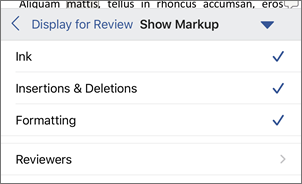
Show tracked changes by type (Word for iPhone)
-
On the Review tab, tap Display for Review.
-
Tap Show Markup.
-
In the Show Markup list, tap the option you want:
-
Ink shows or hides any marks made by digital inking in the document.
-
Insertions & Deletions shows or hides inserted or deleted text.
-
Formatting shows or hides formatting changes.
-
Show tracked changes by reviewer (Word for iPhone)
If there are multiple reviewers for the document, Word will show all changes by default. However, you can choose to show only changes made by specific viewers.
-
On the Review tab, tap Display for Review.
-
Tap Show Markup.
-
Tap Reviewers.
-
In the Other Authors list, tap the names of the reviewers whose changes you want to see or tap All Reviewers.
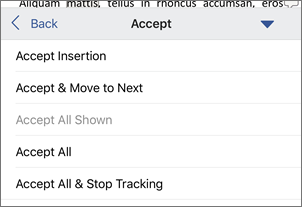
Accept changes (Word for iPhone)
-
Tap twice on a change in the document to select it.
-
On the Review tab, tap Accept.
-
Do one of the following:
-
Tap Accept & Move to Next to accept the change and move to the next change in the document.
-
Tap Accept Deletion, Accept Insertion, or Accept Change to accept the selected change, identified contextually by type, and not move to the next change in the document.
-
Tap Accept All Shown to accept all changes that are visible, but not changes that are hidden. For example, if you’re viewing only changes made by a specific reviewer, tapping Accept All Shown accepts only the changes made by that reviewer.
-
Tap Accept All to accept all changes in the document.
-
Tap Accept All & Stop Tracking to accept all changes in the document and turn off Track Changes.
-
Reject changes (Word for iPhone)
-
Tap twice on a change in the document to select it.
-
On the Review tab, tap Reject.
-
Do one of the following:
-
Tap Reject & Move to Next to reject the change and move to the next change in the document.
-
Tap Reject Deletion, Reject Insertion, or Reject Change to reject the selected change, identified contextually by type, and not move to the next change in the document.
-
Tap Reject All Shown to reject all changes that are visible, but not changes that are hidden. For example, if you’re viewing only changes made by a specific reviewer, tapping Reject All Shown rejects only the changes made by that reviewer.
-
Tap Reject All to reject all changes in the document.
-
Tap Reject All & Stop Tracking to reject all changes in the document and turn off Track Changes.
-

Delete comments (Word for iPhone)
-
Tap twice on a comment in the document to select it.
-
One the Review tab, tap Delete, and then do one of the following:
-
Tap Delete to delete only the selected comment.
-
Tap Delete All to delete all comments in the document.
-
-
To move to another comment without deleting it, tap the Previous or Next icon
Need more help?
Every time you save a document in Word, the information in the document properties is updated. Part of this enumeration is a count of how many instances the file has been saved. This is called the revision number. You can insert the revision number in your documents and have it updated automatically, if you so like.
Follow the steps below to learn how:
- Place your cursor where you would like your revision number to appear.
- Display the Insert tab of the ribbon.
- In the Text group, click the Quick Parts tool and then select Field. Word to display the Field dialog box.
- In the Categories list, select Numbering. Word will update
- the choices in the Field Names list.

- In the Field Names list choose RevNum.
- Click on OK to close the dialog box and insert your field.

You can easily change an appearance of revision marks in your document. Track Changes dialog box
gives you full control on the insertions, deletions, formatting and other revision marks.
On the Review tab, in the Tracking group, click the Track Changes image:

Choose Change Tracking options…:

- In the Markup group:
- Insertions — Lets you choose how inserted text should be marked: under lined, shown
only with a color, bold, italic, double-underlined, or shown with a strikethrough. You can
also select the color to be used for the insertion. By default it’s set to By Author,
meaning Word selects a different color for each reviewer. - Deletions — Lets you choose how deleted text should be marked. In addition to the
methods explained earlier, you can also have Word hide the text or replace the text with a
# or ^ symbol. - Changed Lines — Enables you to tell Word where to place the vertical line indicating
a change — on the left border, the right border, or the outside border . . . or to omit them
altogether. - Comments — Enables you to define how Word should color comments — different colors
for each person entering comments or a specific color for all of them.
- Insertions — Lets you choose how inserted text should be marked: under lined, shown
- In the Moves group — choose colors to display moved changes.
- In the Formatting group — choose how Formatting changes should be indicated.
- In the Ballons group:
- Use Balloons (Print and Web Layout) — Enables you to define the manner in which
balloons are handled — whether or not to use them at all and whether to display them for
insertions and deletions. - Preferred Width — Lets you define the width of the balloons. Remember that balloons
take up room in the margin, and Word has to «squeeze» the document to make room. - Measure In — Lets you choose the units used for measuring the balloon width.
- Margin — Lets you choose which margin Word should place the balloons in.
- Show Lines Connecting to Text — Lets you choose to have lines drawn from the balloons
to the point in the text that they relate to. - Paper Orientation — Affects how the document prints with balloons displayed. You can
force Word to print the document in landscape orientation, to print in the mode for which
the document is set up, or to automatically select the most appropriate. (Note that this
doesn’t affect how the document appears in Print Preview, only how it prints.)
- Use Balloons (Print and Web Layout) — Enables you to define the manner in which
Please, disable AdBlock and reload the page to continue
Today, 30% of our visitors use Ad-Block to block ads.We understand your pain with ads, but without ads, we won’t be able to provide you with free content soon. If you need our content for work or study, please support our efforts and disable AdBlock for our site. As you will see, we have a lot of helpful information to share.
This is a macro for Microsoft Word to save documents with incremented revision numbers in order to prevent loss of work and to easily revert changes.
- When saving this will save the document with the original filename.
- Everytime it is saved using this macro it will append the revision number to the filename.
- For Example: Dissertation – Revision 011 – Jan 6 2011.doc
Installation instructions for Microsoft Word 2010:
- Make sure the Developer Tab is enabled:
- Office 2010:
- Click File -> Options
- Click Customize Ribbon on the left.
- In the right column, check the ‘Developer’ check box.
- Click OK.
- Office 2007:
- Click the Office button in the top left.
- Click “Word Options” located in the bottom right of the menu.
- On the left, click Popular.
- In the right column, click “Show Developer tab in the Ribbon”.
- Click OK.
- Click the Developer tab in Word.
- Click Macros.
- In the Macro name field type “SaveMacro” and click the Create button.
- Delete everything from Sub SaveMacro() to End Sub.
- Copy and paste all the text in the box below:
Sub SaveMacro()

Dim WSHShell, RegKey, rkeyWord, Result

Set WSHShell = CreateObject("WScript.Shell")

Dim intCount As Integer

Dim strDate As String

Dim strPath As String

Dim strFile As String

Dim strFileType As WdDocumentType

Dim strRevisionName As String

Dim intPos As Integer

Dim sExt As String

strDate = Format((Date), "dd mm yyyy")

sExt = ".doc"

strFileType = wdFormatDocument

With ActiveDocument

On Error GoTo CancelledByUser

If Len(.Path) = 0 Then

.Save

End If

strPath = .Path

strFile = .Name

End With

intPos = InStr(strFile, " - ")

If intPos = 0 Then

intPos = InStrRev(strFile, ".doc")

End If

strFile = Left(strFile, intPos - 1)

Start:

RegKey = "HKEY_CURRENT_USERSoftwareMicrosoftOfficeWordSettings"

On Error Resume Next

rkeyWord = WSHShell.RegRead(RegKey & strFile)

If rkeyWord = "" Then

WSHShell.regwrite RegKey & strFile, 0

GoTo Start:

End If

intCount = Val(rkeyWord) + 1

WSHShell.regwrite RegKey & strFile, intCount

strRevisionName = strPath & "" & strFile & " - Revision " & Format(intCount, "00#") & " - " & strDate & sExt

ActiveDocument.SaveAs strRevisionName

Exit Sub

CancelledByUser:

MsgBox "Cancelled By User", , "Save Cancelled."

End Sub
- Now click on the down arrow from the Quick Access Toolbar, then click More Commands…
- Now under where it says “Choose commands from:” change the drop down box to Macros.
- Click on Normal.NewMacros.SaveMacro then click Add.
- It will now appear in the right column.
- If you want to change the icon, click on the Macro, then click Modify below.
- Once done, click OK.
10000+ результатов для ‘numbers revision’
QUIZ
Викторина с изображением
Numbers_11-20
Сопоставить
Дошкольник
1-й класс
2-й класс
3 класс
Начальная школа / начальная
Средняя школа
English
Numbers
Numbers 1-20
Найди пару
Начальная школа / начальная
English
numbers
Numbers 10-20
Викторина
2-й класс
3 класс
English
Numbers
Spotlight 2
Spotlight 3
numbers_11_20
Анаграмма
1-й класс
2-й класс
3 класс
4-й класс
5-й класс
Начальная школа / начальная
Средняя школа
Среднее образование
English
Numbers
Numbers 20-100
Угадай буквы
Beginner
Начальная школа / начальная
Numbers 10-100
I’ve been having a crack at using fields in Word 2007 and have hit a slight stumbling block. I want to add a field which I can use in several parts of the document to represent the current version (something of the form v0.1 but I can’t see an obvious way to do it).
The only provision I’ve found for this is something called RevNum but that gets updated every time I save the document.
Is there a field I’ve missed or a way of adding custom fields or something?
![]()
asked Apr 30, 2010 at 7:50
![]()
You can create a custom Document Property (View or change the properties for an Office document):
Click the Microsoft Office Button Button image, point to
Prepare, and then click Properties.In the Document Information Panel, click the arrow next to
Document Properties, and then click
Advanced Properties.In the Document Properties dialog box, click the Custom tab.
In the Name box, type a name for the custom property, or select a name
from the list.In the Type list, select the data type for the property that you
want to add.In the Value box, type a value for the property. The value that you
type must match the selection in the
Type list. For example, if you select
Number in the Type list, you must type
a number in the Value box. Values that
don’t match the property type are
stored as text.Click Add.
Then insert the custom Document Property into your document (Add property information to a document):
Click where you want to add a property control in your document.
On the Insert tab, in the Text group, click Quick Parts.
Click Document Property, and click the control that you want.
![]()
answered Apr 30, 2010 at 7:58
![]()
ShevekShevek
16.5k7 gold badges46 silver badges75 bronze badges
3
On Office 365, seems you need to do it slightly differently to the above answers. You need to add a custom property to the document, and then access it indirectly via a «DocProperty» field.
To make the custom property
- Click File > Info.
- Click the drop-down triangle next to Properties on the right.
- Click Advanced Properties.
- Click Custom tab.
- At Name: type a name for the property, e.g. «Version».
- At Value: type its value, e.g. «0.3».
- Click OK. The dialogue closes.
To insert it in your document
- If you’re in the Info screen, Click the (<-) back arrow top-left to go back to the main Word screen.
- Click the Insert tab.
- In the Text tools, click the Explore quick parts button; click Field… to open the Field dialogue.
- At Categories: select Document Information.
- At Field names: select DocProperty. The Field properties pane changes to show the properties.
- At Property: click Version (or whatever you called the custom property).
- Click OK. The version number appears in your doc.
Whenever you change the value of the custom property, the document changes too.
![]()
answered Apr 19, 2016 at 15:48
![]()
Rob MRob M
511 silver badge3 bronze badges
Revision Number is not the same as document version. Revision Number gets updated every time a document is saved, whether the document is updated or not. IMO the version number should be manually set in the document properties itself, along with Author, Title etc, and these should be readable. However, MS in their infinite wisdom haven’t included «Version» as a selectable document property/field. Why have it in document properties if you can’t dso anything with it in the document itself like you can with other properties? Bravo MS. Again.
answered Nov 8, 2019 at 10:41
![]()
Update to Office365,
- Click Insert Tab
- Click Quick Parts, choose Field
- Scroll to RevNum, select Numeric format, press OK
answered Sep 23, 2019 at 13:26
![]()
1
2 minute read
When I work for a customer, can happen that I use a document as “template” to build a new one (copy –> paste –> rename –> delete some chapter and start writing).
I know that this is not the best way to proceed but, sometimes I find this procedure very quick a practical.
Side effect of this behavior is that the “revision number” of the new document continue to grow starting from the revision number of the previous document.
Yesterday I just realized that now the Word format is “open” and “human readable” so after some test, I discovered the following solution:
- The .docx file is simply a .zip file, this means that if you rename it to .zip, you can open it with WinZip, WinRar and so on
- Rename .docx to .zip and open the file with your preferred archive editor
- Open the file docPropscore.xml
- Search for “<cp:revision>xxx</cp:revision>” where “xxx” is the actual revision number
- Change xxx with your favorite new number
- Save the file core.xml into your zip again
- Rename .zip back to .docx
Learn what Track Changes is, how to track changes in Word, how to remove tracked changes in Word, and much more.
Track Changes in Word is a powerful feature that makes it possible to mark changes that are made to a document. The feature includes several tools you can use to control which types of changes to track, how to display the tracked changes, and finally how to accept or remove the tracked changes.
Word has included Track Changes functionality for decades. Microsoft has changed the Track Changes features in Word 2013 and later versions compared to earlier versions.
This article covers the Track Changes feature as it works in Word 2013, Word 2016, Word 2019, Word 2021, and Word for Microsoft 365.
If you are using an older version of Word, see Shauna Kelly’s article about Track changes, covering Word 2010 and earlier versions.
Word refers to both tracked changes and comments that are added using Word’s comment feature as revisions. Some of tools discussed in this article are also used in relation to comments. I have covered the Word comment feature in detail in the article How comments in Word work. Please refer to that article for help on comments in Word.
Below, you will find a Table of Contents showing all headings in the article. Click a heading to go to the section in question. When you scroll down, a Go to Info About list will appear to the left, showing the main headings. These headings also work as hyperlinks that let you quickly go to the relevant content.
What is Track Changes in Word?
Track Changes in Word lets you keep track of the changes that are made to a document. This is useful in the editing process of a document and when you ask others for feedback.
Track Changes can be used to keep track of changes no matter whether only you or several people work on a document. Tracked changes can be displayed in a number of different ways in Word. You can also entirely hide the changes. All the different display options are explained later in this article.
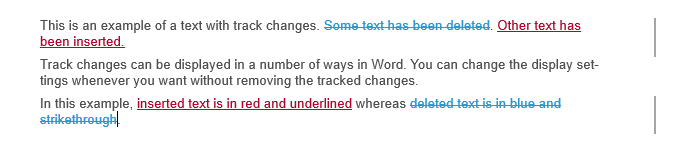
Figure 1. Example of text with tracked changes. In this example, inserted text is in red and underlined whereas deleted text is in blue and strikethrough.
You don’t need to accept all changes. You can select to either accept or reject the individual changes. You can also accept or reject all changes in one operation.
Track Changes need to be turned on for Word to mark the changes. If you email a document to somebody else for feedback, the other person can turn on Track Changes before editing the document. When the document is returned to you, you can see which changes have been made.
Don’t worry if Track Changes has not been turned on during editing. Word has a compare feature that lets you compare two versions of a document and show the differences as tracked changes. This means that you can quickly generate a copy showing all the differences between two versions of a document. For more details, see How to find the differences between two versions of a document below.
Where is track changes in Word?
The track changes tools are found on the Review tab in the Ribbon:

Figure 2. The Track Changes tools in Word are found on the Review tab in the Ribbon. The tools are marked by a colored frame here.
Terminology used in Word in relation to Track Changes
In the different commands related to Track Changes in Word, you will find a number of terms in use. It can be a bit confusing since some of the terms mean the same. Terms with the same meaning seem to be used more or less randomly. See the list below:
|
Terms |
What the terms mean |
|
Tracked changes Changes Markup Revisions |
The changes that have been marked by the Track Changes feature Note that the terms markup and revisions in most cases also cover comments inserted using Word’s comment feature |
|
Author Reviewer |
A person who has edited/made changes to a document |
|
Balloons |
Tracked changes or comments shown in the margin of a document |
|
Accept |
Incorporates a tracked change in the document, as if it belonged to the original document. |
|
Reject |
Removes (or deletes) a tracked change from the document, as if it had not been made |
|
Display Show |
The way Word visually presents the tracked changes on the screen |
In other language versions of Word than English, the confusion may be even worse since the translations may not be consistent. For example, I have found examples in Danish versions of Word where even more terms have been introduced due to inconsistent or incorrect translation.
Is Track Changes the same as redlining in Word?
You may see the terms redline, redlining, blackline, or blacklining used instead of Track Changes. I have found a number of definitions of these terms and the definitions do not say precisely the same.
Redline or redlining seems to be used in the same meaning as Track Changes. The terms indicate that red ink is used to mark changes in a document.
Blackline, blacklining, or legal blacklining seems to be used primarily if changes are marked in a separate document, showing the differences between two versions of a document, i.e. without making any changes in the source documents. You can create such document using Word’s Compare or Combine features. See How to find the differences between two versions of a document and How to create a new document that combines tracked changes from different authors while keeping existing tracked changes below.
Basic concepts – what you should know before you start using Track Changes
The are some basic concepts you should be aware of before you start using Track Changes. If you have never used Track Changes before, it can be a little confusing – but once you learn how it works, it is very powerful.
There are four steps to tracking changes
Tell Word to track changes.
If you want to track the changes you make to a document, you must first turn on Track Changes.
As long as Track Changes is turned on, information about the changes you make is registered in the document. If you turn off Track Changes, Word will stop registering new changes you make. You can turn on or of Track Changes whenever you want.
Even if Track Changes is turned off at the moment, a Word document can contain tracked changes from earlier.
Tell Word to display tracked changes.
Even if a document contains tracked changes, you may not see it. The display of tracked changes can be turned on so the changes are visible or turned off so the changes are hidden.
Even if you hide the tracked changes, they are still in the document until they are accepted or rejected.
Tell Word how to display tracked changes.
Word has a number of options you can use to control how the tracked changes are displayed.
The display options let you determine both which types of changes you see and in which way you see them.
Tell Word to accept or reject the changes.
Tracked changes in a document will remain in the document until they are accepted or rejected. That is the only way to remove them.
How to enable track changes in Word
As explained above, you must turn on Track Changes to tell Word to track all the changes you make in your document.
How to turn on Track Changes in Word
You can use different methods to turn on Track Changes to start tracking your changes.
All methods work as toggles that alternately turns Track Changes on and off. This means that you can use the same methods to turn off Track Changes.
IMPORTANT
Turning Track Changes on or off doesn’t affect whether you can see the tracked changes. See How to display tracked changes in Word below.
METHOD 1 – Use keyboard shortcut
Press Ctrl+Shift+E to turn on Track Changes.
The shortcut works as a toggle. If already turned on, the shortcut turns off Track Changes. Note that this shortcut works in all versions of Word.
This is the fastest method.
METHOD 2 – Click Track Changes icon on the Review tab
To turn on Track Changes, select the Review tab and click the Track Changes icon.
The icon works as a toggle. If you click the icon again, you turn off Track Changes.
If you click the text below the icon, a menu appears from where you can select Track Changes to turn it on.
You can see on the color of the Track Changes icon whether it is turned on or off. The icon is highlighted when Track Changes is on.
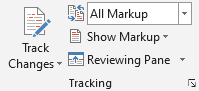
Figure 3A. Track changes is disabled: Track Changes is off.
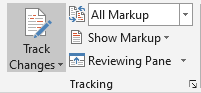
Figure 3B. Track changes is enabled: Track Changes is on (the icon is highlighted).
METHOD 3 – Use the Quick Access Toolbar (QAT)
TIP
You can add Track Changes to the Quick Access Toolbar (QAT) for easy access. The QAT is always visible. This also makes if easy to see whether Track Changes is on or off.
To add the icon to the toolbar, right-click the Track Changes icon on the Review tab and select Add to Quick Access Toolbar.
![]()
Figure 4. Track Changes has been added to the Quick Access Toolbar (QAT) for easy access. Here marked by a colored frame. The icon is highlighted when Track Changes is on.
METHOD 4 – Use the Status Bar
On the Status Bar (in the bottom of the Word window), click the text Track Changes.
The text in the Status Bar works as a toggle. If you click it again, you turn off Track Changes.

Figure 5. Turn on Track Changes via the Status Bar. The text “Off” or “On” tells whether Track Changes is currently off or on.
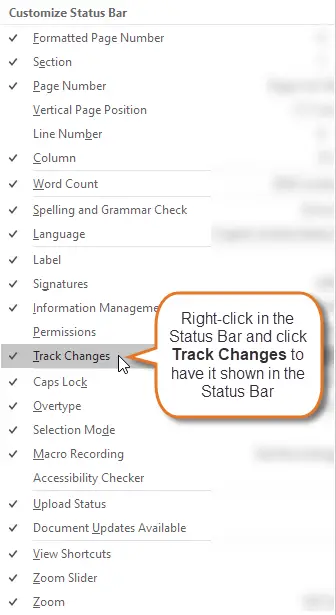
If you can’t see Track Changes, right-click in the Status Bar and select Track Changes from the Customize Status Bar menu that appears.
Figure 6. If Track Changes is not shown in the Status Bar, right-click in the Status Bar and select Track Changes from the Customize Status Bar.
How to stop tracking changes in Word
As explained above, you enable track changes by turning on Track Changes. To stop tracking changes so that Word no longer marks new edits you make, you must turn off Track Changes. Read on below.
How to turn off track changes in Word
You can turn off Track Changes using the same methods as you can use for turning it on. See How to turn on Track Changes in Word above.
IMPORTANT
Turning Track Changes on or off doesn’t affect whether you can see the tracked changes. See How to display tracked changes in Word below.
What is Track Changes Cards and how to get rid of them
Track Changes Cards are pop-up windows that may appear in Word for Microsoft 365 when you click in a change. I have written a separate article about those cards and how you can disable them using my free Word add-in DocTools StopSpellingPopUp. See the article How to disable Track Changes Cards in Word for details.
How to find out whether Track Changes is on or off
Note that tracked changes may not be visible in your document even if Track Changes is on. Tracked changes are only visible if you have set Word to display the changes. See How to display tracked changes in Word below.
IMPORTANT
Turning Track Changes on or off doesn’t affect whether you can see the tracked changes. See How to display tracked changes in Word below.
METHOD 1 – Look at the Status Bar
Look at the Status Bar at the bottom of the screen. Changes are currently being tracked if you see Track Changes: On in the Status Bar.
See METHOD 4 – Use the Status Bar above if you can’t see the text Tracked Changes: On or Tracked Changes: Off in the Status Bar.
METHOD 2 – Look at the Review tab in the Ribbon
If the Track Changes icon in the Review tab in the Ribbon is highlighted, Track Changes is on. See Figure 3 above.
METHOD 3 – Look at the Quick Access Toolbar (QAT)
This method is only relevant if you have added the Track Changes icon to the QAT. See METHOD 3 – Use the Quick Access Toolbar (QAT) above. If the Track Changes icon in the QAT is highlighted, Track Changes is on.
Displaying or hiding tracked changes
How to display tracked changes in Word
Word has a number of options that influence how tracked changes are displayed. All the options can be accessed from the Tracking group on the Review tab in the Ribbon. Below, you can learn how the individual options work.
The different options influence each other. It can be rather difficult to get an overview of all the relations. The result is determined by the combination of your settings in:
- the Display for Review menu (see Figure 7 below)
- the Show Markup menu (you can see the menu in Figure 14 below.)
- the Advanced Track Changes Options dialog box (see Figure 22 below)
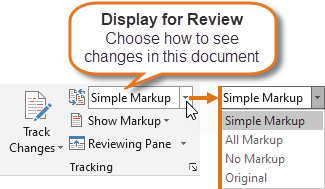
Figure 7. The Display for Review menu includes four display options that determine how tracked changes are shown. See the descriptions of the options below.
|
Display option |
How are tracked changes displayed |
|
Simple Markup |
Red vertical lines in the margin show where changes are found. See Example 1 – Simple Markup display below. In the Advanced Track Changes Options dialog box > Markup section > Changed lines, you can determine how and where the red, vertical lines are shown. TIP: You can click a red line in the margin to switch to All Markup display. |
|
All Markup |
Shows all changes with different colors and lines. The red lines from Simple Markup display turns into gray lines. The exact display depends on your settings in the Show Markup menu and in the Advanced Track Changes Options dialog box.
For an illustration of the Advanced Track Changes Options dialog box, see Figure 22 below. See Example 2 – All Markup display + Show Revisions in Balloons and Example 3 – All Markup display + Show All Revisions Inline below.. TIP: You can click a gray line in the margin to switch to Simple Markup display. |
|
No Markup |
Shows the document as if you had accepted all the tracked changes. This means that the document will look as if all the changes had been there always. Note that the tracked changes are still there – they are just hidden. |
|
Original |
Shows the document as if you had rejected all the tracked changes. This means that the document will look as it did before any of the changes were added. Note that the tracked changes are still there – they are just hidden. |
Summary of the facts from above:
- To see tracked changes, you must select either Simple Markup or All Markup from Display for Review menu.
- In addition, you must make sure that a check mark is shown in the Show Markup menu for the types of tracked changes you want to see: Comments (not handled in this article), Insertions and Deletions, and/or Formatting.
- In the Advanced Track Changes Options dialog box, set up how you want to see the tracked changes.
Example 1 – Simple Markup display

Figure 8. Example of Simple Markup. Note the red lines in the right margin. The lines show where edits are made. You can have the lines shown in the left margin instead, if you want. You can click a red line in the margin to switch to All Markup display.
In Simple Markup display, any comments will appear as small comment icons in the margin.
Example 2 – All Markup display + Show Revisions in Balloons

Figure 9. Example of All Markup in combination with Show Markup > Balloons > Show All Revisions Inline. Note the gray lines in the right margin. The lines appear in the same places as the red lines in Figure 8 above. You can click a gray line in the margin to switch to Simple Markup display.
Example 3 – All Markup display + Show All Revisions Inline

Figure 10. Example of All Markup in combination with Show Markup > Balloons > Show All Revisions Inline. Note the gray lines in the right margin. The lines appear in the same places as the red lines in Figure 8 above. You can click a gray line in the margin to switch to Simple Markup display.
IMPORTANT
Even if you have selected All Markup, you may not see all changes. You can define which types of changes you want to see.
How to hide tracked changes in Word without removing the changes
When working with tracked changes in a document, you may sometimes want to see the document without displaying the changes. You can hide tracked changes while keeping the tracked changes in the document.
If Track Changes is turned on, Word will continue to track the changes but just not show them as long as you are hiding tracked changes.
METHOD 1 – Select Review tab > Display for Review > No Markup
If you select Review tab > Display for Review > No Markup, Word will display your document as if you had accepted all the tracked changes in the document.
It hides the tracked changes but does not remove them. If another user opens the document, that user can easily display the changes.
METHOD 2 – Select Review tab > Display for Review > Original
If you select Review tab > Display for Review > Original, Word will display your document as if you had rejected all the tracked changes in the document.
It hides the tracked changes but does not remove them. If another user opens the document, that user can easily display the changes.
How to remove tracked changes in Word
As explained above, tracked changes remain in the document until they are accepted or rejected. Below, you will learn how to remove tracked changes individually or remove all tracked changes entirely from a Word document.
How to accept or reject a single tracked change
METHOD 1 – Use the right-click menu
To accept a tracked change, right-click in the change and select Accept Insertion or Accept Deletion or Accept Format Change.
To reject a tracked change, right-click in the change and select Reject Insertion or Reject Deletion or Reject Format Change.
The menu that appears when you right-click depends on the context. There are situations where the Accept or Reject commands are not available in the right-click menu. For example, that is most often the case if you right-click in text marked as a spelling error. In that case, use one of the other methods.
METHOD 2 – Click the Accept or Reject icon in the Review tab in the Ribbon
Click within the change, then click Accept or Reject in the Review tab in the Ribbon.
If you have selected text that includes more than one tracked change, all changes in the selection will be accepted or rejected.
METHOD 3 – Use the Accept or Reject menu in the Review tab in the Ribbon
To accept a change and automatically move to the next change, select Review tab > Accept > Accept and Move to Next. See Figure 11 below.
To accept a change without moving to the next, select Review tab > Accept > Accept This change. See Figure 11 below. Use this method if you want to be able to see the result before Word moves on to the next change.
To reject a change and automatically move to the next change, select Review tab > Reject > Reject and Move to Next.
To reject a change without moving to the next, select Review tab > Reject > Reject Change. Use this method if you want to be able to see the result before Word moves on to the next change.
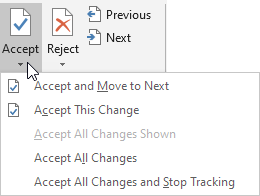
Figure 11. The menu that is displayed if you click the arrow below Accept in the Review tab. A corresponding menu is found when you click Reject.
How to accept or reject all tracked changes in a Word document at once
To accept all tracked changes in the document in one operation, select Review tab > Accept > Accept All Changes. If you want to turn off Track Changes at the same time, select Review tab > Accept > Accept All Changes and Stop Tracking. See Figure 11 above.
To reject (delete) all tracked changes in the document in one operation, select Review tab > Reject > Reject All Changes. If you want to turn off Track Changes at the same time, select Review tab > Reject > Reject All Changes and Stop Tracking.
Formatting changes – how of get rid of them and stop marking formatting changes
In many cases, you may only be interested in keeping track of content changes in the form of insertions and deletions. Changes to formatting, such as style changes or applying bold font, may be irrelevant.
Read on below to learn how to accept existing formatting changes and stop marking new formatting changes you make.
How to accept formatting changes and keep all other tracked changes
- Select Review tab > Tracking group > Show Markup and make sure to set check marks as follows:
Comments: Not checked
Insertions and Deletions: Not checked
Formatting: CheckedOnly Formatting must have a check mark.
- Select Review tab > Show Markup > Specific People and make sure All Reviewers is selected.
- Select Review tab > Changes group > Accept menu > Accept All Changes Shown.
Since only formatting changes were shown, only formatting changes will be accepted. - Select Review tab > Tracking group > Show Markup and turn on Comments and/or Insertions and Deletions again to show those types of changes when Track Changes is on.
See below if you want to stop tracking new formatting changes you make.
How to stop tracking formatting changes
When Track Changes is on, the types of changes that are tracked depend on your current settings in the Advanced Track Changes Options dialog box.
To stop tracking formatting changes:
- Open the Advanced Track Changes Options dialog box. See How to open the Advanced Track Changes Options dialog box below.
- Make sure to turn off the Track formatting check box.
- Click OK.
Note that the setting of the Track Formatting check box is document-specific. Turning on or off that setting does not influence other documents.
Turning off Track Formatting will not remove existing formatting changes that have been marked. You must accept those changes to get rid of them. See How to accept formatting changes and keep all other tracked changes above.
How to copy text with tracked changes
When copying and pasting text with tracked changed, the method to use depends on the result you want. See below.
In the following, I have used these terms:
- Source document: the document you copy from
- Target document: the document into which you paste
How to copy text to another document WITHOUT copying the track changes
- In the source document, turn ON
Track Changes (ensure that the Status Bar shows Track Changes: On). - In the target document, turn OFF
Track Changes (ensure that the Status Bar shows Track Changes: Off). - Now copy and paste.
How to copy text to another document WITH the tracked changes
- In the source document, turn OFF Track Changes (ensure that the Status Bar shows Track Changes: Off).
- In the target document, turn OFF Track Changes (ensure that the Status Bar shows Track Changes: Off).
- Now copy and paste.
Tracked changes and printing
How to print a document with tracked changes
If your document includes tracked changes, you can print it so the printout shows the tracked changes.
- Select File > Print.
- Under Settings, click the first button (shows Print All Pages or another text depending on your latest print settings).
- Select Print Markup in the menu that appears. See Figure 12 below.
- Make other selections as appropriate. Then click Print.

Figure 12. Select Print Markup to have the document printed with tracked changes. You can see the result in the preview that is shown in the window.
Note that my Word Add-in DocTools ExtractChanges Pro lets you extract tracked changes from Word documents incl. full context. If the primary goal of printing is to get an overview of the tracked changes in their context, the extracts you can make using this add-in gives a better overview of the tracked changes than the result you get by printing a document with Print Markup turned on, as described above. You can print such extract document if you want.
How to print a document without tracked changes
Even if your document includes tracked changes, you can print it so that the tracked changes are hidden in the printout. The document will print as if the changes had been accepted.
- Select File > Print.
- Under Settings, click the first button (shows Print All Pages or another text depending on your latest print settings).
- Make sure that Print Markup in the menu that appears does not have a check mark. See Figure 12 above.
- Make other selections as appropriate. Then click Print.
How to print a list of the tracked changes in a Word document
If your document includes tracked changes, you can print a list of tracked changes using Word’s built-in functionality:
- Select File > Print.
- Under Settings, click the first button (shows Print All Pages or another text depending on your latest print settings).
- Select List of Markup in the menu that appears. You can see List of Markup in Figure 12 above.
- Make other selections as appropriate. Then click Print.
The printout will include all the tracked changes, incl. formatting changes. You will see page number, date, and time for each change plus the change itself.
TIP: The free Word add-in DocTools ExtractData lets you automatically export all insertions and deletions in a document to a new document. The exported data is set up in a table. For each insertion and deletion, you will find the page number, line number, type of change, the revised text, author name and revision date.
The advanced Word add-in DocTools ExtractChanges Pro lets you export insertions, deletions and comments in full context, including headings and subheadings. In addition, the add-in includes several other features.
Printouts made from extract documents you create with ExtractData or ExtractChanges Pro do not include formatting changes. However, the extract documents include more details about each insertion and deletion and provides a better overview than the built-in feature.
Multiple authors and Track Changes
How to see who made the changes in a document in case of more than one author
Word use two terms for the people who make track changes to a document: author and reviewer.
METHOD 1 – Hover the mouse over the tracked change to see author name and more
If you have selected Display for Review > All Markup, Word displays a small screen tip, showing the change, the author name, and the date and time the change was made.
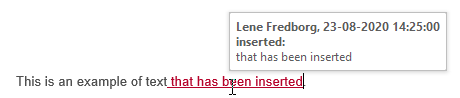
Figure 13. Example of screen tip shown when hovering the mouse over a tracked change.
If no screen tip is shown:
- Check that Review tab > Display for Review > All Markup is selected.
- Check that screen tips are set to be shown. To show screen tips on hover, turn on File > Options > Display > Show document tooltips on hover.
METHOD 2 – Show revisions in balloons
Works in Print Layout view and Web Layout view only.
Make sure that Review tab > Display for Review > All Markup is selected. Select Show Markup > Balloons > Show Revisions in Balloons. Then you will se information about each change in the balloon area.
If too many changes are found to show all information, you must click a change to see the details about that change.
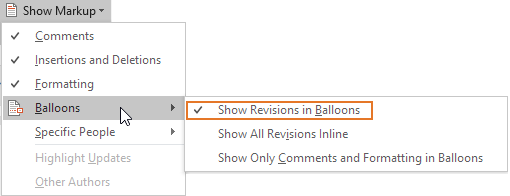
Figure 14. The Show Markup menu with the Balloons menu displayed. The Highlight Updates and Other Authors commands are usually disabled unless for shared documents.
METHOD 3 – Show the Reviewing Pane
Works in all views except Read Mode. Also works even if tracked changes are hidden.
No matter how tracked changes are displayed, you can show the Reviewing Pane to see information about each tracked change. You can turn the Reviewing Pane on and off via Review tab > Reviewing Pane. Select Reviewing Pane Vertical or Reviewing Pane Horizontal as desired.
Colors and Track Changes
How to display tracked changes with the same colors no matter who made the changes
To use the same colors for each author’s changes:
- Open the Advanced Track Changes Options dialog box (see How to open the Advanced Track Changes Options dialog box below).
- In all color boxes, make sure to select a named color instead of By Author. For example, to see all insertions as Red, click the Color field next to Insertions and select Red.
- Click OK.
How to display each author’s changes in a different color
To display each author’s changes in a different color:
- Open the Advanced Track Changes Options dialog box (see How to open the Advanced Track Changes Options dialog box below).
- In all color boxes, select By Author.
- Click OK.
The Advanced Track Changes Options dialog box offers the colors shown below.

Figure 15. The lists of colors you can select from in the color fields in the Advanced Track Changes Options dialog box.
The By Author color icon is sometimes two-colored, red and blue.
When using the By Author setting, one could think that Word would use the colors found in the lists above. However, that is not the case.
I created a macro to change the user name 100 times and for each user name insert the text User# with tracked changes in a document. I found the following:
- If By Author is selected, Word seems to use the 20 different colors illustrated below for markup types that offer the left-most list of colors illustrated above.
- However, if you have already previously added tracked changes using other settings in any document in that Word session (i.e. since you started Word), the allocation of colors seems to be random.
- The 20 different colors used are not the same as the colors found in the left-most color list above.

Figure 16. Word seems to use 20 different colors if By Author is selected. This illustration is part of the result of adding text using 100 different user names. User no. 21, 22, etc. are allocated the same colors as User no. 01, 02, etc. However, if other color settings have been used in the same Word session, the allocation of colors seems to be random.
Read on below for more details about colors and tracked changes.
How to define which color to use for each author – you can’t
If you have selected to apply color By Author as explained above, you may think you can determine which colors to use. The answer to this is: You can’t. Word allocates the colors.
As explained and illustrated above in How to display each author’s changes in a different color above, Word seems to use a total of 20 colors for different authors. If more than 20 authors are involved, the colors are reused for other authors. However, as explained above, the color allocation sometimes seems random.
Do tracked changes made by a specific author always appear with the same color?
As explained in How to display each author’s changes in a different color above, Word allocates colors to tracked changes if you have selected to color By Author.
You can’t be sure that two different users see the same colors in the same document. Also, you can’t be sure that you see the same colors each time you open the same document yourself.
How to make sure that other users see tracked changes in the same way as you do
It is the individual users’ settings of track changes options that determine how they see track changes.
You can’t control their settings unless by using e.g. a macro (programming) to force the options to be set in a specific way. It would also be possible for an IT department in a company to force specific track changes settings via Group Policy.
Track Changes and author names
Word use two terms for the people who make track changes to a document: author and reviewer.
Where does the author name shown in tracked changes come from?
The name shown in tracked changes you make is determined by the current user name set up on your computer. You can change the user name and initials. This will influence new tracked changes you add. Read on to lean how.
How to change the name shown in new tracked changes you make
As explained above, the name shown in tracked changes you make is determined by the current user name set up on your computer. You can change the user name and initials from two places – they both lead to the same dialog box:
- Select File > Options > General. Enter values in the User Name and Initials fields. Click OK.
- Open the Track Changes Options dialog box (see Figure 21 below) Click the Change User Name button. Enter values in the User Name and Initials fields. Click OK.
IMPORTANT
The changed name will apply to new tracked changes you make. Existing tracked changes will remain unchanged.
The change of user name applies to all Office applications (Word, Excel, PowerPoint, etc.)
How to change the user name in existing tracked changes
Once you have made tracked changes, there is no built-in method in Word to change the author name to another name.
However, Word lets you remove personal information from a document. This will set the name of all comments and tracked changes to “Author”. For details, see my article about how comments in Word works.
The DocTools ExtractChanges Pro add-in (from version 6.0) includes a command, Change Author & Date, that lets you change the name in existing tracked changes and comments. In addition, the command lets you remove or change the date of the tracked changes and comments. You can select whether the name and/or date changes are to be applied to all tracked changes and comments or only tracked changes and comments added by a specific author. The changes are made in copy of the document so that the original document remains unchanged.
TIP: If you want to remove the name from tracked changes and comments, you can type e.g. a non-breaking space (Ctrl+Shift+Spacebar), a hyphen or an En dash as both the author name and initials in the Change Author & Date dialog box in DocTools ExtractChanges Pro.
How to remove the name from existing tracked changes
As explained above, Word has no built-in method to change the author name of existing tracked changes except from using the tools to remove personal information.
My add-in DocTools ExtractChanges Pro has a tool that lets you remove or change the name of existing tracked changes and comments. See the information above.
How to display only the tracked changes made by specific authors
Remember that tracked changes are also called revisions – authors are also called reviewers.
To display only tracked changes made by specific authors:
- Select Review tab > Show Markup > Reviewers > select or deselect the reviewers (authors) as desired. Only tracked changes added by reviewers with a check mark will be shown.
Compare or combine Word documents
Word lets you compare two documents to find the differences between the documents no matter whether the individual documents include tracked changes. Word also lets you combine – or merge – documents and, at the same time, preserve all tracked changes and comments from the individual documents. Read on the learn how.
How to find the differences between two versions of a document
You can use Word’s Compare feature to find the differences between two versions of a document and mark the differences as tracked changes. This is also referred to a legal blackline.
You can use the feature no matter whether the documents already contain tracked changes.
The result of the compare is the same as if you had made all the changes. Your current user name will be shown as the author name on all changes.
compare two documents to find the differences between the documents
If one or both of versions you select to compare already includes tracked changes, Word will treat those changes as if they had been accepted.
If you want to preserve the changes made by individual authors so you can see who made the changes, you can instead use Word’s Combine command. See How to create a new document that combines tracked changes from different authors while keeping existing tracked changes below.
To compare two documents:
- Select Review tab > Compare > Compare to open the Compare Documents dialog box. If you can’t see all options in the dialog box, click the More >> button. See Figure 17 below.
- In the Compare Documents dialog box, select the original document and the revised document either from the two lists or by using the browse buttons besides the lists.
- Below Comparison settings, turn on check boxes as desired to specify which types of changes you want to be marked in addition to insertions and deletions, if any.
- Below Show changes, select whether to show changes at character level or word level. See the examples in Figure 18 below.
- Below Show changes in, select in which document to show the changes. The default is New document which I recommend in most situations. Then Word creates a new document with the changes, without making any changes in the existing documents.
- Click OK to execute the compare.
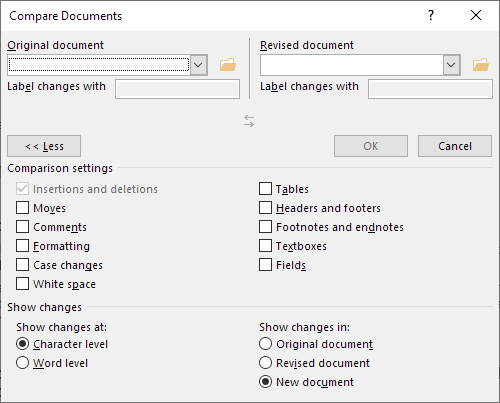
Figure 17. The Compare Documents dialog box with all options shown.
The illustration below shows the difference between selecting Character level and Word level in step 4 above.
- Character level will show changes in individual words by marking as few inserted or deleted characters as possible.
- Word level will show changes in individual words by marking the original word as deleted and the revised word as inserted.

Figure 18. Example of the difference between selecting Character level and Word level in step 4 above.
TIP: The DocTools ExtractChanges Pro add-in lets you – in one operation – compare two versions of a document and extract all changes and comments from the compared version. The DocTools ExtractChanges Pro add-in also lets you do that with multiple documents at a time. You can batch compare one document with several other versions of the same document and extract the changes and comments. Or you can batch compare documents by pairs and extract the changes and comments.
How to merge track changes from two or more documents into one document
If two or more authors have added tracked changes and comments to two or more separate copies of a document, you may want to combine those tracked changes and comments in one document and still preserve the information about who made which change and when.
Word’s Combine feature can be used for that – follow the steps below. However, it only lets you combine two documents at a time. If you want to combine more than two documents, you need to repeat the procedure steps as described in Step 8 below.
To combine two versions of a document and retain existing tracked changes:
- Select Review tab > Compare > Combine to open the Combine Documents dialog box. If you can’t see all options in the dialog box, click the More >> button. See Figure 19 below.
- In the Compare Documents dialog box, select the original document and the revised document either from the two lists or by using the browse buttons besides the lists.
- When you have selected documents, the name defined as your user name will automatically be inserted in the Label unmarked changes with fields. Change the name, if you want. The name will be used to mark any differences between the two document what are not already marked as tracked changes.
- Below Comparison settings, turn on check boxes as desired to specify which types of changes you want to be marked in addition to insertions and deletions, if any.
- Below Show changes, select whether to show changes at character level or word level. See the examples in Figure 18 above.
- Below Show changes in, select in which document to show the changes. The default is New document which I recommend in most situations. Then Word creates a new document with the changes, without making any changes in the existing documents.
- Click OK to execute the combination of tracked changes.
- If you want to combine more documents, repeat Steps 1-7 above. As the original document, you must each time select the combined result from the last Combine operation and as the revised document you must select another edited document. Repeat until you have combined all the edited documents in one document that includes all tracked changes and comments from all the documents.
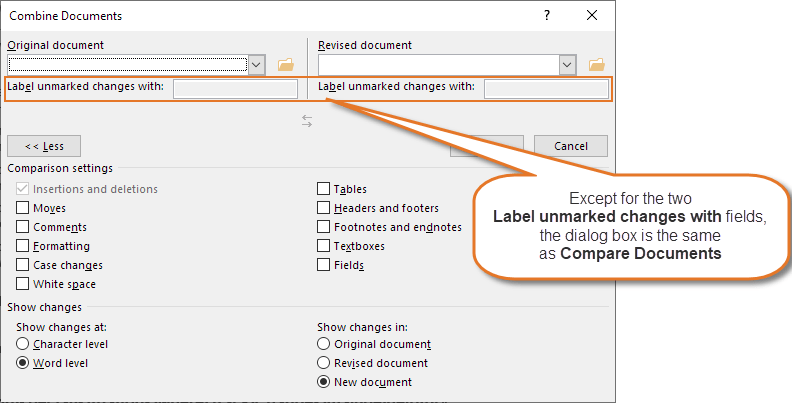
Figure 19. The Combine Documents dialog box. It is almost identical to the Compare Documents dialog box.
About the Advanced Track Changes Options dialog box
To manage the detailed setting for the display of tracked changes, you must use the Advanced Track Changes Options dialog box.
NOTE
Track Moves and Track formatting are document-specific settings that are saved in the document. All other options in the Advanced Track Changes Options dialog box apply to all Word documents.
A new Word document you create will inherit the settings of Track Moves and Track Formatting from the template.
How to open the Advanced Track Changes Options dialog box
To open the Advanced Track Changes Options dialog box:
- Select the Review tab in the Ribbon.
- Click the dialog box launcher in the Tracking group. See Figure 20 below.
This opens the Track Changes Options dialog box. - Click the Advanced Options button to open the Advanced Track Changes Options dialog box. See Figure 22 below.
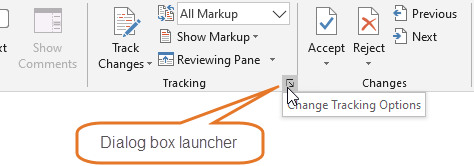
Figure 20. On the Review tab, click the dialog box launcher in the Tracking group to open the Track Changes Options dialog box.
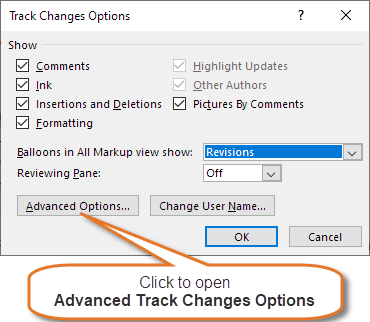
Figure 21. The Track Changes Options dialog box that opens when you click the dialog box launcher in the Tracking group on the Review tab.
Figure 22. The Advanced Track Changes Options dialog box, here shown with the default settings. All options except Comments and Show lines connecting to text are related to the display of tracked changes. See the descriptions below for details about the options.
Overview of all options in the Advanced Track Changes Options dialog box
These general rules apply to Advanced Track Changes Options:
- You can set a specific type of markup out of function by selecting (none) from the related field.
- The settings only come into play when tracked changes are shown.
- Only the Track Moves and Track Formatting options are document-specific. All the other options apply to all Word documents.
For information about the color options (all fields with a color box), see the explanation and illustration in How to display each author’s changes in a different color above.
TIP
For an easy way to revert the settings in the Advanced Track Changes Options dialog box, you can use the ready-to-use macro found on my Word Macros & Tips website.
The table below shows information about all the options in the Advanced Track Changes Options dialog box. Where two options belong together, they are listed side by side with a +sign between.
|
Option |
Default setting |
What it does |
|
GROUP: Markup |
||
|
Insertions + Color |
Underline + By author |
Defines the formatting and color applied to insertions. If you select (none), no formatting is applied. |
|
Deletions + Color |
Strikethrough + By author |
Defines the formatting and color applied to deletions. If you select (none), no formatting is applied. |
|
Changed lines |
Outside border |
Shows vertical bars in the margin where lines with changes are found in the document. The icon below the option shows the result of the currently selected setting. The vertical bars are red in Simple Markup view and gray in All Markup view. You can switch between the displays by clicking a red/gray bar. If Page Setup > Different odd and even is turned on, Outside border shows the lines in the left side of even pages and right side of odd pages. Otherwise, it shows the lines in the left side. If you select (none), no vertical bars are shown. |
|
Comments |
By author |
Defines the color applied to the text that was commented on (the comment scope) and to other comment marks. |
|
GROUP: Moves |
||
|
Track moves |
Turned on |
When turned on, content you cut and paste will be marked. Document-specific option. |
|
Moved from |
Double strikethrough |
Defines how cut text is formatted when you paste it elsewhere. If you select (none), no formatting is applied. |
|
Moved to |
Double underline |
Defines how pasted text that was cut from elsewhere in the document is formatted. If you select (none), no formatting is applied. |
|
GROUP: Table cell highlighting |
||
|
Inserted cells |
Light blue |
Defines the color of new tables cells you insert. If you select (none), no formatting is applied. |
|
Deleted cells |
Pink |
Defines the color of deleted tables cells. If you select (none), no formatting is applied. |
|
Merged cells |
Light yellow |
Defines the color of cells that have been merged from multiple cells. If you select (none), no formatting is applied. |
|
Split cells |
Light orange |
Defines the color of table cells that have been split. If you select (none), no formatting is applied. |
|
GROUP: Formatting |
||
|
Track formatting |
Turned on |
When turned on, changes to formatting will be marked. Document-specific option. Examples of formatting changes: Apply bold, underline, color, change font, change font size. |
|
Formatting + Color |
(none) + By author |
Defines the formatting and color applied to formatting changes. It seems counter-intuitive to mark formatting changes with further formatting – this may conflict. It seems most relevant to keep the default, (none). |
|
GROUP: Balloons |
||
|
Preferred width |
Inches: 3.7″ |
Default depends on the default unit of measurement. Defines the width of the balloons area. Seems to be measured from the vertical bars showing changed lines and to the edge of the paper, provided the vertical bars are in the same side of the page as the balloons area. |
|
Margin |
Right |
Defines whether balloons are shown in the left or right side of the page. |
|
Show lines connecting to text |
Turned on |
Defines whether comments are connected to the texts that was commented on (the comment scope). |
|
Paper orientation in printing |
Preserve |
Defines the paper orientation in print when printing with tracked changes. Auto adjusts orientation based on content. Preserve keeps the actual orientation of pages. Force landscape prints all pages as landscape when printing with tracked changes. |
Special tips about tracking changes
Tips on special situations where Track Changes may be helpful
Normally, it is relevant to track changes in the reviewing process of a document or when asking others for feedback on a document. For example, tracked changes are used a lot in relation to contract work.
It may also be useful to turn on Track Changes in other situations. For example, you may turn on Track Changes before you make a big change to your document. If you don’t like the result, you can quickly reject the changes.
How to get access to the Accept or Reject Changes dialog box from older versions of Word
Long ago, in Word 2000 and earlier versions, Word had a dialog box that worked well as the control center for accepting or rejecting changes. See the illustration below:
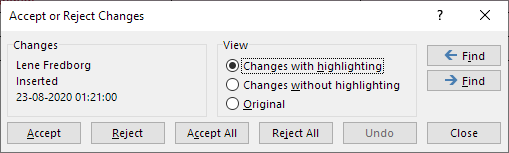
Figure 23. It is still possible to access the old Accept or Reject Changes dialog box. You can assign a keyboard shortcut to the command and/or you can add it to the Quick Access Toolbar (QAT).
The dialog box still works but you can’t access it by default. However, you can easily assign a shortcut to the command or add it to the Quick Access Toolbar (QAT). Follow the instructions below:
- To assign a keyboard shortcut to the Accept or Reject Changes command, follow the general instructions in the Microsoft article Customize keyboard shortcuts. In step 4 in the procedure, select All Commands, in step 5, select ToolsReviewRevisions.
- To add the Accept or Reject Changes to the Quick Access Toolbar (QAT), follow the general instructions in the Microsoft article Customize the Quick Access Toolbar. See the section “Add a command to the Quick Access Toolbar that isn’t on the ribbon”. Select All Commands in the left-most list. The command to find in the list is:
Accept/Reject Changes (ReviewAcceptOrRejectChangeDialog)
About the View options in the Accept or Reject Changes dialog box:
- Changes with highlighting corresponds to selecting Display for review > All Markup.
- Changes without highlighting corresponds to showing Display for review > No Markup.
- Original corresponds to showing Display for review > Original.
- If Display for review > Simple Markup is selected when you open the dialog box, click View option no. 2 or 3 and then click back to option no. 1 to have All Markup displayed.
Balloon settings are found in two places – how are they related?
Some the Track Changes commands and options can be rather confusing. Some are found in more that one place and identical options are not always named identically. This is the case for the Balloons options.
You can set Balloons options in two different places:
- In Review tab > Show Markup > Balloons menu
- In the Track Changes Options dialog box
To open the dialog box, click the dialog box launcher in Review tab > Tracking group. See Figure 20 above.
See the illustrations below:
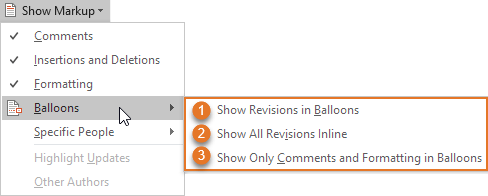
Figure 24. The options marked no. 1, 2, and 3 in the Show Markup > Balloons menu are the same as the options marked no. 1, 2, and 3 in the Track Changes Options dialog box in Figure 25 below.
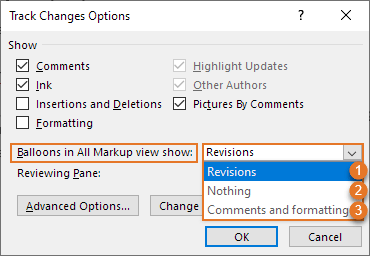
Figure 25. The options marked no. 1, 2, and 3 in the Balloons in All Markup view show list in the Track Changes Options dialog box are the same as the options marked no. 1, 2, and 3 in the Show Markup > Balloons menu in Figure 24 above.
If you select one of the options marked no. 1, 2, and 3 in Figure 24, the corresponding option marked no. 1, 2, or 3 in Figure 25 will automatically be selected and vice versa.
Security issues in relation to Track Changes
Make sure that you don’t email or publish Word documents that include tracked changes (or comments) that are not meant to be seen by others.
You can reduce the risk of revealing tracked changes unintentionally if you take the precautions described below.
How to avoid sending Word documents to others with tracked changes that should not be shared
There are many examples out there about Word documents that have been distributed to others or published with tracked changes that were indeed not meant to be seen be others.
IMPORTANT
Be careful not to distribute Word documents containing tracked changes unless the receiver needs to see the changes.
It is the Track Changes settings on the individual Word user’s computer that determine how that user sees tracked changes. Your own settings only apply to what you see on your computer.
Remember that tracked changes remain in the document until they are accepted or rejected. Even if you hide tracked changes, they are still in the document. This means that they can easily be turned on by another user who opens your document.
To make sure that you are automatically warned before printing, saving, or sending a Word document to somebody else:
- Select File > Options > Trust Center.
- Click the Trust Center Settings button to open the Trust Center dialog box.
- Click Privacy Options.
- Turn on the options:
Warn before printing, saving, or sending a file that contains tracked changes or comments
Make hidden markup visible when opening or saving - Click OK to close the dialog boxes.
See Figure 26A below. When these options are on, you are warned so you can take your precautions before you continue.
If you save often (which I recommend), you may not want to turn on the option Warn before printing, saving, or sending a file that contains tracked changes or comments since a message will open, warning you each time you save a document that includes tracked changes or comment (see Figure 26B below). You may find that too annoying.
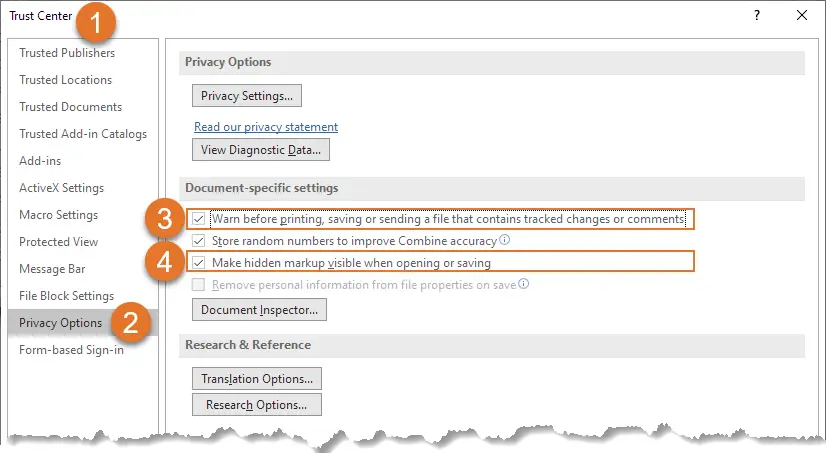
Figure 26A. Trust Center settings that can help you avoid problems with tracked changes that are distributed to others unintentionally. See also Figure 26B below.

Figure 26B. The warning that appears when saving if Warn before printing, saving, or sending a file that contains tracked changes or comments is turned on. The text in the message varies depending on the types of revisions found in the document.
How to lock tracking so Track Changes can’t be turned off
Word lets you lock Track Changes so it can’t be turned off. This way, you can make sure that the document will be shown with tracked changes and that users can’t accept or reject existing changes. User’s can only add new changes.
To lock tracking, select Review tab > click the arrow below the Track Changes icon > select Lock Tracking > enter a password > Click OK.
The Lock Tracking icon is highlighted when tracking is locked.
To unlock tracking, select the Lock Tracking command again > enter the password > click OK.
Other operations and commands, in addition to Track Changes, Accept, and Reject, may be unavailable or disabled in a document when tracking is locked.
How to find out whether there are tracked changes in your document
METHOD 1 – Try to click Previous or Next on the Review tab
To easily find out whether there are any tracked changes (or comments – another type of revision) in your document, select the Review tab and click Previous or Next in the Changes group. The message below is shown if no comments or tracked changes are found in the document.
Figure 27. This message is shown if you click Previous or Next and if no comments or tracked changes are found in the document.
If revisions are found, Word will instead move to the previous or next revision.
METHOD 2 – Use Document Inspector
Note that this method may remove more data from your document than you like and it is not always totally clear what Word does.
If you use the tools on the Review tab with care and are aware of the importance of accepting or rejecting changes before you distribute documents to people who shouldn’t see the changes, you should be safe.
Personally, I never use Document Inspector to remove information.
- Select File > Info > Inspect Document > Check for Issues > Inspect Document.
- In the Document Inspector dialog box, make sure the option Comments, Revisions, and Versions is selected.
- Click Inspect.
- If comments and/or tracked changes are found, a dialog box lets you click Remove All. If you do so, Word will accept all tracked changes and remove all comments.
Note that Word doesn’t tell but “Remove All” means “Accept” in relation to tracked changes.
- Click Close.
For more details, see the Microsoft article Remove hidden data and personal information by inspecting documents, presentations, or workbooks.
How to make sure that Word always displays tracked changes when you open a document
To make sure that Word always displays tracked changes when you open a document, turn on the Trust Center setting Make hidden markup visible when opening or saving. For details, see How to avoid sending Word documents to others with tracked changes that should not be shared above.
IMPORTANT
The fact that traced changes are shown doesn’t mean that Word tracks changes when you start editing the document. To do that, you must make sure to turn on Track Changes.
How to make sure that Word warns you before emailing a document that contains tracked changes
To make sure that Word shows a warning if you attempt to email a document with tracked changes, turn on the Trust Center setting Warn before printing, saving, or sending a file that contains tracked changes or comments. For details, see How to avoid sending Word documents to others with tracked changes that should not be shared above.
I want to send my document outside the company – I want to leave tracked changes in the document, but I don’t want anyone to see who made the tracked changes or when they were made – how can I do that?
To neutralize tracked changes both as regards author names and time information, you can use the Document Inspector.
NOTE
This method may have undesired side-effects. See the CAUTIONS below.
- Select File > Info > Inspect Document > Check for Issues > Inspect Document.
- In the Document Inspector dialog box, make sure the following option is selected:
Document Properties and Personal Information
(You can leave other options checked as well – the first step will not make any changes to the document but only inspect it). - Click Inspect.
- A new dialog opens. A Remove All button is shown next to Document Properties and Personal Information. If you click the Remove All button, the name “Author” will be assigned to all tracked changes in the active document instead of the current author name(s). In addition, date and time will be removed from tracked changes.
- Click Close.
CAUTION 1
The Remove All button for Document Properties and Personal Information turns ON the Trust Center option Remove personal information from file properties on save for the document.
This means that the removal of name and properties will continue to take place also each time you save the document. That is most likely not what you want. To prevent this setting from being saved in the document, select File > Info again and click the text Allow this information to be saved in your file (shown below Inspect Document) to turn off the setting – the text you clicked disappears and the setting has now been turned off (not very intuitive, in my opinion…).
You can also turn off the setting via Trust Center: Select File > Options > Trust Center > Trust Center Settings > Privacy Options and remove the check mark from Remove personal information from file properties on save.
CAUTION 2
The Remove All button also removes all custom document properties and clears all data from built-in properties. If you have DocProperty fields in the document, they will show errors unless you have locked or unlinked the fields first.
For more details about the Document Inspector, see the Microsoft article Remove hidden data and personal information by inspecting documents, presentations, or workbooks.
What other kinds of hidden information might be saved in my Word document?
Your Word documents might contain various kinds of hidden information that could compromise your security or reveal information that you don’t want to share. The term metadata (that is, data about the data) is used to refer to this kind of information.
For details about how to reduce or remove different types of metadata from your documents, see the Microsoft article Remove hidden data and personal information by inspecting documents, presentations, or workbooks.
Troubleshooting in relation to Track Changes
PROBLEM 1 – I have turned on Track Changes but I don’t see any changes
- CHECK 1 – Make sure that you have selected either Simple Markup or All Markup in the Display for Review menu on the Review tab in the Ribbon.
If you still can’t see any changes:
- CHECK 2 – Make sure at least one of the following options in the Show Markup menu is checked: Insertions and Deletions, Formatting.
If you still can’t see any changes:
- CHECK 3 – Open the Advanced Track Changes Options dialog box and check the settings. If a setting is set to (none), that setting is put out of action.
If you still can’t see any changes:
- CHECK 4 – The reason may be that the document contains no tracked changes. To easily find out, click Previous or Next in the Changes group on the Review tab. The message below is shown if you click Previous or Next and if no comments or tracked changes are found in the document.
Figure 28. This message is shown when you click Previous or Next if there are no comments or tracked changes in the document.
PROBLEM 2 – I have turned on balloons but no balloons are shown
Make sure that you have selected All Markup in the Display for Review menu on the Review tab in the Ribbon. Balloons are only shown in All Markup view.
Also, Balloons can only be shown in Print Layout view and Web Layout view.
TIP
You can switch from Simple Markup to All Markup display by clicking a red vertical line in the margin.
PROBLEM 3 – No screen tips are shown when I hover the mouse over a tracked change
- Check that Review tab > Display for Review > All Markup is selected.
- Check that screen tips are set to be shown. To show screen tips on hover, turn on File > Options > Display > Show document tooltips on hover.
PROBLEM 4 – Why are Accept All Changes Shown and Reject All Changes Shown disabled?
In the Accept and Reject menus, the commands Accept All Changes Shown and Reject All Changes Shown are disabled if comments and all types of tracked changes by all people are already selected to be shown. The commands are only enabled if not all comments and tracked changes are selected to be shown.
If, for example, you turn off display of Formatting changes, the commands will be enabled. The commands will also be enabled if Review tab > Show Markup > Specific People isn’t set to All Reviewers.
PROBLEM 5 – I want to define which color to use for each author – how can I do that?
You can’t define which color is used for which author. Word allocates the colors. See How to define which color to use for each author – you can’t above.
PROBLEM 6 – Other users don’t see the same colors used for the individual authors as I do – how can we be sure to see the same colors?
You can’t define which color is used for which author. Word allocates the colors. See How to define which color to use for each author – you can’t above.
PROBLEM 7 – When I use Track Changes, many fields appear as both deleted and inserted – how do I fix that?
A Word document can include many types of fields. Fields include instruction to Word about which content to show. Examples of fields are tables of contents (TOC), numbers in captions, DocProperty fields that show values of custom document properties.
If tracked changes are shown, and if the All Markup display option is selected, you may see many fields twice, both as deleted and inserted. This happens for fields whose results are affected by tracked changes. This influences the layout and it may look confusing. However, Word will fix the fields as soon as you accept or reject the changes and update fields (Ctrl+A to select all, F9 to update fields).
PROBLEM 8 – When I use Track Changes, the automatic numbering of headings and lists look wrong – how do I fix that?
If you view tracked changes inline and if you have added or deleted numbered items, Word will show changes to all numbers that are affected by the changes. This may influence the layout and it may look confusing. However, Word will fix the numbering as soon as you accept or reject the changes. See the example below.
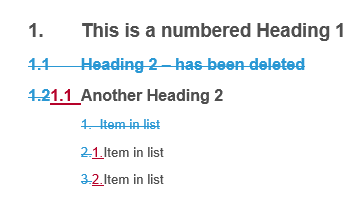
Figure 29. Example of automatic numbering with tracked changes.
PROBLEM 9 – When I open a document, Word automatically shows tracked changes – why?
Word automatically opens with tracked changes displayed if the Trust Center setting Make hidden markup visible when opening or saving is turned on. See How to avoid sending Word documents to others with tracked changes that should not be shared above.
You may turn off the setting. However, having it turned on helps you avoid security issues.
PROBLEM 10 – How can I determine how other users see tracked changes when I share my documents?
It is the Track Changes settings on the individual Word user’s computer that determine how that user sees tracked changes. Your own settings only apply to what you see on your computer.
For more details, see How to make sure that other users see tracked changes in the same way as you do above.
PROBLEM 11 – The Track Changes, Accept, and Reject commands are disabled – how can I fix that?
The problem is most likely that track changes has been locked with a password. Only users who know the password can unlock tracking. See How to lock tracking so Track Changes can’t be turned off above.
PROBLEM 12 – How to get rid of track changes in Word?
To get rid of track changes in Word, you need to remove the changes by accepting or rejecting them. See How to remove tracked changes in Word above.
PROBLEM 13 – I can’t change the user name – how to fix that?
If you can’t change the user name as described in How to change the name shown in new tracked changes you make above, the problem is most likely that your IT department has locked the user name via Group Policy. You may contact the relevant people to find out whether you will be allowed to change the name.
PROBLEM 14 – The author names of tracked changes and comments keep changing to “Author” – why does this happen and how to fix it?
If you use Word’s Inspect Document feature to remove Document Properties and Personal Information from a document, Word remembers this in that specific document by automatically turning ON the Trust Center option Remove personal information from file properties on save for that document.
As long as the Remove personal information from file properties on save option is turned ON, Word will continue to run the removal procedure each time you save the document. As a result, the author name (and date) of every tracked change and comment in the document will change to «Author» each time you save.
To prevent Word from changing the author name to «Author», you must turn OFF the Remove personal information from file properties on save option. Note that any tracked change and comment that has already been changed to show «Author» will not be changed back to show the original author name, but Word will stop changing the author name of new tracked changes and comments. To turn off the option, use one of the following two methods:
METHOD 1: Stop changing to «Author» via File > Inspect Document
Select File > Info > click the text Allow this information to be saved in your file (shown below Inspect Document) to turn off the setting – the text you clicked disappears and the setting has now been turned off (as also mentioned in “CAUTION 1” above, this is not very intuitive). See the illustration below.

Figure 30. How to turn off Remove personal information from file properties on save via Inspect Document. To close the Backstage view, press the Esc key or click the circled arrow in the top-left corner of the window.
METHOD 2: Stop changing to «Author» via Trust Center > Privacy Options
Select File > Options > Trust Center > Trust Center Settings > Privacy Options and remove the check mark from Remove personal information from file properties on save. See the illustration below.

Figure 31. How to turn off Remove personal information from file properties on save via Trust Center.
PROBLEM 15 – How to merge Word documents with comments and track changes?
If different authors have added tracked changed and comments in separate copies of a Word document, you may want to merge all those documents into one document. You can do that using Word’s Combine feature as explained in this step-by-step-procedure.
PROBLEM 16 – The Advanced Track Changes Options dialog box is smaller than normal and is missing the group headings – how to fix that?
I experienced some time ago that the Advanced Track Changes Options dialog box looked too small. I found out that it was missing the headings that are normally used to group the options.
The dialog box has a lot of options. For any user who is not familiar with all the options, the missing group headings would make it really difficult or impossible to find out what the individual options refer to.
The problem with the missing headings in the dialog box seemed to appear randomly. Sometimes the headings were there, sometimes not.
I reported the problem to Microsoft. The answer from Microsoft, after some troubleshooting, was that this specific dialog box has a minimum vertical resolution requirement. This means that the headings will not be shown if the screen resolution is below a certain level.
Even if my screen resolution was more than sufficient to allow the headings to be shown, they sometimes were not shown. I found out that zooming up in Word was what made the headings in the dialog box disappear even if zooming has nothing to do with the size of the dialog box or the screen resolution. Zooming above a certain percentage (131 % on one monitor, 151 % on another monitor) made the headings in the dialog box disappear. Microsoft is not going to fix this problem.
If you run into the problem with disappearing headings in the Advanced Track Changes Options dialog box, the solution is the following:
- Close the Advanced Track Changes Options dialog box.
- Zoom down in Word.
- Open the Advanced Track Changes Options dialog box again.
- If the headings still don’t appear, repeat the steps above.
The illustration below shows how the dialog box looks when the group headings are missing:

Figure 32. The Advanced Track Changes Options dialog box is missing headings due to too high zoom in Word. The headings Markup, Moves, Table cell highlighting, Formatting, and Balloons are missing here. You can compare it to Figure 22 above.
Acknowledgment
Thanks to Shauna Kelly who wrote an article about Track changes, covering Word 2010 and earlier versions. Shauna’s article has been visited by thousands of Word users. It is still visited many times a day. However, since that article was written and last revised when Word 2010 was the newest version of Word, it does not cover all the changes that have been made to the features since then.
This article is written in recognition of Shauna Kelly’s work. It covers all the areas that Shauna covered in her article, however updated to match newer versions of Word. This article also covers all the new and changed Track Changes features added after Word 2010.
Related information
My Word Add-ins DocTools ExtractData and DocTools ExtractChanges Pro both let you extract tracked changes from Word documents. See a comparison of the two add-ins.
For detailed information about how comments in Word work, see my article How comments in Word work.
For a ready-to-use macro to revert the settings in the Advanced Track Changes Options dialog box to default plus several VBA code snippets for handling track changes, see this article on my Word Macros & Tips website.
This article has explained how Track Changes in Word works. I hope this article helps you in your future work with tracked changes in Word.