Microsoft Word — это хороший инструмент не только для набора текста и его форматирования, но и крайне удобное средство для последующего изменения, редактирования и правки. Далеко не все используют в работе так называемую «редакторскую» составляющую программы, поэтому в данной статье мы решили рассказать о том наборе инструментов, который можно и нужно использовать для таких целей.
Урок: Форматирование текста в Ворде
Инструменты, о которых пойдет речь ниже, могут пригодиться не только редактору или пишущему автору, но и всем тем пользователям, которые используют Microsoft Word для совместной работы. Последнее подразумевает, что над одним документом, его созданием и изменением, могут трудиться одновременно несколько пользователей, у каждого из которых есть постоянный доступ к файлу.
Урок: Как в Ворде изменить имя автора
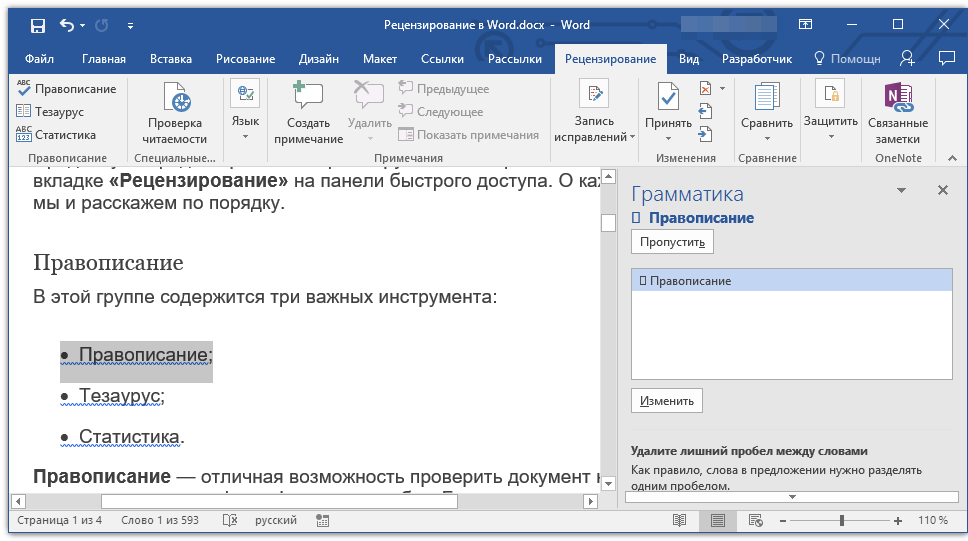
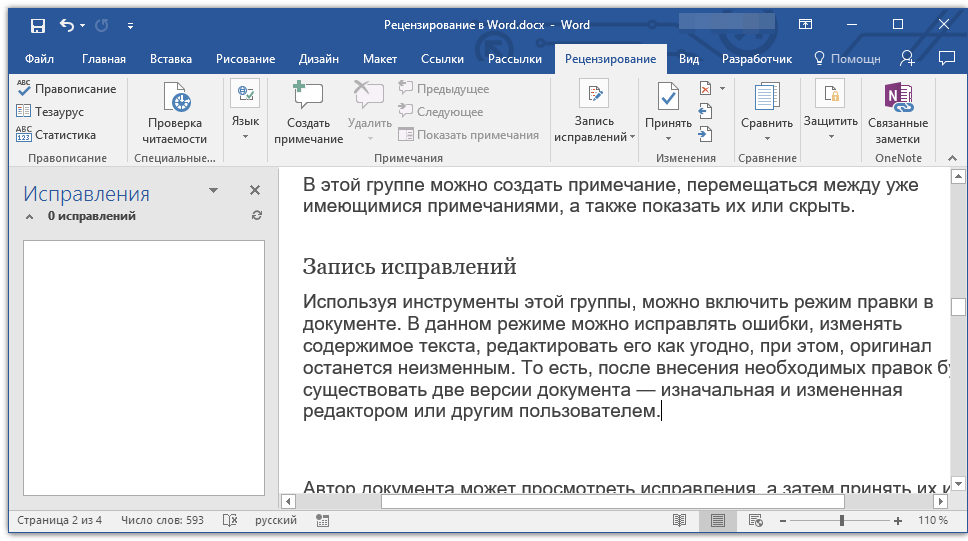
Продвинутый редакторский набор инструментов собран во вкладке «Рецензирование» на панели быстрого доступа. О каждом из них мы и расскажем по порядку.
Правописание
В этой группе содержится три важных инструмента:
- Правописание;
- Тезаурус;
- Статистика.
Правописание — отличная возможность проверить документ на наличие грамматических и орфографических ошибок. Более детально о работе с данным разделом написано в нашей статье.
Урок: Проверка правописания в Word
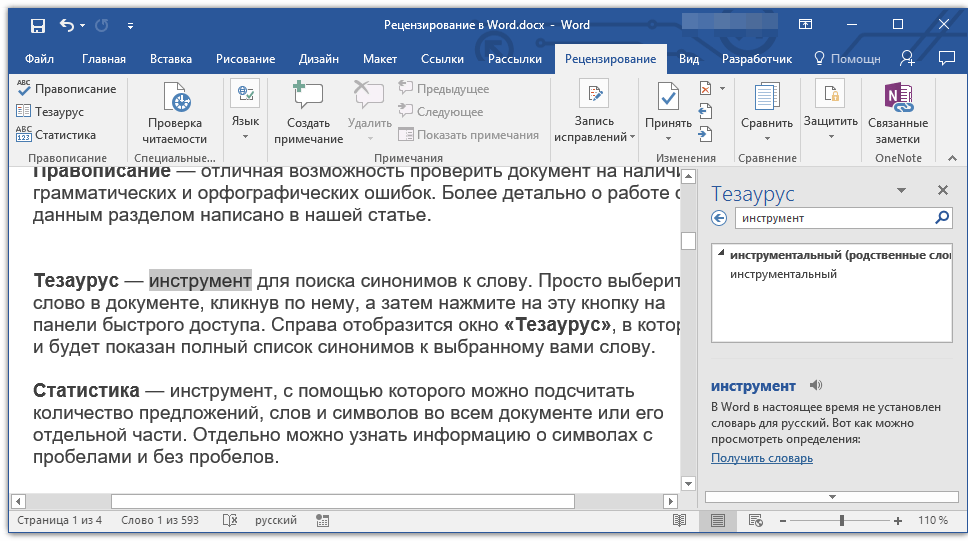
Тезаурус — инструмент для поиска синонимов к слову. Просто выберите слово в документе, кликнув по нему, а затем нажмите на эту кнопку на панели быстрого доступа. Справа отобразится окно «Тезаурус», в котором и будет показан полный список синонимов к выбранному вами слову.
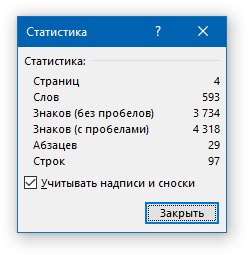
Статистика — инструмент, с помощью которого можно подсчитать количество предложений, слов и символов во всем документе или его отдельной части. Отдельно можно узнать информацию о символах с пробелами и без пробелов.
Урок: Как в Ворде посчитать количество символов
Язык
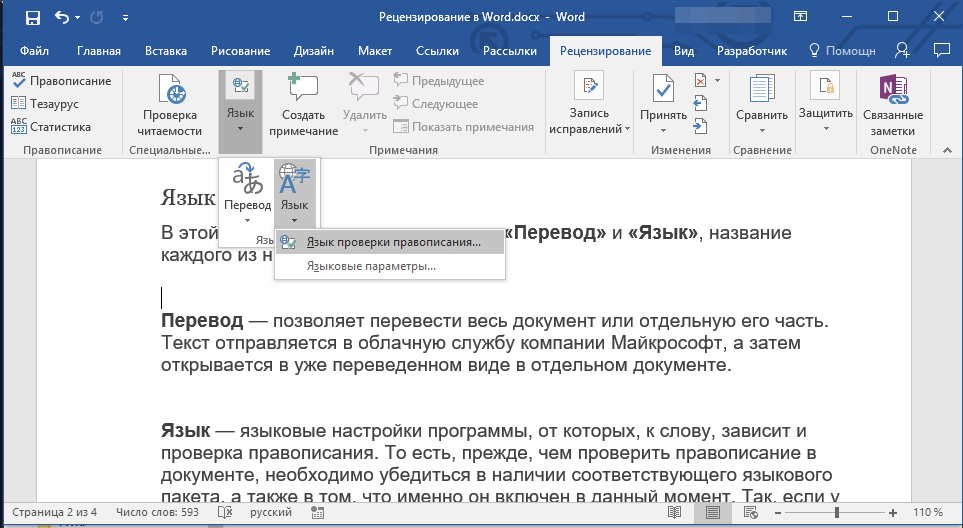
В этой группе всего два инструмента: «Перевод» и «Язык», название каждого из них говорит само за себя.
Перевод — позволяет перевести весь документ или отдельную его часть. Текст отправляется в облачную службу компании Майкрософт, а затем открывается в уже переведенном виде в отдельном документе.
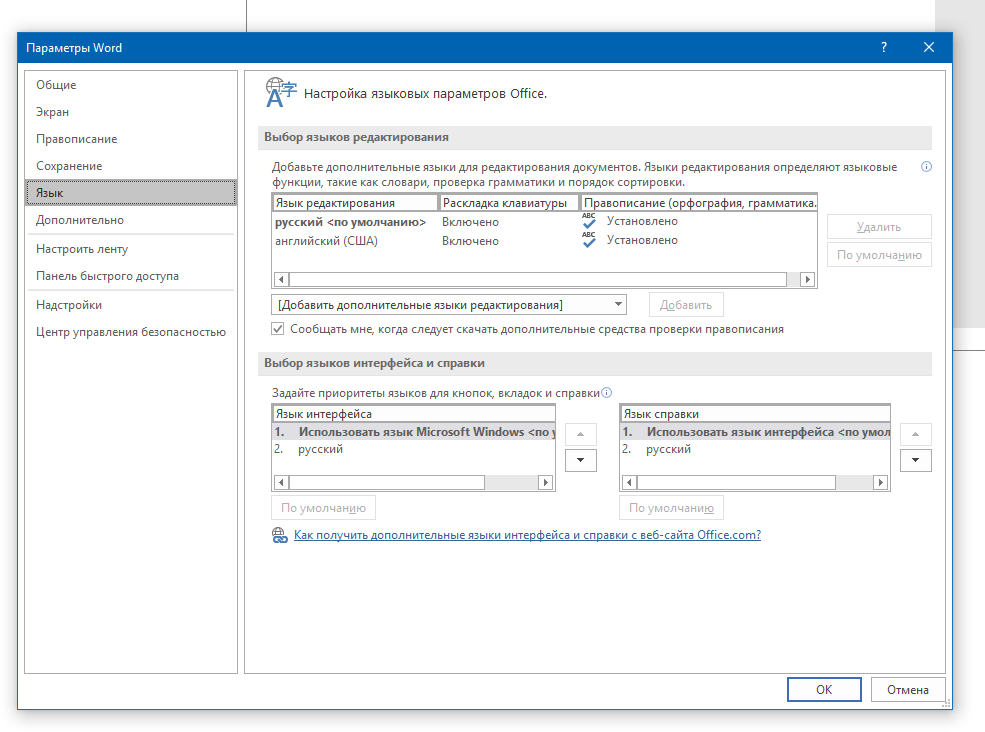
Язык — языковые настройки программы, от которых, к слову, зависит и проверка правописания. То есть, прежде, чем проверить правописание в документе, необходимо убедиться в наличии соответствующего языкового пакета, а также в том, что именно он включен в данный момент.
Так, если у вас будет включен русский язык проверки, а текст будет на английском, программа подчеркнет его весь, как текст с ошибками.
Урок: Как в Word включить проверку правописания
Примечания
Эта группа содержит в себе все те инструменты, которые можно и нужно использовать в редакторской или совместной работе над документами. Это возможность указать автору на допущенные неточности, внести замечания, оставить пожелания, подсказки и т.д., оставив при этом неизменным изначальный текст. Примечания — это своего рода пометки на полях.
Урок: Как в Ворде создать примечания
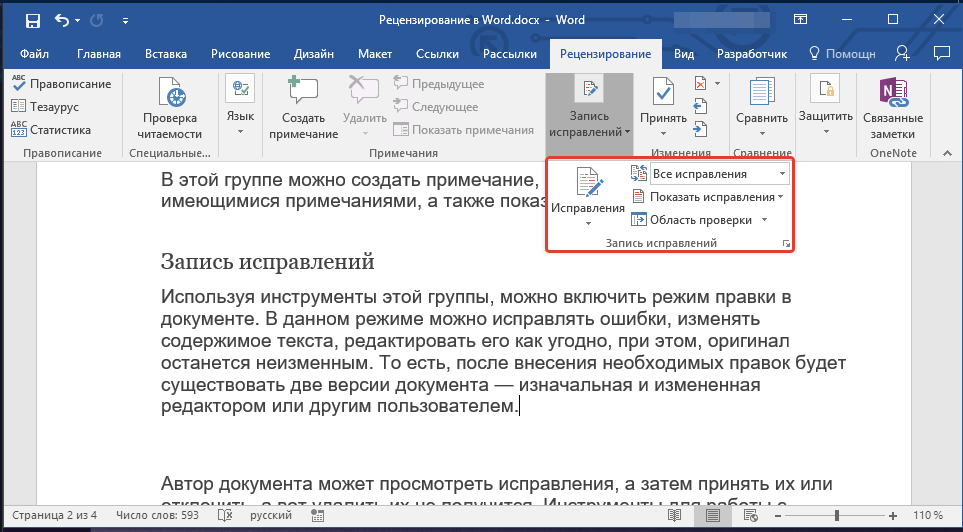
В этой группе можно создать примечание, перемещаться между уже имеющимися примечаниями, а также показать их или скрыть.
Запись исправлений
Используя инструменты этой группы, можно включить режим правки в документе. В данном режиме можно исправлять ошибки, изменять содержимое текста, редактировать его как угодно, при этом, оригинал останется неизменным. То есть, после внесения необходимых правок будет существовать две версии документа — изначальная и измененная редактором или другим пользователем.
Урок: Как в Word включить режим правки
Автор документа может просмотреть исправления, а затем принять их или отклонить, а вот удалить их не получится. Инструменты для работы с исправлениями находятся в соседней группе «Изменения».
Урок: Как в Ворде убрать исправления
Сравнение
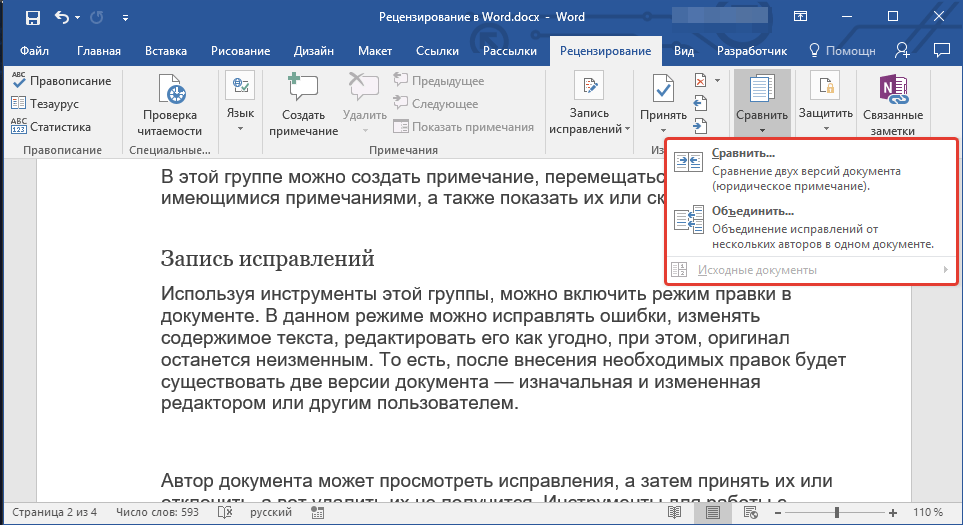
Инструменты этой группы позволяют сравнить два схожих по содержанию документа и показать так называемую разницу между ними в третьем документе. Предварительно необходимо указать исходный и изменяемый документ.
Урок: Как в Word сравнить два документа
Кроме того, в группе «Сравнение» можно объединить исправления, внесенные двумя разными авторами.
Защитить
Если вы хотите запретить редактирование документа, с которым работаете, выберите в группе «Защитить» пункт «Ограничить редактирование» и укажите необходимые параметры ограничения в открывшемся окне.
Кроме того, вы можете защитить файл паролем, после чего открыть его сможет только тот пользователь, у которого есть пароль, установленный вами.
На этом все, мы рассмотрели все инструменты рецензирования, содержащиеся в Microsoft Word. Надеемся, эта статья будет полезной для вас и заметно упростит работу с документами и их редактирование.
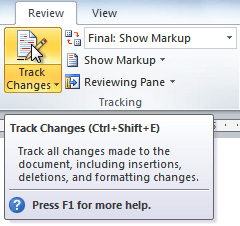
Select Review > Track Changes to turn it on. Make edits in your document and Word captures any edits you make. Select Review > Track Changes to turn it off.
Try it!
- Select Review > Display for Review.
- Select the option you want:
- In the Show Markup list, select the types of revisions you’d like to see:
Contents
- 1 How do you use reviews?
- 2 How do I add a review pane in Word?
- 3 How do we write a review?
- 4 How do you write a good review example?
- 5 How do I show comments in Word?
- 6 How do I use the review pane?
- 7 How do I view comments in Word?
- 8 How do you write a feedback review?
- 9 How do you write a positive review?
- 10 How do you write a review essay?
- 11 How do you write a five star review?
- 12 How do you start a review paper?
- 13 How do you write a positive review response example?
- 14 How do you inspect a document for issues?
- 15 How do I Uncollapse a comment in Word?
- 16 What is review in MS Word?
- 17 How do I edit comments in a Word document?
- 18 What is review format?
- 19 How do you share a review?
- 20 How do you get a review?
How do you use reviews?
“The restaurant received bad reviews.” “I gave the movie a good review.” “The school board is conducting a review of the curriculum.” “The teacher is holding a review for the upcoming test.”
How do I add a review pane in Word?
If you prefer to display the Reviewing Pane, follow these steps:
- Make sure the Review tab of the ribbon is displayed.
- In the Tracking group you see the Reviewing Pane tool. Click the down-arrow at the right of the tool.
- Choose either Reviewing Pane Vertical or Reviewing Pane Horizontal, according to your desires.
How do we write a review?
Top tips for writing a review
- 1 Read, watch, or listen to the work more than once.
- 2 Provide essential information.
- 3 Understand your audience.
- 4 Take a stand.
- 5 Explain how you’re judging the work.
- 6 Introduce evidence to support your criteria.
- 7 Know the conventions of the genre.
- 8 Compare and contrast.
How do you write a good review example?
Table of contents
- Provide useful, constructive feedback.
- Talk about a range of elements, including customer service.
- Be detailed, specific, and honest.
- Leave out links and personal information.
- Keep it civil and friendly.
- Feel free to update your review if needed.
- Check you’ve got the right domain name or company.
Find the “Review” tab, select the “Tracking” group, and click on “Show Markup”. Rest your pointer on Balloons, and then select “Show All Revisions inline” to display comments inline and deletions with strikethroughs. Rest your pointer on a comment inside the document. The comment will appear in a ScreenTip.
How do I use the review pane?
On the Review tab, in the Tracking group, choose Reviewing Pane. NOTE: The summary section at the top of the Reviewing Pane displays the exact number of tracked changes and comments that remain in your document.
To view all comments, no matter which document view is chosen, summon the Reviewing pane: Click the Review tab, and in the Tracking group, click the Reviewing Pane button. Choose either the horizontal or vertical display to summon the Reviewing pane and peruse comments as well as text revisions.
How do you write a feedback review?
5 Steps for Writing Effective Performance Review Comments
- Be positive and comprehensive.
- Share specific feedback and provide examples.
- Pair constructive feedback with developmental suggestions.
- Use the right words.
- Organize your feedback.
How do you write a positive review?
Tips for giving positive feedback
- Make it specific. If your positive feedback is vague, they won’t know which of their skills are good and which ones they need to improve.
- Give it in a timely manner.
- Let others see it.
- Praise everyone eventually.
- Explain their impact.
- Give the right amount of praise.
How do you write a review essay?
On writing the review…
- Reviews should include concise statements of the subject matter, problems, or issues to which the books are directed.
- Essays should include brief summaries of the authors’ major arguments and conclusions and a discussion of the manner in which they developed their conclusions.
How do you write a five star review?
Tips for Writing an Awesome 5 Star Review
- Tip 1: Share something special. Did you hire an Electrical Contractor who performed beyond your expectations?
- Tip 2: Write with personality. Be creative and thoughtful in your review and express what impressed you most about our service to you.
- Tip 3: Include variety.
How do you start a review paper?
Introduction
- Introduce your topic. It may sound redundant to “introduce” your topic in the introduction, but often times writer’s fail to do so.
- State your topic’s relevance. Think of your review paper as a statement in the larger conversation of your academic community.
- Reveal your thesis to the reader.
How do you write a positive review response example?
Example: Thank you so much for your kind words, Jane. We really appreciate you taking the time out to share your experience with us — and we agree, Jordan is truly a gem to have on our team! We count ourselves lucky for customers like you. We look forward to working with you again in the future!
How do you inspect a document for issues?
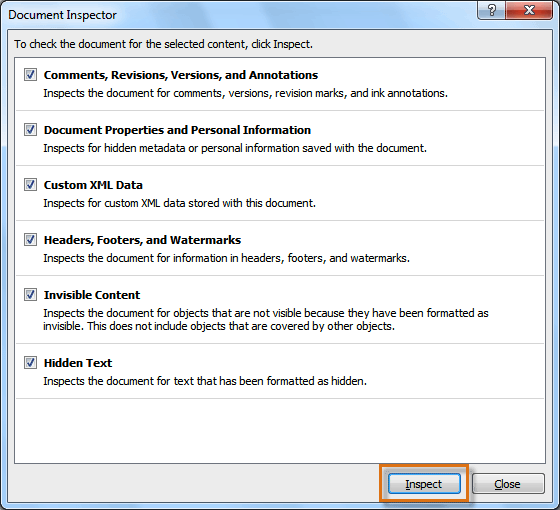
Click the File tab to go to Backstage view. From the Info pane, click Check for Issues, then select Inspect Document from the drop-down menu. Document Inspector will appear. Check or uncheck the boxes, depending on the content you want to review, then click Inspect.
To hide your comments and tacked changes using the No Markup view, simply:
- Navigate to the Review tab.
- Open the Display Review dropdown menu (click on the downward facing arrow at the end)
- Choose No Markup.
What is review in MS Word?
The review tab is useful in a number of ways.For instance, you can use it for proofing your document, adding or removing comments, and tracking changes among other things.
How to edit a comment in Microsoft Word documents
- Open the Word document.
- Make all comments visible.
- Click in the comment.
- Edit the text for that comment.
- Click out of the comment to save changes.
What is review format?
Typically, reviews include an abstract, an introduction, a literature review section, sometimes a methods section if you have specifics to include, and a discussion and conclusion section.
Follow these simple steps to get your Google review on the radar of your Facebook audience in no time:
- Step #1: Search for your business on Google Maps.
- Step #2: Find the star review you want to share.
- Step #3: Click on the Share button.
- Step #4: Copy the Short URL.
- Step #5: Post it on your Facebook page.
How do you get a review?
10 ways to increase and improve your customer reviews
- Put your reviews front and center.
- Get on the same sites as your customers.
- Follow up with buyers.
- Ask the right questions.
- Contact those who leave you glowing reviews.
- Contact those who leave you negative reviews.
- Run a contest.
- Reward those who review.
Lesson 20: Reviewing Documents
/en/word2010/working-with-headers-and-footers/content/
Introduction
Let’s say someone asks you to proofread a report. If you have a hard copy of the report, you might use a red pen to cross out sentences, mark misspellings, or add comments in the margins. However, you could also do all of these things in Word using the Track Changes and Comments features.
When you’ve finished reviewing the document, the other person can choose to automatically accept all of your changes, or decide whether to accept or reject each change one by one.
In this lesson, you’ll learn how to track changes, add comments, and compare two versions of a document.
Using Track Changes and Comments
When you need to collaborate on the content of a document or if you need someone to proofread your document, Word’s Track Changes and Comments features make it easier for you to collaborate with others.
Optional: You can download this example for extra practice.
About Track Changes
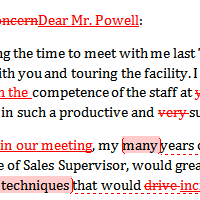
When you turn on the Track Changes option, all changes you make to the document show up as colored markups. If you delete some text, it won’t disappear but instead will have a visible strike through it. If you add text, it will be underlined. This allows another person to see which changes have been made before making the changes permanent.

The color of the markups will vary depending on who is reviewing the document, so if there are multiple reviewers you’ll be able to tell at a glance who made each change.
To turn on Track Changes:
- Click the Review tab.
- Click the Track Changes command. It should now be highlighted in gold to show that it is active.
The Track Changes command
- Any changes you make to the document will be shown as colored markups.
Tracked changes
- Click the Track Changes command again to turn it off.
Adding and deleting comments
Sometimes instead of changing something, you may want to make a comment about part of the document. Comments show up in balloons in the right margin and can be read by the original author or by any other reviewers.
To add a comment:
- Highlight some text, or place the insertion point where you want the comment to appear.
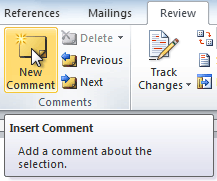
- From the Review tab, click the New Comment command.
The New Comment command
- Type your comment.
A comment
To delete a comment:
- Select the balloon containing the comment you want to delete.
A selected comment
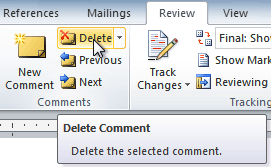
- From the Review tab, click the Delete command.
Deleting a comment
To delete all comments:
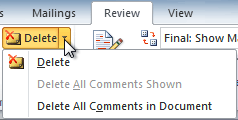
- From the Review tab, click the Delete drop-down arrow.
The Delete drop-down arrow
- Click Delete All Comments in Document.
Accepting and rejecting changes
Tracked changes are really just suggested changes. To become permanent, they have to be accepted. On the other hand, the original author may disagree with some of the tracked changes and choose to reject them.
To accept or reject changes:
- Select the change you want to accept or reject.
Selecting a change
- From the Review tab, click the Accept or Reject command.
The Accept and Reject commands
- If you accepted the change, the markup will disappear, and the text will look normal.
After accepting a change
For some tracked changes, you can reject the changes by deleting them as if they were normal text. For example, if a reviewer adds a word to a sentence, you can just delete the word.
To accept all changes:
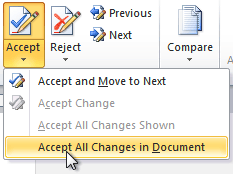
- From the Review tab, click the Accept drop-down arrow. A drop-down menu will appear.
Accepting all changes
- Select Accept All Changes in Document.
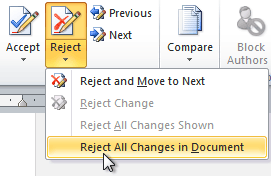
To reject all changes:
- From the Review tab, click the Reject drop-down arrow. A drop-down menu will appear.
Rejecting all changes
- Select Reject All Changes in Document.
Accepting or rejecting all changes does not affect comments, so if you want to delete them you’ll have to do so separately.
Changing how markups appear
If there are a lot of tracked changes in a document, they can become distracting if you’re trying to read through the document. There are a few settings you can use to hide the markups or change how they appear.
To hide tracked changes:
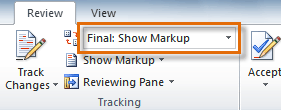
- From the Review tab, click the Display for Review command. The Display for Review command is located to the right of the Track Changes command, and it may not be labeled. It will probably say Final:Show Markup.
The Display for Review Command
- In the drop-down menu, there are four options:
- Final: Show Markup: Shows the final version along with the markup
- Final: Shows the final version and hides all markups
- Original: Show Markup: Shows the original version along with the markup
- Original: Shows the original version and hides all markups
- Choose Final or Original from the drop-down menu to hide markups.
Displaying the Final version (markups hidden)
Setting Display for Review to Final is not the same as accepting all changes. You will still need to accept or reject the changes before sending the final version of your document.
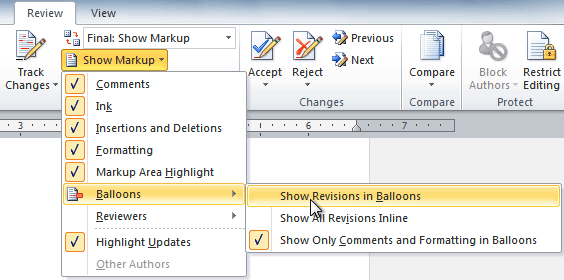
To show revisions in balloons:
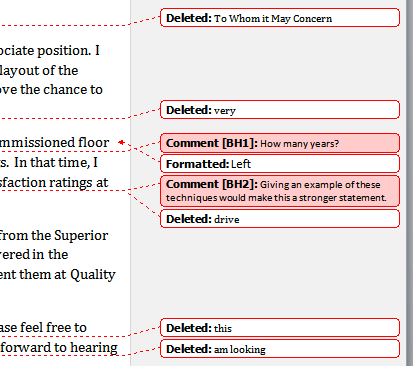
By default, most revisions show up inline, meaning the text itself is marked. You can choose to show the revisions in balloons, which moves many of the revisions (such as deletions) to balloons in the right margin. This can make the document easier to read because there are fewer inline markups. Balloons also give you more detailed information about some markups.
- From the Review tab, click Show Markup
Balloons
Show Revisions in Balloons.
Showing revisions in balloons
- Some of the revisions will move to the right margin.
Revisions in the right margin
To go back to inline markups, you can select either Show All Revisions Inline or Show Only Comments and Formatting in Balloons.
Comparing two documents
If you edit a document without tracking changes, it’s still possible to use reviewing features such as Accept and Reject. You can do this by comparing two versions of the document. All you need is the original document and the revised document, and they must have different file names.
To compare two documents:
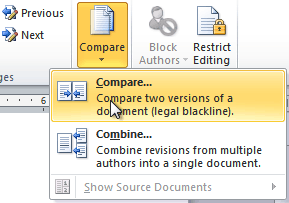
- From the Review tab, click the Compare command. A drop-down menu will appear.
- From the drop-down menu, click Compare.
The Compare command
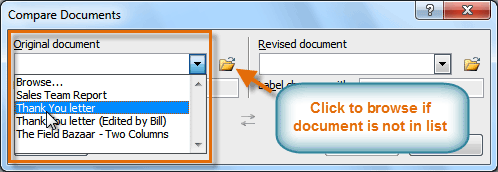
- A dialog box will appear. Choose your Original document by clicking the drop-down arrow and selecting the document from the list. If your document is not on the list, click the Browse button to browse for the file.
Choosing the Original document
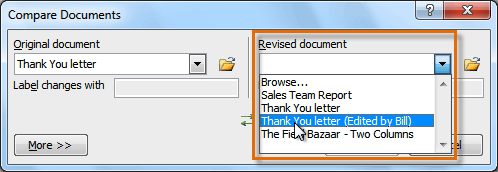
- Choose the Revised document the same way you chose the Original document, then click OK.
Choosing the Revised document
At this point, Word compares the two documents to determine which changes were made, and it creates a new document that you can save if you want. The changes show up as colored markups, just like the ones that appear when using Track Changes. You can then use the Accept and Reject commands to finalize the document.
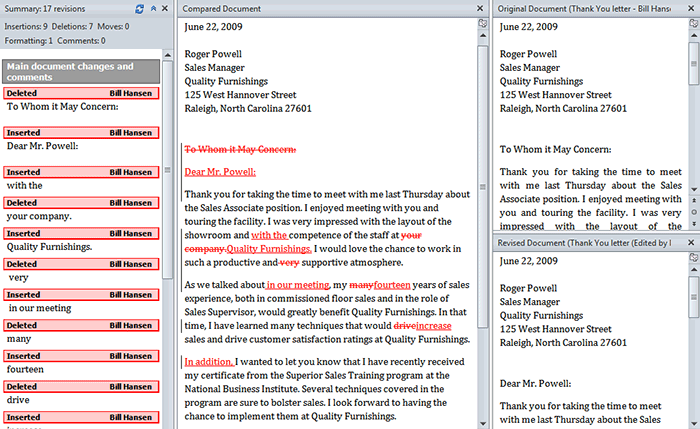
To the right of the new document, there’s a pane that displays the original and revised documents that you can use for reference (although you can’t edit them). If you don’t see the pane on the right, click Compare

Using the reviewing features safely
If there are any comments or tracked changes in your document, you should remove them before sending it to anyone you’re not collaborating with. Comments and tracked changes can reveal confidential information that could lead to embarrassment or make you or your company appear unprofessional—or worse.
Once you’ve removed all of the comments and tracked changes, it’s a good idea to double-check your document using the Document Inspector. The Document Inspector can tell you if there is any hidden data in your document that you may need to remove. It looks for data in many different places—not just comments and tracked changes.
To use the Document Inspector:
- Save your document.
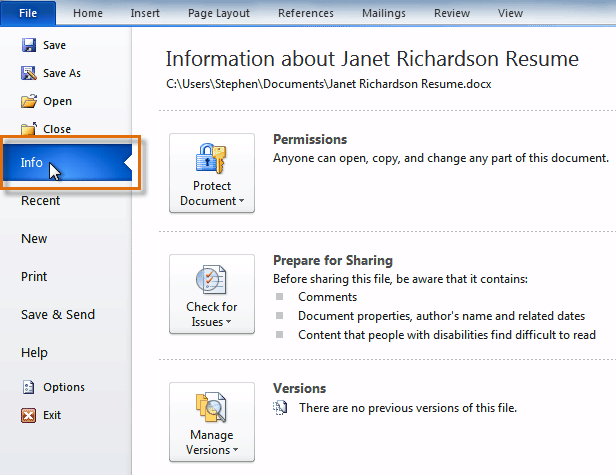
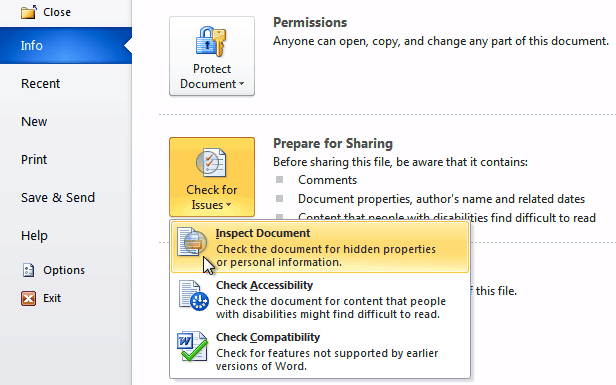
- Click the File tab to go to Backstage view.
- Select Info on the left side of the page.
Selecting Info
- Click the Check for Issues command. A drop-down menu will appear.
- Select Inspect Document.
Clicking Inspect Document
- Click Inspect.
Starting the inspection
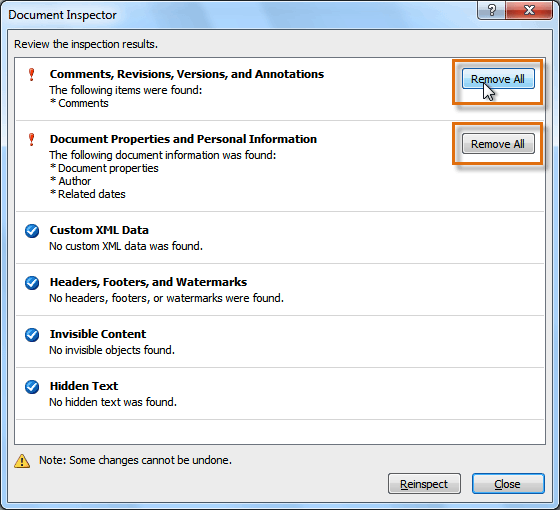
- The inspection results will show an exclamation mark for any categories where it found potentially sensitive data, and it will also have a Remove All button for each of these categories. Click Remove All to remove the data.
Removing possibly sensitive data
- Close the dialog box when you’re done.
- From Backstage view, click Save to make the changes permanent.
Challenge!
- Open an existing Word document. If you want, you can use this example.
- Turn on Track Changes.
- Delete some text.
- Add some text.
- Change some of the text formatting.
- Experiment with the Display for Review command.
- Accept all of the changes.
- Use the Document Inspector to check the document.
/en/word2010/working-with-tables/content/
Have you explored the Review tab on Microsoft Office’s ribbon beyond spell check and word count? Well Microsoft Word has more features to offer. In this blog, I will walk you through the Comments, Tracking, and Changes sections. Here there are features that help to review edits that have been made to a document. This is especially useful when a document is being passed back and forth between several people. I think you will find yourself using these features more often than you would expect.
Track Changes

Commenting

If your Tracking settings are at their default, you should see a little comment icon wherever someone has added a comment. And of course you will see the edits of every user identified by a distinct color. If this is all you need then great! But some of you might want to see all the comments without having to click on them. Or maybe you need to see what the document looks like after or before the edits. This is all possible by changing the amount of markup you want to see.
Changing Viewable Markup
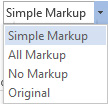
There are four options:
- Simple Markup – this is the default. You will see a little bubble like icon for each comment that has been added. Also, any Track Changes will be shown by a vertical line in the margin section.
- All Markup – as the name says, this option shows all the markup in the document.
- No Markup – removes all the coloring but keeps the edits.
- Original – this will show you what the document looked like before any of the edits were recorded.
Accepting and Rejecting Changes

Those are the basic reviewing features in Word. I would advise playing around with these tools and even the ones that are not mentioned in this blog. It’s good to be well-versed in Microsoft Word if you use it often. We hope you find the Track Changes capability useful as you edit documents. If you have any questions, feel free to contact us at Igniting Business.
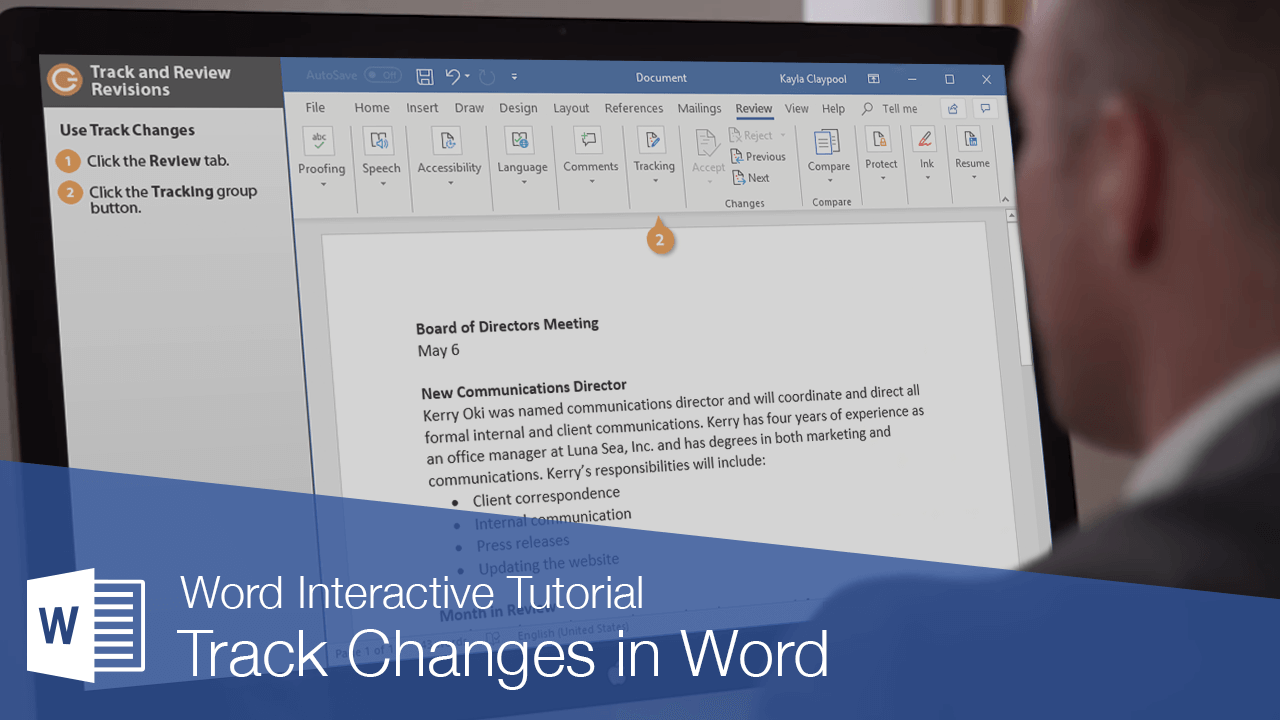
Revising a document with tracked changes in Word works just like revising a printed copy with a red pen. You can easily see the original text, and any additions, deletions, or changes made to the document are clearly marked.
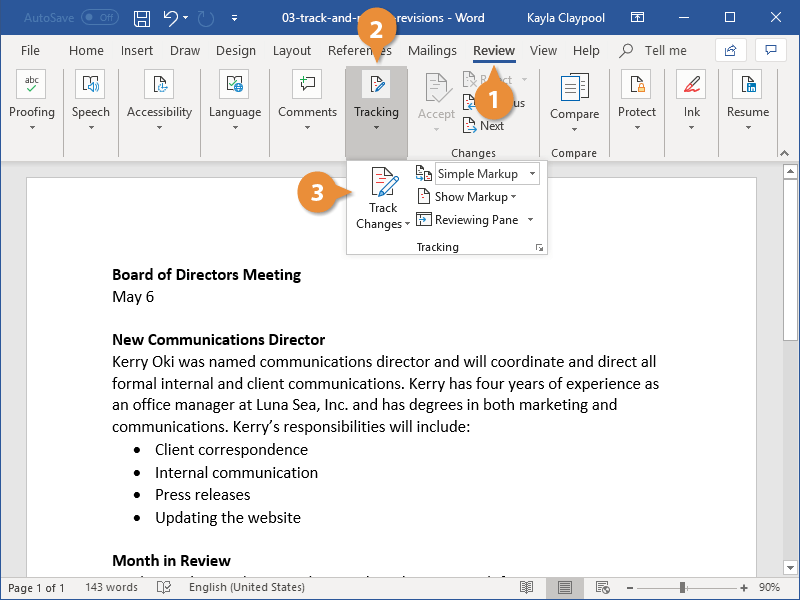
Use Track Changes
In order for changes to be marked up, you need to first track the changes.
- Click the Review tab on the ribbon.
- Expand the Tracking group, if necessary.
- Click the Track Changes button.
Now, any changes made to the document will be tracked and marked up.
Right-click the status bar and select Track Changes to toggle it on or off.
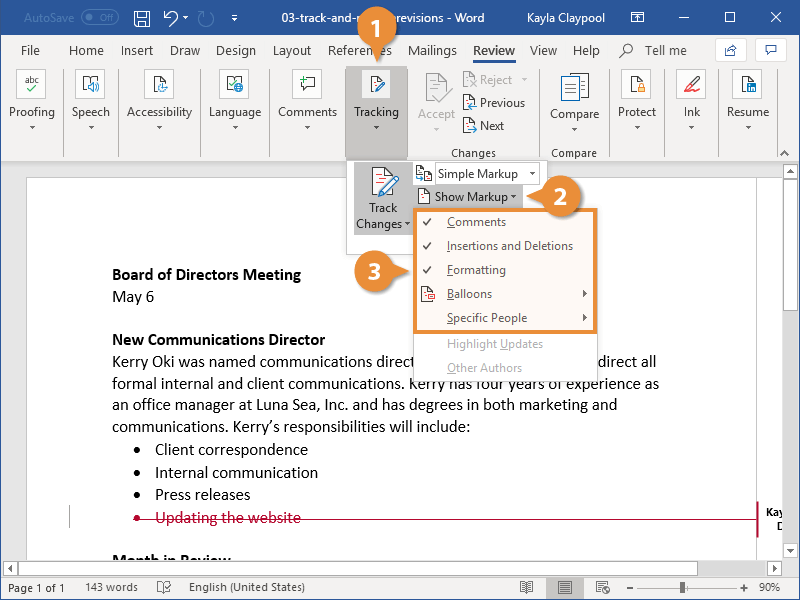
View Markup
Once changes are tracked, you can choose which changes appear marked up.
- Expand the Tracking group, if necessary.
- Click the Show Markup button.
You can toggle whether or not tracking shows Comments, Ink, Insertions and Deletions, and Formatting changes. You can also toggle what appears in the balloons in the right margins, and hide revisions from certain people.
- Select a type of markup to hide or show.
The selected type of markup is toggled on or off.
You can also use the Display for Review menu, directly above the Show Markup button, to control how detailed the markup that appears is.
- Simple Markup: Comments will appear, and text changes will be marked with a line in the margin.
- All Markup: Every change will be described in the margin, including what the change was and who made it.
- No Markup: No changes will be marked up.
- Original: The original document will be shown, without any of the changes that have been made.
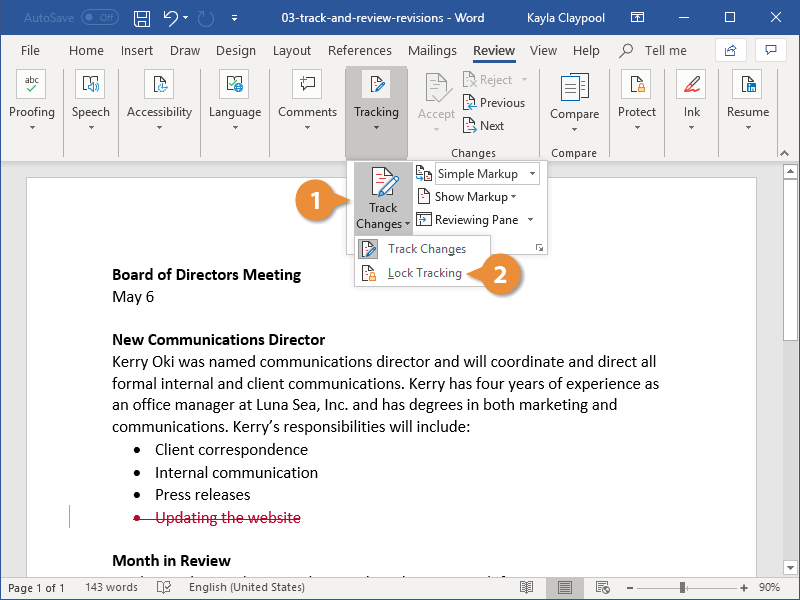
Lock Tracking
To make sure that everyone’s changes get tracked, you can lock tracking so that it can’t be disabled without a password.
- Click the Track Changes button’s list arrow.
- Select Lock Tracking.
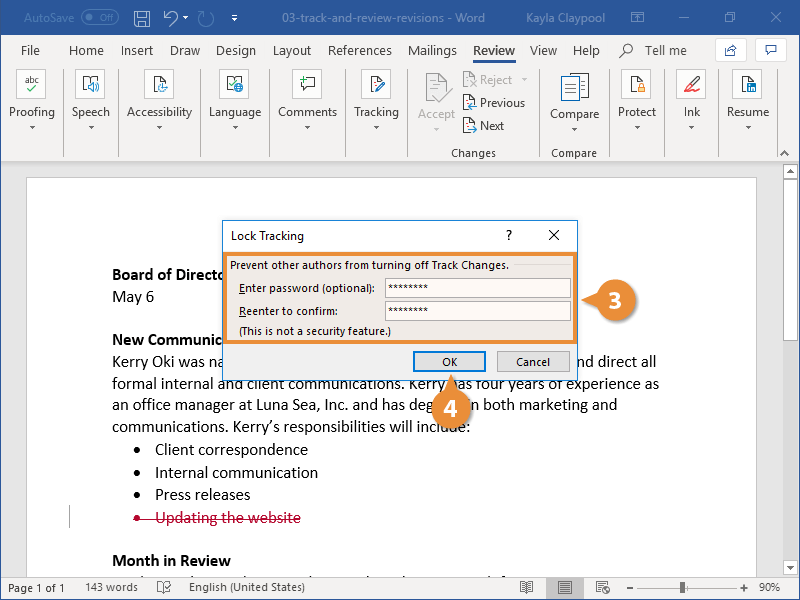
A dialog box opens, where you can enter a password that will be required to turn Track Changes off.
- Enter and confirm a password.
- Click OK.
Track Changes is locked and can only be disabled with the password. Also, you cannot accept or reject changes while Track Changes is locked.
To unlock Track Changes, click the Track Changes button list arrow again, select Lock Tracking, enter the password, then click OK.
Review Revisions
Revising documents using Word’s revision features can save a lot of time, because the changes are already entered in your document. If you accept the changes, Word automatically incorporates the changes into your document. If you reject the changes, Word uses your original text.
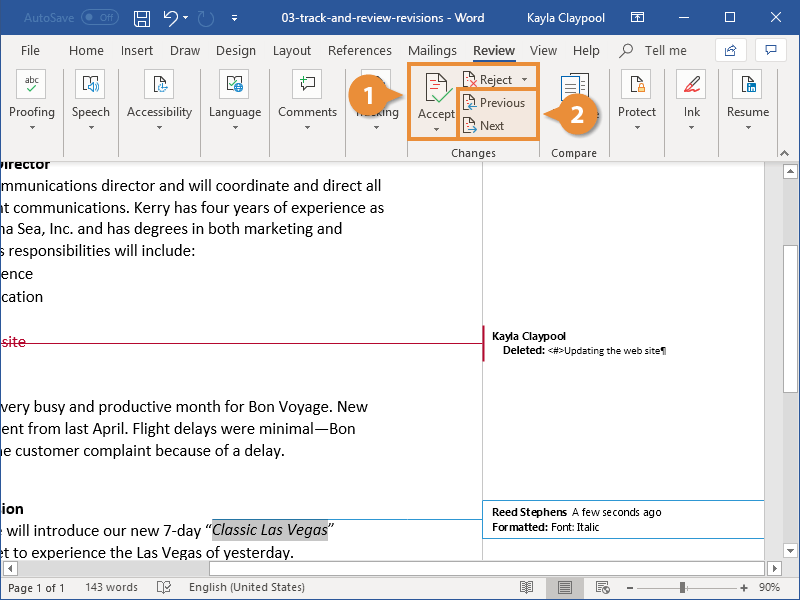
- Select a change, or use the Next Change and Previous Change buttons to move through changes.
- Click Accept or Reject to accept or reject changes.
Changes that are accepted are incorporated into the document, removing the markup and moving on to the next change. Changes that are rejected are removed and replaced with the original text.
Right-click a revision and select Accept or Reject.
Review all tracked changes at once with the Reviewing Pane. Turn it on by clicking the Reviewing Pane button in the Tracking group.
FREE Quick Reference
Click to Download
Free to distribute with our compliments; we hope you will consider our paid training.

- February 4, 2020
-
Valiant Technology
- 4 min
Office 365 collaboration features make the user experience behind working from anywhere a reality. The use of the online version of Word has been incredibly useful for working in the cloud. A recent update makes collaboration from anywhere even easier with easier access to reviewing in Office online applications.
On the Word desktop application, track changes is great for collaboration. If you enable track changes, anything you change will be marked as a suggestion that can be approved or denied. This feature initially was not present in the online version of Word, so you’d have to tell someone to open the file in the local app to see any of those markups.
Now this feature is available on Word online and is always visible in the top ribbon. It’s just a quick drop down to start tracking changes, or make the file read only for yourself to block changes. Let’s go over the options and the steps to enabling these statuses.
Finding the new editing options
You’ll find this feature as a drop down selection up at the top, on the ribbon below the doc title and next to Clippy’s descendent, the “tell me what you want to do” help search bar. The default is set to editing mode. This allows you to make changes as normal, including autosave functions. If you delete something, it’s deleted. If you change wording, its changed, etc.. Version history can help you get back any content you overwrite, but should be used as a correction to a mistake, not as a workflow for reviewing and tracking changes.
Changing the status to reviewing
The reviewing option is great for when you want to add suggestions such as changing wording or if you want to make it clear to your collaborators what has changed and allow input on those changes. This also makes it so the previous collaborator can see the suggested changes and allows them to change it further or restore their original content if desired.
To enable reviewing, click the drop down that says “editing”, and change to the “reviewing” status. It’s that easy! You can also turn on reviewing by going to the review tab at the top and clicking track changes which you can enable just for yourself or for all collaborators.
Yep, the reviewing option is just track changes rebranded. The changes you make, such as adding new text, will be marked up in a different color. Any content that you delete will still be visible with a red strikeout for text or pictures. Some changes cannot be tracked such as resizing images. In this case, you will receive a pop up warning asking if you want to proceed or revert to the original format.
To accept changes, any collaborator can right click and select accept. If instead the user wants to deny changes and revert back to the original text, they can right click and choose deny. Collaborators can also review many changes at once. To do so, they would have to go to the review tab and click one of the two last symbols, for either previous and next. Unfortunately, the option to accept or reject all changes with a click is currently only available on the desktop application.
Viewing as your personal read only
Changing your staus from editing to viewing is available in both Word and Excel online. Viewing will prevent you from making any changes to a document, essentially making it read only for yourself. Use this function to prevent any accidental changes or errors especially for templates or completed documents.
If you try to make changes, a yellow bar will pop up letting you know the file is in read only mode. However, there will be a button to easily open this file in an editable format. You can also start editing by clicking the “edit document” dropdown in the upper righthand corner.
It’s important to note that this makes the file read only just for you and only for that current session. To make it read only for all users, you would have to change the permission setting on the file.
Stop, collaborate, and review
There are so many uses for enabling track changes in word online. Start today and enable the reviewing or viewing functions to make your online collaboration more dynamic. You can easily stop tracking your changes by clicking the drop down at the top or going to the review tab and turning it off from there. Easy as… well, track changes has always been, but now its online and accessible from anywhere.
Working together, but at different times just got a whole
lot easier.
Subscribe to Valiant’s Monthly Email Digest
Valiant’s monthly email digest is filled with original content written by our staff, tech news, and business insights.
The second part of our series on the basics of reviewing documents in Word.
In a previous issue https://office-watch.com/?12 we gave a simple overview of the reviewing features in Word. When you strip away all the fancy jargon and marketing hype then you are left with a simple way to share a document and let people make changes without any re-typing.
In this issue we’ll look at some more features and tricks for reviewing in Word, including answering some questions arising from the first issue in this series.
Changes you made in the meantime
When you open an incoming document in recent versions of Word it should detect that this is an edited version of an original document, and it should offer to merge the edits into the document saved on your hard drive.
This is handy because it means that you can keep making changes to a document after you send it out for revision. When the edited document comes back your edits and those from the ‘outsider’ can be integrated into a single document.
We’ve rarely seen this work properly. There’s an option in Word 2003 to include a unique identifier in each document (which lets Word work out if a document is the ‘same’ as one you worked on before) but often it refuses to work.
Many people try to ‘help’ by renaming the document they send back. You send a document ‘FredDagg.doc’ and it comes back as ‘FredDagg edited by Bruce Bayliss.doc’. This seems to make it harder for Word to do its automatic magic.
Merging documents
If Word can’t tell the incoming file is part of a document you’re working on, all is not lost.
You can use the Merge function to highlight the differences between two documents.
Open one document then go to Tools | Compare and Merge documents to choose the document to compare with. With the default settings the second document is opened with the differences from the first document marked as changes.
On the dialog to select the second document you have some choice (these vary, and we’ll list those in Word 2003):
- Legal Blackline is useful for people who are not lawyers. This option creates a new, third, document which has the first document as a ‘baseline’ plus differences with the second document applied as tracked changes. You can use the Reviewing Pane to see what changes where made. Neither of the original documents are altered.
- Find Formatting lets you ignore any formatting changes (bold, fonts etc) and just focus on changes in the wording, images etc.
If you don’t choose ‘Legal Blackline’ then you have three options on the Merge button:
- Merge, changes in the open (first) document are shown in the second document you’re about to select
- Merge into current document, is the reverse of the first option. Changes in the second document you’re about to select are shown in the ‘first’ document already open.
- Merge into new document, creates a new document with the common parts of the two docs as the baseline and the differences from the two source documents showing as changes.
Compare
The Compare feature lets you put two documents side-by-side for you the check them manually.
Open both documents in Word.
Choose Window | Compare documents
Both documents will appear side-by-side with a special toolbar on the screen with three buttons:
- Synchronous scrolling is what makes this feature special. As you scroll through one document the other document moves by the same amount. Click on this button to turn the auto-scrolling on or off. If the two documents get out of sync, turn synchronous scrolling off, put the documents into sync manually then turn it back on again.
- Reset window position, puts the two documents back into ‘side by side’ positions if they’ve been moved around on the screen.
- Close Side-by-Side will turn the feature off.
You can edit either or both documents normally while in side-by-side mode. That includes copying and pasting between the documents.
If they don’t have Word
If the editor (person you send the document to) doesn’t have Microsoft Word or they turned Track Changes off you still have options.
Most, if not all, word-processors can read Microsoft Word (.doc) files. Even Wordpad in Windows XP can open and edit a .doc file. While they won’t have access to the Track Changes / Reviewing features they can still edit the document and send it back to you.
If you’re really desperate you should save the document in RTF format and send that out for comments. When it comes back you’ll have to save it as a Word document before using the Merge feature.
The Merge documents feature works regardless of how the documents were created or edited. As long as the two documents are Word documents you can merge them.
What did I do?
There’s a clever use of Revisions / Track Changes which is also covered in detail in Peter’s Office BACKUP Handbook http://shop.office-watch.com/obh .
You can turn on Track Changes for documents you are only going to work on yourself. When you do you’ll save all your edits to the document from then on. Changing to ‘Final showing Markup’ view will let you see past changes (different word selections, deleted paragraphs) and give you a chance to recover them.
This might seem pointless but can be extremely useful with a long and complex document, for you have the option to ‘see’ ideas, expressions and wordings that you might have discarded but have second thoughts about.
If nothing else, turning on Track Changes and having the view set to Final means you won’t notice any difference while working on your document, unless and until you need it.
Removing the changes in the final document
The biggest problem with Track Changes is at the last step, when you have the document finalized and ready to go out. As we noted in the last issue this can be a real and embarrassing problem.
Microsoft loves to talk about ‘meta data’ by which they mean all the extra info in a file aside from the obvious and visible document contents. If you go to File | Properties you’ll see all sorts of information about the document which you might not expect.
If you are sending the document as a file you probably don’t want the track changes and other details to be available to the receiver.
You’d think and hope that simply applying Accept Changes or Reject Changes to all the edits in the document would be enough – but alas that’s not enough.
Microsoft has an add-in tool for Office 2003 and Office XP which will remove all this extra info from the document. There are problems with this tool listed at https://office-watch.com/kb?834636
If you won’t want to use that technique there’s a clumsy but effective hack. Save the final document in the RTF format which can’t contain any past changes etc. Then send out that RTF version.
Another advantage of using RTF is that it can’t contain any macros or viruses, so there is no risk of spreading (or being accused of spreading) any nasties.
If we need to type a document, there’s a very strong chance we’ll be using Microsoft Word. Every article, review, and tutorial that I write for Qwerty Articles is written in Microsoft Word. This word processor is the world’s go-to software for document creation.
Microsoft has expanded its popular Office productivity suite into a modern-day subscription known as Office 365 or O365. With control of the market and providing access to everyone through a subscription, it has become a must-have for most writers.
We all use Microsoft Word, whether it be for personal use, work use, or school use. You can create anything your heart desires in this word processor, and it does its best at making it look professional and accurate.
With the latest version of Office 2016, Word received some serious features like automatically updating content for graphics if the information was gathered from an online source, but did you know that, introduced back in Word 2013, Word comes with an abundance of powerful editing tools?
When we create a document, we tend to miss our own mistakes. We have already typed it, and therefore we know what it should say. We can misspell words or miss grammar mistakes because our minds just assume it’s all correct. This is known as a typoglycemia.
If you are typing a document, your mind can think faster than your fingers can type and your eyes can miss even the most obvious mistakes. That is why it’s always best to have someone peer review your content before printing or distributing it. That’s why I get my friend, John Wafford (JohnthePilot from www.techsupportforum.com), to check my articles before I publish them.
Peer reviewing and editing allow someone who has never read the content to come in and make changes. Something may not make sense to them, or they may notice a run-on sentence. They can then bring this to the attention of the document creator. Even if the peer reviewer does not have a background in editing, their comments will still help to improve the document.
The objective of editing is not just to catch mistakes, but to allow you to learn from your mistakes. If you don’t know what the reviewer/editor changed, you will continue to make that same mistake over and over again. They need to be able to inform you of what they changed. This is where Word’s reviewing tools come in to play.
Word offers the ability to show and track all changes made by multiple contributors to the document. There’s the ability to communicate within the document itself and ask questions through the built-in commenting system.
Whether you are creating a résumé, drafting a business proposal, or writing a school paper have someone use the Review Tab in Word to go over it.
Join me as we dive into each button in the Word 2016 Review Ribbon tab. We will be going through each section and explaining its use. Lastly, follow along to learn about simple, yet easy to miss typing mistakes.
The Basics
The first section in the Review tab is the proofing section. By default, Word automatically applies these tools for you. Proofing consists of spelling and grammar, thesaurus, and word count.
We’ve all seen when Word will inform us of a misspelt word or when we use the wrong form of ‘its’ or ‘it’s’. Misspelt words will receive a red squiggly line where you can right-click the word for Word to offer suggestions on what it thought you meant to type.
The way this works is Word has a local dictionary database installed on your computer. When a word is completed with a trailing space, it checks the typed string against this database. If the word matches a string in the database, it’s often correct. If not, it will take the typed letters and attempt to find similar words with similar meanings.
If Word tells you that your last name is incorrect, you can add it to Word’s dictionary. You can do this for any word that Word says is incorrect. When a word is underlined by the red squiggly line, right-click the word and select Add to Dictionary. Just be warned that Word will always accept this as a valid word for all current and future documents.
When you find yourself relying on Word’s local dictionary to make spelling adjustments for you, you need to consider taking the time to fix the mistake yourself. It’s easy to right-click the red underlined word and select the correct option, but you won’t fix your mistake for the next time. Instead, look at how the incorrect word is meant to be spelt. Then, instead of autocorrecting the word, retype the word. Speak the letters aloud as you type them and over time you will efficiently and easily avoid misspelling those words.
Now, just because Word isn’t putting a red squiggly line under the word, doesn’t mean it’s correct. Often words may sound the same when you say them aloud, but they could have two totally different meanings.
Something to take note of with Word’s spell checker is that it does not spellcheck uppercase words by default. To adjust this, you can go to the File, Options menu in Word. Select Proofing and untick the box that is labelled Ignore words in UPPERCASE.
Next, punctuation can make or break a sentence in your writing. It’s important to use the correct usage for commas, periods, explanation marks, semicolons, and the many other punctuation marks that are available to us. Introductory clauses should be followed by a comma, to have a follow up of the beginning sentence.
Recently, the gamers chatting system, Discord, introduced a spellchecker into their application. Amusingly to inform you of their new feature, they published the following changelog:
If someone read that sentence to you, it would sound correct because your brain assumes the correct spellings have been used. When you read through it yourself, your brain can pick up on the misspellings.
Word’s proofing is above average, but it’s nowhere near perfect. In the above sentence, it only caught two of five mistakes, disregarding the fact that the sentence doesn’t flow properly.
Underlined in blue, Word understands that people may mistake ‘we’ve’ for ‘weave’ and ‘know’ with ‘no and offers suggestions to correct these. Blue underlined words are suggestions offered by Word, whereas red unlined words are errors.
The words ‘two’ and ‘sew’ go unnoticed. If you weren’t to reread your own content or you brush over this sentence, people will notice your mistake after you’ve published it.
Microsoft Word does not have machine learning. Its static information is all it has to go on and so, common mistakes for misusing ‘to’, ‘too’, and ‘two’, go unnoticed. Even websites that are meant to check for grammar completely miss this sort of thing.
Next in the proofing section is Word’s thesaurus. This feature is one of my favorite things about Word’s proofing tools.
At times, it may not provide the best solution, but it does help prevent repetition of the same word. If you find yourself using the same word over and over again in a document, you may want to find a slightly different word to help break up the sentence.
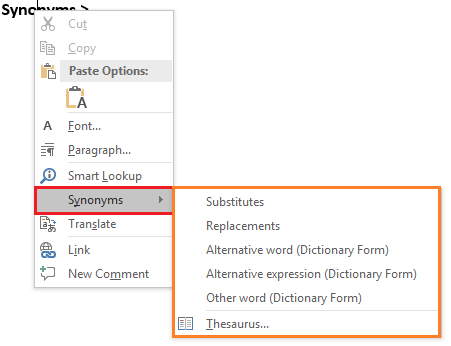
You can access the thesaurus in the Review tab at the top of Word, but it can be accessed quickly by right-clicking on a word and selecting Synonyms >.
The last and final section in the proofing category is about word count. Most personal and work-related documents won’t have much call for this section, but it’s useful for school papers or other items which have a word minimum or maximum.
In the bottom left of Word, you will notice how many words are currently shown in the document. In fact, you can also find the number of pages and whether or not there are spelling and grammar issues down there too.
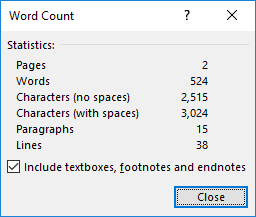
Did you know that you can click on the word counter or access it in the Review tab? Clicking on the word counter will reveal additional facts about your document. These include number of pages, number of words, number of characters (no spaces), number of characters (with spaces), number of paragraphs, and number of lines contained within the document.
If you are a student trying to figure out how to get your latest homework assignment to be a certain page count, don’t try to use the ‘period increase’ trick. Doing so only gives the falsehood that the document looks longer. If the teacher opens the document and checks the word count, they’ll know something isn’t right.
One fun fact that is now shown here is the amount of time you have spent using a document. In the File menu found at the top left of Word, you can see your total time editing a document in minutes. This document took a little over 500 minutes or 8.3 hours to create.
Assisting those who need assistance
Often accessibility is overlooked in Word. Many of us type our documents for school or personal use, and when typing for work it’s often for an internal document.
In the rare case you are sending a Word document to the masses, you may want to consider adding accessibility to the document. Accessibility is providing additional information to those with vision or comprehension issues.
Word can scan for accessibility faults within the document to better assist those with vision and hearing problems. These faults include: missing alternative text for pictures, missing headers, or large open sections of nothingness.
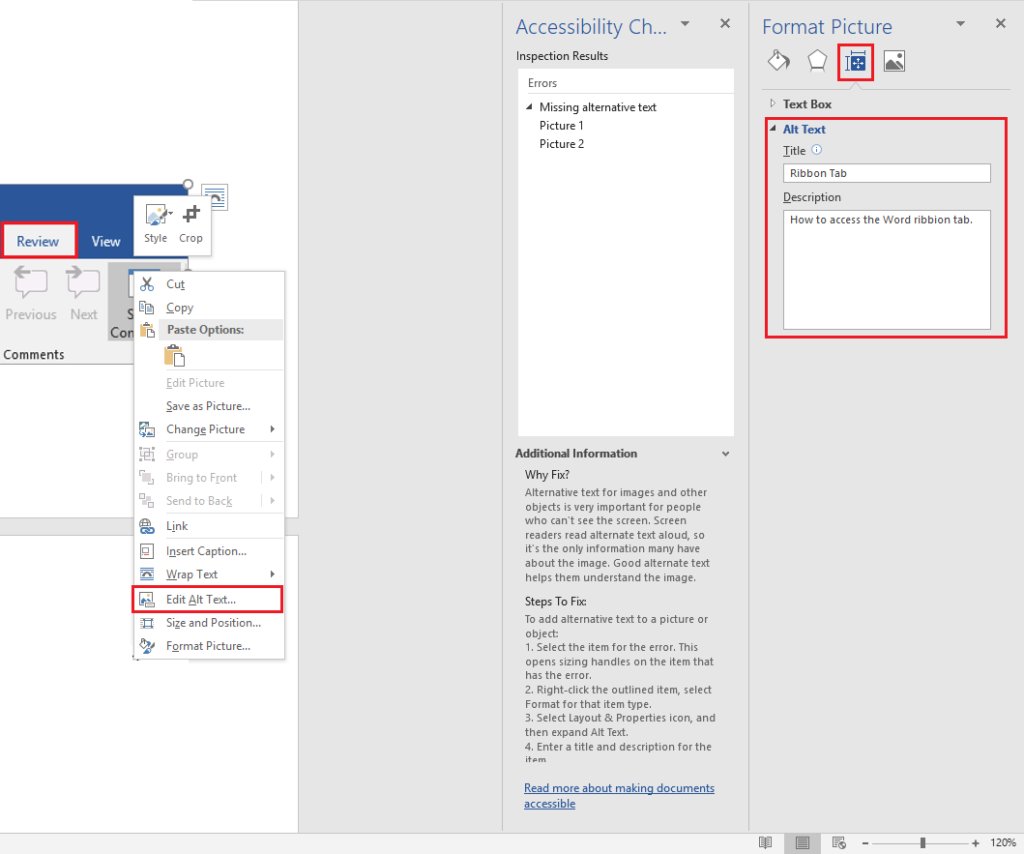
Adding alternative text or alt text to a picture can help inform a reader what the image is trying to show. This is useful in two ways. With alt text, you can briefly explain what the image is attempting to say or add additional meaning to the image. If a picture is worth 1,000 words, help narrow it down to one meaning.
Furthermore, alt text can be displayed if an image is not yet loading. This is common for web pages where alt text will be shown in place of a missing picture. This way, the reader understands what should have been there.
This document contains purple headers. We use purple headers which help to organize the content into sections. By doing this, a reader will understand when the document has moved on to the next section or that what they are reading is different from the past few paragraphs. Think of headers as chapters in a book.
Often, headers should be emboldened or highlighted in a different color/font. Word includes header tags under the Home tab and then within the Styles menu. Adding these to a work document is simple but adds a lot of professionalism.
The Art of Language
Much like accessibility, changing your language settings in Word is going to be one of those buttons that you rarely use, but as in-depth as this tutorial is, it must be mentioned.
Let’s say that you work for a global company and need to send a message to all company employees. Word can translate a document to a bunch of different languages on the fly. You can opt to choose partial text or an entire document.
If you are bilingual, you can also adjust your language proofing settings. Let’s say you are trying to learn Italian and want to practice writing. You can change your Word proofing language to Italian and watch as it does as we mentioned before and puts red and blue squiggly lines under incorrect words.
Potrebbe non essere perfetta, quella di un madrelingua, ma hai metà otterrà almeno là!
Express your thoughts
The next two sections are going to be the meat and potatoes of this tutorial. These two sections are the part that a reviewer/editor should know well and understand how it all works.
When editing a document, you want the content creator to understand why you are making a change, or if you have a ‘to-do’ document, you can comment on actions that you’ve taken to complete that certain task.
Under the commenting section, you can add comments to a document and write clear and concise information about why a change was made. Alternatively, if a sentence does not make sense, have the content creator adjust it for you; it will help them correct their own mistakes.
An editor should be reading through the document with an unbiased view and reading it as if they have no understanding of the content. This will prompt questions and allow the content creator to make adjustments before final publication. For example, a comment is the perfect way of asking the content creator to explain what an abbreviation means, or when they feel that one word works better than another.
In my recent review on the AzulleTech Byte3 Mini PC, I had used the term ‘somebody’ as it is common to do when speaking aloud. However, it was pointed out that ‘someone’ may be better for writing documents.
The distinction between ‘everybody’ and ‘everyone’ is subtle. While dictionaries often show them as interchangeable ‘everybody’ implies ‘all of you’ whereas ‘everyone’ implies ‘each of you’.
The content creator and other peer reviewers/editors can reply to comments in the comment field in the right-hand pane. This offers extensive communication without the need to mark up the document and clearly identifies who is talking.
If you do not see comments in your Word document, access the Review tab in the ribbon. Under the Comments section, select the Show Comments button to activate it. When the button is grayed out, any available comments will show in their own panel.
Lastly, comments can be marked as ‘Resolved’. Going back to the to-do list, marking a comment as resolved could indicate that the commented task has been completed.
Editing the Document
Up until now, each section in this tutorial has been paired with a section in the Review tab within Word 2016. Here, we will be going into how to edit and markup a document for the content creator to then accept or reject the changes. This will go into Tracking and Changes.
As a peer reviewer or an editor, it’s important to markup a document with spelling and grammar mistakes made by the content creator. The content creator will almost certainly miss something, and there will always be something to correct. They wrote it, they will think it’s written correctly, and they will make mistakes because of that.
Before you begin making any changes to a Word document, select the Track Changes button in the Review Tab. Alternatively, as a content creator, you can lock Track Changes and force it to be on for all reviewers/editors rather than giving them the option to turn it on and off.
When Track Changes is on, each change you, as a peer reviewer/editor, make in the document will be marked in the document. Pressing backspace on a word, space, or paragraph will add a strikethrough through that word, space or paragraph. Adding or editing words will automatically put them in colored text.
Let’s return to the Discord change log statement and make edits to it using Track Changes.
With Track Changes turned on as we begin to correct the above statement, we should see the following:
Do not make this common mistake when using Track Changes: When deleting a word, do not add a space to your change, otherwise, when using the “accept changes” feature in Word, you would be accidentally adding spaces to the content creators document, thereby introducing grammatical mistakes.
In the above edit, notice how all of the red words are words that I’ve added, and they butt up against the old word. If I had written them with a trailing space after each word, it would be incorrect.
Also, notice how the words that I have deleted receive a strikethrough through them. This indicates deletion, and they will be removed.
When editing a document using Track Changes, ensure that you have Simple Markup turned on in the Tracking menu found in the Review tab. For the document owner, A red bar on the side of the document will appear next to edited content indicating something was changed.
Simple Markup is what is shown in the image above, and it’s best used by editors as it will avoid the common mistake of adding a space to inserted words. They can also see it in its correct simple form. When the content creator receives their document, All Markup lets them see the changes that have been made.
Before diving into the Track Changes section, understand, as a content creator, why a change was made. Prevent mistakes in the future by rereading your content aloud or take notes of why the change was made.
Once you’ve looked at all of the changes to the documents, as a content creator, you can accept them one-by-one or take the easy route and accept them all at once. Likewise, you can choose to reject some or all changes.
With All Markup turned on, use the Accept or Reject buttons to go one by one or use their respective drop-down menus to select all accepts/rejects.
Moreover, you can review changes by using the Previous and Next buttons within this same section.
Comparing Documents
Uh oh! Did someone save your document with a different name and make changes in it without using Track Changes? Did somebody write a similar document that they need to compare to yours?
With the Compare option, Word can take two Word documents and compare one with the other for any changes. It will line them up side-by-side and show you similarities between them. This is excellent for legal or work documents that may have slight, but crucial alterations.
For example, if you were reviewing a contract and they ask you to sign an updated copy, you could choose to compare the updated copy with the previous to see the changes made.
Additionally, the compare section will allow you to combine two documents into one. Either replacing words or appending them to the bottom of a document.
Lockdown
Let’s say you’ve spent a long time editing a document and you like the look and feel of it. This document uses purple headers, and I like the look and feel of that. So, I would like to protect my document from editing those headers.
Within the Protect section and under Restrict Editing, I can opt to choose certain formatting restrictions as well as force editors to edit only certain areas of the document. With editing restrictions turned on, I can force them to always use Track Changes, only be able to read the document, or only have access to commenting.
Additionally, I can select certain users to have an override permission that allows certain people to ignore the enforcement put in place by the restrict editor.
When Restrict Editing is turned on, the content creator will be asked to create a password which will prevent other people from turning it off. Don’t forget or lose this password as once placed it is needed again to turn off the restriction.
Not found in the Review tab, there are a few other lockdown permissions that can be put in place to protect your document.
Copyrighting your document is automatic. If you typed it in your own time, it’s yours. Nobody can take this document and legally put it on their website for any reason without your consent. Alas, that doesn’t stop people from doing that.
If you are sharing a Word document with people and you want to lock down your content Word has you covered.
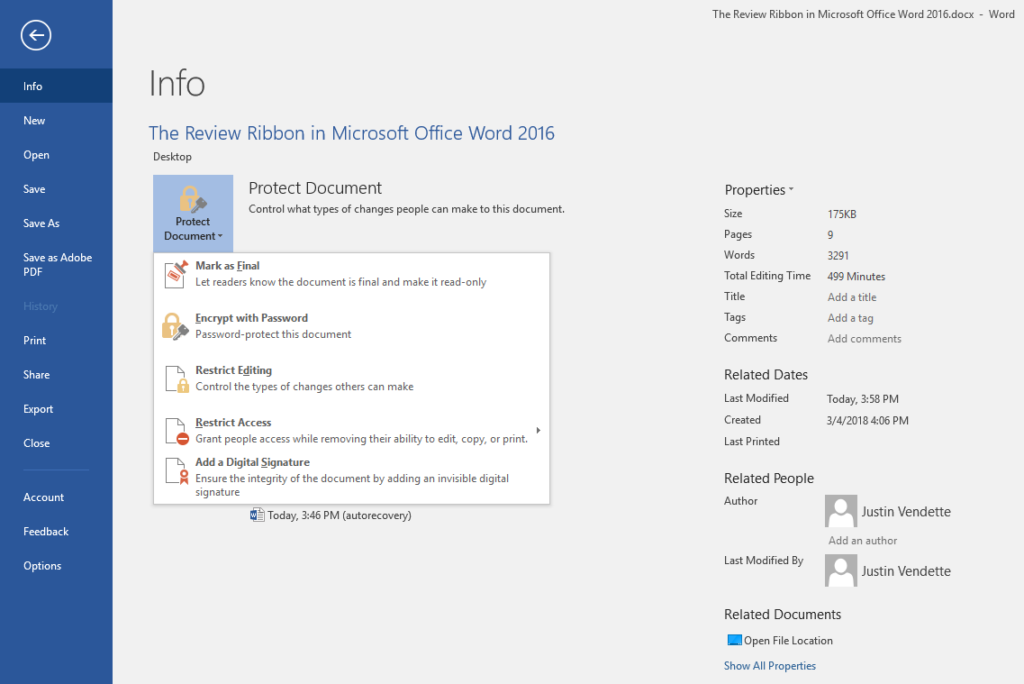
Open the File menu from the upper Ribbon. Under the Info menu, select the dropdown for Protect Document.
Here, we have a few protection options. The first is to mark a document as a final copy, indicating that no further changes are necessary, yet you still wish to have people read it before publication.
Next, you can encrypt this document with a password. Password encryption means only those with the password can open or even view the document. Don’t forget the password as forgetting it would mean the document can never be opened again.
Restrict Editing follows on from what we just talked about a minute ago. You can further restrict editing by restricting access. Permit and Deny access for opening, reading, editing, copying, or printing can be made here.
Adding a digital signature to your document means you’ve signed the document. Nobody will be able to change this signature, and it permanently locks the document to your name. Similarity, you should be marked as the author of this document.
Much like a book, you can add authors to the Word document if multiple people helped write the document.
Modern Technology, Preceding Markup
The last and final section in Word’s Review tab is the Ink section. If a peer reviewer or editor wants to stick with their old fashion pen for editing, they can use a touchscreen computer and their finger/electronic pen to write on the screen.
With the Microsoft Ink setting enabled, they can write on the document as if it were actual paper. Multiple colors and pen styles are available for different writing and markup styles.
The End
Word is a powerful and extremely useful tool. The more you begin to learn about Word’s underlying features, the more professional and accurate your documents will look. This massive tutorial may seem like a lot but knowing how to edit and control your documents just by using one tab in the Word Ribbon is extremely powerful.
The ultimate take away from this document is that Word is not perfect. Word will not catch all your mistakes, and it will even offer suggestions that aren’t grammatically correct. When sending out a document, email, or another sort of media, have someone proofread it and make changes. It will be one of the best things you can do.
Learn from your mistakes and understand and correct them as you go along. The best way to self-proofread is to read aloud. Speaking it and listening to yourself will prevent your brain from adding words that do not exist and will slow down how fast your eyes are skimming through the content.
Buy Microsoft Office 356 here.
© 2018 Justin Vendette













 Valiant Technology


