
This article is for people with visual or cognitive impairments who use a screen reader program such as Microsoft’s Narrator, JAWS, or NVDA with Microsoft 365 products. This article is part of the Microsoft 365 screen reader support content set where you can find more accessibility information on our apps. For general help, visit Microsoft Support home.
Use Word with your keyboard and a screen reader to track, show, and list the changes in your document. We’ve tested it with Narrator, JAWS, and NVDA, but it might work with other screen readers as long as they follow common accessibility standards and techniques. You’ll also learn how to accept or reject tracked changes.
 Need instructions on how to track changes or accept tracked changes in a Word document, but not using a screen reader? See Track changes in Word or Accept tracked changes.
Notes:
-
New Microsoft 365 features are released gradually to Microsoft 365 subscribers, so your app might not have these features yet. To learn how you can get new features faster, join the Office Insider program.
-
To learn more about screen readers, go to How screen readers work with Microsoft 365.
-
When using a screen reader, you’ll use that screen reader’s modifier key, sometimes along with other related keys, to navigate and interact within the app and execute commands. In our documentation this will sometimes be indicated by «SR key.»
In this topic
-
Turn on Track Changes
-
Choose how to show changes (revisions)
-
Check and navigate the tracked changes
-
Show all changes in the Reviewing pane
-
Show all changes in the JAWS Virtual Viewer
-
Show all changes in the JAWS Revisions window
-
Read the tracked changes inline
-
Navigate the changes one by one
-
Move to the details of formatting changes with Narrator
-
-
Remove tracked changes
-
Accept a single tracked change
-
Reject a single tracked change
-
Accept or reject all tracked changes
-
-
Keep Track Changes turned on
-
Turn off Track Changes
Turn on Track Changes
When you turn on Track Changes, Word marks up and shows any changes that anyone makes to your document. You can turn this feature on using either a direct keyboard shortcut, or the ribbon.
-
To turn on Track Changes, do one of the following:
-
To use the direct shortcut, press Ctrl+Shift+E.
-
To use the ribbon, press Alt+R, G, G.
-
Choose how to show changes (revisions)
You can choose how to show the tracked changes in your document.
-
Press Alt+R, T, D. The markup menu is expanded, and you hear the name of the currently selected markup.
-
In the markup list, press the Up or Down arrow keys until you hear the name of the option you want. The following options are available:
-
Simple Markup is the default option, and indicates where the changes are with a vertical line in the document margin. Your screen reader announces that there’s a change at the beginning of a changed paragraph.
-
No Markup hides markup to show what the incorporated changes will look like. This option does not delete the changes.
Tip: To show the markup again, choose Simple Markup or All Markup.
-
All Markup shows all edits with different colors of text and lines. This option is the recommended markup. Your screen reader announces the change and change type where the change happened.
If formatting has been changed, JAWS also reads the details of the change. With Narrator, you need to move to the margin notes or Reviewing Pane to hear the details. For instructions, go to Move to the details of formatting changes with Narrator or Show all changes in the Reviewing Pane.
-
Original shows the document in its original form.
To select and apply an option, press Enter.
-
-
To select which changes are tracked, press Alt+R, T, M. The Show Markup menu is expanded. Press the Down arrow key until you hear the option you want, and then press Enter.
Repeat this step for all the markup types you’d like to select.
Check and navigate the tracked changes
You have several options to check and navigate the tracked changes in a document. You can simply let your screen reader read the document announcing the changes. If the document is long or there are many tracked changes, you might want to use the listing options that Word or the screen reader offers for an overview of the changes. Alternatively, you can navigate through the document change by change.
Show all changes in the Reviewing Pane
-
Press Alt+R+T, P. The Reviewing Pane menu is expanded.
-
Do one of the following:
-
To display the pane horizontally, press H.
-
To display the pane vertically, press V.
-
-
To browse the changes in the pane, press the Up or Down arrow key.
-
When you are done working with the Reviewing Pane, to close it, press Alt+R+T, P, and then press Enter.
Show all changes in the JAWS Virtual Viewer
-
Press the Windows logo key+Semicolon (;). The Items to Display in Virtual Viewer dialog box opens.
-
Press the Down arrow key until you hear «Revisions,» and then press Enter. The Virtual Viewer opens and you hear the total number of revisions in the document.
-
Press the Tab key to browse the list of revisions. JAWS reads the change and its details.
-
When on a change, press Enter to jump into the document body.
Show all changes in the JAWS Revisions window
-
Press Shift+SR key+R. The Revisions window opens.
-
Press the Down arrow key to browse the list of changes.
-
When on a change, press Enter to jump into the document body.
Read the tracked changes inline
The way your screen reader announces the changes and change types when reading through the document depends on the selected markup and the screen reader you’re using.
For instructions on how to use a screen reader to read a Word document, go to Read a document.
Tip: With JAWS, you can open the speech history if you want to check what JAWS has been saying. At any point, press the SR key+Spacebar, followed by H. To browse the speech history, press the Up or Down arrow key.
Navigate the changes one by one
You can use keyboard shortcuts to move through the tracked changes one by one.
-
To go to the next change in the document, press Alt+R, H, 1.
-
To go to the previous change in the document, press Alt+R, F.
Move to the details of formatting changes with Narrator
You can navigate from the document editing area to the margin to check the details of a tracked formatting change.
-
Select the All Markup option as instructed in Choose how to show changes (revisions).
-
Let your screen reader read the body text until it announces a formatting change. Then press the SR key+A.
-
The focus moves to the margin and Narrator announces the change detail. To return back to the body text, press the Left arrow key.
Remove tracked changes
The only way you can remove tracked changes permanently in a document is to accept or reject them.
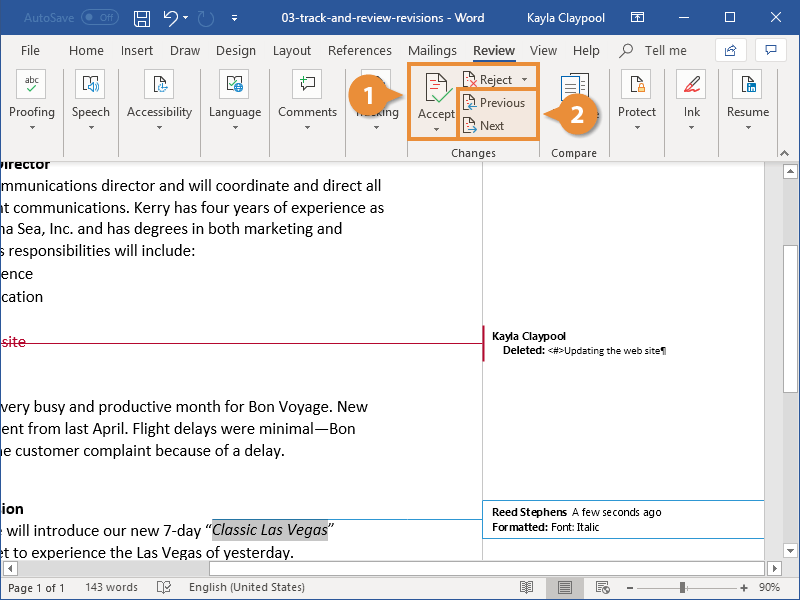
Accept a single tracked change
You can accept single changes in the document body, Reviewing Pane, or margin notes.
-
Navigate to the tracked change you want to remove.
-
To accept the change, do one of the following:
-
Press Shift+F10. The context menu opens. Press E. The change is accepted, and the focus returns to the body text.
-
Press Alt+R, A, 2. You hear: “Accept and Move to Next.” Then press Enter. The change is accepted, and the focus moves to the next change.
-
Reject a single tracked change
You can reject single changes in the document body, Reviewing Pane, or margin notes.
-
Navigate to the tracked change you want to remove.
-
To reject the change, do one of the following:
-
Press Shift+F10. The context menu opens. Press R. The change is rejected, and the focus returns to the body text.
-
To reject the change, press Alt+R, J. You hear: “Reject and Move to Next.” Then press Enter. The current change is rejected, and the focus moves to the next change.
-
Accept or reject all tracked changes
-
To accept all tracked changes, press Alt+R, A, 2, L.
-
To reject all tracked changes, press Alt+R, J, L.
Keep Track Changes turned on
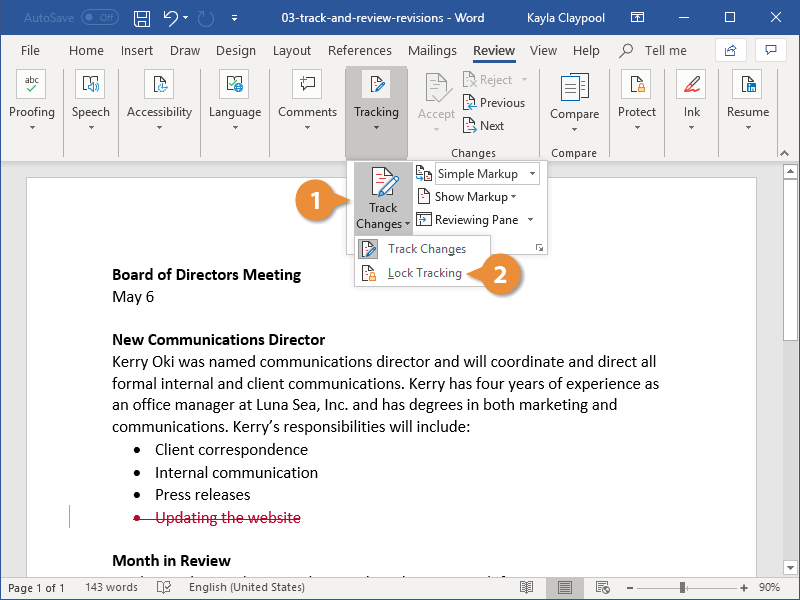
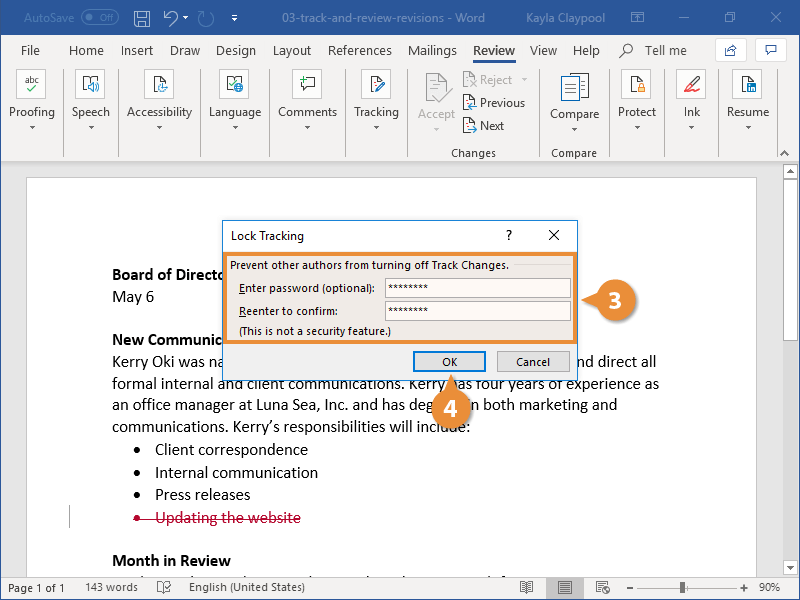
To prevent someone else from turning off Track Changes, turn on Lock Tracking and add a password. When Tracked Changes is locked, anyone opening your document can view the changes but they can’t turn off the feature, and they can’t accept or reject changes.
-
Press Alt+R, G, L. You hear: “Lock Tracking.”
-
Choose and type a password, and press the Tab key. You hear: “Re-enter to confirm.” Type your password again, and then press Enter.
Turn off Lock Tracking
-
Press Alt+R, G, L. You hear: «Unlock Tracking window, password.”
-
Type your password and press Enter.
Turn off Track Changes
When you turn Track Changes off, Word stops marking up new changes. All changes that were already tracked remain marked up in the document, until you remove them. You can turn this feature off using either a direct keyboard shortcut or the ribbon.
-
To turn off Track Changes, on the keyboard, press Ctrl+Shift+E.
-
To use the ribbon to turn off Track Changes, on the keyboard, press Alt+R, G, G.
See also
Use a screen reader to add, read, and delete comments in Word
Use a screen reader to check spelling and grammar in Word
Keyboard shortcuts in Word
Basic tasks using a screen reader with Word
Set up your device to work with accessibility in Microsoft 365
Use a screen reader to explore and navigate Word
What’s new in Microsoft 365: Release notes for Current Channel
Use Word for Mac with your keyboard and VoiceOver, the built-in macOS screen reader, to see who’s been making changes to your document, manage tracked changes, and delete comments in your Word for Mac document.
Need instructions on how to track changes or accept tracked changes in a Word document, but not using a screen reader? See Track changes in Word or Accept or reject tracked changes in Word.
Notes:
-
New Microsoft 365 features are released gradually to Microsoft 365 subscribers, so your app might not have these features yet. To learn how you can get new features faster, join the Office Insider program.
-
This topic assumes that you are using the built-in macOS screen reader, VoiceOver. To learn more about using VoiceOver, go to VoiceOver Getting Started Guide.
-
For the best reading and editing experience, we recommend using the Print Layout View and the All Markup option.
In this topic
-
Turn Track Changes on and off
-
Show changes (revisions) in a document
-
Navigate to tracked changes
-
Remove tracked changes
-
Keep Track Changes turned on
Turn Track Changes on and off
When you turn on Track Changes, Word for Mac marks up and shows any changes that anyone makes to your document. You can turn this feature on using a direct keyboard shortcut.
To toggle Track Changes on and off, in the document text area, press Command+Shift+E.
Show changes (revisions) in a document
You can choose how you’d like to show the tracked changes in your document.
-
Press F6 until you hear the currently selected tab. If you’re already on the Review tab, proceed to step 3.
-
Press the Tab key or Shift+Tab until you hear «Review tab,» and then press Control+Option+Spacebar. You hear: «Review tab, selected.»
-
Press the Tab key until you hear the current markup, followed by «Display for review, pop up button.»
-
To expand the markup menu, press Control+Option+Spacebar.
A list with the following four view options opens:
-
Simple Markup is the default option, and indicates where the changes are with a red line in the document margin.
-
No Markup hides markup to show what the incorporated changes will look like. This option does not delete the changes.
Note: To see the markup again, choose Simple Markup or All Markup.
-
All Markup shows additions in the body text with different colors, and deletions and format changes in the comments pane. This option is the recommended markup and best supported by screen readers.
-
Original shows the document in its original form.
-
-
Press the Up or Down arrow keys until you hear the option you’d like to select, and then press Control+Option+Spacebar. You hear the selected markup, followed by «Display for review.»
-
To choose the type of markup you’d like to see, press the Tab key until you hear “Markup options, menu button,” and then press Control+Option+Spacebar.
A list with the following options opens:
-
Comments
-
Ink
-
Insertions and Deletions
-
Formatting
-
Track Moves From/To
-
Balloons
-
Reviewers
-
-
In the list, press the Up or Down keys until you hear the name of the option you’d like to choose. Then press Control+Option+Spacebar. Repeat this step for all the markup types you’d like to select or unselect.
Navigate to tracked changes
When Track Changes is on, Word marks up the body text or the comments pane in your document. VoiceOver announces the changes and the change types when reading through the text.
-
Underline and color are used for insertions in the body text. You hear «Insertion change» when navigating by the beginning and end of a tracked change.
-
Word marks deletions in the comments pane. VoiceOver announces the deleted word.
-
If the formatting has been changed, you hear: «Format change.” To hear details about the formatting changes, you need to navigate to the margin of your document.
Note: Make sure you’ve selected the All Markup option as instructed in Show changes (revisions) in a document.
Use the Next and Previous buttons
-
To navigate through all tracked changes in your document one by one, navigate to the Review tab as instructed in Show changes (revisions) in a document.
-
Press the Tab key until you hear «Previous button, previous» or «Next button, next,» and then press Control+Option+Spacebar. Repeat this step until you’ve gone through the changes.
Use the Comments pane
-
To move through deletions and formatting changes logged in the Comments pane, in the editing area, press Control+Option+Right arrow key. The focus moves to the comments pane.
-
To move in the list, press Control+Option+Up or Down arrow key.
Use the Reviewing pane
-
To navigate to the Reviewing pane, press Control+Option+M. You hear: «Menu bar, Apple.»
-
Press the Right arrow key until you hear «View,» and then press Control+Option+Spacebar.
-
Press the Down arrow key until you hear «Sidebar,» and the press Control+Option+Spacebar.
-
Press the Down arrow key until you hear «Reviewing,» and then press Control+Option+Spacebar.
-
Press the Tab key until you hear: «Summary.» To listen to the overview of the changes, press the Right arrow key. You hear the total number of changes and the number of insertions, deletions, moves, formatting changes, and comments.
-
To move from the summary to the change details, press VO+Shift+Up arrow key. You hear: «Out of reviewing pane group.»
-
Press the Down arrow key once, and then press Control+Option+Shift+Down arrow key. VoiceOver reads the change details line by line.
-
To close the Reviewing pane, press Control+Option+Shift+Up arrow key. Press the Up arrow key until you hear: «Thumbnails pane.» Press the Right arrow key until you hear «Close button,» and then press Control+Option+Spacebar.
Remove tracked changes
The only way you can remove tracked changes permanently in a document is to accept or reject them.
Accept or reject a single tracked change
-
Navigate to the tracked change you’d like to remove as instructed in Navigate to tracked changes.
-
Navigate to the Review tab as instructed in Show changes (revisions) in a document.
-
Do one of the following:
-
To accept the change, press the Tab key until you hear “Accept menu button,» and then press Control+Option+Shift+M. Press the Tab key until you hear «Accept and move to next” and press Control+Option+Spacebar. The change is accepted, and the focus moves to the next change in your document.
-
To reject the change, press the Tab key until you hear «Reject menu button,» and then press Control+Option+Shift+M. Press the Tab key until you hear “Reject and move to next” and press Control+Option+Spacebar. The change is rejected, and the focus moves to the next change in your document.
-
Accept or reject all tracked changes
-
Navigate to the Review tab as instructed in Show changes (revisions) in a document.
-
Do one of the following:
-
To accept all tracked changes, press the Tab key until you hear “Accept menu button,» and then press Control+Option+Shift+M. Press the Tab key until you hear «Accept all changes» and press Control+Option+Spacebar.
-
To reject all tracked changes, press the Tab key until you hear “Reject menu button,» and then press Control+Option+Shift+M. Press the Tab key until you hear «Reject all changes» and press Control+Option+Spacebar.
-
Keep Track Changes turned on
To prevent someone else from turning off Track Changes, you can lock the feature. You can also add a password for further protection. When Tracked Changes is locked, anyone opening your document can view the changes but they can’t turn off the feature, and they can’t accept or reject changes.
-
Navigate to the Review tab as instructed in Show changes (revisions) in a document. Press the Tab key until you hear «Protect Document, unchecked checkbox» and press Control+Option+Spacebar. The Password Protect dialog box opens.
-
Press the Tab key until you hear «Protect document for,» and then press Control+Option+Spacebar.
-
Press the Tab key until you hear «Tracked changes, radio button» and press Control+Option+Spacebar.
-
To set a password, press the Tab key until you hear «Protection secure, edit text.» Type a password and press the Tab key.
-
In the confirmation dialog box, type the password again, and press the Tab key until you hear: «OK default button.» Press Control+Option+Spacebar.
-
Press the Tab key until you hear «OK, default button» and press Control+Option+Spacebar.
Turn off Track Changes locking
-
In the Password Protect dialog box, press the Tab key until you hear «Protect document for,» and then press Control+Option+Spacebar.
-
Type the password and press the Tab key until you hear «OK default button» and press Control+Option+Spacebar.
-
Press the Tab key until you hear «OK default button,» and then press Control+Option+Spacebar.
See also
Use a screen reader to share a document in Word
Keyboard shortcuts in Word
Basic tasks using a screen reader with Word
Set up your device to work with accessibility in Microsoft 365
Use a screen reader to explore and navigate Word
What’s new in Microsoft 365: Release notes for Current Channel
Use VoiceOver, the built-in iOS screen reader, to switch Track Changes on or off in your Word for iOS document. Find the existing changes in the document, and then accept or reject them. Lock Track Changes on so others cannot switch it off.
Notes:
-
New Microsoft 365 features are released gradually to Microsoft 365 subscribers, so your app might not have these features yet. To learn how you can get new features faster, join the Office Insider program.
-
This topic assumes that you are using the built-in iOS screen reader, VoiceOver. To learn more about using VoiceOver, visit Apple accessibility.
-
To learn more about screen readers, go to How screen readers work with Microsoft 365.
In this topic
-
Turn Track Changes on and off
-
Navigate to tracked changes
-
Accept or reject changes
-
Keep Track Changes turned on
Turn Track Changes on and off
When you turn Track Changes on, all changes made to your Word document are tracked and shown.
-
Open the document in Word. Swipe right until you hear «Show ribbon, button,» and double-tap the screen.
-
You hear the currently selected tab, such as: «Home, tab.» To change to the Review tab, double-tap the screen and swipe right or left until you hear «Review, tab,» and double-tap the screen.
-
Swipe right repeatedly until you hear «Track Changes, off, button» (if Track Changes is currently off) or «Selected, Track Changes, on, button» (if Track Changes is currently on), and double-tap the screen to turn on or off.
-
To close the tab and return to the document, swipe left repeatedly until you hear «Hide ribbon, button,» and double-tap the screen.
Navigate to tracked changes
Use the Review tab in the Print Layout view to navigate the tracked changes and comments in your Word document.
-
Make sure the document is open in the Print Layout view in Word.
To change to the Print Layout view, swipe right until you hear «Print Layout, button,» and double-tap the screen. If you hear «Mobile View, button,» you’re already in the Print Layout view.
-
Swipe right or left until you hear «Show ribbon, button,» and double-tap the screen.
-
You hear the currently selected tab, such as: «Home, tab.» If needed, double-tap the screen and swipe right or left until you hear «Review, tab,» and double-tap the screen.
-
To navigate to changes in the document, swipe right repeatedly until you hear «Next change, button» or «Previous change, button,» and double-tap the screen.
-
To hear the change or comment, swipe right repeatedly until you hear the person who’s made the change and the changed text or comment.
-
To move to the next change, swipe left until you hear «Next change, button,» and double-tap the screen. To hear the change or comment, swipe right until you hear it. To move back to the Next change button, swipe left.
Accept or reject changes
You can check and accept or reject the changes in a Word document one by one or select to accept or reject all of them at once.
-
Navigate to the change you want to accept or reject as instructed in Navigate to tracked changes.
-
Swipe left repeatedly until you hear «Accept, button» or «Reject, button,» and double-tap the screen.
-
The Accept or Reject menu opens. To hear the available options, swipe right. When you hear the option you want to select, double-tap the screen.
Keep Track Changes turned on
To prevent someone else from turning off Track Changes in your document, you can select to block other authors. Others opening your document can still view it but they can’t turn off Track Changes, or accept or reject changes.
-
Open the document in Word. Swipe right until you hear «Show ribbon, button,» and double-tap the screen.
-
You hear the currently selected tab, such as: «Home, tab.» To change to the Review tab, double-tap the screen and swipe right or left until you hear «Review, tab,» and double-tap the screen.
-
Swipe right repeatedly until you hear «Block other authors, button,» and double-tap the screen.
-
The Block Authors menu opens. Swipe right until you hear «Block other authors, button,» and double-tap the screen.
See also
Use a screen reader to share a document in Word
Keyboard shortcuts in Word
Basic tasks using a screen reader with Word
Set up your device to work with accessibility in Microsoft 365
Use a screen reader to explore and navigate Word
What’s new in Microsoft 365: Release notes for Current Channel
Use TalkBack, the built-in Android screen reader, to switch Track Changes on or off in your Word for Android document. Find the existing changes in the document, and then accept or reject them.
Notes:
-
New Microsoft 365 features are released gradually to Microsoft 365 subscribers, so your app might not have these features yet. To learn how you can get new features faster, join the Office Insider program.
-
This topic assumes that you are using the built-in Android screen reader, TalkBack. To learn more about using TalkBack, go to Android accessibility.
In this topic
-
Turn Track Changes on and off
-
Navigate to tracked changes
-
Accept or reject changes
Turn Track Changes on and off
When you turn Track Changes on, all changes made to your Word document are tracked.
-
Open the document in Word. Swipe right until you hear «Not checked, more options, switch,» and double-tap the screen.
-
You hear the currently selected tab, such as: «Tab menu, Home, selected.» To change to the Review tab, double-tap the screen and swipe right or left until you hear «Review, tab,» and double-tap the screen.
-
Swipe right repeatedly until you hear «Track Changes, not checked, switch» (if Track Changes is currently off) or «Track Changes, checked, switch» (if Track Changes is currently on), and double-tap the screen to turn on or off.
-
To close the tab and return to the document, swipe left repeatedly until you hear «Checked, more options, switch,» and double-tap the screen.
Navigate to tracked changes
Use the Review tab to navigate the tracked changes in your Word document.
-
Swipe right or left until you hear «Not checked, more options, switch,» and double-tap the screen.
-
You hear the currently selected tab, such as: «Tab menu, Home, selected.» To change to the Review tab, double-tap the screen and swipe right or left until you hear «Review, tab,» and double-tap the screen.
-
To navigate to the changes in the document, swipe right repeatedly until you hear «Next change, button» or «Previous change, button,» and double-tap the screen. You hear the changed text.
-
The focus remains on the Next change or Previous change button. To cycle through the changes, just double-tap the screen.
Accept or reject changes
You can check and accept or reject the changes in a Word document one by one or select to accept or reject all of them at once.
-
Navigate to the change you want to accept or reject as instructed in Navigate to tracked changes.
-
Swipe left repeatedly until you hear «Accept, menu» or «Reject, menu,» and double-tap the screen.
-
The Accept or Reject menu opens. To hear the available options, swipe right. When you hear the option you want to select, double-tap the screen.
See also
Use a screen reader to share a document in Word
Keyboard shortcuts in Word
Basic tasks using a screen reader with Word
Set up your device to work with accessibility in Microsoft 365
Use a screen reader to explore and navigate Word
What’s new in Microsoft 365: Release notes for Current Channel
Use Word for the web with your keyboard and a screen reader to see who’s been making changes to your document and manage tracked changes. We have tested it with Narrator in Microsoft Edge, JAWS in Chrome, and NVDA in Firefox, but it might work with other screen readers and web browsers as long as they follow common accessibility standards and techniques.
Notes:
-
If you use Narrator with the Windows 10 Fall Creators Update, you have to turn off scan mode in order to edit documents, spreadsheets, or presentations with Microsoft 365 for the web. For more information, refer to Turn off virtual or browse mode in screen readers in Windows 10 Fall Creators Update.
-
New Microsoft 365 features are released gradually to Microsoft 365 subscribers, so your app might not have these features yet. To learn how you can get new features faster, join the Office Insider program.
-
To learn more about screen readers, go to How screen readers work with Microsoft 365.
-
When you use Word for the web with a screen reader, switch to the full screen mode. Press F11 to toggle the full screen mode on and off.
-
When you use Word for the web, we recommend that you use Microsoft Edge as your web browser. Because Word for the web runs in your web browser, the keyboard shortcuts are different from those in the desktop program. For example, you’ll use Ctrl+F6 instead of F6 for jumping in and out of the commands. Also, common shortcuts like F1 (Help) and Ctrl+O (Open) apply to the web browser – not Word for the web.
-
If the Xbox Game Bar app is running on your device, opening the Review tab in Word for the web with the shortcut Alt+Windows logo key+R can cause unintentional activation of the screen recording feature in the app. To prevent this, close the Xbox Game Bar app.
In this topic
-
Turn on Track Changes
-
Navigate the tracked changes
-
Remove tracked changes
-
Turn off Track Changes
Turn on Track Changes
When you turn on Track Changes, Word marks up and shows any changes that either you or everyone makes to your document.
-
To turn on Track Changes, do one of the following:
-
To enable tracking changes for everyone, press Alt+Windows logo key+R, G, F.
-
To enable tracking changes for just yourself, press Alt+Windows logo key+R, G, J.
-
Navigate the tracked changes
-
To navigate the tracked changes in a document, do one of the following:
-
To navigate to the next tracked change, press Alt+Windows logo key+R, H.
-
To navigate to the previous tracked change, press Alt+Windows logo key+R, J.
-
Remove tracked changes
The only way you can remove tracked changes permanently in a document is to accept or reject them.
-
Navigate to the change you wish to accept or reject, as described in Navigate the tracked changes.
-
Do one of the following:
-
To accept the change, press Alt+Windows logo key+R, A, 2.
-
To reject the change, press Alt+Windows logo key+R, J.
The focus moves to the next tracked change.
-
Turn off Track Changes
When you turn Track Changes off, Word stops marking up new changes. All changes that were already tracked, remain marked up in the document until you remove them.
To turn off Tracked Changes, press Alt+Windows logo key+R, G, O.
See also
Use a screen reader to insert and change text in Word
Use a screen reader to check spelling and grammar in Word
Keyboard shortcuts in Word
Basic tasks using a screen reader with Word
Use a screen reader to explore and navigate Word
What’s new in Microsoft 365: Release notes for Current Channel
Technical support for customers with disabilities
Microsoft wants to provide the best possible experience for all our customers. If you have a disability or questions related to accessibility, please contact the Microsoft Disability Answer Desk for technical assistance. The Disability Answer Desk support team is trained in using many popular assistive technologies and can offer assistance in English, Spanish, French, and American Sign Language. Please go to the Microsoft Disability Answer Desk site to find out the contact details for your region.
If you are a government, commercial, or enterprise user, please contact the enterprise Disability Answer Desk.
Lesson 20: Reviewing Documents
/en/word2010/working-with-headers-and-footers/content/
Introduction
Let’s say someone asks you to proofread a report. If you have a hard copy of the report, you might use a red pen to cross out sentences, mark misspellings, or add comments in the margins. However, you could also do all of these things in Word using the Track Changes and Comments features.
When you’ve finished reviewing the document, the other person can choose to automatically accept all of your changes, or decide whether to accept or reject each change one by one.
In this lesson, you’ll learn how to track changes, add comments, and compare two versions of a document.
Using Track Changes and Comments
When you need to collaborate on the content of a document or if you need someone to proofread your document, Word’s Track Changes and Comments features make it easier for you to collaborate with others.
Optional: You can download this example for extra practice.
About Track Changes
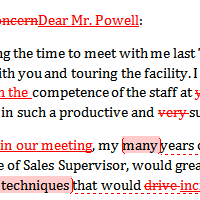
When you turn on the Track Changes option, all changes you make to the document show up as colored markups. If you delete some text, it won’t disappear but instead will have a visible strike through it. If you add text, it will be underlined. This allows another person to see which changes have been made before making the changes permanent.
 A document with tracked changes
The color of the markups will vary depending on who is reviewing the document, so if there are multiple reviewers you’ll be able to tell at a glance who made each change.
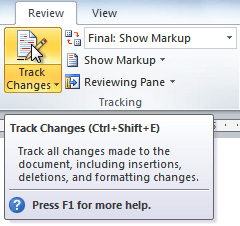
To turn on Track Changes:
- Click the Review tab.
- Click the Track Changes command. It should now be highlighted in gold to show that it is active.
 The Track Changes command
 - Any changes you make to the document will be shown as colored markups.
Tracked changes
- Click the Track Changes command again to turn it off.

Adding and deleting comments
Sometimes instead of changing something, you may want to make a comment about part of the document. Comments show up in balloons in the right margin and can be read by the original author or by any other reviewers.
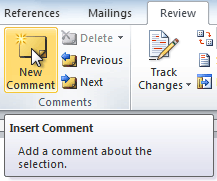
To add a comment:
- Highlight some text, or place the insertion point where you want the comment to appear.
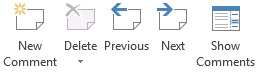
- From the Review tab, click the New Comment command.
The New Comment command
- Type your comment.
A comment

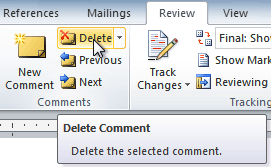
To delete a comment:
- Select the balloon containing the comment you want to delete.
A selected comment
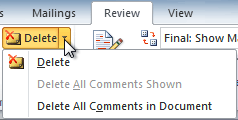
- From the Review tab, click the Delete command.
Deleting a comment

To delete all comments:
- From the Review tab, click the Delete drop-down arrow.
The Delete drop-down arrow
- Click Delete All Comments in Document.
Accepting and rejecting changes
Tracked changes are really just suggested changes. To become permanent, they have to be accepted. On the other hand, the original author may disagree with some of the tracked changes and choose to reject them.
To accept or reject changes:
- Select the change you want to accept or reject.
Selecting a change
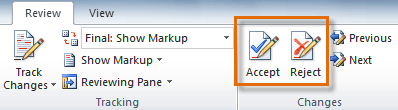
- From the Review tab, click the Accept or Reject command.
The Accept and Reject commands
- If you accepted the change, the markup will disappear, and the text will look normal.
After accepting a change

For some tracked changes, you can reject the changes by deleting them as if they were normal text. For example, if a reviewer adds a word to a sentence, you can just delete the word.
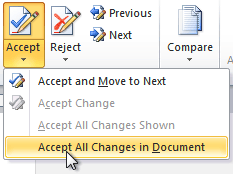
To accept all changes:
- From the Review tab, click the Accept drop-down arrow. A drop-down menu will appear.
Accepting all changes
- Select Accept All Changes in Document.
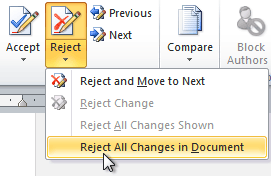
To reject all changes:
- From the Review tab, click the Reject drop-down arrow. A drop-down menu will appear.
Rejecting all changes
- Select Reject All Changes in Document.
Accepting or rejecting all changes does not affect comments, so if you want to delete them you’ll have to do so separately.
Changing how markups appear
If there are a lot of tracked changes in a document, they can become distracting if you’re trying to read through the document. There are a few settings you can use to hide the markups or change how they appear.
To hide tracked changes:
- From the Review tab, click the Display for Review command. The Display for Review command is located to the right of the Track Changes command, and it may not be labeled. It will probably say Final:Show Markup.
The Display for Review Command
- In the drop-down menu, there are four options:
- Final: Show Markup: Shows the final version along with the markup
- Final: Shows the final version and hides all markups
- Original: Show Markup: Shows the original version along with the markup
- Original: Shows the original version and hides all markups
- Choose Final or Original from the drop-down menu to hide markups.
Displaying the Final version (markups hidden)


Setting Display for Review to Final is not the same as accepting all changes. You will still need to accept or reject the changes before sending the final version of your document.
To show revisions in balloons:
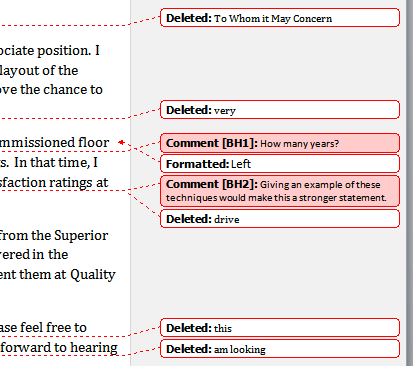
By default, most revisions show up inline, meaning the text itself is marked. You can choose to show the revisions in balloons, which moves many of the revisions (such as deletions) to balloons in the right margin. This can make the document easier to read because there are fewer inline markups. Balloons also give you more detailed information about some markups.
- From the Review tab, click Show MarkupBalloonsShow Revisions in Balloons.
Showing revisions in balloons
- Some of the revisions will move to the right margin.
Revisions in the right margin
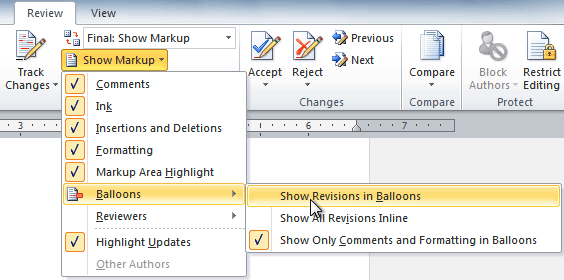
To go back to inline markups, you can select either Show All Revisions Inline or Show Only Comments and Formatting in Balloons.
Comparing two documents
If you edit a document without tracking changes, it’s still possible to use reviewing features such as Accept and Reject. You can do this by comparing two versions of the document. All you need is the original document and the revised document, and they must have different file names.
To compare two documents:
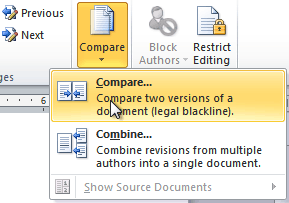
- From the Review tab, click the Compare command. A drop-down menu will appear.
- From the drop-down menu, click Compare.
The Compare command
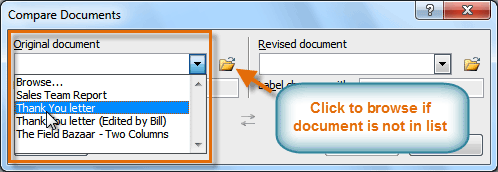
- A dialog box will appear. Choose your Original document by clicking the drop-down arrow and selecting the document from the list. If your document is not on the list, click the Browse button to browse for the file.
Choosing the Original document
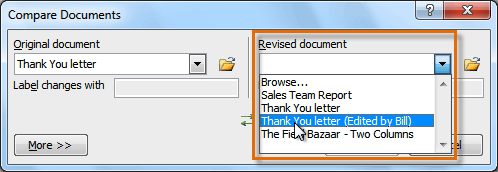
- Choose the Revised document the same way you chose the Original document, then click OK.
Choosing the Revised document
At this point, Word compares the two documents to determine which changes were made, and it creates a new document that you can save if you want. The changes show up as colored markups, just like the ones that appear when using Track Changes. You can then use the Accept and Reject commands to finalize the document.
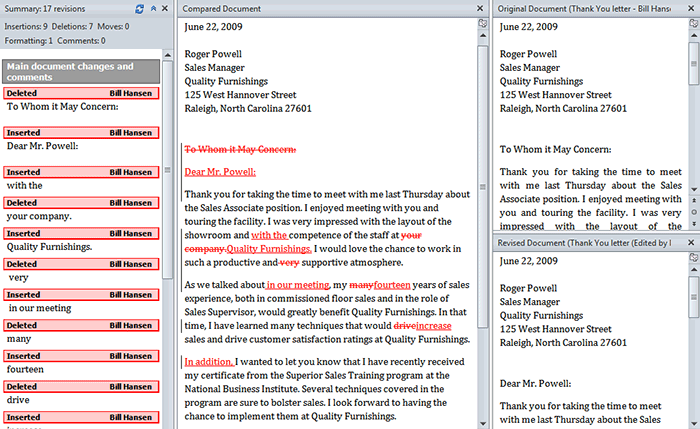 Comparing two documents
To the right of the new document, there’s a pane that displays the original and revised documents that you can use for reference (although you can’t edit them). If you don’t see the pane on the right, click Compare Show Source DocumentsShow Both.
Using the reviewing features safely
If there are any comments or tracked changes in your document, you should remove them before sending it to anyone you’re not collaborating with. Comments and tracked changes can reveal confidential information that could lead to embarrassment or make you or your company appear unprofessional—or worse.
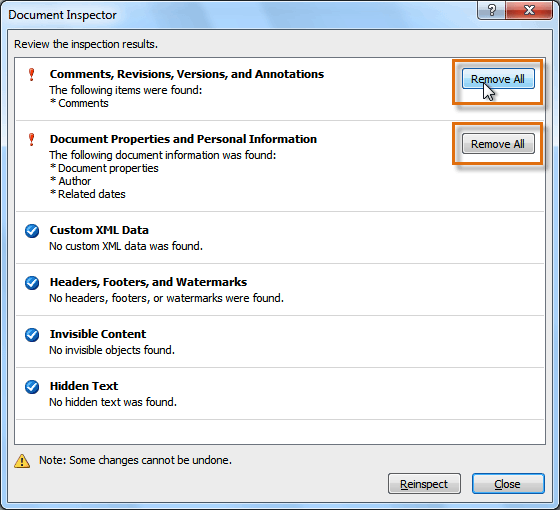
Once you’ve removed all of the comments and tracked changes, it’s a good idea to double-check your document using the Document Inspector. The Document Inspector can tell you if there is any hidden data in your document that you may need to remove. It looks for data in many different places—not just comments and tracked changes.
To use the Document Inspector:
- Save your document.
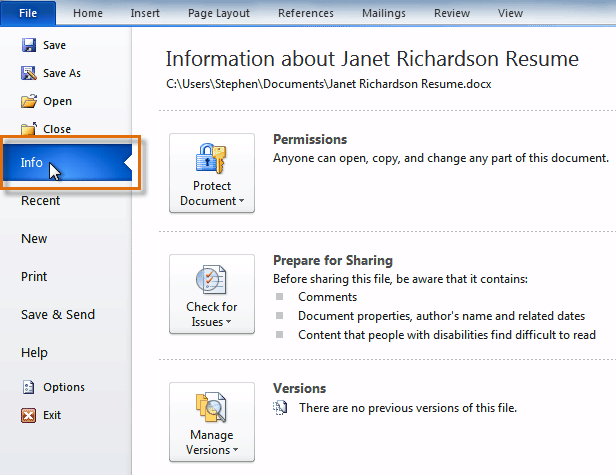
- Click the File tab to go to Backstage view.
- Select Info on the left side of the page.
Selecting Info
- Click the Check for Issues command. A drop-down menu will appear.
- Select Inspect Document.
Clicking Inspect Document
- Click Inspect.
Starting the inspection
- The inspection results will show an exclamation mark for any categories where it found potentially sensitive data, and it will also have a Remove All button for each of these categories. Click Remove All to remove the data.
Removing possibly sensitive data
- Close the dialog box when you’re done.
- From Backstage view, click Save to make the changes permanent.


Challenge!
- Open an existing Word document. If you want, you can use this example.
- Turn on Track Changes.
- Delete some text.
- Add some text.
- Change some of the text formatting.
- Experiment with the Display for Review command.
- Accept all of the changes.
- Use the Document Inspector to check the document.
/en/word2010/working-with-tables/content/
Making Word Review Mode Easier to Set
The Office 365 for IT Pros eBook is built from a set of Word documents (chapter files) that combine into one very large document to form the book. As you might expect, the writing team shares many documents. According to message center notification MC402119 (July 19, Microsoft 365 roadmap item 93400), Microsoft is making a UI change to make it easier for authors to set Word review mode in sharing links and encourage the use of review mode in editing sessions.
Essentially, when you share a Word document (stored in OneDrive for Business or SharePoint Online), you can choose a new sharing permission to ensure that the sharing link allows recipients to open the document in review mode only. Figure 1 shows a sharing link to set review mode in Word desktop. The ability to set review mode in a sharing link has existed for a few years. We’ll get to the details of the change Microsoft is making shortly.

Review Mode Functionality
When a sharing link recipient opens the document, Word enables review mode for the session (Figure 2). Review mode means that the reviewer doesn’t have full control over the content. They can’t change from review mode to enable full editing in either the online or desktop app. Instead, they can insert comments in the documents or make tracked changes. Later, the document owner can decide to accept or reject the comments or changes as they refine the content.

Sharing documents with review mode enabled should be the default go-to option. It allows subject matter experts to review content and make suggestions without allowing them the ability to do things like make and accept tracked changes, turn tracked changes off, or sneak in some unexpected text. Review mode gives control to the author and makes sure that they see every suggested change and update.
Changing the Sharing Link UI
The change made in MC402119 is not to Word, which has supported review mode for a couple of years (in both Online and desktop versions). Instead, it’s a change to the UI of the Sharing Link dialog to replace the Open in Review mode option as seen in Figure 1 with a Can Review option in the link settings permissions dropdown (Figure 3).

The new option is currently only available when using Word Online, SharePoint Online, or OneDrive for Business. Word desktop users can continue to set review mode only for a link. Both methods result in restricting sharing recipients to review mode. Including the option in the permissions menu highlights that review mode is available, which is probably why Microsoft has made the change. The change is currently rolling out to tenants worldwide and should be complete in early August.
Word Review Mode for Desktop and Other Apps
Microsoft hasn’t said if the permissions change in the sharing link will appear in Word desktop anytime soon, nor have they made any comment about bringing review mode to PowerPoint, Excel, or other apps. For now, Word is the only app where review mode is available. That’s not really a hardship unless you need to review a bunch of PowerPoint decks, but at least PowerPoint supports comments to make your views about slides known.
So much change, all the time. It’s a challenge to stay abreast of all the updates Microsoft makes across Office 365. Subscribe to the Office 365 for IT Pros eBook to receive monthly insights into what happens, why it happens, and what new features and capabilities mean for your tenant.
Microsoft Word allows the users to review the documents and provide their review comments inside the document. You can also enable tracking the changes in the document. So it will be useful later at the time of reviewing or finalizing the document.
Below are the steps to track changes in the Word document, Create/Delete the comments and Accept/Reject the changes made in the document.
This article applies to:
- Microsoft Word 2010
Step (1). Open your Word document into the Microsoft Word application.
Step (2). Click on the Review tab on Ribbon control. It will display review-related icons on Ribbon control.
Step (3). Check whether the Track Changes feature is already enabled or not. If it is not enabled, click on the Track Changes icon to enable Track Changes. Remember that before reviewing the document you must enable track changes. So this enables you to track all the changes you make to the document including insertions, deletions, and even formatting changes. This will be useful at the time of finalizing the changes in the document to accept or reject the changes you make to the document.
Step (4). Review the document and make any corrections to the document. The changes will be tracked and Word will create tracking entries in the document. So these tracking entries are useful to accept or reject while re-reviewing or finalizing the document.
Step (5). Insert the review comments by selecting the text or paragraph for which you want to provide your review comments and click on the New Comment icon. It will insert a comment and allow you to provide the text for your comment.

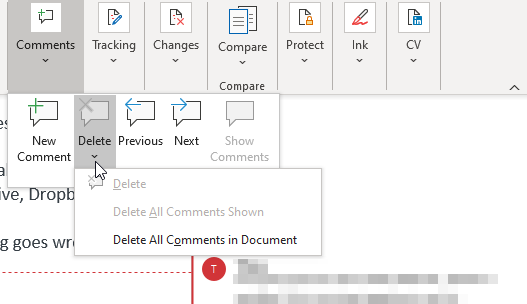
Step (6). Select the comment and update the text you want to provide into it or you can also delete the comment by clicking on the Delete comment icon.

- You can also delete multiple comments at a time. Click on the arrow mark below the Delete icon. It will display a pull-down menu. Select Delete All Comments Shown to delete all displayed comments or click on Delete All Comments in Document to delete all the comments in the document.
Step (7). Usually, documents are on multiple pages and while reviewing the documents it is a bit difficult to navigate between the items which you want to review. You may not be required to review all the documents but may be required to review portions of the document or may be required to review particular reviewers’ changes in the document.
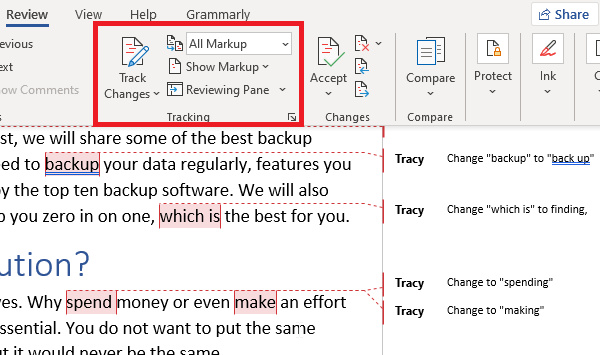
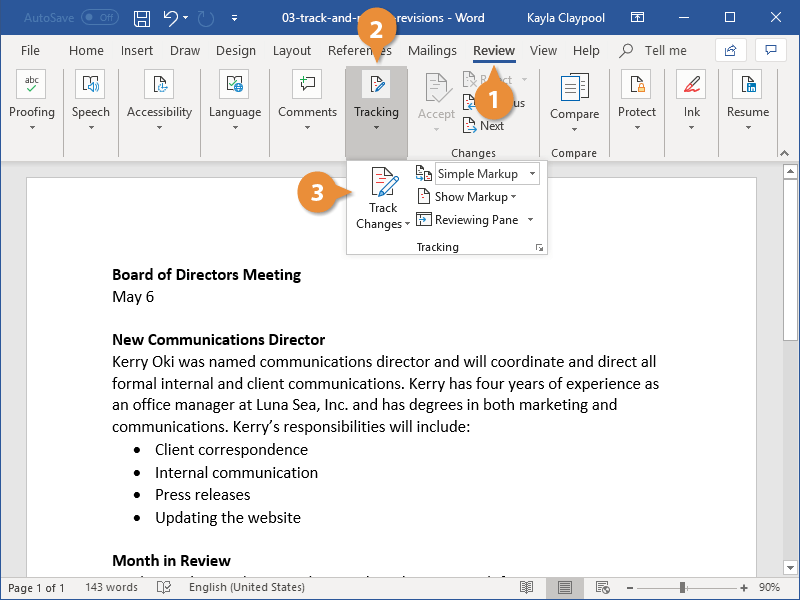
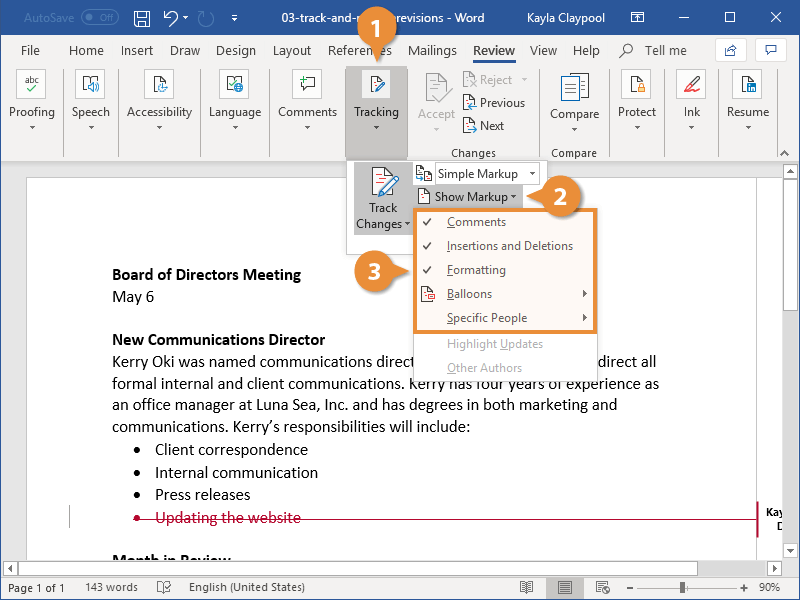
Step (8). Click on the Show Markup button which is under the Tracking group. It will display a pull-down menu. From Show Markup pull-down menu:
![]()
- Select the items you want to review. Once you selected, those markups only showed in the document. For eg: You need to review only the comments made by reviewers, just select Comments and un-select the rest of the items. So in the document, it displays only the markups related to the comments.
- Select Reviewers menu item. It will display a sub-menu with a list of reviewers. Select the reviewers whose changes you want to track and un-select the rest of the reviewers. So in the document, it will show the markups related to the selected reviewers only.
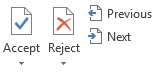
Step (9). While reviewing the document, you may need to Accept or Reject the changes made in the document.
- Click on Accept button which is under the Changes group to accept the selected change.

Microsoft Word – Review – Accept changes - You can also accept multiple changes at a time:
- Click on the arrow symbol under Accept button. It will display a pull-down menu.
- From the pull-down menu, click on Accept All Changes in Document to accept all the changes in the document or click on Accept All Changes Shown to accept only the changes currently shown in the document.
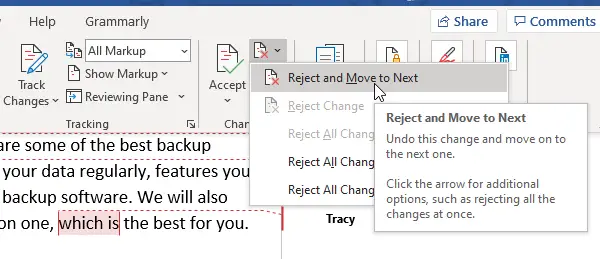
- By clicking on the Reject button you can reject the selected change.

Microsoft Word – Review – Reject changes - You can also reject multiple changes at a time:
- Click on the arrow symbol under the Reject button. It will display a pull-down menu.
- From the pull-down menu, click on Reject All Changes in Document to reject all the changes in the document or click on Reject All Changes Shown to reject only the changes currently shown in the document.
- Navigate between the changes by clicking on the Previous or Next buttons.


Step (10). You can also see the summary of review changes by clicking on Reviewing Pane button which is under the Tracking group in Review ribbon control. This window is useful while reviewing the changes because it will display all the changes in one place in the respective section.

- Once you click on Reviewing Pane button it displays a Reviewing Pane either horizontal or vertical depending on your selection in Reviewing Pane pull-down menu. This menu will display when you click on the arrow button next to Reviewing Pane button from the Tracking group.

Microsoft Word – Reviewing Pane pull-down menu - Even you can Accept/Reject the changes from Reviewing Pane. Select the review item and right-click on it. It will display a pop-up menu. You can select Accept Deletion or Reject Deletion to accept or reject the selected change.

Microsoft Word – Reviewing Pane pop-up menu - On top of the Reviewing Pane, it displays a summary of revisions, types of changes along the count.


Once you are going to finalize the review of the document, you must review all the changes and you should not leave any of the changes left it either accepted or rejected before going to release the document.
Microsoft Word includes features that allow you to track the changes made by multiple users, as well as a review function that allows reviewers to insert their comments within a document.
How do I do a review on pages?
Choose Edit > Track Changes (from the Edit menu at the top of your computer screen). A review toolbar appears at the top of the page.
How do I use the Reviewing Pane in Word?
If you prefer to display the Reviewing Pane, follow these steps:
- Make sure the Review tab of the ribbon is displayed.
- In the Tracking group you see the Reviewing Pane tool. Click the down-arrow at the right of the tool.
- Choose either Reviewing Pane Vertical or Reviewing Pane Horizontal, according to your desires.
How do you correct a reviewed Word document?
Turn tracked changes on or off
- Open the document that you want to edit.
- On the Review tab, under Tracking, select the Track Changes switch to turn on track changes. Tips: Each reviewer’s changes are displayed in a different color. If there are more than eight reviewers, Word will reuses colors.
How can I improve my document?
The 5 easiest ways to improve any document (even if English is your second language)
- First, focus on your reader. The most important thing about a document isn’t your agenda.
- Signpost your document clearly.
- Communicate one idea at a time.
- Write a strong beginning …
- …
How do you edit on pages?
To activate change tracking in Pages, open a document and choose Edit -> Track Changes. You’ll see a new toolbar appear. In Pages, this is a narrow strip below the main toolbar that contains the editing controls you can use. Start making whatever changes you want.
How do I accept all edits in pages?
To accept all changes, choose Accept All Changes from the Action menu. To reject all changes, choose Reject All Changes from the Action menu. To accept multiple changes at once, select the text or table cells containing changes you want to keep, and then click the Accept button in the tracking bar.
What are the features of Microsoft Word Review?
Microsoft Word includes features that allow you to track the changes made by multiple users, as well as a review function that allows reviewers to insert their comments within a document. These features are very useful when you are part of a peer group assigned to work on a project together.
When do I need to review closing documents?
There’s a lot going on, and a lot of paperwork to go over and sign. Make things easier on yourself by reviewing the documents in advance. By law, you must receive a copy of your Closing Disclosure three business days prior to closing.
What do you need to know about Google Docs?
Google Docs brings your documents to life with smart editing and styling tools to help you easily format text and paragraphs. Choose from hundreds of fonts, add links,
Microsoft Office Word offers a Review Feature, which allows one to Track Changes in a document. In this guide, we are sharing how you can use the Review Feature or Track Changes feature in Microsoft Word.
I have broken down the Review Feature feature into multiple sections and explained how each of them is useful:
- Enable Track Changes
- Reviewing and Commenting
- View Changes
- Accepting and Rejecting Changes
- Finalizing the document
- Merging Comments and Changes into One Document
- Compare two documents without Tracking
Merging and comparing documents are optional features, and you need to use it in different scenarios.
1] Enable Track Changes

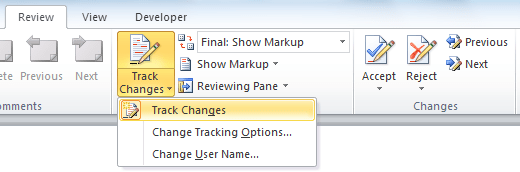
Before you send a document that will go through a review, make sure to enable the Track Changes feature. Once it is turned on, changes made by any of the reviewers will be recorded with their name. Those changes can be approved or rejected by another person. The feature also offers a way to lock Track Changes so that nobody can disable it. Let’s learn both of them.
- Make sure the document is ready for review.
- Open the document, and then go to Review section > click on Track Changes, and then click on Track Changes menu again.
- Once enabled, you should notice that the button has a grey background.
- Next, click on Lock Tracking, and enter a password, confirm and click ok.
- After this, Track Changes will be disabled for you or anybody else unless disabled by using the same password again.
Note: If you lose or forget your password, Microsoft won’t be able to recover it for you. Make sure to note it somewhere regarding the document.
2] Reviewing and Commenting
After this, whatever changes are made to the document will be recorded no matter where the document is shared and edited. Here is how the changes will be recorded:
- Deletions are marked with a strikethrough
- Additions are shown with an underline
- Every author gets its color for the changes
- Select a paragraph or set of words, and click on the comment button to add your comments
A red horizontal line will show up next to the line or paragraph, making it easier to identify. Click on it, and all changes and comments will be visible. Adding to this, you can further customize colors by clicking on the arrow on the right-bottom corner of the Tracking section.
Note: Even if you turn off tracking, the colored underlines and strikethrough will be visible in the document.
3] View Changes
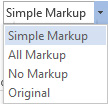
Assuming a document has come back to you after review, and you need to find all the changes and comments. Go to Review > Tracking > Display for Review.
- Go to Review > tracking > change from Simple Markup to All Markup
- If you choose No Markup, then the document will display as the final version only
- If you select Original, you can view the original document without any changes
4] Accepting and Rejecting Changes
If you are ok with a difference, then click on Accept and move next, but if you do not like it, click on Reject and jump to next. It will undo the change to the previous revision. You should see that the difference is marked with an underline. You also have options to
- Accept All Changes in Document
- Reject All Changes in Document.
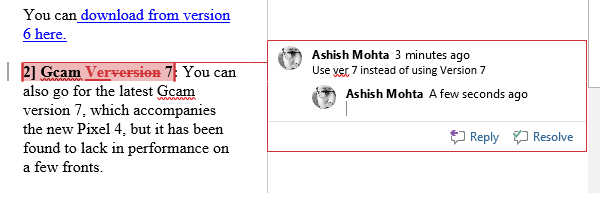
You also have the comments section, which can help you navigate through all the comments. You can reply to comments, mark it as resolved when you have made a change or delete it.
5] Finalizing the document
When you know everything is complete, follow these steps to remove any visible markups and comments.
- Delete all the comments by clicking on Comments > Delete > Delete all comments
- Click on Accept All changes and stop tracking
- You might be asked to enter the password if the tracking was locked.
Done this, the Review feature in Office Word document is complete. However, there are two more features that we have added to the guide. They can be handy in a different scenario.
6] Merge comments & changes from different documents into one Document

If you have given a document to be reviewed by multiple users, then you can combine them into one final document for review.
- Open a blank Microsoft document, and go to Review > Compare > Combine
- Select two documents, original on the left side, and edited on the right.
- Click ok and repeat for all documents until it is over.
Change made by the authors will be visible in different colors. If you want to filter by author, you can click on Show Markup > Specific people and remove authors you don’t need.
When doing so, make sure to use the Protect feature to lock authors and setup editing restrictions. It is useful when a document is available on a shared location.
7] Compare two documents without Tracking
Lastly, if there was no tracking enabled, and changes were made, you can use the Compare tool to find the differences.
- Open a blank document, and then go to Review > click on the Compare button, and then click on the Compare again.
- It will show a similar dialogue box where you can select the original document, revised document, author name, and more.
- You can also choose to compare comments, headers, footers, tables, and more.
That concludes our guide on how you can use the review features to track, comment, compare in Microsoft Word. It’s a powerful tool for companies where the documents are reviewed at different levels.
I hope the guide was easy to understand and follow.
Have you explored the Review tab on Microsoft Office’s ribbon beyond spell check and word count? Well Microsoft Word has more features to offer. In this blog, I will walk you through the Comments, Tracking, and Changes sections. Here there are features that help to review edits that have been made to a document. This is especially useful when a document is being passed back and forth between several people. I think you will find yourself using these features more often than you would expect.
Track Changes
 Let’s begin with the largest button in the Track Changes section of the Review tab. If you click the icon above the words «Track Changes,» Word will begin recording your edits. You will either see your edits in a different color, or a vertical line will appear next to any section you edit. When there are several users, each users will have their own distinct color. To turn off Track Changes, simply click the same button you clicked to enable the feature.
Commenting
 Not only can you record your edits, but you can also add comments pertaining to different sections of your document. To do this, simply highlight a portion of text and click «New Comment». You will see a box pop up where you can enter your thoughts. As before, different users will have their own colored comments. To delete a comment, click on the comment and find «Delete.» Users can also easily reply to comments, facilitating discussion about the changes.
If your Tracking settings are at their default, you should see a little comment icon wherever someone has added a comment. And of course you will see the edits of every user identified by a distinct color. If this is all you need then great! But some of you might want to see all the comments without having to click on them. Or maybe you need to see what the document looks like after or before the edits. This is all possible by changing the amount of markup you want to see.
Changing Viewable Markup
There are four options:
- Simple Markup – this is the default. You will see a little bubble like icon for each comment that has been added. Also, any Track Changes will be shown by a vertical line in the margin section.
- All Markup – as the name says, this option shows all the markup in the document.
- No Markup – removes all the coloring but keeps the edits.
- Original – this will show you what the document looked like before any of the edits were recorded.
Accepting and Rejecting Changes
 The final thing you need to know is how to accept or reject any changes that have been tracked. All you need to do is find the «Changes» section in the Review tab. Here you can accept someone’s suggestions, or you can reject them. The «Previous» and «Next» will help you navigate through the document’s edits. You can also highlight more than one Track Change and then click «Accept.» If you want to accept or reject all Track Changes, you will find the options in the dropdown arrow beneath «Accept» or «Reject.»
Those are the basic reviewing features in Word. I would advise playing around with these tools and even the ones that are not mentioned in this blog. It’s good to be well-versed in Microsoft Word if you use it often. We hope you find the Track Changes capability useful as you edit documents. If you have any questions, feel free to contact us at Igniting Business.
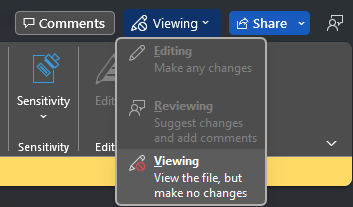
Hi, Office Insiders! My name is Kimberley Chua, and I’m a Product Manager on the Word team. I’m excited to share that we’ve made it even easier to switch between editing, reviewing, and viewing your documents in Word for Windows.
Switch between editing, reviewing, and viewing
Have you ever been concerned about making unintended changes while reviewing a file written by a colleague? Use Viewing mode and be assured that you won’t be able to type on the canvas while reading the document. Switch to Reviewing mode to turn on Track Changes Just Mine and leave behind tracked changes in the document (or leave comments) when you want to offer suggestions.
We’ve updated Word for Windows so you can now easily change between modes with a couple clicks.
How it works
- Open any Word document for which you have edit permissions.
- Click the Editing button in the ribbon (in the top-right corner, next to the Share button), and then click Reviewing or Viewing to switch to a different way of working with your document. (NOTE: The button name will change based on the selected mode.)
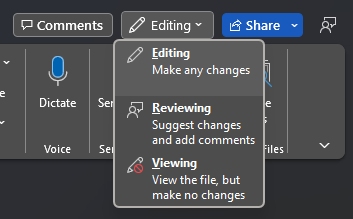
3. To switch back to editing the document, select the button again and click Editing.
Tips and tricks
- Turning on Track Changes automatically sets the document to Reviewing mode.
- If you open a document that you don’t have edit or review permissions for, you can still access the document but you won’t be able to switch to either Editing or Reviewing mode. Any changes to the document will be blocked while you are reading the document in Viewing mode.
Availability
The feature is available to all users in Word for the web, and is rolling out to Beta Channel users running Version 2206 (Build 15314.10000) or later.
Don’t have it yet? It’s probably us, not you.
Features are released over some time to ensure things are working smoothly. We highlight features that you may not have because they’re slowly releasing to larger numbers of Insiders. Sometimes we remove elements to further improve them based on your feedback. Though this is rare, we also reserve the option to pull a feature entirely out of the product, even if you, as an Insider, have had the opportunity to try it.
Feedback
We are actively working on this feature, and your feedback is key to guiding future improvements. Please select Help > Feedback to tell us what you think. Thanks!
Learn what other information you should include in your feedback to ensure it is actionable and reaches the right people. We’re excited to hear from you!
Sign up for the Office Insider newsletter and get the latest information about Insider features in your inbox once a month!
Revising a document with tracked changes in Word works just like revising a printed copy with a red pen. You can easily see the original text, and any additions, deletions, or changes made to the document are clearly marked.
Use Track Changes
In order for changes to be marked up, you need to first track the changes.
- Click the Review tab on the ribbon.
- Expand the Tracking group, if necessary.
- Click the Track Changes button.

Now, any changes made to the document will be tracked and marked up.
Right-click the status bar and select Track Changes to toggle it on or off.
View Markup
Once changes are tracked, you can choose which changes appear marked up.
- Expand the Tracking group, if necessary.
- Click the Show Markup button.
You can toggle whether or not tracking shows Comments, Ink, Insertions and Deletions, and Formatting changes. You can also toggle what appears in the balloons in the right margins, and hide revisions from certain people.
- Select a type of markup to hide or show.
The selected type of markup is toggled on or off.
You can also use the Display for Review menu, directly above the Show Markup button, to control how detailed the markup that appears is.
- Simple Markup: Comments will appear, and text changes will be marked with a line in the margin.
- All Markup: Every change will be described in the margin, including what the change was and who made it.
- No Markup: No changes will be marked up.
- Original: The original document will be shown, without any of the changes that have been made.
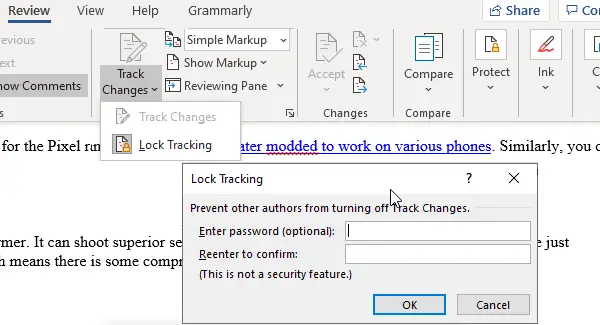
Lock Tracking
To make sure that everyone’s changes get tracked, you can lock tracking so that it can’t be disabled without a password.
- Click the Track Changes button’s list arrow.
- Select Lock Tracking.
A dialog box opens, where you can enter a password that will be required to turn Track Changes off.
- Enter and confirm a password.
- Click OK.
Track Changes is locked and can only be disabled with the password. Also, you cannot accept or reject changes while Track Changes is locked.
To unlock Track Changes, click the Track Changes button list arrow again, select Lock Tracking, enter the password, then click OK.
Review Revisions
Revising documents using Word’s revision features can save a lot of time, because the changes are already entered in your document. If you accept the changes, Word automatically incorporates the changes into your document. If you reject the changes, Word uses your original text.
- Select a change, or use the Next Change and Previous Change buttons to move through changes.
- Click Accept or Reject to accept or reject changes.
Changes that are accepted are incorporated into the document, removing the markup and moving on to the next change. Changes that are rejected are removed and replaced with the original text.
Right-click a revision and select Accept or Reject.
Review all tracked changes at once with the Reviewing Pane. Turn it on by clicking the Reviewing Pane button in the Tracking group.

FREE Quick Reference
Click to Download
Free to distribute with our compliments; we hope you will consider our paid training.

Microsoft Word REVIEWING DOCUMENTS

Introduction to Reviewing Documents Let’s say someone asks you to proofread a report. If you have a hard copy of the report, you might use a red pen to cross out sentences, mark misspellings, or add comments in the margins. However, you could also do all of these things in Word using the Track Changes and Comments features. When you’ve finished reviewing the document, the other person can choose to automatically accept all of your changes, or decide whether to accept or reject each change one by one. In this lesson, you’ll learn how to track changes, add comments, and compare two versions of a document.

Video on Reviewing Documents Use your headphones (if you have some, or share with someone) and watch the following video on Microsoft Word. https: //youtu. be/i. JE 3 CG 4 go. O 4

Reviewing Documents PRACTICE WHAT YOU READ!!!! Open a file you have on your computer with Microsoft Office 2010. (If you have 2014 on your computer, locate 2010). Use the 8. Reviewing Documents Practice. docx from my website. After reading EACH slide, locate what each slide is teaching you, or do what each slides asks of you. Some of this information is you may already know or be familiar with, but we need to make sure that everyone is on the same page. PRACTICE WHAT YOU READ!!!!

Using Track Changes and Comments When you need to collaborate on the content of a document or if you need someone to proofread your document, Word’s Track Changes and Comments features make it easier for you to collaborate with others.

About Track Changes When you turn on the Track Changes option, all changes you make to the document show up as colored markups. If you delete some text, it won’t disappear but instead will have a visible strike through it. If you add text, it will be underlined. This allows another person to see which changes have been made before making the changes permanent. Note: The color of the markups will vary depending on who is reviewing the document, so if there are multiple reviewers you’ll be able to tell at a glance who made each change.

To turn on Track Changes: 1) Click the Review tab. 2) Click the Track Changes command. It should now be highlighted in gold to show that it is active. 3) Any changes you make to the document will be shown as colored markups. 4) Click the Track Changes command again to turn it off.

Adding and deleting comments Sometimes instead of changing something, you may want to make a comment about part of the document. Comments show up in balloons in the right margin and can be read by the original author or by any other reviewers.

To add a comment: 1) Highlight some text, or place the insertion point where you want the comment to appear. 2) From the Review tab, click the New Comment command. 3) Type your comment.

To delete a comment: 1) Select the balloon containing the comment you want to delete. 2) From the Review tab, click the Delete command.

To delete all comments: 1) From the Review tab, click the Delete drop-down arrow. 2) Click Delete All Comments in Document.

Accepting and rejecting changes Tracked changes are really just suggested changes. To become permanent, they have to be accepted. On the other hand, the original author may disagree with some of the tracked changes and choose to reject them.

To accept or reject changes: 1) Select the change you want to accept or reject. 2) From the Review tab, click the Accept or Reject command. 3) If you accepted the change, the markup will disappear, and the text will look normal. Note: For some tracked changes, you can reject the changes by deleting them as if they were normal text. For example, if a reviewer adds a word to a sentence, you can just delete the word.

To accept all changes: 1) From the Review tab, click the Accept drop-down arrow. A drop-down menu will appear. 2) Select Accept All Changes in Document.

To reject all changes: 1) From the Review tab, click the Reject drop-down arrow. A drop-down menu will appear. 2) Select Reject All Changes in Document. Note: Accepting or rejecting all changes does not affect comments, so if you want to delete them you’ll have to do so separately.

Changing how markups appear If there a lot of tracked changes in a document, they can become distracting if you’re trying to read through the document. There a few settings you can use to hide the markups or change how they appear

To hide tracked changes: 1) From the Review tab, click the Display for Review command. The Display for Review command is located to the right of the Track Changes command, and it may not be labeled. It will probably say Final: Show Markup. 2) In the drop-down menu, there are four options: Final: Show Markup: Shows the final version along with the markup Final: Shows the final version and hides all markups Original: Show Markup: Shows the original version along with the markup Original: Shows the original version and hides all markups

To hide tracked changes: 3) Choose Final or Original from the drop-down menu to hide markups. Setting Display for Review to Final is not the same as accepting all changes. You will still need to accept or reject the changes before sending the final version of your document.

To show revisions in balloons: By default, most revisions show up inline, meaning the text itself is marked. You can choose to show the revisions in balloons, which moves many of the revisions (such as deletions) to balloons in the right margin. This can make the document easier to read because there are fewer inline markups. Balloons also give you more detailed information about some markups. 1) From the Review tab, click Show Markup. Balloons. Show Revisions in Balloons.

To show revisions in balloons: 2) Some of the revisions will move to the right margin. Note: To go back to inline markups, you can select either Show All Revisions Inline or Show Only Comments and Formatting in Balloons.

Comparing two documents If you edit a document without tracking changes, it’s still possible to use reviewing features such as Accept and Reject. You can do this by comparing two versions of the document. All you need is the original document and the revised document, and they must have different file names.

To compare two documents: 1) From the Review tab, click the Compare command. A drop-down menu will appear. 2) From the drop-down menu, click Compare. 3) A dialog box will appear. Choose your Original document by clicking the drop-down arrow and selecting the document from the list. If your document is not on the list, click the Browse button to browse for the file

To compare two documents: 4) Choose the Revised document the same way you chose the Original document, then click OK. At this point, Word compares the two documents to determine which changes were made, and it creates a new document that you can save if you want. The changes show up as colored markups, just like the ones that appear when using Track Changes. You can then use the Accept and Reject commands to finalize the document. To the right of the new document, there’s a pane that displays the original and revised documents that you can use for reference (although you can’t edit them). If you don’t see the pane on the right, click Compare. Show Source Documents. Show Both.

Using the reviewing features safely If there any comments or tracked changes in your document, you should remove them before sending it to anyone you’re not collaborating with. Comments and tracked changes can reveal confidential information that could lead to embarrassment or make you or your company appear unprofessional—or worse. Once you’ve removed all of the comments and tracked changes, it’s a good idea to double-check your document using the Document Inspector. The Document Inspector can tell you if there is any hidden data in your document that you may need to remove. It looks for data in many different places—not just comments and tracked changes.

To use the Document Inspector: 1) Save your document. 2) Click the File tab to go to Backstage view. 3) Select Info on the left side of the page.

To use the Document Inspector: 4) Click the Check for Issues command. A drop-down menu will appear. 5) Select Inspect Document.

To use the Document Inspector: 6) Click Inspect.

To use the Document Inspector: 7) The inspection results will show an exclamation mark for any categories where it found potentially sensitive data, and it will also have a Remove All button for each of these categories. Click Remove All to remove the data.  Close the dialog box when you’re done. 9) From Backstage view, click Save to make the changes permanent.

Assignment 1) Open an existing Word document. 2) Turn on Track Changes. 3) Delete some text. 4) Add some text. 5) Change some of the text formatting. 6) Experiment with the Display for Review command. 7) Accept all of the changes. Use the Document Inspector to check the document.

Bibliography http: //www. gcflearnfree. org/word 2010/