
Use comments in your document to make suggestions to other people or to track issues for follow-up.
Insert a comment
-
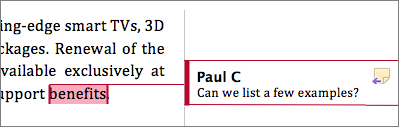
Select the text you want to comment on, or click at the end of the text.
-
On the Review tab, click New Comment.
-
Type your comment. Word shows your comment in a balloon in the document’s margin.

Reply to a comment
-
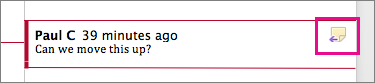
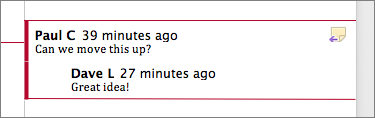
In the comment, click the Reply button.
Or click the comment and on the Review tab, click New Comment.
-
Type your reply.
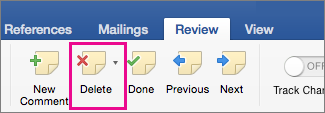
Delete a comment
-
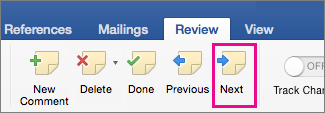
On the Review tab, in the Comments section, click Next to select a comment.
-
On the Review tab, click Delete.
To delete all comments at once, click the arrow by Delete, and then click Delete All Comments in Document.

See also
Track changes in Word for Mac
To preserve the layout of your document, comments are displayed in balloons that appear in the margin. 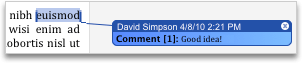
Insert a comment
-
Select the text or item that you want to comment on, or click to insert the cursor near the text that you want to comment on.
-
On the Review tab, under Comments, click New.
-
Type the comment text in the comment balloon.
Tip: You can also turn on Track Changes, which uses revision mark to show additions, deletions, and formatting changes.
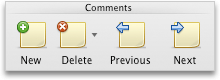
Delete a comment
-
Select the comment that you want to delete.
-
On the Review tab, under Comments, click Delete.
Tip: You can also delete a comment by clicking the close button in the upper-right corner of the comment balloon.
Change the name or initials used in a comment
If you collaborate with multiple reviewers and want to avoid anonymous comments, ask your reviewers to add their names or initials by using this procedure.
-
On the Word menu, click Preferences.
-
Under Personal Settings, click User Information
. -
In the First, Last, and Initials boxes, type the first name, last name, and initials that you want to use in your comments.
 .
.See also
Use tracked changes
Need more help?
To view comments in Word, irrespective of which view is picked, open the Reviewing Pane. Click on the Review tab, and then the Tracking group. Then click on the Reviewing Pane button. You can choose either the vertical or horizontal display to open the Reviewing Pane and view comments in Word 2016.
Contents
- 1 How do I see all comments in a Word document?
- 2 How do I edit comments in a Word document?
- 3 How do I Uncollapse a comment in Word?
- 4 How do I show Comments pane in Word?
- 5 How do I suggest edits in Word?
- 6 How can we add comments to the changes made?
- 7 Does Word have encryption?
- 8 How do you add marginal comments in Word?
- 9 How do you redline a document?
- 10 How do you suggest in Word?
- 11 How do you put your name in comments in Word?
- 12 How can you record the changes made to an original document?
- 13 What is comments in MS Word?
- 14 How do you display comments?
- 15 How do I get rid of markup area?
- 16 How do I encrypt a word?
- 17 How do I send an encrypted Word document?
- 18 How good is word encryption?
- 19 What is redlining in Microsoft Word?
- 20 How do I redline comparison in Word?
How to view all comments in Word in one place
- Open the Word document.
- In the toolbar, click Review.
- Find and click Tracking.
- Tick All Markups.
How to edit a comment in Microsoft Word documents
- Open the Word document.
- Make all comments visible.
- Click in the comment.
- Edit the text for that comment.
- Click out of the comment to save changes.
To hide your comments and tacked changes using the No Markup view, simply:
- Navigate to the Review tab.
- Open the Display Review dropdown menu (click on the downward facing arrow at the end)
- Choose No Markup.
If you prefer to display the Reviewing Pane, follow these steps:
- Make sure the Review tab of the ribbon is displayed.
- In the Tracking group you see the Reviewing Pane tool. Click the down-arrow at the right of the tool.
- Choose either Reviewing Pane Vertical or Reviewing Pane Horizontal, according to your desires.
How do I suggest edits in Word?
How to use Track Changes
- Open Microsoft Word.
- Choose the Review tab at the top of the document.
- Either click the Track Changes button (PC) or toggle the Track Changes switch (Mac).
- Make sure that you change ‘Simple Markup’ to ‘All Markup’ from the drop down bar next to Track Changes.
2. How can we add comments to the changes made?
- Select the text or item that you want to comment on, or click to insert the cursor near the text that you want to comment on.
- On the Review tab, under Comments, click New.
- Type the comment text in the comment balloon.
Does Word have encryption?
Specifically, you may securely encrypt files created in Microsoft Word, Excel and Powerpoint. This encryption is controlled by a single password which only you (or others authorized to read or edit the file) should know.
Insert, delete, or change a comment
- Select the text you want to comment on, or click at the end of the text.
- On the Review tab, click New Comment.
- Type your comment. Word shows your comment in a balloon in the document’s margin.
How do you redline a document?
About This Article
- Click the Review tab.
- Click Track Changes.
- Click Simple Markup.
- Click All Markup.
- Click Show Markup.
- Highlight text and select New Comment.
- Edit the document and click Accept.
How do you suggest in Word?
To turn on “Suggesting” mode in Google Docs, click the “Editing” button near the top-right of the document your are editing and choose “Suggesting.”
In an opened Word document, click File > Options. In the Word Options window, make sure you are locating in the General tab, change the name in the User name box as below screenshot shown, and finally click the OK button. Now you have changed the default user name for comments in Word document.
How can you record the changes made to an original document?
You can use change marks to show added material, deleted material, and and changes to formatting.
To start recording changes:
- Open the Budget Spreadsheet.
- Select Edit > Changes > Record from the menu bar.
- Begin editing the document.
Comments can be added to a document that do not change the document. You can insert a comment inside balloons that will appear in the document margins. They can also be hidden until you want to edit your paper.
Find the “Review” tab, select the “Tracking” group, and click on “Show Markup”. Rest your pointer on Balloons, and then select “Show All Revisions inline” to display comments inline and deletions with strikethroughs. Rest your pointer on a comment inside the document. The comment will appear in a ScreenTip.
How do I get rid of markup area?
The markup area appears whenever a document features comments, but its appearance is controlled by settings on the Review tab. To hide the markup area, click the Review tab. In the Tracking group, click the Display for Review button, shown here.
How do I encrypt a word?
How to encrypt text in a note
- Open a note and highlight the text you wish to encrypt.
- Right-click or control-click the highlighted text and select “Encrypt Selected Text”
- Enter a passphrase into the form.
- Once you have set the passphrase and confirm, the text will be encrypted.
How do I send an encrypted Word document?
Click the File menu, select the Info tab, and then select the Protect Document button. Click Encrypt with Password. Enter your password then click OK. Enter the password again to confirm it and click OK.
How good is word encryption?
How secure is the encryption? The encryption in Microsoft Office 2016 is considered safe (AES with 256-bit key) and takes a very long time to break with today’s machine resources if the password is secure enough. See the Username and Password page for more information on how to make secure passwords.
What is redlining in Microsoft Word?
What is redlining? When you track changes in a Microsoft Word document, a redline will appear under the text that you have made the change too. This is called redlining.
How do I redline comparison in Word?
Open the documents that you want to compare. On the Review tab, in the Compare group, click Compare. Click Compare two versions of a document (legal blackline). Under Original document, browse for the document that you want to use as the original document.
Microsoft Word — это хороший инструмент не только для набора текста и его форматирования, но и крайне удобное средство для последующего изменения, редактирования и правки. Далеко не все используют в работе так называемую «редакторскую» составляющую программы, поэтому в данной статье мы решили рассказать о том наборе инструментов, который можно и нужно использовать для таких целей.
Урок: Форматирование текста в Ворде
Инструменты, о которых пойдет речь ниже, могут пригодиться не только редактору или пишущему автору, но и всем тем пользователям, которые используют Microsoft Word для совместной работы. Последнее подразумевает, что над одним документом, его созданием и изменением, могут трудиться одновременно несколько пользователей, у каждого из которых есть постоянный доступ к файлу.
Урок: Как в Ворде изменить имя автора

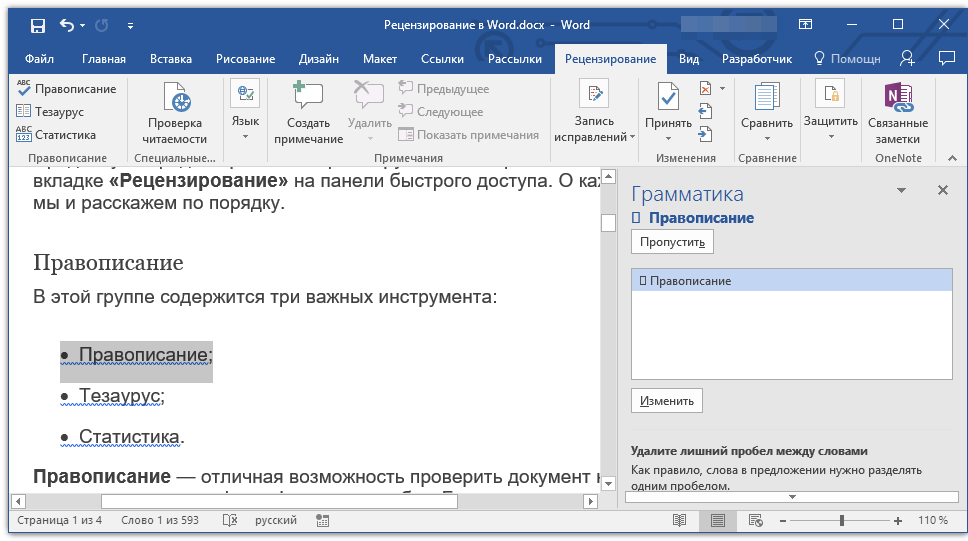
Продвинутый редакторский набор инструментов собран во вкладке «Рецензирование» на панели быстрого доступа. О каждом из них мы и расскажем по порядку.
Правописание
В этой группе содержится три важных инструмента:
- Правописание;
- Тезаурус;
- Статистика.
Правописание — отличная возможность проверить документ на наличие грамматических и орфографических ошибок. Более детально о работе с данным разделом написано в нашей статье.
Урок: Проверка правописания в Word
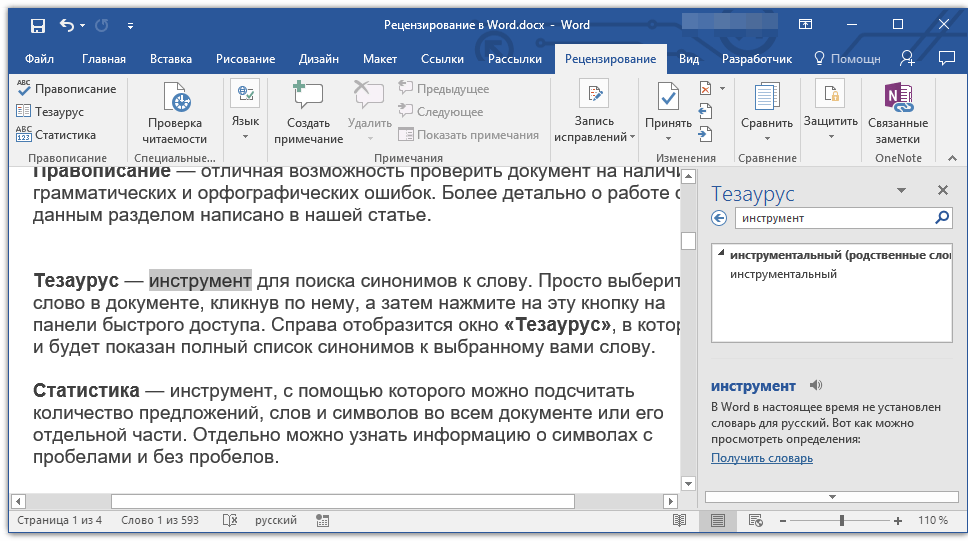
Тезаурус — инструмент для поиска синонимов к слову. Просто выберите слово в документе, кликнув по нему, а затем нажмите на эту кнопку на панели быстрого доступа. Справа отобразится окно «Тезаурус», в котором и будет показан полный список синонимов к выбранному вами слову.
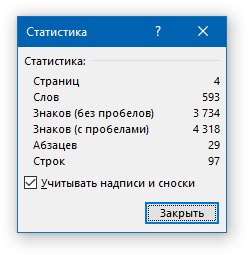
Статистика — инструмент, с помощью которого можно подсчитать количество предложений, слов и символов во всем документе или его отдельной части. Отдельно можно узнать информацию о символах с пробелами и без пробелов.

Урок: Как в Ворде посчитать количество символов
Язык
В этой группе всего два инструмента: «Перевод» и «Язык», название каждого из них говорит само за себя.
Перевод — позволяет перевести весь документ или отдельную его часть. Текст отправляется в облачную службу компании Майкрософт, а затем открывается в уже переведенном виде в отдельном документе.

Язык — языковые настройки программы, от которых, к слову, зависит и проверка правописания. То есть, прежде, чем проверить правописание в документе, необходимо убедиться в наличии соответствующего языкового пакета, а также в том, что именно он включен в данный момент.
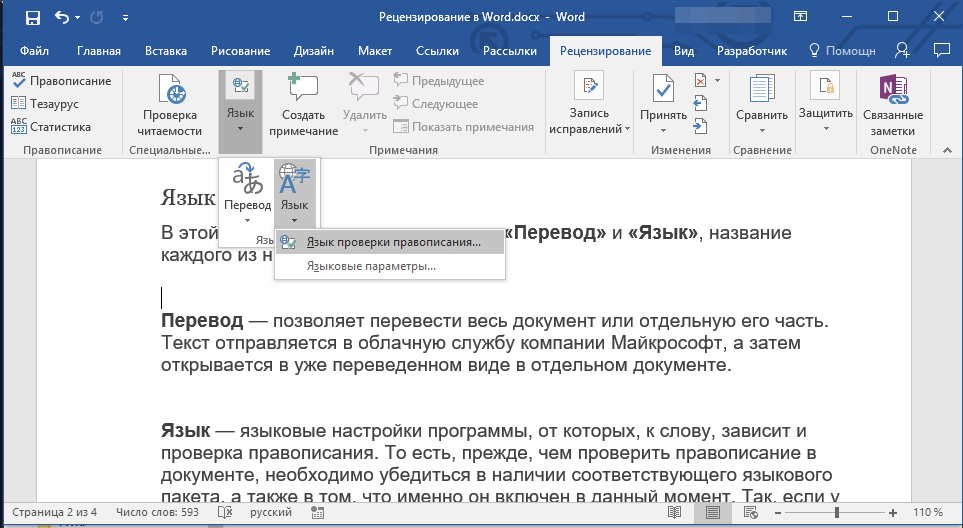
Так, если у вас будет включен русский язык проверки, а текст будет на английском, программа подчеркнет его весь, как текст с ошибками.
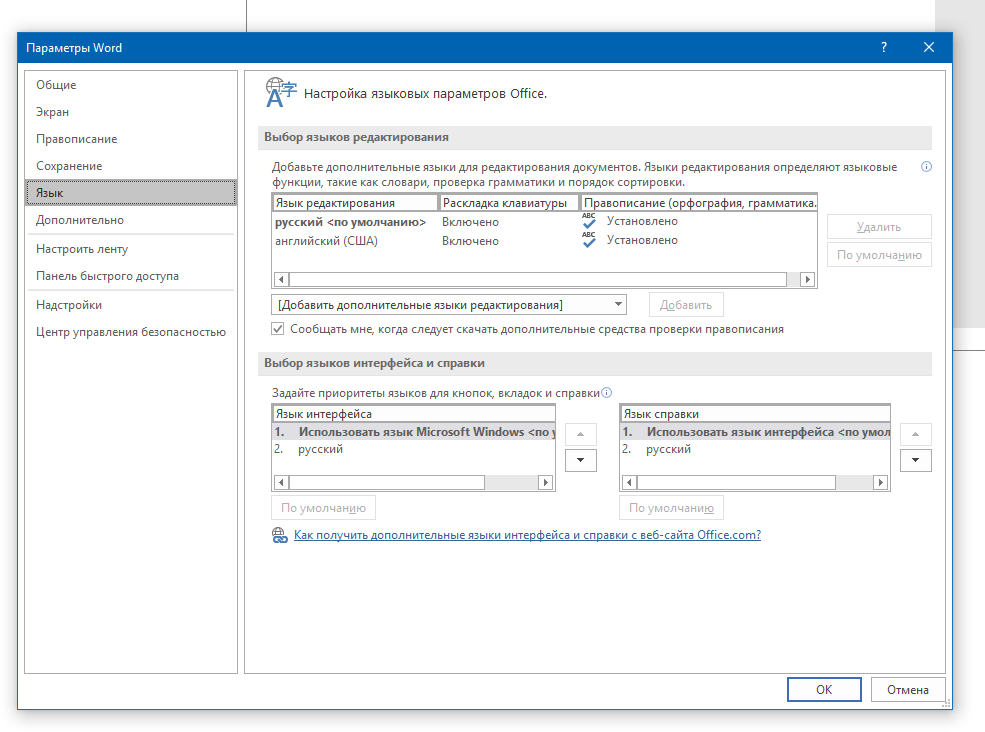
Урок: Как в Word включить проверку правописания
Примечания
Эта группа содержит в себе все те инструменты, которые можно и нужно использовать в редакторской или совместной работе над документами. Это возможность указать автору на допущенные неточности, внести замечания, оставить пожелания, подсказки и т.д., оставив при этом неизменным изначальный текст. Примечания — это своего рода пометки на полях.

Урок: Как в Ворде создать примечания
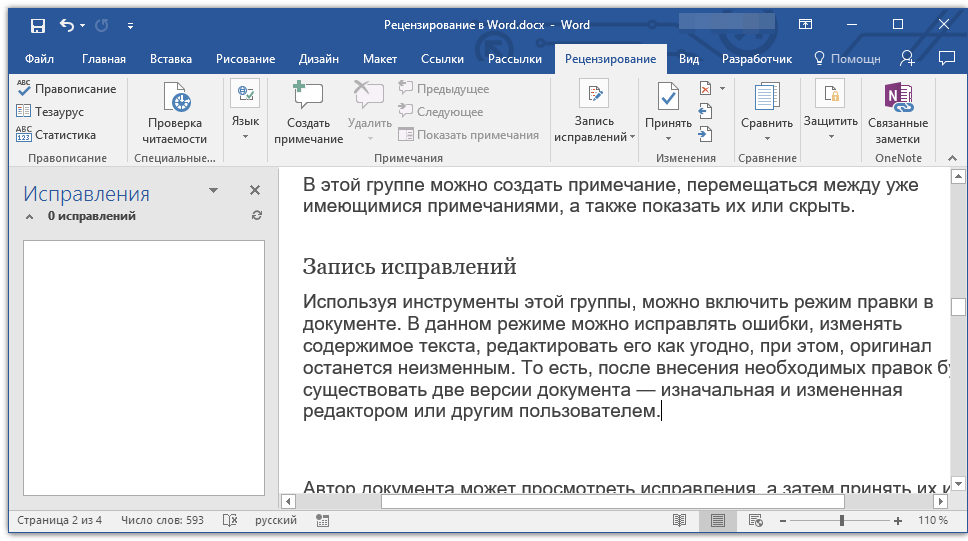
В этой группе можно создать примечание, перемещаться между уже имеющимися примечаниями, а также показать их или скрыть.
Запись исправлений
Используя инструменты этой группы, можно включить режим правки в документе. В данном режиме можно исправлять ошибки, изменять содержимое текста, редактировать его как угодно, при этом, оригинал останется неизменным. То есть, после внесения необходимых правок будет существовать две версии документа — изначальная и измененная редактором или другим пользователем.
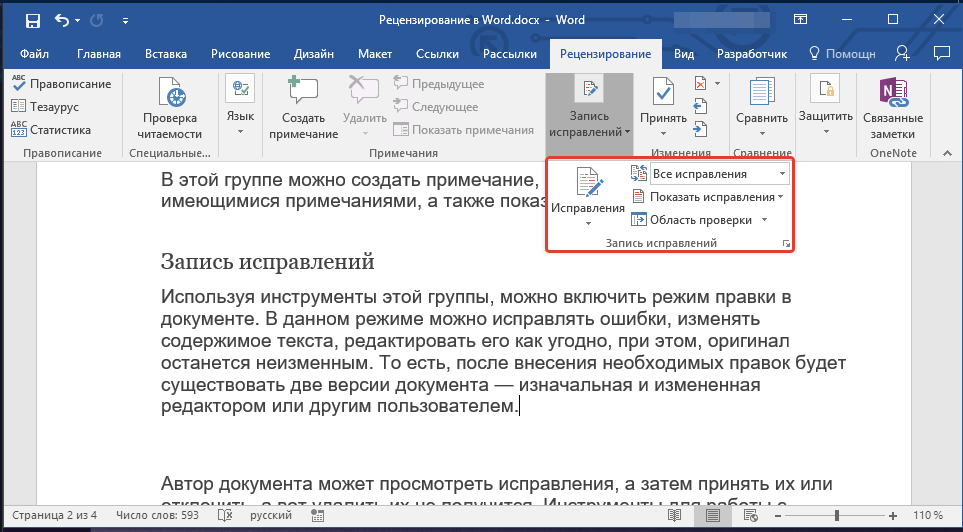
Урок: Как в Word включить режим правки
Автор документа может просмотреть исправления, а затем принять их или отклонить, а вот удалить их не получится. Инструменты для работы с исправлениями находятся в соседней группе «Изменения».
Урок: Как в Ворде убрать исправления
Сравнение
Инструменты этой группы позволяют сравнить два схожих по содержанию документа и показать так называемую разницу между ними в третьем документе. Предварительно необходимо указать исходный и изменяемый документ.
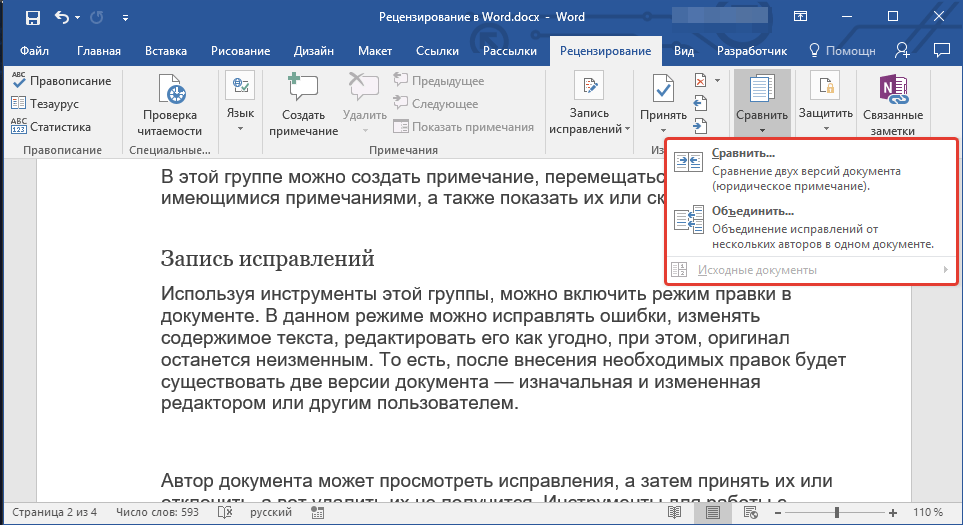
Урок: Как в Word сравнить два документа
Кроме того, в группе «Сравнение» можно объединить исправления, внесенные двумя разными авторами.
Защитить
Если вы хотите запретить редактирование документа, с которым работаете, выберите в группе «Защитить» пункт «Ограничить редактирование» и укажите необходимые параметры ограничения в открывшемся окне.

Кроме того, вы можете защитить файл паролем, после чего открыть его сможет только тот пользователь, у которого есть пароль, установленный вами.
На этом все, мы рассмотрели все инструменты рецензирования, содержащиеся в Microsoft Word. Надеемся, эта статья будет полезной для вас и заметно упростит работу с документами и их редактирование.
Show or Hide Comments in Microsoft Word Documents
by Avantix Learning Team | Updated January 10, 2021
Applies to: Microsoft® Word® 2010, 2013, 2016, 2019 or 365 (Windows)
You can show and hide comments using the Review tab in the Ribbon in Microsoft Word. If you add comments in a Word document, they will appear in a markup area on the right side of pages by default. If you want to show or hide comments, you’ll need to control the display of markup. Keep in mind that comments that are hidden could be displayed by a colleague or client.
The markup area appears in Print Layout View (the default view in Word) whenever a document includes comments and its appearance can be controlled using settings on the Review tab in the Ribbon. The default markup is set to Simple Markup with comments displayed. If the markup area is not appearing on the right, click Show Comments in the Comments group. Tracked changes also appear in the markup area.
In this article, we’re assuming that the default markup options are being used (although you can change the display of markup using Track Changes Options).
Recommended article: How to Remove Comments in Word (3+ Ways to Delete Comments)
Do you want to learn more about Microsoft Word? Check out our virtual classroom or live classroom Word courses >
Hide comments using Display for Review
To hide comments in the markup area using Display for Review:
- Click the Review tab in the Ribbon.
- In the Tracking group, click Display for Review. A drop-down menu appears.
- Select No Markup or Original to hide the markup area, including comments.
The following drop-down menu appears when you click Display for Review:

When you click Display for Review, you have the following options:
- Simple Markup which displays the markup area with comments and revisions. If you select Simple Markup and then click Show Comments in the Comments group, the markup area appears or disappears (if there are no tracked changes). If no markup area appears on the right, comments appear as speech bubbles that you can click to display the comment.
- All Markup which displays the markup area with all comments or revisions as well as lines to their locations in the text.
- No Markup which hides the markup area so that comments and revisions are hidden.
- Original which hides the markup area as well as any revisions made to the document. In regard to comments, this option is the same as No Markup.
In the following example, Simple Markup is selected as well as Show Comments in the Comments group (Print Layout View in Word 365):

In the next example, Simple Markup is selected and Show Comments is not selected in the Comments group (Print Layout View in Word 365):

Comments appear in different ways depending on the selected view. Typically, you would change views using the View tab in the Ribbon. If you select Draft View, comments appear as the initials of the reviewer with square brackets and are highlighted with a background color. You can position the mouse pointer on the text to view the comment in a pop-up bubble. In Read Mode View, comments appear as speech bubbles to the right of the text. Simply click a bubble to view a comment.
Hide comments using Show Markup
To hide comments using Show Markup:
- Click the Review tab in the Ribbon.
- In the Tracking group, click Show Markup. A drop-down menu appears.
- Select Comments to deselect comments.
The Show Markup drop-down menu includes the following options:

Show comments in the markup area
To show comments in the markup area:
- Click the Review tab in the Ribbon.
- In the Tracking group, click Display for Review. A drop-down menu appears.
- Select Simple Markup or All Markup to show the markup area, including comments.
- Click Show Markup. A drop-down menu appears.
- Ensure Comments is selected.
- If you selected Simple Markup, in the Comments group, select Show Comments in the Comments group.
View all comments using the Reviewing Pane
To view all comments regardless of view:
- Click the Review tab in the Ribbon.
- In the Tracking group, click Reviewing Pane. A drop-down menu appears.
- Select either the horizontal or vertical display. The Reviewing Pane appears and will displays comments and revisions.
You can click the Reviewing Pane button again in the Ribbon to hide the Reviewing Pane.
Hiding markup is not the same as accepting changes or deleting comments. You should accept or reject changes and delete comments in your Word document before you send out the final version.
Subscribe to get more articles like this one
Did you find this article helpful? If you would like to receive new articles, JOIN our email list.
More resources
How to Find and Replace in Word (and Use Wildcards)
How to Superscipt or Subscript in Word (with Shortcuts)
How to Insert or Type the Sigma Symbol in Word (Σ or σ)
How to Insert Excel Data into a Word File (Linked or Unlinked)
How to Insert a Check Mark or Tick Mark in Word (5 Ways with Shortcuts)
Related courses
Microsoft Word: Intermediate / Advanced
Microsoft Excel: Intermediate / Advanced
Microsoft PowerPoint: Intermediate / Advanced
Microsoft Word: Long Documents Master Class
Microsoft Word: Styles, Templates and Tables of Contents
Microsoft Word: Designing Dynamic Word Documents Using Fields
VIEW MORE COURSES >
Our instructor-led courses are delivered in virtual classroom format or at our downtown Toronto location at 18 King Street East, Suite 1400, Toronto, Ontario, Canada (some in-person classroom courses may also be delivered at an alternate downtown Toronto location). Contact us at info@avantixlearning.ca if you’d like to arrange custom instructor-led virtual classroom or onsite training on a date that’s convenient for you.
Copyright 2023 Avantix® Learning
Microsoft, the Microsoft logo, Microsoft Office and related Microsoft applications and logos are registered trademarks of Microsoft Corporation in Canada, US and other countries. All other trademarks are the property of the registered owners.
Avantix Learning |18 King Street East, Suite 1400, Toronto, Ontario, Canada M5C 1C4 | Contact us at info@avantixlearning.ca