
Learn about the Review Tab in Microsoft Office Word 2007
| New Look | Home Tab | Insert Tab | Page Layout Tab | References Tab |
| Mailings Tab | Review Tab | View Tab | Acrobat Tab | Misc. Items |
In Microsoft Word 2007, the Review Tab is useful in a lot of ways. You can have the Spelling and Grammar feature, the Research option, Thesaurus and Translation functionality to help you improve your documents. Here is what the Review Tab looks like.

Under the Proofing group, you can use find the Spelling and Grammar feature. You can easily check the spellings, punctuation errors and grammar using this tool.
Here is the screen shot.

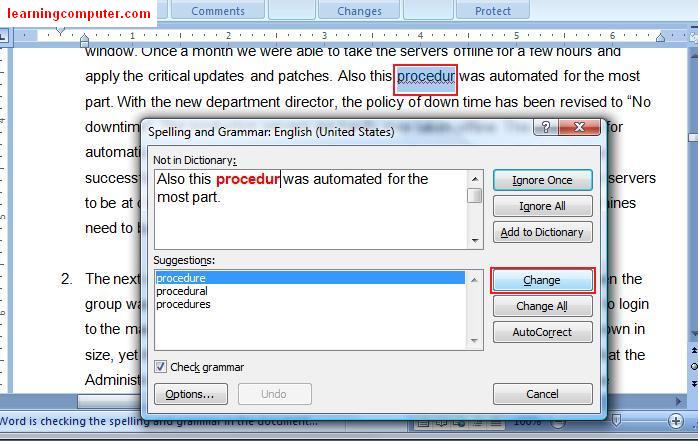
The first thing we are going to try is to check the spelling and grammar of a document. Go ahead and select the insertion point and click on spelling and grammar on the Proofing group on the Review Tab. This will start the Spelling and Grammar dialog box as shown below. Notice that it found an incorrectly spelled word, procedur. You can either click on Change if you would like to accept the suggestion made by Microsoft Word. Otherwise you can ignore it if you think the word is OK as it is.
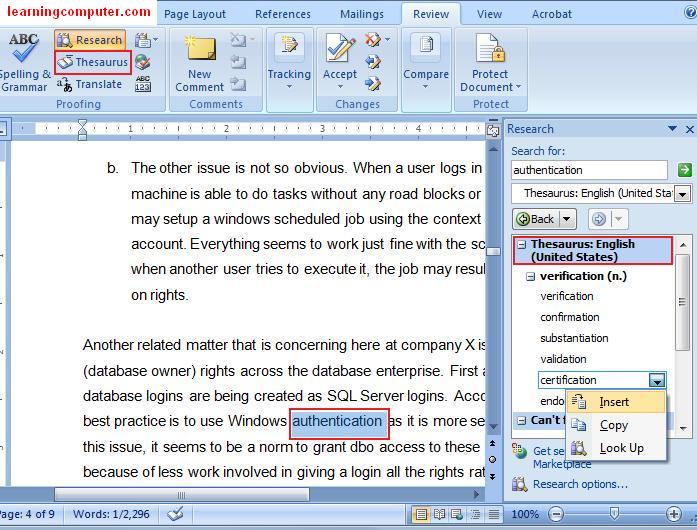
Next we are going to try is the Research command on the word authentication as shown in the figure below. Select the word authentication and click on Research icon, this will launch the Dictionary feature as shown in the right side of the screen shot. It was able to find the word with the correct pronunciation and also the meaning for you to review. Very cool indeed!

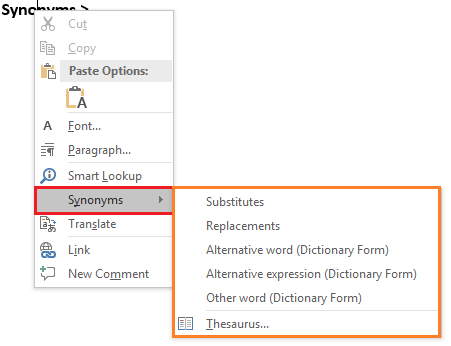
Another related feature is the Thesaurus in Microsoft Word 2007. This amazing feature helps you find synonyms and also antonyms of any specific word. In our example it found a list of synonyms for authentication as shown on the right side in the figure below. I’m going to select certification and select insert. This helps if you are like me and use the same words over and over again.
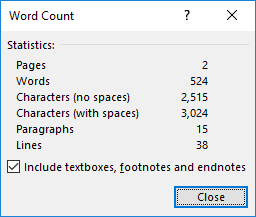
In the next figure I have highlighted the Word Count feature. This lets you find the number of characters, paragraphs and lines in the document. This is a pretty useful feature if you are working on a term research paper where you have to stay within a certain number of words or pages.

If you are collaborating on a document with other team members or on a project report, the Comments feature in the Review tab in Microsoft Word 2007 can be a true lifesaver. In the following screen shot, I have added a comment that is shown in red. Notice that it used my initials and a number right before the actual comment. As the other team members and comments, the application will use different colors. This helps to keep all the comments organized from different authors.

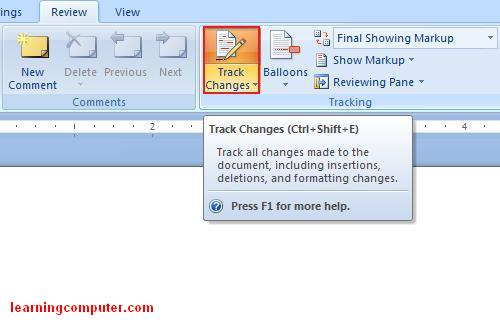
Moving onto the next group section which is the Track changes group. We can easily manage additions, deletion, any comments and formatting changes in an efficient manner using this feature. You can find the Track Changes command under Tracking group in the Review Tab in Microsoft Word 2007.
Let us look at an example of this feature using a Course Syllabus sample. After the initial review, the changes are highlighted as shown below. The additions are in red and underlined, the deletions are in red and using a strike through.
Furthermore notice that there is a vertical bar next to all the changes.

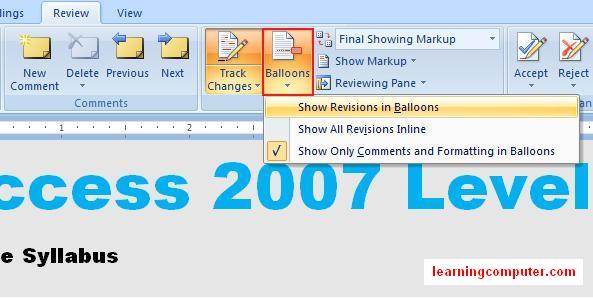
If you prefer seeing all the changes in Balloons, you can do this by selecting Show only Comments and Formatting in Balloons command. This will clean the document up and move the comments and changes to the right side in the markup area.
The next two screen shots display the functionality of this feature.

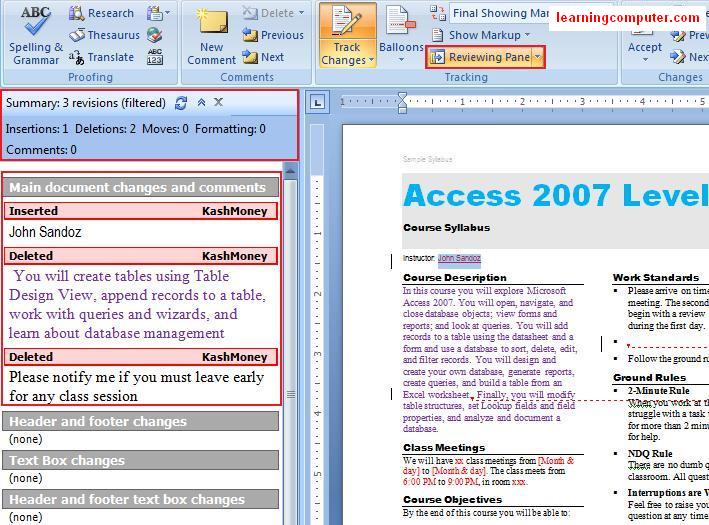
If you would like to see all the changes in one place, you can use the Reviewing Pane command. In the image below, I have selected the Reviewing pane under the Tracking Group. Notice all the revisions are summarized on the left side of the document and broken down into insertions, deletions, etc. by the author and into different sections, very cool!
After all the changes have been reviewed and checked, we are ready to accept all the revisions. We can do just that by selecting Accept all Changes in Document under the Accept command in the Changes group under the Review tab in Microsoft Word 2007. This will go ahead and update the document then finalize all the revisions and changes.

As you can see the Review tab in Microsoft Word 2007 has a lot to offer us. OK at times, it is necessary to review different versions off the same document especially if there are several people working on it at the same time. In Microsoft Word 2007, this is just a breeze. You can also use the Compare feature to combine multiple versions of the same document.

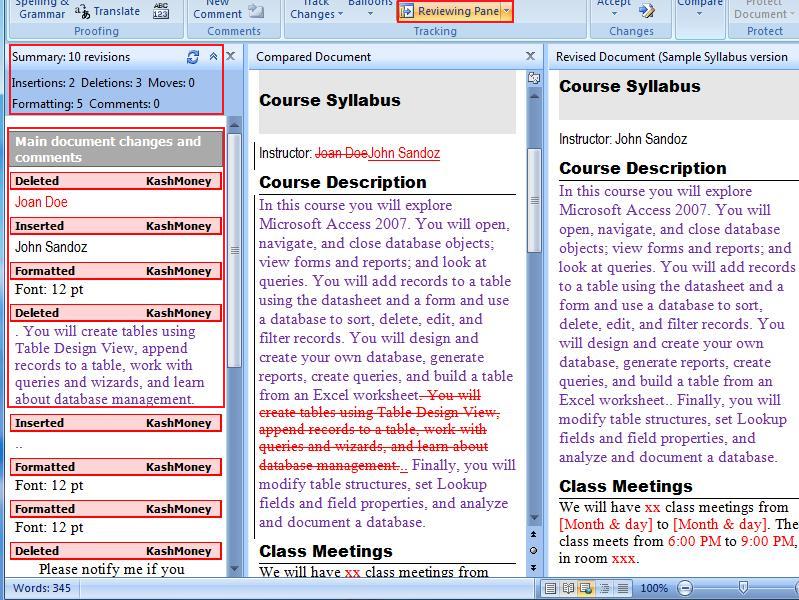
Let us go ahead and see how this can be achieved. I’m going to compare two Course Syllabi that I have been working on for a class that I am teaching. I select the Compare command which launches a dialog box as shown below. I select the original document in the left side and the revised document on the right side and hit OK.

This will launch the wizard that will compare the two versions. Not only will it show all the differences between the two versions, but also display a summary on the left side as shown below and the screen shot.
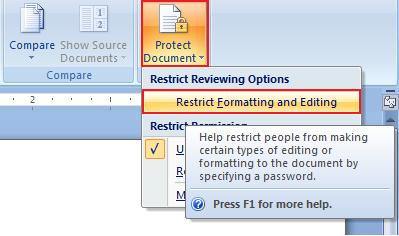
The last thing I would like to show you is how to protect a document from editing. This option will restrict others from making certain types of editing or formatting changes to the document. You can select the Protect Document option under the Protect group.
Here is the command shown on the ribbon in Microsoft Word 2007.
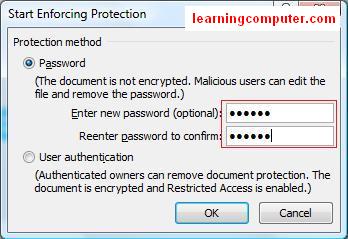
This will launch the Restrict Formatting and Editing dialog box as shown below. I will select the editing restrictions option that is number two and then click on us start forcing protection.
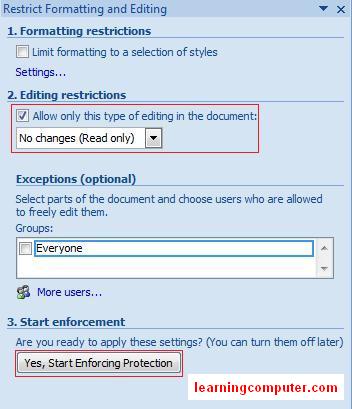
In the start enforcing production, I will select password, enter my password and click OK. There you go, now your document is protected by this password.
Next time someone tries to open this document and make changes, they will be prompted by this friendly on perfect document dialog box, pretty cool.
A screen shot is as follows.

This concludes the lesson on Review Tab in Microsoft Word 2007.
If you are unable to find the information you are looking for, please visit Microsoft’s Word 2007 training courses and tutorials
Have you heard the word? Up to speed with Word 2007
Web Design Dallas
Connect with US!
![]()
If we need to type a document, there’s a very strong chance we’ll be using Microsoft Word. Every article, review, and tutorial that I write for Qwerty Articles is written in Microsoft Word. This word processor is the world’s go-to software for document creation.
Microsoft has expanded its popular Office productivity suite into a modern-day subscription known as Office 365 or O365. With control of the market and providing access to everyone through a subscription, it has become a must-have for most writers.
We all use Microsoft Word, whether it be for personal use, work use, or school use. You can create anything your heart desires in this word processor, and it does its best at making it look professional and accurate.
With the latest version of Office 2016, Word received some serious features like automatically updating content for graphics if the information was gathered from an online source, but did you know that, introduced back in Word 2013, Word comes with an abundance of powerful editing tools?
When we create a document, we tend to miss our own mistakes. We have already typed it, and therefore we know what it should say. We can misspell words or miss grammar mistakes because our minds just assume it’s all correct. This is known as a typoglycemia.
If you are typing a document, your mind can think faster than your fingers can type and your eyes can miss even the most obvious mistakes. That is why it’s always best to have someone peer review your content before printing or distributing it. That’s why I get my friend, John Wafford (JohnthePilot from www.techsupportforum.com), to check my articles before I publish them.
Peer reviewing and editing allow someone who has never read the content to come in and make changes. Something may not make sense to them, or they may notice a run-on sentence. They can then bring this to the attention of the document creator. Even if the peer reviewer does not have a background in editing, their comments will still help to improve the document.
The objective of editing is not just to catch mistakes, but to allow you to learn from your mistakes. If you don’t know what the reviewer/editor changed, you will continue to make that same mistake over and over again. They need to be able to inform you of what they changed. This is where Word’s reviewing tools come in to play.
Word offers the ability to show and track all changes made by multiple contributors to the document. There’s the ability to communicate within the document itself and ask questions through the built-in commenting system.

Whether you are creating a résumé, drafting a business proposal, or writing a school paper have someone use the Review Tab in Word to go over it.
Join me as we dive into each button in the Word 2016 Review Ribbon tab. We will be going through each section and explaining its use. Lastly, follow along to learn about simple, yet easy to miss typing mistakes.

The Basics
The first section in the Review tab is the proofing section. By default, Word automatically applies these tools for you. Proofing consists of spelling and grammar, thesaurus, and word count.
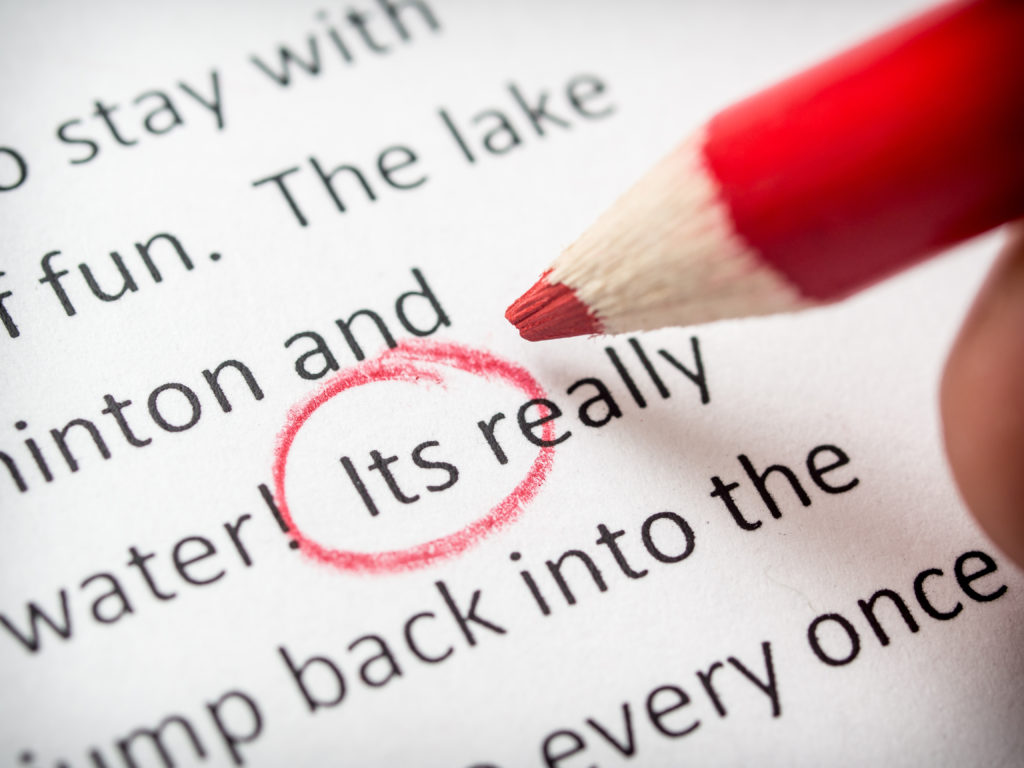
We’ve all seen when Word will inform us of a misspelt word or when we use the wrong form of ‘its’ or ‘it’s’. Misspelt words will receive a red squiggly line where you can right-click the word for Word to offer suggestions on what it thought you meant to type.
The way this works is Word has a local dictionary database installed on your computer. When a word is completed with a trailing space, it checks the typed string against this database. If the word matches a string in the database, it’s often correct. If not, it will take the typed letters and attempt to find similar words with similar meanings.
If Word tells you that your last name is incorrect, you can add it to Word’s dictionary. You can do this for any word that Word says is incorrect. When a word is underlined by the red squiggly line, right-click the word and select Add to Dictionary. Just be warned that Word will always accept this as a valid word for all current and future documents.
When you find yourself relying on Word’s local dictionary to make spelling adjustments for you, you need to consider taking the time to fix the mistake yourself. It’s easy to right-click the red underlined word and select the correct option, but you won’t fix your mistake for the next time. Instead, look at how the incorrect word is meant to be spelt. Then, instead of autocorrecting the word, retype the word. Speak the letters aloud as you type them and over time you will efficiently and easily avoid misspelling those words.
Now, just because Word isn’t putting a red squiggly line under the word, doesn’t mean it’s correct. Often words may sound the same when you say them aloud, but they could have two totally different meanings.
Something to take note of with Word’s spell checker is that it does not spellcheck uppercase words by default. To adjust this, you can go to the File, Options menu in Word. Select Proofing and untick the box that is labelled Ignore words in UPPERCASE.
Next, punctuation can make or break a sentence in your writing. It’s important to use the correct usage for commas, periods, explanation marks, semicolons, and the many other punctuation marks that are available to us. Introductory clauses should be followed by a comma, to have a follow up of the beginning sentence.
Recently, the gamers chatting system, Discord, introduced a spellchecker into their application. Amusingly to inform you of their new feature, they published the following changelog:
![]()
If someone read that sentence to you, it would sound correct because your brain assumes the correct spellings have been used. When you read through it yourself, your brain can pick up on the misspellings.
Word’s proofing is above average, but it’s nowhere near perfect. In the above sentence, it only caught two of five mistakes, disregarding the fact that the sentence doesn’t flow properly.
Underlined in blue, Word understands that people may mistake ‘we’ve’ for ‘weave’ and ‘know’ with ‘no and offers suggestions to correct these. Blue underlined words are suggestions offered by Word, whereas red unlined words are errors.
The words ‘two’ and ‘sew’ go unnoticed. If you weren’t to reread your own content or you brush over this sentence, people will notice your mistake after you’ve published it.
Microsoft Word does not have machine learning. Its static information is all it has to go on and so, common mistakes for misusing ‘to’, ‘too’, and ‘two’, go unnoticed. Even websites that are meant to check for grammar completely miss this sort of thing.
Next in the proofing section is Word’s thesaurus. This feature is one of my favorite things about Word’s proofing tools.
At times, it may not provide the best solution, but it does help prevent repetition of the same word. If you find yourself using the same word over and over again in a document, you may want to find a slightly different word to help break up the sentence.
You can access the thesaurus in the Review tab at the top of Word, but it can be accessed quickly by right-clicking on a word and selecting Synonyms >.
The last and final section in the proofing category is about word count. Most personal and work-related documents won’t have much call for this section, but it’s useful for school papers or other items which have a word minimum or maximum.
In the bottom left of Word, you will notice how many words are currently shown in the document. In fact, you can also find the number of pages and whether or not there are spelling and grammar issues down there too.
Did you know that you can click on the word counter or access it in the Review tab? Clicking on the word counter will reveal additional facts about your document. These include number of pages, number of words, number of characters (no spaces), number of characters (with spaces), number of paragraphs, and number of lines contained within the document.
If you are a student trying to figure out how to get your latest homework assignment to be a certain page count, don’t try to use the ‘period increase’ trick. Doing so only gives the falsehood that the document looks longer. If the teacher opens the document and checks the word count, they’ll know something isn’t right.
One fun fact that is now shown here is the amount of time you have spent using a document. In the File menu found at the top left of Word, you can see your total time editing a document in minutes. This document took a little over 500 minutes or 8.3 hours to create.

Assisting those who need assistance
Often accessibility is overlooked in Word. Many of us type our documents for school or personal use, and when typing for work it’s often for an internal document.
In the rare case you are sending a Word document to the masses, you may want to consider adding accessibility to the document. Accessibility is providing additional information to those with vision or comprehension issues.
Word can scan for accessibility faults within the document to better assist those with vision and hearing problems. These faults include: missing alternative text for pictures, missing headers, or large open sections of nothingness.
Adding alternative text or alt text to a picture can help inform a reader what the image is trying to show. This is useful in two ways. With alt text, you can briefly explain what the image is attempting to say or add additional meaning to the image. If a picture is worth 1,000 words, help narrow it down to one meaning.
Furthermore, alt text can be displayed if an image is not yet loading. This is common for web pages where alt text will be shown in place of a missing picture. This way, the reader understands what should have been there.

This document contains purple headers. We use purple headers which help to organize the content into sections. By doing this, a reader will understand when the document has moved on to the next section or that what they are reading is different from the past few paragraphs. Think of headers as chapters in a book.
Often, headers should be emboldened or highlighted in a different color/font. Word includes header tags under the Home tab and then within the Styles menu. Adding these to a work document is simple but adds a lot of professionalism.
The Art of Language
Much like accessibility, changing your language settings in Word is going to be one of those buttons that you rarely use, but as in-depth as this tutorial is, it must be mentioned.
Let’s say that you work for a global company and need to send a message to all company employees. Word can translate a document to a bunch of different languages on the fly. You can opt to choose partial text or an entire document.
If you are bilingual, you can also adjust your language proofing settings. Let’s say you are trying to learn Italian and want to practice writing. You can change your Word proofing language to Italian and watch as it does as we mentioned before and puts red and blue squiggly lines under incorrect words.
Potrebbe non essere perfetta, quella di un madrelingua, ma hai metà otterrà almeno là!

Express your thoughts
The next two sections are going to be the meat and potatoes of this tutorial. These two sections are the part that a reviewer/editor should know well and understand how it all works.
When editing a document, you want the content creator to understand why you are making a change, or if you have a ‘to-do’ document, you can comment on actions that you’ve taken to complete that certain task.
Under the commenting section, you can add comments to a document and write clear and concise information about why a change was made. Alternatively, if a sentence does not make sense, have the content creator adjust it for you; it will help them correct their own mistakes.
An editor should be reading through the document with an unbiased view and reading it as if they have no understanding of the content. This will prompt questions and allow the content creator to make adjustments before final publication. For example, a comment is the perfect way of asking the content creator to explain what an abbreviation means, or when they feel that one word works better than another.
In my recent review on the AzulleTech Byte3 Mini PC, I had used the term ‘somebody’ as it is common to do when speaking aloud. However, it was pointed out that ‘someone’ may be better for writing documents.

The distinction between ‘everybody’ and ‘everyone’ is subtle. While dictionaries often show them as interchangeable ‘everybody’ implies ‘all of you’ whereas ‘everyone’ implies ‘each of you’.
The content creator and other peer reviewers/editors can reply to comments in the comment field in the right-hand pane. This offers extensive communication without the need to mark up the document and clearly identifies who is talking.
If you do not see comments in your Word document, access the Review tab in the ribbon. Under the Comments section, select the Show Comments button to activate it. When the button is grayed out, any available comments will show in their own panel.
Lastly, comments can be marked as ‘Resolved’. Going back to the to-do list, marking a comment as resolved could indicate that the commented task has been completed.
Editing the Document
Up until now, each section in this tutorial has been paired with a section in the Review tab within Word 2016. Here, we will be going into how to edit and markup a document for the content creator to then accept or reject the changes. This will go into Tracking and Changes.
As a peer reviewer or an editor, it’s important to markup a document with spelling and grammar mistakes made by the content creator. The content creator will almost certainly miss something, and there will always be something to correct. They wrote it, they will think it’s written correctly, and they will make mistakes because of that.
Before you begin making any changes to a Word document, select the Track Changes button in the Review Tab. Alternatively, as a content creator, you can lock Track Changes and force it to be on for all reviewers/editors rather than giving them the option to turn it on and off.
When Track Changes is on, each change you, as a peer reviewer/editor, make in the document will be marked in the document. Pressing backspace on a word, space, or paragraph will add a strikethrough through that word, space or paragraph. Adding or editing words will automatically put them in colored text.
Let’s return to the Discord change log statement and make edits to it using Track Changes.
![]()
With Track Changes turned on as we begin to correct the above statement, we should see the following:

Do not make this common mistake when using Track Changes: When deleting a word, do not add a space to your change, otherwise, when using the “accept changes” feature in Word, you would be accidentally adding spaces to the content creators document, thereby introducing grammatical mistakes.
In the above edit, notice how all of the red words are words that I’ve added, and they butt up against the old word. If I had written them with a trailing space after each word, it would be incorrect.
Also, notice how the words that I have deleted receive a strikethrough through them. This indicates deletion, and they will be removed.
When editing a document using Track Changes, ensure that you have Simple Markup turned on in the Tracking menu found in the Review tab. For the document owner, A red bar on the side of the document will appear next to edited content indicating something was changed.

Simple Markup is what is shown in the image above, and it’s best used by editors as it will avoid the common mistake of adding a space to inserted words. They can also see it in its correct simple form. When the content creator receives their document, All Markup lets them see the changes that have been made.
Before diving into the Track Changes section, understand, as a content creator, why a change was made. Prevent mistakes in the future by rereading your content aloud or take notes of why the change was made.
Once you’ve looked at all of the changes to the documents, as a content creator, you can accept them one-by-one or take the easy route and accept them all at once. Likewise, you can choose to reject some or all changes.
With All Markup turned on, use the Accept or Reject buttons to go one by one or use their respective drop-down menus to select all accepts/rejects.
Moreover, you can review changes by using the Previous and Next buttons within this same section.
Comparing Documents
Uh oh! Did someone save your document with a different name and make changes in it without using Track Changes? Did somebody write a similar document that they need to compare to yours?
With the Compare option, Word can take two Word documents and compare one with the other for any changes. It will line them up side-by-side and show you similarities between them. This is excellent for legal or work documents that may have slight, but crucial alterations.
For example, if you were reviewing a contract and they ask you to sign an updated copy, you could choose to compare the updated copy with the previous to see the changes made.
Additionally, the compare section will allow you to combine two documents into one. Either replacing words or appending them to the bottom of a document.
![]()
Lockdown
Let’s say you’ve spent a long time editing a document and you like the look and feel of it. This document uses purple headers, and I like the look and feel of that. So, I would like to protect my document from editing those headers.
Within the Protect section and under Restrict Editing, I can opt to choose certain formatting restrictions as well as force editors to edit only certain areas of the document. With editing restrictions turned on, I can force them to always use Track Changes, only be able to read the document, or only have access to commenting.
Additionally, I can select certain users to have an override permission that allows certain people to ignore the enforcement put in place by the restrict editor.
When Restrict Editing is turned on, the content creator will be asked to create a password which will prevent other people from turning it off. Don’t forget or lose this password as once placed it is needed again to turn off the restriction.
Not found in the Review tab, there are a few other lockdown permissions that can be put in place to protect your document.
Copyrighting your document is automatic. If you typed it in your own time, it’s yours. Nobody can take this document and legally put it on their website for any reason without your consent. Alas, that doesn’t stop people from doing that.
If you are sharing a Word document with people and you want to lock down your content Word has you covered.
Open the File menu from the upper Ribbon. Under the Info menu, select the dropdown for Protect Document.
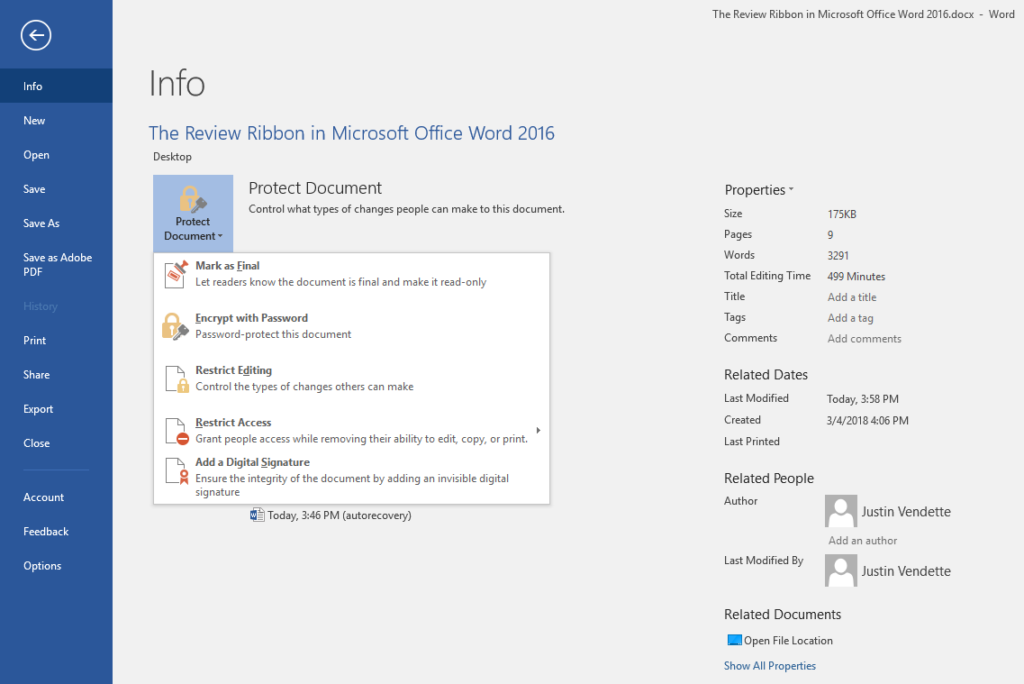
Here, we have a few protection options. The first is to mark a document as a final copy, indicating that no further changes are necessary, yet you still wish to have people read it before publication.
Next, you can encrypt this document with a password. Password encryption means only those with the password can open or even view the document. Don’t forget the password as forgetting it would mean the document can never be opened again.
Restrict Editing follows on from what we just talked about a minute ago. You can further restrict editing by restricting access. Permit and Deny access for opening, reading, editing, copying, or printing can be made here.
Adding a digital signature to your document means you’ve signed the document. Nobody will be able to change this signature, and it permanently locks the document to your name. Similarity, you should be marked as the author of this document.
Much like a book, you can add authors to the Word document if multiple people helped write the document.

Modern Technology, Preceding Markup
The last and final section in Word’s Review tab is the Ink section. If a peer reviewer or editor wants to stick with their old fashion pen for editing, they can use a touchscreen computer and their finger/electronic pen to write on the screen.
With the Microsoft Ink setting enabled, they can write on the document as if it were actual paper. Multiple colors and pen styles are available for different writing and markup styles.

The End
Word is a powerful and extremely useful tool. The more you begin to learn about Word’s underlying features, the more professional and accurate your documents will look. This massive tutorial may seem like a lot but knowing how to edit and control your documents just by using one tab in the Word Ribbon is extremely powerful.
The ultimate take away from this document is that Word is not perfect. Word will not catch all your mistakes, and it will even offer suggestions that aren’t grammatically correct. When sending out a document, email, or another sort of media, have someone proofread it and make changes. It will be one of the best things you can do.
Learn from your mistakes and understand and correct them as you go along. The best way to self-proofread is to read aloud. Speaking it and listening to yourself will prevent your brain from adding words that do not exist and will slow down how fast your eyes are skimming through the content.
Buy Microsoft Office 356 here.
© 2018 Justin Vendette
This tutorial shows how to use Track Changes in Microsoft Word. Track Changes helps us edit documents by tracking insertions, deletions, replacements, and format changes. Word calls these edits markups.
This tutorial also includes an overview of Word’s new Modern comment tool.
We will cover twelve topics:
- How to Turn Track Changes On and Off
- How to Show and Hide Track Changes
- How to Delete Text with Track Changes
- How to Insert Text with Track Changes
- How to Replace Text with Track Changes
- How to Change Formatting with Track Changes
- How to Accept or Reject Track Changes
- How to Insert Comments
- How to Reply to Comments
- How to Resolve Comments
- How to Delete Comments
- How to Open and Close the Reviewing Pane
Watch all the steps shown here in real time!
Explore more than 200 writing-related software tutorials on my YouTube channel.
Let’s dive in…
How to Turn Track Changes On and Off
- Select the Review tab in the ribbon.

- Select the Track Changes button in the Tracking group. The button will appear darker than the rest of the ribbon when Track Changes is turned on.

- Select the Track Changes button (see figure 2) again to turn off tracking.
How to Show and Hide Track Changes
You can control how comments and edits appear by using the Display for Review and Show Markup menus in the Tracking group in the ribbon.
- Select the Display for Review drop-down menu to choose how edits and comments are displayed. The options are (A) Simple Markup, (B) All Markup, (C) No Markup, and (D) Original.

(A) Simple Markup displays the edited version of the document without visible in-line edits. However, edits are indicated by a vertical line in the left margin.
For example, if you delete a sentence, that sentence won’t appear on screen. Instead, a vertical line will appear in the left margin showing that a change was made in that location.
If you want to see the edit, select the vertical line to switch to All Markup.

Comments will be visible on the right side of the screen when in Simple Markup.
(B) All Markup displays all edits and comments.
A vertical line, like the one shown in Simple Markup (see figure 4), will appear on the left side of the screen indicating that a change was made in that location.
Select that line to switch to Simple Markup.
(C) No Markup displays the edited version of the document without any visible edits or comments.
(D) Original displays the original version of the document without any edits or comments.
- Select the Show Markup drop-down menu to choose what features Track Changes displays. (Note that this menu is called Markup Options in Word for Mac.)
I recommend showing markups for Insertions and Deletions and Formatting as well as choosing Show Only Formatting in Balloons so that your insertions and deletions will appear in the text and formatting changes will appear next to the text.

Be default, comments will appear in balloons on the right side of the text.
Important note: The remaining sections show Track Changes in the All Markup view.
How to Delete Text with Track Changes
- Select the text you want to delete.
- Select the Delete key on your keyboard. The deleted text will appear with a strikethrough in the All Markup view.

How to Insert Text with Track Changes
- Place your cursor where you want to insert new text.
- Type the new text. The insertion will appear with an underline in the All Markup view.

How to Replace Text with Track Changes
- Select the text you want to replace.
- Type the replacement text. The original text will appear with a strikethrough, and the replacement text will appear with an underline in the All Markup view.

How to Change Formatting with Track Changes
Formatting includes the font style, font size, font color, italics, bold font, underlining, superscripting and subscripting, indentations, alignment, and margins.
- Select the text you want to reformat.
- Change the format. Track Changes will automatically display the change with your other markup if you have selected formatting in the Show Markup section of the Tracking group.

How to Accept or Reject Track Changes
Edits created with Track Changes must be accepted before they become part of your document. You can accept or reject edits individually or all at once.
Accept or Reject Edits Individually
- Click on or select the insertion, deletion, or replacement text.
- Select the Accept or Reject button in the Changes group.

Pro Tip: Use the Previous and Next buttons to navigate through all the edits in the document.

Accept or Reject All Edits
Unless you are very confident in your reviewers’ expertise, I strongly caution against accepting or rejecting all edits without first checking the accuracy of each one.
- Select the Accept or Reject menu arrow in the Changes group.
- Select your preferred option: Accept/Reject All Changes or Accept/Reject All Changes and Stop Tracking.

This section covers the basics of using comments in Word. For a more in-depth look, please see my previous tutorial “How to Use Comments in Microsoft Word (Modern Comments).”
You can use the Comment tool with Track Changes turned on or turned off.
- Place your cursor near the text you want to comment on or select the text.
- Select the Review tab in the ribbon (see figure 1).
- Select the New Comment button in the Comments group.

- Type your comment into the comment text box on the right side of the screen.
If you are part of an organization, you may be able to @ mention other users in your comments.
- Select the Post button or type the keyboard shortcut Ctrl + Enter (PC) or Command + Return (Mac) to post the comment.

- If you need to edit your comment, select the Edit button (PC users see figure 15; Mac users see figure 16).


- Type your reply into the Reply text box in the other person’s comment.
- Select the Post button or type the keyboard shortcut Ctrl + Enter (PC) or Command + Return (Mac) to post the reply.

You can mark a comment as “Resolved” to tell other people (or remind yourself) that an issue has been taken care of. However, you can also reopen a resolved comment, thereby turning it back to a regular comment.
- Select the three-dot menu in the comment.
- Select Resolve thread from the drop-down menu.

The comment will no longer be visible in the contextual view on the right side of the screen.
How to Reopen Resolved Comments
- Select the Review tab (see figure 1).
- Select the Show Comments menu arrow.
- Select List from the drop-down menu.

- Select the Reopen button in the comment.

Here are two ways to delete comments.
Method 1: Select the three-dot menu in the comment and then select Delete thread from the drop-down menu.

Method 2: Place your cursor in the comment or the text connected to the comment and then select the Delete menu arrow in the Review tab.
From there, choose Delete to delete the current comment, or Delete All Comments Shown, Delete All Comments in Document, or Delete All Resolved Comments (PC only).

How to Open and Close the Reviewing Pane
The Reviewing Pane (labeled Revisions) shows all the comments and edits selected in the Show Markup drop-down menu in the Tracking group in the ribbon, along with the total number of those comments and markups in the document.
The Reviewing Pane isn’t necessary for using Track Changes, but it can be helpful when you need to find a specific edit or want to see how many edits or comments are in the document.
- Select the Review tab (see figure 1).
- Select the Reviewing Pane button in the Tracking group.
The Reviewing Pane will appear, normally on the left side of your screen.

- Reselect the Reviewing Pane button to close the Reviewing Pane.
Related Resources
How to Copy and Paste Text with Comments and Track Changes in Word
How to Remove User Names from Existing Track Changes in Microsoft Word
How to Change Your User Name for Track Changes in Microsoft Word
How to Stop Microsoft Word from Calling You “Author” in Track Changes
How to Change the Color of Track Changes in Microsoft Word
Updated January 16, 2023
Show or Hide Comments in Microsoft Word Documents
by Avantix Learning Team | Updated January 10, 2021
Applies to: Microsoft® Word® 2010, 2013, 2016, 2019 or 365 (Windows)
You can show and hide comments using the Review tab in the Ribbon in Microsoft Word. If you add comments in a Word document, they will appear in a markup area on the right side of pages by default. If you want to show or hide comments, you’ll need to control the display of markup. Keep in mind that comments that are hidden could be displayed by a colleague or client.
The markup area appears in Print Layout View (the default view in Word) whenever a document includes comments and its appearance can be controlled using settings on the Review tab in the Ribbon. The default markup is set to Simple Markup with comments displayed. If the markup area is not appearing on the right, click Show Comments in the Comments group. Tracked changes also appear in the markup area.
In this article, we’re assuming that the default markup options are being used (although you can change the display of markup using Track Changes Options).
Recommended article: How to Remove Comments in Word (3+ Ways to Delete Comments)
Do you want to learn more about Microsoft Word? Check out our virtual classroom or live classroom Word courses >
Hide comments using Display for Review
To hide comments in the markup area using Display for Review:
- Click the Review tab in the Ribbon.
- In the Tracking group, click Display for Review. A drop-down menu appears.
- Select No Markup or Original to hide the markup area, including comments.
The following drop-down menu appears when you click Display for Review:

When you click Display for Review, you have the following options:
- Simple Markup which displays the markup area with comments and revisions. If you select Simple Markup and then click Show Comments in the Comments group, the markup area appears or disappears (if there are no tracked changes). If no markup area appears on the right, comments appear as speech bubbles that you can click to display the comment.
- All Markup which displays the markup area with all comments or revisions as well as lines to their locations in the text.
- No Markup which hides the markup area so that comments and revisions are hidden.
- Original which hides the markup area as well as any revisions made to the document. In regard to comments, this option is the same as No Markup.
In the following example, Simple Markup is selected as well as Show Comments in the Comments group (Print Layout View in Word 365):

In the next example, Simple Markup is selected and Show Comments is not selected in the Comments group (Print Layout View in Word 365):

Comments appear in different ways depending on the selected view. Typically, you would change views using the View tab in the Ribbon. If you select Draft View, comments appear as the initials of the reviewer with square brackets and are highlighted with a background color. You can position the mouse pointer on the text to view the comment in a pop-up bubble. In Read Mode View, comments appear as speech bubbles to the right of the text. Simply click a bubble to view a comment.
Hide comments using Show Markup
To hide comments using Show Markup:
- Click the Review tab in the Ribbon.
- In the Tracking group, click Show Markup. A drop-down menu appears.
- Select Comments to deselect comments.
The Show Markup drop-down menu includes the following options:

Show comments in the markup area
To show comments in the markup area:
- Click the Review tab in the Ribbon.
- In the Tracking group, click Display for Review. A drop-down menu appears.
- Select Simple Markup or All Markup to show the markup area, including comments.
- Click Show Markup. A drop-down menu appears.
- Ensure Comments is selected.
- If you selected Simple Markup, in the Comments group, select Show Comments in the Comments group.
View all comments using the Reviewing Pane
To view all comments regardless of view:
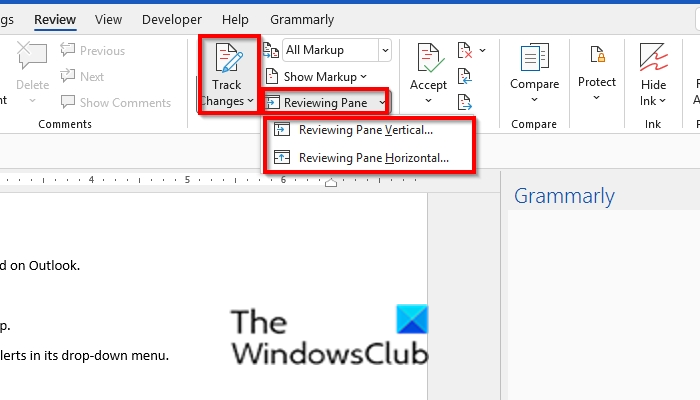
- Click the Review tab in the Ribbon.
- In the Tracking group, click Reviewing Pane. A drop-down menu appears.
- Select either the horizontal or vertical display. The Reviewing Pane appears and will displays comments and revisions.
You can click the Reviewing Pane button again in the Ribbon to hide the Reviewing Pane.
Hiding markup is not the same as accepting changes or deleting comments. You should accept or reject changes and delete comments in your Word document before you send out the final version.
Subscribe to get more articles like this one
Did you find this article helpful? If you would like to receive new articles, JOIN our email list.
More resources
How to Find and Replace in Word (and Use Wildcards)
How to Superscipt or Subscript in Word (with Shortcuts)
How to Insert or Type the Sigma Symbol in Word (Σ or σ)
How to Insert Excel Data into a Word File (Linked or Unlinked)
How to Insert a Check Mark or Tick Mark in Word (5 Ways with Shortcuts)
Related courses
Microsoft Word: Intermediate / Advanced
Microsoft Excel: Intermediate / Advanced
Microsoft PowerPoint: Intermediate / Advanced
Microsoft Word: Long Documents Master Class
Microsoft Word: Styles, Templates and Tables of Contents
Microsoft Word: Designing Dynamic Word Documents Using Fields
VIEW MORE COURSES >
Our instructor-led courses are delivered in virtual classroom format or at our downtown Toronto location at 18 King Street East, Suite 1400, Toronto, Ontario, Canada (some in-person classroom courses may also be delivered at an alternate downtown Toronto location). Contact us at info@avantixlearning.ca if you’d like to arrange custom instructor-led virtual classroom or onsite training on a date that’s convenient for you.
Copyright 2023 Avantix® Learning
Microsoft, the Microsoft logo, Microsoft Office and related Microsoft applications and logos are registered trademarks of Microsoft Corporation in Canada, US and other countries. All other trademarks are the property of the registered owners.
Avantix Learning |18 King Street East, Suite 1400, Toronto, Ontario, Canada M5C 1C4 | Contact us at info@avantixlearning.ca
Download PC Repair Tool to quickly find & fix Windows errors automatically
Task panes are interfaces that usually appear on the right side of the window within Microsoft Office programs (Word, PowerPoint, Outlook, and Excel). Task panes provide users access to interface controls that run code to alter documents, emails, or display data from a data source. Microsoft Office provides several Task panes, such as the Navigation pane, Selection Pane, Thesaurus pane, and the Reviewing pane.
What is the Reviewing Pane in Word?
The Reviewing pane shows all the changes in your document; it contains options to choose if you want the pane below or next to your document. The Reviewing pane helps users to confirm if their document is left with any track changes.
In this post, we will show you how to turn on or off Reviewing pane in Word documents.
Follow the steps below to open and close the reviewing pane in Microsoft Word.
- Open a Word Document.
- On the Review tab, click Track changes
- Click Reviewing pane in the Tracking group
- Select the position of vertical or horizontal.
- Click the Task pane options button and select any of the options – Move, Resize and Close.
Let us see this in detail.
Open a Microsoft Word Document.
On the Review tab, click Track changes because the Reviewing pane works with the Track Changes.
Click the Reviewing pane in the Tracking group; You can choose if you want the Reviewing pane to be in the position of Vertical or Horizontal.

The changes you make in the document will appear on the Reviewing pane.
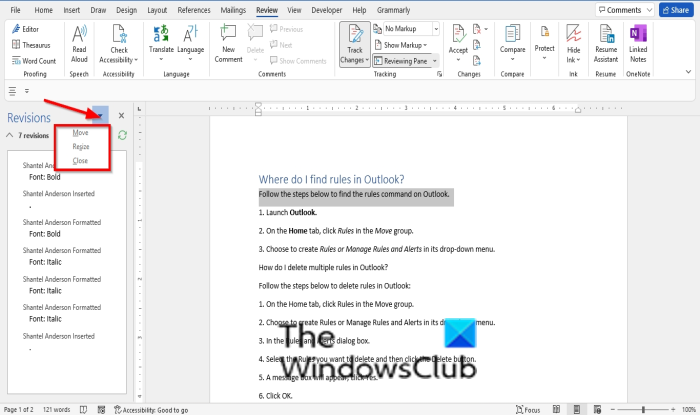
You can click the Task pane options button and select any of the options Move, Resize and Close.
- If you want to move the Reviewing pane, click the Move option. You will see a double-cross arrow cursor. Drag the Reviewing pane to any location on the document. To exit the double-cross error, click the Esc button on the keyboard.
- If you want to resize the Reviewing pane, click the Resize option.
- If you want to close the Reviewing pane, click the Close option are click the X button on the Reviewing pane.
Related: How to Use Review Feature to track changes in Word documents.
Where is the default Reviewing Pane in Word?
When users open a Reviewing pane, it is open vertically by default and is positioned on the left of the Word interface. Word offers an option for you to move your Reviewing pane to any position on the Word interface.
We hope this tutorial helps you understand how to open and close the Reviewing pane in Microsoft Word; if you have questions about the tutorial, let us know in the comments.

Shantel has studied Data Operations, Records Management, and Computer Information Systems. She is quite proficient in using Office software. Her goal is to become a Database Administrator or a System Administrator.
MS Word

Microsoft Word (MS Word) is a
very powerful, professionally designed Word Processing Package. Though it is word
processing package but many desktop publishing features are in-built in this
software. Number of pre-designed formats for newsletters, books, and business
letters are given as a form of templates for ready use. On-line help of word provides you immediate solutions on desktop. In-built AutoFormat helps you in formatting your text. AutoCorrect helps you in suggesting you to correct the spelling drawn from your own dictionary or in-built dictionary, Thesaurus. For beginners, menus and for experts self-designed wizards, template and toolbars are given
Word helps to produce document with Charts, Graphs and Mail-Merge to the customer regularly. It imports data from MS Excel, MS Access for generation of documents/reports
MS Word is menu driven
user-friendly text processing software package. It provides the following
facilities besides the normal text processing:
- Automatic Formatting
- Search option to find, change all the grammatical form
of a word. - Spell checking as you type
- Formatting documents in few steps.
- Tip Wizard observes your style of working and propose
easier ways of working.
REVIEW TAB

Review tab consist of:
a.
Spelling and Grammar (F7)
a.
Track Changes (Ctrl+Shift+E)
a.
Accept and Move to Next
b.
Reject and Move to Next
1) Proofing
Spelling and Grammar helps
us to check the spelling errors or grammatical errors in our Document. It also
shows us the suggestions for the incorrect words.
- Open Microsoft Word (Start à Programs à Microsoft Word)
- Go to the Review Tab.
- Click on the Spelling and Grammar.
- A dialog box opens. In the
dialog box wrong words are highlighted Red and below the wrong word suggestions
are shown.

- If you don’t want to change
that word click On Ignore. - If you want to add that word
in your dictionary click add to dictionary. - If you want to replace that
word with the suggestion then click Replace.
Research helps you to search
through the Reference Materials such as dictionaries, encyclopedia.
- Open Microsoft Word (Start à Programs à Microsoft Word)
- Go to the Review Tab.
- Click on the Research
- A task Pane will open on the
right side.

- This task pane helps you to
search through the reference materials.
Thesaurus helps you to find the similar meaning of the word. It suggests a similar word of the word you have selected.
- Open Microsoft Word (Start à Programs à Microsoft Word)
- Go to the Review Tab.
- Click on the Thesaurus.
- A task Pane will open on the right side.
- Type there the word, of which you want to find the similar meaning.
- There many suggestions are shown similar to the word.
d. Translate
Translate helps us to translate the selected word into any other language. (For Example: English à Hindi)
- Open Microsoft Word (Start à Programs à Microsoft Word)
- Go to the Review Tab
- Click on the Translate
- A task Pane will open on the right side.

- Type there the word, which you want to translate.
- Then select the language in which you want to translate that particular word.
- Then click Translate OR Press ENTER.
Translation ScreenTip Enables
a ScreenTip that translate words you pause your cursor over into another
language.
We should always turn off Translation ScreenTip.
![]()
With the help of Set Language
we can set the language to check the Spelling and Grammar of the selected text.
- Open Microsoft Word (Start à Programs à Microsoft Word)
- Go to the Review Tab.
- Click on the Set Language
- A dialog box will open

- In the dialog box, click on
the required language - Then press OK.
Word Count helps you to find
and count the Number Words, Number of Characters, Number of Paragraphs and Number
of Lines in our Document, or in the selected paragraph.
- Open Microsoft Word (Start à Programs à Microsoft Word)
- Go to the Review Tab.
- Click on the Word Count
- If you want to count the Number
of Words (Or Number of Characters, Number of Paragraphs and Number of Lines) of
a specific paragraph, then select that paragraph. - Or Click on the Word Count.

- There a dialog box appears,
in the dialog box – the Number of Words (Or Number of Characters, Number of Paragraphs
and Number of Lines) appears.
2) Comments

New Comment help to add a comment about
the selected text, so that we can understand that selected text better.
- Open Microsoft Word (Start à Programs à Microsoft Word)
- Go to the Review Tab.
- Select the text, about what
you want to add a Comment. - Click on the New Comment.
- And then type your comment.
b. Delete Comments

With the help of Delete comment we can remove the added comment on the selected text.
- Open Microsoft Word (Start à Programs à Microsoft Word)
- Go to the Review Tab.
- Take the cursor there, where you want to delete the Comment.
- Click on the Delete Comment
- Options displayed:
- Delete
- Delete all comment shown
- Delete all comments in the Document
- Select the option according to your need
- If you want to delete only selected Comment, click the first option Delete.
- If you want to delete all the comments in the document click on the third one option i.e. Delete all Comments in the Document.

Previous Comment helps us to jump in the previous comment of the Document. It navigates you to the previous comment in your Document.
For Example you are in 3rd comment. Click on the previous comment, this command navigate you to the 2nd comment.

Next Comment help us to jump to the next comment of the Document. It navigates you to the next comment in your Document.
For Example you are in 3rd comment. Click on the next comment, this command navigate you to the 4th comment.
3) Tracking
a. Track Changes
Track Changes enables you to track the changes in the Document including insertions, deletions and formatting changes.
- Open Microsoft Word (Start à Programs à Microsoft Word)
- Go to the Review Tab.
- Click on the Track Changes. After that all the changes made to your document will be noted/tracked.
There are many options in the Track Changes, you can change it according to your need.
To change them:
- Click on the arrow below the Track Changes icon.

- Then click on the Change Tracking Options…..
- A dialog box will open.

- You can change it according to your need.
You can choose how to show your Revision (Editing, Formatting, Insertions and Deletions) in the Document. You can show the revisions as the Balloons in the margin of the document or show them directly within the document.
To Choose how to show your revisions:
- Open Microsoft Word (Start à Programs à Microsoft Word)
- Go to the Review Tab.
- Click on the arrow below the icons of Balloons. Options shown:
- Show Revisions in Balloons.
- Show all Revisions Inline.
- Show only Comments and Formatting in the balloons.
- Choose the Options according to your need.

You can choose how you want to view the changes made to the Document.
- Open Microsoft Word (Start à Programs à Microsoft Word)
- Go to the Review Tab.
- Click on the Display for Preview. by default it will show- Final Showing Markup, but you can change it.
- Options shown are:

- Final Showing Markup
- Final
- Original Showing Markup
- Original
- Select according to your need.

You can choose what kind of Markup/Revision (Editing, Formatting, Insertions and Deletions) you want to show or hide in your document.
- Open Microsoft Word (Start à Programs à Microsoft Word)
- Go to the Review Tab.
- Click on the Show markup.
- Options Displayed:
- Comment
- Ink
- Insertions and Deletions
- Formatting
- Markup Area Highlight
- Select the markup/revisions you want to display in your document.


Reviewing Pane helps us see our all the revisions (insertions, deletions, editing, comments, formatting) in a separate window. We can view it Horizontally or vertically, according to our need.
4) Changes
a. Accept
If you are Accepting the changes in the document then click here.
- Open Microsoft Word (Start à Programs à Microsoft Word)
- Go to the Review Tab.
- Click on the Accept
- When you click on the arrow, Options Displayed:
- Accept and move to next: Click on it if you want to accept the current change and then move to next.
- Accept Changes: Click on it if you want to accept only the current change in the document.
- Accept all changes shown: Click on it if you want to accept only the changes which are shown.
- Accept all changes in the Document: Click here if you are accepting all the changes made to the Document.
b. Reject
If you are rejecting the changes in the document then click here.
- Open Microsoft Word (Start à Programs à Microsoft Word)
- Go to the Review Tab.
- Click on the Reject
- When you click on the arrow, Options Displayed:
- Reject and move to next: Click on it if you want to reject the current change and then move to next.
- Reject Changes: Click on it if you want to reject only the current change in the document.
- Reject all changes shown: Click on it if you want to reject only the changes which are shown.
- Reject all changes in the Document: Click here if you are rejecting all the changes made to the Document.
c.
Previous
It navigates us to the previous changes made by us to the document, So that you can accept or reject that revision.
b. Next
It navigates us to the next changes made by us to the document, So that you can accept or reject that revision.
5) Protect
Protect Document
You can Protect your Document With a Password, so that nobody can edit your document. It will be secure with a Password. You can restrict the access of other people to your Document.
- Open Microsoft Word (Start à Programs à Microsoft Word)
- Go to the Review Tab.
- Click on the Protect Document.
- Some options displays on your screen.

- Click on the top most option, Restrict Formatting and Editing.
- On the right hand side, a Restrict Formatting and Editing task pane opens.
- Enable:
- Limit formatting to a selection of style.
- Allow only this type of editing in the document [No Change(read only)]

- Then click on; Yes, Start Enforcing Protection.
- Then a dialog box will appear on the screen, Ask for the Password to protect your Document.
- Feed password in it, Reenter that password. Then press OK.
YOUR DOCUMENT WILL BE PROTECTED.
WRITER: MR.
KRISHAN KUMAR SAINI
TODAY
WE HAVE LEARNT ABOUT THE USE OF «REVIEW TAB IN MS WORD». HOPE THIS
LESSON IS HELPFUL FOR YOU.