
To view comments in Word, irrespective of which view is picked, open the Reviewing Pane. Click on the Review tab, and then the Tracking group. Then click on the Reviewing Pane button. You can choose either the vertical or horizontal display to open the Reviewing Pane and view comments in Word 2016.
Contents
- 1 How do I see all comments in a Word document?
- 2 How do I edit comments in a Word document?
- 3 How do I Uncollapse a comment in Word?
- 4 How do I show Comments pane in Word?
- 5 How do I suggest edits in Word?
- 6 How can we add comments to the changes made?
- 7 Does Word have encryption?
- 8 How do you add marginal comments in Word?
- 9 How do you redline a document?
- 10 How do you suggest in Word?
- 11 How do you put your name in comments in Word?
- 12 How can you record the changes made to an original document?
- 13 What is comments in MS Word?
- 14 How do you display comments?
- 15 How do I get rid of markup area?
- 16 How do I encrypt a word?
- 17 How do I send an encrypted Word document?
- 18 How good is word encryption?
- 19 What is redlining in Microsoft Word?
- 20 How do I redline comparison in Word?
How to view all comments in Word in one place
- Open the Word document.
- In the toolbar, click Review.
- Find and click Tracking.
- Tick All Markups.
How to edit a comment in Microsoft Word documents
- Open the Word document.
- Make all comments visible.
- Click in the comment.
- Edit the text for that comment.
- Click out of the comment to save changes.
To hide your comments and tacked changes using the No Markup view, simply:
- Navigate to the Review tab.
- Open the Display Review dropdown menu (click on the downward facing arrow at the end)
- Choose No Markup.
If you prefer to display the Reviewing Pane, follow these steps:
- Make sure the Review tab of the ribbon is displayed.
- In the Tracking group you see the Reviewing Pane tool. Click the down-arrow at the right of the tool.
- Choose either Reviewing Pane Vertical or Reviewing Pane Horizontal, according to your desires.
How do I suggest edits in Word?
How to use Track Changes
- Open Microsoft Word.
- Choose the Review tab at the top of the document.
- Either click the Track Changes button (PC) or toggle the Track Changes switch (Mac).
- Make sure that you change ‘Simple Markup’ to ‘All Markup’ from the drop down bar next to Track Changes.
2. How can we add comments to the changes made?
- Select the text or item that you want to comment on, or click to insert the cursor near the text that you want to comment on.
- On the Review tab, under Comments, click New.
- Type the comment text in the comment balloon.
Does Word have encryption?
Specifically, you may securely encrypt files created in Microsoft Word, Excel and Powerpoint. This encryption is controlled by a single password which only you (or others authorized to read or edit the file) should know.
Insert, delete, or change a comment
- Select the text you want to comment on, or click at the end of the text.
- On the Review tab, click New Comment.
- Type your comment. Word shows your comment in a balloon in the document’s margin.
How do you redline a document?
About This Article
- Click the Review tab.
- Click Track Changes.
- Click Simple Markup.
- Click All Markup.
- Click Show Markup.
- Highlight text and select New Comment.
- Edit the document and click Accept.
How do you suggest in Word?
To turn on “Suggesting” mode in Google Docs, click the “Editing” button near the top-right of the document your are editing and choose “Suggesting.”
In an opened Word document, click File > Options. In the Word Options window, make sure you are locating in the General tab, change the name in the User name box as below screenshot shown, and finally click the OK button. Now you have changed the default user name for comments in Word document.
How can you record the changes made to an original document?
You can use change marks to show added material, deleted material, and and changes to formatting.
To start recording changes:
- Open the Budget Spreadsheet.
- Select Edit > Changes > Record from the menu bar.
- Begin editing the document.
Comments can be added to a document that do not change the document. You can insert a comment inside balloons that will appear in the document margins. They can also be hidden until you want to edit your paper.
Find the “Review” tab, select the “Tracking” group, and click on “Show Markup”. Rest your pointer on Balloons, and then select “Show All Revisions inline” to display comments inline and deletions with strikethroughs. Rest your pointer on a comment inside the document. The comment will appear in a ScreenTip.
How do I get rid of markup area?
The markup area appears whenever a document features comments, but its appearance is controlled by settings on the Review tab. To hide the markup area, click the Review tab. In the Tracking group, click the Display for Review button, shown here.
How do I encrypt a word?
How to encrypt text in a note
- Open a note and highlight the text you wish to encrypt.
- Right-click or control-click the highlighted text and select “Encrypt Selected Text”
- Enter a passphrase into the form.
- Once you have set the passphrase and confirm, the text will be encrypted.
How do I send an encrypted Word document?
Click the File menu, select the Info tab, and then select the Protect Document button. Click Encrypt with Password. Enter your password then click OK. Enter the password again to confirm it and click OK.
How good is word encryption?
How secure is the encryption? The encryption in Microsoft Office 2016 is considered safe (AES with 256-bit key) and takes a very long time to break with today’s machine resources if the password is secure enough. See the Username and Password page for more information on how to make secure passwords.
What is redlining in Microsoft Word?
What is redlining? When you track changes in a Microsoft Word document, a redline will appear under the text that you have made the change too. This is called redlining.
How do I redline comparison in Word?
Open the documents that you want to compare. On the Review tab, in the Compare group, click Compare. Click Compare two versions of a document (legal blackline). Under Original document, browse for the document that you want to use as the original document.

Microsoft Word — это хороший инструмент не только для набора текста и его форматирования, но и крайне удобное средство для последующего изменения, редактирования и правки. Далеко не все используют в работе так называемую «редакторскую» составляющую программы, поэтому в данной статье мы решили рассказать о том наборе инструментов, который можно и нужно использовать для таких целей.
Урок: Форматирование текста в Ворде
Инструменты, о которых пойдет речь ниже, могут пригодиться не только редактору или пишущему автору, но и всем тем пользователям, которые используют Microsoft Word для совместной работы. Последнее подразумевает, что над одним документом, его созданием и изменением, могут трудиться одновременно несколько пользователей, у каждого из которых есть постоянный доступ к файлу.
Урок: Как в Ворде изменить имя автора

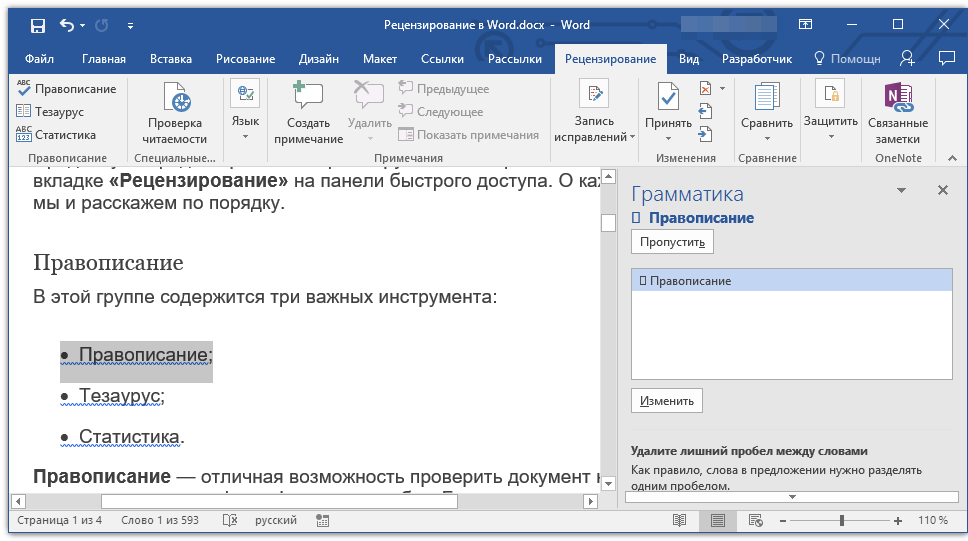
Продвинутый редакторский набор инструментов собран во вкладке «Рецензирование» на панели быстрого доступа. О каждом из них мы и расскажем по порядку.
Правописание
В этой группе содержится три важных инструмента:
- Правописание;
- Тезаурус;
- Статистика.
Правописание — отличная возможность проверить документ на наличие грамматических и орфографических ошибок. Более детально о работе с данным разделом написано в нашей статье.
Урок: Проверка правописания в Word
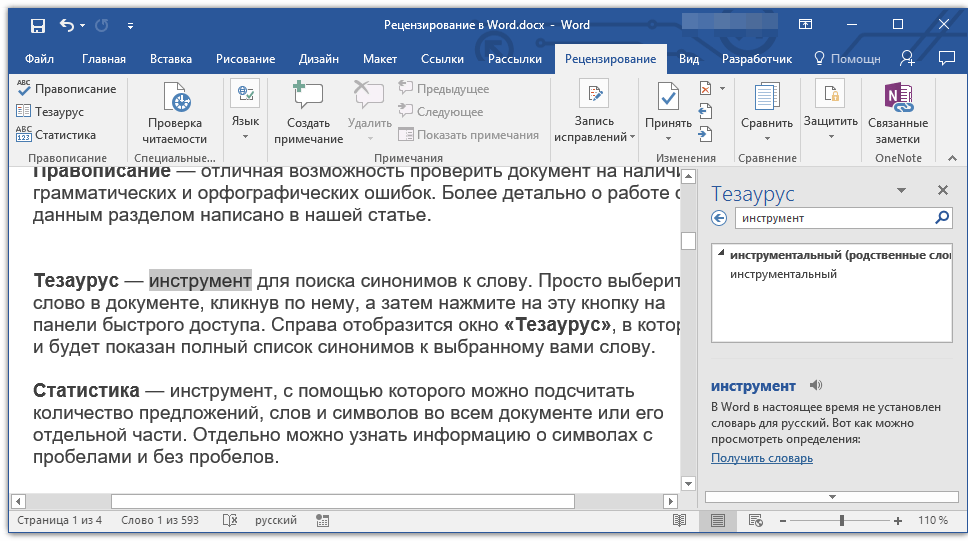
Тезаурус — инструмент для поиска синонимов к слову. Просто выберите слово в документе, кликнув по нему, а затем нажмите на эту кнопку на панели быстрого доступа. Справа отобразится окно «Тезаурус», в котором и будет показан полный список синонимов к выбранному вами слову.
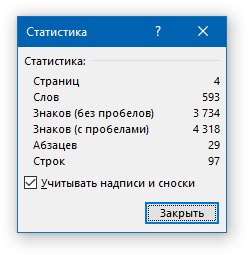
Статистика — инструмент, с помощью которого можно подсчитать количество предложений, слов и символов во всем документе или его отдельной части. Отдельно можно узнать информацию о символах с пробелами и без пробелов.

Урок: Как в Ворде посчитать количество символов
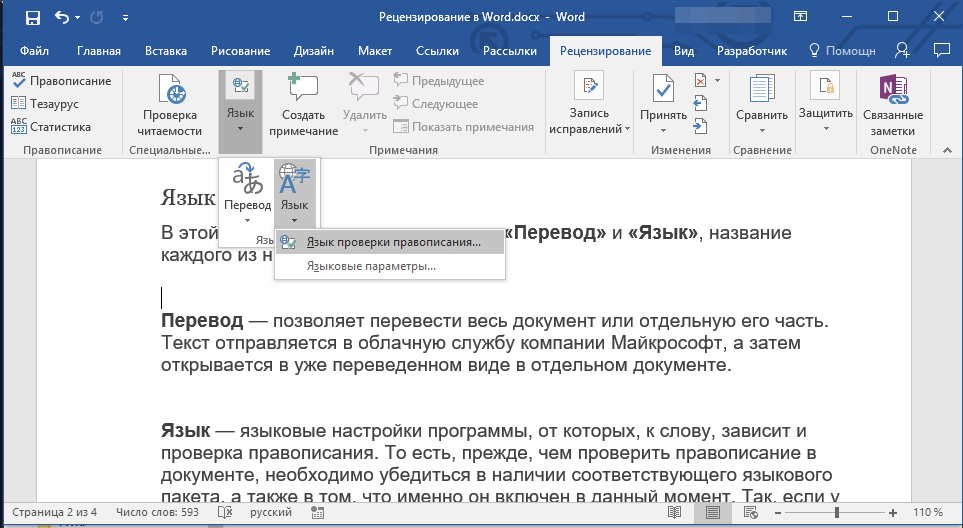
Язык
В этой группе всего два инструмента: «Перевод» и «Язык», название каждого из них говорит само за себя.
Перевод — позволяет перевести весь документ или отдельную его часть. Текст отправляется в облачную службу компании Майкрософт, а затем открывается в уже переведенном виде в отдельном документе.

Язык — языковые настройки программы, от которых, к слову, зависит и проверка правописания. То есть, прежде, чем проверить правописание в документе, необходимо убедиться в наличии соответствующего языкового пакета, а также в том, что именно он включен в данный момент.
Так, если у вас будет включен русский язык проверки, а текст будет на английском, программа подчеркнет его весь, как текст с ошибками.
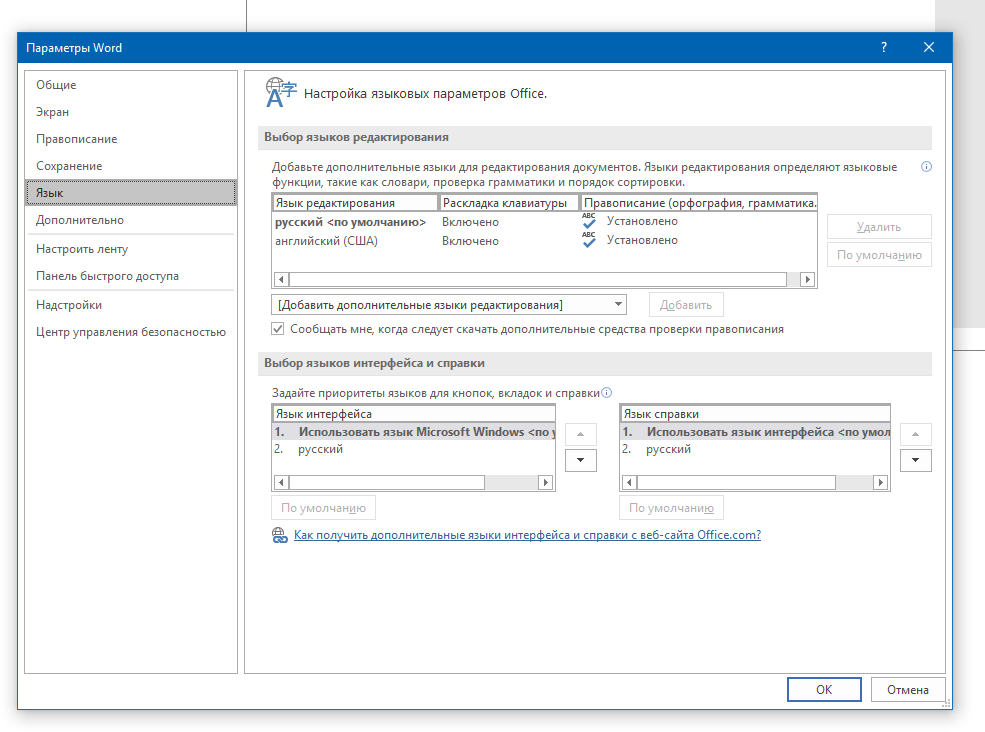
Урок: Как в Word включить проверку правописания
Примечания
Эта группа содержит в себе все те инструменты, которые можно и нужно использовать в редакторской или совместной работе над документами. Это возможность указать автору на допущенные неточности, внести замечания, оставить пожелания, подсказки и т.д., оставив при этом неизменным изначальный текст. Примечания — это своего рода пометки на полях.

Урок: Как в Ворде создать примечания
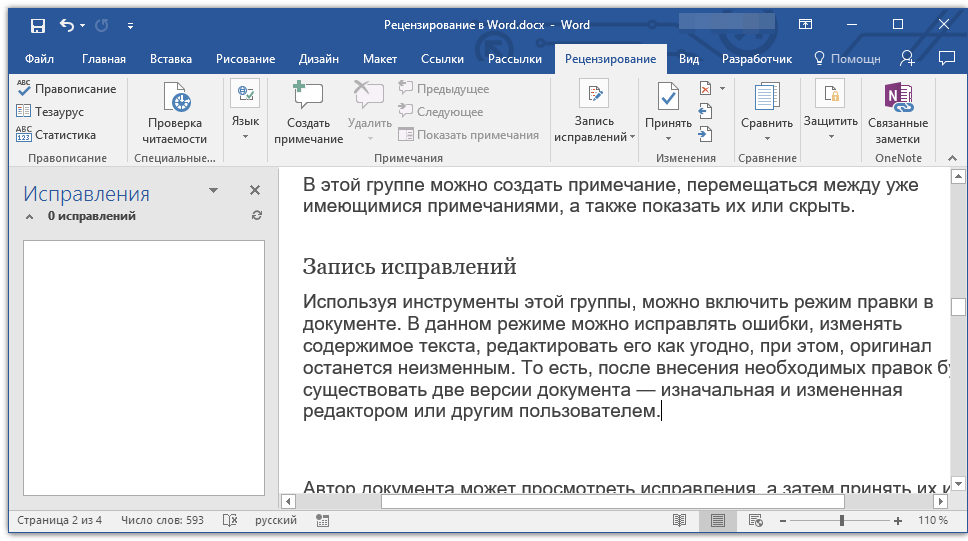
В этой группе можно создать примечание, перемещаться между уже имеющимися примечаниями, а также показать их или скрыть.
Запись исправлений
Используя инструменты этой группы, можно включить режим правки в документе. В данном режиме можно исправлять ошибки, изменять содержимое текста, редактировать его как угодно, при этом, оригинал останется неизменным. То есть, после внесения необходимых правок будет существовать две версии документа — изначальная и измененная редактором или другим пользователем.
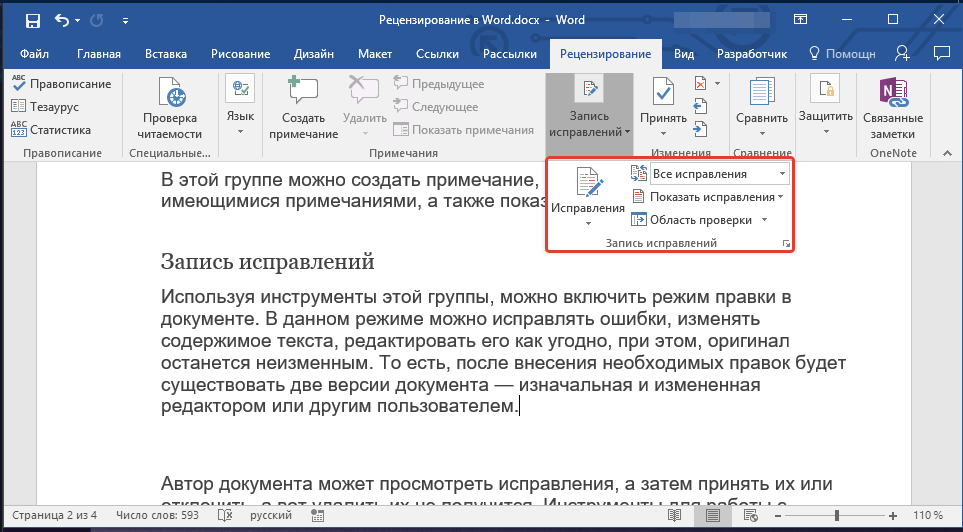
Урок: Как в Word включить режим правки
Автор документа может просмотреть исправления, а затем принять их или отклонить, а вот удалить их не получится. Инструменты для работы с исправлениями находятся в соседней группе «Изменения».
Урок: Как в Ворде убрать исправления
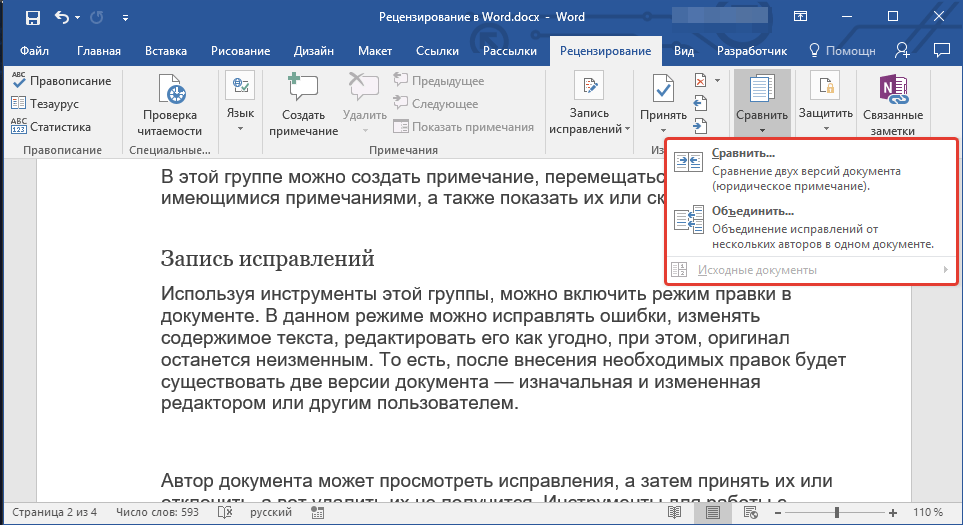
Сравнение
Инструменты этой группы позволяют сравнить два схожих по содержанию документа и показать так называемую разницу между ними в третьем документе. Предварительно необходимо указать исходный и изменяемый документ.
Урок: Как в Word сравнить два документа
Кроме того, в группе «Сравнение» можно объединить исправления, внесенные двумя разными авторами.
Защитить
Если вы хотите запретить редактирование документа, с которым работаете, выберите в группе «Защитить» пункт «Ограничить редактирование» и укажите необходимые параметры ограничения в открывшемся окне.

Кроме того, вы можете защитить файл паролем, после чего открыть его сможет только тот пользователь, у которого есть пароль, установленный вами.
На этом все, мы рассмотрели все инструменты рецензирования, содержащиеся в Microsoft Word. Надеемся, эта статья будет полезной для вас и заметно упростит работу с документами и их редактирование.
Show or Hide Comments in Microsoft Word Documents
by Avantix Learning Team | Updated January 10, 2021
Applies to: Microsoft® Word® 2010, 2013, 2016, 2019 or 365 (Windows)
You can show and hide comments using the Review tab in the Ribbon in Microsoft Word. If you add comments in a Word document, they will appear in a markup area on the right side of pages by default. If you want to show or hide comments, you’ll need to control the display of markup. Keep in mind that comments that are hidden could be displayed by a colleague or client.
The markup area appears in Print Layout View (the default view in Word) whenever a document includes comments and its appearance can be controlled using settings on the Review tab in the Ribbon. The default markup is set to Simple Markup with comments displayed. If the markup area is not appearing on the right, click Show Comments in the Comments group. Tracked changes also appear in the markup area.
In this article, we’re assuming that the default markup options are being used (although you can change the display of markup using Track Changes Options).
Recommended article: How to Remove Comments in Word (3+ Ways to Delete Comments)
Do you want to learn more about Microsoft Word? Check out our virtual classroom or live classroom Word courses >
Hide comments using Display for Review
To hide comments in the markup area using Display for Review:
- Click the Review tab in the Ribbon.
- In the Tracking group, click Display for Review. A drop-down menu appears.
- Select No Markup or Original to hide the markup area, including comments.
The following drop-down menu appears when you click Display for Review:

When you click Display for Review, you have the following options:
- Simple Markup which displays the markup area with comments and revisions. If you select Simple Markup and then click Show Comments in the Comments group, the markup area appears or disappears (if there are no tracked changes). If no markup area appears on the right, comments appear as speech bubbles that you can click to display the comment.
- All Markup which displays the markup area with all comments or revisions as well as lines to their locations in the text.
- No Markup which hides the markup area so that comments and revisions are hidden.
- Original which hides the markup area as well as any revisions made to the document. In regard to comments, this option is the same as No Markup.
In the following example, Simple Markup is selected as well as Show Comments in the Comments group (Print Layout View in Word 365):

In the next example, Simple Markup is selected and Show Comments is not selected in the Comments group (Print Layout View in Word 365):

Comments appear in different ways depending on the selected view. Typically, you would change views using the View tab in the Ribbon. If you select Draft View, comments appear as the initials of the reviewer with square brackets and are highlighted with a background color. You can position the mouse pointer on the text to view the comment in a pop-up bubble. In Read Mode View, comments appear as speech bubbles to the right of the text. Simply click a bubble to view a comment.
Hide comments using Show Markup
To hide comments using Show Markup:
- Click the Review tab in the Ribbon.
- In the Tracking group, click Show Markup. A drop-down menu appears.
- Select Comments to deselect comments.
The Show Markup drop-down menu includes the following options:

Show comments in the markup area
To show comments in the markup area:
- Click the Review tab in the Ribbon.
- In the Tracking group, click Display for Review. A drop-down menu appears.
- Select Simple Markup or All Markup to show the markup area, including comments.
- Click Show Markup. A drop-down menu appears.
- Ensure Comments is selected.
- If you selected Simple Markup, in the Comments group, select Show Comments in the Comments group.
View all comments using the Reviewing Pane
To view all comments regardless of view:
- Click the Review tab in the Ribbon.
- In the Tracking group, click Reviewing Pane. A drop-down menu appears.
- Select either the horizontal or vertical display. The Reviewing Pane appears and will displays comments and revisions.
You can click the Reviewing Pane button again in the Ribbon to hide the Reviewing Pane.
Hiding markup is not the same as accepting changes or deleting comments. You should accept or reject changes and delete comments in your Word document before you send out the final version.
Subscribe to get more articles like this one
Did you find this article helpful? If you would like to receive new articles, JOIN our email list.
More resources
How to Find and Replace in Word (and Use Wildcards)
How to Superscipt or Subscript in Word (with Shortcuts)
How to Insert or Type the Sigma Symbol in Word (Σ or σ)
How to Insert Excel Data into a Word File (Linked or Unlinked)
How to Insert a Check Mark or Tick Mark in Word (5 Ways with Shortcuts)
Related courses
Microsoft Word: Intermediate / Advanced
Microsoft Excel: Intermediate / Advanced
Microsoft PowerPoint: Intermediate / Advanced
Microsoft Word: Long Documents Master Class
Microsoft Word: Styles, Templates and Tables of Contents
Microsoft Word: Designing Dynamic Word Documents Using Fields
VIEW MORE COURSES >
Our instructor-led courses are delivered in virtual classroom format or at our downtown Toronto location at 18 King Street East, Suite 1400, Toronto, Ontario, Canada (some in-person classroom courses may also be delivered at an alternate downtown Toronto location). Contact us at info@avantixlearning.ca if you’d like to arrange custom instructor-led virtual classroom or onsite training on a date that’s convenient for you.
Copyright 2023 Avantix® Learning
Microsoft, the Microsoft logo, Microsoft Office and related Microsoft applications and logos are registered trademarks of Microsoft Corporation in Canada, US and other countries. All other trademarks are the property of the registered owners.
Avantix Learning |18 King Street East, Suite 1400, Toronto, Ontario, Canada M5C 1C4 | Contact us at info@avantixlearning.ca
Lesson 20: Reviewing Documents
/en/word2010/working-with-headers-and-footers/content/
Introduction
Let’s say someone asks you to proofread a report. If you have a hard copy of the report, you might use a red pen to cross out sentences, mark misspellings, or add comments in the margins. However, you could also do all of these things in Word using the Track Changes and Comments features.
When you’ve finished reviewing the document, the other person can choose to automatically accept all of your changes, or decide whether to accept or reject each change one by one.
In this lesson, you’ll learn how to track changes, add comments, and compare two versions of a document.
Using Track Changes and Comments
When you need to collaborate on the content of a document or if you need someone to proofread your document, Word’s Track Changes and Comments features make it easier for you to collaborate with others.
Optional: You can download this example for extra practice.
About Track Changes
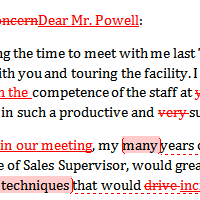
When you turn on the Track Changes option, all changes you make to the document show up as colored markups. If you delete some text, it won’t disappear but instead will have a visible strike through it. If you add text, it will be underlined. This allows another person to see which changes have been made before making the changes permanent.
 A document with tracked changes
The color of the markups will vary depending on who is reviewing the document, so if there are multiple reviewers you’ll be able to tell at a glance who made each change.
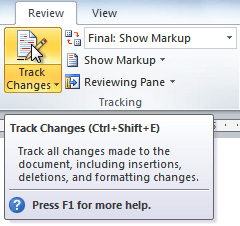
To turn on Track Changes:
- Click the Review tab.
- Click the Track Changes command. It should now be highlighted in gold to show that it is active.
 The Track Changes command
 - Any changes you make to the document will be shown as colored markups.
Tracked changes
- Click the Track Changes command again to turn it off.

Adding and deleting comments
Sometimes instead of changing something, you may want to make a comment about part of the document. Comments show up in balloons in the right margin and can be read by the original author or by any other reviewers.
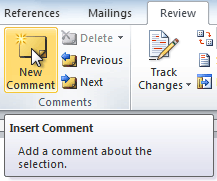
To add a comment:
- Highlight some text, or place the insertion point where you want the comment to appear.
- From the Review tab, click the New Comment command.
The New Comment command
- Type your comment.
A comment

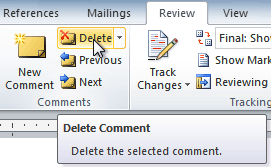
To delete a comment:
- Select the balloon containing the comment you want to delete.
A selected comment
- From the Review tab, click the Delete command.
Deleting a comment

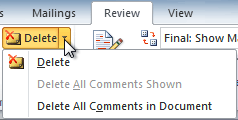
To delete all comments:
- From the Review tab, click the Delete drop-down arrow.
The Delete drop-down arrow
- Click Delete All Comments in Document.
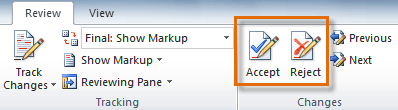
Accepting and rejecting changes
Tracked changes are really just suggested changes. To become permanent, they have to be accepted. On the other hand, the original author may disagree with some of the tracked changes and choose to reject them.
To accept or reject changes:
- Select the change you want to accept or reject.
Selecting a change
- From the Review tab, click the Accept or Reject command.
The Accept and Reject commands
- If you accepted the change, the markup will disappear, and the text will look normal.
After accepting a change

For some tracked changes, you can reject the changes by deleting them as if they were normal text. For example, if a reviewer adds a word to a sentence, you can just delete the word.
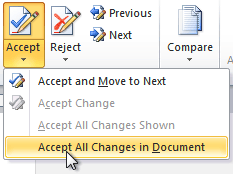
To accept all changes:
- From the Review tab, click the Accept drop-down arrow. A drop-down menu will appear.
Accepting all changes
- Select Accept All Changes in Document.
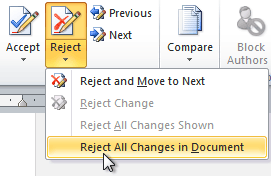
To reject all changes:
- From the Review tab, click the Reject drop-down arrow. A drop-down menu will appear.
Rejecting all changes
- Select Reject All Changes in Document.
Accepting or rejecting all changes does not affect comments, so if you want to delete them you’ll have to do so separately.
Changing how markups appear
If there are a lot of tracked changes in a document, they can become distracting if you’re trying to read through the document. There are a few settings you can use to hide the markups or change how they appear.
To hide tracked changes:
- From the Review tab, click the Display for Review command. The Display for Review command is located to the right of the Track Changes command, and it may not be labeled. It will probably say Final:Show Markup.
The Display for Review Command
- In the drop-down menu, there are four options:
- Final: Show Markup: Shows the final version along with the markup
- Final: Shows the final version and hides all markups
- Original: Show Markup: Shows the original version along with the markup
- Original: Shows the original version and hides all markups
- Choose Final or Original from the drop-down menu to hide markups.
Displaying the Final version (markups hidden)


Setting Display for Review to Final is not the same as accepting all changes. You will still need to accept or reject the changes before sending the final version of your document.
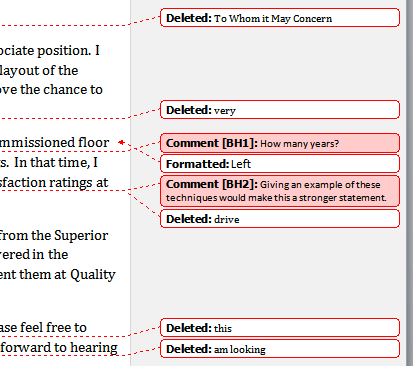
To show revisions in balloons:
By default, most revisions show up inline, meaning the text itself is marked. You can choose to show the revisions in balloons, which moves many of the revisions (such as deletions) to balloons in the right margin. This can make the document easier to read because there are fewer inline markups. Balloons also give you more detailed information about some markups.
- From the Review tab, click Show MarkupBalloonsShow Revisions in Balloons.
Showing revisions in balloons
- Some of the revisions will move to the right margin.
Revisions in the right margin
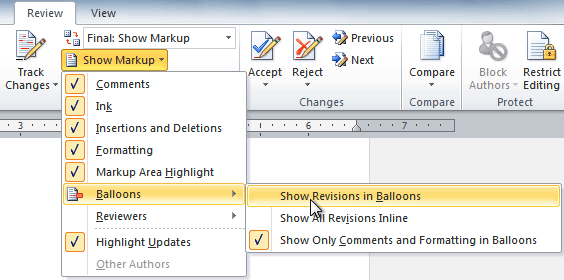
To go back to inline markups, you can select either Show All Revisions Inline or Show Only Comments and Formatting in Balloons.
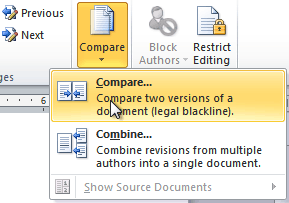
Comparing two documents
If you edit a document without tracking changes, it’s still possible to use reviewing features such as Accept and Reject. You can do this by comparing two versions of the document. All you need is the original document and the revised document, and they must have different file names.
To compare two documents:
- From the Review tab, click the Compare command. A drop-down menu will appear.
- From the drop-down menu, click Compare.
The Compare command
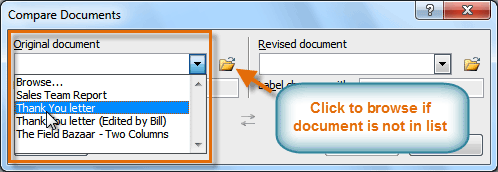
- A dialog box will appear. Choose your Original document by clicking the drop-down arrow and selecting the document from the list. If your document is not on the list, click the Browse button to browse for the file.
Choosing the Original document
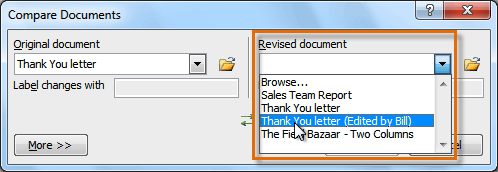
- Choose the Revised document the same way you chose the Original document, then click OK.
Choosing the Revised document
At this point, Word compares the two documents to determine which changes were made, and it creates a new document that you can save if you want. The changes show up as colored markups, just like the ones that appear when using Track Changes. You can then use the Accept and Reject commands to finalize the document.
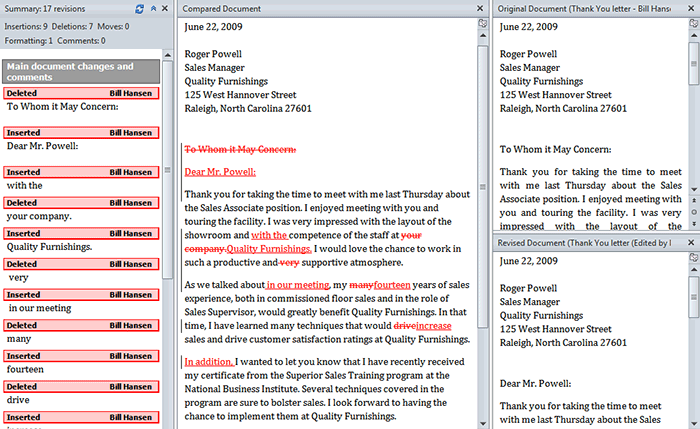 Comparing two documents
To the right of the new document, there’s a pane that displays the original and revised documents that you can use for reference (although you can’t edit them). If you don’t see the pane on the right, click Compare Show Source DocumentsShow Both.
Using the reviewing features safely
If there are any comments or tracked changes in your document, you should remove them before sending it to anyone you’re not collaborating with. Comments and tracked changes can reveal confidential information that could lead to embarrassment or make you or your company appear unprofessional—or worse.
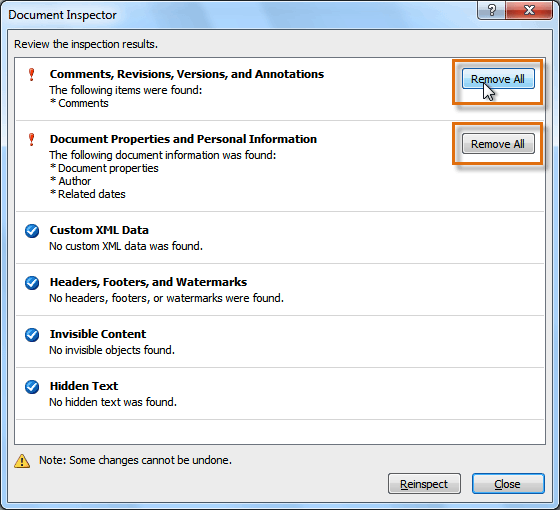
Once you’ve removed all of the comments and tracked changes, it’s a good idea to double-check your document using the Document Inspector. The Document Inspector can tell you if there is any hidden data in your document that you may need to remove. It looks for data in many different places—not just comments and tracked changes.
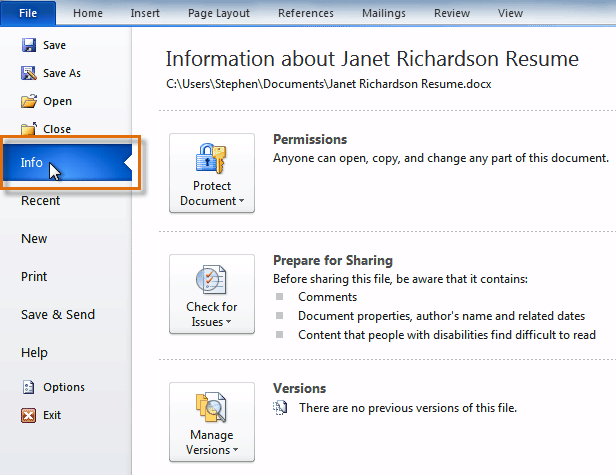
To use the Document Inspector:
- Save your document.
- Click the File tab to go to Backstage view.
- Select Info on the left side of the page.
Selecting Info
- Click the Check for Issues command. A drop-down menu will appear.
- Select Inspect Document.
Clicking Inspect Document
- Click Inspect.
Starting the inspection
- The inspection results will show an exclamation mark for any categories where it found potentially sensitive data, and it will also have a Remove All button for each of these categories. Click Remove All to remove the data.
Removing possibly sensitive data
- Close the dialog box when you’re done.
- From Backstage view, click Save to make the changes permanent.


Challenge!
- Open an existing Word document. If you want, you can use this example.
- Turn on Track Changes.
- Delete some text.
- Add some text.
- Change some of the text formatting.
- Experiment with the Display for Review command.
- Accept all of the changes.
- Use the Document Inspector to check the document.
/en/word2010/working-with-tables/content/
Comments in Word – easy comment review, export to Excel or Word, etc.
Rank and filter comments by importance, extract comments to Excel, and much more – NEW version
Learn how the DocTools CommentManager Word add-in can help you
DocTools CommentManager makes it faster and easier than ever to manage comments in Word – review comments in Word from one place, extract all comments, create inline comments for instructions and help, etc.
A time-saving tool for anyone who is involved in editing and reviewing contracts, specifications, legal documents, scientific reports, technical reports, technical specifications, user manuals and other documents where comments are used extensively.

Completely compatible with Word’s own comment features but with many powerful, new and unique capabilities added.
DocTools CommentManager 3.0 works with both classic comments, i.e. the comments known in several versions of Word, and modern comments that have been introduced by Microsoft in Word for Microsoft 365 in spring 2021.
The DocTools CommentManager add-in lets you work with two types of comments in Word:
Standard comment
The type of comment you can insert via the Insert tab or the Review tab in the Ribbon (called comment or standard comment below)
Inline comment
A special type of comment inserted as a 1-column table inline in the document – can be used for instructions, help texts, tips, etc.
Standard comments are normally used during the editing and review phase of a Word document and will most often need to be removed from the final document. Inline comments may be used either as temporary instructions, tips or help during the editing process or as permanent tips or notes.
With DocTools CommentManager, you can do everything you can using Word’s own comment features and a lot more. You can:
- Review all standard comments from a control center from where you can see all commends, edit comments, add replies to comments, mark comments as resolved, rank comments, find comments with specific metadata or text, filter comments to see e.g. only comments with rank 1, etc.
- Change the author name of existing comments, e.g. to show the company name instead of individual author names in documents that are to be shared with external people
- Extract all comments, incl. metadata, to a new Word document or to Excel – you can print the extract document with all comments, if desired
- Insert inline comments with the click of a button
- Delete all resolved comments in one operation
- Browse all inline comments and quickly delete individual inline comments, if you want
- Delete all inline comments with the click of a button, if you want
- Customizable defaults for inline comments
- Easy access to display options and other settings related to standard comments
- And more…
Empower everyone who works with review and comments in Word. Get DocTools CommentManager today!
Watch the videos below and read on to learn how DocTools CommentManager can help you.
The add-in works with Word 2013, Word 2016, Word 2019, Word 2021, Word for Microsoft 365 on PC / Windows.
The add-in works with both 32-bit and 64-bit versions of Word.
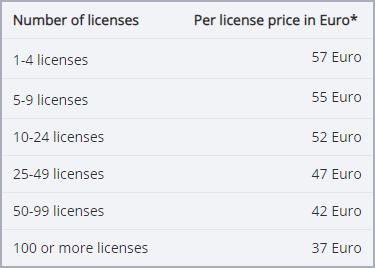
Single user license only EUR 57 – volume discount – see Pricing details below.
NEW in version 3.0
In spring 2021, Microsoft has introduced a redesign of the built-in comment features in Word for Microsoft 365, referred to as modern comments. Unfortunately, modern comments include a lot of restrictions compared to classic comments. Also, the changes ruined some of the features in DocTools CommentManager.
Word 2019 and earlier versions will remain using the classic comments features as previously. Sooner or later, users of Word for Microsoft 365 will be switched to use modern comments.
In DocTools CommentManager 3.0, I have redesigned the add-in to handle the issues in relation to modern comments. This means that the new version works with both classic comments and modern comments.
Videos – see examples of DocTools CommentManager features
The videos below show examples of features in the DocTools CommentManager add-in.
VIDEO 1 Review comments in Word
Shows how you can use the Review Comments command as the control center for managing comments in Word.
Duration: 3:38
VIDEO 2 Extract comments to Word or Excel
Shows how to extract comments into a new Word document or an Excel file in seconds.
Duration: 1:55
What users say about DocTools CommentManager
First, Wow! Thank you for the incredibly quick and detailed response!
The CommentManager is a very comprehensive and impressive tool. I haven’t seen much out there that compares with it or the other DocTools add-ins.
Darrel Harmer
Senior Project Manager, State government agency – USA
The CommentManager program is a gift! Truly. Thank you for developing it.
I use it in coding qualitative research for my doctoral dissertation and plan to use it in future research.
Leslie Grubler
Dissertation Researcher from NYC
The use of the DocTools add-ins have tremendously boosted my productivity.
CommentManager greatly facilitates the task of reviewing and answering comments as well as of creating Word or Excel documents with all the comments. Features such as the possibility of searching and moving comments and of adding inline comments are great assets of this add-in.
DocTools add-ins are very intuitive to use and allow a high degree of customization. Accordingly, I will be happy to continue using these add-ins and I do hope more will become available in the near future.
Carlos Blanco Villa
CEO, BIOMETRICA SRL, Belgium
First of all I love the CommentManager tool. It’s a godsend.
Cam Johnston
Managing Director, Juno Risk Solutions, Inc – Canada
Comment features – comparison |
DocTools |
Word’s built-in |
|---|---|---|
|
Insert comments |
||
|
Delete all comments or delete comments individually |
||
|
Add reply to comments |
||
|
Go to next or previous comment |
||
|
Display comments in different ways or hide comments |
||
|
Insert a comment without using the mouse – press the keyboard shortcut Alt+Ctrl+M |
||
|
Use the Esc key on the keyboard to move the cursor from a comment back to the document, just after the commented text so you are ready for typing without first deselecting the commented text NOTE: Currently, Microsoft doesn’t support using the Esc key in modern comments |
||
|
Change the author name in existing comments, e.g. to show the company name instead of individual user names in documents that are to be shared with external people |
||
|
Remove author names from all comments to make them totally neutral – without removing other metadata |
||
|
Review comments in Word from a control center from where you can see all comments, edit comments, reply to comments, mark comments as resolved, delete comments, etc. |
||
|
Rank comments by importance and quickly filter comments by rank |
||
|
Filter comments to see only unresolved comments or only resolved comments |
||
|
Quickly find and get an overview of all comments that match certain criteria – for example, find all comments added by the same author or comments that include a specific text string |
||
|
Extract all comments or selected comments, incl. metadata, to a new Word document – gives you full overview of all comments and lets you print all comments, if desired – you can select from a number of sort options, incl. sort by rank |
||
|
Extract all comments or selected comments, incl. metadata, to an Excel file – gives you full overview of all comments and lets you use Excel features, e.g. for filtering |
||
|
Find a comment in the source document directly from an extract document |
||
|
Convert selected text to a comment, thereby removing the selection from the document and adding it to a new comment in the location where the text was found |
||
|
Delete all resolved comments in one operation |
||
|
Move a comment from one place in a document to another |
||
|
Insert inline comments that can be used for tips, instructions, help texts, tips, notes, etc. |
||
|
Review inline comments via a dialog box that lets you browse through the inline comments and delete the individual inline comments if desired |
||
|
Delete all inline comments in one operation |
||
|
Specify default settings for both standard comments, comment numbering, and inline comments – define comment numbering, colors, etc. |
||
|
See the index number of the current comment and the total number of comments when you go to next or previous comment (example: comment 23 of 45) |
||
|
Easy access to modify the styles used for comments |
Pricing and general information
3.0 – see Changelog for info about versions and changes
Word 2013, Word 2016, Word 2019, Word 2021, Word for Microsoft 365 on PC / Windows
Free trial – try before you buy:
Applies to licenses purchased on a single order
One-time fee – no recurring payments
* Prices do not include applicable taxes
* Perpetual license – license does not expire
* One-time fee – no recurring payments
* Select from many currencies on the order page
* Download link delivered instantly via email
UPGRADE to newest version from any earlier version and save 30%
The UPGRADE version requires that you have purchased license(s) for an earlier version. To start the secure order process of UPGRADE license(s), click the UPGRADE button. The price will automatically be reduced by 30% of the normal prices listed above.
Click the Buy Now button to start the secure order process. All orders are processed securely by MyCommerce Share-It and are delivered online instantly. You can select from a large number of currencies on the order page. The price in other currencies than EUR vary based on the currency exchange rate.
Introduction to some of the special features in DocTools CommentManager
Word’s comment feature is often used during the editing and review phase of Word documents. In documents with many comments, you may easily get lost.
It can be difficult to get an overview of the comments and keep track of them all. This work hasn’t been made easier after Microsoft, for unknown reasons, removed the numbering from comments. Also, the introduction of modern comments in Word for Microsoft 365 has made the work with comments more cumbersome and inefficient. The DocTools CommentManager add-in can help work more efficiently with comments.
DocTools CommentManager lets you do everything you can do with comments in Word using the built-in comment functionality – but you can do it easier and faster and with more control. In addition, DocTools CommentManager includes unique and efficient comment features that let you perform tasks you can’t do using Word’s own functionality. For details about Word’s built-in comment functionality, see my article How comments in Word work.
Below, you will find short descriptions and illustrations of some of the special features that are included in DocTools CommentManager to make your work with comments in Word more efficient. You will find more details below this introduction.
Also, look at the menus illustrated below, and you will get an idea of features.
SPECIAL FEATURE 1 – Review comments in Word via an easy-to-use control center
The Review Comments command in the More Comment Tools menu makes it easy to manage and review comments even in documents with a lot of comments.
If you are using Word for Microsoft 365 with modern comments and if you are one of the numerous Word users who have been frustrated about how it works, you may find the Review Comments command even more helpful.
As mentioned above, the Review Comments command works as a control center for managing comments. The command opens a dialog box that lets you review comments. Directly from the dialog box, you can:
- see an overview of all comments, incl. metadata
- edit comments
- add replies to comments
- mark comments as resolved or unresolved
- rank comments by importance
- find or filter comments by rank
- filter to see only unresolved comments or only resolved comments
- find or filter comments by other criteria, such as comment text, date, or author
- delete comments
- you can even spell-check comments you edit using the Edit Comment button
You can show/hide an overview list of all comments and select comments directly from the overview as you wish.
The illustration below shows the Review Comments dialog box, opened in a document that currently includes 41 comments added by a number of authors.
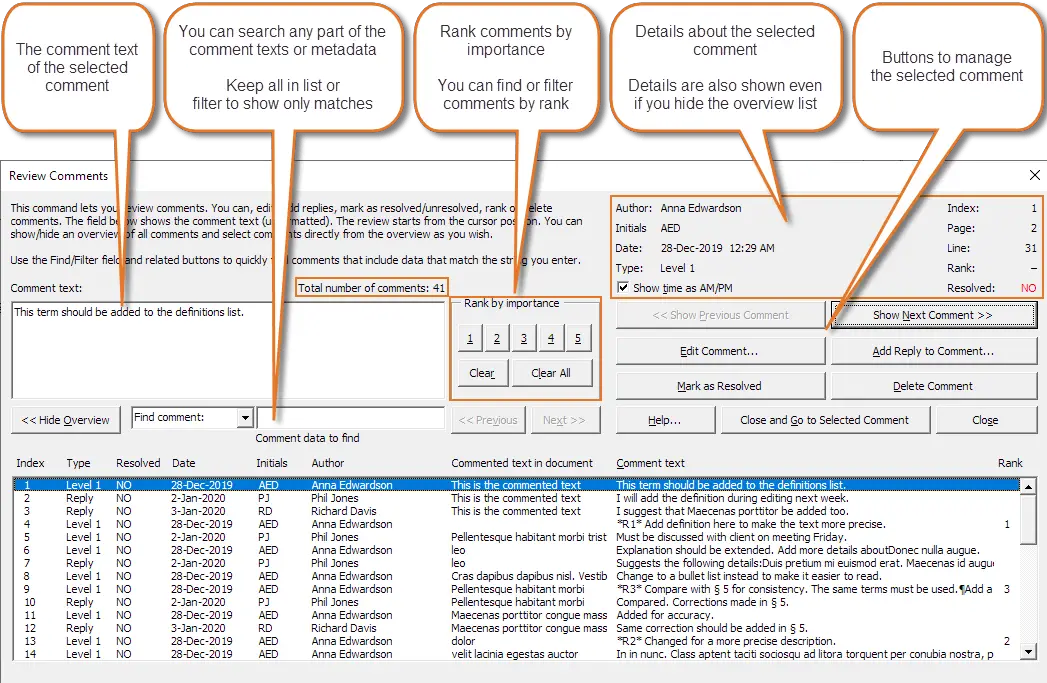
The Review Comments dialog box works as a control center for managing comments. The metadata shown in the top-right corner is automatically updated when you select another comment in the dialog box. Note that you can see the total number of comments just above the Comment text field (marked by a colored frame in the illustration).
When you assign a rank to a comment, a string is added in start of the comment text, keeping track of the rank (*R1* for rank 1, *R2* for rank 2, etc. You can rank comments 1-5 using the rank button. It is possible to manually assign rank 6-9 too, if you want. You can clear the rank from the selected comment or all comments using the Clear and Clear all button, respectively.
The Find/Filter feature in the Review Comments dialog box makes it easy to find comments that match specific criteria. Information below the Find field shows how many comments were found that match the Find/Filter string, it any.
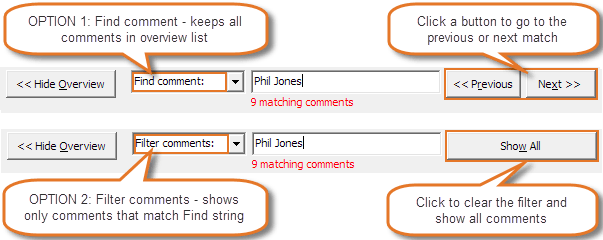
You have two options for quickly finding specific comments: Find comment and Filter comments.
In the Review Comments dialog box, the find feature lets quickly find comments in two ways:
Find comment keeps all comments in the list. You can then use the Preview and Next buttons to browse the comments that match the Find string.
Filter comments lists only the comments that match the Find string.
The Find/Filter feature in the Review Comments dialog box also lets you filter comments by the rank you assign. See the example below.
![]()
Select one of the Show Rank only options from the Find/Filter list.
![]()
Example: Bottom of Review Comments dialog box. Show Rank 1 only is selected. The overview shows only comments with rank 1.
To list only unresolved or resolved comments in the list, select Show unresolved or Show resolved, respectively.
SPECIAL FEATURE 2 – Extract comments including metadata – Extract to Word or Excel
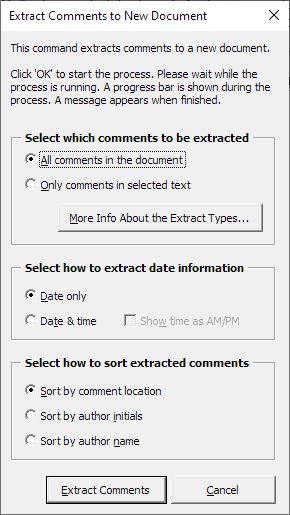
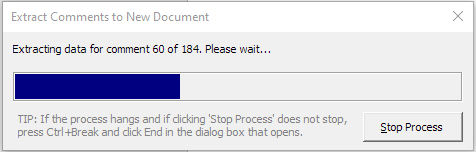
You can extract comments to either a new Word document or to an Excel file using the Extract Comments to New Word Document and Extract Comments to Excel commands in the More Comment Tools menu. The extract document will include a row for each comment.
You can select whether the extract document is to include all comments or only comments in a selected part of the document.
You can select whether pictures and graphics in comments are to be included in the extract. If you turn OFF the option, a slash (/) will appear instead of the graphic elements in the extract and tables in comments will be converted to text only.
When extracting to Word, you can also select how comments are to be sorted in the extract document. You can sort by comment location, by author initials, by author name, or by rank.
In Excel, you can use Excel’s own features to quickly filter or sort the extracted comments as you wish.
An extract documents is useful to get a good overview of comments. Also, you can use an extract document to print comments, if desired. In case of a Word extract document, you can quickly find the comment in the source document by using the Find Comment command.
The extract document shows the following data:
- #: Comment number
- Type: Shows Level 1 or Reply
- Resolved: YES or NO
- Line: Shows line number, relative to page, where comment is found
- Heading: Nearest preceding heading formatted with a Heading 1-9 style
- Comment scope: The text that is commented
- Comment text: The comment text
- Initials: Shows author initials
- Author name: Shows the full author name
- Date: Shows date (and time, if selected) when the comment was added
- Rank: Shows rank value set in Review Comments dialog box
As can be seen in the illustration of the dialog boxes, the Heading and Rank columns are optional.
If no paragraphs in the document have been formatted with the built-in Heading 1-9 styles, the Heading option will be disabled.
TIP about the Rank column: Even if you have not added rank via Review Comments, you can manually add rank values in the extract documents if you want. This makes it possible to use the values for sorting.
For the rank to be used in Review Comments, it must be set in the source document. Rank or other changes you add in an extract document will not influence the original source document.
The Extract Comments to New Word Document dialog box lets you define how the extract is to be made.
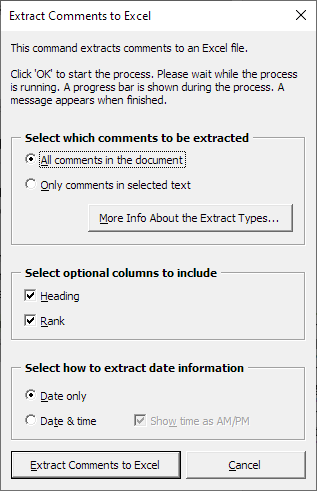
The Extract Comments to Excel dialog box lets you define how the Excel extract is to be made.
Example – extract comments to Word document
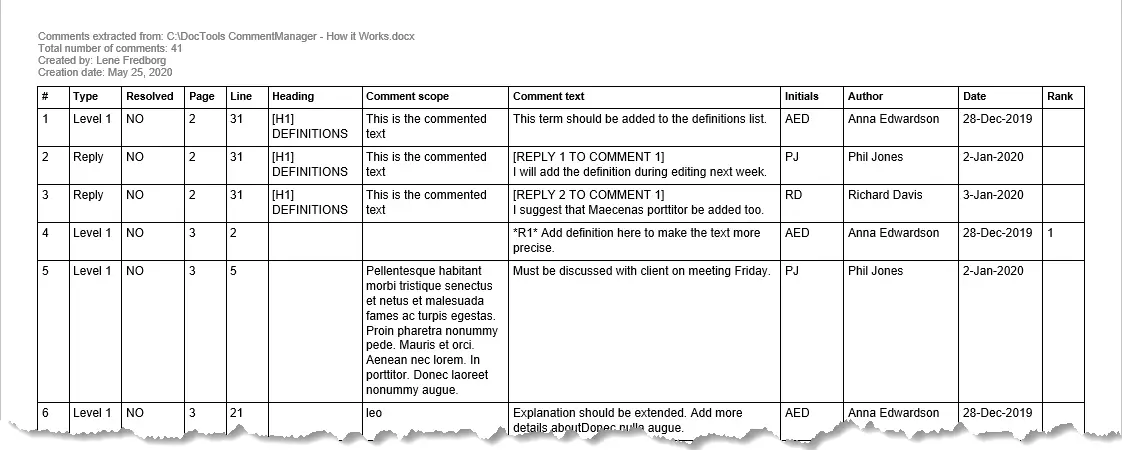
Example of extracted comments created using Extract Comments to New Word Document – the document includes both comments and metadata.
Example – extract comments to Excel file
The header and footer in the Excel file include data about the extract corresponding to the Word extract document shown above. However, the data is not visible in the illustration below.
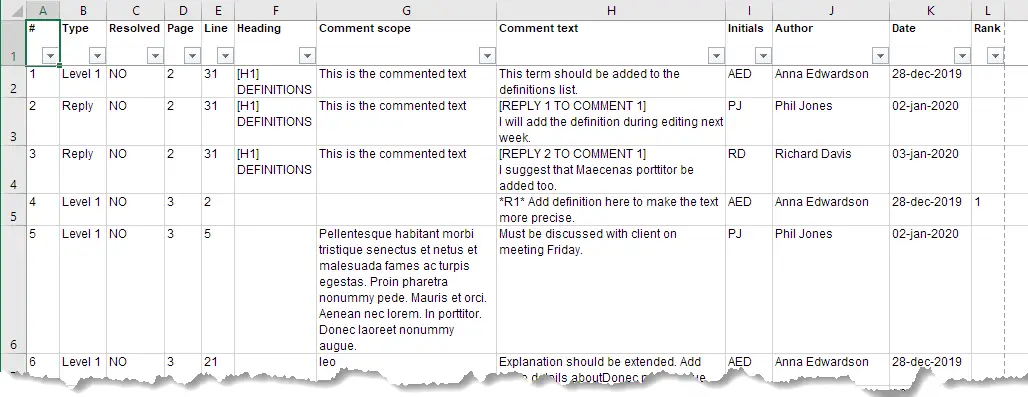
Example of extracted comments created using Extract Comments to Excel – the document includes both comments and metadata. Note that filter buttons are automatically applied, making it easy for you to filter and sort the data.
You will find more details about the comment features below. See also the comparison of features in DocTools CommentManager and Word’s built-in comment features above.
SPECIAL FEATURE 3 – See comment number and total number of comments in the Status Bar
Earlier versions of DocTools CommentManager had features for permanently showing the comment number in comments. Unfortunately, Microsoft’s implementation of modern comments has made it impossible to keep that functionality. However, when you use the Previous Comment and Next Comment commands in the CommentManager tools, the number of the selected comment and the total number of comments will be shown in the Status Bar in the bottom of the Word window.
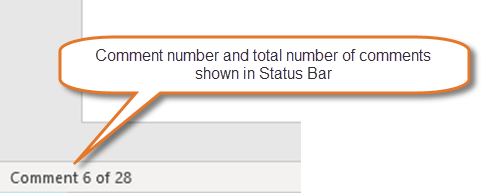
Click Previous Comment or Next Comment in the CommentManager group to see comment number and total number of comments shown in Status Bar.
TIP: In case of classic comments, the add-in will also show comment number and total number of comments in the Status Bar when you right-click in a comment. This extra feature doesn’t work with modern comments since they don’t react to right-click.
SPECIAL FEATURE 4 – Insert inline comments for instructions, help, tips, notes, etc.
You can insert an inline comment with the click of a button. An inline comment is a 1-column table with a heading of your choice. In addition, you can customize the shading color and border applied to inline comments.
Inline comments are useful in templates or documents where you, for example, need to tell the user what to do. Inline comments can also be used to quickly add special tips and notes that must stand out from the text. You can use inline comments both for content such as instructions that are to be deleted from the final document and for tips and notes that are to remain in the final document. A command lets you delete all inline comments with the click of a button, so it is easy to get rid of all such comments if needed.
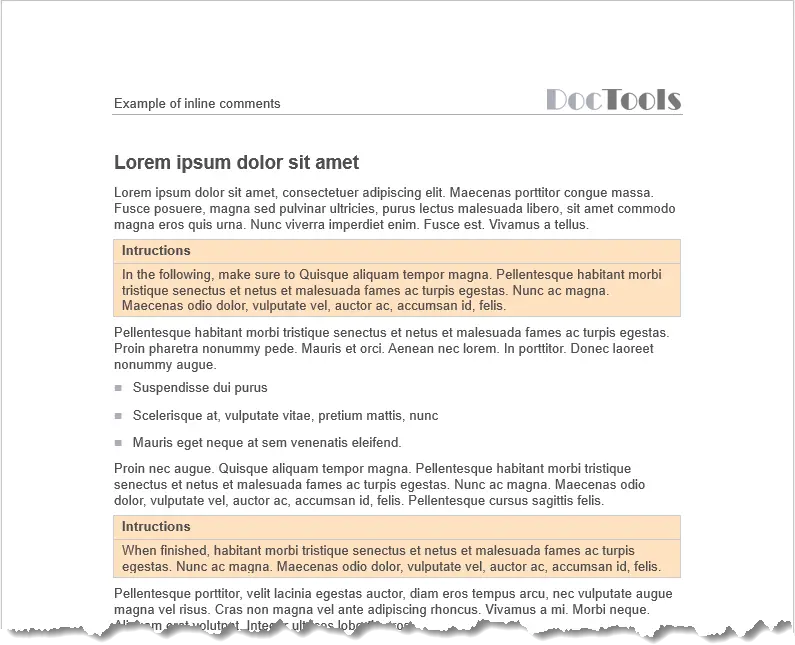
Example of inline comments used for instructions. When you insert an inline comment, it will automatically be applied the shading (or no shading), border (or no border) you have set as the default. You can also define which paragraph style to apply to the text by default.
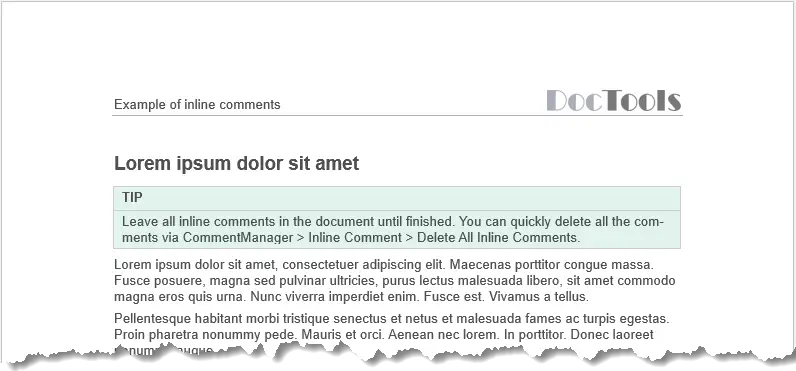
Another example of an inline comment. You can change the shading and borders of all inline comments in a document in one operation if needed.
About the Review Inline Comments command
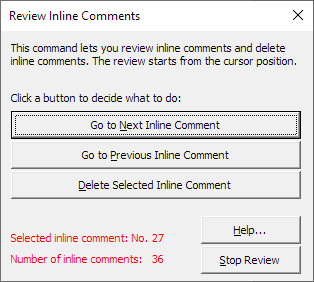
The Review Inline Comments dialog box lets you review all inline comments.
The Review Inline Comments dialog box lets you browse all inline comments to review them. The dialog box shows the number of inline comments found and the index number of the currently selected inline comment. This makes it easy to keep track of the inline comments.
You can delete individual inline comments from the Review Inline Comments dialog box or by simply selecting an inline comment table in the document and delete it.
DocTools CommentManager also includes a command that lets you delete all inline comments in one operation. This is useful, for example, if inline comments are used as temporary instructions to the editor(s) of the document.
About the Set inline Comment Options command

The Set Inline Comment Options dialog box.
The Set Inline Comment Options dialog box lets you set defaults for inline comments. In addition, you can restore settings from the attached template or import settings from another document.
You can change the settings whenever you want. Each document will remember your settings for that document.
The story behind the DocTools CommentManager add-in
For many years, I have provided both a macro and a Word add-in free of charge that let you extract comments from a Word document. Since many companies use comments a lot in relation to the editing and review process of documents, I found that some special comment tools could be useful. Read about some of the special features above and see the illustrations of the DocTools CommentManager menus and the descriptions of the individual commands below to get an idea of all the features.
Until version 3.0, DocTools CommentManager included features for adding automatic numbering to all comments to compensate for Microsoft’s removal of numbering in Print Layout view in Word 2013 and newer versions. However, Microsoft’s introduction of modern comments in Word for Microsoft 365 has made it impossible to keep the automatic numbering feature due to the very limited formatting options in modern comments. I have compensated for that, e.g. by adding a feature that shows comment number information in the Status Bar.
About inline comments
In several of the customer-specific solutions I have developed, I have included tools for easy insertion of a special type of comments that I have referred to as Inline comments. For example, inline comments can be used for tips, notes and help aimed at the users of documents. When working with the development of DocTools CommentManager, I decided to include functionality for inline comments too since it has been highly valued and used by my customers. I have extended and improved the functionality to make it flexible and to make it easy to make inline comments stand out from or match the content of any documents depending on your needs.
I started the development of DocTools CommentManager in spring 2018. Since I was busy working with customer-specific solutions and other Word add-ins, I did not find the time to make DocTools CommentManager ready for being published on this website until the start of 2020. Since then, I have published a number of updates.
More details about the functionality of DocTools CommentManager
The user interface (i.e. screen texts in the Ribbon, dialog boxes, help, etc.) of DocTools CommentManager is in English but the add-in can be used with any language version of Word.
DocTools CommentManager is easy to use. You can start using it immediately, but it is recommended to spend time familiarizing with the functionality to take full advantage of all the features.
You have access to the functionality of the add-in via the CommentManager group in the DocTools tab in the Ribbon:
The CommentManager group in the DocTools tab
TIP: You can add any of the commands to the Quick Access Toolbar (QAT) if you want. To do this, right-click the desired command and click Add to Quick Access Toolbar.
The Insert Comment command inserts a standard Word comment. You can also use the keyboard shortcut Alt+Ctrl+M to insert a comment. The display of comments depends on your comment display settings.
Help and tips are built into the add-in
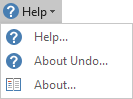
If you hover the mouse over a command, you will see a short description of the command. When you select a command that opens a dialog box, the dialog box will show information about what to do. In addition, the Help command in the Help menu provides comprehensive help:
The Comment Author menu – tools for managing the author name shown in comments
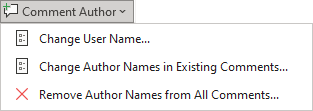
The Comment Author menu includes tools for managing the author name shown in comments in Word.
You can change the Author name to be used in new comments and change the author name of existing comments, e.g. to show the company name instead of individual user names. You can also entirely remove the author names from all comments.
See MENU – Comment Author below for a short description of all the commands in the Comment Author menu.
The More Comment Tools menu – misc. productivity tools for managing comments
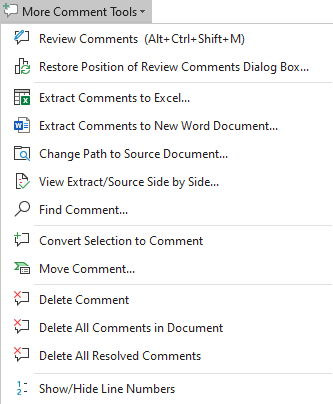
The More Comment Tools menu includes several productivity tools for managing comments.
The Review Comments command works as a control center for managing comments. The command opens a dialog box that lets you review comments, edit comments, add replies to comments, mark comments as resolved, rank comments, filter comments, or delete comments. You can show/hide an overview of all comments and select comments directly from the overview as you wish.
See MENU – More Comment Tools below for a short description of all the commands in the More Comment Tools menu.
The Inline Comment menu – tools for inserting and managing inline comments in documents
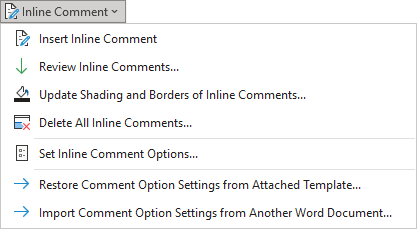
The Inline Comment menu includes commands for inserting, browsing, and deleting inline comments. In addition, you will find commands for setting inline comment defaults.
An inline comment is inserted as a 1-column, 2-row table in the cursor position. The heading text and colors you specify in the Set Inline Comment Options dialog box will be applied to the table. You can use inline comments for instructions, help texts, etc. that are to be deleted after the editing process is finished or you can use inline comments for permanent content like tips or notes.
See MENU – Inline Comment below for a short description of all the commands in the Inline Comment menu.
The Display Options menu – tools for setting general comment options

The Display Options menu includes commands for viewing comments with numbering in Print Preview, for defining how track changes are displayed and for modifying comment styles.
See MENU – Display Options below for a short description of all the commands in the Display Options menu.
Progress bar
A progress bar will be shown when you perform operations that may take more than a few seconds.
Overview of all the commands in DocTools CommentManager
Insert Comment
Shortcut: Alt+Ctrl+M
Inserts a new comment. The comment display depends on your display settings for comments and revisions. Works as Word’s built-in command for inserting a new comment.
- Click here to see the Comment Author menu
This command lets you change the user name and initials — used for new comments you add, for all other revisions and as the author name of new documents.
Change Author Names in Existing Comments
This command lets you change author names and initials in existing comments. You can select whether to change the name and initials only in comments with a specific author name or in all comments.
You can, for example, use this command to add your company name as the author of all comments before sending a document to external receivers. You can also use the command to correct an author name in case an incorrect name was set as the author’s user name at the time when he/she added comments.
Remove Author Names from All Comments
This command lets you remove author names and initials from all comments in the active document, thereby making the comments fully neutral.
- Click here to see the More Comment Tools menu
Review Comments
Shortcut: Alt+Ctrl+Shift+M
This command opens a dialog box that lets you review comments, edit comments, add replies to comments, mark comments as resolved, rank comments by importance, or delete comments. You can find comments and filter comments. You can show/hide an overview of all comments and select comments directly from the overview as you wish.
In addition to the comment text, the dialog box shows details about the selected comment (author, initials, page, line and index number, rank, and more).
Restore Position of Review Comments Dialog Box
This command lets you restore the position of the ‘Review Comments’ dialog box to the default, so it is fully visible on the screen. Normally, the ‘Review Comments’ dialog box will open with the position it had most recently. Under special conditions, this may result in the dialog box being positioned outside the screen, making it invisible for you. For example, this may happen if you are using another monitor setup than last time you used the ‘Review Comments’ command (e.g. switched form two to a single monitor).
Extract Comments to Excel
This command lets you extract comments to a new Excel file. The Excel file will include a row for each comment, including index no., resolved status, type, page, line, heading (optional), comment scope text, comment text, author, date, and rank (optional).
TIP: As opposed to Word, Excel lets you use e.g. filter functions that can be useful in the process of handling comments.
Extract Comments to New Word Document
This command lets you extract comments to a new Word document. The extract document will include a row for each comment, including index no., resolved status, type, page, line, heading (optional), comment scope text, comment text, author, date, and rank (optional).
TIP: If you need a printed version of all comments, you can use this command. Print the resulting extract document.
Change Path to Source Document
The active document must be an extract document. This command lets you point out the document that was used as the source document when you created the extract document.
You can use this command if the source document has been moved and/or renamed.
View Extract/Source Side by Side
The active document must be an extract document. The command arranges the extract document and the source document side by side. If the source document is not open, the command will find and open it if possible, using the path stored in the extract document.
The active document must be an extract document in Word format (not Excel) or a source document containing comments. This command lets you find a specific comment in a document by its index number (example: comment no. 18).
TIP: If the active document is an extract document, first click anywhere in the row that includes the extracted comment you want to find in the source document. The command will then automatically open/activate the source document and select the comment with the index number found in column 1 in row you clicked in the extract document.
If your have added/removed comments in the source document after creating the extract document, the found comment will be dislocated correspondingly.
Convert Selection to Comment
This command lets you convert text in the document to a comment. The command removes the content and adds it to a new comment in the location where the text was found. The selection must include the text in the main text story that is to be converted to a comment.
This command lets you move a comment, i.e. change the comment so it is linked to a different scope in the same or another paragraph.
The selection must include the text the moved comment is going to point to. You must keep track of the index number of the comment to be moved.
In case of a level 1 comment, any replies added to the comment will be moved too.
TIP: The selection may include or overlap the existing scope of the comment to be moved. This way, you can use this command to correct the scope in case it does not currently mark the desired text.
The selection must be in a comment. Deletes the comment in question.
Delete All Comments in Document
Deletes all comments in the active document.
Delete All Resolved Comments
Deletes all comments in the active document that have been marked as resolved.
Toggles line numbers on and off for the entire document. Each page will start with line number 1 and show line number for every line. NOTE: Word does not show line numbers next to tables.
You can set a different line number display via the Page Setup dialog box > Layout tab > Line Numbers. If you want the line numbers to match line numbers in comment extract documents, you must select ‘Restart each page’.
- Click here to see the Inline Comment menu
Inserts a 1-column, 2-row table in the cursor position. The heading text and colors you specify in the ‘Set Special Comment Options’ dialog box will be applied to the table. You can use inline comments for instructions, help texts, etc. that are to be deleted after the editing process is finished or you can use inline comments for permanent content like tips or notes.
Opens a dialog box that lets you review all inline comments. The dialog box also lets you delete inline comments.
Update Shading and Borders of Inline Comments
This command updates the shading and border colors of all inline comments in the document to match the comment option settings.
Delete All Inline Comments
Deletes all inline comments that have been inserted using the ‘Delete All Inline Comments’ command. This makes it easy to remove e.g. instructions and help texts that are one meant to be used during the editing process.
Set Inline Comment Options
Opens a dialog box that lets you define a number of settings for inline comments.
Restore Comment Option Settings from Attached Template
Lets you import comment options settings from the attached template.
Import Comment Option Settings from Another Word Document
Lets you import comment options settings from the any document or template.
- Click here to see the Display Options menu
Switch to Classic Print Preview
Switches to the Print Preview from Word versions before the Ribbon was introduced (Word 2003 and earlier) as opposed to the preview shown when selecting Ribbon > File tab > Print.
NOTE: You can see index numbers of the comments in both preview versions.
Apply Comment Color by Author
Sets the option for comment color in balloons to ‘By author’. Each author’s comments will then be applied a separate color (up to 16 colors selected by Word).
You can select other color settings for comments via the ‘Advanced Track Changes Options’ dialog box.
In case of Word for Microsoft 365 with modern comments, the color setting has no effect.
Opens the built-in ‘Track Changes Options’ dialog box in which you can set basic options for comments and track changes.
The command also lets you update author name and initials of existing comments to the new values you specify.
Advanced Track Changes Options
Opens the built-in ‘Advanced Track Changes Options’ dialog box in which you can set advanced options for comments and track changes.
SUBMENU: Modify Comment Styles
Commands for modifying the styles used in relation to standard comments:
Modify ‘Comment Text’ style
Modify ‘Comment Reference’ style
Modify ‘Comment Subject’ style
Modify ‘Balloon Text’ style
Goes to the previous comment in the active document. Continues from the end when the start is reached.
TIP: The Status Bar in the bottom of the window shows the index number of the selected comment and the total number of comments (example: Comment 23 of 45).
Goes to the next comment in the active document. Continues from the start when the end is reached.
TIP: The Status Bar in the bottom of the window shows the index number of the selected comment and the total number of comments (example: Comment 23 of 45).
Help on DocTools CommentManager.

FREE TRIAL – Try Before You Buy
Try CommentManager risk-free for 7 days
If you want to try out the add-in before you buy, click the Free Trial button and follow the instructions. The free trial version includes all the functionality of the full version and will work for 7 days.

Click the Buy Now button above to start the secure order process. All orders are processed securely by MyCommerce Share-It and are delivered online instantly. You can select from a large number of currencies on the Share-It order page. The price in other currencies than EUR vary based on the currency exchange rate.
You will receive license key and further instructions via email.
If you have questions about orders, payment, and delivery, please consult the MyCommerce FAQ page.
If you have any other questions, please check the Support – How to menu and the information on the individual add-in pages you can access via the Products menu. If you don’t find an answer to your questions, please do not hesitate to send your questions to DocTools via the Contact form.
As described and illustrated above, the DocTools CommentManager add-in adds several efficient tools to Word to help you work more smarter and easier with comments in Word. See also all the other DocTools productivity tools for Microsoft Word.
Long documents can have hundreds or even thousands of markups, which can make finding individual feedback quite time-consuming. Today’s tutorial shows how to quickly view specific reviewers’ comments and edits in Microsoft Word.
First, we’ll use Track Changes to view comments and edits from specific reviewers. Then, we’ll use the Navigation pane to view comments (but not edits) from specific reviewers.
This tutorial is also available as a YouTube video showing all the steps in real time.
Watch more than 150 other videos about Microsoft Word and Adobe Acrobat on my YouTube channel.
Please note that these steps are for Word for Microsoft 365, Word 2021, Word 2019, and Word 2016. The steps are similar for Word 2013 and Word 2010.
Use Track Changes to View Comments and Edits from Specific Reviewers
The Tracking tools offer the most control over the comments and edits you see from specific reviewers.
1. Select the View tab and then ensure the document is set to Print Layout for best viewing.

2. Select the Review Tab.

3. Select the Display for Review drop-down menu and then select All Markup.

4. Select the Show Markup drop-down menu and then check the options you want to view: Comments, Insertions and Deletions, and/or Formatting.

5. Select Balloons and then select the viewing option you prefer: Show Revisions in Balloons, Show All Revisions Inline, or Show Only Comments and Formatting in Balloons. (My personal preference is Show Only Comments and Formatting in Balloons.)

6. Select the Specific People drop-down menu. Deselect the reviewers’ names whose comments and edits you don’t want to see. (Alternately, you may have to select the reviewers’ names whose comments and edits you do want to see if none are selected.)

The comments and edits from the reviewer or reviewers you selected will now show in the document.
When you’re finished…
7. Return to Specific People in the Show Markup drop-down menu and select All Reviewers to show everyone’s comments and edits.
Use Navigation to View Comments from Specific Reviewers
If you only need to view specific reviewers’ comments (not edits), use the Navigation pane to quickly move through the document.
1. Select the View tab and then ensure the document is set to Print Layout for best viewing.
2. Select the Home Tab.

3. Select Find in the Editing group to open the Navigation pane.

Pro Tip: Windows users can select Ctrl + F to open the Navigation pane directly.
4. Select the magnifying glass.

5. Select Comments and then check the reviewers’ names whose comments you want to view.

6. Use the navigation arrows to move up and down through the comments in the documents. (The comments won’t appear in the Navigation pane itself.)

When you’re finished…
7. Select the X in the text box to return the comment view to All Reviewers.

In my next Microsoft Word tutorial, we’ll look at how to search within comments without having to run the search through the entire document.
Further Reading: How to Remove User Names from Existing Track Changes in Microsoft Word
Updated June 04, 2022
Learn about the Review Tab in Microsoft Office Word 2007
| New Look | Home Tab | Insert Tab | Page Layout Tab | References Tab |
| Mailings Tab | Review Tab | View Tab | Acrobat Tab | Misc. Items |
In Microsoft Word 2007, the Review Tab is useful in a lot of ways. You can have the Spelling and Grammar feature, the Research option, Thesaurus and Translation functionality to help you improve your documents. Here is what the Review Tab looks like.

Under the Proofing group, you can use find the Spelling and Grammar feature. You can easily check the spellings, punctuation errors and grammar using this tool.
Here is the screen shot.

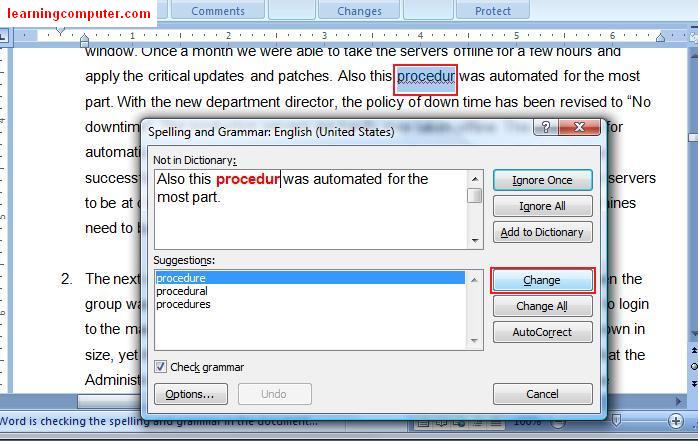
The first thing we are going to try is to check the spelling and grammar of a document. Go ahead and select the insertion point and click on spelling and grammar on the Proofing group on the Review Tab. This will start the Spelling and Grammar dialog box as shown below. Notice that it found an incorrectly spelled word, procedur. You can either click on Change if you would like to accept the suggestion made by Microsoft Word. Otherwise you can ignore it if you think the word is OK as it is.
Next we are going to try is the Research command on the word authentication as shown in the figure below. Select the word authentication and click on Research icon, this will launch the Dictionary feature as shown in the right side of the screen shot. It was able to find the word with the correct pronunciation and also the meaning for you to review. Very cool indeed!

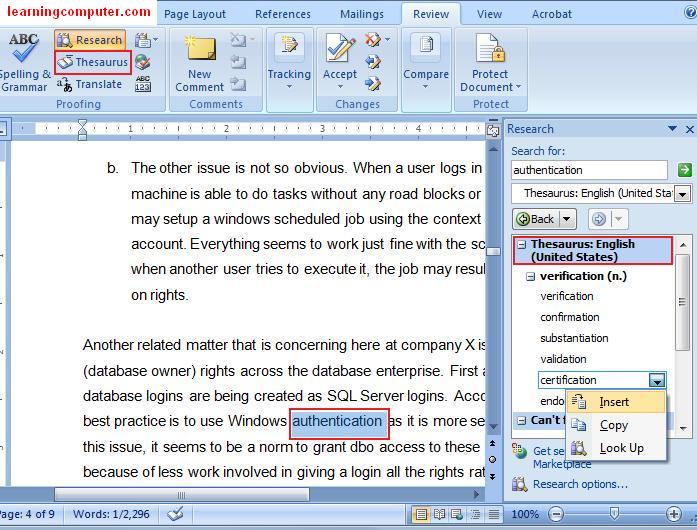
Another related feature is the Thesaurus in Microsoft Word 2007. This amazing feature helps you find synonyms and also antonyms of any specific word. In our example it found a list of synonyms for authentication as shown on the right side in the figure below. I’m going to select certification and select insert. This helps if you are like me and use the same words over and over again.
In the next figure I have highlighted the Word Count feature. This lets you find the number of characters, paragraphs and lines in the document. This is a pretty useful feature if you are working on a term research paper where you have to stay within a certain number of words or pages.

If you are collaborating on a document with other team members or on a project report, the Comments feature in the Review tab in Microsoft Word 2007 can be a true lifesaver. In the following screen shot, I have added a comment that is shown in red. Notice that it used my initials and a number right before the actual comment. As the other team members and comments, the application will use different colors. This helps to keep all the comments organized from different authors.

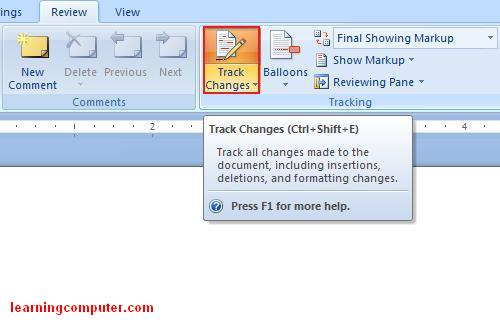
Moving onto the next group section which is the Track changes group. We can easily manage additions, deletion, any comments and formatting changes in an efficient manner using this feature. You can find the Track Changes command under Tracking group in the Review Tab in Microsoft Word 2007.
Let us look at an example of this feature using a Course Syllabus sample. After the initial review, the changes are highlighted as shown below. The additions are in red and underlined, the deletions are in red and using a strike through.
Furthermore notice that there is a vertical bar next to all the changes.

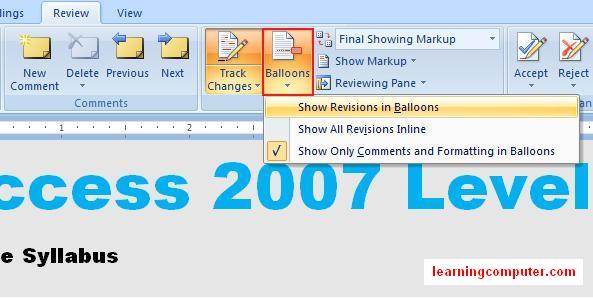
If you prefer seeing all the changes in Balloons, you can do this by selecting Show only Comments and Formatting in Balloons command. This will clean the document up and move the comments and changes to the right side in the markup area.
The next two screen shots display the functionality of this feature.

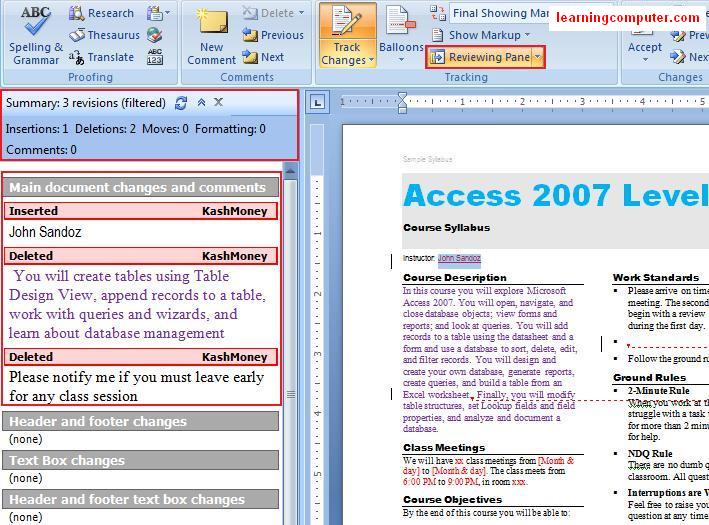
If you would like to see all the changes in one place, you can use the Reviewing Pane command. In the image below, I have selected the Reviewing pane under the Tracking Group. Notice all the revisions are summarized on the left side of the document and broken down into insertions, deletions, etc. by the author and into different sections, very cool!
After all the changes have been reviewed and checked, we are ready to accept all the revisions. We can do just that by selecting Accept all Changes in Document under the Accept command in the Changes group under the Review tab in Microsoft Word 2007. This will go ahead and update the document then finalize all the revisions and changes.

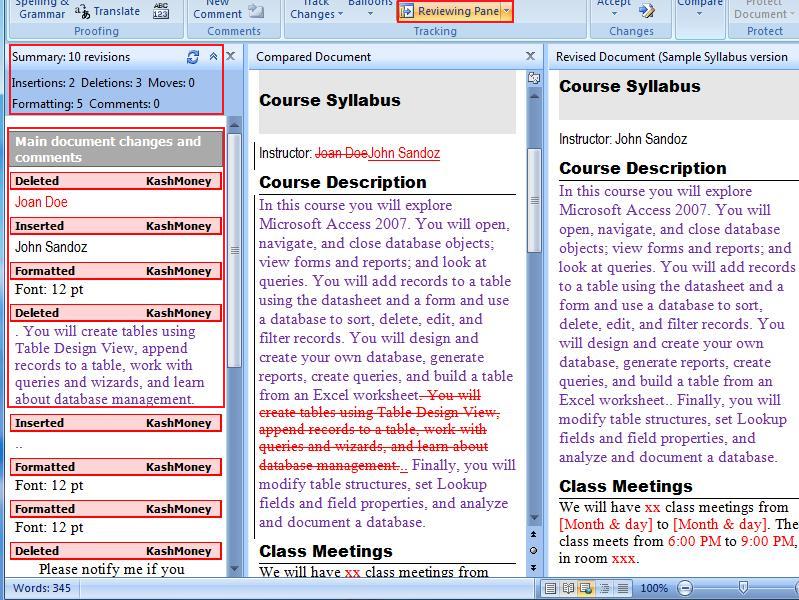
As you can see the Review tab in Microsoft Word 2007 has a lot to offer us. OK at times, it is necessary to review different versions off the same document especially if there are several people working on it at the same time. In Microsoft Word 2007, this is just a breeze. You can also use the Compare feature to combine multiple versions of the same document.

Let us go ahead and see how this can be achieved. I’m going to compare two Course Syllabi that I have been working on for a class that I am teaching. I select the Compare command which launches a dialog box as shown below. I select the original document in the left side and the revised document on the right side and hit OK.

This will launch the wizard that will compare the two versions. Not only will it show all the differences between the two versions, but also display a summary on the left side as shown below and the screen shot.
The last thing I would like to show you is how to protect a document from editing. This option will restrict others from making certain types of editing or formatting changes to the document. You can select the Protect Document option under the Protect group.
Here is the command shown on the ribbon in Microsoft Word 2007.
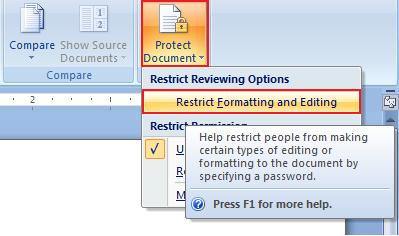
This will launch the Restrict Formatting and Editing dialog box as shown below. I will select the editing restrictions option that is number two and then click on us start forcing protection.
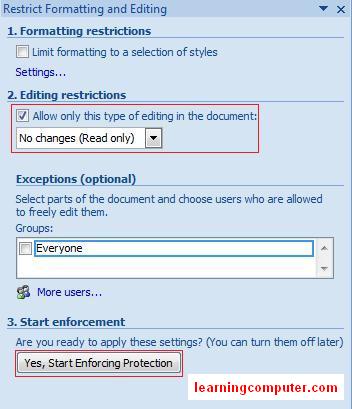
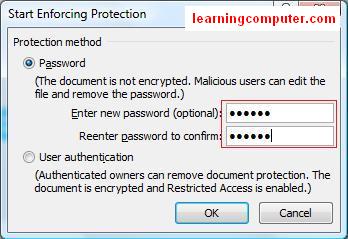
In the start enforcing production, I will select password, enter my password and click OK. There you go, now your document is protected by this password.
Next time someone tries to open this document and make changes, they will be prompted by this friendly on perfect document dialog box, pretty cool.
A screen shot is as follows.

This concludes the lesson on Review Tab in Microsoft Word 2007.
If you are unable to find the information you are looking for, please visit Microsoft’s Word 2007 training courses and tutorials
Have you heard the word? Up to speed with Word 2007
Web Design Dallas
Connect with US!
![]()