
132
132 people found this article helpful
How to Reveal Formatting Marks and Codes in Word
Go behind the scenes of your text to resolve formatting issues
Updated on January 30, 2022
What to Know
- Temporary reveal: In Word, go to the ribbon and select Home. Choose the Show Formatting Symbols icon to toggle marks on and off.
- Permanent reveal: In Word, go to the ribbon and select File > Options > Display. Select Show all formatting marks > OK.
This article explains two ways to reveal the formatting marks and codes in a Microsoft Word document. It also includes information on the Reveal Formatting panel. These instructions apply to Word for Microsoft 365, Word 2019, Word 2016, and Word 2013.
Temporarily Show Formatting Symbols
Microsoft Word uses bullets, numbered lists, page breaks, margins, columns, and more. To see how Word structures a document, view the formatting marks and codes associated with the text.
Quick-view the formatting Word uses in a document by toggling the feature on and off when you need it. Here’s how.
-
To reveal the formatting symbols, go to the ribbon and select Home.
-
In the Paragraph group, select Show/Hide (the icon looks like a paragraph mark).
-
The formatting symbols appear in the document and each symbol is represented by a specific mark:
- Spaces display as dots.
- Tabs are indicated with arrows.
- The end of each paragraph is marked with a paragraph sign.
- Page breaks display as dotted lines.
-
To hide the formatting symbols, select Show/Hide.
Permanently Show Formatting Symbols
If you find that having the formatting symbols visible makes working with Word easier and you want to have them visible all the time, here’s how to change the setting:
-
On the ribbon, select File.
-
Choose Options.
-
In the Word Options dialog box, select Display.
-
In the Always show these formatting marks on the screen section, select Show all formatting marks.
-
Select OK to save your changes.
Display the Reveal Formatting Panel
To find more information about the formatting of a Word document, display the Reveal Formatting panel.
-
Press Shift+F1 on the keyboard to display the Reveal Formatting panel.
-
To view information about a portion of the document, select that text.
-
In the Reveal Formatting panel, select a link to see detailed information about the formatting components and to make changes to the formatting.
-
To close the panel, select X.
Thanks for letting us know!
Get the Latest Tech News Delivered Every Day
Subscribe
You can also use SciTE to paste code if you don’t want to install heavy IDEs and then download plugins for all the code you’re making. Simply choose your language from the language menu, type your code, high-light code, select Edit->Copy as RTF, paste into Word with formatting (default paste).
SciTE supports the following languages but probably has support for others: Abaqus*, Ada, ANS.1 MIB definition files*, APDL, Assembler (NASM, MASM), Asymptote*, AutoIt*, Avenue*, Batch files (MS-DOS), Baan*, Bash*, BlitzBasic*, Bullant*, C/C++/C#, Clarion, cmake*, conf (Apache), CSound, CSS*, D, diff files*, E-Script*, Eiffel*, Erlang*, Flagship (Clipper / XBase), Flash (ActionScript), Fortran*, Forth*, GAP*, Gettext, Haskell, HTML*, HTML with embedded JavaScript, VBScript, PHP and ASP*, Gui4Cli*, IDL — both MSIDL and XPIDL*, INI, properties* and similar, InnoSetup*, Java*, JavaScript*, LISP*, LOT*, Lout*, Lua*, Make, Matlab*, Metapost*, MMIXAL, MSSQL, nnCron, NSIS*, Objective Caml*, Opal, Octave*, Pascal/Delphi*, Perl, most of it except for some ambiguous cases*, PL/M*, Progress*, PostScript*, POV-Ray*, PowerBasic*, PowerShell*, PureBasic*, Python*, R*, Rebol*, Ruby*, Scheme*, scriptol*, Specman E*, Spice, Smalltalk, SQL and PLSQL, TADS3*, TeX and LaTeX, Tcl/Tk*, VB and VBScript*, Verilog*, VHDL*, XML*, YAML*.
Microsoft Word — это хороший инструмент не только для набора текста и его форматирования, но и крайне удобное средство для последующего изменения, редактирования и правки. Далеко не все используют в работе так называемую «редакторскую» составляющую программы, поэтому в данной статье мы решили рассказать о том наборе инструментов, который можно и нужно использовать для таких целей.
Урок: Форматирование текста в Ворде
Инструменты, о которых пойдет речь ниже, могут пригодиться не только редактору или пишущему автору, но и всем тем пользователям, которые используют Microsoft Word для совместной работы. Последнее подразумевает, что над одним документом, его созданием и изменением, могут трудиться одновременно несколько пользователей, у каждого из которых есть постоянный доступ к файлу.
Урок: Как в Ворде изменить имя автора

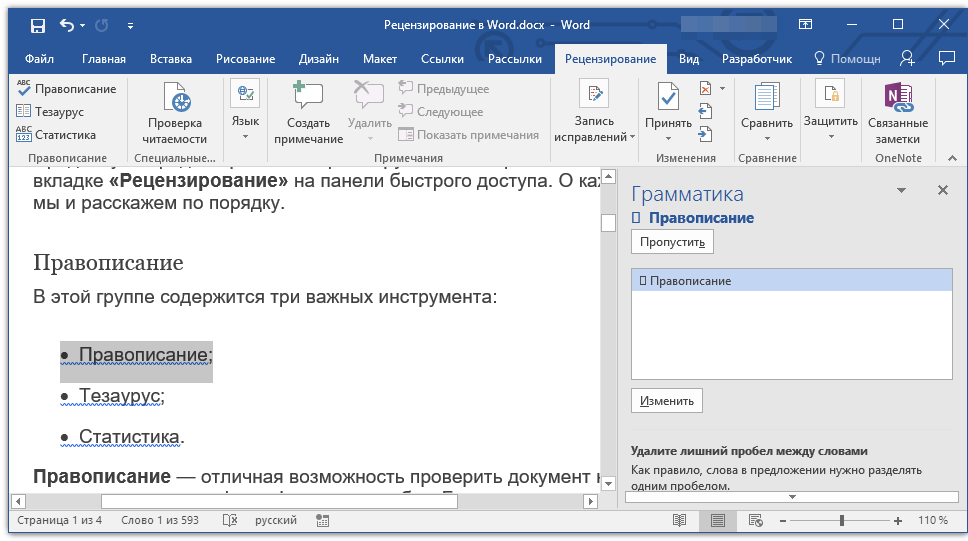
Продвинутый редакторский набор инструментов собран во вкладке «Рецензирование» на панели быстрого доступа. О каждом из них мы и расскажем по порядку.
Правописание
В этой группе содержится три важных инструмента:
- Правописание;
- Тезаурус;
- Статистика.
Правописание — отличная возможность проверить документ на наличие грамматических и орфографических ошибок. Более детально о работе с данным разделом написано в нашей статье.
Урок: Проверка правописания в Word
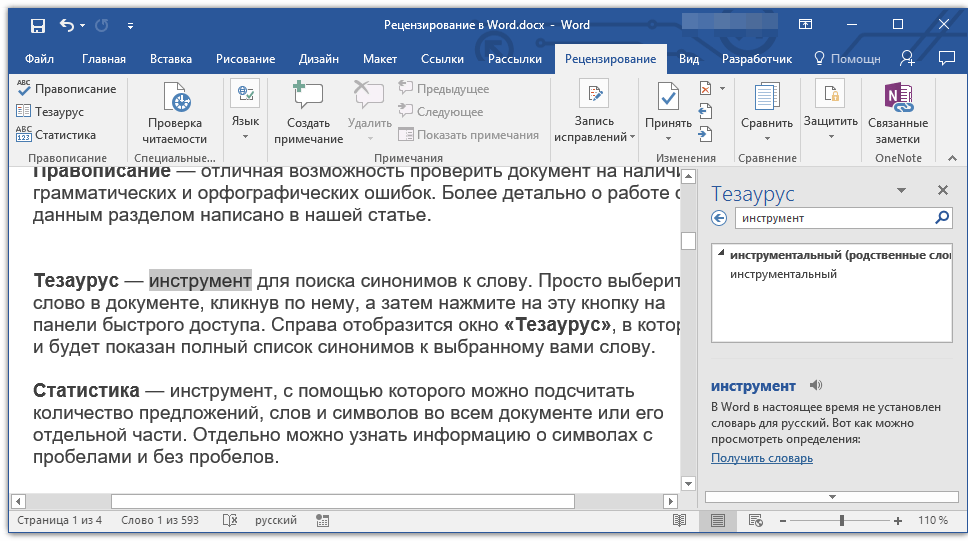
Тезаурус — инструмент для поиска синонимов к слову. Просто выберите слово в документе, кликнув по нему, а затем нажмите на эту кнопку на панели быстрого доступа. Справа отобразится окно «Тезаурус», в котором и будет показан полный список синонимов к выбранному вами слову.
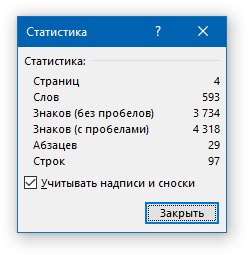
Статистика — инструмент, с помощью которого можно подсчитать количество предложений, слов и символов во всем документе или его отдельной части. Отдельно можно узнать информацию о символах с пробелами и без пробелов.

Урок: Как в Ворде посчитать количество символов
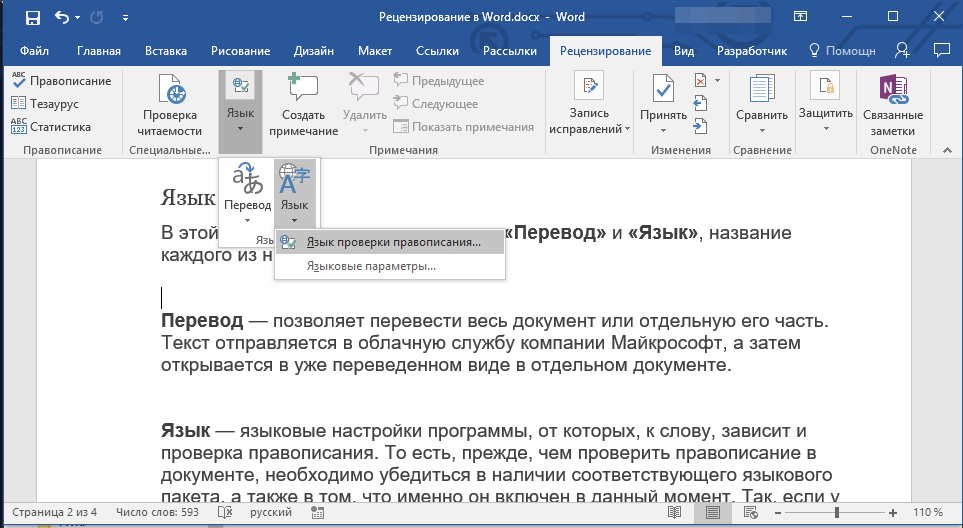
Язык
В этой группе всего два инструмента: «Перевод» и «Язык», название каждого из них говорит само за себя.
Перевод — позволяет перевести весь документ или отдельную его часть. Текст отправляется в облачную службу компании Майкрософт, а затем открывается в уже переведенном виде в отдельном документе.

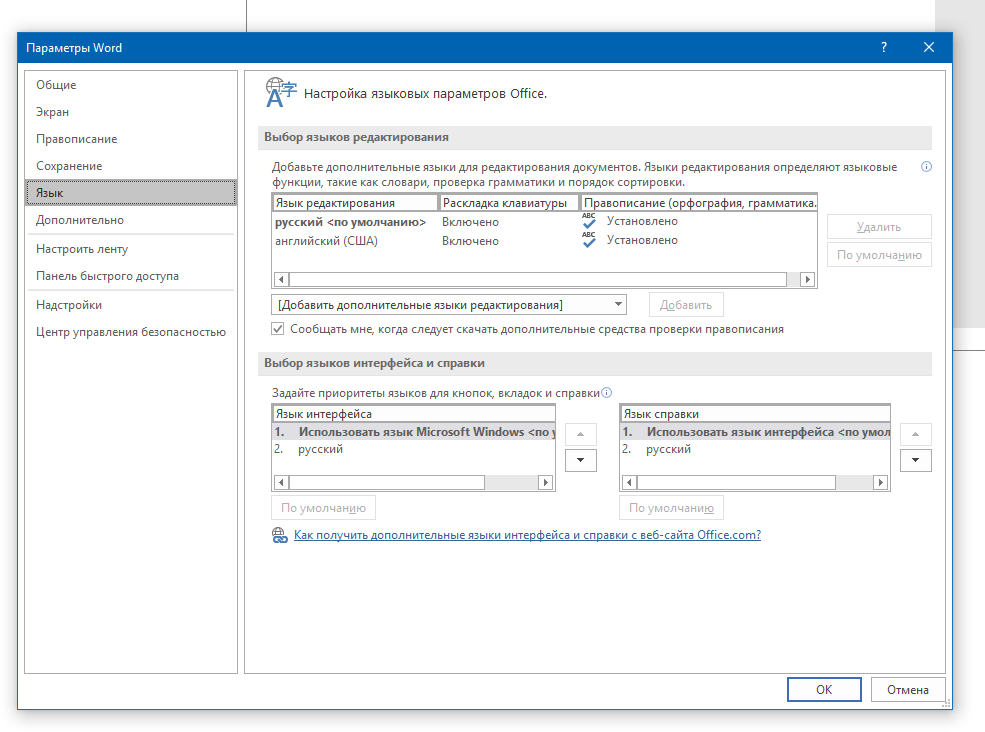
Язык — языковые настройки программы, от которых, к слову, зависит и проверка правописания. То есть, прежде, чем проверить правописание в документе, необходимо убедиться в наличии соответствующего языкового пакета, а также в том, что именно он включен в данный момент.
Так, если у вас будет включен русский язык проверки, а текст будет на английском, программа подчеркнет его весь, как текст с ошибками.
Урок: Как в Word включить проверку правописания
Примечания
Эта группа содержит в себе все те инструменты, которые можно и нужно использовать в редакторской или совместной работе над документами. Это возможность указать автору на допущенные неточности, внести замечания, оставить пожелания, подсказки и т.д., оставив при этом неизменным изначальный текст. Примечания — это своего рода пометки на полях.

Урок: Как в Ворде создать примечания
В этой группе можно создать примечание, перемещаться между уже имеющимися примечаниями, а также показать их или скрыть.
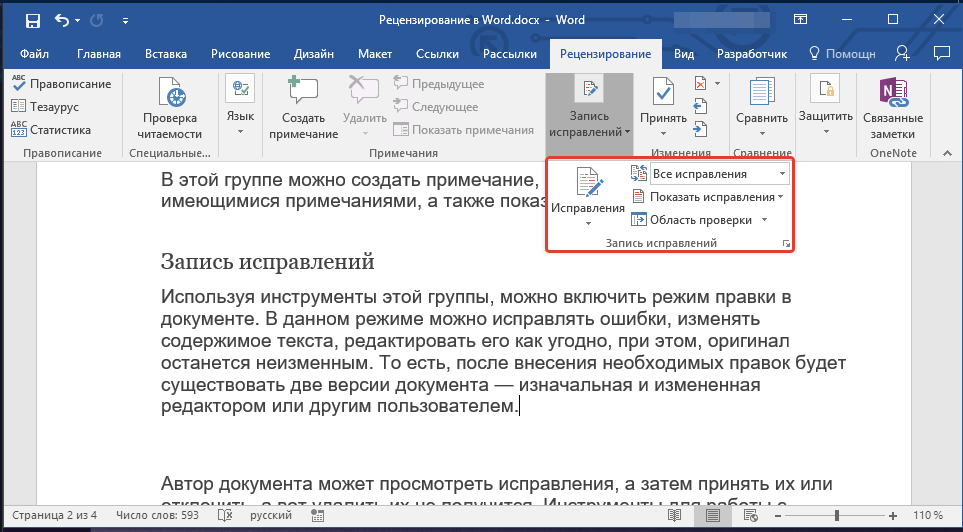
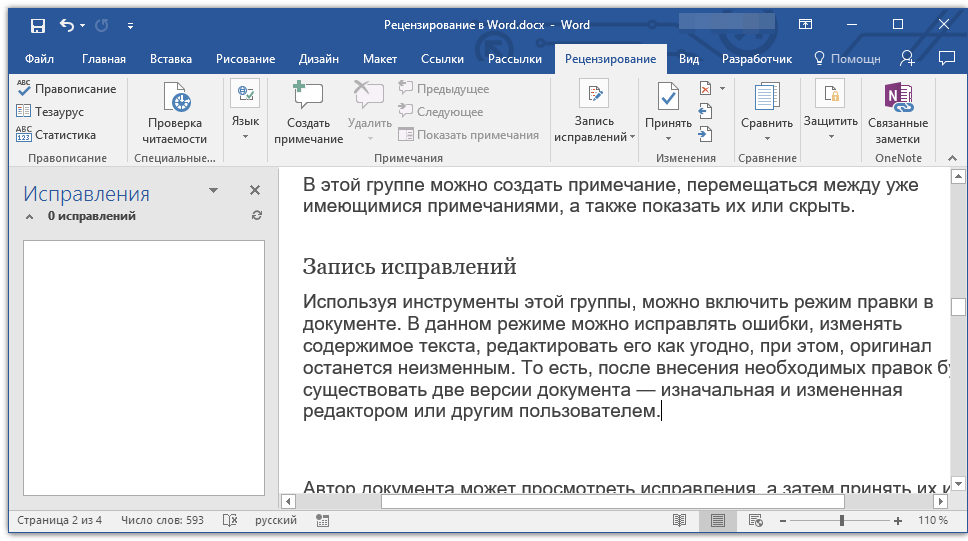
Запись исправлений
Используя инструменты этой группы, можно включить режим правки в документе. В данном режиме можно исправлять ошибки, изменять содержимое текста, редактировать его как угодно, при этом, оригинал останется неизменным. То есть, после внесения необходимых правок будет существовать две версии документа — изначальная и измененная редактором или другим пользователем.
Урок: Как в Word включить режим правки
Автор документа может просмотреть исправления, а затем принять их или отклонить, а вот удалить их не получится. Инструменты для работы с исправлениями находятся в соседней группе «Изменения».
Урок: Как в Ворде убрать исправления
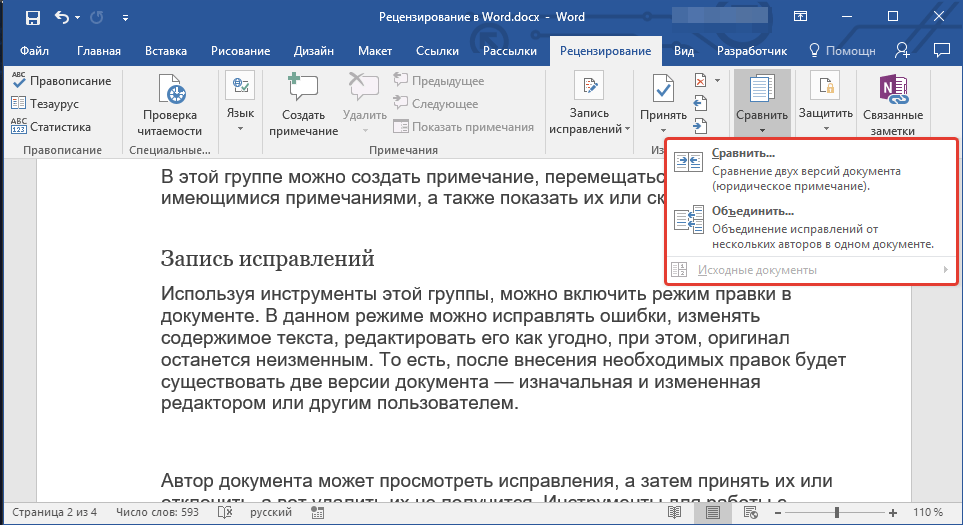
Сравнение
Инструменты этой группы позволяют сравнить два схожих по содержанию документа и показать так называемую разницу между ними в третьем документе. Предварительно необходимо указать исходный и изменяемый документ.
Урок: Как в Word сравнить два документа
Кроме того, в группе «Сравнение» можно объединить исправления, внесенные двумя разными авторами.
Защитить
Если вы хотите запретить редактирование документа, с которым работаете, выберите в группе «Защитить» пункт «Ограничить редактирование» и укажите необходимые параметры ограничения в открывшемся окне.

Кроме того, вы можете защитить файл паролем, после чего открыть его сможет только тот пользователь, у которого есть пароль, установленный вами.
На этом все, мы рассмотрели все инструменты рецензирования, содержащиеся в Microsoft Word. Надеемся, эта статья будет полезной для вас и заметно упростит работу с документами и их редактирование.

Have you switched to Microsoft Word from WordPerfect? Do you remember the Reveal Codes feature in WordPerfect that made it so easy to see exactly how your document was formatted? Well, you can get that feature now in Word using a free tool called CrossEyes.
NOTE: CrossEyes works in Word 2010 and earlier, but not in Word 2013.
CrossEyes lets you easily identify and resolve any document-formatting problems in Word. No more guessing at how your document is formatted.
Download CrossEyes using the link at the end of this article. Install the add-in, following the instructions in the setup wizard.
Once CrossEyes is installed, open Word. If you see the Security Warning message displayed below telling you that macros have been disabled, click Enable Content. Without doing this, CrossEyes will not work.

Click the Add-Ins tab.
Click CrossEyes in the Custom Toolbars section of the Add-Ins tab.
Initially, the Tips dialog box displays. If you don’t want to see this dialog box every time you activate CrossEyes, uncheck the Show Tips at Startup check box. Click Close to close the dialog box.
To demonstrate CrossEyes, we will open the Tutorial that comes with the add-in. Click the CrossEyes menu button to access the options for CrossEyes or press Ctrl + M.
Select Tutorial from the popup menu.
The tutorial opens in Word.
NOTE: When the tutorial opens, the CrossEyes pane at the bottom of the Word window closes. To open CrossEyes again, follow the steps above again.
Notice that the formatting displays in color, surrounding the text it applies to, just like the Reveal Codes in Word Perfect.
For example, there are two paragraphs under Example 2 in the tutorial that look exactly alike. However, when you look at the formatting in CrossEyes, you’ll see one is formatted with Heading 1 and the other looks like it is, but has in fact been manually formatted to look the same.
There are options you can set in CrossEyes to customize it. Click the CrossEyes menu button and select Options.
NOTE: You can also click the Options button on the CrossEyes toolbar or press Alt + O (the capital letter O, not zero).
The Detail Options tab allows you to specify which details to display, where to show paragraph properties, and how to show field codes.
The Appearance tab allows you to change the colors used to display the different categories of formatting, the font to use for the formatting codes, and the width of the caret.
The General tab allows you to change the Shortcut Key used to toggle between the Word document and the CrossEyes pane. You can also select the Default View and Enable Logging.
To close the CrossEyes pane, click the X button in the upper, right corner of the pane.
You can also double-click on a formatting code in the CrossEyes pane to open the dialog box used to change that formatting.
Download CrossEyes from http://www.levitjames.com/Products/CrossEyes.aspx.
READ NEXT
- › Liquid Metal vs. Thermal Paste: Is Liquid Metal Better?
- › This New Google TV Streaming Device Costs Just $20
- › HoloLens Now Has Windows 11 and Incredible 3D Ink Features
- › Google Chrome Is Getting Faster
- › How Long Do CDs and DVDs Last?
- › How to Adjust and Change Discord Fonts
How-To Geek is where you turn when you want experts to explain technology. Since we launched in 2006, our articles have been read billions of times. Want to know more?
It appears Microsoft turned off auto-numbering of comments in Word 2013. So when going to Review in the ribbon and adding a «New Comment» there is no way to identify the comment when discussing with colleagues. In previous versions of word, adding a new comment included an auto-incremented comment number.
This is particularly problematic for example when a colleague is using an older version of office and refers to a comment by number — e.g. #5.
Is there any way to identify the comment numbers in Word 2013, so comments can be identified during discussions?
![]()
Ƭᴇcʜιᴇ007
111k19 gold badges199 silver badges264 bronze badges
asked Jun 26, 2013 at 19:24
![]()
Not in the edditing view as you are used to in Word 2010. Comment numbering only shows up if you go to the outline or draft viewing mode.
Go to the view menu and select outline or draft in the views section
answered Jun 26, 2013 at 19:38
![]()
3
- In the upper-right corner of the Word application, find the Quick Access toolbar.
- At the right-end of the toolbar click the down arrow and select More Commands… from the menu.
- In the dialog box in the Choose commands from drop-down select All Commands.
- Select Print Preview Edit Mode in the list and click Add >> to add it to the Quick Access toolbar.
After that, I clicked on Print Preview Edit Mode and I was able to see comment numbers. Make sure that you deselect the magnifier that will appear so that you can edit the document.
One more thing, the document where I performed this was sent to me by somebody using Word 2010. I do not know if the numbering will appear for comments added with Word 2013.
![]()
answered Feb 24, 2014 at 4:35
![]()
JuanJuan
511 silver badge1 bronze badge
2
Not optimal but you can hover the mouse over the number to read the comment.
Would be nice to have the 2010 feature back
answered Mar 7, 2014 at 13:17
![]()
For the use case where a colleague refers to comments by number, the following workaround may help.
- Navigate to the «Go To» tab of the «Find and Replace» dialog (default shortcut
Ctrl+G). - Under «Go to what», select «Comment».
- In the drop-down box labelled «Enter reviewer’s name», type in the number of the comment (ignore the fact the Word is actually asking for a reviewer name) and press Enter. Word will navigate to the comment number you have specified.
Unfortunately, this cannot help you identify the number of a given comment, but it works the other way around.
Depending on the number of comments in your document, you could guess a number, see where Word takes you and then type +1 or -1 into the drop-down box. Pressing Enter repeatedly would then take you through the comments one by one and you can count in your head until you reach the one you are looking for.
I admit this is tedious, but it may be a good workaround for small documents and is always effective at finding a comment if you know the number.
answered Mar 23, 2017 at 19:06
![]()
![]()
Written by Allen Wyatt (last updated May 15, 2021)
This tip applies to Word 97, 2000, 2002, and 2003
I get many people who write and express frustration because they miss the «reveal codes» feature they were used to in WordPerfect. They do not understand why there is no comparable function in Word. The reason is because there is a core difference between how documents are formatted in Word and WordPerfect, and each takes a totally different approach to text in general. I won’t try to convince anyone that one approach is better than the other; both have their pros and cons. Suffice it to say that they are just different than each other.
WordPerfect essentially treats text and formatting the same. When you format some of your text, a «start code» is inserted at the beginning of the selection, and an «end code» is inserted at the end. These are actual codes, inserted in the actual text. These are the code markers that are visible when you display the reveal codes window. You can select and delete these codes, just as you would any other character. In fact, you can insert a «start code» in your text, and if you don’t insert an «end code,» (or if you delete the «end code» without deleting the «start code») the rest of the document is formatted according to the lone «start code.»
You can’t do that in Word. This is because Word treats text and formatting completely independent of each other. The file format used in Word stores formatting information in a different portion of the file than the text to which that formatting is applied. Thus, the formatting is not within the «text stream,» as it is in WordPerfect. Instead, Word tracks the paragraph and character formatting applied to every character in the document, without the need to worry about «start codes» or «end codes.»
In Word, basically «what you see is what you get.» If something is formatted as bold text, it appears as bold text. It is essentially impossible to have stray or unused formatting codes in your text, as you can in WordPerfect. The reason is because there are no such codes.
The closest you can get to the reveal codes is to display the complete formatting information that Word is applying to a character or paragraph. You can do this by following these steps:
- Press Shift+F1. (You can also choose What’s This? from the Help menu.) This causes the mouse pointer to change to an arrow with a question mark beside it.
- Point to the character or paragraph in question and click the mouse button.
When you do this, Word 97 and Word 2000 display a «balloon» that looks like the dialog balloons used in some cartoons. The balloon contains detailed information about the formatting of the character you pointed to, as well as the paragraph in which the character appears.
If you are using Word 2002 and 2003, the Reveal Formatting task pane is displayed at the right side of the screen. This task pane shows all the same information that is in the balloons used in earlier versions of Word, but provides the added feature of allowing you to modify formatting, as desired.
If you are using Word 97 or Word 2000, you have two options at this point. You can either click on a different character to see more formatting information, or you can press Esc to make the balloons go away. If you are using Word 2002 or 2003, the Reveal Formatting task pane remains on the screen until you either display a different task pane or dismiss the task pane all together.
WordTips is your source for cost-effective Microsoft Word training.
(Microsoft Word is the most popular word processing software in the world.)
This tip (1837) applies to Microsoft Word 97, 2000, 2002, and 2003.
Author Bio
With more than 50 non-fiction books and numerous magazine articles to his credit, Allen Wyatt is an internationally recognized author. He is president of Sharon Parq Associates, a computer and publishing services company. Learn more about Allen…
MORE FROM ALLEN
Quickly Identifying Applied AutoFilters
Apply an AutoFilter to a worksheet, and you can quickly forget exactly what that AutoFilter entailed. Here are a couple …
Discover More
Word 2016 Graphics (Table of Contents)
One way to enhance your documents is with Word’s powerful graphics capabilities. Discover how to best utilize graphics …
Discover More
Stopping an Excel Window from Maximizing
When you drag an Excel window near the edge of your screen, you may end up having that window occupy more of the screen …
Discover More
Learn about the Review Tab in Microsoft Office Word 2007
| New Look | Home Tab | Insert Tab | Page Layout Tab | References Tab |
| Mailings Tab | Review Tab | View Tab | Acrobat Tab | Misc. Items |
In Microsoft Word 2007, the Review Tab is useful in a lot of ways. You can have the Spelling and Grammar feature, the Research option, Thesaurus and Translation functionality to help you improve your documents. Here is what the Review Tab looks like.

Under the Proofing group, you can use find the Spelling and Grammar feature. You can easily check the spellings, punctuation errors and grammar using this tool.
Here is the screen shot.

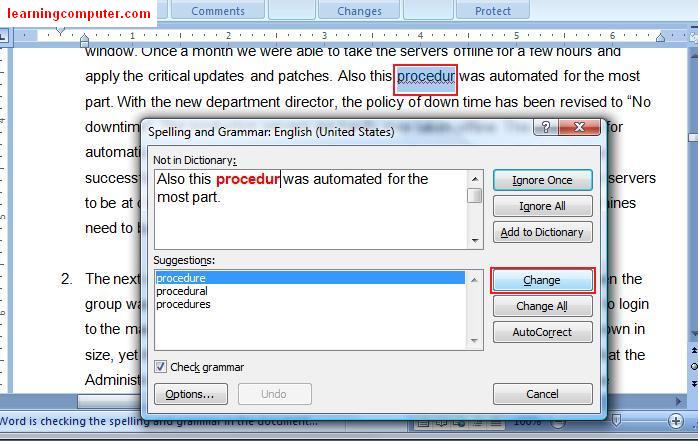
The first thing we are going to try is to check the spelling and grammar of a document. Go ahead and select the insertion point and click on spelling and grammar on the Proofing group on the Review Tab. This will start the Spelling and Grammar dialog box as shown below. Notice that it found an incorrectly spelled word, procedur. You can either click on Change if you would like to accept the suggestion made by Microsoft Word. Otherwise you can ignore it if you think the word is OK as it is.
Next we are going to try is the Research command on the word authentication as shown in the figure below. Select the word authentication and click on Research icon, this will launch the Dictionary feature as shown in the right side of the screen shot. It was able to find the word with the correct pronunciation and also the meaning for you to review. Very cool indeed!

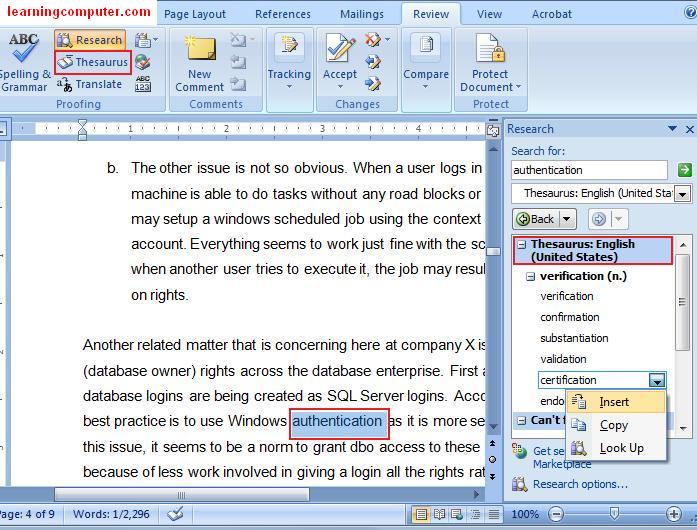
Another related feature is the Thesaurus in Microsoft Word 2007. This amazing feature helps you find synonyms and also antonyms of any specific word. In our example it found a list of synonyms for authentication as shown on the right side in the figure below. I’m going to select certification and select insert. This helps if you are like me and use the same words over and over again.
In the next figure I have highlighted the Word Count feature. This lets you find the number of characters, paragraphs and lines in the document. This is a pretty useful feature if you are working on a term research paper where you have to stay within a certain number of words or pages.

If you are collaborating on a document with other team members or on a project report, the Comments feature in the Review tab in Microsoft Word 2007 can be a true lifesaver. In the following screen shot, I have added a comment that is shown in red. Notice that it used my initials and a number right before the actual comment. As the other team members and comments, the application will use different colors. This helps to keep all the comments organized from different authors.

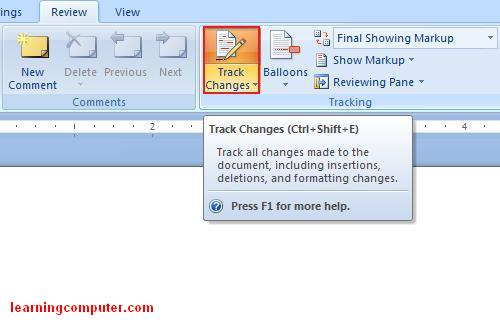
Moving onto the next group section which is the Track changes group. We can easily manage additions, deletion, any comments and formatting changes in an efficient manner using this feature. You can find the Track Changes command under Tracking group in the Review Tab in Microsoft Word 2007.
Let us look at an example of this feature using a Course Syllabus sample. After the initial review, the changes are highlighted as shown below. The additions are in red and underlined, the deletions are in red and using a strike through.
Furthermore notice that there is a vertical bar next to all the changes.

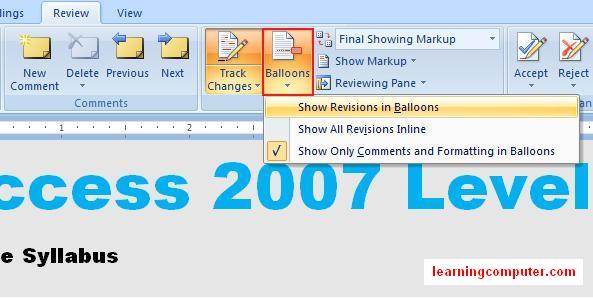
If you prefer seeing all the changes in Balloons, you can do this by selecting Show only Comments and Formatting in Balloons command. This will clean the document up and move the comments and changes to the right side in the markup area.
The next two screen shots display the functionality of this feature.

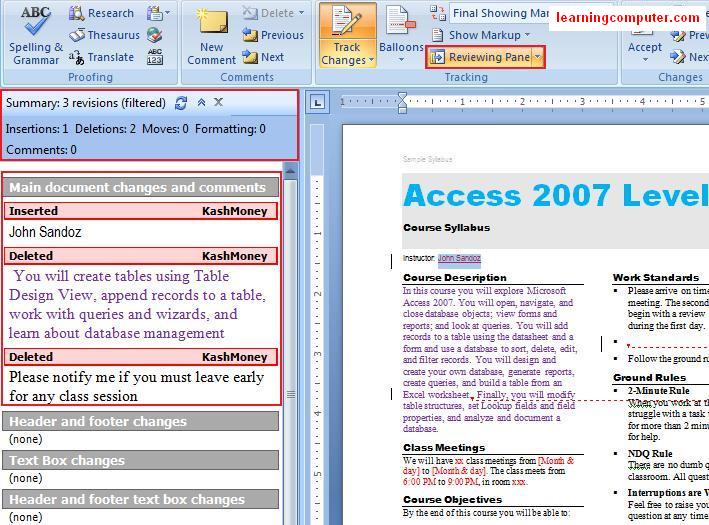
If you would like to see all the changes in one place, you can use the Reviewing Pane command. In the image below, I have selected the Reviewing pane under the Tracking Group. Notice all the revisions are summarized on the left side of the document and broken down into insertions, deletions, etc. by the author and into different sections, very cool!
After all the changes have been reviewed and checked, we are ready to accept all the revisions. We can do just that by selecting Accept all Changes in Document under the Accept command in the Changes group under the Review tab in Microsoft Word 2007. This will go ahead and update the document then finalize all the revisions and changes.

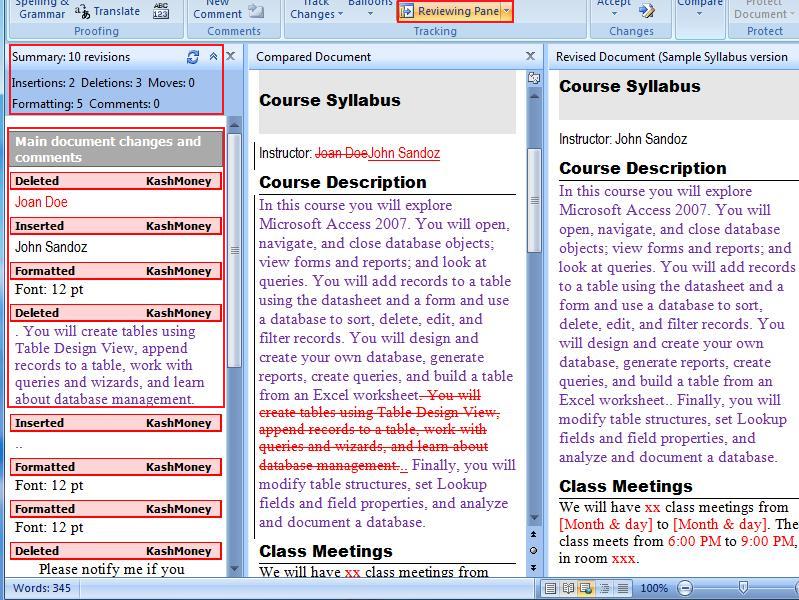
As you can see the Review tab in Microsoft Word 2007 has a lot to offer us. OK at times, it is necessary to review different versions off the same document especially if there are several people working on it at the same time. In Microsoft Word 2007, this is just a breeze. You can also use the Compare feature to combine multiple versions of the same document.

Let us go ahead and see how this can be achieved. I’m going to compare two Course Syllabi that I have been working on for a class that I am teaching. I select the Compare command which launches a dialog box as shown below. I select the original document in the left side and the revised document on the right side and hit OK.

This will launch the wizard that will compare the two versions. Not only will it show all the differences between the two versions, but also display a summary on the left side as shown below and the screen shot.
The last thing I would like to show you is how to protect a document from editing. This option will restrict others from making certain types of editing or formatting changes to the document. You can select the Protect Document option under the Protect group.
Here is the command shown on the ribbon in Microsoft Word 2007.
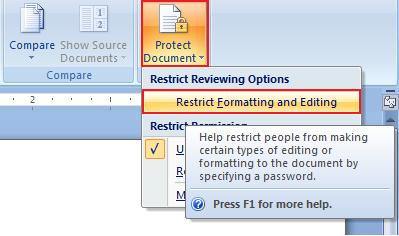
This will launch the Restrict Formatting and Editing dialog box as shown below. I will select the editing restrictions option that is number two and then click on us start forcing protection.
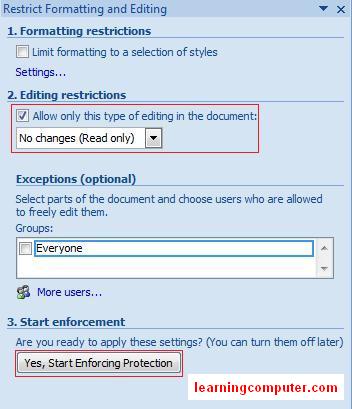
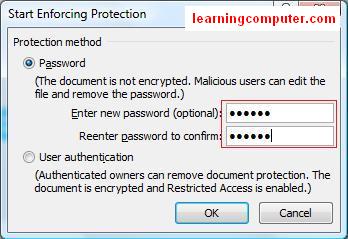
In the start enforcing production, I will select password, enter my password and click OK. There you go, now your document is protected by this password.
Next time someone tries to open this document and make changes, they will be prompted by this friendly on perfect document dialog box, pretty cool.
A screen shot is as follows.

This concludes the lesson on Review Tab in Microsoft Word 2007.
If you are unable to find the information you are looking for, please visit Microsoft’s Word 2007 training courses and tutorials
Have you heard the word? Up to speed with Word 2007
Web Design Dallas
Connect with US!
![]()