
Sometimes it’s the little things that trip you up, like figuring out how to print text in reverse. Some people call this mirror text. I’m not trying to imitate Leonardo Da Vinci and his mirror fonts. Instead, I was trying to help someone do a t-shirt transfer that included a quote. In this tutorial, I’ll show how to mirror text using Microsoft Word, 3rd party services, and your printer.
If you’ve ever tried to use one of those heat transfer papers to make a t-shirt or print a “secret” message for a kid that can be read in the mirror, you know this problem. I’m sure there are other uses for reverse text that escape me. However, the scenario did make me think of different ways to solve this problem.
How to Mirror Print in Word
By default, Microsoft Word doesn’t have the means to reverse text. However, you can rotate objects using WordArt. In this example, I’m using Word in Microsoft 365 and will add my text using WordArt.
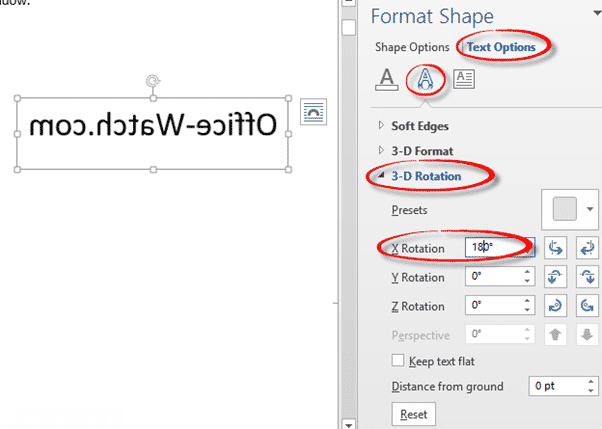
- From the Insert menu and Text section, select WordArt.
- From the drop-down menu, select your color combination.
- Type or paste your text into the text box.
- With your cursor in the textbox, click Shape Format.
- From the Shape Styles section, click Shape Effects and 3-Rotation.
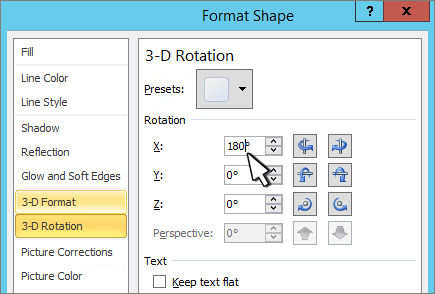
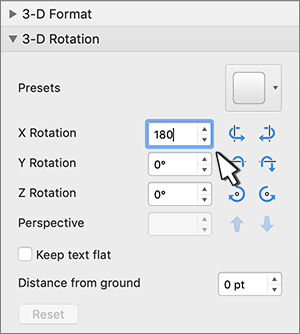
- From the side menu, select 3-D Rotation options…. The Format Shape dialog opens to the right.
- From the Format Shape dialog, click 3D Rotation.
- In the Rotation section, enter 180 for the X: value.
- Click the X button on the top-right to close the dialog.
✪ As a suggestion, make sure you proofread your text before it becomes reverse text.
Flip Images in Microsoft Word
When it comes to reversing images, the process is a bit different but easily achievable.
- Insert or paste your image into Word.
- Click the image to select it.
- From Picture Format, click the Rotate Object button in the Arrange Group.

- Select Flip Horizontal from drop-down menu.
Check Printer Properties
Many printers have a feature that reverses text output. The problem is there doesn’t seem to be a consistent name for this feature. In fact, when I went to the HP site, they provided many names for this feature, including:
- back print
- flip horizontal
- mirror image
- reverse
I have an HP DeskJet 6940, and it does have this mirror printing feature, although you have to hunt for it. I had to click into the Printer Properties and then go to the Finishing tab.

Online Reverse Text Generators
Several online sites allow you to type or paste the text that you need. One mirror text generator that I found useful is from TextMechanic.

As you can see from the buttons above, the site provides many options for altering your text. If you’re in a silly/devious mood, you can copy the results and paste them into your email app or word processor and see how people react. One caveat is that you can only do 4 tasks per hour.
Also, if you paste the output into an application like Microsoft Word, be prepared for a bunch of red squiggly lines if you have spell-check enabled. This might be a situation where you want to turn off spell check in Word.
The next time you need to reverse print, remember you have a number of options. While the options and settings may be hard to find, the process is easy.
Hand-picked Tutorials
- How to Make Custom Gift Certificates
- How to Make a Letterhead in Word
- How to Reduce Word File Size
- How to Make a Picture Smaller
- How to Fix Spell Check in Word
Using a text box
-
Insert a text box in your document and type and format your text.
For more details, see Add, copy, or delete a text box.
-
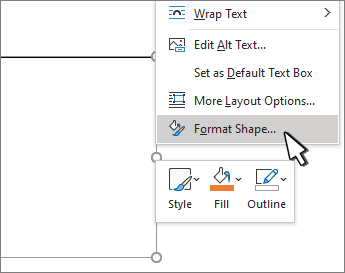
Right-click the box and select Format Shape.

-
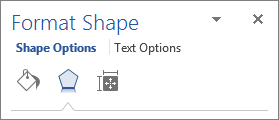
In the Format Shape pane, select Effects.
-
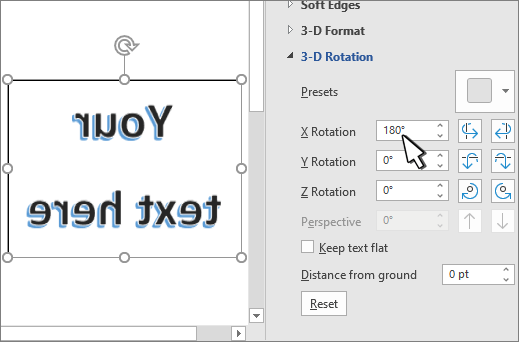
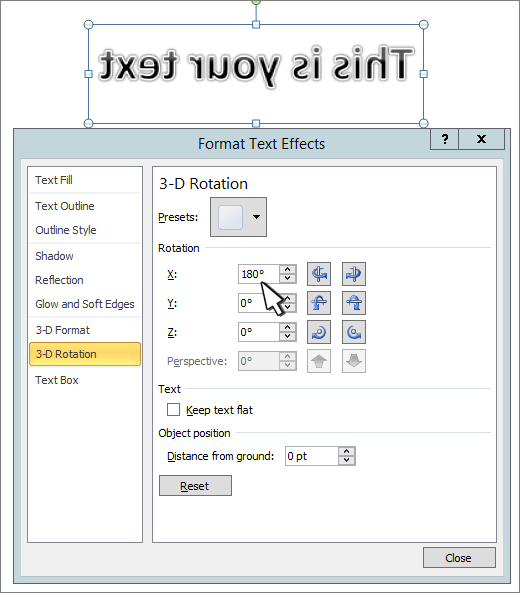
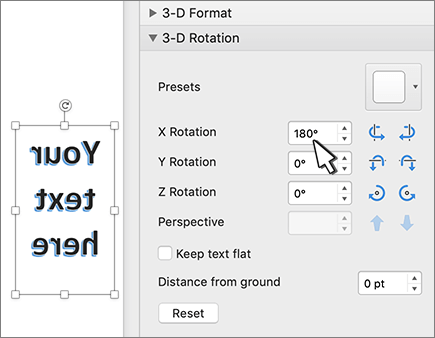
Under 3-D Rotation, in the X Rotation box, enter 180°.
Notes:
-
If your text box becomes filled with a color, you can remove the color in the Format Shape pane. Under Shape Options, select the Fill & Line tab
, expand Fill, and select No fill. -
If you want to remove the text box outline, right-click the text box, select Outline in the mini toolbar that appears, and choose No Outline.
-
 , expand Fill, and select No fill.
Using WordArt text
-
Select the WordArt to mirror.
For more info see Insert WordArt.
-
Select Shape Format or Drawing Tools Format.
-
Select Text Effects > 3D Rotation > 3D Rotation Options.
-
Under 3-D Rotation, set X Rotation to 180°.
Using a text box
-
Insert a text box in your document by selecting Insert > Text Box, and then type and format your text.
-
Right-click the box and select Format Shape.
-
In the Format Shape dialog box, select 3-D Rotation on the left.
-
In the X box, enter 180°.
Notes:
-
If your text box becomes filled with a color, you can remove the color by right-clicking the text box, selecting the arrow next to Shape Fill in the mini toolbar that appears, and selecting No Fill.
-
If you want to remove the text box outline, right-click the text box, select the arrow next to Shape Outline in the mini toolbar that appears, and choose No Outline.
-
Using WordArt Text
-
Select the WordArt to mirror.
For more info see Insert WordArt.
-
Select Drawing Tools > Format.
-
Select Text Effects > 3D Rotation > 3D Rotation Options.
-
Under 3-D Rotation, set X to 180°.
Using a text box
-
Insert a text box in your document and type and format your text.
For more details, see Add, copy, or delete a text box in Word.
-
Select the box and then select Format Pane.
-
In the Format Shape pane, select Effects.
-
Under 3-D Rotation, in the X Rotation box, enter 180°.
Note: If your text box becomes filled with a color, you can remove the color in the Format Shape pane. Under Shape Options, select the Fill & Line tab
, expand Fill, and select No fill.
Using WordArt text
-
Select the WordArt to mirror. For more info see Insert WordArt.
-
Select Shape Format.
-
Select Text Effects > 3D Rotation > 3D Rotation Options.
-
Under 3-D Rotation, set X Rotation to 180°.
The use of reverse text is not new. Many notable writers used this method of writing. It ages back to 17th century and even beyond. It was widely used during era of Ottoman Empire and Pre-Islamic era.
Reverse text could be used for various purposes in our daily life. It can be used to print a reflecting sticker saying ambulance but in reverse text. This is used to notify the drivers who see through back view mirror to move aside and clear the road for ambulance. The reverse text appears justified in back view mirror because of double mirroring.
Reversed letters are also used to transfer printed text and logo through transfer paper which after implementing appears right. It is also used for data encoding. Reverse text can also be used to make children remember spellings of complex words. However, people face difficulty while printing reverse text for further use.
In this article, we will discuss multiple ways to print reverse text. These ways are listed below:
Using Microsoft Word
Microsoft word is an amazing word processor that is unmatchable to any other word processing software solution. It provides various ways to format and write text. You can write or print text in various fonts and sizes. This makes it an efficient tool for word processing.
It also provides solution for conversion of written text into reverse text style. Here is how you can use Microsoft Word to write or print reverse text. There are two separate methods of doing it. The first one enables you to save the reverse text data in soft form and the other one is only affiliated with printing the text in reverse form.
Let’s take a look at both methods. In the first method, you simply have to insert a text box from inset option in the file. You can choose any type of text box from transparent boundary to styled boundary with colored front. Now, write the text in this box which you want to reverse using Microsoft Word. Make sure to size the inserted text box according to size of the text to make it fully visible in the text box.
Now, choose the format shape option by right clicking on the text box. Choose 3d rotation from the menu and you will see some preference options. Now, see the rotation section and set the X-axis rotation at 180 degrees and there you go text is reversed.
This was the first method; second one is rather easier but can only be used for printing purpose. Choose a file with text and open it with Microsoft Word. Now click options and choose advanced option in the menu. Scroll through and reach the print section on the right side of display. Now tick the boxed option saying print pages in reverse order. Now click okay and exit from the menu. This is how you can use Microsoft Word to write and print reverse text for further use.
Check the Preferences of Your Printer
Many printers have already a preference for reverse text printing. But the problem is, the name of this feature could vary from printer to printer. In some printers it would be named as back print while in other types it would be found as mirror image, flip horizontal, revers, and emulsion down.
You can use this feature to get out put as reverse text. In case, if you don’t find this feature in properties of your printer then don’t worry there is another easy method to get reverse text printed. While providing instructions to printer, go to advanced tab and choose ‘reverse all pages’ option in output options section, this is how you can get reverse text printed easily.
If you are using an old printer and you don’t see anything like those mentioned above than you can apply another to get reverse text as output from printer. Choose the pages option and reverse the order of pages in page range option, such as, if it was set on 1-5 you just have to change it to 5-1 and now you can print reverse text easily using your printer.
Use Reverse text Generator
If you want an easier method to get text written backward then you should try any online reverse text generator. Using Prepostseo reverse text, you can reverse the text of a whole paragraph or an article. You can use any text reverser available online for this purpose.
You just have to copy and paste the text you want to reverse, and the word reverser word reverser would perform its job and write the text backwards. There are plenty of tools available for this purpose, however, we recommend you to use backwards text generator available on prepostseo. In addition to ease of use provided by this tool, there are plenty of other tools related to text which could be used when needed.
Use MS Paint
You can also use Microsoft Paint to reverse letters and here is how. First open the Microsoft paint app, now copy the formatted text in Microsoft paint. Now select the text copied in window of Microsoft paint. Go to the image menu and choose the flip or rotate option from menu.
Now select flip horizontal to reverse the text written in MS paint. Now confirm the action by clicking Okay. Now when the text is reversed, again copy it from the Microsoft paint window and paste it in notepad or Microsoft Word for further use or print.
Conclusion
The reversing of text is not a new thing, it was used ages ago. There are proofs of the use of reversed text in Arabia before the advent of Islam. It was also used during the Ottoman Empire. It still finds many uses in our daily life. It is used for pasting text on fabrics, and wooden pieces through transfer paper, it is also used to write ambulance to make drivers notice the presence of ambulance on road, it can also be used as a fun game and help children in learning spellings of complex words.
We have described some of the ways to print reversed text. We hope you’d find these methods helpful for this purpose.
There are at least ten ways to ‘reverse’ ‘mirror’ or ‘flip’ text or images in a Word document. Horizontal, vertical, reversed, combined or any angle you like.
When people say those terms they can mean different things so we’ll look at many options and how to do them.
- Mirror horizontal
- Mirror vertically
- Reverse vertically
- Reverse vertically and horizontal mirror combined
- Reverse horizontally (aka mirrored text only)
- Vertically oriented text
- Free form twisting of text in 3-D
Also along a curve, but that’s a separate subject see How to set text on its side, an angle or a curve in Word
Mirror horizontal
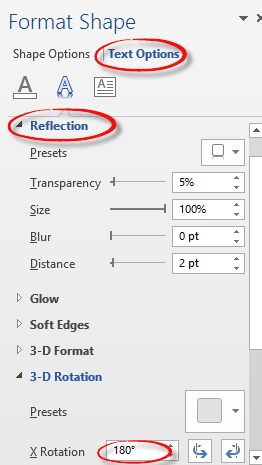
Let’s start with an easy one. A mirror / reflection effect like this ‘Half Reflection – touching’ preset.

Or one of the many variations in the reflection amount and gap between text and reflection.

Select the text then go to Home | Font and pull-down the Text Effects menu to choose Reflection.

There are various preset options or go to ‘Reflection Options…’ to see all your choices in a pane.

Start with a preset then adjust the settings to what you exactly want. The above extreme settings give you the most ‘reflection’.
Transparency – how opaque or solid the mirrored text is. 0% is solid 100% is invisible.
Size – the size or extent of the mirrored text. 0% shows no mirror text at all.
Blur – a fuzzy effect on the mirrored text. 0pt is sharp text.
Distance – the distance between the bottom of the main text and the start of the reflected text.
The right-hand pane lets you play with the settings and see a live preview of the results.
You can combine reflection with other text effects like Shadow.
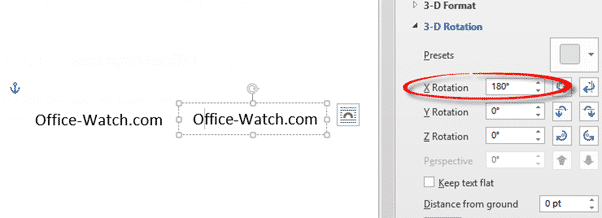
Reverse vertically
Sadly there’s no simple equivalent for vertically reversed text but it’s not a lot harder. All you have to do is put the text in a Text Box, then you get the 3D Rotation option necessary.

Go to Insert | Text Box and choose a simple preset.
Sadly there’s no ‘blank’ text box preset. To get rid of the box lines go to the Format Shape pane, Shape Options | Fill & Line | Line and choose No Line.

Type some text in in the text box and format it just like any other text. Resize the text box with the handles in each corner so the text fits within the box.

In the Format Shape pane, Text Options, Text Effects then scroll down to 3-D Rotation (an option missing from text formatting outside a text box).
Change the X Rotation value to 180° and lo! the text flips! This effect applies to all the text inside the text box.
Both effects together
The smarties among you will have figured out that you can combine both effects into one. Why you’d want to do such an unreadable thing is an entirely separate question.

Format the text within a text box then go to Format Shape | Text Options. Change both Reflection and 3-D Rotation to suit.
Reflect the Text Box
There’s an alternative way to do the reflection. Instead of reflecting the text inside the text box, you can mirror the entire text box. Here’s an example with the text box frame visible so you can see the difference. The reflected text is outside the text box frame.

For text only, this makes little difference but add some other elements in the text box like images to see how mirroring the entire text box is worth keeping in mind.

Mirror vertically
Word only supports horizontal or X axis mirroring directly. We can’t see any way to mirror vertically somewhat like this.

The only workaround is to make a text box with the same text, rotate 180° on the X axis and position next to the original text.
Vertical Text
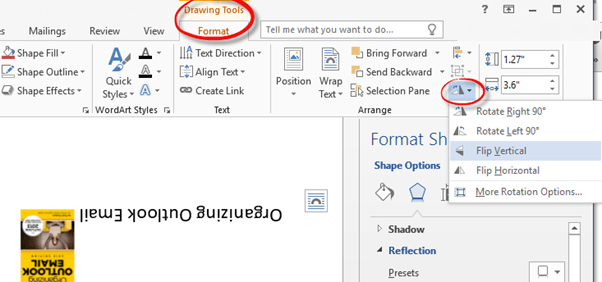
Text Boxes also let you position text vertically. Select the Text Box then Drawing Tools | Text Direction | Rotate all text either 90° or 270°.

As you can see, only the text is rotated. You have to manually rotate other elements, like images, within the text box.
Or you can rotate the entire text box. This also gives you more options than the three available for rotating text alone. Go to Drawing Tools | Format | Arrange | Rotate. Choose one of the four options available or go to More Rotation Options to enter an exact degree of rotation.
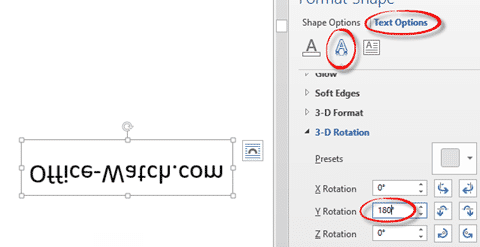
Mirror text only
Maybe you don’t want the upright text, just the mirror imaged text. Do that in a text box. It’s the same process as for ‘Reverse Vertically’ mentioned above but now do a 180° on the Y Rotation (vertical axis) at Format Shape | Text Options | Text Effect | 3-D Rotation.
Any way you like
By all means, play with the X Y and Z rotation options to orient the text as you wish.

Windows Paint
Some people suggest using Windows Paint to re-orient text. As you can see above, modern Word can handle pretty much any orientation you need.
It’s certainly possible to do some of that with Paint or many other drawing tools – but Word has enough for most purposes.
Printer options
For entire pages, there may be flip or mirror choices available in your printer. If you install the manufacturers print drivers, it will give you a lot more choices than the plain Windows driver. Among those choices might be some to flip pages.
Exactly what’s available depends on your printer and software. As an example, in Word’s Print dialog/pane, choose Printer Properties. In our test Brother printer under Advanced there’s a Mirror Print option.

That will flip the page horizontally so text looks like this:

Check your printer properties to see what’s possible.
Text on a curve
How to set text on its side, an angle or a curve in Word shows how to place text along a curve in Word.
Make a Word text box with rounded corners
Two ways to add Gradient or Rainbow text or background effects in Word
Put text around a shape, square or circle in Microsoft Word
Where did WordArt go after Word 2007?
When printing transparent labels or heat-transfer labels, it’s often necessary to reverse the words so that they are a mirror image of what will appear on the final product. The easiest solution is to use a printer that can print a mirror image of the labels. If your printer lacks this option, you can instead convert the label into an image and then reverse the image so that it becomes a mirrored copy of the original.
Printer Settings
Step 1
Launch the program you used to create your labels and then open the file containing the labels or open a label template.
Step 2
Add text to the labels as you would normally.
Step 3
Select the «Print» command from the application’s File menu or toolbar to access the dialog box that allows you to select a printer.
Step 4
Select the printer you use to print labels and then click the «Properties» button to open the printer settings window.
Step 5
Look for an option labeled something along the lines of «Mirror Print» or «Print Mirror Image.» The option will probably not be on the main screen, and you must select the «Advanced» tab, the «Advanced Options» button or something similar to find it. Many printers don’t have the option.
Step 6
Select the option if you find it, click «OK» to close the printer settings window and then print your labels as you would normally.
Convert to Image
Step 1
Open the Microsoft Word document containing your labels or open a Word labels template. If you are using another program to create your labels, the basic steps are the same although the specific program commands may vary.
Step 2
Add your text to the first label as you would normally.
Step 3
Launch the Windows Snipping Tool utility so that you can capture an image of your label. Click «Search» on the Windows 8 Charms bar, type «snip» into the search field and press «Enter.» The small Snipping Tool windows appears on the screen.
Step 4
Move the new window so that it doesn’t cover the first label and then click «New» in the Snipping Tool window.
Step 5
Drag your cursor around the first label and release the mouse button. Make sure you capture the exact dimension of the label. If your first attempt is off by a little, click the «New» button in the Snipping Tool window and try again.
Step 6
Save the image using the PNG or JPG file format and then close the Snipping Tool and return to Microsoft Word.
Step 7
Delete the entire contents of the first label. If you are unable to delete the original label because it is part of a protected custom template, create a blank template to complete the steps.
Step 8
Insert your cursor into the first label field, select the «Insert» tab on the Word toolbar and then click «Pictures» on the ribbon.
Step 9
Select the image file you created earlier and click «Insert.» The image of the label appears.
Step 10
Select the image you just inserted and then select the «Format» tab on the toolbar.
Step 11
Click the «Rotate» command in the Arrange section of the ribbon and then select «Flip Horizontal.» This command causes the original image to be replaced by a mirror image.
Step 12
Press «Ctrl-C» to copy the mirror image onto the clipboard. Delete the contents of the other labels and then press «Ctrl-V» in each label to insert the mirror image.
References
Resources
Tips
- If you are creating a sheet of labels that contain different text, you must convert each label individually.
Writer Bio
Alan Sembera began writing for local newspapers in Texas and Louisiana. His professional career includes stints as a computer tech, information editor and income tax preparer. Sembera now writes full time about business and technology. He holds a Bachelor of Arts in journalism from Texas A&M University.
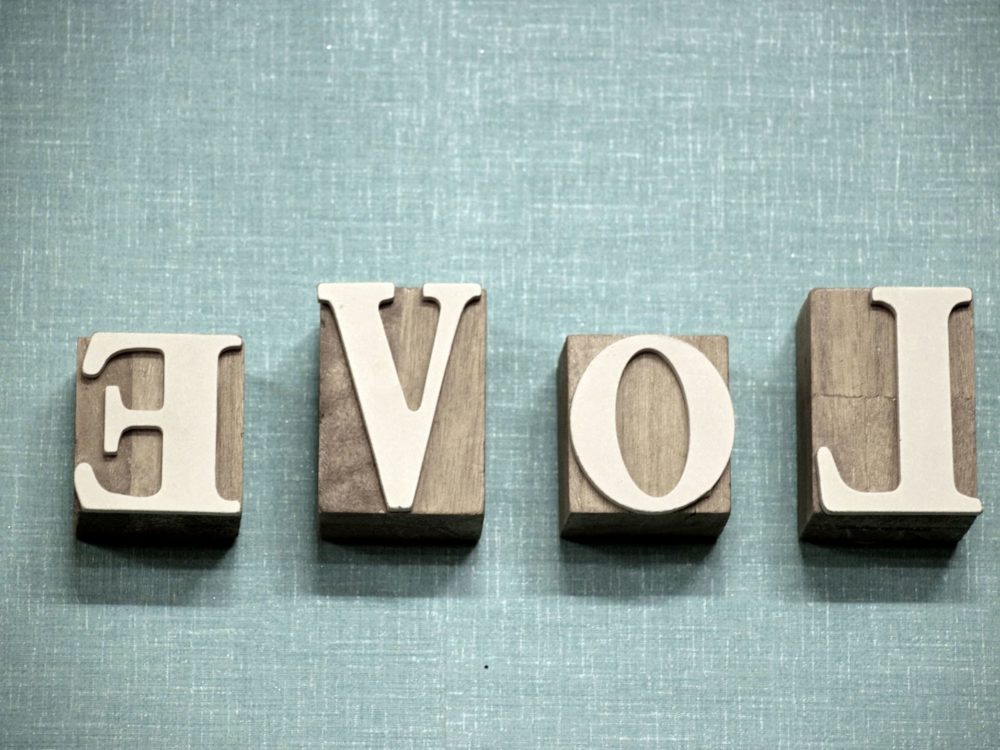
Image Credit
Visage/Stockbyte/Getty Images
There is a lot that the printing industry offers, and it has not lost its significance. The world of printing is widespread, and you need to grasp every concept involved in the process. With new printing options and inventions gracing the industry, you should be well-acquainted with digital printing. A question raised How to Reverse Print in Word?
It covers various techniques, and it’s vital for printing letters, newsletters, posters, signage, menus, and labels. Digital printing saves time and money as you can make as little as one print. To make your printing project come out right and satisfying, be well-versed with different terminologies used in the field.
Probably, you have heard, read, or know a lot about reverse print. If not, read on and gather vital information to guide you in your printing endeavors.
Contents
- Everything to Know about Reverse Printing
- Printing Mirror Image Hassle-Free
- Reverse Text and Image on Windows
- Reverse Print in Word on Mac
- Reverse Print Image PDF
- How to Reverse Print Text in Google Docs
- Final Thoughts
- Recommendation
Everything to Know about Reverse Printing
Print options vary, more so depending on the printer one is using. You can access many of these printing options in the Print Dialog Box on your printer. You can as well rely on your Word document to access more print options.
Surprisingly, when you utilize the Word print option, you will replace any options you choose in your printer. One of the unique print options that will grasp your attention is to print pages in reverse order. If it’s your first time to come across this option, you will probably wonder how to reverse print order in word 2013.
Reverse print is the best option to go for when you are printing multiple-page documents. It’s pretty convenient, and you will print as many pages as possible and in the correct sequence. Your final documents will be collected, arranged, and assembled accurately when reverse printing.
When printing your documents or files in Word, you can print them either forward or backward. However, this exercise will depend on the type of printer you use. In the printing industry, a reverse print is any graphic or text that has been produced using ink to form its unique outline.
This process allows the underlying paper color to create the actual image. To reverse or mirror a text in a document, you must enter it in a text box. Once you flip it, you can remove the appearance of having used a text box by getting rid of the outline.
The reverse print technique has also been handy in fabric printing projects. For instance, a mirror text can be transferred into a garment using heat and pressure. There are multiple options to know, ranging from the type of printer to use to Microsoft WordArt.
Have you ever undertaken a heat transfer paper project to print a text or image on a fabric you can read in the mirror? If yes, then you are aware of reverse fonts and what reverse printing brings about. However, there is a lot to know about how to reverse print images in word 2007.
Whenever undertaking a printing project, there is always a rewarding and correct way to print documents in Word. And when it comes to a reverse print, here are a few benefits to motivate you in your projects. Have a look:
- It is a convenient way to print a bulk of files.
- Cost-effective option to print as many documents as you wish
- It saves more time because you don’t have to spend a lot of time sorting and rearranging the printed copies.
- Creates consistency as you can print in the correct order.
- Improves work efficiency if you are operating a printing business.
Printing Mirror Image Hassle-Free
If you are a novice in the printing world, you may be wondering whether it’s possible to print in mirror-image format and create iron-on transfers. Indeed it is possible and a less daunting task. It would be best to learn how to print a mirrored image or text using Windows or Mac applications.
Once you know how to reverse print images in Word, you will find it easy to transfer text to fabrics and iron-on transfer papers. Microsoft Word does a good job when printing documents, and you should embrace these skills in printing onto wax or parchment papers. Remember, everything is reversed on the printout, and there are several factors to consider. Have a look:
- Check Your Printer Settings/ Properties
Before you learn how to reverse print image text in Word and undertake such a project, check your printer settings. Printers used in the printing industry vary and come with various features. It’s wise to check whether your printer has the reverse part.
Unfortunately, many printer manufacturers give these features different names. Some of the common terms used to define this feature include:
- Reverse
- Mirror image
- Backprint
- Flip horizontal
Before you decide to use another method to flip a text or artwork, check to see if your printer supports reversed output. Click on printer properties and follow the provided steps or instructions.
- Use Reliable Online Reverse Text Generator
How to mirror text in word 2010 shouldn’t be challenging if you rely on online reserve text generators. You will find online platforms that allow you to type a text or insert an image you want to reverse print. These free tools will instantly convert your image or text into a backward version of the original image or text.
These tools give outstanding results in seconds and with less effort. It’s convenient and accessible to any user. You can use these tools whenever you wish, and on any text you want to reverse. Here are comprehensive steps on how to use a Reverse Text Generator.
- Copy the text you want to reverse.
- Paste it in the blank box.
- Choose if you wish to flip, reverse, or revert the text.
- Wait for a few seconds for the process to finish.
If you are ready to reserve print your documents, you should tick every step involved right. There is no room to make errors, so you need to be cautious about undertaking this printing project. HP printers are widely used in the printing industry thanks to their all-in-one features, high-yield ink options, and efficient printing speeds.
With this in mind, I don’t have any uncertainties knowing how to reverse print images on an HP printer. Follow every detail on how to mirror an image or text in Windows or Mac operating systems. Read on and learn how to print reversed images or texts.
Reverse Text and Image on Windows
Windows 10 is one of the most convenient operating systems widely used in the world. Its user experience and functionality are unparalleled. It’s more satisfying if you didn’t have any worries using Microsoft Word to reverse print texts or images on windows.
Knowing how to reverse print image Windows 10 makes it easy to undertake printing projects stress-free. However, it’s the ability to reverse print, making it a worthwhile operating system to install on your computers.
You can quickly and consistently print mirrored images or texts on a windows PC. Follow a few steps below:
- Go to Microsoft Word and click on the “Insert” tab.
- Select the “Pictures” option and add any image you like to the document. Use some of the images saved on your computer.
- Click the “Format” tab. Standard image formats to print include PNG, TIFF, BMP, and JPG.
- Click on “Rotate” in the arrange group. Flip the image on any of the provided options and reverse it.
- Now that the image is reversed. Click the printer icon to open your print options or preferences. Then print the image.
Alternatively, you can use the single command that forces a printer to reverse print an image or text. Here is how to go about it:
- Open Word and click on “Options”>Advanced.
- Scroll through the group and stop on the “Print” section.
- To reverse print a text or image, select the “Print Pages in Reverse Order” check box.
- Click “OK” and exit the Options section.
Reverse Print in Word on Mac
Every component on the Mac operating system is optimized, so don’t stress if you want to print a mirror image. Clear your doubts today if you don’t know how to reverse print in Word on Mac with these helpful steps:
- Open the graphic or photo in preview.
- Click on the “Tools” menu.
- Then click on “Flip Horizontal” on the menu. You will flip the entire text.
- Print your image. Now your text is reversed.
- Go on and select “Print” and click “OK.” You will print your mirrored text.
Reverse Print Image PDF
Many people widely use PDF (Portable Document Format) to save files that cannot be altered and need to be easily printed or shared. It’s a reliable format compatible with Windows, Mac, and other operating systems. When using PDF, it’s easy to integrate non-text elements, images, and hyperlinks.
With every person using PDF today, it may not be easy to know how to reverse print image pdf. The good news is that there are a few steps you can follow and mirror images or texts. Have a look:
- Click the “Open File” icon to load PDF.
- Click the “Edit” button, and select the image.
- Click “Overturn Horizontal” or “Overturn Vertical” to mirror your image.
- Edit the file as you wish.
- Click the “File”> “Save As.”
- Click the “Print” button and print your mirrored PDF image.
How to Reverse Print Text in Google Docs
A Google doc is a vital tool that makes it easy to create digital content. While using this tool, you can easily edit a document while others can spontaneously see the changes you make. Significantly, you can automatically track the changes you make on your document and return to the document’s previous version.
You can also use Google docs from anywhere and on your phone, laptop, or desktop. If you don’t have the internet, you can still use it offline and upload the document later. Despite the many benefits of using Google docs, many people may not know how to reverse print text in Google docs.
There are a couple of procedures you can reverse print text in Google docs. However, you should choose the most convenient method, and it involves:
- Click “Insert,” then “Drawing,” and “New.”
- You will find an “Action” tab.
- Click on the tab and select “WordArt.”
- A small text window will pop up, and you can insert the text you want to reverse.
- Enter to save if you want to use more lines of the text; press Shift+Enter.
- To reverse your text horizontally, put your cursor on the center-right square on the text box. Then drag the text to the left.
- Click “Save” and close it for the text to appear in Google docs.
- Print your reversed text.
Final Thoughts
It shouldn’t be that daunting to reverse print in Word if you have the skills and are determined to excel in your endeavors. Whether you are printing on Windows, Mac, PDF, or Google docs, there are incredible steps you have to follow. With thorough practice, you will use this knowledge to undertake different printing projects.
Recommendation:
- How to Get Rid of Old Printers – Ideas
- How to Clean a Printer – A complete Guide
- Remove Screen Printing from Shirt
- How to Use T-shirt Transfer Paper
- How to Use Iron on Transfer Paper
Microsoft Office gives you the ability to create stylized text. Let’s see how you can quickly reverse or mirror text in a few steps.

Mirror text or reversed text isn’t something you would think of using in a professional Microsoft Word document. But this feature could have interesting cosmetic applications. Maybe you want to make a drop cap letter more interesting or want to design a prettier printable invite with a horizontal flip of the text.
We will show you how to do this in Microsoft Word in the steps below.
How to Reverse or Mirror Text in Microsoft Word
You do not get to click a single button to reverse text in Microsoft Word. Instead, you have to take the help of the Text box and the Format Shape controls to flip text around. These steps work across Office 365 and other Office tools like Word, PowerPoint, Excel, and Outlook.
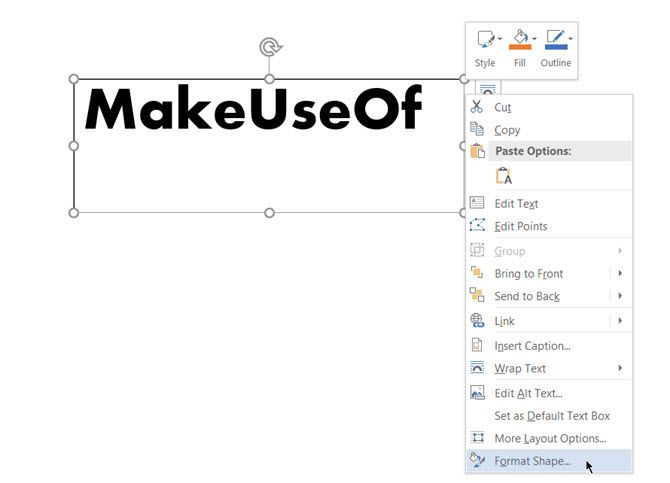
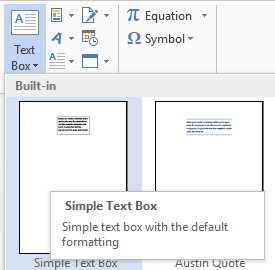
- To insert a text or even a single letter, go to Insert > Text Box. Now, type your text and then format it.
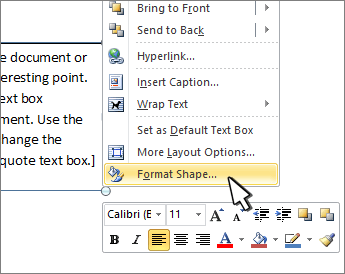
- With the box selected, right-click the box and click Format Shape.
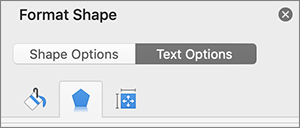
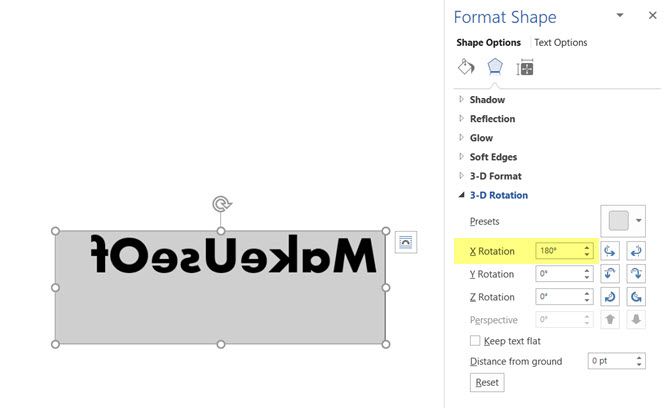
- The Format Shape panel is displayed on the right. Click on the pentagon icon for Effects.
- Under 3-D Rotation, in the X Rotation box, enter “180 degrees” to mirror the text. You can also set other rotations as 0 degrees and the Y Rotation to 180 and make the text mirrored and flipped upside down.
- As a finishing touch, select the text box shape and set Shape Fill to “No Fill” and Shape Outline to “No Outline”.
Some simple style effects to the text in Microsoft Word can make them stand out. But do keep in mind the purpose of the document before you start formatting the text.
Making Your Documents More Interesting
Playing around with text is just one way to make your Microsoft Word documents a little more interesting. The more you know about how to use Microsoft Word, the easier it is to create impressive documents and snazzy printables.
![]()
One of the most common mistakes when using transfer paper for white and light coloured fabrics is forgetting about reversing the text or image so that the artwork is readable from the front. Transfer paper is a versatile product that allows anyone with a working Inkjet printer and normal ink to create their own t-shirt design, pillowcases and even woodwork. The process is as simple as creating the desired design on a computer, printing it using an inkjet printer and and transferring it onto the suitable substrate.
When printing onto dark garments, using the dark transfer paper, the image should not be mirrored.
When the subject of reverse printing is neglected, the images will appear the wrong way around thereby causing frustration and waste of a perfectly good transfer paper. There are several methods to achieve a mirrored print using your printer’s own printing settings to available options in one of the many popular printing software. As always, you will do well to firstly print your design on normal printer paper (uncoated paper that is!) so if you have made a mistake, you are not wasting expensive paper.
How To Reverse Text For Transfer Paper Printing:
Print settings – Most printers nowadays will offer the means to print in mirror or reverse mode. This option is normally found in the printer’s settings once you click on the print option and get the print dialog box. (often one of the available paper types is T Shirt Paper which will flip the image automatically when printed).
MS Word – Microsoft Word is a popular choice for those who tend to print text as the choice of fonts and font size make it a prize tool. To reverse the image in MS Word simply create the words using WordArt then once the box with the text comes up, you can drag the left side all the way to the right until the text switches sides.
MS Paint –Paint is a popular choice for image manipulation in its basic form as it comes with Windows based machines. To create the desired effect, head to the Image tab and chose Flip/Rotate then use flip horizontal.
One of these three methods will allow you to reverse the image or text. No matter which option you’ve selected, print a test page first using normal paper.
You might try this solution in getting a vector of string‘s using the ‘ ‘ (single space) character as a delimiter.
The next step would be to iterate over this vector backwards to generate the reverse string.
Here’s what it might look like (split is the string splitting function from that post):
Edit 2: If you don’t like vectors for whatever reason, you can use arrays (note that pointers can act as arrays). This example allocates a fixed size array on the heap, you may want to change this to say, double the size when the current word amount has reached a certain value.
Solution using an array instead of a vector:
#include <iostream>
#include <string>
using namespace std;

int getWords(string input, string ** output)
{
    *output = new string[256];  // Assumes there will be a max of 256 words (can make this more dynamic if you want)
    string currentWord;
    int currentWordIndex = 0;
    for(int i = 0; i <= input.length(); i++)
    {
        if(i == input.length() || input[i] == ' ')  // We've found a space, so we've reached a new word
        {
            if(currentWord.length() > 0)
            {
                (*output)[currentWordIndex] = currentWord;
                currentWordIndex++;
            }
            currentWord.clear();
        }
        else
        {
            currentWord.push_back(input[i]);    // Add this character to the current word
        }
    }
    return currentWordIndex;    // returns the number of words
}

int main ()
{
    std::string original, reverse;
    std::getline(std::cin, original);  // Get the input string
    string * arrWords;
    int size = getWords(original, &arrWords);  // pass in the address of the arrWords array
    int index = size - 1;
    while(index >= 0)
    {
       reverse.append(arrWords[index]);
       reverse.append(" ");
       index--;
    }
    std::cout << reverse << std::endl;
    return 0;
}
Edit: Added includes, main function, while loop format
#include <vector>
#include <string>
#include <iostream>
#include <sstream>


// From the post
std::vector<std::string> &split(const std::string &s, char delim, std::vector<std::string> &elems)
{
   std::stringstream ss(s);
   std::string item;
   while(std::getline(ss, item, delim)) {
       elems.push_back(item);
   }
   return elems;
}


std::vector<std::string> split(const std::string &s, char delim) {
    std::vector<std::string> elems;
    return split(s, delim, elems);
}

int main ()
{
    std::string original, reverse;
    std::cout << "Input a string: " << std::endl;
    std::getline(std::cin, original);  // Get the input string

    std::vector<std::string> words = split(original, ' ');

    std::vector<std::string>::reverse_iterator rit = words.rbegin();

    while(rit != words.rend())
    {
       reverse.append(*rit);
       reverse.append(" "); // add a space
       rit++;
    }
    std::cout << reverse << std::endl;
    return 0;
}