
The printing order typically starts from page 1 and proceeds up to the last page. Printed papers that emerge from the printer come out with the last page on top and the first page at the bottom of the pile. If your document had only about 5-10 pages, sorting them manually—to bring page one on the top—is no major task.
Now, instead of a few pages, what if your document was actually a book with a few hundred pages?
After you have printed all the pages, sorting them to bring page 1 on the top could soon become a tedious exercise.
Well, the solution is very simple—why not start the printing process beginning with the last page and finish with page one?
The process is termed printing in reverse order, and the printer you are using may allow doing so because of a built-in functionality.
However, all printers may not possess that facility, so you can set up Microsoft Word to do that for you.
We will guide you through the process of printing your Word document in reverse order following a few simple steps. In fact, you can do that in two ways.
- Set Word to print in reverse order by default.
- Reverse print the document using custom print options.
Lets start.
Method #1: Set Reverse Printing as default
This method will set up Word to print any document in the reverse order—very useful if you are working steadily on a single large document and not switching documents frequently.
Step #1: Open Microsoft Word
Start Microsoft Word.

Step #2: Open Word Options
In the bottom left corner, click on Options. This will open the Word Options page.

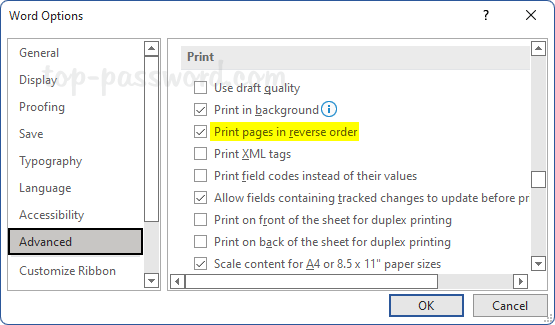
Step #3: Set Print in Reverse Order
- Click on the Advanced tab on the left side. Scroll down the right side until you reach the section Print.
- Click on Print pages in reverse order, making sure that a tick-mark appears inside the small square immediately in the left.
- Click on OK to exit.
The above steps set up Word to print in the reverse order of pages for any document you open from now onwards.
To go back to printing starting from page 1, simply follow the above steps again, and make sure there is no tick-mark against Print pages in reverse order in Word Options.
Method #2: Reverse Printing using Printer Options
Use this method if you print several different Word documents frequently, and only some require printing in reverse order.
Step #1: Open a Word Document
Open a Word document. Click on the File tab on the top menu bar. The File dialog will open.

Step #2: Set Up the Print Dialog
- Click on the Print tab on the left. The Print dialog will now open, showing a print preview of the document on the right side.
- Under Settings, click on Print All Pages. An options menu will drop.
- Click on Custom Print. The options menu will close with the cursor blinking inside a blank field.

Step #3: Set Up Custom Print to print in reverse order.
Word offers hints for filling up the blank field. You can see these hints if you hover the mouse pointer on the Instructions icon to the right of the blank field.
To print in reverse order, type the number of the last page with which you want to start the printing, followed by a hyphen, and then the number of the page on which you want the printing to end.
For instance, you may type 5-1, or 8-4, or other, depending on your requirement.
Word displays the current page and the total number of pages at the bottom for your convenience and reference.

Step #4: Print
Click the Print icon to start printing. Once printing has completed, Word will revert to printing all pages in regular order for other documents when you open them next.
Conclusion
If your printer is capable of printing in reverse order, you may use that specific feature. However, it is possible to reverse print with any printer, and Word allows you to do that in two ways—one for all documents, and the other for the current document. We have explained both methods in simple steps.
There is a lot that the printing industry offers, and it has not lost its significance. The world of printing is widespread, and you need to grasp every concept involved in the process. With new printing options and inventions gracing the industry, you should be well-acquainted with digital printing. A question raised How to Reverse Print in Word?
It covers various techniques, and it’s vital for printing letters, newsletters, posters, signage, menus, and labels. Digital printing saves time and money as you can make as little as one print. To make your printing project come out right and satisfying, be well-versed with different terminologies used in the field.
Probably, you have heard, read, or know a lot about reverse print. If not, read on and gather vital information to guide you in your printing endeavors.
Contents
- Everything to Know about Reverse Printing
- Printing Mirror Image Hassle-Free
- Reverse Text and Image on Windows
- Reverse Print in Word on Mac
- Reverse Print Image PDF
- How to Reverse Print Text in Google Docs
- Final Thoughts
- Recommendation
Everything to Know about Reverse Printing
Print options vary, more so depending on the printer one is using. You can access many of these printing options in the Print Dialog Box on your printer. You can as well rely on your Word document to access more print options.
Surprisingly, when you utilize the Word print option, you will replace any options you choose in your printer. One of the unique print options that will grasp your attention is to print pages in reverse order. If it’s your first time to come across this option, you will probably wonder how to reverse print order in word 2013.
Reverse print is the best option to go for when you are printing multiple-page documents. It’s pretty convenient, and you will print as many pages as possible and in the correct sequence. Your final documents will be collected, arranged, and assembled accurately when reverse printing.
When printing your documents or files in Word, you can print them either forward or backward. However, this exercise will depend on the type of printer you use. In the printing industry, a reverse print is any graphic or text that has been produced using ink to form its unique outline.
This process allows the underlying paper color to create the actual image. To reverse or mirror a text in a document, you must enter it in a text box. Once you flip it, you can remove the appearance of having used a text box by getting rid of the outline.
The reverse print technique has also been handy in fabric printing projects. For instance, a mirror text can be transferred into a garment using heat and pressure. There are multiple options to know, ranging from the type of printer to use to Microsoft WordArt.
Have you ever undertaken a heat transfer paper project to print a text or image on a fabric you can read in the mirror? If yes, then you are aware of reverse fonts and what reverse printing brings about. However, there is a lot to know about how to reverse print images in word 2007.
Whenever undertaking a printing project, there is always a rewarding and correct way to print documents in Word. And when it comes to a reverse print, here are a few benefits to motivate you in your projects. Have a look:
- It is a convenient way to print a bulk of files.
- Cost-effective option to print as many documents as you wish
- It saves more time because you don’t have to spend a lot of time sorting and rearranging the printed copies.
- Creates consistency as you can print in the correct order.
- Improves work efficiency if you are operating a printing business.
Printing Mirror Image Hassle-Free
If you are a novice in the printing world, you may be wondering whether it’s possible to print in mirror-image format and create iron-on transfers. Indeed it is possible and a less daunting task. It would be best to learn how to print a mirrored image or text using Windows or Mac applications.
Once you know how to reverse print images in Word, you will find it easy to transfer text to fabrics and iron-on transfer papers. Microsoft Word does a good job when printing documents, and you should embrace these skills in printing onto wax or parchment papers. Remember, everything is reversed on the printout, and there are several factors to consider. Have a look:
- Check Your Printer Settings/ Properties
Before you learn how to reverse print image text in Word and undertake such a project, check your printer settings. Printers used in the printing industry vary and come with various features. It’s wise to check whether your printer has the reverse part.
Unfortunately, many printer manufacturers give these features different names. Some of the common terms used to define this feature include:
- Reverse
- Mirror image
- Backprint
- Flip horizontal
Before you decide to use another method to flip a text or artwork, check to see if your printer supports reversed output. Click on printer properties and follow the provided steps or instructions.
- Use Reliable Online Reverse Text Generator
How to mirror text in word 2010 shouldn’t be challenging if you rely on online reserve text generators. You will find online platforms that allow you to type a text or insert an image you want to reverse print. These free tools will instantly convert your image or text into a backward version of the original image or text.
These tools give outstanding results in seconds and with less effort. It’s convenient and accessible to any user. You can use these tools whenever you wish, and on any text you want to reverse. Here are comprehensive steps on how to use a Reverse Text Generator.
- Copy the text you want to reverse.
- Paste it in the blank box.
- Choose if you wish to flip, reverse, or revert the text.
- Wait for a few seconds for the process to finish.
If you are ready to reserve print your documents, you should tick every step involved right. There is no room to make errors, so you need to be cautious about undertaking this printing project. HP printers are widely used in the printing industry thanks to their all-in-one features, high-yield ink options, and efficient printing speeds.
With this in mind, I don’t have any uncertainties knowing how to reverse print images on an HP printer. Follow every detail on how to mirror an image or text in Windows or Mac operating systems. Read on and learn how to print reversed images or texts.
Reverse Text and Image on Windows
Windows 10 is one of the most convenient operating systems widely used in the world. Its user experience and functionality are unparalleled. It’s more satisfying if you didn’t have any worries using Microsoft Word to reverse print texts or images on windows.
Knowing how to reverse print image Windows 10 makes it easy to undertake printing projects stress-free. However, it’s the ability to reverse print, making it a worthwhile operating system to install on your computers.
You can quickly and consistently print mirrored images or texts on a windows PC. Follow a few steps below:
- Go to Microsoft Word and click on the “Insert” tab.
- Select the “Pictures” option and add any image you like to the document. Use some of the images saved on your computer.
- Click the “Format” tab. Standard image formats to print include PNG, TIFF, BMP, and JPG.
- Click on “Rotate” in the arrange group. Flip the image on any of the provided options and reverse it.
- Now that the image is reversed. Click the printer icon to open your print options or preferences. Then print the image.
Alternatively, you can use the single command that forces a printer to reverse print an image or text. Here is how to go about it:
- Open Word and click on “Options”>Advanced.
- Scroll through the group and stop on the “Print” section.
- To reverse print a text or image, select the “Print Pages in Reverse Order” check box.
- Click “OK” and exit the Options section.
Reverse Print in Word on Mac
Every component on the Mac operating system is optimized, so don’t stress if you want to print a mirror image. Clear your doubts today if you don’t know how to reverse print in Word on Mac with these helpful steps:
- Open the graphic or photo in preview.
- Click on the “Tools” menu.
- Then click on “Flip Horizontal” on the menu. You will flip the entire text.
- Print your image. Now your text is reversed.
- Go on and select “Print” and click “OK.” You will print your mirrored text.
Reverse Print Image PDF
Many people widely use PDF (Portable Document Format) to save files that cannot be altered and need to be easily printed or shared. It’s a reliable format compatible with Windows, Mac, and other operating systems. When using PDF, it’s easy to integrate non-text elements, images, and hyperlinks.
With every person using PDF today, it may not be easy to know how to reverse print image pdf. The good news is that there are a few steps you can follow and mirror images or texts. Have a look:
- Click the “Open File” icon to load PDF.
- Click the “Edit” button, and select the image.
- Click “Overturn Horizontal” or “Overturn Vertical” to mirror your image.
- Edit the file as you wish.
- Click the “File”> “Save As.”
- Click the “Print” button and print your mirrored PDF image.
How to Reverse Print Text in Google Docs
A Google doc is a vital tool that makes it easy to create digital content. While using this tool, you can easily edit a document while others can spontaneously see the changes you make. Significantly, you can automatically track the changes you make on your document and return to the document’s previous version.
You can also use Google docs from anywhere and on your phone, laptop, or desktop. If you don’t have the internet, you can still use it offline and upload the document later. Despite the many benefits of using Google docs, many people may not know how to reverse print text in Google docs.
There are a couple of procedures you can reverse print text in Google docs. However, you should choose the most convenient method, and it involves:
- Click “Insert,” then “Drawing,” and “New.”
- You will find an “Action” tab.
- Click on the tab and select “WordArt.”
- A small text window will pop up, and you can insert the text you want to reverse.
- Enter to save if you want to use more lines of the text; press Shift+Enter.
- To reverse your text horizontally, put your cursor on the center-right square on the text box. Then drag the text to the left.
- Click “Save” and close it for the text to appear in Google docs.
- Print your reversed text.
Final Thoughts
It shouldn’t be that daunting to reverse print in Word if you have the skills and are determined to excel in your endeavors. Whether you are printing on Windows, Mac, PDF, or Google docs, there are incredible steps you have to follow. With thorough practice, you will use this knowledge to undertake different printing projects.
Recommendation:
- How to Get Rid of Old Printers – Ideas
- How to Clean a Printer – A complete Guide
- Remove Screen Printing from Shirt
- How to Use T-shirt Transfer Paper
- How to Use Iron on Transfer Paper
When we print our documents in reverse order, our printer will start printing from the last sheet to the first . In this way we get that the first page that we have on top when the printing finishes is the first page of our document, the rest of the pages succeeding in an orderly way. This avoids that, in case we carry out the process in the traditional way, from having to be ordering all the pages, which we will appreciate if we have to print a fairly high number of sheets.

If we want to print in reverse order from Word, we can do it easily in two different ways . One of them is from the “Options” section , from where we can print in reverse order by default, and the other is from the “Print” section , where we can configure the document to be printed in reverse order only once. In addition, it is also possible to configure the printer to print the sheets in reverse order by default so that it works with any other application.
Configure from the Options section
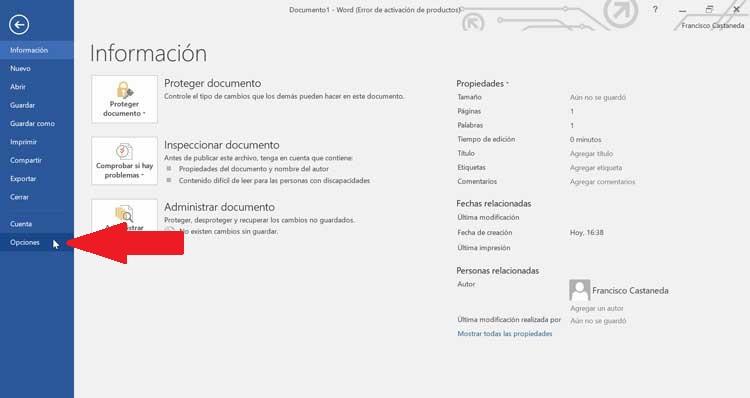
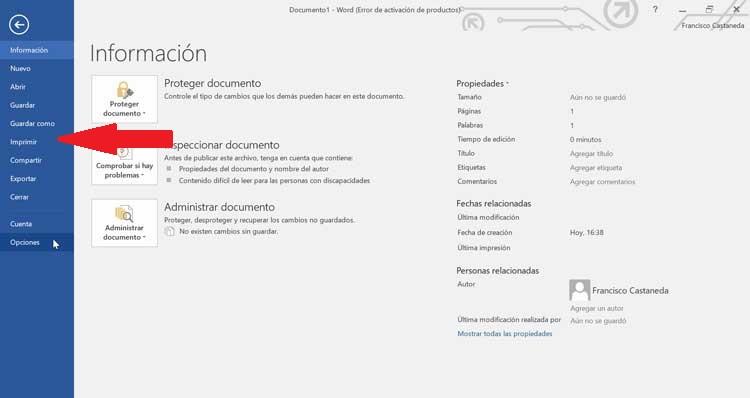
If we want Word to print our documents in reverse by default , we can leave it previously configured by default . For this we will open our text document that we are going to print. Once we have it open, click on the “File” tab that is located in the upper left.
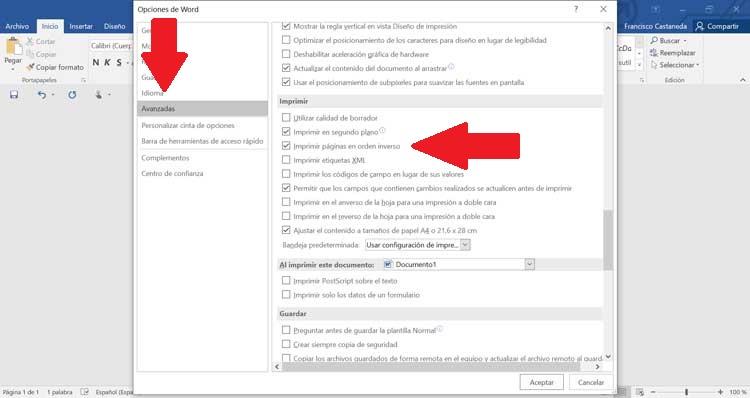
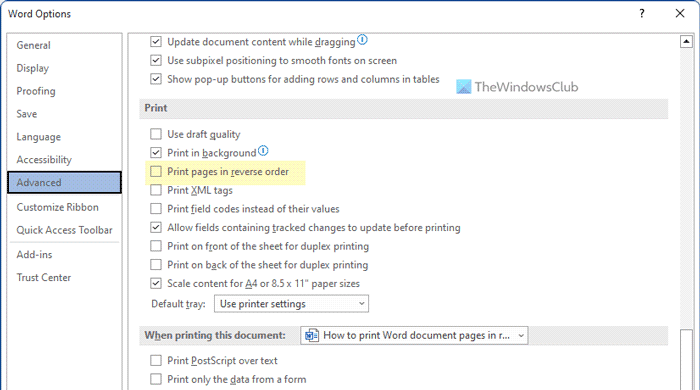
Once pressed, another screen with a menu will appear in the left column. Here we must look at the bottom of everything and click on “Options” . Next, a pop-up window called “Word Options” will open . If we look at the column on the left side we will see several options, among which we must select “Advanced” .
Now, on the right side, we must lower the bar until we find the “Print” section . Once located, we must find and select the option “Print pages in reverse order” , which is the third of the options that we find. To activate this function we will only have to activate the box that appears on the left side, and then click on “OK” to save all changes.
After following these simple steps and activating the Print pages in reverse order box, Word will from now on print the pages in reverse order, that is, starting from the last page to the first.
Configure from the Print section
Another option that we have to print in reverse order is from the “Print” section within the Word functions. We must do this if we want to print in a reverse way only in a specific way for the document that we have open, since the changes are not saved by default, but will only be applied to the document that we are using at that moment.
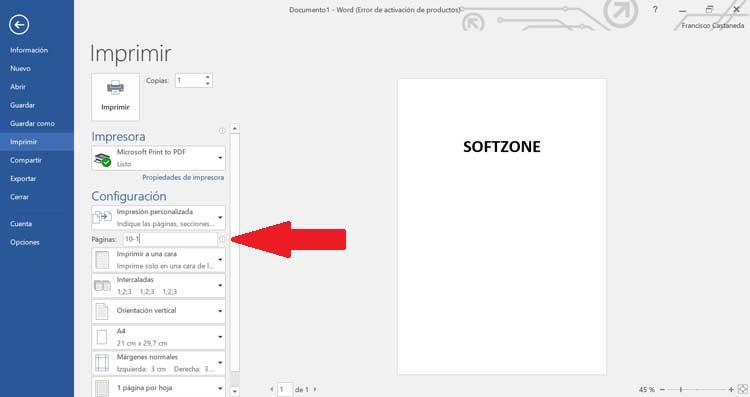
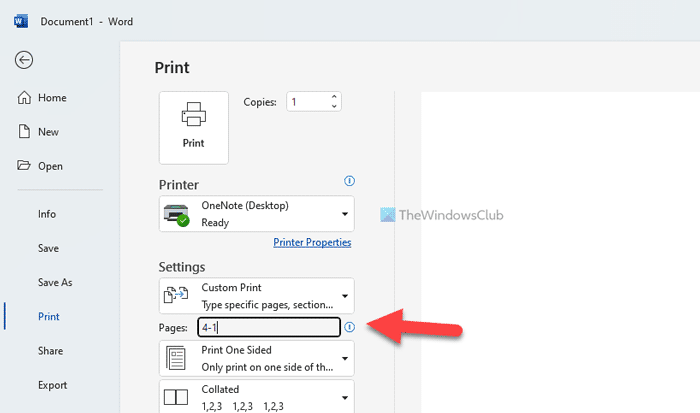
To do it in this way we will have to have Word open with the document that we want to print. Once open, we will click on the File tab that we find in the upper left. A new window will appear with a list of functions in the left column, of which we will have to select “Print” .
Once we click on the Print option, a new window will appear, where we must select the “Configuration” section . Here we must look for the option “Pages” and write in them the number of pages of the document in reverse. For example, if the document that we are going to print has 10 pages we must write 10-1. Finally, it only remains to click on the “Print” button, so that all the pages are printed in reverse order this time.
Set the reverse order from your printer
Beyond Word, it is possible to make these adjustments so that our document is printed in the reverse order, from the configuration options of our printer . In this way, we can print in reverse from any application we have.
To do this, press the “Win + I” keyboard shortcut, and in this way we will open the “Windows 10 Settings” . Next, click on the “Devices” tab. A new window will appear where we must select the Printers and scanners option from the right column.
Next, we must open the Properties of our printer, which will be different depending on each model and brand. Once inside, we must search and select the corresponding option that allows us to print in reverse , from the last to the first page, of our document, whatever the application we use. Once selected, click on “OK” and the configuration will have been saved by default.
Всегда есть правильный способ печати ваших документов правильно печатать документы Некоторые струйные модели печатают страницы с напечатанной стороной вверху, что означает, что вы должны вручную изменить порядок печати вручную.
Это не слишком большая проблема при печати всего нескольких страниц, но когда у вас есть стопка документов, имеет смысл печатать их в обратном порядке, чтобы вы могли аккуратно сопоставить пачку.
Давайте рассмотрим три простых способа обратной печати страниц.
1. Установите его в Microsoft Word
Microsoft Word имеет единственную команду, которая заставляет принтер выполнять обратную печать каждого задания на печать:
- Откройте Word, затем нажмите « Параметры»> «Дополнительно» .
- Прокрутите страницу и перейдите в раздел « Печать » справа.
- Если вы хотите выполнить обратную печать страницы, установите флажок « Печать страниц в обратном порядке» . Нажмите OK и выйдите из экрана параметров.

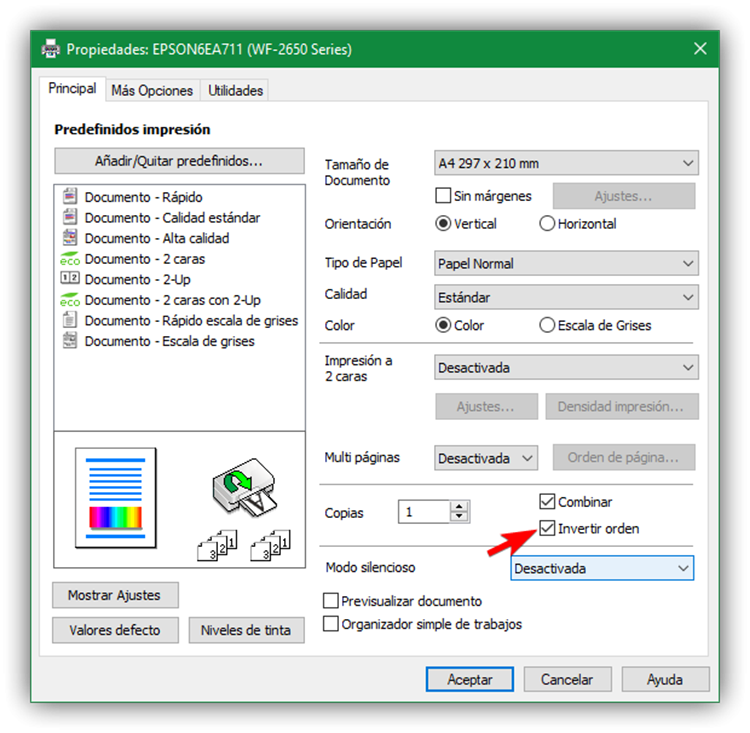
2. Установите его в настройках принтера
Большинство принтеров дадут вам точный контроль над процессом печати страниц. У меня есть принтер Samsung, а вкладка «Дополнительно» позволяет печатать в обратном порядке. Ваш принтер тоже будет иметь возможность. Вот как вы обычно можете установить его:
- Нажмите вкладку «Параметры страницы» в настройках печати.
- Установите флажок Печать с последней страницы .
- Нажмите ОК.

3. Установите его на любом принтере из любого приложения
Если вы не можете найти команду или флажок в обратном порядке печати в настройках принтера или в диалоговом окне «Печать» приложения, просто введите нужный диапазон страниц в обратном порядке в диапазоне страниц диалогового окна «Печать».
Например, если вы печатаете страницы с 1 по 5 документа, введите «5-1», как показано ниже, затем нажмите « Печать» .

Эти небольшие советы помогут вам повысить эффективность печати и упорядочить все ваши страницы.
Расскажите нам об одном типографском наконечнике, который помогает повысить вашу производительность каждый день.
Изображение предоставлено: Ольга Чернова через Shutterstock
August 5, 2022 updated by
Leave a reply »
Your printer always prints a document from the first page instead of from the last page? How can I print Word document pages in reverse order? If you’re using Microsoft Word to print a word document, here’s 2 simple methods to print pages in reverse order on Windows 11 / 10.
Method 1: Temporarily Print Word Document in Reverse Order
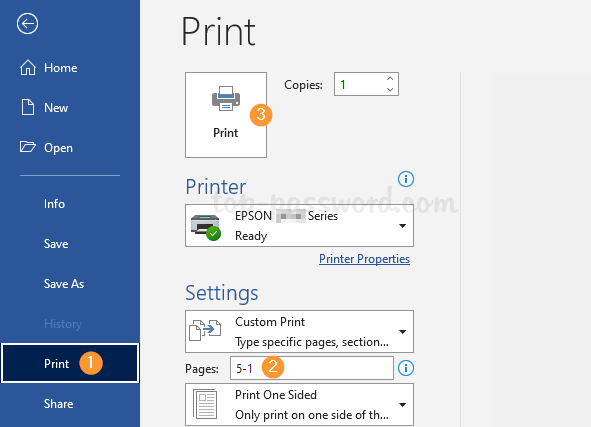
- When you’re using Microsoft Word, click the File menu in the Ribbon. Next, click the Print tab on the left.
- The printing settings will appear on the right side. Simply click the Pages text box and enter your desired page range in reverse order. For example, if want to print pages 1 to 5 of a Word document, enter “5-1” as below

- To begin printing, click the Print button at the top.
Method 2: Always Print Word Document in Reverse Order
- Open Microsoft Word, click the File menu in the Ribbon. Next, click the Options tab on the left side.

- The Word Options dialog box will appear. Choose the Advanced tab on the left side. Scroll down the right side until you see the Print section. Check the Print pages in reverse order option and click OK.

- From now on, Microsoft Word will always print all your documents in reverse order by default.
That’s it!
- Previous Post: 2 Methods to Start Microsoft Edge in Full Screen
- Next Post: 4 Steps to Embed Fonts in a Microsoft Word Document
Sometimes it’s the little things that trip you up, like figuring out how to print text in reverse. Some people call this mirror text. I’m not trying to imitate Leonardo Da Vinci and his mirror fonts. Instead, I was trying to help someone do a t-shirt transfer that included a quote. In this tutorial, I’ll show how to mirror text using Microsoft Word, 3rd party services, and your printer.
If you’ve ever tried to use one of those heat transfer papers to make a t-shirt or print a “secret” message for a kid that can be read in the mirror, you know this problem. I’m sure there are other uses for reverse text that escape me. However, the scenario did make me think of different ways to solve this problem.
How to Mirror Print in Word
By default, Microsoft Word doesn’t have the means to reverse text. However, you can rotate objects using WordArt. In this example, I’m using Word in Microsoft 365 and will add my text using WordArt.
- From the Insert menu and Text section, select WordArt.
- From the drop-down menu, select your color combination.
- Type or paste your text into the text box.
- With your cursor in the textbox, click Shape Format.
- From the Shape Styles section, click Shape Effects and 3-Rotation.
- From the side menu, select 3-D Rotation options…. The Format Shape dialog opens to the right.
- From the Format Shape dialog, click 3D Rotation.
- In the Rotation section, enter 180 for the X: value.
- Click the X button on the top-right to close the dialog.
✪ As a suggestion, make sure you proofread your text before it becomes reverse text.
Flip Images in Microsoft Word
When it comes to reversing images, the process is a bit different but easily achievable.
- Insert or paste your image into Word.
- Click the image to select it.
- From Picture Format, click the Rotate Object button in the Arrange Group.

- Select Flip Horizontal from drop-down menu.
Check Printer Properties
Many printers have a feature that reverses text output. The problem is there doesn’t seem to be a consistent name for this feature. In fact, when I went to the HP site, they provided many names for this feature, including:
- back print
- flip horizontal
- mirror image
- reverse
I have an HP DeskJet 6940, and it does have this mirror printing feature, although you have to hunt for it. I had to click into the Printer Properties and then go to the Finishing tab.

Online Reverse Text Generators
Several online sites allow you to type or paste the text that you need. One mirror text generator that I found useful is from TextMechanic.

As you can see from the buttons above, the site provides many options for altering your text. If you’re in a silly/devious mood, you can copy the results and paste them into your email app or word processor and see how people react. One caveat is that you can only do 4 tasks per hour.
Also, if you paste the output into an application like Microsoft Word, be prepared for a bunch of red squiggly lines if you have spell-check enabled. This might be a situation where you want to turn off spell check in Word.
The next time you need to reverse print, remember you have a number of options. While the options and settings may be hard to find, the process is easy.
Hand-picked Tutorials
- How to Make Custom Gift Certificates
- How to Make a Letterhead in Word
- How to Reduce Word File Size
- How to Make a Picture Smaller
- How to Fix Spell Check in Word
Download PC Repair Tool to quickly find & fix Windows errors automatically
If you want to print Word document pages in reverse order, here is how you can get it done. There are three different methods to print Word documents in reverse order in Windows 11 and Windows 10 PC. Here we have explained all the methods so that you can follow any of them as per your requirements.

To print Word document pages in reverse order, follow these steps:
- Open Microsoft Word on your computer.
- Click on the File.
- Click the Options menu.
- Switch to the Advanced tab.
- Head to the Print section.
- Tick the Print pages in reverse order checkbox.
- Click the OK button.
To know more about this setting, continue reading.
First, you need to open Microsoft Word on your computer. Then, click on the File menu in the top menu bar, and click on Options. It will open the Word Options panel on your computer.
Then, switch to the Advanced tab on the left side and find the Print section. You need to scroll down a bit to get it. Here you can find an option called Print pages in reverse order.
You need to tick this checkbox and click the OK button to save the change. Once done, Word will print pages in reverse order until you revert the change.
How to print any pages in reverse order in Windows 11/10
To print any pages in reverse order in Windows 11/10, follow these steps:
- Using Print dialog
- Using Office apps
To find out more about these steps, keep reading.
1] Using Print dialog
Although this option might not be available for all printers, you may find it in most of them. It is possible to print pages in reverse order using the system dialog of Print.
All you need to do is to choose an option before starting the printing process. That said, open the printer’s Properties window and switch to the Advanced tab. Here you can find an option called Print Order.
You need to expand the checkbox and select the Reverse All Pages option. Following that, you can continue with the printing process. It will print in reverse.
2] Using Office apps
Word, Excel, and PowerPoint come with an option to print pages in reverse order. Whether you want to print a document, spreadsheet, or presentation, you can print that in reverse.
For that, you need to open any of those apps on your computer and click on the File menu. Then, switch to the Print section. Here you can see an option called Pages.
You need to enter the page number like this: 10-1 or 4-1.
Let’s say your file has four pages. If so, you need to enter the last page number (here, it is 4) at the beginning and the first-page number (it is always 1) at the end.
Then, you can go through the printing process as usual.
Read: How to split a Page into 4 parts in Microsoft Word
How do I change the order of pages in printing?
There are three ways to change the order of pages in printing. If you are talking about Microsoft Word, follow the guide above. The first one is all about turning on a setting in Word Options. However, the second and third methods can be used for any other document, including a PowerPoint presentation.
What is the reverse Pages option when printing?
If your document has five pages and you want to print the fifth page first and the first page at the end, you need to turn on the reverse printing option. It is possible to enable this setting in Microsoft Word with the help of the in-built option. On the other hand, you can do the same using the Printer Properties panel and Print option in Word.
Read: Word cannot print because there doesn’t seem to be a printer installed‘

When he is not writing about Microsoft Windows or Office, Sudip likes to work with Photoshop. He has managed the front end and back end of many websites over the years. He is currently pursuing his Bachelor’s degree.
Pages printed in reverse order will be arranged in normal page number, which is easier to collate properly for Word documents with more content. Here I’d like to share two methods to save your time and energy without binding errors.
Method 1: Word Options
1. Click File at top left in the Ribbon.

2. Click Options in the left pane.

3. The Word Options dialog box will display. Go to Advanced tab, find Print group and check the box of Print pages in reverse order. Do not forget to hit OK at the bottom.

Method 2: Printer Setting
1. Click File at top left in the Ribbon.

2. Click Print in the left pane, and find Settings group. Simply enter your desired page range in reverse order in the box of Pages. For example, if want to print pages 1 to 7 of a document, enter “7-1” as below, then click Print at the bottom.

Copyright Statement: Regarding all of the posts by this website, any copy or use shall get the written permission or authorization from Myofficetricks.
Using Word and Excel is very difficult for many users because these programs contain great features, but many of them are hidden. Therefore, this post will explain step by step how to easily print a Word and Excel document in reverse order.
In the case of Word, we remind you that this tool is not only used to create and edit documents from the cell phone or PC since it has a lot of functions that many are unaware of.
For example, it has several keyboard shortcuts that allow us to work faster, which is very helpful. In this way, you can underline a text, change the font or even print a document with just pressing a couple of keys at the same time.
There are two very simple ways to print a Word document in reverse order, the first is from the “Options” section (you can print in reverse order by default); and the second from the “Print” section (you print the document in reverse order only once).
Section «Options»
- Open the Microsoft Word document that you want to print.
- Inside the document, go to the upper left corner and click on the “File” section.
- Immediately a new window will appear where you will see a side menu with several alternatives; click on “Options”.
- Then a pop-up window called “Word Options” will appear; On the left side, you will see several options click on the “Advanced” option.
- Now you should look for the “Print” section in that section.
- Look for the option “Print pages in reverse order”, this option usually appears third in the “Print” section.
- To activate this function you must check the box that appears on the left side of the option; You will know that the function is active because you will see the symbol seen in orange in the box.
- Click “OK” to save the changes.
Once this function is activated, Microsoft Word will print the document in the reverse order of the current one; that is, if before activating the function you printed from page 1 to the last sheet, now the document will be printed starting from the last page to the first.

If you open a new Word document, it will have the last print order set that you left active the last time you used Microsoft Word. If you do not want to follow that order to print, follow steps 1 to 6 above and uncheck the “Print pages in reverse order” box and click “OK” to return to the order established by Word.
«Print» section
- Inside the Word document go to the upper left corner and click on “File”.
- When a side menu appears, select “Print“.
- A new window will appear where you should look for the “Settings” section.
- Now in the dialog box that is on the right side of the “Pages” option, you must write the number of pages of the document. For example, if you want to print a 30-page document, you would type 30-1.
How to print an Excel document in reverse order?

Excel defaults to printing your pages from top to bottom and from left to right; but you can configure this order for Microsoft Excel to print in reverse, that is, to the right, then down.
- Open the Excel document.
- Click on the spreadsheet you want to print.
- Then go to the toolbar at the top of the document; and click on the “Page Layout” section.
- In this section look for the option “Adjust print area” this option is found under the options “Width” “Height” and “Scale”.
- On the right side of the “Adjust print area” option you will see a dialog box selector (a box with a diagonal arrow); click on that selector.
- Immediately a pop-up window will appear called “Page Setup”; In this window select the “Sheet” section.
- In the last section of that “Page Order” section, there are two options for printing; the first is Excel’s default “Down, then right,” and the second is “Right, then down.”
- To change the option, you just have to check the box of the option you want and click “OK” to save the changes.
When you open a new document in Microsoft Excel, it will have the default order established by Excel for its documents; it will not save the changes established by you in previous documents. So if you need to print a spreadsheet in reverse order again you have to set up the document.
If you want to print a document in Word and Excel in reverse order, you just have to follow the steps described in this tutorial; It is so easy and simple to use Microsoft Word and Excel that you will be surprised.