
You can mark a document as read-only and still allow changes to selected parts.
You can make these unrestricted parts available for anyone who opens the document, or you can grant permission to specific individuals so that only they can change the unrestricted parts of the document.
Protect a document and mark the parts that can be changed
-
On the Review tab, in the Protect group, click Restrict Editing.

-
In the Editing restrictions area, select the Allow only this type of editing in the document check box.
-
In the list of editing restrictions, click No changes (Read only).
-
Select the part of the document where you want to allow changes.
For example, select a block of paragraphs, a heading, a sentence, or a word.
Tip: To select more than one part of the document at the same time, select the part that you want, then press CTRL and select more parts while you hold down the CTRL key.
-
Under Exceptions, do one of the following:
-
To allow anyone who opens the document to edit the part that you selected, select the Everyone check box in the Groups list.
-
To allow only particular individuals to edit the part that you selected, click More users, and then type the user names.
Include your name if you want to be able to edit that part of the document. Separate each name with a semicolon.
Important: If you intend to protect the document with user authentication rather than password protection, be sure to type e-mail addresses for user names.
-
Click OK, and then select the check boxes next to the names of the individuals that you are allowing to edit the part that you selected.
Note: If you select more than one individual, those individuals are added as an item to the Groups box, so that you can quickly select them again.
-
-
Continue to select parts of the document and assign users permission to edit them.
-
Under Start enforcement, click Yes, Start Enforcing Protection.
-
Do one of the following:
-
To assign a password to the document so that users who know the password can remove the protection and work on the document, type a password in the Enter new password (optional) box, and then confirm the password.
Note: Use this option if you want other people to be able to work on the document at the same time.
Use strong passwords that combine uppercase and lowercase letters, numbers, and symbols. Weak passwords don’t mix these elements. Strong password: Y6dh!et5. Weak password: House27. Passwords should be 8 or more characters in length. A pass phrase that uses 14 or more characters is better. .
Make sure you remember the password. If you forget the password, Microsoft cannot retrieve it. Store passwords you write down in a secure place away from the information they help protect.
-
To encrypt the document so that only authenticated owners of the document can remove the protection, click User authentication.
Note: Encrypting the document prevents others from working on the document at the same time.
-
Unlock a protected document
To remove all protection from a document, you might need to know the password that was applied to the document. Or you might have to be listed as an authenticated owner for the document.
If you are an authenticated owner of the document, or if you know the password for removing document protection, do the following:
-
On the Review tab, in the Protect group, click Restrict Editing.
-
In the Restrict Editing task pane, click Stop Protection.
-
If you are prompted to provide a password, type the password.
Make changes in a restricted document
When you open a protected document, Word restricts what you can change based on whether the document owner granted you permission to make changes to a specific part of the document.
The Restrict Editing task pane displays buttons for moving to the regions of the document that you have permission to change.
If you do not have permission to edit any parts of the document, Word restricts editing and displays the message, «Word has finished searching the document» when you click the buttons in the Restrict Editing task pane.
Find parts you can edit
If you close the Restrict Editing task pane and then try to make changes where you do not have permission, Word displays the following message in the status bar:
This modification is not allowed because the selection is locked.
To return to the task pane and find a region where you have permission to edit, do the following:
-
On the Review tab, in the Protect group, click Restrict Editing.
-
Click Find Next Region I Can Edit or Show All Regions I Can Edit.
See also
Information Rights Management in Office
Restrict or permit formatting changes
Add or remove protection in your document, workbook, or presentation
What is File Block?
What do you want to do?
-
Add protection and mark the parts that can be changed
-
Unlock a protected document
-
Make changes in a restricted document
Add protection and mark the parts that can be changed
-
On the Review tab, in the Protect group, click Restrict Editing.
-
In the Editing restrictions area, select the Allow only this type of editing in the document check box.
-
In the list of editing restrictions, click No changes (Read only).
-
Select the part of the document where you want to allow changes.
For example, select a block of paragraphs, a heading, a sentence, or a word.
Tip: To select more than one part of the document at the same time, select the part that you want, then press CTRL and select more parts while you hold down the CTRL key.
-
Under Exceptions, do one of the following:
-
To allow anyone who opens the document to edit the part that you selected, select the Everyone check box in the Groups list.
-
To allow only particular individuals to edit the part that you selected, click More users, and then type the user names.
Include your name if you want to be able to edit that part of the document. Separate each name with a semicolon.
Important: If you intend to protect the document with user authentication rather than password protection, be sure to type e-mail addresses, not Microsoft Windows or Windows Vista user accounts, for user names.
-
Click OK, and then select the check boxes next to the names of the individuals that you are allowing to edit the part that you selected.
Note: If you select more than one individual, those individuals are added as an item to the Groups box, so that you can quickly select them again.
-
-
Continue to select parts of the document and assign users permission to edit them.
-
Under Start enforcement, click Yes, Start Enforcing Protection.
-
Do one of the following:
-
To assign a password to the document so that users who know the password can remove the protection, type a password in the Enter new password (optional) box, and then confirm the password.
Note: You must use this option if you intend to post the document so that multiple people can work on it at the same time.
Use strong passwords that combine uppercase and lowercase letters, numbers, and symbols. Weak passwords don’t mix these elements. Strong password: Y6dh!et5. Weak password: House27. Passwords should be 8 or more characters in length. A pass phrase that uses 14 or more characters is better.
It is critical that you remember your password. If you forget your password, Microsoft cannot retrieve it. Store the passwords that you write down in a secure place away from the information that they help protect.
-
To encrypt the document so that only authenticated owners of the document can remove the protection, click User authentication.
Note: Encrypting the document prevents authoring by more than one person at the same time.
For more information about user authentication, see Information Rights Management in Office 2010.
-

Unlock a protected document
To remove all protection from a document, you might need to know the password that was applied to the document. Or you might have to be listed as an authenticated owner for the document.
If you are an authenticated owner of the document, or if you know the password for removing document protection, do the following:
-
On the Review tab, in the Protect group, click Restrict Editing.
-
In the Restrict Formatting and Editing task pane, click Stop Protection.
-
If you are prompted to provide a password, type the password.
Make changes in a restricted document
When you open a protected document, Microsoft Word 2010 restricts what you can change based on whether the document owner granted you permission to make changes to a specific part of the document.
The Restrict Formatting and Editing task pane displays buttons for moving to the regions of the document that you have permission to change.
If you do not have permission to edit any parts of the document, Word restricts editing and displays the message, «Word has finished searching the document» when you click the buttons in the Restrict Formatting and Editing task pane.
Open the Restrict Formatting and Editing task pane
If you close the task pane and then try to make changes where you do not have permission, Word displays the following message in the status bar:
This modification is not allowed because the selection is locked.
To return to the task pane and find a region where you have permission to edit, do the following:
-
On the Review tab, in the Protect group, click Restrict Editing.
-
Click Find Next Region I Can Edit or Show All Regions I Can Edit.
See also
Information Rights Management in Office
Restrict or permit formatting changes
Add or remove protection in your document, workbook, or presentation
What is File Block?
Important:
Office 2007 is no longer supported. Upgrade to Microsoft 365 to work anywhere from any device and continue to receive support.
Upgrade now
What do you want to do?
-
Add protection mark the parts that can be changed
-
Unlock a protected document
-
Make changes in a restricted document
Add protection mark the parts that can be changed
-
On the Review tab, in the Protect group, click Protect Document, and then click Restrict Formatting and Editing.
-
In the Editing restrictions area, select the Allow only this type of editing in the document check box.
-
In the list of editing restrictions, click No changes (Read only).
-
Select the part of the document that you want to be unrestricted.
For example, select a block of paragraphs, a heading, a sentence, or a word.
Tip: To select more than one part of the document at the same time, select the part that you want, then press CTRL and select more parts while you hold down the CTRL key.
-
Under Exceptions, do one of the following:
-
To allow anyone who opens the document to edit the part that you selected, select the Everyone check box in the Groups list.
-
To allow only particular individuals to edit the part that you selected, click More users, and then type the user names. Separate each name with a semicolon. Click OK, and then select the check boxes next to the names of the individuals that you are allowing to edit the part that you selected.
Important: If you intend to protect the document with user authentication rather than password protection, be sure to type e-mail addresses, not Microsoft Windows or Windows Vista user accounts, for user names.
Note: If you select more than one individual, those individuals are added as an item to the Groups box, so that you can quickly select them again.
-
-
Continue to select parts of the document and assign users permission to edit them.
-
Under Start enforcement, click Yes, Start Enforcing Protection.
-
Do one of the following:
-
To assign a password to the document so that users who know the password can remove the protection, type a password in the Enter new password (optional) box, and then confirm the password.
Use strong passwords that combine uppercase and lowercase letters, numbers, and symbols. Weak passwords don’t mix these elements. Strong password: Y6dh!et5. Weak password: House27. Passwords should be 8 or more characters in length. A pass phrase that uses 14 or more characters is better.
It is critical that you remember your password. If you forget your password, Microsoft cannot retrieve it. Store the passwords that you write down in a secure place away from the information that they help protect.
-
To encrypt the document so that only authenticated owners of the document can remove the protection, click User authentication.
-

Unlock a protected document
Having permission to make changes in the document is not the same as having permission to remove protection from the document. Even in a document where everyone has permission to make changes to the content, only those individuals who are authenticated owners or who type the correct password have permission to remove protection.
If you are an authenticated owner of the document, or if you know the password for removing document protection, do the following:
-
On the Review tab, in the Protect group, click Protect Document, and then click Restrict Formatting and Editing.
-
In the Restrict Formatting and Editing task pane, click Stop Protection.
Make changes in a restricted document
When someone opens a protected document, Microsoft Office Word 2007 restricts changes based on whether the person has been granted permission to make changes to a specific part of the document. When the document is opened, the Restrict Formatting and Editing task pane displays buttons for moving to editable regions of the document. If permission has been granted for Everyone to be able to make changes to parts of the document, anyone who opens the document can move to the parts they can change by clicking Find Next Region I Can Edit.
If permission has been granted for only specific individuals to be able to make changes to parts of the document, only those individuals can move to the parts they can change. For everyone else, Office Word 2007 restricts editing and displays the message, «Word has finished searching the document» when they click the buttons in the Restrict Formatting and Editing task pane.
Open the Restrict Formatting and Editing task pane
If you close the task pane and then attempt to make changes where you do not have permission, Word 2007 displays in the status bar the following message:
This modification is not allowed because the selection is locked.
To return to the task pane and find a place where you have permission to edit, do the following:
-
On the Review tab, in the Protect group, click Protect Document, and then click Restrict Formatting and Editing.
-
Click Find Next Region I Can Edit or Show All Regions I Can Edit.
See also
Add or remove protection in your document, workbook, or presentation
Microsoft Word lets us block all comments and Track Changes by saving files as Read Only. However, have you ever wanted to block just some comments or Track Changes instead of all of them? Today’s tutorial explains how to restrict editing in Microsoft Word.
Specifically, we will turn on editing restrictions and then (1) limit edits to comments only, (2) prevent users from making untracked changes, (3) allow users to fill in forms without making additional changes, and (4) mark the entire document as Read Only for specific users.
The final section shows how to turn off editing restrictions.
Reader Alert: This tutorial is for general knowledge only. Microsoft Word’s basic protection features are not “hacker proof” and should not be relied upon to protect sensitive or classified documents.
This tutorial is available as a YouTube video showing all the steps in real time.
Watch more than 200 other writing-related software tutorials on my YouTube channel.
The images below are from Word for Microsoft 365. These steps also apply to Word 2021, Word 2019, Word 2016, Word 2013, and Word 2010.
How to Turn On Editing Restrictions
- Select the File tab in the ribbon.

- Select the Info tab in the Backstage view.

- Select the Protect Document button.

- Select Restrict Editing in the drop-down menu.

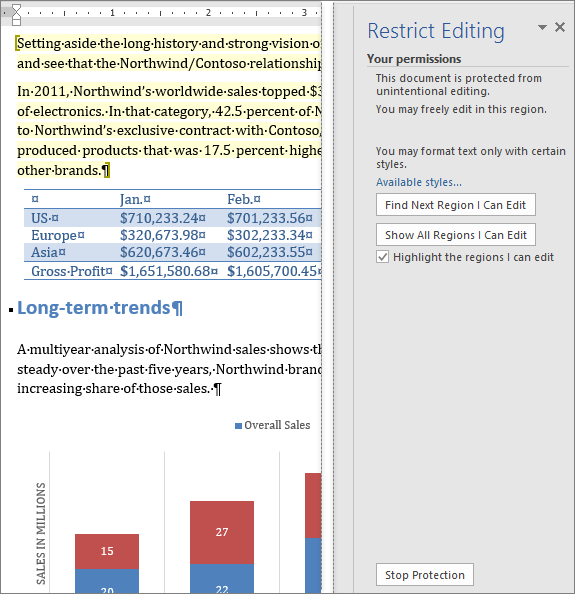
- Check Allow only this type of editing in the document in the Restrict Editing task pane.

- Select the menu arrow in the Editing restrictions section.
![]()
- Choose the type of editing you want to allow from the drop-down menu: Tracked changes, Comments, Filling in forms, or No changes (Read only).
-
- The Track changes option prevents other Word users from creating untracked changes in the document. If a change is made, it will be tracked.
- The Comments option allows other Word users to leave comments but not to use the Track Changes editing tools.
- The Filling in forms option lets other Word users fill in forms but not to leave comments or use the Track Changes editing tools.
- The No changes (Read only) option prevents other Word users from changing the document.

Optional Step: Exceptions
If you selected Comments or No changes, you can exempt groups of users from the restrictions selected above. Additional users can be exempt by selecting More Users and then following Word’s user-verification process.
The option to exempt users isn’t available if you chose the Track changes or Filling in forms options.

- Select the Yes, Start Enforcing Protection button.

- Enter and then reenter a password in the Start Enforcing Protection dialog box.

- Select the OK button to close the Start Enforcing Protection dialog box.

Important Note: Word will allow you to turn on your editing restrictions without a password by selecting OK in the Start Enforcing Protection dialog box. However, without a password, other users can simply turn off your restrictions themselves.
How to Turn Off Editing Restrictions
You can turn off editing restrictions added to your own documents. However, these steps won’t turn off restrictions in password-protected copies of files you have shared with other users.
- Select the File tab in the ribbon (see figure 1).
- Select the Info tab in the Backstage view (see figure 2).
- Select the Protect Document button. Note that the text near the button now says, “Certain types of changes are restricted in this document.”

- Select Restrict Editing in the drop-down menu (see figure 4).
- Select the Stop Protection button in the Restrict Editing task pane.

- Enter your password in the text box in the Unprotect Document dialog box.

- Select the OK button to close the Unprotect Document dialog box.

Related Resources
How to Restrict Style Changes in Microsoft Word
How to Open Files in Protected View in Microsoft Word
How to Stop Microsoft Word from Calling You “Author” in Track Changes
How to Restrict Editing in Adobe Acrobat
Updated February 12, 2023
Enable and restrict editing in Microsoft Word
What to Know
- To enable editing, go to Review > Restrict Editing and uncheck all boxes in the Restrict Editing pane.
- To restrict formatting changes, under Formatting Restrictions, select Settings.
- To restrict changes to parts of a document, select Allow only this type of editing in the document.
This article explains how to enable and disable editing in Microsoft Word. These instructions apply to Microsoft Word for Office 365, Word 2019, Word 2016, Word 2010, and Word for Mac.
How Do I Enable Editing in Word?
You can only turn editing on and off if you are the owner of a document. Here’s how to turn on editing in documents that have previously been restricted:
-
Select the Review Tab, then select Restrict Editing.
-
In the Restrict Editing pane, uncheck Limit formatting to a selection of styles and Allow only this type of editing in the document.
How to Restrict Formatting Changes in Word
If you share a document with other people, you can restrict specific actions that users can take in the document. You can disable editing altogether and make the file read-only, or you can restrict editing to certain parts of the document. To restrict the formatting changes, follow the steps below.
-
Select the Review Tab, then select Restrict Editing.
-
Under Formatting Restrictions, select Settings.
-
In the pop-up window, check the Limit formatting to a selection of styles box.
-
Choose what to restrict, or select All. You must check the three boxes at the bottom separately. When you’re done, select OK.
-
Under Start Enforcement, select Yes, Start Enforcing Protection.
-
A prompt will appear to add a password to that portion of the document. Click OK, and the changes will take effect.
How to Restrict Changes to Certain Parts of the Document
Without making it read-only, restricting changes to certain parts of a shared document is also possible.
-
Select the Review Tab, then select Restrict Editing.
-
Under Editing Restrictions, select Allow only this type of editing in the document.
-
Select the drop-down to choose what you want to restrict (forms, comments, track changes). Choose No changes (Read Only) to restrict everything.
-
Under Exceptions (Optional), add any users you want to exempt from restrictions.
-
Under Start Enforcement, select Yes, Start Enforcing Protection.
-
A prompt will appear to add a password to that portion of the document. Click OK, and the changes will take effect.
FAQ
-
Why can’t I enable editing in Word?
The document is probably locked. To unlock it, you must sign in as the document owner and then remove the password protection restriction. Select File > Info > Protect Document > Encrypt with Password > remove the password > OK.
-
Can you edit a scanned document in Word?
Yes. As long as the document is in PDF format, you can edit a scanned document in Word. Just open the PDF in Word to convert the document.
-
How do I turn off track changes in Word?
-
How do I turn off AutoCorrect in Word?
To change AutoCorrect settings in Word, go to File > Options > Proofing > AutoCorrect Options. From here, you can customize the feature or turn it off altogether.
Thanks for letting us know!
Get the Latest Tech News Delivered Every Day
Subscribe