
Research and add content with citations to your document
Note: Researcher uses Bing to pull in the appropriate content from the web and provide structured, safe and credible information.
-
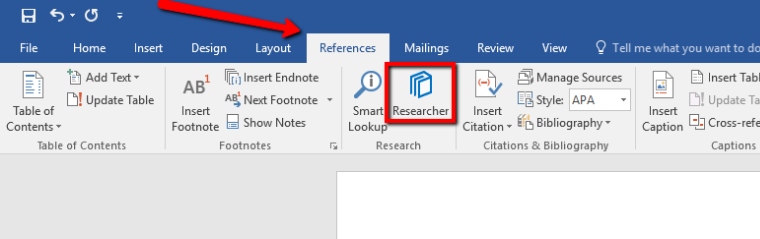
On the Reference tab, in the Reference group, choose Researcher.

-
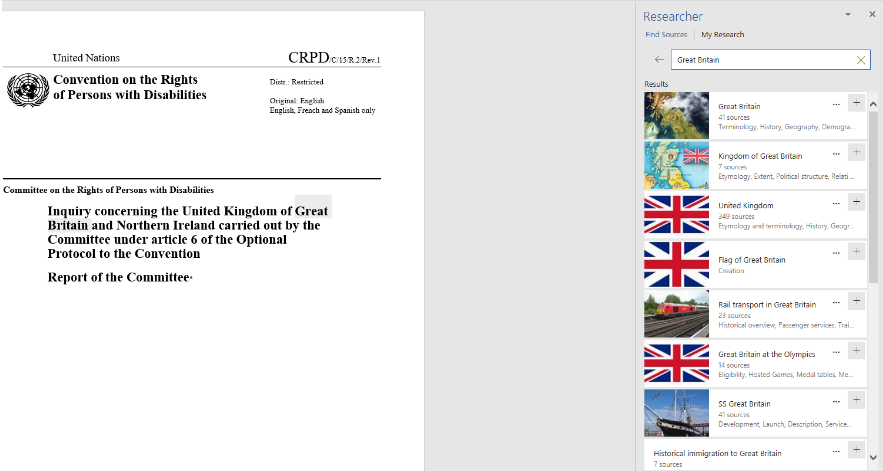
In the search box, type a keyword for the topic you are researching and press Enter.
The Results pane shows a list of sources you can use in your document.
-
Choose a topic in the Results pane to explore in detail.
or
Tap the plus sign on the upper right hand corner of on any result to begin an outline for your research topic. This adds the result as a topic heading in your document and saves a link to the result in a comment.
-
When you are exploring the text in the Results pane and do one of the following:
-
Choose Add to add only text to your document.
-
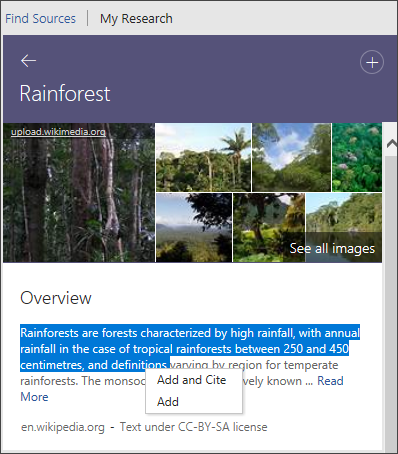
Choose Add and Cite to add text and also include citation for your source.
-
Tap See all images to open the image gallery. Choose the plus sign to add the image to your document
-
-
After you add text or image, you are prompted to update your bibliography.
Choose Update to automatically create or update your existing bibliography.
Editing Citations
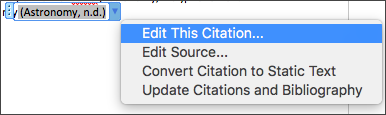
To edit, choose the citation and select the drop-down.
-
SelectEdit Citation.
See Add or change sources, citations, and bibliographies for more information.
Research and add content with citations to your document
-
On the Reference tab, choose Researcher.
-
In the search box, type a keyword for the topic you are researching and press Enter.
The Results pane shows a list of sources you can use in your document.
Note: Researcher uses Bing to pull in the appropriate content from the web and provide structured, safe and credible information.
-
Choose a topic in the Results pane to explore in detail.
or
Tap the plus sign on the upper right hand corner of on any result to begin an outline for your research topic. This adds the result as a topic heading in your document and saves a link to the result in a comment.
-
When you are exploring the text in the Results pane and do one of the following:
-
Choose Add to add only text to your document.
-
Choose Add and Cite to add text and also include citation for your source.
-
Tap See all images to open the image gallery. Choose Add image to add it to the document
-
-
After you add text or image, you are prompted to update your bibliography.
Choose Update to automatically create or update your existing bibliography.

For a quick overview of the feature, check out the video below

Editing Citations
To edit, choose the citation and select the drop-down.
-
Choose Edit This Citation….
See Editing citations for more information.

Microsoft wants to make your research easier. With the Word Researcher tool, you can close your web browser and get sources for school essays, research papers, and similar documents in a few clicks.
What Can You Do With Researcher?
The Researcher feature, powered by Bing, gives you a handy search box to find people, events, places, and concepts. The results of your search provide you with relevant topics and top sources including books, journals, websites, and images.
When you select the source you want, you can see an overview, history, location, images, and other important details. And the best part is, you never leave your Microsoft Word document.
In addition to viewing the details for your topic, you can start an outline for your paper as well as adding and citing text. Click the main subject or one of the information sections and add it directly to your document.
Here, we’ll show you how to reduce the time you spend researching and speed up the creation of your paper with the Researcher tool in Microsoft Word.
Note: At the time of writing, Researcher is available with Word for Microsoft 365, Word for Microsoft 365 for Mac, and Word 2016. It is available to Microsoft 365 subscribers for Windows desktop clients.
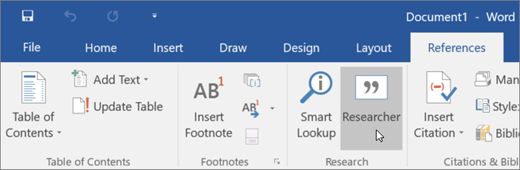
To use the Researcher tool, open the “References” tab of your Word document. Click “Researcher” from the “Research” section of the ribbon.
When the pane opens on the right, type a term into the Search box and you’re on your way!

Review Relevant Topics and Top Sources
You’ll receive results for your search with Relevant Topics at the top and Top Sources beneath.
Relevant Topics
Some topics may only give you a couple of Relevant Topics. Click “More Topics” below that section to see additional sources.
If you click one of the Relevant Topics, you’ll see a nice overview of the subject. At the end of the “Overview” section, click “Read More” for full details.
Depending on your topic, you’ll then see several block sections packed with details. This structure comes in handy for starting your outline with them, which we’ll describe below.
If the subject and Relevant Topic have images, you can click “See All Images” for a neat grid of photos and illustrations. Click one to open your browser and view the image online. Plus, you can add these to your document, which we’ll also show you below.
Top Sources
For even more options, the “Top Sources” area offers books, journals, and websites. Select any one of those for its details.
If you choose a Relevant Topic at the top first, you can then filter your Top Sources by subtopic. Click the drop-down box for “All Topics” and pick one.
While most of the material is contained within Word, you may come across a source here and there that you must open in your browser. Click the link to open the source site in your default web browser.
Add Topic Items to Your Document
Along with viewing information on your topic, you can add headings, text, and images directly to your document using Researcher.
Add Headings
On the top right of each source’s section, you’ll see a plus sign. Click the “+” icon to add that section as a collapsible heading for your document outline. Remember, this only adds the heading, not the text, within the section.
Add Text
If you want to add a snippet of text to your document, you can do this as well. Select the text from the source by dragging your cursor through it. When you release, you’ll see a small box appear with options for “Add and Cite” and “Add.”
When you choose “Add and Cite,” the text will pop into your document with the source cited at the end of the snippet. The citation is formatted automatically, so you can add it to a bibliography easily.
When you choose “Add,” the text will still appear in your document, but without the citation.
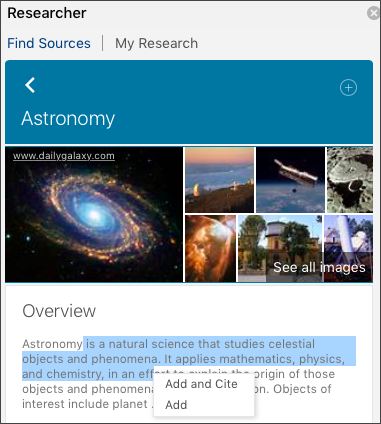
Add Images
If your topic offers images, and you click “See All Images,” you have the option to add one or more of those, too. This is super convenient because you don’t have to hunt them down yourself.
Click the “+” icon in the corner of the image to add it to your paper.
It will appear in your document with the source cited beneath it.
Note: Be sure to respect copyrights when using the available images for your purpose. If you’re unsure whether you can use an image, click “Learn More” above the image grid. This takes you to the Microsoft legal webpage explaining copyright and offering FAQs. You can also check our article on images with a Creative Commons License for those sources from Creative Commons.
College essays and research papers are enough work in themselves. By using Researcher in Microsoft Word, you can ease the burden of the research for your document and get a jumpstart on its contents.
READ NEXT
- › Google Docs Features to Help You Ace Your College Papers
- › Learn These Microsoft Word Features to Make College Easier
- › 7 Awesome Microsoft Word Features You Should Be Using
- › How to Edit and Reuse Citations in Microsoft Word
- › How to Use the Google Docs Explore Feature for Research
- › How Long Do CDs and DVDs Last?
- › How to Adjust and Change Discord Fonts
- › Liquid Metal vs. Thermal Paste: Is Liquid Metal Better?

Being a student isn’t easy. When you’re writing academic papers and theses, help in any shape or form, is highly welcome, especially if you hate writing.
That’s why being familiar with new tools and just keeping up to date with current tech trends, will make the writing process much easier.
As a student, you‘re no doubt familiar with Microsoft Word’s spelling and grammar checker that helps you polish your writing. But do you ever go beyond those two features when drafting your documents?
In case you didn’t know, Microsoft comes with Editor and Researcher tools to complement the ones you commonly use and have at your disposal.
The Researcher tool gives you the opportunity to explore online information without leaving the document editing page, while the Editor tool improves and simplifies your spell check and grammar.
If you haven’t used these features or don’t even realize the power of what they can do for your papers, you’re missing out. Whether you need to boost your writing skills for that summer course you’re taking or looking to improve for next September, these features just might do the trick.
Let’s explain how these can help you a bit more.
Researching Tips — All You Need To Know
Everything starts with an idea and the same goes for your paper writing. When you’re done with brainstorming it’s time to start educating yourself a bit more about your topic and start the actual writing.
But when you’re doing your thesis writing in Microsoft Word, you probably spend a lot of time on tiresome and tedious online research. That’s why Microsoft Word 2016 created the Researcher tool to assist you with the exhausting process.
The Researcher feature is a service that helps you find and incorporate credible sources and content to your Word documents. The feature uses Microsoft’s Bing Knowledge Graph to get the desired information online and place it directly into your document.
And you don’t have to worry about the trustworthiness of your data. Microsoft created and curated a list of trusted material and reference sources from which it pulls out your research. Researcher provides structured, credible and, more importantly, safe information you can use freely.
You can even use the option to automatically create your citations and directly add quotes to your research paper. So you don’t have to worry about writing references in MS Word. This eliminates the hard work that includes finding, inserting, and citing any published sources you use, giving you more time to refine and strengthen your thesis rather than going back and digging up more research to support it.
You can find the Researcher option under the References Tab in the top menu bar:
After clicking the icon, a right sidebar will appear where you can search for the term you’re researching.
The Editor Feature That Will Help You Write More Naturally
What makes the difference between a great research paper and a poor one? The secret is in the way everything is edited for the final version. Behind every good student lies a top class editing tool and to help you here, Microsoft offers up an Editor feature.
The Editor feature is a digital writing assistant that helps you with proofing and editing your content. Simply put, the feature flags any unclear phrases, marks up complex words, and makes suggestions by displaying various alternatives. It’s aimed at improving your writing style in MS Word.
The writing style functionality uses a combination of machine learning and human input, making the writing clearer or more effective. Rather than concentrating solely on spelling errors, MS Word’s style suggestions ability can replace complicated phrases with more direct alternatives.
To boot, details on why MS Word suggested the proposed changes are also added inside your document so you get a chance to learn from your mistakes.
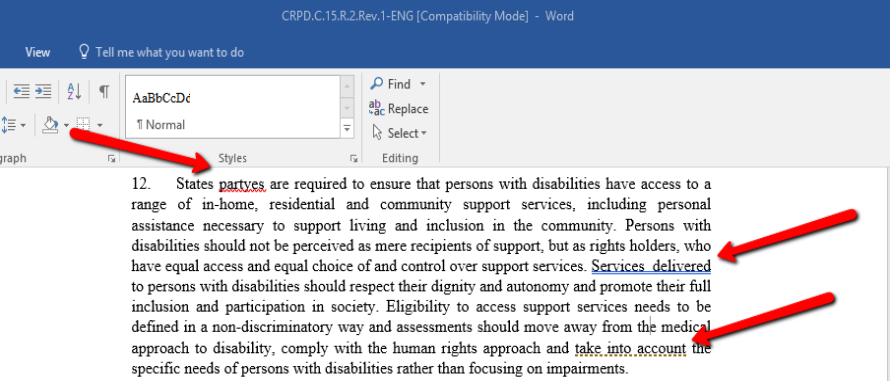
Spelling checks and grammar edits will still be underlined, while writing style suggestions have their own design with dotted lines:
- Spelling mistakes are underlined with a red squiggle
- Blue double underlines are for any grammar issues
- Gold dotted lines are reserved for writing style concerns
Bonus Tip: Present Your Paper In A More Dynamic Way
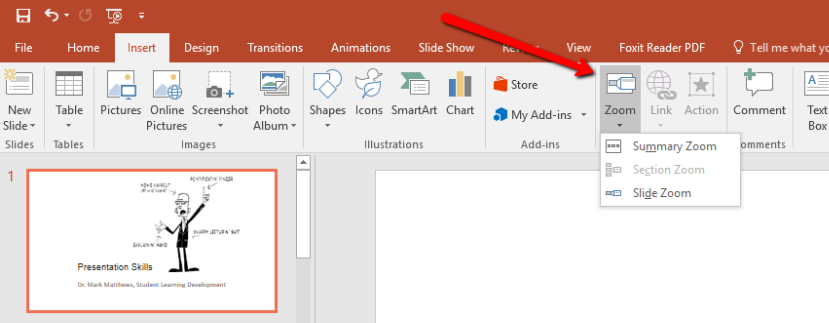
If you’ve done everything right, then it’s time to present your work. It’s not uncommon to use MS PowerPoint to create presentations and visually explain your theses. And now this is even easier with an option in Microsoft PowerPoint 2016 you also probably didn’t know about.
This nifty feature is the Zoom feature, which looks similar to what Prezi is offering. This is aimed at making presentations more appealing, giving your slides a breath of fresh air.
Instead of presenting slides one by one, you can quickly provide a full summary and let the audience know exactly how long is left in the presentation. This way you get a clear view of what section is being covered and the Zoom feature will make it more visually appealing.
Essentially, it gives the student a “thumbnails” view of upcoming slides, managing individual ones more like hyperlinks to different web pages.
With these features writing a paper or presenting your ideas becomes much easier. And this isn’t useful just for students. It’s useful for anyone conducting, writing and presenting research.
Will the Researcher tool make your life easier and will the style suggestions actually be useful for you? Let us know in the comment section below.
How to Get and Use Researcher and Editor Tool on MS Word 2016 – Researcher and Editor tools are enhancements of Microsoft Word‘s existing features like spell and grammar check, auto-correct, synonym suggestion, smart lookup, etc. The company has designed the tools with the aim to integrate research capability along with writing assistance within Word 2016. These recently released innovations will make writing less bothering and time-consuming. Hence, we will explain the steps to View and Use Researcher and Editor Tool on MS Word 2016.
You can refer to the Word Researcher tool to hunt up credible research stuff quickly with the assistance of Bing’s Knowledge Graph. Likewise, the Word Editor tool relieves with the refinement of content with its advanced proofing and editing abilities.
The Word Researcher tool allows the user to expand reliable sources and drill down further into them without the need to leave MS Word. Additionally, one can delve into sub-topics, assemble facts / quotes / citations from the suggested articles and generate content that is rich, informative, and factually accurate.
You can refer to the below steps to locate the ‘Researcher’ tool:-
Step 1 – Open Word 2016 in ‘Edit’ mode and click on the ‘References’ menu
Step 2 – The ‘Researcher’ option is available under References
Step 3 – Enter a few keywords for your topic in the ‘Researcher’ window in the right pane and click on the ‘Search’ icon
It will list the related articles for you to browse through
![]()
How to use the Editor tool to refine your content?
The Word Editor Tool is further built upon the standard spell and grammar check attribute of MS Word with the intent to make your writing succinct and eloquent. While the Editor tool primarily assists you with improving your writing style. However, the futuristic purpose of this tool is to educate you as to why a word or phrase is inaccurate rather than simply rectifying the error.
Demystifying the Red Squiggle
Step 1 – Perform a right-click on the Word with a red spiral line indicating a spelling error; the inbuilt thesaurus will suggest alternatives with their meanings if any.
Step 2 – Click on the suitable option and the correction is done.

How to Resolve the Blue Double Underline?
Step 1 – The double blue line implies a grammatical error; Editor Tool will suggest an alternative and will also explain the reason for the wrong choice.
Step 2 – Click on the suitable option to accept the suggestion
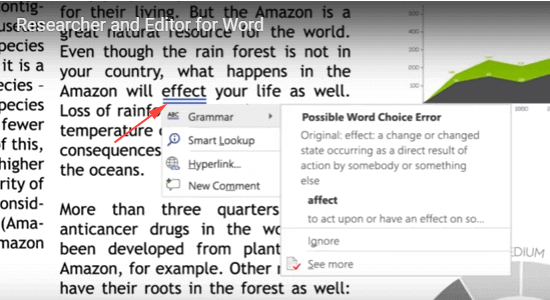
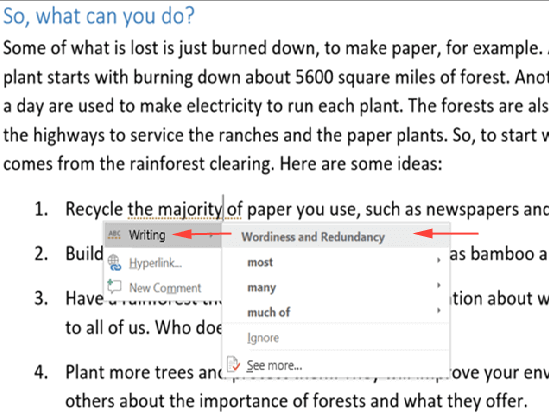
How to Fix the Gold Dotted Line?
Step 1 – The gold dotted line appears whenever the tool spots a writing style issue. In the above example, the Editor tool has recommended ‘most’ as a replacement for the phrase ‘majority of’
Step 2 – You can accept the suggestion by clicking on the appropriate option.
Chapter 4. Proofing and Research Tools
You know what they say: Nobody’s perfekt. Everyone makes spelling mistakes,
typos, and grammar flubs. And nobody—yet—can cram an entire library’s
worth of reference information between their ears. Thanks to Word’s proofing and
research tools, you don’t have to be perfect to produce perfect documents. Word can
keep an eye on your spelling and grammar and correct common typos before you even
realize your finger hit the wrong key. It takes the drudgery, too, out of common
formatting tasks, like creating lists and inserting certain symbols, by automating
them. It can also help you find information you need, from synonyms and definitions
to translations to web searches—all without leaving Word.
Checking Spelling and Grammar
You may not have a small army of editors to make sure your spelling and
grammar are up to snuff, but thanks to Word’s spelling- and grammar-checking tools, you don’t need them. Word is
constantly on the lookout for mistakes in both departments, flagging problems
and offering suggested fixes.
Catching Spelling Mistakes
Word assumes you want to catch and correct spelling errors as they occur,
so it automatically checks your spelling as you type. When Word spots an
error, it puts a wavy red line under the offending word. If the mistake is
obvious, you can fix the spelling yourself to make the red line go away. If
you’re not sure how to spell the word correctly, right-click it. A shortcut
menu opens, as shown in Figure 4-1, with suggested
corrections at the top. Click a suggestion to replace the misspelled word
with the correct one.

Figure 4-1. When Word spots an iffy spelling, a wavy red line appears beneath the
suspect word. To find out what the correct spelling may be, right-click
the word and choose a correction from the menu.
Some people prefer to focus on getting their thoughts down as they
write—they don’t want to worry about fixing typos and spelling errors
until later. If that’s how you roll, then getting your spelling checked
while you type is distracting, kind of like having someone reading over your
shoulder, periodically poking you and saying, “Hey! Look there! You made a
mistake!” If you prefer to focus on your thoughts as your write and clean up
the text later, it’s simple to turn off automatic spell checking:
-
Click File→Options (Alt, F,
I).The Word Options dialog box opens.
-
Select Proofing.
Options related to spell checking are in the “When
correcting spelling and grammar in Word” section. -
Turn off the “Check spelling as you type”
checkbox, and then click OK.Those wavy red lines appear no more in your documents.
If you turn off the “Check spelling as you type” feature, don’t forget to
run a spell check on your document before you print it out or email it;
Checking Spelling and Grammar shows you how.
Tip
You can hide those wavy red lines as you work on a document and then
turn them back on when you’re ready to see which words need fixing. To
hide the marking of spelling mistakes, go Backstage by clicking
File→ptions (Alt, F, I); in the Word Options dialog box, select
Proofing. In the “Exceptions for” section, choose the current
document or All New Documents and then turn on the checkbox labeled
“Hide spelling errors in this document only”; click OK. Now Word keeps
track of spelling problems as you type, but doesn’t point them out to
you.
When you’re ready to see the document’s spelling mistakes, head
Backstage to the Word Options Proofing page again, turn off the “Hide
spelling errors…” checkbox, and then click OK. The wavy red lines
are back—you can see your spelling errors without having to run a
word-by-word spelling check.
Using contextual spelling
Sometimes you get the spelling right but the meaning wrong. For
example, “their,” “there,” and “they’re” are all correct spellings, but
those words are not interchangeable; each has its own meaning. For
example, you can’t write
There going to check into they’re room once they get
their.
or
Their going to check into there room once they get
they’re.
The sentence makes sense only when you put the right spelling in the
right place:
They’re going to check into their room once they get
there.
Word’s contextual spelling feature sniffs out
problems that regular spell checking doesn’t catch. It works
just like spell checking. When you type a
word that might not fit the context in which it appears, Word throws a
wavy blue line under it. To see Word’s proposed suggestion, right-click
the questioned word.
Contextual spelling isn’t perfect. It does miss some mistakes. But if
it catches even some of the errors that would otherwise sneak into your
document, that’s a good thing.
Note
Turn contextual spelling on or off in the Word Options dialog box,
select File→ptions (Alt, F, I), choose Proofing, and, in the
“When correcting spelling and grammar in Word” section, find the “Use
contextual spelling” checkbox. For Word to watch for contextual
spelling errors as you type, you must also have “Check spelling as
you type” turned on.
Checking spelling in an entire document
If you’d rather check your document’s spelling all at once than on the
fly, here’s how:
-
In the document whose spelling you want
to check, select Review→Spelling & Grammar (Alt,
R, S).Word searches for any word that doesn’t match the spellings in
its built-in dictionary. When it finds one, it opens the
Spelling and Grammar
dialog box, shown in Figure 4-2. This
box shows the misspelled word (highlighted
in red) in its context and suggests a spelling. If there are
several possible corrections, Word lists them all. -
To replace the misspelled word, select
the correct replacement and click Change. If you think the
misspelled word appears more than once in the document, then
select Change All to replace them all at once. If the word
is correct as it is, tell Word to ignore it (just this
instance or all instances in the document) or to add it to
the dictionary.Word jumps to the next misspelled word.
-
Keep repeating these steps until Word
can find no more potential spelling errors and tells you the
spelling check is complete. Click OK.Word leaves spell checking mode and returns
you to your document.
Note
While it checks your spelling, Word also looks for repeated words, as in “The dog chased
the the cat.” When it flags an occurrence
of a repeated word, your options are to ignore just this instance or
to delete the repeated word.

Figure 4-2. When Word finds a spelling that doesn’t match anything in its
dictionary, it suggests one or more replacements. You can accept a
replacement (click Change or Change All) or tell Word to ignore the
word this time (Ignore Once) or throughout the document (Ignore
All). Click Add to Dictionary if the word is one you use frequently,
like your boss’s last name.
Note
If you have contextual spelling (Using contextual spelling) turned on, Word
highlights any possible contextual mistakes in blue.
Word’s Grammar Checker
Word can also play grammar cop, policing your style and
working to root out embarrassing errors. Word is great at finding sentence
fragments, passive voice, capitalization errors, and other grammatical
no-no’s.
Grammar checking works very much like
spell checking. You can have Word check your grammar as you type or check
the whole document at once (or both, if you’re really a
perfectionist). In fact, you can run a grammar check at the same time you
have Word check your spelling.
To control whether Word checks grammar as you type, select
File→Options (Alt, F, I). In the Word Options dialog box, choose
Proofing; in the “When correcting spelling and grammar in Word” section, turn on the “Mark
grammar errors as you type” checkbox. (When you do, Word automatically turns
on the “Check grammar with spelling” checkbox as well.) Click OK.
When you have automatic grammar checking turned on, Word puts a wavy green
line under any text—a word, a phrase, a sentence—that looks
like it might be incorrect. Right-click any part of the text that has the
wavy green underlining. The shortcut menu, shown in Figure 4-3, suggests a grammar
fix (or tells you what the problem might be, such as Fragment). Replace
what’s underlined by clicking Word’s suggestion, or leave things as they are
by clicking Ignore Once.
Tip
Not sure why Word flagged the selection as a possible error? Click
About This Sentence to open a dialog
box that explains the suspected error, along with easy-to-understand
examples of right and wrong usage.

Figure 4-3. When Word’s grammar checker finds a potential mistake, right-click
the flagged word or phrase to open a shortcut menu that helps you
correct the problem. Click the suggested fix to insert it in your
document. Click About This Sentence for an explanation of why Word
flagged it.
If you prefer to give the entire document a grammatical once-over, you can
run a grammar check simultaneously with a
spelling
check. When you fire up the spell checker (Review→Spelling &
Grammar or Alt, R, S), look in the bottom-left part of the Spelling and
Grammar dialog box and make sure there’s a checkmark in the “Check grammar”
checkbox. This tells Word to look for grammatical problems at the same time it
scours your document for spelling mistakes.
When Word finds a potential grammatical problem, the Spelling and Grammar
dialog box looks something like the one in Figure 4-4. Word highlights
the potential problem in green and suggests alternatives (or names the
problem, as shown in Figure 4-4). Here are your
options for dealing with text flagged in a grammar check:
-
Ignore Once. Click this button to
skip over this one instance and move on, while still applying the
grammatical rule that flagged this instance. -
Ignore Rule. Maybe you’re writing a
novel or play, for example, and don’t care if your document has
sentence fragments, because people often use them in speech. If
there’s a grammatical rule you don’t want Word to apply, click this
button to skip all potential violations of the rule. -
Change. When Word suggests a fix,
apply it to your document by clicking this button. If Word
identifies a problem but can’t say how to fix it in this case,
you’ll see something like “Fragment (consider revising)” in the
Suggestions box. To fix the problem, click the flagged sentence in
the Spelling and Grammar dialog box and make your changes there.
Then click Change to insert your changed text into the
document. -
Next Sentence. Click this button to
leave this sentence as is and check the next sentence for
errors.

Figure 4-4. When you run a grammar check, Word offers a correction or, as here,
identifies the potential problem.
Tip
If you’re not sure why the highlighted text might be a problem, click
Explain to open a dialog box and get a
mini–grammar lesson.
When Word has finished checking the document, it tells you it’s done.
Click OK to go back to the document.
Getting Things Right with AutoCorrect
Typos happen. When your fingers are flying over the keyboard, sometimes
they’ll land on the wrong key. Spell checking roots out some typos, but why take
that extra step if you don’t have to? Word corrects many common typos as soon as
you make them. When you type abotu, for example, as soon as
you hit the space bar Word magically changes the word to
about. That’s thanks to AutoCorrect,
which keeps a long list of common typos and their corrections—and
automatically applies those corrections as you type. So if you can never
remember that darn “I before E except after C” rule, you’ll love AutoCorrect.
This feature also converts certain combinations of letters and punctuation marks
into symbols; for example, if you type:) Word converts it into a smiley face
(☺), and (c) becomes the copyright symbol
(©).
As its name implies, AutoCorrect happens automatically, and it’s already
turned on when you install Word. So you don’t really have to do anything to take
advantage of AutoCorrect. But you can tweak it in various ways, as this section
explains.
Note
Word won’t autocorrect any text that contains a hyperlink. So you can type
website names without fear that Word will “correct” their spelling to
something else.
Undoing an AutoCorrect Change
Ninety-nine percent of the time, AutoCorrect is super-helpful. Sometimes,
though, it blithely goes ahead and makes a change you don’t want. For
example, a common typo that AutoCorrect fixes is changing “teh” to “the.” As
you type up a list of conference participants, you notice that Dr. Teh has
become Dr. The. In this case, you don’t want the correction. If you notice
an AutoCorrect change immediately after it happens, you can undo the change
by pressing Alt+Backspace before you go any further.
If you type on a bit further before you notice the AutoCorrect-induced
error, though, Alt+Backspace won’t work (that keystroke combination simply
undoes your most recent action). In that case, go back and hover over the
autocorrected word or symbol so that a small blue rectangle appears beneath
it. Move the pointer toward the rectangle until the AutoCorrect Options
button, shown in Figure 4-5,
appears (the picture on the button looks like a lightning bolt). If you want
to undo the change just this time, click the button and select the “Change
back” option from the shortcut menu. If you want Word to stop making this
correction for good, select the Stop Automatically Correcting option.

Figure 4-5. Use the AutoCorrect Options button to undo corrections that you don’t
want. Click Control AutoCorrect Options to open the AutoCorrect dialog
box (page 123).
Setting AutoCorrect Options
You can adjust what Word does and doesn’t autocorrect. If there’s a typo
you make frequently that AutoCorrect doesn’t already cover, for example, you
can add the typo and its correction to the AutoCorrect list. Or if you want
to stop Word from automatically correcting something—maybe you use
(c) in lists and don’t want that combination of characters to turn into a
copyright symbol—you can do that, too.
To fine-tune your AutoCorrect settings, open the AutoCorrect dialog box:
Select File→ptions (Alt, F, I), select Proofing, and click the
AutoCorrect Options button. The AutoCorrect dialog box opens to the
AutoCorrect tab, shown in Figure 4-6, which gives you
these options (Word has all of them turned on by default):
-
Show AutoCorrect Options buttons.
If you don’t want the AutoCorrect Options button (Figure 4-5) to appear
when you hover the pointer over an autocorrected word, then turn on
this checkbox. -
Correct TWo INitial CApitals. If
you tend to type faster than you can let up on the Shift key, this
is a helpful correction. But you can turn it off by unchecking the
box. -
Capitalize first letter of
sentences. Basically, this tells Word to make sure that
a capital letter always follows a period, question mark, or
exclamation point.Tip
If there are cases where you want two
initial caps or a lowercase letter after a period, click the
Exceptions button and tell Word what your special case is. (The
next section tells you more about creating AutoCorrect
exceptions.) -
Capitalize first letter of table
cells. This setting helps you format tables
consistently. -
Capitalize names of days. This
setting does what it says, properly capitalizing the names of the
days of the week. -
Correct accidental usage of cAPS LOCK
key. When you’ve got Caps Lock on, it turns normal
capitalization backwards: Caps Lock makes all the letters you type
capital letters (unless you hit the Shift key, which makes letters
lowercase). When you hit the Caps Lock key by mistake, it makes your
writing look like you’re shouting. This AutoCorrect
option fixes the problem and turns off Caps Lock. (If you
want to shout, you can always hit the Caps
Lock key again.) -
Replace text as you type. Turning
off this checkbox suspends AutoCorrect.
If it’s off and you want to correct a misspelled word, for example,
you have to use the spelling checker or a good old-fashioned sharp
eye. With this checkbox on, you can add new corrections to
AutoCorrect (as explained later in this section). -
Automatically use suggestions from the
spelling checker. This option uses Word’s dictionary to
correct common spelling errors automatically. (If you turn it off,
Word autocorrects only those spellings that are in its AutoCorrect
list.)

Figure 4-6. Word comes with all these AutoCorrect options turned on, but you can
pick and choose the ones you want. For any of these options you don’t
want Word to correct automatically, turn off the checkbox. Add custom
corrections in the “Replace text as you type” section—put the
typo you want corrected in the Replace text box and its correction in
the With text box.
Making an exception
AutoCorrect
makes you a better typist, fixing typos as they happen. Sometimes,
though, you might want AutoCorrect to be a little less vigilant. You
might want Word to catch the problem when you type two initial caps
accidentally, for example, but wish it would make an exception for
frequently used abbreviations, like “RAs” for research
associates—it gets a little old having to undo the autocorrection
to “Ras” every single time you type RAs.
You can tell Word to make specific exceptions to the things it
corrects automatically. Here’s how:
-
Select
File→ptions→Proofing→AutoCorrect
Options (Alt, F, I; use the arrow keys to select Proofing,
and then press Alt+A).This opens the AutoCorrect dialog box shown in Figure 4-6. (If
your dialog box looks different from the one in the figure, then
click the AutoCorrect tab.) -
Click the Exceptions button
(Alt+E).The AutoCorrect
Exceptions dialog box has three tabs you can use to set up your
specific exceptions:First Letter. This tab
lists exceptions to the rule that a capital letter must
always follow a period, question mark, or exclamation
point.INitial CAps. Here’s where
you’d make “RAs” an exception. For any word you add here,
Word won’t correct two initial caps by making the second
letter lowercase.Other Corrections. This is
the catch-all tab for anything else you don’t want Word to
AutoCorrect. -
Select the tab you want. In the “Don’t
correct” text box, type your exception, using the
capitalization you want (in the example, you’d type
RAs). Click OK.Word puts your addition on its exceptions list and will no
longer autocorrect it.
Tip
You don’t have to find your way to the AutoCorrect Exceptions box
every time you want Word to make an exception to something it
corrects automatically. The AutoCorrect Exceptions box has a
checkbox labeled “Automatically add words to list” under the
exceptions list. When this checkbox is turned on (as it is by
default), Word adds an exception to the list whenever you
undo an autocorrection.
Adding custom corrections
You can tell Word to automatically correct any of your habitual typos
that aren’t covered by its dictionary or AutoCorrect list, such as a
name you find difficult to spell. Simply open the AutoCorrect dialog box
to the AutoCorrect tab (Figure 4-6): Select
File→ptions (Alt, F, I), select Proofing, and then click
AutoCorrect Options. If necessary, click the AutoCorrect tab.
In the dialog box, make sure the “Replace text as you type” checkbox
is turned on. Then type the misspelling in the Replace text box and the
correct spelling in the With text box. Click Add to add this correction
to the AutoCorrect
list.
Tip
AutoCorrect
can be an easy way to spare your tired fingers some typing. If
there’s a long phrase you use frequently, you can create your own
keyboard shortcut for it using AutoCorrect. For example, say you
work for the Mutually Beneficial Aid and Comfort Society of Peers
and Mentors, and you get really tired of typing out the
organization’s long name. Open the AutoCorrections dialog box and,
in the Replace text box, type a keystroke combination you’d never
normally use, like #$%. Then, in the With box,
type the long phrase: in the example,Mutually Beneficial
Aid and Comfort Society of Peers and Mentors. Click
Add. Now, whenever you type #$% in a document,
Word autocorrects it to the name of the organization.
Deleting an AutoCorrect correction
If AutoCorrect insists on making a correction you
don’t want, you can delete that correction from
the AutoCorrect list. Open the AutoCorrect dialog box and find the
correction in the AutoCorrect list. Corrections start with punctuation
marks and symbols, followed by words in alphabetical order. Use the
scroll arrows to find the correction you want to banish. Select it, and
then click the Delete button.
Tip
When you use the AutoCorrect Options button (Figure 4-5) in a
document to tell Word to stop making an automatic correction, that
action also deletes the correction from the AutoCorrect dialog box’s
AutoCorrect list.
AutoFormatting in Word
Spelling and grammar aren’t the only things Word corrects automatically as
you type; it also makes formatting corrections and adjustments. For example,
if you’re on a new line and type 1., Word assumes
you’re starting a numbered list and turns what you just typed into that kind
of list. The AutoFormat
As You Type feature can be a great timesaver—or it can be a pain in
the neck, depending on your preferences. Some people don’t like it when the
paragraph suddenly turns into a list, and some of Word’s formatted
characters—like “smart” quotes and dashes—don’t translate well
to other programs.
Whether you love or hate autoformatting, you’re in control. Start by
heading to the AutoFormat As You Type tab of the AutoCorrect dialog box. To
get there, select File→ptions (Alt, F, I), select Proofing, and click
AutoCorrect Options. In the AutoCorrect dialog box, click the AutoFormat As
You Type tab, shown in Figure 4-7.
As Figure 4-7 shows, Word
turns on most of its AutoFormat
options by default. Here’s what they do:
-
Replace as you type. This section
contains the following
replacements:-
“Straight quotes” with “smart
quotes.” Instead of quotation marks that look
like two small vertical lines, this option inserts curly
quotation marks that curve toward the word they precede or
follow. -
Fractions (1/2) with fraction
character (1/2). Type a common fraction as a
number, followed by a slash, followed by another number, and
Word inserts a single-character fraction instead. -
*Bold* and _italic_ with real
formatting. If you surround some text with
asterisks, Word changes the text to boldface. Putting
underline characters before and after text makes it italic.
(This option is normally turned off, so turn on the checkbox
if you want to activate it.) -
Internet and network paths with
hyperlinks.
With this option on, whenever you type a web address (like
www.google.com), Word inserts a hyperlink to
that address into the text. So a reader who’s connected to
the Internet can Ctrl-click the link to open the web page.
And if you publish the document as a blog post or web page,
its links are already live. -
Ordinals (1st) with
superscript. If you’d
rather write “1st” than “1st,” then leave this checkbox
turned on to add superscript formatting to the
letters. -
Hyphens (—) with dash
(—). Back in the
days of typewriters, two hyphens did the same job as a dash,
and a typesetter would convert the hyphens into a dash as
part of the publication process. Word plays typesetter for
you, automatically
converting two hyphens in a row into a single dash.
-
-
Apply as you type. This section
lists autoformatting
that lets you create lists, horizontal lines, and tables by simply
typing, without hitting buttons on the ribbon:-
Automatic bulleted
lists. This
option creates a bulleted list whenever you begin a new line
by typing an asterisk (*), hyphen (-), or closing angle
bracket (>) followed by a space or a tab.Tip
If you create a bulleted list using this method, press
Enter twice to end the list. -
Border lines. When this option is
active, you can draw a specific style of horizontal line by
going to a new line and typing three of the following
characters one right after another and then pressing
Enter:Tildes (~) create a wavy line.
Pound signs (#) create a triple line: a bold center line
with thin lines above and below it.Asterisks (*) create a dashed line.
Hyphens (-) create a thin line (but be careful that two
consecutive hyphens don’t autoformat
into a dash).Underscores (_) create a bold line.
Equal signs (=) create a double line.
-
Built-in Heading
styles. This option
automatically
formats a paragraph of five or fewer words as a heading when
you take one of these actions:For Heading 1, type a new line.
For Heading 2, precede the new line with a single
tab.For Heading 3, precede the new line with two tabs.
Whichever level of heading you want, be sure that the line
does not end with any mark of punctuation, and then press
Enter twice to apply the heading style. -
Automatic numbered
lists. This
option automatically formats your text as a numbered list
when you start a new line by typing 1 followed by a period
or a tab. Press Enter twice to end the list.
Figure 4-7. These are the standard settings for AutoFormat As You
Type. Turn any checkbox off or on to make your
AutoFormat settings the way you want them.Tip
Not everyone likes having Word decide
they’re typing a list whenever they begin a line with
the number 1. If you don’t want
autoformatted
numbered lists, here’s how to tell Word to knock it off:
Select File→Options (Alt, F, I) and then select
Proofing→AutoCorrect Options. This opens the
AutoCorrect dialog box. Click the AutoFormat
As You Type tab and, in the “Apply as you type” section,
turn off the “Automatic numbered lists” checkbox. Click
OK, and Word no longer autoformats these
lists. -
Tables. This option lets
you create a table by using a rather
cumbersome combination of plus signs (+) and hyphens (-). If
you use it, begin and end each column with a plus sign and
use hyphens to indicate column width. For example, typing
+———+—-+———+—-+ and
then pressing Enter would create a one-line table of four
columns, with the first and third columns twice the width of
the second and fourth columns. (Watch out for consecutive
hyphens that get autoformatted into dashes.) To create a new
row, place the cursor just after the row you want to insert
the new row beneath, and then press Enter.
-
-
Automatically as you type. This
section controls these miscellaneous formatting changes:-
Format beginning of list item like
the one before it. If you apply formatting to
the beginning of a list, such as boldfacing an introductory
word or phrase (like this list does), Word keeps track of
that formatting up to the first punctuation mark and applies
it to the list items that follow. -
Set left- and first-indent with tabs
and backspaces. This option is off
by default. If you turn it on, you can indent a paragraph by
placing the cursor at the beginning of the paragraph’s first
line and pressing the Tab key. To indent an entire
paragraph, place the cursor at the beginning of any line in
the paragraph except the first line, and press the Tab key.
To undo either kind of indentation, press the Backspace
key. -
Define styles based on your
formatting. This options applies one of Word’s
built-in styles (Formatting Power with Styles) to text you’ve
formatted manually when your text has the same formatting as
that built-in style.
-

Word’s Built-in Research Tools
Word comes with a number of handy research tools built in, including a
dictionary, thesaurus, translator, and access to several search and research
websites. You access these tools in the Research pane, shown in Figure 4-8. To summon its help,
click Review→Research (Alt, R, R).
Tip
If the Research pane looks a little small, you can make it bigger. Hover
your mouse pointer over the Research pane’s left border until it becomes a
two-headed arrow, and then click and drag to resize the pane. When the pane
is the size you want, let go of the mouse button.
Looking Up a Word in the Dictionary
No matter how big your vocabulary, once in a while you have to look up a
word to find out (or check) its meaning. No need to leaf through a
dictionary,
though—you can look up words using the Research
pane.
Select the word that’s puzzling you and open the Research pane (Figure 4-8):
Review→Research (Alt, R, R). When the pane opens, the word you
selected already appears in the “Search for” text box. From the drop-down
list beneath it, select the dictionary. (In the U.S., it’s Encarta
Dictionary: English [North America]). Word looks up the word you selected
and displays its definitions; scroll down to read through them.
To look up another word, just type it into the “Search for” box and press
Enter or click the green “Start searching” arrow.

Figure 4-8. Word’s Research pane puts an entire library of reference information
at your fingertips. Use the drop-down list beneath the “Search for” box
to select the research tool you want (here, Word’s thesaurus is
displaying a list of synonyms).
Using the Thesaurus
When the word you’re thinking of is almost—but not quite—the
word you want, you can consult a thesaurus to look up synonyms. To make that
chore just a little bit easier, Word has its own thesaurus that you can
check as you work, without taking the time to pull a book from the
shelf.
The quickest way to get a list of synonyms is to right-click
the word you want to replace. In the
shortcut menu, point at Synonyms to see a fly-out list of alternatives for
the word you right-clicked. Click any word on that list, and it replaces the
original word.
If none of the words on the list are what you’re looking for, go to the
bottom of the list and click Thesaurus.
This opens the thesaurus in the Research pane, shown in
Figure 4-8. The
Thesaurus offers a longer list of synonyms than the fly-out list. Scroll
through the possibilities and click the one you want to put it in the
document.
Tip
Here’s another route to open the Thesaurus in the Research pane:
Select the word you want and then choose Review→Thesaurus (Alt,
R, E).
Getting Information about a Subject
If your computer is connected to the Internet, you can also use the
Research pane to look up information. When you type a word or phrase into
the “Search for” text box, choose Bing from the
drop-down list to use Microsoft’s search engine to find references to your
search term on the web.
Note
The Search pane offers a couple of options besides Bing for
researching a topic: Factiva iWorks and HighBeam Research. Both of these are
subscription sites that show you a preview of an article—but you
can read the whole thing only if you pay to subscribe.
The Search pane shows you a preview of each website it finds; when you
want to read more, click the link that follows the preview to open that page
in your web browser.
Tip
If trying to read the article previews in the Search pane gives you a
headache, scroll down to find the “View all results on Live Search”
link. Click it to open a window that shows the results in your web
browser.
Translating Text
A foreign word or phrase can add a little je ne sais
quoi to your writing. Word’s translation tools let you
translate from one language to another—with nearly two dozen
languages to choose from.
Word uses its built-in bilingual
dictionaries to translate words and common phrases. To translate an entire
document, Word works with translation service WorldLingo (www.worldlingo.com) to provide a
machine translation of the document. Here’s how it works: Word sends a copy
of your document over the Internet to the WorldLingo website, where a
computer program scans and translates the text. Computers don’t have quite
the “ear” for human language that people do, so the translation is likely to
sound stiff and, in places,
may even be somewhat hard to understand. Still, you’ll get the gist of the
document by translating
it with this method. (On the plus side, machine translation isn’t yet good
enough that your kids can use it to cheat on their Spanish homework.)
Getting a quick translation with the Mini Translator
Word’s Mini Translator gives you a quick translation. When you point
to a word or select a phrase, the translation appears in a transparent
box that floats over your text. Move the mouse pointer toward the box to
make it solid (and easier to read), as shown in Figure 4-9.
Here’s how to set up Word’s Mini Translator:
-
In the Language section of the Review
tab, select Translate (Review→Translate or Alt, R,
L).From the menu that appears, select Choose Translation Language
at the bottom (if you’ve got keyboard shortcuts turned on, press
L). -
This opens the Translation Options
dialog box. In the left-hand list, select Mini
Translator.The main part of the dialog box shows a drop-down list of the
languages available for translation. -
Select the language you want from the
drop-down list and click OK.Now, when you point to a word or select a phrase in your
document, Word translates it into the language you selected, as
shown in Figure 4-9.

Figure 4-9. The Mini Translator gives you an on-the-spot translation of a
word or selected phrase. The buttons at the bottom are, from left to
right, Expand, Copy, Play (to hear a recording of someone
pronouncing the word or phrase), Stop (to stop the recording), and
Help.
Tip
If the Mini Translator has lots of definitions and
you can’t read them all, click the lower-left Expand button to open
the Research pane, with translation information about the selected
word or phrase already displayed.
You probably don’t need the Mini Translator turned on for every
document you work with. To turn it off, select
Review→Translate→Mini Translator (Alt, R, L, M). This
sequence toggles the Mini Translator off and on, so when you require the
Mini Translator’s services again, repeat the same clicks or keystrokes,
and it’s back.
Note
When you open Word, the Mini Translator is off by default, so you
have to turn it on to use it.
Using the Research pane for translations
If you don’t like having the Mini Translator always hovering over your
text, you can use the Research pane (Figure 4-8) to get a quick
translation of a word or phrase. Select the phrase you want to
translate, and then follow these steps:
-
Select
Review→Translate→Translate Selected Text (Alt,
R, L, S).The Research pane opens with the text you selected in the
“Search for” box. In the Translations box, two
drop-down lists show the From and To languages. -
Make sure the From and To languages
match what you want the translator to do—for example,
translate a phrase from Spanish to English. If necessary,
use the drop-down lists to choose languages.In the WorldLingo section (you may have to scroll down to see
it), a translation of the selection appears.
Translating an entire document
If you need to translate more than just a word or phrase, you can tell
Word to translate an entire document. Doing so requires two main steps:
choosing the languages you’re working with and then sending the document
over the Internet to the translation site. So before you translate a
document, make sure you’re connected to the Internet. Next choose your
From and To languages:
-
Select
Review→Translate→Choose Translation Language
(Alt, R, L, L).The Translation Language Options dialog box opens.
-
Make sure that Translate Document is
selected in the left-hand pane. Then select your From and To
languages from the drop-down lists. Click
OK.Word sets these languages as your standard for whole-document
translation. (You can always change them later by following
these steps again.)
After you’ve selected the languages you want, here’s how you tell Word
to translate a document:
-
Select
Review→Translate→Translate Document (Alt, R,
L, T).A dialog box appears, informing you that Word will send the
document over the Internet to its translation service. Word
doesn’t encrypt the document, which means it may be visible to
third parties as it crosses the Internet—so don’t use
this service to translate documents that have confidential or
sensitive information, like financial data or Social Security
numbers. -
Click Send.
Word sends the document to WorldLingo. A browser window
opens and tells you that the translation is in progress. When
the translation is ready, it appears in the browser
window.
Tip
If you have the research pane open (Review→Research or Alt,
R, R), you can order up a whole-document translation: Select
Translation from the top drop-down list, choose your From and To
languages, and then click the green arrow after “Translate the whole
document”.
Get Office 2010: The Missing Manual now with the O’Reilly learning platform.
O’Reilly members experience books, live events, courses curated by job role, and more from O’Reilly and nearly 200 top publishers.
 In addition to a dictionary, spell-checker, and thesaurus, Microsoft Word 2007 includes access to an encyclopedia from within Word’s main window itself. Note that access to the Encarta and other encyclopedias requires access to an active internet connection. This tutorial will show you how to leverage Word 2007’s built-in encyclopedias for your research.
Research work with encyclopedias in Word 2007
 To access the built-in research resources and encyclopedias in Microsoft Word 2007, click on the Review tab of the Ribbon. Now click on the Research button to open and display the Research pane along the right edge of Word’s main window.
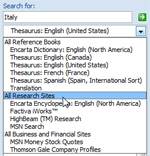
 Type the word or proper noun you wish to research in the Search for text field, but don’t quite launch the topic search yet. Click on the dropdown menu below, and choose «All Research Sites» — this instructs Word 2007 to include all the encyclopedias and other built-in research tools for your search:
Evaluate research results from within Word 2007
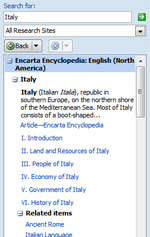 Now click the green button above to launch your topic search: Word 2007 will list all the results it found in a scrollable list. To restrict your research to a single tool or encyclopedia, simply select the research tool you want in the dropdown menu, and re-launch the search.
The summary of the topic is displayed at the top of your search results, and links are included for more detailed information: these link to web pages will open outside Microsoft Word, and launch in your default web browser.
Notice that at the end of the main article’s links, Word 2007 displays a list Related items: these are also clickable links that will too open in a separate browser window. (You can copy any research topic you found relevant and then paste it back into your Word document.)
up ↑
Professionalize your next research paper by using the research tools in Word 2010. Discover how to insert a bibliography, line numbers, footnotes, and endnotes. Also, explore the the dictionary, thesaurus, and translation tool.
WHAT YOU WILL LEARN
-

Using the dictionary & thesaurus
Managing your bibliography
Translating your document
Inserting line numbers
-
Inserting footnotes
Customizing your footnotes
Inserting endnotes
IN THIS COURSE
-
4m 47s
Word 2010 features integrated dictionary and thesaurus tools which can be consulted and used to look up definitions and synonyms. It can be very useful if there is a particular word that you are looking for, or if you want to avoid using the same word on multiple occasions. You can even use the thesaurus to find synonyms and related terms in another language.
FREE ACCESS -
5m 58s
If you often have to cite sources or texts, you will find Word 2010’s bibliography tool useful. Rather than inserting and reinserting the same references, you can create a database of article, book and text references which can then be inserted whenever you want. Your bibliographical entry has space to hold a huge amount of information, including the title of the work, the author, publisher, and even the document’s ISBN.
FREE ACCESS -
Locked
3. Translating your document in Word 2010 for Windows
5m 15s
If you need to translate your document into another language, Word 2010 comes complete with a series of basic translation tools. These can help you to translate your document or sections of your document.
FREE ACCESS -
Locked
4. Inserting line numbers in Word 2010 for Windows
5m 35s
If you are working on a poem, academic article or literary work, you may want to insert line numbers. Word 2010 features a tool that will automatically insert and format line numbers. You can manually remove individual line numbers, adjust where they appear in your document and even restart your line numbering on every new page or in every new section.
FREE ACCESS -
Locked
5. Inserting footnotes in Word 2010 for Windows
6m 9s
Footnotes are used to include additional information that may be of use to the reader but does not necessarily have a place in the main body of your document. Word 2010’s footnotes tools can help you to format and manage any footnotes or endnotes that you insert. You can, for example, ensure that your footnote numbering is automatically managed and adjusted, regardless of where you insert your new footnote.
FREE ACCESS -
Locked
6. Customizing your footnotes in Word 2010 for Windows
4m
In Word 2010, you can customize the footnotes and endnotes that you have inserted into your document. You can, for example, adjust your number format and force your numbering to start again on every new page.
FREE ACCESS -
Locked
7. Inserting endnotes in Word 2010 for Windows
3m 48s
Endnotes are used to store additional information relating to the document that you are working on. Unlike footnotes, this information is stored at the end of the document. Endnotes work in a similar way to footnotes and you can even convert your footnotes into endnotes and vice versa.
FREE ACCESS
EARN A DIGITAL BADGE WHEN YOU COMPLETE THIS COURSE
Skillsoft is providing you the opportunity to earn a digital badge upon successful completion on some of our courses, which can be shared on any social network or business platform.
Digital badges are yours to keep, forever.