
This article explains how to export a report to XLSX format from Preview (Visual Studio, WinForms, WPF), Document Viewer (Web Platforms), and in code. The article also describes export modes and export options you can specify for the exported XLSX file.
Note
Export options listed in this article generate WYSIWYG output. Report layouts with misaligned columns, empty spaces, and misaligned headers and footers might produce merged cells and extra columns/rows in the exported XLSX file. Refer to the following section for more details: Merged Cells And Extra Columns/Rows: Troubleshooting. To export data to XLSX without exact layout replication, use the Spreadsheet Document API instead of the reporting export engine.
Export From Preview (Visual Studio, WinForms, WPF)
You can export a report from Visual Studio Preview tab, WinForms Print Preview, and WPF Print Preview. Expand the drop-down list with export formats and select XLSX File.

Specify export mode and options in the invoked XLSX Export Options dialog and click OK.
Export From Document Viewer (Web Platforms)
You can export a report from ASP.NET Web Forms Document Viewer, ASP.NET MVC Document Viewer, or ASP.NET Core Document Viewer. Specify export options in the Export Options dialog, expand the Export To drop-down list in the toolbar, and select XLSX.

Export in Code
Use the XtraReport.ExportToXlsx or XtraReport.ExportToXlsxAsync methods to export a report to XLSX format. Specify the path/stream to which the report should be exported as the first argument in these methods. If you specify only the path/stream, the report is exported to XLSX format with the default options. To change the default options, do the following:
- If you create a report in code: create a XlsxExportOptions object, specify export options for this object, then pass the object to the XtraReport.ExportToXlsx or XtraReport.ExportToXlsxAsync methods as the second argument.
- If you create a report in the Visual Studio Designer: change the options in the Properties panel.
Example
View Example: Export a Report to XLSX Format
- Form1.cs
- Form1.vb
using DevExpress.XtraPrinting;
using DevExpress.XtraReports.UI;
using System.Windows.Forms;
using System;

namespace XlsxExportExample {
    public partial class Form1 : Form {
        public Form1() {
            InitializeComponent();
        }

        private void Form1_Load(object sender, EventArgs e) {
            // Create a report.
            XtraReport report = new XtraReport() {
                Name = "Report Example",
                Bands = {
                    new DetailBand() {
                        Controls = {
                            new XRLabel() {
                                Text = "Some content goes here...",
                            }
                        }
                    }
                }
            };

            // Specify export options.
            XlsxExportOptions xlsxExportOptions = new XlsxExportOptions() {
                ExportMode = XlsxExportMode.SingleFile,
                ShowGridLines = true,
                FitToPrintedPageHeight = true
            };

            // Specify the path for the exported XLSX file.
            string xlsxExportFile =
                Environment.GetFolderPath(Environment.SpecialFolder.UserProfile) +
                @"Downloads" +
                report.Name +
                ".xlsx";

            // Export the report.
            report.ExportToXlsx(xlsxExportFile, xlsxExportOptions);
        }
    }
}
Export Modes
Use the Export Mode option to specify one of the following XLSX export modes.
Single File
Exports a report to a file that contains one sheet with all report pages. The report’s page headers, footers, and top/bottom margins appear only once, at the beginning and end of the sheet.
Single File Page-By-Page
Saves every report page as one sheet. The report’s page headers, footers, and top/bottom margins appear on every sheet.
Different Files
Exports a report to multiple files. Each file contains a sheet that corresponds to one report page. Page headers, footers, and top/bottom margins appear on every sheet.
Export Options
The following options are available in the XLSX Export Dialog, which you can open from the Visual Studio Print tab, WinForms Print Preview, WPF Print Preview, and in the Export Options dialog of the Document Viewer (Web platforms).
- Page Range
- Sheet Name
- Text Export Mode
- Show Grid Lines
- Export Hyperlinks
- Raw Data Mode
The options below are available only in the Properties panel in the Visual Studio Report Designer, WinForms End-User Report Designer, WPF End-User Report-Designer, …

… and in the Export options dialog of the Document Viewer (Web platforms).
- Image Export Options
- Print Options
- Encryption Options
- Right-to-Left Document
- Ignore Errors
Page Range
The Page Range option specifies the range of pages that should be exported to an XLSX file. For example, the “1,3,5-12” range exports pages one, three, and five through twelve.
Sheet Name
Use the Sheet Name option to specify the name of the sheet in the exported XLSX file. If you use Single File Page-By-Page mode, a consecutive index is added to the name of each sheet in the exported XLSX file.
Text Export Mode
Use the Text Export Mode option to specify one of the following XLSX export modes for report data:
-
Value (default)
Exports all data with the same formatting as in the original document. Integer, double, and Boolean values are exported with their original types. All other values are exported as strings. For the XRLabel control, the XlsxFormatString property value is used as a format string. If the property is not specified, the TextFormatString property value is used as a format string.
-
Text
Exports all data as strings.
Show Grid Lines
The Show Grid Lines option specifies whether sheet gridlines are visible in the exported XLSX file.
Export Hyperlinks
Use the Export Hyperlinks option to specify whether to include hyperlinks in the exported XLS file. Only absolute URLs of the following types are supported:
|
URL Type |
Example |
|---|---|
|
Email address |
mailto:office@example.com?subject=Inquiries |
|
Web page |
https://www.example.com |
|
File |
file:///D:/Files/Agreement.html |
Raw Data Mode
Enable the Raw Data Mode option to export plain data and ignore images, graphics, font, and appearance settings.
Image Export Options
Enable the Rasterize Images option to rasterize vector images in pictures, charts, and barcodes in the exported XLSX file. Use the Rasterization Resolution option to specify image resolution.
Print Options
Enable the Fit To Printed Page Height/Fit To Printed Page Width option to shrink the height/width of the exported document’s printout to one page. Enable both of these options to shrink the width and height of the exported document’s printout to one page.
Encryption Options
Use the Password option to set a password for the exported XLSX file. Use the Type option to specify one of the following encryption types:
-
Strong (default)
Corresponds to the Agile Encryption mechanism.
-
Compatible
Corresponds to the Standard Encryption that is compatible with Excel 2007.
Important
Passwords for XLSX files are stored as plain text in report definitions. Ensure that only trusted parties have access to report definition files.
Right-to-Left Document
If you use right-to-left fonts in a report, enable the Right-to-Left Document option to use the right-to-left layout for sheets in the exported XLSX file.
Ignore Errors
Use the Ignore Errors option to specify errors that should be ignored in the exported XLSX file.
Limitations
Common
- Values of custom types are not exported to XLSX files. If a cell within the exported XLSX file contains a value of a custom type, the cell displays the #VALUE! error.
- An XLSX cell may contain up to 32,767 characters. If the control’s Text property contains longer text, the text is truncated in the exported XLSX file. No errors or warnings are displayed. Refer to the following Microsoft topic for more information: Excel specifications and limits.
- Cross-sheet references work in Single File export only.
Single File Mode
- If a report uses CachedReportSource, changes made in Preview are not included in Single File exports.
- If a report includes a page merged from another document, you cannot export the report as a Single File. The exported file contains only one of the merged reports. As a workaround, use subreports to combine multiple reports into a single document or export each report to a single XLSX file, then join these files into one file.
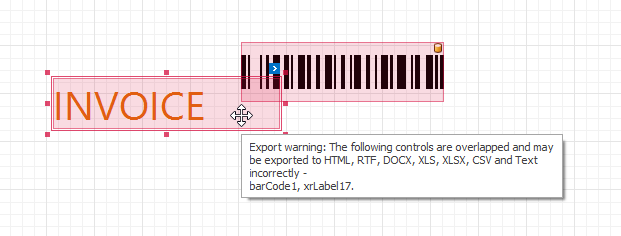
Overlapped Controls
-
Overlapped controls might produce a corrupted layout in the exported XLSX file. In the Report Designer, overlapped controls are shown in red. Move the mouse pointer over these controls to show a detailed export warning:

If you create a report in code, use the HasExportWarningControls collection to check if the report contains controls with export warnings.
-
The XRLabel control placed over the XRPictureBox control is exported to an XLSX file under the picture.
The BeforePrint Event
If a control is bound to a data source field and the Text Export Mode option is set to Value, data from this field is exported directly to an XLSX file. If you modify the control’s Text property value in the BeforePrint event, the changes are not exported to the XLSX file. To modify and export the control’s data, use one of the following techniques:
- Assign data to the control’s Value property instead of the Text property in the implemented BeforePrint event.
- Use the EvaluateBinding event instead of BeforePrint. Assign a new value to the e.Value property.
- Set the Text Export Mode option to Text. Note that all values are exported as strings for this mode.
HTML/RTF Export
You can specify HTML content for the XRLabel control and HTML/RTF content for the XRRichText control. Only the following groups of HTML tags and their RTF equivalents are supported in XLSX files:
|
Tag Group |
Tags Example |
|---|---|
|
Text format |
<b>, <i>, <u>, <s> |
|
Font settings (name, size, and foreground color) |
<font=[font name]> |
|
Line break |
<br> |
|
Non-breaking space |
<nbsp> |
Refer to the AllowMarkupText property description for information on XRLabel‘s HTML tags supported in XLSX files. See the following topic for details on HTML tags that XRRichText supports: HTML Support Limitations: Supported and Unsupported Tags.
Export Report Groups to Separate XLSX Sheets
This section explains how you can export each data group into an individual worksheet. You can leverage Single File Page By Page export mode if you take a few preparatory steps.
Do the following to export each report group to separate XLSX sheets:
-
Modify the report layout to place each group on a new report page. Use one of the following methods to separate the report groups:
- If the groups are stored in one report, use the XRPageBreak control or enable the Band.PageBreak property.
- If each group is stored as a separate report, use the XRSubreport control with the GenerateOwnPages property enabled.
-
Fit the content of each group to one report page. To do this, set the XtraReport.RollPaper property to true.
- Enable Single File Page By Page export mode to export each page of the report to a separate XLSX sheet.
- (Optional) Use the XlSheetCreated event to change the default name of each XLSX sheet.
Note
You may want these layout changes to be applied only to the XLSX export and not to on-screen preview or other export formats. In such cases, we recommend that you create a copy of the report and adjust this copy specifically for XLSX export purposes. If you create a report in the Visual Studio Designer, you can customize the report in code.
View Example: Export Report Groups to Separate Excel Sheets
Merged Cells And Extra Columns/Rows: Troubleshooting
Export options listed in this article produce WYSIWYG output. Report layouts with misaligned columns, empty spaces, misaligned headers and footers, and overlapped controls might produce merged cells and extra columns/rows in the exported XLSX file. This section describes how you can modify a report layout to resolve these issues.
Misaligned Columns
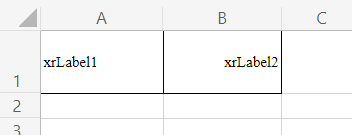
The image below shows a report with a table whose header’s columns are not aligned with the table cells:

The exported XLSX file has the following layout:

Only A, C, E, and G columns are visible. Extra B, D, F, and H columns are added to the exported XLSX file. The problem occurs because the table header and the cells in the Detail band are not aligned. The image below shows the borders of the misaligned columns:

To remove extra columns, align header and detail cells horizontally:

Empty Spaces
The image below shows a report with empty spaces between controls:
![]()
The exported XLSX file has the following layout:
![]()
In the image below, cells with exported controls have a yellow background. As you can see, the export generated additional cells to replicate empty spaces between controls.
![]()
To fix this issue, move or resize report controls to eliminate empty space. Use the TextAlignment and Padding properties to adjust text position.
![]()
Misaligned Headers And Footers
The image below shows a report with a header in which the control’s borders are not lined up with the report’s table columns.

The exported XLSX file has the following layout:

The image below highlights the controls that generate extra columns:

To remove these extra columns, align the controls in the report header and footer to table columns:

Overlapped Controls
The following image shows a report layout with two overlapped labels:
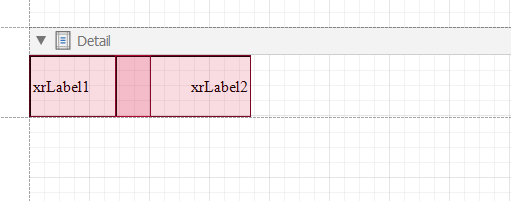
The exported Excel file appears as follows:
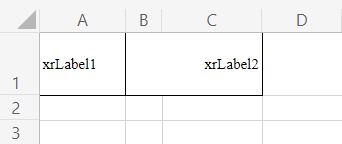
You can see that an extra column named B appears in the exported file. To remove this column, modify your report layout such that the controls do not overlap.
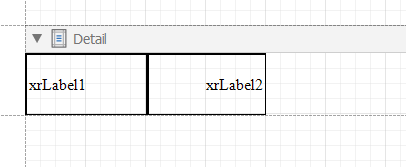
After the modification, the exported file does not contain the extra column:
В этой статье мы рассмотрим способы для выгрузки данных в xls/xlsx файл. Для примера был создан небольшой тестовый проект для демонстрации возможностей библиотек. Допустим у нас есть класс студент
|
public class Student { public int ID { get; set; } public string Name { get; set; } public int Age { get; set; } public bool Gender { get; set; } public string phone { get; set; } public int Eng { get; set; } public int Math { get; set; } } |
Создадим функцию которая будет создавать фейковые данные студентов
|
1 2 3 4 5 6 7 8 9 10 11 12 13 14 15 16 17 18 19 20 21 22 23 24 |
/// <summary> /// Generate Random Student Data /// </summary> /// <param name=»count»>count</param> /// <returns>List<Student></returns> private List<Student> GenerateRandomData(int count) { Random rnd = new Random(); List<Student> students = new List<Student>(); for (int i = 0; i < count; i++) { students.Add(new Student() { Name = «name» + i.ToString(), Age = rnd.Next(10, 60), Gender = rnd.NextDouble() >= 0.5, ID = i, phone = «8987654321», Eng = rnd.Next(0, 100), Math = rnd.Next(0, 100) }); } return students; } |
Теперь рассмотрим способы выгрузить эти данные в excel.
Содержание
- NPOI
- Общие характеристики NPOI:
- Как использовать
- EPPlus
- Общие характеристики
- Как использовать
- ClosedXML
- Как использовать
- ClosedXML.Report
- Функции
- Как использовать
- OleDB
- Провайдеры данных
- Extended Properties
- Как использовать
NPOI
Этот проект является .NET версией проекта POI Java. С помощью NPOI вы можете легко читать/записывать файлы Office 2003/2007.
Общие характеристики NPOI:
a. Это абсолютно бесплатно для использования
b. Охват большинства функций Excel (стиль ячеек, формат данных, формула и т. д.)
c. Поддерживаемые форматы: xls, xlsx, docx.
d. Разработан для ориентации на интерфейс (взгляните на NPOI. Пространство имен SS)
e. Поддержка не только экспорта, но и импорта
f. Реальные успешные кейсы по всему миру
г. огромное количество базовых примеров
h. Работает как на Windows, так и на Linux
Подробно узнать о проекте можно по ссылке
Ниже указан способ выполнить экспорт с помощью NPOI
Как использовать
Установим библиотеку через NuGet
Подключим в код
using NPOI.XSSF.UserModel;
using NPOI.SS.UserModel;
|
1 2 3 4 5 6 7 8 9 10 11 12 13 14 15 16 17 18 19 20 21 22 23 24 25 26 27 28 29 30 31 32 33 34 35 36 37 38 39 40 41 42 43 44 45 46 47 48 |
List<Student> students = GenerateRandomData(100); XSSFWorkbook workbook = new XSSFWorkbook(); ISheet sheet = workbook.CreateSheet(«Primer_NPOI»); //create the header row IRow headerRow = sheet.CreateRow(0); int count = 0; foreach (var item in typeof(Student).GetProperties()) { headerRow.CreateCell(count++).SetCellValue(item.Name); } //set the value for (int i = 1; i < students.Count() + 1; i++) { IRow row = sheet.CreateRow(i); count = 0; row.CreateCell(count++).SetCellValue(students[i — 1].ID); row.CreateCell(count++).SetCellValue(students[i — 1].Name); row.CreateCell(count++).SetCellValue(students[i — 1].Age); row.CreateCell(count++).SetCellValue(students[i — 1].Gender ? «М» : «Ж»); row.CreateCell(count++).SetCellValue(students[i — 1].phone); row.CreateCell(count++).SetCellValue(students[i — 1].Eng); row.CreateCell(count).SetCellValue(students[i — 1].Math); } try { //save file SaveFileDialog saveDialog = new SaveFileDialog() { DefaultExt = «.xlsx», FileName = «Primer_NPOI», Filter = «Excel |*.xlsx» }; if (saveDialog.ShowDialog() == true) { using (FileStream MS = new FileStream(saveDialog.FileName,FileMode.Create)) { workbook.Write(MS); } } } catch (Exception ex) { StatusText.Text = ex.Message; } |
- Создание, чтение и изменение книг Office Open XML (xslx и xlsm)
- Поддерживает как .NET Framework, так и .NET Core. Нет различий в наборе функций между фреймворками.
- Предоставляет простой в использовании, строго типизированный программный интерфейс, который тесно связан с хорошо известным API Excel VBA.
- Только управляемый код, без зависимостей от Microsoft Excel
- Закаленная в боях кодовая база после многих лет работы в качестве самой скачиваемой в мире библиотеки .NET для управления электронными таблицами. Качество, обеспечиваемое тысячами юнит-тестов.
- Исходный код EPPlus в открытом доступе на Github , распространяется под некоммерческой лицензией Polyform
Как использовать
Установка
|
1 2 3 4 5 6 7 8 9 10 11 12 13 14 15 16 17 18 19 20 21 22 23 24 25 26 27 28 29 30 31 32 33 34 35 36 37 38 39 40 41 42 43 44 45 46 47 48 49 50 51 52 53 54 55 56 57 58 59 60 61 62 63 64 65 66 67 68 |
List<Student> students = GenerateRandomData(100); using (ExcelPackage p = new ExcelPackage()) { ExcelWorksheet sheet = p.Workbook.Worksheets.Add(«EPPlus_Test»); //create the header row int count = 1; foreach (var item in typeof(Student).GetProperties()) { sheet.Cells[1, count].Style.Fill.PatternType = ExcelFillStyle.Solid; sheet.Cells[1, count].Style.Fill.BackgroundColor.SetColor(Color.Yellow); sheet.Cells[1, count++].Value = item.Name; } //set the value for (int i = 2; i < students.Count() + 2; i++) { count = 1; sheet.Cells[i, count++].Value = students[i — 2].ID; sheet.Cells[i, count++].Value = students[i — 2].Name; sheet.Cells[i, count++].Value = students[i — 2].Age; sheet.Cells[i, count++].Value = students[i — 2].Gender ? «М» : «Ж»; sheet.Cells[i, count++].Value = students[i — 2].phone; sheet.Cells[i, count++].Value = students[i — 2].Eng; sheet.Cells[i, count].Value = students[i — 2].Math; sheet.Cells[i, count].Style.Fill.PatternType = ExcelFillStyle.Solid; sheet.Cells[i, count].Style.Fill.BackgroundColor.SetColor(students[i — 2].Math < 60 ? Color.Red : Color.Transparent); } sheet.Column(4).AutoFit(); //condition format var ruleIcon = sheet.ConditionalFormatting.AddThreeIconSet(new ExcelAddress(2, 5, 10, 5), eExcelconditionalFormatting3IconsSetType.Signs); var colorformat = sheet.ConditionalFormatting.AddDatabar(new ExcelAddress(2, 6, 10, 6), Color.Blue); //add chart ExcelWorksheet sheet2 = p.Workbook.Worksheets.Add(«chart»); ExcelChart chart = sheet2.Drawings.AddChart(«NewChart», eChartType.Area3D); chart.Title.Text = «Title»; chart.Series.Add(sheet.Cells[2, 6, 6, 6], sheet.Cells[2, 1, 6, 1]); chart.SetPosition(4, 1, 1, 0); chart.SetSize(800, 400); chart.View3D.DepthPercent = 60; chart.View3D.Perspective = 15; chart.View3D.RotX = 20; chart.View3D.RotY = 15; try { //save file SaveFileDialog saveDialog = new SaveFileDialog() { DefaultExt = «.xlsx», FileName = «EPPlus_Test», Filter = «Excel |*.xlsx» }; if (saveDialog.ShowDialog() == true) { File.WriteAllBytes(saveDialog.FileName, p.GetAsByteArray()); //p.SaveAs(new FileInfo(saveDialog.FileName)); } } catch (Exception ex) { StatusText.Text = ex.Message; } } } |
ClosedXML
ClosedXML — это библиотека .NET для чтения, обработки и записи файлов Excel 2007+ (.xlsx, XLSM). Он направлен на предоставление интуитивно понятного и удобного интерфейса для работы с базовым OpenXML API.
Ссылка на проект
Для получения дополнительной информации см. вики
Как использовать
|
1 2 3 4 5 6 7 8 9 10 11 12 13 14 15 16 17 18 19 20 21 22 23 24 25 26 27 28 29 30 31 32 33 34 35 36 37 38 39 40 41 42 43 44 45 46 47 48 49 50 51 52 |
List<Student> students = GenerateRandomData(100); XLWorkbook workbook = new XLWorkbook(); var sheet = workbook.Worksheets.Add(«ClosedXML_Test»); int count = 1; foreach (var item in typeof(Student).GetProperties()) { sheet.Cell(1, count).Style.Fill.PatternType = XLFillPatternValues.Solid; sheet.Cell(1, count).Style.Fill.BackgroundColor = XLColor.Yellow; sheet.Cell(1, count++).Value = item.Name; } for (int i = 2; i < students.Count() + 2; i++) { count = 1; sheet.Cell(i, count++).Value = students[i — 2].ID; sheet.Cell(i, count++).Value = students[i — 2].Name; sheet.Cell(i, count++).Value = students[i — 2].Age; sheet.Cell(i, count++).Value = students[i — 2].Gender ? «М» : «Ж»; sheet.Cell(i, count++).Value = students[i — 2].phone; sheet.Cell(i, count++).Value = students[i — 2].Eng; sheet.Cell(i, count).Value = students[i — 2].Math; sheet.Cell(i, count).Style.Fill.PatternType = XLFillPatternValues.None; sheet.Cell(i, count).Style.Fill.BackgroundColor = students[i — 2].Math < 60 ? XLColor.Red : XLColor.Transparent; } sheet.Column(4).AdjustToContents(); //condition format sheet.Range(2, 6, 10, 6).AddConditionalFormat().DataBar(XLColor.Orange).LowestValue().HighestValue(); sheet.Range(2, 3, 10, 3).AddConditionalFormat().IconSet(XLIconSetStyle.ThreeTrafficLights2) .AddValue(XLCFIconSetOperator.EqualOrGreaterThan, 45, XLCFContentType.Number) .AddValue(XLCFIconSetOperator.EqualOrGreaterThan, 20, XLCFContentType.Number) .AddValue(XLCFIconSetOperator.EqualOrGreaterThan, 10, XLCFContentType.Number); try { //save file SaveFileDialog saveDialog = new SaveFileDialog() { DefaultExt = «.xlsx», FileName = «ClosedXML», Filter = «Excel |*.xlsx» }; if (saveDialog.ShowDialog() == true) { workbook.SaveAs(saveDialog.FileName); } } catch (Exception ex) { StatusText.Text = ex.Message; } |
ClosedXML.Report
ClosedXML.Report — это инструмент для создания отчетов и анализа данных в приложениях .NET с помощью Microsoft Excel. Это . NET-библиотека для создания отчетов Microsoft Excel без необходимости установки Excel на компьютере, на котором выполняется код. С помощью ClosedXML.Report можно легко экспортировать любые данные из классов .NET в Excel с помощью XLSX-шаблона.
Функции
- Копирование форматирования ячеек
- Условное форматирование
- Вертикальные и горизонтальные таблицы и поддиапазоны
- Возможность реализации формул Excel
- Использование динамически вычисляемых формул с синтаксисом C # и Linq
- Операции с табличными данными: сортировка, группировка, суммарные функции.
- Сводные таблицы
- Поддиапазоны

Как использовать
ClosedXML/ClosedXML.Report: ClosedXML.Report is a tool for report generation with which you can easily export any data from your .NET classes to Excel using a XLSX-template. (github.com)
OleDB
Провайдеры данных
Для работы с Excel 2003 (.Xls) можно использовать провайдер Microsoft Jet OLE DB 4.0.
|
SELECT * FROM OPENROWSET( ‘Microsoft.Jet.OLEDB.4.0’, ‘Excel 12.0;Database=d:tmpTimeSheets.xlsx;HDR=YES;IMEX=1’, ‘SELECT * FROM [Sheet1$]’); |
Для работы с Excel 2007 (.Xlsx) — Microsoft ACE OLEDB 12.0.
|
SELECT * FROM OPENROWSET ( ‘Microsoft.ACE.OLEDB.12.0’, ‘Excel 12.0;Database=d:tmpTimeSheets.xlsx;HDR=YES;IMEX=1’, ‘SELECT * FROM [Sheet1$]’); |
В Windows 10 открыть настройки источников данных ODBC можно написав «Источники данных ODBC» или через Панель управления Администрирование.
Extended Properties
HDR=YES|NO. HDR=YES означает, что первую строку листа, следует рассматривать как заголовки колонок. Т.о. значение из первой строки можно использовать как имена полей в sql запросах (любых: select, insert, update, delete).IMEX=1|3. 1 — открыть соединение для чтения. 3 — для записи.
Как использовать
|
1 2 3 4 5 6 7 8 9 10 11 12 13 14 15 16 17 18 19 20 21 22 23 24 25 26 27 28 29 30 31 32 33 34 35 36 37 38 39 40 41 42 43 44 45 |
List<Student> students = GenerateRandomData(100); try { SaveFileDialog saveDialog = new SaveFileDialog() { DefaultExt = «.xlsx», FileName = «Sample», Filter = «Excel |*.xlsx» }; if (saveDialog.ShowDialog() == true) { string Connstring = $«Provider=Microsoft.ACE.OLEDB.12.0;Data Source={saveDialog.FileName};Extended Properties=’Excel 12.0 Xml;HDR=YES;'»; using (OleDbConnection Conn = new OleDbConnection(Connstring)) { await Conn.OpenAsync(); //create sheet string sql = «CREATE TABLE Test (ID int,Name VarChar,Age int,Gender VarChar,phone VarChar,Eng int,Math int)»; using (OleDbCommand cmd = new OleDbCommand(sql, Conn)) { await cmd.ExecuteNonQueryAsync(); //insert data cmd.CommandText = «Insert into Test values (@ID,@Name,@Age,@Gender,@phone,@Eng,@Math)»; for (int i = 0; i < students.Count; i++) { cmd.Parameters.Clear(); cmd.Parameters.Add(«@ID», OleDbType.Integer).Value = students[i].ID; cmd.Parameters.Add(«@Name», OleDbType.VarChar).Value = students[i].Name; cmd.Parameters.Add(«@Age», OleDbType.Integer).Value = students[i].Age; cmd.Parameters.Add(«@Gender», OleDbType.VarChar).Value = students[i].Gender ? «М» : «Ж»; cmd.Parameters.Add(«@phone», OleDbType.VarChar).Value = students[i].phone; cmd.Parameters.Add(«@Eng», OleDbType.Integer).Value = students[i].Eng; cmd.Parameters.Add(«@Math», OleDbType.Integer).Value = students[i].Math; await cmd.ExecuteNonQueryAsync(); } } } } } catch (Exception ex) { StatusText.Text = ex.Message; } |
Скачать проект

This Power BI tutorial, we will also disucss different approaches to Export Data in Power BI to excel. We will discuss how to export data from Power BI desktop to excel, Export Data from Power BI Dashboard to excel and Export Data from Power BI Report to excel. We will also see, Power BI Export to Excel Limitations.
Also, We will see Power BI Export underlying data details, how to enable the Export option in Power BI Desktop and what are the limitations and considerations in Power BI Export to Excel.
Learn how to export Power BI reports to PDF.
Different approaches to Export Data in Power BI
In Power BI, you can export the data by using three different approaches as:
- Export Data From Power BI Desktop
- Export Data from Power BI Dashboard
- Export Data from Power BI Report
To export the data from the Power BI Desktop, Click on the visual which you want to export.
Once you will click on the visual, you can see the three dots (…) which are present at the top right corner of the visual as you can see in the below screenshot. Select Export data from the drop-down.

Now it will ask you to save the Excel file. For that, you choose your location where you want to save the excel file and Select the Excel File type as CSV. Then click on Save.
In the below example, I have saved the file name as IncomeTaxRate with the type of CSV File.

When you will open the Excel file on your desktop, you can see the table like the below screenshot.
As I have saved my file with IncomeTaxRate name, that’s why the Excel spreadsheet name is appearing with the same name as shown below.

Export Data from Power BI Dashboard
Similarly, you can export the data from the Power BI Dashboard. For that, Go to your particular dashboard where the visual is present that you want to export.
Once you will go to the Power BI Dashboard page, Select your visual and click on the three dots (…) which are present at the top right corner of the visual. Then select Export data option from the drop-down menu as shown below.

When you will select the Export data option, then the below window will appear where you have to choose the Summarized data and the File format as .xlsx (Excel) as shown below. Then click on Export.
Once you will Export, the Excel file will be downloaded and it will be saved as .xlsx file type.

While you will open the downloaded Excel file (.xlsx), then the Excel spreadsheet will appear as the below screenshot. Here the Excel spreadsheet name will be the same as of the visualization name.

Export Data from Power BI Report
This is exactly similar to the Export Data From Power BI Desktop. Both are the same concept and processes. Here, One of the differences between them is, You have to export the data from the Power BI Report in Browser instead of the Power BI Desktop.
In the same way as Power BI Desktop, In the browser Power BI Report, Select your specific visual which you want to export. Then click on the three dots (…) and select Export data from the drop-down menu as shown below.

Select the Summarized data and select the File format as .xlsx (Excel) from the drop-down. Click on Export.
Once you will click on the Export option, then the file will be downloaded and saved as per the name of the visualization.

When you will open the Excel, then the spreadsheet will appear as the below screenshot. The Excel spreadsheet name will be the same as per the visualization name.

Underlying data details in Power BI Export
This Export underlying data details will work depends upon the help of your admin or IT department. In the Reporting view (In Power BI Desktop and Services), the measure option will display in the Field list with a calculator icon.
One most important thing you should know is, the Measures will create by using Power BI Desktop where the Power BI service does not.
In the below Table, It represents all the Visual Contains and what you will see in the Export in Power BI.
| Visual Contains | In Export, What you will see |
| Aggregates | You will see the first aggregate and the data (non-hidden) from the entire table. |
| Aggregates | You will see the related data. That means when the visual uses data from other tables which are related to the data table that contains the aggregate (where the relationship is *:1 or 1:1) |
| Measures | You will see all measures that are present in the visual and all measures from any data table containing a measure that is used in the visual. |
| Measures | You can see all non-hidden data from tables which contains the measure (where the relationship is *:1 or 1:1) |
| Measures | It will help you to show all the data from all tables which are related to tables which contains the measure with the relationship of *:1 or 1:1 |
| Measures only | You will see all the non-hidden columns from all the related tables to expand the measure. |
| Measures only | It will help you to summarize data for any duplicate rows for model measures. |
Enable Export options in Power BI Desktop
To use the Power BI Export to Excel, you must ensure to enable the export option which is present in the Power BI Desktop.
To enable the Export to Excel option, Follow the below steps:
- Go to the Power BI Desktop.
- Select File (from the top left corner) -> Click on Options and Settings-> Select Options.

- Select the Report settings which is present under the CURRENT FILE.
Once you will select the Report settings option, you can see three choices under the Export data section as shown below. The three choices are:
- Allow end-users to export summarized data from the Power BI service or Power BI Report Server
- Allow end-users to export both summarized and underlying data from the service or Report Server
- Don’t allow end-users to export any data from the service or Report Server
To do the Power BI Export to Excel, you need to enable the first choice as you can see in the below screenshot. Once all things are done, just click on OK.

Power BI Export to Excel Limitations
One of the most important things is the Limitations and considerations in Power BI Export to Excel. You should know about each and every limitation which is applied to Power BI Desktop, Power BI Service and Power BI Pro and Premium.
The Power BI Export to Excel limitations are presented below:
- The first thing you need to know is the Power BI permission. To do the Export to Excel in Power BI, you have to build a permission for the underlying dataset.
- Your application should have a maximum 150,000 number of rows which will export from an import mode report to an Excel file (.xlsx file).
- Your application (In Power BI Desktop and Power BI Service) should have a maximum 30,000 number of rows which will export from an import mode report to an Excel file (.csv file).
- In the Power BI Visualization, When you will enable the Show items with no data option, then the Underlying data will not work during Exporting.
- Also, For the below reasons, Underlying data of Power BI Export will not work as:
- If the data source is an Analysis Services Live connection.
- If the version is older than in 2016.
- If the tables in the model don’t have a unique key.
- If an administrator or report designer has disabled this feature.
- 16 MB is the maximum amount of data that Power BI can export when using the DirectQuery.
- In Power BI, the Custom Visuals and R visuals are not supporting currently.
- In Power BI Export to Excel, the Excel spreadsheet name should be the same as the Visualization name.
- If your .csv file contains Unicode character, then the text in Excel will not display properly. In that case, try to open the file in a Notepad and there you can see the Unicode will display correctly. When you want to open the file in Excel, just import the file into .csv.
- To import the file into Excel, follow these below things:
- Open Excel.
- Go to the Data tab.
- Select Get external data > From text
- Go to the local folder where the file is stored and select the .csv.
- If you are the Admin in Power BI, then you can disable the export to Excel of data option.
You may like the below Microsoft Power BI tutorials:
- Power BI Data Analysis Expressions (DAX) Tutorial
- Power BI Query Group Tutorial
- Power BI Change Data Type of a Column
- How to Split Columns in Power BI
- Power BI Buttons
- Enter Data into Power BI Desktop
- Power BI Workbooks
- Power BI Error: This content isn’t available
- Power BI On-premises Data Gateway
- How to share Power BI Dashboard and Report
- Microsoft Power BI Error: This content isn’t available
- Power BI Custom Visuals
Hence in this Microsoft Power BI Tutorial, We discussed What are the different approaches to Export the Data, how to export the data from Power BI Desktop, Export the data from the Power BI Dashboard, Export the data from the Power BI Report.
Also, We saw Power BI Export underlying data details, how to enable the Export option in Power BI Desktop and what are the limitations and considerations in Power BI Export to Excel.

Hello Everyone!! I am Bhawana a SharePoint MVP and having about 10+ years of SharePoint experience as well as in .Net technologies. I have worked in all the versions of SharePoint from wss to Office 365. I have good exposure in Customization and Migration using Nintex, Metalogix tools. Now exploring more in SharePoint 2016 🙂 Hope here I can contribute and share my knowledge to the fullest. As I believe “There is no wealth like knowledge and no poverty like ignorance”
| title | description | author | ms.author | ms.date | ms.service | ms.subservice | ms.topic | ms.custom |
|---|---|---|---|---|---|---|---|---|
|
Export a paginated report to Microsoft Excel (Report Builder) |
In Report Builder, the Excel rendering extension renders a paginated report to the Office Open XML format to use with Microsoft Excel. |
maggiesMSFT |
maggies |
03/24/2023 |
reporting-services |
report-builder |
conceptual |
updatefrequency5 |
Export a paginated report to Microsoft Excel (Report Builder)
[!INCLUDEssrs-appliesto] [!INCLUDE ssrs-appliesto-ssrs-rb] [!INCLUDE ssrs-appliesto-pbi-rb] [!INCLUDE ssrb-applies-to-ssdt-yes]
The Excel rendering extension renders a paginated report to the [!INCLUDEofprexcel] format (.xlsx). With the Excel rendering extension, the width of columns in Excel more accurately reflects the width of columns in reports.
The format is Office Open XML. The content type of files generated by this renderer is application/vnd.openxmlformats-officedocument.spreadsheetml.sheet and the file extension is .xlsx.
You can change some default settings for this renderer by changing the device information settings. For more information, see Excel Device Information Settings.
See Export Reports (Report Builder and SSRS) for details on how to export to Excel.
[!IMPORTANT]
When you define a parameter of type String, the user is presented with a text box that can take any value. If a report parameter is not tied to a query parameter and the parameter values are included in the report, it is possible for a report user to type expression syntax, script, or a URL into the parameter value, and render the report to Excel. If another user then views the report and clicks the rendered parameter contents, the user may inadvertently execute the malicious script or link.To mitigate the risk of inadvertently running malicious scripts, open rendered reports only from trusted sources. For more information about securing reports, see Secure Reports and Resources.
Excel Limitations
[!INCLUDEofprexcel] places limitations on exported reports due to the capabilities of Excel and its file formats. The most significant are the following:
-
The maximum column width is limited to 255 characters or 1726.5 points. The renderer does not verify that the column width is less than the limit.
-
The maximum number of characters in a cell is limited to 32,767. If this is exceeded, the renderer displays an error message.
-
The maximum row height is 409 points. If the contents of the row cause the row height to increase beyond 409 points, the Excel cell shows a partial amount of text up to 409 points. The rest of the cell contents is still within the cell (up to Excel’s max number of characters of 32,767).
-
Because the maximum row height is 409 points, if the defined height of the cell in the report is something larger than 409 points, Excel splits the cell contents into multiple rows.
-
The maximum number of worksheets is not defined in Excel, but external factors, such as memory and disk space, might cause limitations to be applied.
-
In outlines, Excel permits up to seven nested levels only.
-
If the report item that controls whether another item is toggled is not in the previous or next row or column of the item being toggled, the outline is disabled also.
For more details about Excel limitations, see Excel specifications and limits.
Sizes of Excel 2003 (.xls) Files
[!IMPORTANT]
The [!INCLUDEofprexcel] 2003 rendering extension is deprecated. For more information, see Deprecated Features in SQL Server Reporting Services in SQL Server 2016.
When reports are first exported and saved to Excel 2003, they do not benefit from the file optimization that Excel automatically applies to its *.xls workbook files. The larger file size can cause problems for e-mail subscriptions and attachments. To reduce the size of the *.xls files for exported reports, open the *.xls files and then resave the workbooks. Resaving the workbooks typically reduces their file sizes by 40 to 50 percent.
[!NOTE]
In Excel 2003, approximately 1000 characters are displayed in an Excel cell on the worksheet but up to the maximum number of characters can be edited in the formula bar. This limitation does not apply to current (.xlsx) Excel files.
Text Boxes and Text
The following limitations apply to text boxes and text:
-
Text box values that are expressions are not converted to Excel formulas. The value of each text box is evaluated during report processing. The evaluated expression is exported as the contents of each Excel cell.
-
Text boxes are rendered within one Excel cell. Font size, font face, decoration, and font style are the only formatting that is supported on individual text within an Excel cell.
-
The text effect «Overline» is not supported in Excel.
-
Excel adds a default padding of approximately 3.75 points to the left and right sides of cells. If a text box’s padding settings are less than 3.75 points and is just barely wide enough to accommodate the text, the text may wrap in Excel.
[!NOTE]
To work around this issue, increase the width of the text box in the report.
Images
The following limitations apply to images:
-
Background images for report items are ignored because Excel does not support background images for individual cells.
-
The Excel rendering extension only supports the background image of the report body. If a report body background image is displayed in the report, the image is rendered as a worksheet background image.
Rectangles
The following limitation applies to rectangles.
- Rectangles in report footers are not exported to Excel. However, rectangles in the report body, tablix cells, and so forth are rendered as a range of Excel cells.
Report Headers and Footers
The following limitations apply to report headers and footers:
-
Excel headers and footers support a maximum of 256 characters including markup. The rendering extension truncates the string at 256 characters.
-
[!INCLUDEssRSnoversion] does not support margins on report headers and footers. When exported to Excel, these margin values are set to zero and any header or footer that contains multiple rows of data might not print multiple rows, depending on the printer settings.
-
Text boxes in a header or footer maintain their formatting but not their alignment when exported to Excel. This occurs because leading and trailing spaces are trimmed when the report is rendered to Excel.
Merging Cells
The following limitation applies to merging cells:
- If cells are merged, word-wrap does not work correctly. If any merged cells exist on a row where a text box is rendered with the AutoSize property, autosize will not work.
The Excel renderer is primarily a layout renderer. Its goal is to replicate the layout of the rendered report as closely as possibly in an Excel worksheet and consequently cells might be merged in the worksheet to preserve the report layout. Merged cells can cause problems because the sort functionality in Excel requires cells to be merged in a very specific way for sort to work properly. For example, Excel requires that the ranges of merged cells have the same size in order to be sorted.
If it is important that reports exported to Excel worksheets can be sorted, then the following can help you reduce the number of merged cells in your Excel worksheets, which is the common cause for difficulties with Excel sort functionality.
-
Not aligning items left and right is the most common cause of merged cells. Make sure the left and right edges of all report items line up with one another. Making items align and the same width will solve the problem in the majority of cases.
-
Although you align all items precisely, you might find in some rare cases that some columns continue to be merged. This could be caused by internal unit conversion and rounding when the Excel worksheet is rendered. In the report definition language (RDL), you can specify position and size in different measurement units such as inches, pixels, centimeters, and points. Internally the Excel uses points. To minimize conversion and the potential inaccuracy of rounding when converting inches and centimeters to points, consider specifying all measurements in whole points for the most direct results. One inch is 72 points.
Report Row Groups and Column Groups
Reports that include row groups or column groups contain empty cells when exported to Excel. Imagine a report that groups rows on commute distance. Each commute distance can contain more than one customer. The following picture shows the report.

When the report is exported to Excel, the commute distance appears only in one cell of the Commute Distance column. Depending on the alignment of the text in the report (top, middle, or bottom) the value is in the first, middle, or last cell. The other cells are empty. The Name column that contains customer names has no empty cells. The following picture shows the report after it is exported to Excel. The red cell borders were added for emphasis. The gray boxes are the empty cells. (Neither the red lines nor the gray boxes are part of the exported report.)

Reports with row groups or column groups require modification after exporting to Excel and before you can display the exported data in a PivotTable. You must add the group value to cells in which they are missing. Thus, the worksheet becomes a flat table with values in all cells. The following picture shows the updated worksheet.

So if you create a report for the specific purpose of exporting it to Excel for further analysis of the report data, consider not grouping on rows or columns in your report.
Excel Renderer
Current (.xlsx) Excel File Renderer
In [!INCLUDEssNoVersion] [!INCLUDEssRSnoversion], the default Excel renderer is the version compatible with current (.xlsx) [!INCLUDEofprexcel] files. This is the Excel option on the Exporting menus in the [!INCLUDEssRSnoversion] web portal and SharePoint list.
When you use the default Excel renderer, instead of the earlier Excel 2003 (.xls) renderer, you can install the Microsoft Office Compatibility Pack for Word, Excel, and PowerPoint to allow earlier versions of Excel to open the files that are exported.
Excel 2003 (.xls) Renderer
[!IMPORTANT]
The [!INCLUDEofprexcel] 2003 rendering extension is deprecated. For more information, see Deprecated Features in SQL Server Reporting Services in SQL Server 2016.
The earlier version of the Excel renderer, compatible with Excel 2003, is now named Excel 2003 and is listed on menus using that name. The content type of files generated by this renderer is application/vnd.ms-excel and the file name extension of files is .xls.
By default, the Excel 2003 menu option is not visible. An administrator can make it visible under certain circumstances by updating the RSReportServer configuration file. To export reports from [!INCLUDEssBIDevStudioFull] using the Excel 2003 renderer, you update the RSReportDesigner configuration file.
The Excel 2003 menu option extension is never visible in the following scenarios:
-
Report Builder in disconnected mode and you preview a report in Report Builder. Because the RSReportServer configuration file resides on the report server, the tools or products from where you export reports must be connected to a report server to read the configuration file.
-
Report Viewer Web Part in local mode and the SharePoint farm is not integrated with a [!INCLUDEssRSnoversion] report server. For more information, see Local Mode vs. Connected Mode Reports in the Report Viewer (Reporting Services in SharePoint Mode)
If the Excel 2003 menu option renderer is configured to be visible, both the Excel and Excel 2003 options are available in the following scenarios:
-
[!INCLUDEssRSnoversion] web portal native mode.
-
SharePoint site when Reporting Services is installed in SharePoint integrated mode.
-
[!INCLUDEssBIDevStudioFull] and you preview reports.
-
Report Builder connected to a report server.
-
The Report Viewer Web Part in remote mode.
The following XML shows the elements for the two Excel rendering extensions in the RSReportServer and RSReportDesigner configuration files:
<Extension Name="EXCELOPENXML" Type="Microsoft.ReportingServices.Rendering.ExcelOpenXmlRenderer.ExcelOpenXmlRenderer,Microsoft.ReportingServices.ExcelRendering"/>
<Extension Name="EXCEL" Type="Microsoft.ReportingServices.Rendering.ExcelRenderer.ExcelRenderer,Microsoft.ReportingServices.ExcelRendering" Visible="false"/>
The EXCELOPENXML extension defines the Excel renderer for current (.xlsx) Excel files. The EXCEL extension defines the Excel 2003 version. Visible = "false" indicates the Excel 2003 renderer is hidden. For more information, see RsReportServer.config Configuration File and RSReportDesigner Configuration File.
Differences Between the current (.xlsx) Excel and Excel 2003 Renderers
Reports, rendered by using the current (.xlsx) Excel or the Excel 2003 renderers are typically identical and only under rare circumstances will you notice differences between the two formats. The following table compares the Excel and the Excel 2003 renderers.
| Property | Excel 2003 | Current Excel |
|---|---|---|
| Maximum columns per worksheet | 256 | 16,384 |
| Maximum rows per worksheet | 65,536 | 1,048,576 |
| Number of colors allowed in a worksheet | 56 (palette)
If more than 56 colors are used in the report, the rendering extension matches the required color to one of the 56 colors already available in the custom palette. |
Approximately 16 million (24-bit color) |
| ZIP compressed files | None | ZIP compression |
| Default font family | Arial | Calibri |
| Default font size | 10pt | 11pt |
| Default row height | 12.75 pt | 15 pt |
Because the report explicitly sets the row height, the default row height affects only rows that are sized automatically upon export to Excel.
Report Items in Excel
Rectangles, subreports, the report body, and data regions are rendered as a range of Excel cells. Text boxes, images, and charts, data bars, sparklines, maps, gauges, and indicators must be rendered within one Excel cell, which might be merged depending on the layout of the rest of the report.
Images, charts, sparklines, data bars, maps, gauges, indicators, and lines are positioned within one Excel cell but they sit on top of the cell grid. Lines are rendered as cell borders.
Charts, sparklines, data bars, maps, gauges, and indicators are exported as pictures. The data they depict, such as the value and member labels for a chart, is not exported with them and is not available in the Excel workbook unless it is included in a column or row in a data region within a report.
If you want to work with chart, sparkline, data bar, maps, gauge, and indicator data, export the report to a .csv file or generate Atom-compliant data feeds from the report. For more information, see Exporting to a CSV File (Report Builder and SSRS) and Generating Data Feeds from Reports (Report Builder and SSRS).
Page Sizing
The Excel rendering extension uses the page height and width settings to determine what paper setting to define in the Excel worksheet. Excel tries to match the PageHeight and PageWidth property settings to one of the most common paper sizes.
If no matches are found, Excel uses the default page size for the printer. Orientation is set to Portrait if the page width is less than the page height; otherwise, orientation is set to Landscape.
Worksheet Tab Names
When you export a report to Excel, the report pages that were created by page breaks are exported to different worksheets. If you provided an initial page name for the report, each worksheet of the Excel workbook will have this name by default. The name appears on the worksheet tab. However, since each worksheet in a workbook must have a unique name, an integer starting at 1 and incremented by 1 is appended to the initial page name for each additional worksheet. For example, if the initial page name is Sales Report by Fiscal Year, the second worksheet would be named Sales Report by Fiscal Year1, the third one Sales Report by Fiscal Year2, and so forth.
If all report pages created by page breaks provide new page names, each worksheet will have the associated page name. However, these page names might not be unique. If page names are not unique, the worksheets are named the same way as initial page names. For example, if the page name of two groups is Sales for NW, one worksheet tab will have the name Sales for NW, and the other Sales for NW1.
If the report provides neither an initial page name, nor page names related to page breaks, the worksheet tabs will have the default names Sheet1, Sheet2, and so forth.
Reporting Services provides properties to set on reports, data regions, groups, and rectangles to help you create reports that can be exported to Excel in a way that you want. For more information, see Pagination in Reporting Services (Report Builder and SSRS).
Document Properties
The Excel renderer writes the following metadata to the Excel file.
| Report Element properties | Description |
|---|---|
| Created | Date and time of report execution as an ISO date/time value. |
| Author | Report.Author |
| Description | Report.Description |
| LastSaved | Date and time of report execution as an ISO date/time value. |
Page Headers and Footers
Depending on the Device Information SimplePageHeaders setting, the page header can be rendered in two ways: the page header can be rendered at the top of each worksheet cell grid, or in the actual Excel worksheet header section. By default, the header is rendered to the cell grid on the Excel worksheet.
The page footer is always rendered to the actual Excel worksheet footer section, regardless of the value of the SimplePageHeaders setting.
Excel header and footer sections support a maximum of 256 characters, including markup. If this limit is exceeded, the Excel renderer removes markup characters starting at the end of the header and/or footer string to reduce the number of total characters. If all markup characters are removed and the length still exceeds the maximum, the string is truncated starting from the right.
SimplePageHeader Settings
By default, the Device Information SimplePageHeaders setting is set to False; therefore, the page headers are rendered as rows in the report on the Excel worksheet surface. The worksheet rows that contain the headers become locked rows. You can freeze or unfreeze the pane in Excel. If the Print Titles option is selected, these headers are automatically set to print on every worksheet page.
The page header repeats at the top of every worksheet in the workbook except the document map cover sheet if the Print Titles option is selected on the Page Layout tab in Excel. If the Print on first page or the Print on last page option is not selected in the Report Header Properties or Report Footer Properties dialog boxes, the header will not be added to the first or last page respectively.
Page footers are rendered in the Excel footer section.
Because of Excel limitations, text boxes are the only type of report item that can be rendered in the Excel header/footer section.
Interactivity
Some interactive elements are supported in Excel. The following is a description of specific behaviors.
Show and Hide
[!INCLUDEofprexcel] has limitations with how it manages hidden and displayed report items when they are exported. Groups, rows, and columns that contain report items that can be toggled are rendered as Excel outlines. Excel creates outlines that expand and collapse rows and columns across the entire row or column which can cause the collapse of report items that are not intended to be collapsed. In addition, Excel’s outlining symbols can become cluttered with overlapping outlines. To address these issues, the following outlining rules are applied when using the Excel rendering extension:
-
The report item in the top-left corner that can be toggled can continue to be toggled in Excel. Report items that can be toggled and share vertical or horizontal space with the report item that can be toggled in the top-left corner cannot be toggled in Excel.
-
To determine whether a data region will be collapsible by rows or columns, the position of the report item that controls the toggling and the position of the report item that is toggled are determined. If the item controlling the toggling appears before the item to be toggled, the item is collapsible by rows. Otherwise, the item is collapsible by columns. If the item controlling the toggling appears beside and above the area to be toggled equally, the item is rendered with row collapsible by rows.
-
To determine where the subtotals are placed in the rendered report, the rendering extension examines the first instance of a dynamic member. If a peer static member appears immediately above it, the dynamic member is assumed to be the subtotals. Outlines are set to indicate that this is summary data. If there are no static siblings of a dynamic member, the first instance of the instance is the subtotal.
-
Due to an Excel limitation, outlines can be nested up to 7 levels only.
Document Map
If any document map labels exist in the report, a document map is rendered. The document map is rendered as an Excel cover worksheet inserted at the first tab position in the workbook. The worksheet is named Document map.
The text displayed in the document map is determined by the report item’s or group’s DocumentMapLabel property. Document map labels are listed in the order that they appear in the report, starting at the first row, in the first column. Each document map label cell is indented the number of levels deep it appears in the report. Each level of indentation is represented by placing the label in a subsequent column. Excel supports up to 256 levels of outline nesting.
The document map outline is rendered as a collapsible Excel outline. The outline structure matches the nested structure of the document map. The expand and collapse state of the outline starts at the second level.
The root node of the map is the report name, the <reportname>.rdl, and it is not interactive. The document map links font is Arial, 10pt.
Drillthrough Links
Drillthrough links that appear in text boxes are rendered as Excel hyperlinks in the cell in which the text is rendered. Drillthrough links for images and charts are rendered as Excel hyperlinks on the image when rendered. When clicked, the drillthrough link opens the client’s default browser and navigates to the HTML view of the target.
Hyperlinks
Hyperlinks that appear in text boxes are rendered as Excel hyperlinks in the cell in which the text is rendered. Hyperlinks for images and charts are rendered as Excel hyperlinks on the image when rendered. When clicked, the hyperlink opens the client’s default browser and navigates to the target URL.
Interactive Sorting
Excel does not support interactive sort.
Bookmarks
Bookmark links in text boxes are rendered as Excel hyperlinks in the cell in which the text is rendered. Bookmark links for images and charts are rendered as Excel hyperlinks on the image when rendered. When clicked, the bookmark goes to the Excel cell in which the bookmarked report item is rendered.
Changing Reports at Run-Time
If a report must render to multiple formats and it is not possible to create a report layout that renders the way you want in all required formats, then you might consider using the value in the RenderFormat built-in global to conditionally change the report appearance at run time. This way you can hide or show report items depending on the renderer used to get the best results in each format. For more information, see Built-in Globals and Users References (Report Builder and SSRS).
Troubleshoot export to Excel
Export to Excel or Word fails when using Virtual Service Account and Execution Account
The workaround for this issue is to give Read permission to the Execution account for the described registry entry under the Virtual User Account branch, and restart the computer. For example, one possible registry entry is HKEY_USERSS-1-5-80-4050220999-2730734961-1537482082-519850261-379003301SoftwareMicrosoftAvalon.Graphics.
See Also
Pagination in Reporting Services (Report Builder and SSRS)
Rendering Behaviors (Report Builder and SSRS)
Interactive Functionality for Different Report Rendering Extensions (Report Builder and SSRS)
Rendering Report Items (Report Builder and SSRS)
Tables, Matrices, and Lists (Report Builder and SSRS)
In this tutorial we will walk through the process of creating an Excel XLSX report based on a wpDataTable.
Here we will create a single report for all table rows. If you would like to generate a separate Excel file for each table row please look here.
Let’s see an example first. Try to filter the table and download several report options (click “Download report”) to see how the generated reports follows:
| wdt_ID | Client | Date | Product | Price | Qty | Total | Tax |
|---|---|---|---|---|---|---|---|
| 1 | Joshua Hamilton | 04/04/2016 | Wireless Headphone | 44,00 | 10 | 440,00 | 79,20 |
| 2 | Connor John | 04/04/2016 | Gaming Keyboard | 38,00 | 8 | 304,00 | 54,72 |
| 3 | Ewan Griffiths | 06/04/2016 | LCD HD Monitor | 120,00 | 5 | 600,00 | 108,00 |
| 4 | Ewan Griffiths | 07/04/2016 | LCD HD Monitor | 120,00 | 6 | 720,00 | 129,60 |
| 5 | Larry Lowery | 08/04/2016 | Wireless Headphone | 44,00 | 7 | 308,00 | 55,44 |
| 6 | Joshua Hamilton | 08/04/2016 | Gaming Keyboard | 38,00 | 8 | 304,00 | 54,72 |
| 7 | Joshua Hamilton | 09/04/2016 | Mini Wireless Keyboard | 33,00 | 2 | 66,00 | 11,88 |
| 8 | Marc Kline | 09/04/2016 | USB HD Webcam | 15,00 | 4 | 60,00 | 10,80 |
| 9 | Ewan Griffiths | 10/04/2016 | Gaming Keyboard | 38,00 | 2 | 76,00 | 13,68 |
| 10 | Larry Lowery | 10/04/2016 | USB HD Webcam | 15,00 | 9 | 135,00 | 24,30 |
| wdt_ID | Client | Date | Product | Price | Qty |
Let’s walk through the creating process of such a report.
1. Prepare a source wpDataTable which will be the data provider
As Report Builder is an add-on for wpDataTables. This table was created in Table Constructor, it has the following fields: “Client” (string), “Date” (date), “Product” (string / selectbox), “Price” (float) and “Quantity” (integer). Additionally, tax and total are calculated by formula/calculated columns.
To see how to create such tables with wpDataTables table constructor here.
To see how to use formula columns, click here.
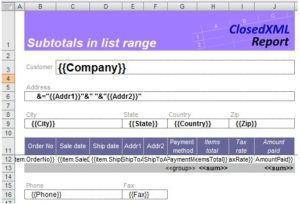
2. Prepare the Excel XLSX template for the report.
Prepare an Excel file, with the layout that you need for the report. We used:
- Predefined variables: ${generatorname}, ${today}
- Additional variables: ${customer}, ${invoicenumber}
- Cell values from wpDataTable: ${product.all} (product name), ${quantity.all} (products quantity), ${price.all} (price), ${formula_1.all} (row total), ${formula_2.all} (row tax)
- Totals: ${formula_1.total} (price total), ${formula_2.total} (tax total)
To download the template click here.
See here the full list of rules of preparing templates for ReportBuilder.
When you are creating a single report with the Report Builder, Please be aware that you should enter variables with .all in their name in order to extract all the data in one report (example ${product.all}).
3. Create a report in WordPress admin page through Report Builder Wizard.
Go to WP-admin, open ReportBuilder -> Create a new report
On the first step choose the source wpDataTable:

On the next step provide the report name, choose ‘Single file’ generation logic (which means we’ll create a single file for whole table, not a separate file for each row), tick “Follow table filtering”, and define 2 additional variables (“invoicenumber” and “customer”):

Then upload the template that you have prepared (click “Browse…“, drag&drop the file, click “Use template”):

On the next step you can download the preview for X first rows of the table:

If you are satisfied, you can click “Save Report” to store the result, if something is wrong, you can go back in the wizard and change the settings or upload a different template. Once you click “Save Report”, you will see the shortcodes for this report:

The shortcodes contain buttons for downloading report, saving report to WP Media Library, and for inputs for additional variables.
You can copy these shortcodes directly from this page by clicking on shortcode button, but this isn’t necessary as you can always generate these in standard WordPress post/page editor, or in Visual composer.
Once you close the wizard you will be redirected to the Browse page. You can always quickly download the report (for the whole table) from there by clicking the “Download” button, or quickly get the list of available shortcodes.
The last thing to do is to insert the Report controls to the post or page where you need them, so the users would be able to use it:
- See here how to insert the report builder controls to the post or page using standard WordPress Visual editor.
- See here how to insert the report builder controls to the post or page using Visual Composer.