
![]() Listen to this article
Listen to this article
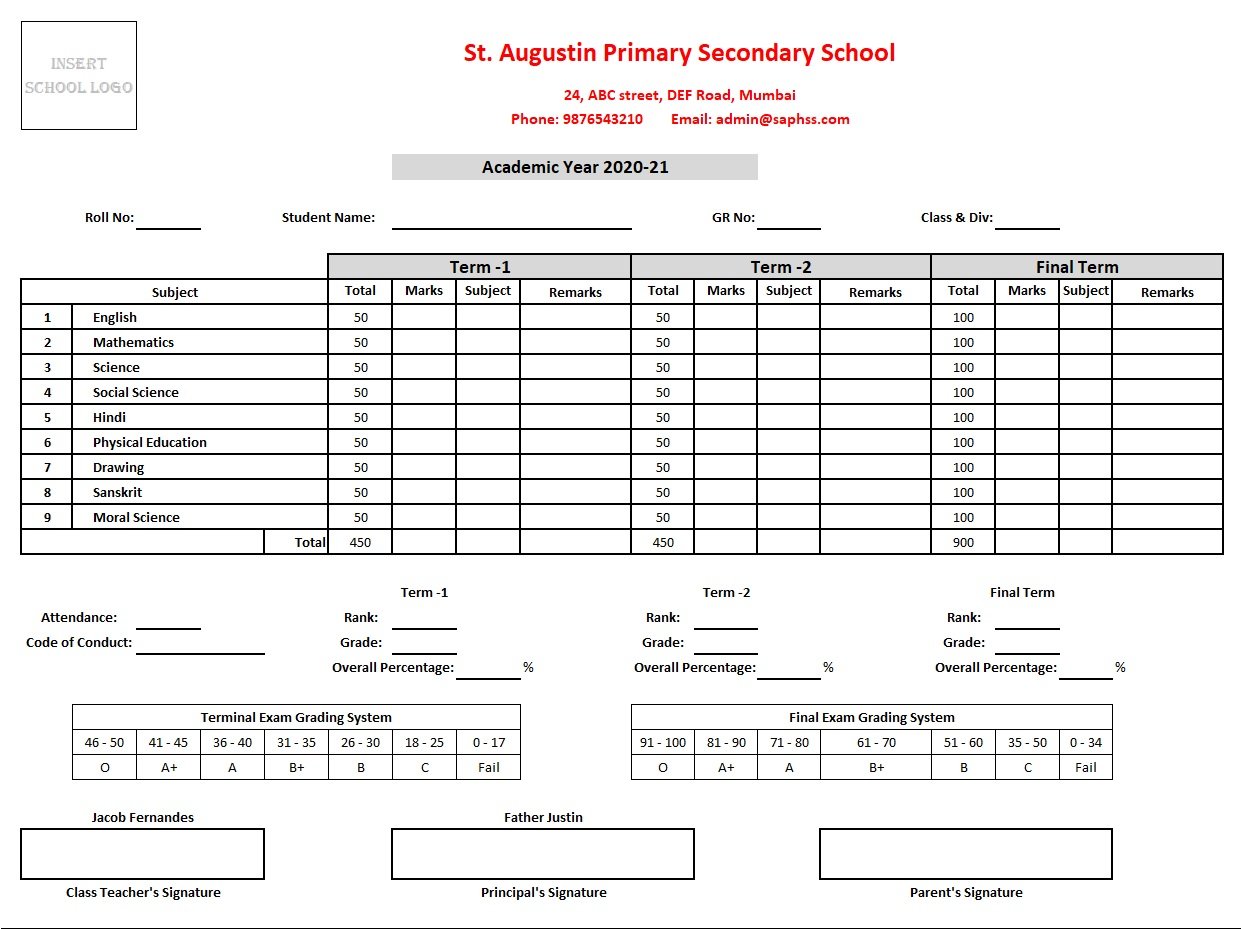
The Ready-To-Use School Report Card And Mark sheet Template in Excel, OpenOffice Calc, and Google Sheet for simplifying the task of preparing a report card.
Completely automate the process of making mark sheets and report cards for the students. With the help of this template, a teacher or a school administrator can easily prepare a term-wise mark sheet of students in no time.
Moreover, this template helps you prepare term-wise report cards and cumulative progress reports for a complete academic year.
Furthermore, it consists of additional printable mark sheets and report cards. These printables help the school admin to easily distribute work to different subject teachers.
Every school cannot afford software solutions for these tedious tasks. Usually, admins and school staff have to manually do these tedious tasks 3-4 times a year.
Using this template, teachers can easily generate report cards for their respective classes with minimal effort. This saves their precious time and energy. The school management can use this for the betterment of students as well as teachers.
Download School Report Card and Mark Sheet Template (Excel, OpenOffice Calc & Google Sheet)
To simplify the tedious job of educators/teachers, we have created a Student Report Card and Mark Sheet Template with predefined formulas.
Just enter the marks obtained by students in respective subjects and the template will automatically display the percentage, grade, rank, etc for all term exams.
Microsoft Excel OpenOffice Calc Google Sheet
Additionally, you can also download other HR templates like Payroll Template With Attendance, Salary Slip Excel Template India, Salary Slip Format UAE, Simple Salary Sheet, and Employee Salary Sheet depending on the company requirement.
Feel free to contact us for the customization of this template as per your requirement. We also design new templates based on your needs. You can hire us for our services on Fiverr or directly contact us at info@msofficegeek.com.

Steps to prepare mark sheet and report card for students:
- Enter general school information like name of the school, address, academic year, class, division, school reopening date, working days, name of the class teacher and principal.
- Define Grading System for each term. Range of marks and grades based on that.
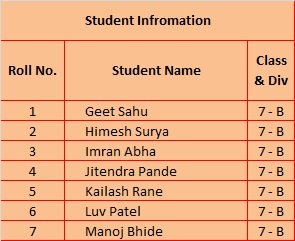
- In the mark sheet file, enter the names of the students against roll numbers. These details are to be entered only once.
- Define subjects as per your needs. Enter marks obtained by each student in each subject against the respective name and term. This will display the percentage marks obtained in each subject and its respective subject grade.
- Once you are done updating the marks in each subject, go to the Term-Wise Report Card Template and select the roll number from the dropdown list to print the report card.
The user can prepare individual term-wise report cards for Term-1, Term-2, and Final Term by just inserting the marks of respective subjects in given cells.
Moreover, there are two types of printing options. One is with school details which can be printed on plain stationery. In case, if you have ready report card stationery with school details on it, you can use another format that has blank space on the top.
Let us discuss the components of the template in detail.
Components of School Report Card And Mark Sheet Excel Template
This template consists of 10 sheets: Basic information sheet, Mark Sheet, 2 types of printable mark sheets, 4 types of report cards, and 2 types of printable report cards.
Let us understand each in detail.
Basic Information Sheet
The basic information sheet consists of the necessary information that the template uses in the mark sheet and report card.

The School Information consists of the following:
School Name
School Address
Academic Year
Class
Division
Class Teacher
Principal
School Reopen Date
Term-wise Working Days

The Grading System consists of the predefined range of marks and their respective grades along with a code of conduct. The user can define the grading system as per their needs. This grading system is used for both: subject grades and overall grades.
Mark Sheet Template
The Mark Sheet consists of Roll number, Student name, class, and division. In this section, the teacher just needs to enter the student’s name. These details seldom change during an academic year.
There is a provision of a total of 9 subjects. Each subject has marks obtained, percentage of marks, and subject grade for term-1, term-2, and final term.

The teacher only needs to enter the marks obtained. The template consists of predefined formulas. Hence, it automatically calculates percentages and displays the subject grade based on the grading system. All 9 subjects are similarly configured.

After the subject marks, comes the total section. No need to enter any data in this section. All the cells consist of predefined formulas. Hence, they are auto-populated.

Followed by this comes the student’s attendance section. Insert the days present by the student in the respective term. Insert code of conduct based on each student. In the end, insert the GR number. The template displays the GR number on the report card.

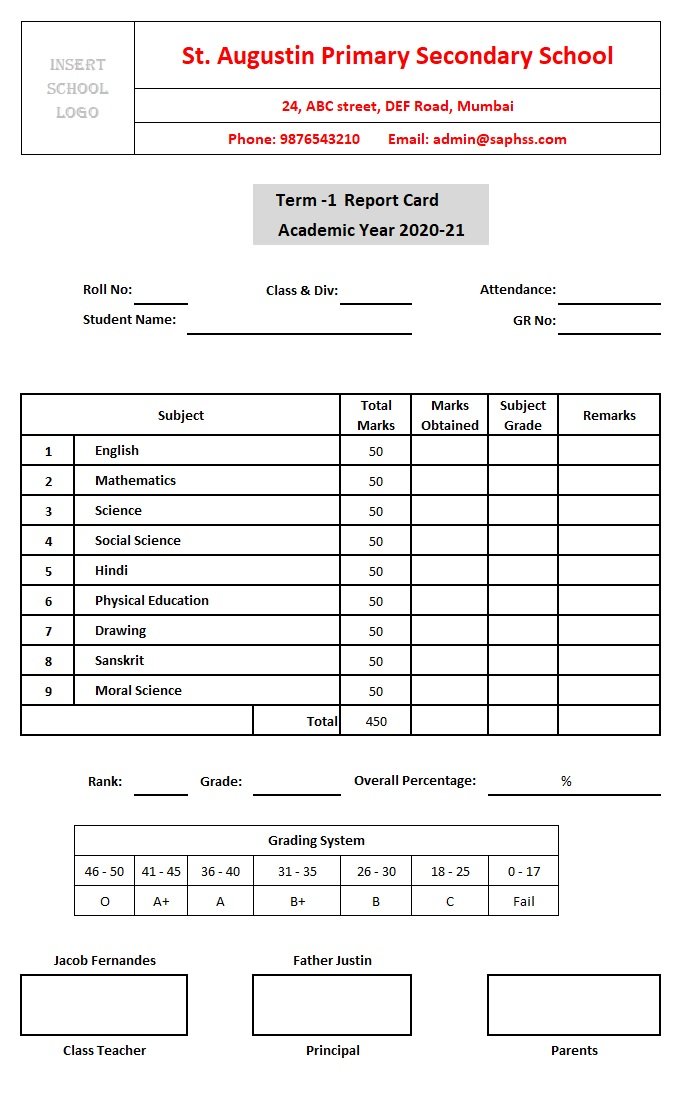
Printable Term-wise Mark Sheet Template

Usually, there are many subjects and all the teachers cannot work on the same file simultaneously. Hence, we have created a printable version of Term wise mark sheet.
It is a replica of the previous mark sheet file. Print the file and give the paper to each subject teacher to insert the marks obtained by the students. Once all the subjects are done, insert them in the Mark Sheet Template.
Subject-wise Printable Mark Sheet Template

We have also created a subject-wise printable mark sheet to be distributed to each teacher. Just print the sheet and hand it over to the teacher. Once filled in by the teacher, the class teacher or the admin can collect and insert the same in the mark sheet template.

Term-Wise Student Report Card Template
The work is almost done. Now, in the Term-Wise Report Card Template, there are 3 different report cards, one for each term: Term-1, Term-2, and Final Term.

Term 1 Report Card

Term 2 Report Card

Final Term Report Card
Use this sheet if you don’t have pre-printed stationery to print the report card with school details.
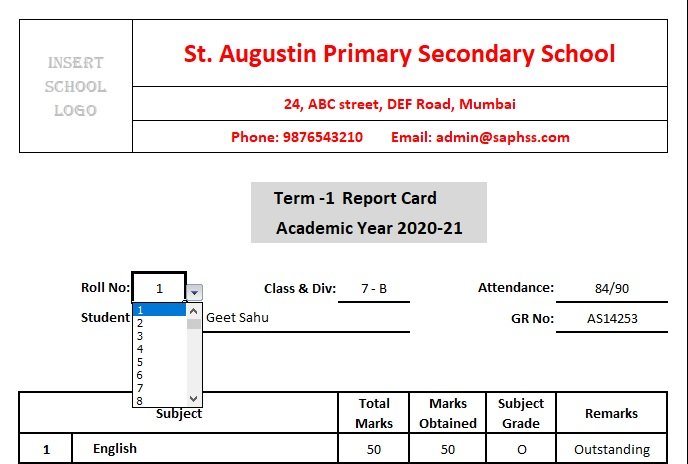
To print the report card, select the roll number of the student from the dropdown list. With the help of the Vlookup Function, the template auto-populates the details of each subject for the respective term.
Furthermore, if the student has failed the final term result will be blank in promoted to section. If the student has passed then it will show the next class.
Term-Wise Student Report Card Template On School Letterhead
This sheet is the same as above. The only difference is that it doesn’t have school details at the top. It functions similarly to the above sheet. Just select the roll number of the student and the report card is ready to print.

Use this sheet if you already have a pre-printed school letterhead or stationery.
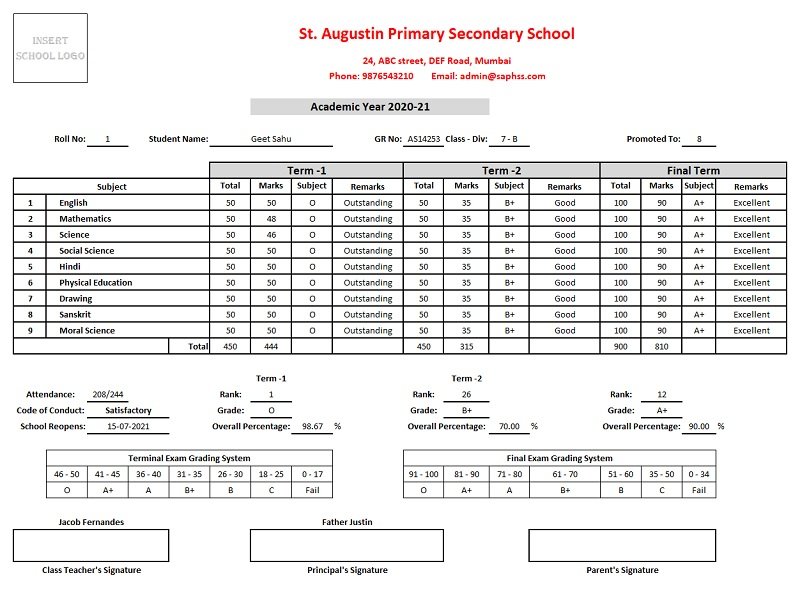
Cumulative Progress Report (Annual)
Cumulative report card consists of marks of all three terms in one. Often, schools issue cumulative report cards for the complete academic year. Thus, all you need to do is to select the roll number from the dropdown list and the report card is ready to print.
Cumulative Progress Report (Annual) on School Letterhead
This sheet is the same as above. The only difference is that it doesn’t have school details at the top. It functions similarly to the above sheet. Just select the roll number of the student and the report card is ready to print.

Use this sheet if you already have a pre-printed school letterhead or stationery.
Printable Term-wise Report Card Template
This template also consists of term-wise printable report cards. Hence, these printables can be used as samples to be given to offset printers to prepare pre-printed stationery.
Printable Cumulative Progress Report
Similar to the above, this template also consists of a Printable Cumulative Progress Report. You can print and manually fill in the data or use them as samples for offset printing.
Purpose of Academic Evaluation of Students
The main purpose of the Academic evaluation of students is to serve as a communication link between the school and parents. It provides details of student’s achievements during the term/semester or a complete academic year.
A report card communicates a student’s progress over the course of the school year. Moreover, it allows students to be aware of the expectations and work accordingly with their teachers to achieve them.
What is Positive Feedback System?
Positive feedback is providing non-demoralizing statements to students. It motivates and encourages the students to do their studies well.
This feedback is critical to the improvement and success of the students. Key principles to follow while providing positive feedback are:
- It should be based on appropriate behavior or the efforts made towards the appropriate behavior.
- It should be genuine, unbiased, and filled with enthusiasm.
- Teachers must provide frequently for students who have trouble following the rules.
- It should be personalized based on the child’s needs.
Benefits of Positive Feedback System
Following are the benefits of the Positive Feedback System:
- Inspires them to embrace their mistakes and encourages them to try again.
- Instills confidence to face failure and try without worrying about the results.
- Gives the student a sense of belonging and makes them feel wanted and supported.
- Develops a growth mindset and teaches them to learn from their mistakes.
Frequently Asked Questions
How are ranks defined when two or more students have the same sum of total marks?
In such a case, all students are given the same rank. For example, if 3 students have grand total marks equal then all of them will have the same rank.
Is the child promoted to next class if he/she fails in one subject?
Usually, the reason for failing is determined in such cases. Normally, a student will not be promoted. But if he/she is a studious student and wasn’t able to attend school for some genuine reason, it will be the decision of the school management to promote or not.
If you like this article, kindly share it on different social media platforms so that your friends and colleagues can also benefit from the same. Sharing is Caring.
Please send us your queries or suggestions in the comment section below. We will be more than happy to assist you.
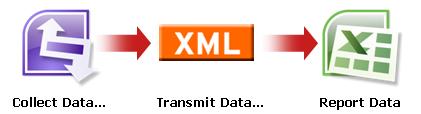
Microsoft Office InfoPath lets you create form templates for data entry and collection. Microsoft Office Excel 2007 enables users to calculate, chart, and analyze data. By using both of these programs and XML, you can easily create a simple but effective, no-code business solution for tracking assets in a company.
In this article
-
Introduction to creating an Asset Tracker solution
-
Step 1: Customize the Asset Tracker form template
-
Step 2: Map the schema file and customize the table layout in Excel
-
Step 3: Create a PivotTable and PivotChart summary report
-
Step 4: Collect asset information from users
-
Step 5: Import forms into Excel
-
Final thoughts: Consider using a SharePoint list or Access database
Introduction to creating an Asset Tracker solution
You can exchange XML data between InfoPath and Excel. Although the Infopath Export command is a simple, straightforward way to send form data to Excel, there’s another approach you can take which gives you much more flexibility. By explicitly mapping the InfoPath XML schema file (.xsd) in Excel, and then importing InfoPath form files (.xml) into Excel, you can customize the layout of your data and better leverage the features in Excel to help you manage and analyze your data more efficiently.
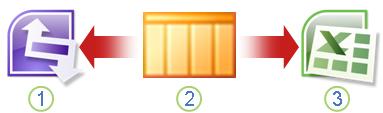
In this article, we will use the InfoPath Asset Tracker sample form template to illustrate how you can make InfoPath, XML, and Excel work together. Imagine that each year, your organization inventories assets in each employee’s office. Then, an Excel report is run to help decide how to allocate the equipment budget for next year. The following diagram is an overview of how you can gather, track, and report asset data in your department.
1. The Asset Tracker form template is created.
2. The schema file is mapped to an Excel table and the table layout is customized.
3. A blank PivotTable and PivotChart summary report is created.
4. The Asset Tracker form is used to collect data from users.
5. All form data is exported into the Excel table and the PivotTable and PivotChart reports are refreshed.
This solution involves the following user roles and products:
 = Required
  = Not required
|
Software Requirements |
|||
|
Roles |
Office InfoPath 2007 |
Office Outlook 2007 |
Office Excel 2007 |
|
Solution Designer |
|
|
|
|
Decision-maker |
|
|
|
|
Employees |
|
|
|
Top of Page
Step 1: Customize the Asset Tracker form template
The Asset Tracker form template, which is included in InfoPath, enables you to gather information about each asset in an employee’s office, the department that the employee belongs to, categories of assets, and details about each asset. In this solution, a form designer submits the form template to the decision-maker’s e-mail account by using Office Outlook 2007.

Task 1: Open and customize the Asset Tracker form template
Because you cannot publish a form template to a list of e-mail recipients if it has a rich text box control containing linked images, you need to make a small change to the Asset Tracker sample template form.
-
On the File menu, click Design a Form Template.
-
In the Design a Form Template dialog box, under Open a form template, click Customize a sample.
-
In the Getting Started dialog box, click Sample — Asset Tracker, and then under Form Tasks, click Design this form.
-
Right click the assetNotes control, point to Rich Text Box properties, click the Display tab, and then under Available formatting, clear the Linked Images check box.
Task 2: Define the Submit options
The next task is to define the Submit options so that the employees can submit a uniquely named form file (.xml) to the decision-maker’s e-mail account as an attached file.
-
On the Tools menu, click Submit Options.
-
In the Submit Options dialog box, select the Allow users to submit this form check box.
-
Click Send form data to a single destination, and then, in the list, click E-mail.
-
Click Add.
The Data Connection Wizard appears.
-
In the To box, type the alias of the decision-maker who will receive all the submitted forms.
-
To specify a unique subject line, in the Subject box:
-
Click Insert Formula
 .
. -
Type the following formula:
-
 .
.concat(my:employee/my:employeeName, my:employee/my:employeeDepartment)
-
Click Verify Formula, and then click OK twice.
-
In the Introduction box, type an appropriate message or add important instructions for this solution.
-
Click Next.
-
On the next page of the wizard, click Send the form data as an attachment, and then select the Attach the form template to ensure that users can open the form check box.
This helps ensure that employees have access to the form template file (.xsn) in case they cannot access it from it’s network location.
-
To specify a a unique file name for each form file (.xml) in the Attachment Name box:
-
Click Insert Formula
. -
Type the same formula as the one on the Subject line:
-
concat(my:employee/my:employeeName, my:employee/my:employeeDepartment)
-
Click Verify Formula, and then click OK twice.
-
Click Next.
-
On the next page of the wizard, in the Enter a name for this data connection box, type a descriptive name for this submit data connection.
-
Verify that the information is correct in the Summary section, and then click Finish.
-
Save the form it to a public network folder accessible to the decision-maker and to all employees.
Top of Page
Step 2: Map the schema file and customize the table layout in Excel
Setting up the connection between InfoPath and Excel requires three tasks: extracting the schema file for the Asset Tracker form template, mapping this schema file in Excel, and customizing the default layout of the Excel table that will contain all the imported XML form data files.
Task 1: Extract the schema file from InfoPath
-
In InfoPath, open the Asset Tracker form template file.
-
On the Tools menu, click Design this Form.
-
On the File menu, click Save As Source Files.
-
In the Browse for Folder dialog box, select a folder or create a new folder where you want to store the schema file.
Note the location of the folder where all of the source files are saved and the name of the schema file, in this case, myschema.xsd, which contains the schema definition of the form XML data.
Task 2: Map the InfoPath schema file in Excel
-
Create a new Excel file, and then save it to a location accessible to the decision-maker.
-
In Excel, if the Developer tab is not visible, do the following:
-
Click the Microsoft Office Button
, and then click Excel Options. -
In the Popular category, under Top options for working with Excel, select the Show Developer tab in the Ribbon check box, and then click OK.
Note: The Ribbon is a component of the Microsoft Office Fluent user interface.
-
-
On the Developer tab, in the XML group, click Source.
The XML Source task pane is displayed.
-
Click XML Maps, and then in the XML Maps dialog box, click Add.
-
On a computer that is running Windows Vista
-
In the Address bar, click the drive or folder that contains the myschema.xsd file that you created in step 2 of the section, Task 1: Extract the schema file from InfoPath.
On a computer that is running Microsoft Windows XP
-
In the Look in list, click the drive or folder that contains the myschema.xsd file that you created in step 2 of the section, Task 1: Extract the schema file from InfoPath.
-
-
Click the file, and then click Open.
-
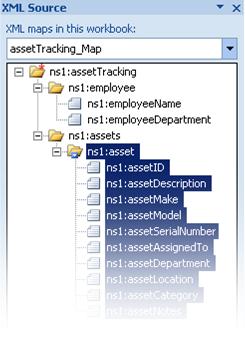
When the Multiple Roots dialog box appears, click the assetTracking root node that is defined in the myschema.xsd file, and then click OK.
The XML map is displayed in the XML Source task pane.
-
Drag the ns1:asset node element, which is a repeating XML element, to the worksheet location where you want the Excel table to appear.
 , and then click Excel Options.
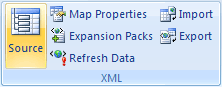
Task 3: Customize the layout of the Excel table
By default, Excel uses the XML element names as column headings for the table. However, you can change the column headings by editing the column header cells.
-
To modify the default column headers, keep the Excel table selected, find the following string prefix, ns1:asset, and remove it. For example, you would change ns1:assetID to ID.
-
To adjust the column width, click the Select All button, and then double-click any column heading boundary.

Top of Page
Step 3: Create a PivotTable and PivotChart summary report
Decision-makers use PivotTable and PivotChart reports to analyze, explore, and visualize summary data. By setting up the PivotTable and PivotChart reports you want to use in this scenario ahead of time, it will be a simple operation for a decision-maker to run the report with the completed data later.
-
Select a cell in the Excel table.
-
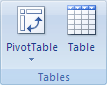
On the Insert tab, in the Tables group, click PivotTable, and then click PivotTable.
Excel displays the Create PivotTable dialog box.
-
To place the PivotTable report in a new worksheet starting at cell A1, click New Worksheet, and then click OK.
Excel adds an empty PivotTable report to the specified location and displays the PivotTable Field List so that you can add fields, create a layout, and customize the PivotTable report.
-
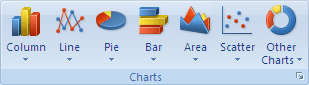
To create a cross-tabular report of the data, drag the ID field to the Values area, the Department field to the Column labels area, the Category field to the Row labels area, and the AssignedTo field to the Report Filter area.
-
Click the PivotTable report.
-
On the Insert tab, in the Charts group, click the Bar chart type.
-
Under 2-D Bar, select Clustered Bar.
-
Adjust the size and location of the PivotChart report to your preference.
Top of Page
Step 4: Collect asset information from users
Now, that the form template is ready to be filled out by all of the employees, you need to publish the form and send it to each employee. When each employee submits the completed form, it is sent as an XML data file (.xml) attached in an e-mail message to the decision-maker’s e-mail account. The decision-maker can then move all of the messages to a dedicated InfoPath folder in Outlook. In this scenario, it is recommended that you assign a specific time-period for all users to complete the forms so that the decision-maker can run the report with all the completed forms when the data-gathering deadline has been reached.

-
In InfoPath, open the form template (.xsn) that you saved in Step 1: Design the Asset Tracker sample form template
-
On the Tools menu, click Design this Form.
-
On the File menu, click Publish.
-
In the Publishing Wizard, click To a list of e-mail recipients, and then click Next.
-
On the next page of the wizard, in the Form template name box, type a name for the form template, and then click Next. The form template name will appear in the subject heading of the message that is sent to your e-mail message recipients.
-
Optionally, on the next page of the wizard, you can create columns that will appear in your Outlook folders to help organize your e-mail messages.
-
Click Next.
-
Click Publish.
-
After the Publishing Wizard finishes publishing the form template, an e-mail message with the form will open.
-
Fill out the message, type in the employee names or use a distribution list, and then send the message.
In Outlook, the decision-maker can organize all of the submitted XML forms in one of two ways:
-
If the InfoPath Form folders message box appears the first time the message opens, click Create Form Folder.
-
Create a rule in Outlook to move all of the related InfoPath forms to an InfoPath folder.
For more information, see Manage messages by using rules.
Top of Page
Step 5: Import forms into Excel
Because you already created the Excel workbook steps 2 and 3, it’s a simple matter for the decision maker to export and review the form data. The decision maker simply needs to export the xml files (.xml) from Outlook, import all of the form files (.xml) into the Excel workbook, and then refreshing the data.
Task 1: Export the forms from Outlook to a Windows folder
-
In Outlook, select the folder that contains all of the forms that you received from employees, and then press CTRL+A to select all of the form e-mail messages.
-
Right click the selection, point to InfoPath Actions, and then click Export Forms.
-
In the Export Forms dialog box, select a folder, and press OK.
Task 2: Import the forms into Excel
-
In the Excel workbook that you created in Step 2: Map the schema file and customize the table layout in Excel, select one of the mapped cells in the Excel table.
-
On the Developer tab, in the XML group, click Import.
The Import XML dialog box is displayed.
-
On a computer that is running Windows Vista
-
In the Address bar, click the folder that contains the XML data files (.xml) created in Task 1: Export the forms from Outlook to a Windows folder.
On a computer that is running Microsoft Windows XP
-
In the Look in list, click folder that contains the XML data files (.xml) created in Task 1: Export the forms from Outlook to a Windows folder.
-
-
Do one of the following:
-
If the files are contiguous, press SHIFT, and then click the first and the last file in the list.
-
If the files are not contiguous, press CTRL, and then click each file that you want to import in the list.
-
-
Click Import.
By default, Excel overwrites any existing data in the mapped cells, which is the desired final outcome for this business solution. However, a decision-maker could, for example, import the data several times to gauge progress before the scheduled deadline.
Note: In Excel, you can also append the data by using the Append new data to existing XML tables option (on the Developer tab, in the XML group, click Map Properties), which may be appropriate for other solutions.
For more information, see Connect to an XML file.
Task 3: Refresh the PivotTable and PivotChart reports
-
Click a cell in the PivotTable report.
-
On the Options tab, in the Data group, click the arrow next to Refresh All, and then click Refresh.

The Excel workbook now contains all of the data and summary reports that you need to help you allocate the equipment budget for next year. Of course, you can do further analysis in your Excel workbook if necessary, such as sorting, filtering, or conditionally formatting the data.
Top of Page
Final thoughts: Consider using a SharePoint list or Access database
As an alternative, consider using a SharePoint list or Access database, instead of XML, to transfer data between InfoPath and Excel.
Use a SharePoint List
From InfoPath, you can easily use a SharePoint list as a read-only data source. You can do one of two things:
-
From the SharePoint list, export the data to Excel, which automatically creates a data connection in Excel.
-
From Excel, explicitly create a data connection to the SharePoint list.
Once a data connection is created, you can refresh the data in Excel to retrieve up-to-date data.
You can use a SharePoint list to add and update the data, use an InfoPath form to display an item from the list (for example, a complex or long item best displayed vertically), and then use Excel to further analyze the data.
1. Display a single item for easy review in InfoPath.
2. Add and update data in a SharePoint List.
3. Refresh and report up-to-date with Excel.
For more information, see Add a data connection to a SharePoint document library or list
Use an Access database
From InfoPath, you can create a read/write connection to an Access database. From Excel, you can explicitly create a data connection to the Access database that you can refresh to retrieve up-to-date data. You can even define the connection to automatically refresh when the workbook is opened, or periodically refresh, such as every 5 minutes.
You can use an Access database as an intermediary between InfoPath and Excel. When you submit an InfoPath form to Access, you update the Access database. When you refresh the data connection in Excel, you retrieve updated data from Access. In effect, you are submitting data indirectly from InfoPath to an Excel workbook.

1. Display and submit a form to an Access database.
2. Store data in an Access database.
3. Refresh and report up-to-date with Excel.
For more information, see Design a form template that is based on a Microsoft Access database.
Tip: Did you know that you can create an InfoPath form directly from Access? If your users have Outlook 2007 or 2010 and InfoPath 2007 or 2010 installed on their computers, you can gather data from diverse users directly from Access by using the Collect data from e-mail messages wizard. For more information, see the Access help topic, Add the data collected through e-mails to your Access database.
Top of Page
Подборка по базе: Grammar exercise.docx, 1 practical exercise (1).doc, LABORATORY EXERCISE №2 Жусупова И..docx, L4. Multi-criteria optimization algorithms. Algorithm Borda. To, L3. Hamiltonian cycle problem. Algorithms A-star, PRM, NNA and e, L2. Algorithms A-star, PRM, NNA and exercises.ppt, Solutions U1-2 exercises.pdf, Unit 3. Vocabulary exercises.docx, a more formal email — exercises.pdf, Academic Reading question types and exercises @mockTashkent.pdf
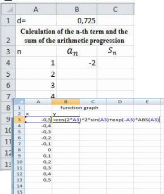
ogression. The formula of the n-th member of the arithmetic progression:an=a1+
Exercise 1.
C reate the table that calculates the n-th term and the sum of the arithmetic progression. The formula of the n-th member of the arithmetic progression: an=a1+d(n-l) and the sum formula of the first n terms of the arithmetic progression: Sn=(a1+an)*n/2, where a1 is the first term of the progression, a d is the difference of the arithmetic progression, using the absolute reference. The first term, which is equal to -2, and the difference is 0,725.
- Click on Sheet1. Rename it to Exercize1.
- Write down the formulas yourself.
Exercise 2.Construct a graph of the function y = cos2 (2x) sin (x) + e-x│x│ for x in steps of 0.1.
- Create the following table on sheet 2: fill in the values of the variable x with the fill marker.
In cell B3 enter the formula: = cos (2 * A3) ^ 2 * sin (A3) + EXP (-A3) * ABS (A3), copy the formula to the remaining cells.
- Select the values for the function and start the Chart Wizard.
- Select the chart type — Graph.
- In the Row tab, in the X-Axis signatures, select the range of X values.
6. Place the chart in this sheet and rename sheet 2 as the Function Graph.
Exercise 3.
Attestation was conducted on 3 subjects and it is necessary to determine whether a student is certified in all
subjects.
- Go to Sheet3. Rename it to Ex3.
- Fill the table according to the sample.
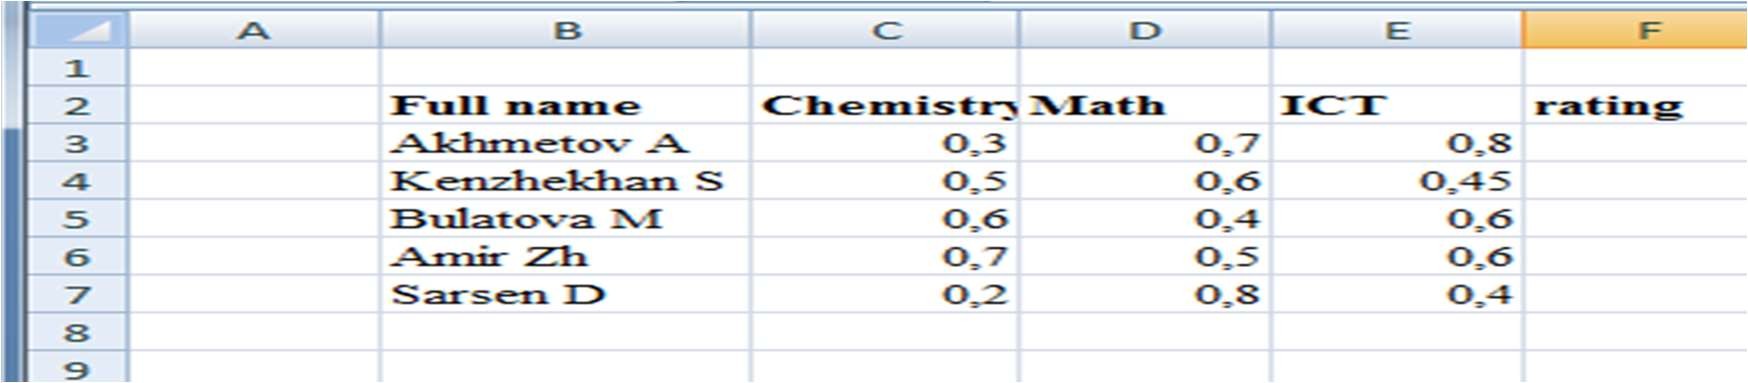
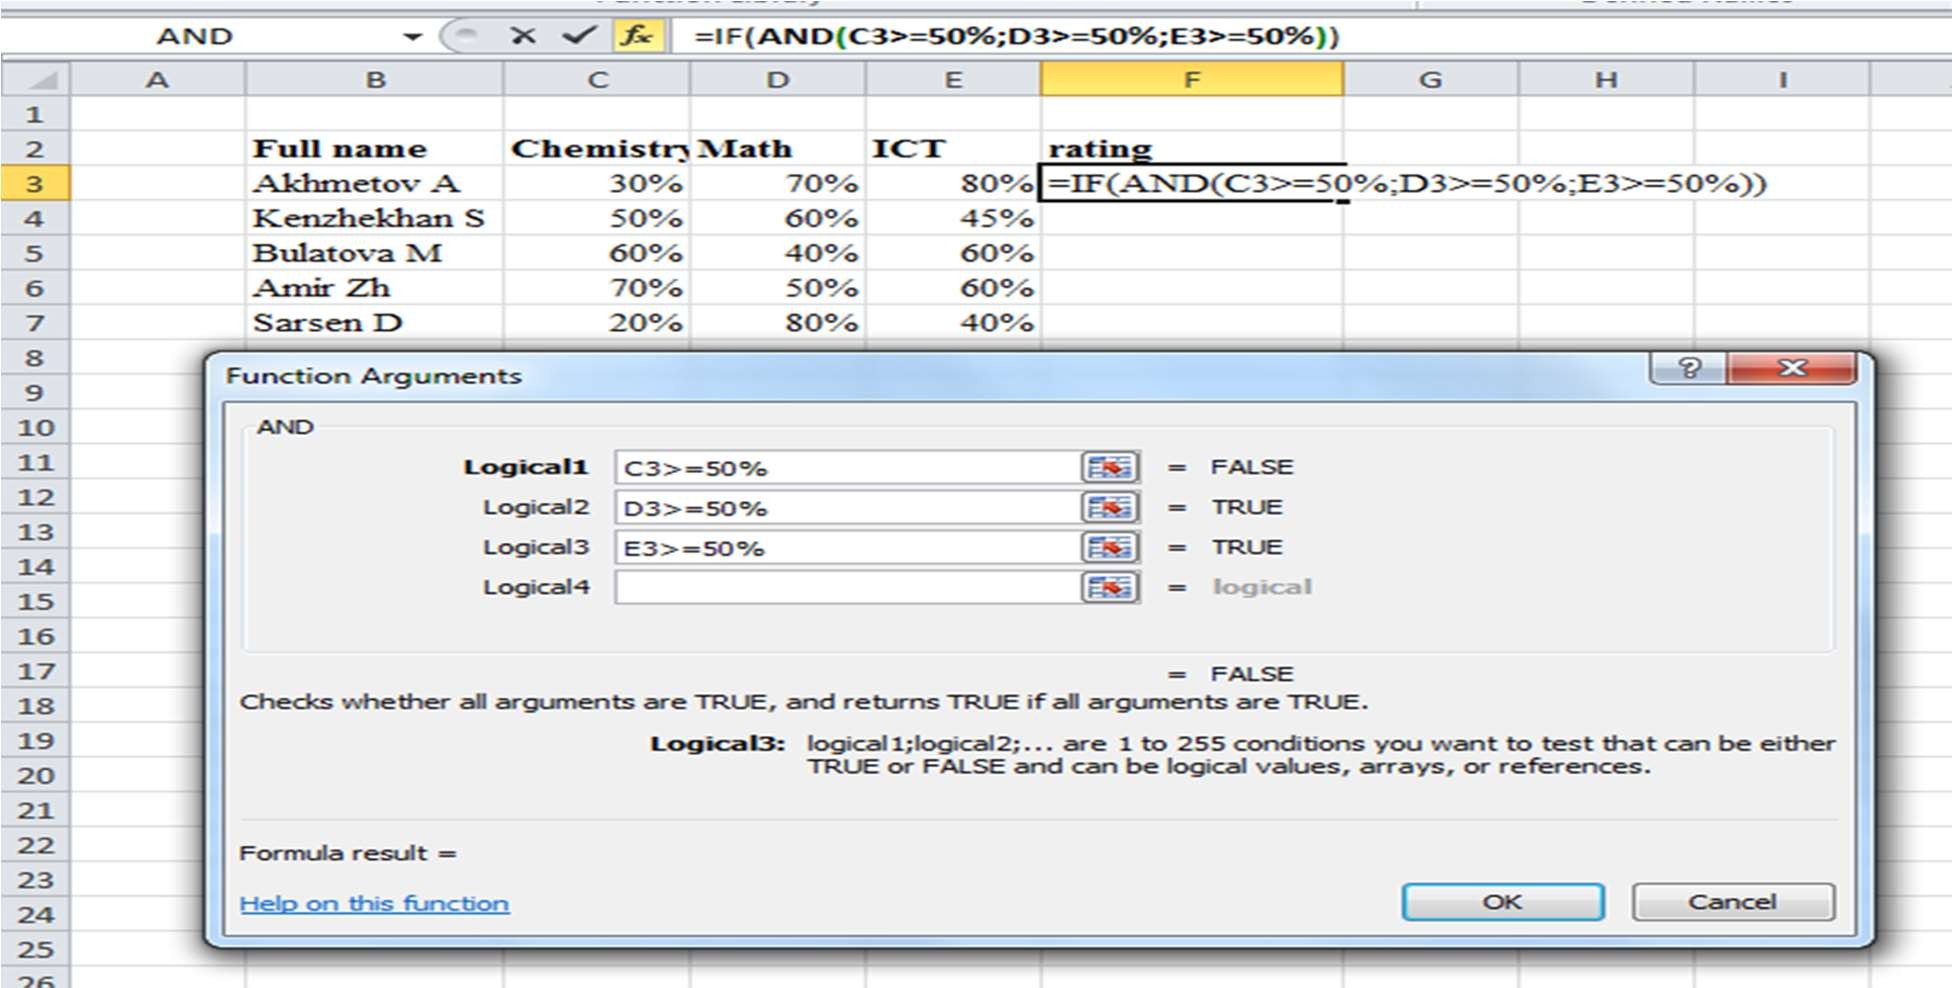
- The values must be written in percentages. For this: Select the range B3: D7. Clickl the context menu → Format cells.Go to the Numbers tab. Number format select Percentage, Set the number of decimal places to 0.
- In cell F3, click the IF function.
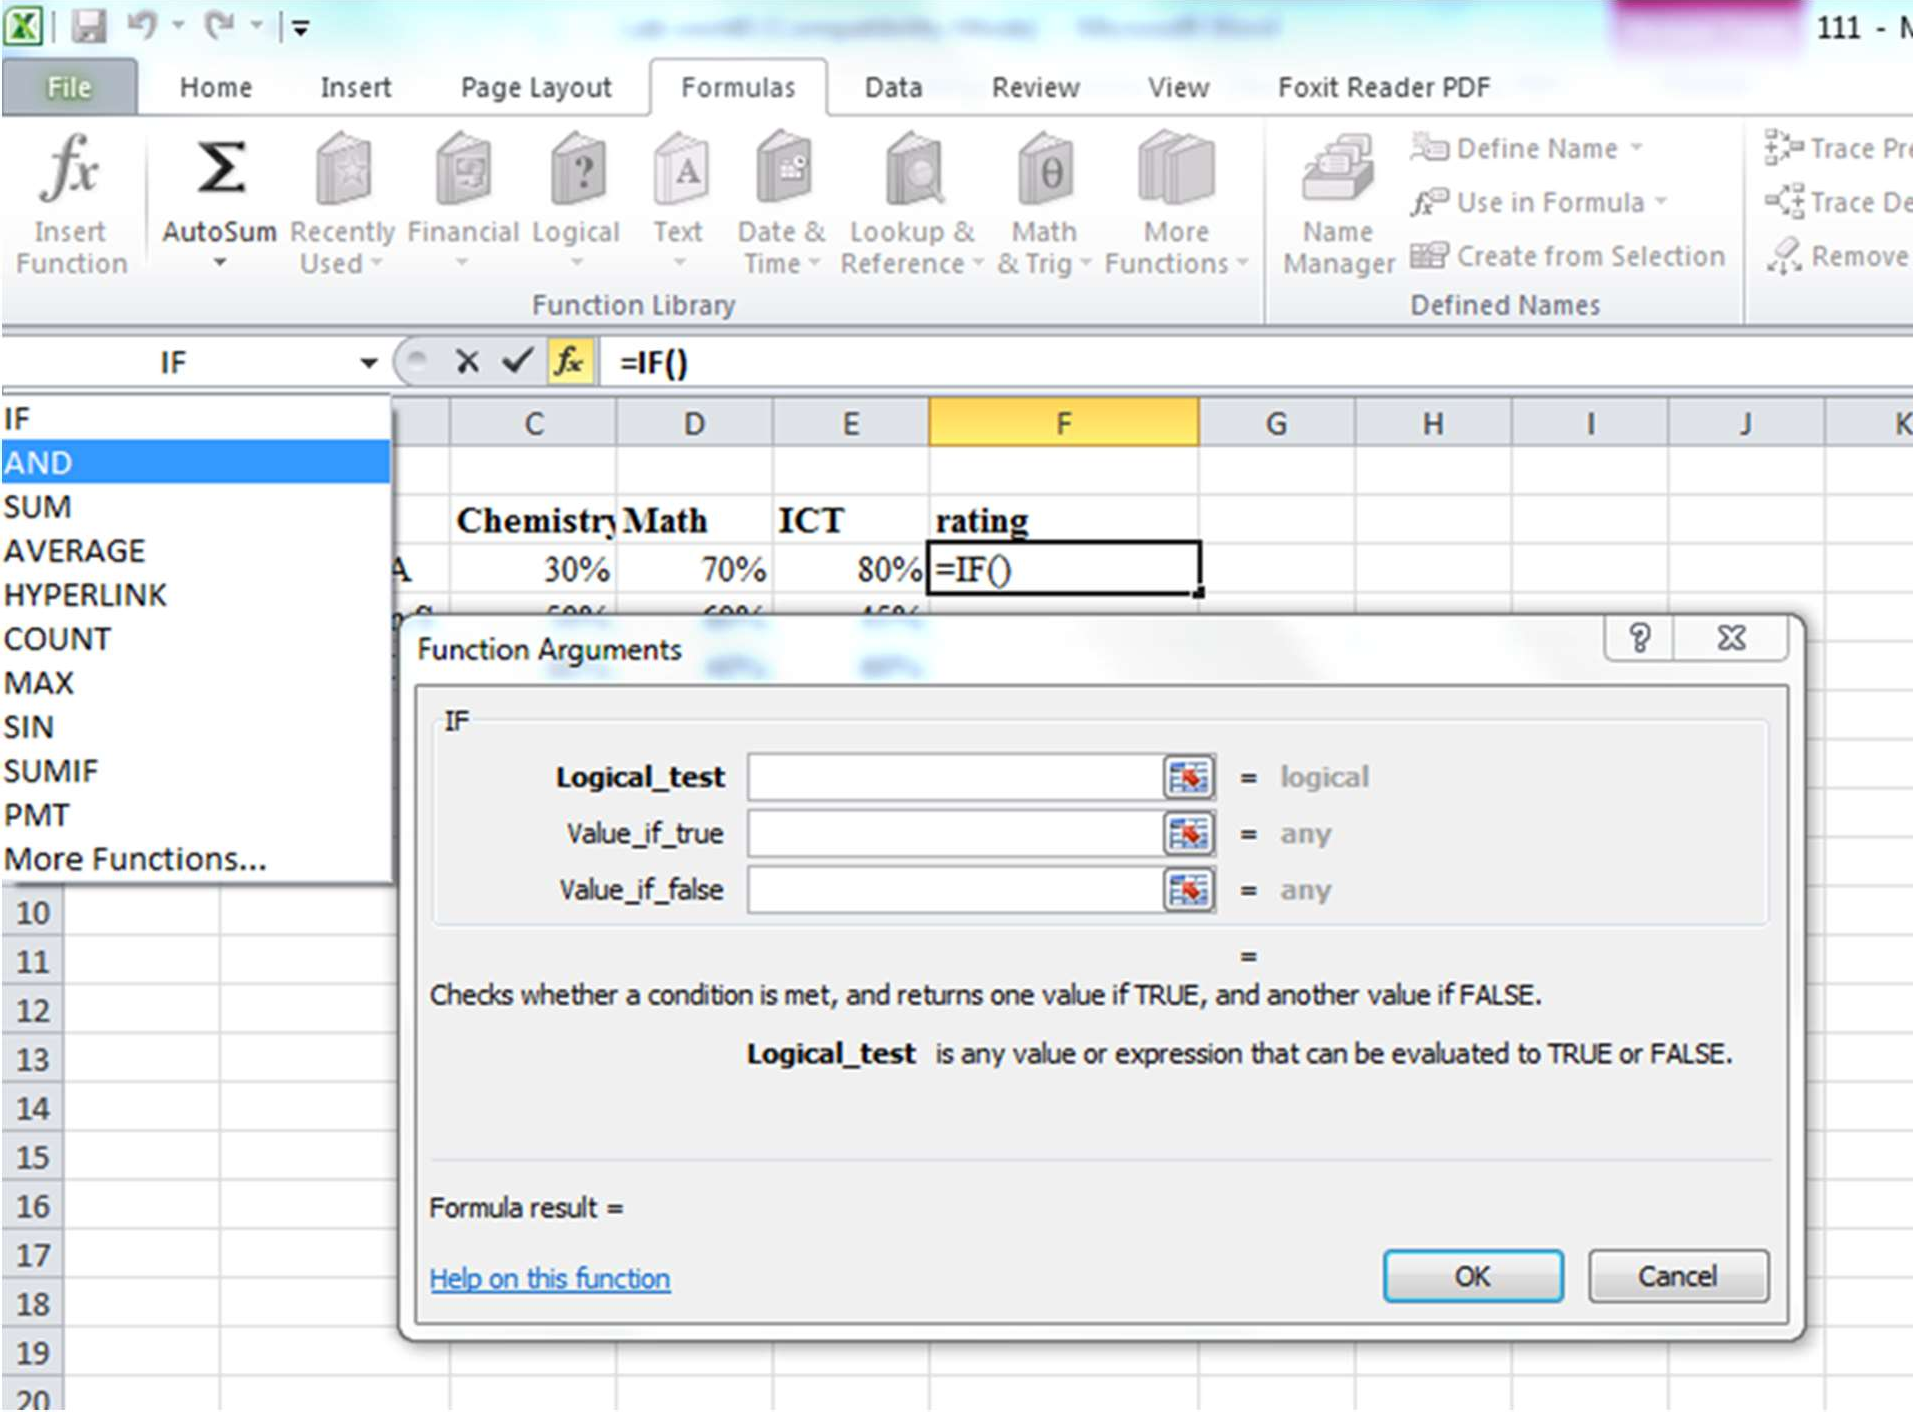
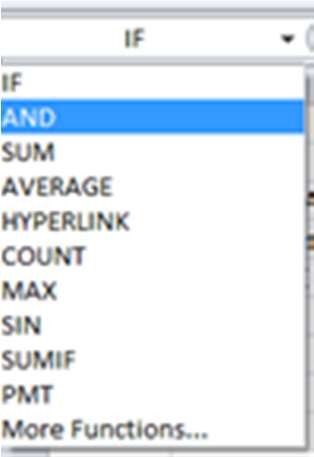
 At the level of the formula line on the left side, click on
- In the list, select Other functions, in the Logical category, select the function AND.
- In the field Logical_value1: B3> = 50%, Logical_value2: C3> = 50%, Logical_value3: D3> = 50%.
- Click in the formula bar on the IF.
- In the field Value if true, type the words: «attestation»
- In the Value field, if you want to type words: «not attestation»
- Click on OK
- The result should be stretched for other cells.

Exercise 4Building 3D Surface Plots
z 3x2 2sin2 ( y) y2
- Ex_4деп аталатын жұмыс бетін құрыңыз.
x,y1;1
- х-тің мәндерін 0,2 қадаммен А2 ұяшықтан бастап баған түрінде енгізіңіз;
- у-тің мәндерін 0,2 қадаммен В1 ұяшықтан бастап жол түрінде енгізіңіз;
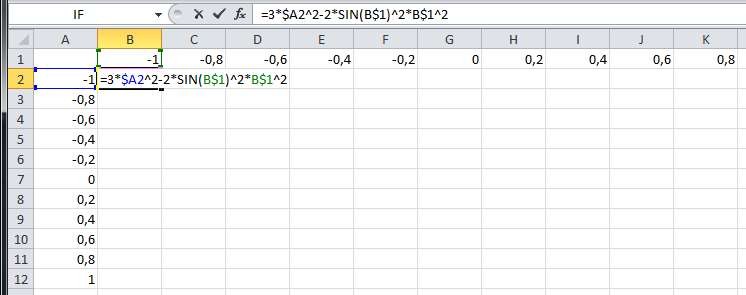
- В2 ұяшыққа формула: =3*А2^2 – 2* SIN(B1)^2*B1^2 жазыңыз;
Формуланы жазып болғаннан кейін оны қалған ұяшықтарға көшіру кезінде адрестердің дұрыс өзгеруін бақылап көріңіз, қорытынды жасаңыз: х-тің мәндері барлық уақытта А бағанында болуы керек, сондықтан баған өзгеріп кетпес үшін оның алдына абсолют адрестің белгісі қойылады, яғни $А болады, ал у-тің мәндеріне сәйкес бірінші жолдың адресі $1 болып өзгереді.
- Ендеше осыған сәйкес В2 ұяшықтағы формуланы: =3*$А2^2 – 2* SIN(B$1)^2*B$1^2 түрге келтіреміз;
- z–тің қалған мәндерін толтыру маркерін пайдалана отырып, шығарыңыз;
- Ол үшін В2:В12 диапазонды белгілеп алып толтыру маркерін сәйкес тіктөртбұрышты обылыс толғанға дейін созасыз;.
9-сурет
- Кестеніх, у, z. мәндерімен қоса белгілеп алыңыз;
- Диаграмма шеберін (Charts) шақырыңыз, диаграмма типіненSurface(1-ші түрін ) таңдаңыз;
- Диаграмманың параметрлерін өзгертіңіз;
- Диаграмманы сол бетке орналастырыңыз, атын Surface деп өзгертіңіз.

Tasks for independent work:
You should build х, у =[-1;1], Z= surface according to the following tasks
| Variant | Tasks |
| 1 | Z=5x2cos2(y) –2y2ey |
| 2 | Z=2x2cos2(x) –2y2 |
| 3 | Z=2e0.2xx2 –2y4 |
| 4 | Z=x2 –2e0.2yy2 |
| 5 | Z=3x2sin2(x) –5e2yy |
Control questions:
- What is a spreadsheet?
- What types of addressing you know? How do they difference from each other?
- What is a chart?
- How can you create charts? Could you tell about the types of charts?
- What kind of ways can you enter a function in Excel?
- What categories of functions do you know?
- Give me examples of statistical functions, which you know
- Give me examples of math functions, which you know
- Give me examples of logical functions, which you know
Model answer and analysis of a table in IELTS writing task 1.
Tables sometimes show up in IELTS academic writing task 1. In some cases, they are in a double task such as a pie chart and table or a bar graph and table. In this lesson, we have a table on its own with a lot of data. This is taken from Cambridge IELTS 7, page 30, it is a popular example of a table for IELTS teachers.
Before writing anything you will need to analyse the task. Take around 4 minutes to plan, look at the categories, the countries, the year and the highest and lowest statistics. The grammar tense is important to get right too, you can see below that the table shows data from 2002, so I will write in the past tense.
Example Task

Source: Cambridge IELTS 7, page 30
Planning Stage
As mentioned earlier, you need around 4 to 5 minutes to plan your answer. There are 5 countries in the table. There are 3 categories to report on and it is in the past, 2002. The tense will be past simple, but most importantly, I do not need to report on every bit of data in this table.
The task question says: ‘Summarise the information by selecting and reporting the main features, and make comparisons where relevant’. This means that you do not have to report on everything. You have to be selective or you will lose points in the exam.
Lets take a look at the highest and lowest data:

I have picked out the highest and lowest statistics here. I will only write about those in this report, the data must be grouped into 2 main body paragraphs. The overview will pick out the key features without mentioning percentages or numbers. The introduction just paraphrases the task question.
I don’t need to cover too much as the report should be under 200 words but over 150 words. No conclusion is needed.
The table below gives information on consumer spending on different items in five different countries in 2002. Summarise the information by selecting and reporting the main features, and make comparisons where relevant.
 Source: Cambridge IELTS 7
The table illustrates the percentages of consumer spending in five nations, comprising of three categories of products and services in 2002.
Overall, the largest proportion of consumer expenditure for each country was for food, drinks and tobacco. Conversely, the leisure and education section shows the lowest percentages of spending among the five countries.
With regard to the highest expenditures, consumer spending on food, drinks and tobacco was the highest in Turkey at 32.14%, followed by Ireland at nearly 29%. Likewise, Turkey shows the highest expenditure in the leisure and education category at 4.35%. For the clothing and footwear section, the largest proportion of spending was for Italy at 9%.
In terms of the lowest expenditures, the table shows that Sweden had the lowest figures for national consumer spending for food, drinks and tobacco and clothing and footwear, at 15.77% and 5.40% respectively. Spain had the lowest amount of spending on leisure and education at almost 2%, followed closely by Ireland with a figure of 2.21%.
164 words
Analysis
- The word count in my model answer is 164 words. Aim for more than 150 words. Over 200 words is just overkill.
- In main body one, I chose the highest percentages and kept it concise.
In main body 2, I chose the lowest percentages and kept it concise and clear. This is grouping the data which is important for good coherence and cohesion.
- Always start your overview with ‘Overall’ and do not write statistics or numbers, use language to highlight the key features.
- Yes there is some repetition with the word ‘highest’ and ‘spending /expenditure’ this cannot be avoided, you can repeat words as long as it is done within reason.
- In some cases, you can use approximation, such as: almost 2% or nearly 29%, or even better is if you can use fractions to paraphrase statistics, as this will help your Vocabulary band score. Click here for a lesson on approximation and fractions vocabulary.
Any questions? Leave a comment below…..

Salary Sheet is a ready-to-use template in Excel, Google Sheets, OpenOffice Calc, and Apple Numbers that helps you to perform the salary calculations with ease.
It is a payroll document in which you can record payroll data for multiple employees along with a Salary slip prepared according to Indian rules of Employment, which includes provident fund and employee allowances.
What is A Salary Sheet?
A salary Sheet is a document that includes complete details of the amount payable to an employee for work done during a particular period. It includes details like basic pay, allowances, deductions, and overtime, etc. of employees.
A salary sheet or payroll sheet is the Human Resource document that a company uses to calculate the salaries of their employees. It is also known as payroll or payroll sheet. HR maintains financial records of employees like wages, salaries, deductions, bonuses, holidays, leaves, sick leave, etc. in Payroll.
Generally, Payroll is made daily for wages, weekly, biweekly, or monthly for salaries. It differs from one period to another as it is calculated based on actual working days. Thus, each month working days, overtime, leaves, and other variables are different for each employee.
Formula To Calculate Salary
Take-Home Salary = Basic Salary + Allowances – Deductions.
Hr and Payroll staff needs to micro-manage payroll data of employees, which include basic salary, HRA, TA, Conveyance, Leave details, provident fund deductions, etc.
We have created an automated Salary Sheet Template with predefined formula. You can prepare the salary of multiple employees within minutes with the help of this template.
This template is available in 4 file formats – Excel, Google Sheets, Open Office Calc, and Apple Numbers. Click on the button below to download the desired format:
Excel Google Sheets Open Office Calc Apple Numbers
Click here to Download All HR & Payroll Excel Templates for ₹299.
The functioning and formulation in all the four file formats are the same except the spellnumber function as it is not supported in OpenOffice Calc, Google Sheets, or Apple Numbers.
Important Note: To edit and customize the Google Sheet, save the file on your Google Drive by using the “Make a Copy” option from the File menu.
Additionally, you can download other HR and Payroll related templates like Salary Slip, Attendance Sheet, Weekly Timesheet, and much more.
Let us discuss the contents of the template in detail.
Contents of Salary Sheet Template
Note: After you download the excel and open the office template, don’t forget to enable the content in the security warning pop-up below the ribbon as shown in the images below:
Salary Sheet template consists of the following three sheets: Employee Database, Consolidation Sheet, and Employee Salary Slip
Employee Database
The database sheet consists of the master data where data of each employee will be entered. Major data in this sheet needs to be entered one time.
The first section consists of employee details such as employee name, designation, salary month, allowed leaves, leaves taken, and working days.
You can select the month and year of salary from the dropdown list. When the user selects the month and year for the first employee, it automatically displays the same for other employees. We have kept a provision of 20 employees. If you want to make the salary for more employees, you can drag the same using the fill handle.
The user can select the total days of the month (30, 31, 28, or 29) from the dropdown list. When the user selects the month and year for the first employee, it automatically displays the same for other employees.
Allowed leaves are different according to the designation and company policy. Hence, you need to enter individually.
Insert actual leaves availed by the employee and the template automatically calculates the working days. The allowed leaves are deducted from the total leaves and this is how the actual working days are calculated. The template uses the “=IF(G4>=F4, E4-G4+F4, E4)” formula to calculate the working days.
Insert CTC for each employee as per the employee contract. CTC = Direct benefits + Indirect benefits + Saving Contributions. For more information on CTC click here.
CTC is calculated based on working days. Hence, the template calculates the CTC proportionately according to the working days for that particular month. The template uses “IF(H4=0, “”, ROUND(I4/E4*H4, -1))” formula.
Components of Salary
There are three major components of the Salary: Basic Pay, Allowances, and Deductions.
Basic Pay/Basic Salary
Basic salary is the fixed amount to be paid to an employee addition of any allowances or subtraction of any deductions. Bonuses, overtime, dearness allowance, etc are not a part of basic pay. For more information about Basic Salary click here.
The template auto-calculates the basic salary based on CTC. Usually, it is 40% or 50% of the basic salary. Basic Salary is proportionate to the working days. It uses the following formula to calculate the basic salary “=IF(H4=0, “”, ROUND ($J4/E4*H4*50%, -1))”.
Next comes the allowances section. Allowances are the financial benefits an employer provides above the Basic Salary to his employees. These allowances differ based on company policy, industry, job profile, and department. The template adds all the following amounts to form the gross salary.
Dearness Allowance
DA or dearness allowance is an allowance which the employer pays to its employees against the price rise in the economy to reduce the impact of inflation. In India, Pakistan, and Bangladesh, employers provide DA as the cost of living adjustment allowance. Government employees, public sector employees, and pensioners get to DA.
DA is auto-calculated. DA (Dearness Allowance) is 4% to 10% of basic pay depending on the contract. It uses the following formula to calculate DA “=IF(H4=0,” “, ROUND (J4/E4*H4*10%, -1))”. For more information on Dearness Allowance click here.
House Rent Allowance
HRA stands for House Rent Allowance. House Rent Allowance is the amount allocated by an employer to the employee as a portion of their CTC salaries. The employer decides the house rent allowance depending on different criteria like the city of residence and salary grade.
For employees in a metro city, it is 50% of the basic pay whereas for employees of a non-metro city it is 40% of the basic pay. Generally, when these rules aren’t applicable it is 10 % of the basic salary. For more information on House Rent Allowance click here.
House Rent Allowance is auto-calculated. Usually, it is 25%-30% of CTC. Insert the percentage in the formula as per the employment contract. It uses the following formula to calculate HRA “=IF (H4=0, ” “, ROUND (J4 / E4 * H4 * 25%, -1))”.
Conveyance Allowance
Allowance or money to compensate for an employee’s travel expenses between their residence and workplace is Conveyance Allowance. It is also known as transport allowance.
You need to insert the conveyance allowance in the formula as per the employee contract. The conveyance working column calculates the conveyance amount based on employee attendance.
It uses the following formula to calculate the conveyance allowance “=IF(H4=0, ” “, ROUND (N4/E4*H4, -1))”. Furthermore, if the employee’s working days are 0 then it will display 0.
To know more about Conveyance Allowance click here.
Medical Allowance
Medical Allowance is a fixed allowance that an employer pays to its employees as a part of their salary to meet their regular medical needs. The employer credits a fixed amount as a medical allowance along with the salary to the employee’s account every month.
Medical allowance is calculated based on applicability to employees as per the contract. If you have selected yes in the medial allowance column at the end, then it will calculate otherwise it will display 0.
Furthermore, if the employee’s working days are 0 then it will display 0. It uses the following formula to calculate the medical allowance “=IF(H4=0, ” “, ROUND(P4/E4*H4,-1))”.
For more information on medical allowance click here.
Special Allowance
The special Allowance is auto-calculated by deducting the basic pay and other allowances. The special allowance is a fixed allowance given to employees to meet certain requirements over and above the basic salary.
The template uses the following formula to calculate special allowance “=IF(H4=0, ” “, ROUND(J4-T4,-1))”. You can insert manually if it is different for each employee.
Children Education Allowance, Hostel Allowance, Miner’s Allowance, Outstation Allowance, Offshore Allowance, etc are some of the special allowances.
Bonus Pay
Insert the amount of bonus pay if it is applicable for any employee for any particular month. Bonus pay is a reward an employer pays to his employee for his good work. Usually, in countries like India Pakistan, and Bangladesh, companies pay bonuses yearly based on the overall financial performance of the organization and are paid during festive seasons.
TA – Travel Allowance
Insert TA for the employee on actually spent by the employee for that particular month. TA stands for Traveling Allowance. Traveling allowance is the amount paid or allotted to an employee by the employer for traveling to another place for business purpose.
The traveling allowance includes modes of travel, accommodation, meals, and other incidentals. To know more about Travel Allowance click here.
All the above things compile the gross salary. Gross Salary is the total of all the components of your monthly payout before any kind of deductions.
Followed by the allowances, the templates consist of deductions. Employee Deductions are the amounts subtracted from an employee’s gross pay to reach net pay. The template deducts all the following amounts from the gross salary.
Employee Contribution To Provident Fund
As per the Indian Labor Law, an employee has to contribute a part of the salary towards the provident fund. Currently, it is 12%. The template uses the following formula to calculate “=ROUND (MIN (1800, IF (AG4=”Yes”, SUM(K4: L4) * 12%, 0)), -1)”.
Employee Provident fund is a type of retirement benefits scheme for salaried employees. Under this scheme, the employee makes a stipulated contribution from his salary. The government decides this percentage.
Salary Advance
Insert the amount of salary advance for each employee if applicable. When an employee draws in full or portion of salary in advance, it refers to as Salary advance. While calculating the salary the employer deducts the same from the salary.
Professional Tax
If the professional tax is applicable then insert the monthly amount of professional tax. Professional Tax is a tax that a government levies on professionals based on their salary/monthly income. Usually, it is around Rs. 200 a month which amounts to the maximum payable Rs. 2500 in a year in India.
Tax-Deducted At Source
Insert the actual TDS amount. TDS stands for Tax Deducted at Source. It is the income tax that an employer deducts from the salary of the employee. The employer deposits this collected tax to the IT Department. Click here for more information on TDS, TDS Threshold, TDS Return, etc.
Subtracting the total amount of deduction from the gross salary compiles the net payable salary to the employee.
General Information
Select the gender and prefix of the employee from the dropdown list. Also, select the authorized signatory of the department for each department if it is different from the dropdown list.
Select “Yes” if PF is applicable. Select “Yes” if the employee has submitted the medical bills. If the user selects “No”, the template will not add the medical allowance to the salary.
Given above are details preparing the salary according to the Indian Salary structure.
The user needs to enter data only in blue colored cells. The pink-colored cells contain predefined formulas. You need not enter data in pink colored cells. See the image below:
In this sheet, some data input columns have a drop-down menu, which makes it easier for the user to select and enter data. Month, Year, Title, Gender, etc are the drop-down menu. See the image below:
The template consists of buttons at the top of the sheet for easy navigation in as shown below:
After entering data in the Database Sheet clicking on the “Consolidation” button. It will navigate you to the Consolidation Sheet.
Consolidation Sheet
The consolidation sheet consists of a month-wise sheet of salary data entered in the Database Sheet. This sheet links the Database sheet to each cell and automatically fetches the date from the Database sheet. You don’t need to enter any data into this sheet.
If you enter the month or year in the database sheet wrong then it will not display in the consolidation sheet for that particular month.
You can print a monthly report of salary for approval from higher management. Once, the signing authority approves the salary you can pay the employee by cheque or direct bank transfers.
Click on the “Go to Salary Slip” button to navigate to Salary Slip Sheet to print individual salary slip for employees.
Salary Slip
The salary slip sheet uses the VLOOKUP Function to program the sheet. On the extreme right, select the name of the employee from the drop-down list. The template displays the salary data of the respective employee. Click on the print button to print the Salary Slip.
Your Payroll process is complete. This template is very user-friendly and easy to use for everyone. This template can be helpful for Accounts assistants, Office Admin, HR Assistants, Executive Assistants, etc for preparing salaries.
If you want to make only a Salary slip without keeping the data you can use our ready-to-use Corporate Salary Slip Template.
We thank our readers for liking, sharing, and following us on different social media platforms.
If you have any queries please share in the comment section below. We will be more than happy to assist you.
Frequently Asked Questions
What Are Payroll Expenses?
Payroll Expenses include salaries, wages, bonuses, commissions, EFB, PF, EPS, company contributions such as a company-paid health plan, and the company-paid portion of taxes.
An employer pays the payroll expenses to its employees in the form of salary/wage for their services/work and associated expenses such as employee benefits and state and federal payroll taxes.
What is Gross Salary?
Gross Salary is the salary amount including all benefits and allowances before any kind of deductions. In simple terms, Gross Salary is the total of all the components of your monthly payout before any kind of tax deductions. Gross Salary = Basic Salary + Allowances + Benefits. For more information on components of Gross Salary click here.
What is Net Pay or Take Home Salary?
The net pay or the take-home pay is the amount of salary/wages of an employee that remains after all deductions(taxes, health insurance, benefits, etc.) have been subtracted. In simple terms, Net pay is the amount an employee receives after all taxes/deductions during a particular pay period.
How To Calculate Overtime?
Overtime Pay means the amount compensated for hours or days worked more than the maximum limit mentioned in your contract or set by federal or provincial law. Click here to get the formula for calculating Overtime.
How much percentage of CTC is the Basic Salary?
Basic salary is usually 40% – 50% of CTC.
How much percentage of Basic Salary is Dearness Allowance(DA)?
Dearness Allowance is usually 5% to 10% of Basic Salary.
On which amount PF deduction is calculated?
PF is calculated on Basic Salary.