
 Please Note:
This article is written for users of the following Microsoft Word versions: 2007, 2010, 2013, 2016, 2019, and Word in Microsoft 365. If you are using an earlier version (Word 2003 or earlier), this tip may not work for you. For a version of this tip written specifically for earlier versions of Word, click here: Replacing Multiple Spaces with Tabs.
![]()
Written by Allen Wyatt (last updated February 15, 2020)
This tip applies to Word 2007, 2010, 2013, 2016, 2019, and Word in Microsoft 365
You may receive a document from someone that uses multiple spaces to separate items on a line. This is typically done when a person wants to format tabular material, and separates columns using spaces. You can find this quite a bit in information downloaded from the Web.
If you are starting with a source document in this condition, you may be wondering how you can replace all the consecutive spaces with a single tab character. It is possible to go through multiple search-and-replace operations to achieve the desired goal, but there is a quicker way. You can replace any number of consecutive spaces with a single tab character by following these steps:
- Press Ctrl+H. Word displays the Replace tab of the Find and Replace dialog box.
- Click on the More button if it is available. (See Figure 1.)
- In the Find What box, enter a single space followed by the characters {2,}. (Type only the left brace, the number 2, the comma, and the right brace.)
- In the Replace With box, type ^t.
- Make sure the Use Wildcards check box is selected.
- Click on Replace All.
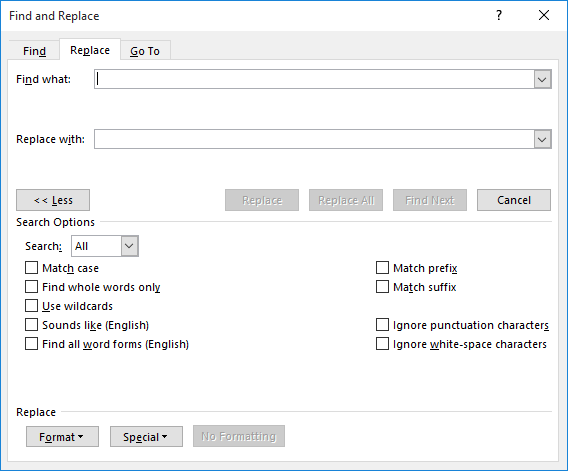
Figure 1. The Replace tab of the Find and Replace dialog box.
WordTips is your source for cost-effective Microsoft Word training.
(Microsoft Word is the most popular word processing software in the world.)
This tip (12741) applies to Microsoft Word 2007, 2010, 2013, 2016, 2019, and Word in Microsoft 365. You can find a version of this tip for the older menu interface of Word here: Replacing Multiple Spaces with Tabs.
Author Bio
With more than 50 non-fiction books and numerous magazine articles to his credit, Allen Wyatt is an internationally recognized author. He is president of Sharon Parq Associates, a computer and publishing services company. Learn more about Allen…
MORE FROM ALLEN
Finding Columns of a Certain Width
If you need to find out how many columns are set to be a specific width, you’ll need a macro to help determine the info. …
Discover More
Scaling Graphics in a Macro
If you need to make sure that the graphics in a document are all scaled similarly, you’ll love the macros presented in …
Discover More
Aligning a Paragraph in a Macro
If you are applying formatting from within a macro, you may want to change the alignment of various paragraphs. Here’s …
Discover More
More WordTips (ribbon)
Using Find and Replace to Change Text Case
Can you really use Find and Replace to change the case of text in your document? Not really, but that shouldn’t stop you …
Discover More
Quick and Dirty Paragraph Count
Need to know how many paragraphs are in a document? You can use Word’s Find and Replace feature to get a count quickly.
Discover More
Removing HTML Tags from Text
HTML tags are great when you want to display information on a web page. They are not so great when you have them in a …
Discover More
Microsoft Office, Microsoft Word
Let’s set the stage:
You receive a file from your co-worker where data has been arranged into multiple columns to create a table-like format.
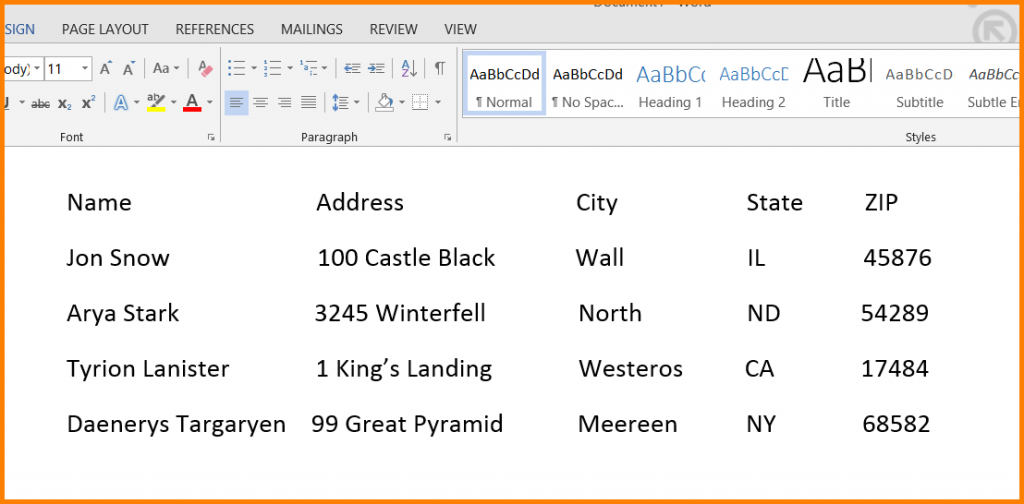
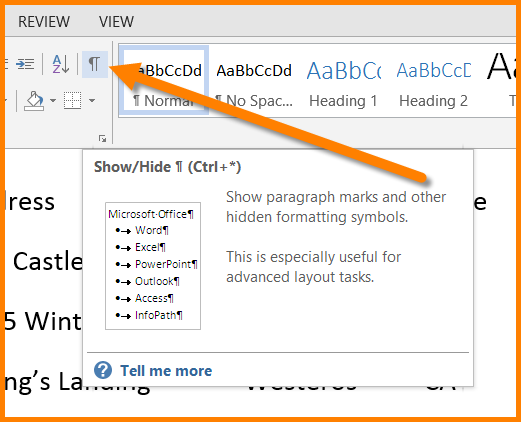
Upon careful examination, you notice that the column alignment is just a little bit off. To discover the cause you press your Show /Hide button in Word to reveal the formatting codes.
This reveals the nightmare that is “Beginner’s Formatting”.

Not understanding how TABS work, the co-worker had brute-forced data into columns by adding however many spaces it took to achieve the desired look.
Your job is to replace all of those spaces with single TAB characters.
With data spanning hundreds of rows (what about THOUSANDS of rows), you are now facing a long and arduous task.
FIND and REPLACE to the rescue!!!
Follow these steps to mass replace every cluster of space characters with a single TAB character:
- On the HOME tab on the Ribbon, choose Replace from the Editing group (or press [Ctrl]+H) to open the Find And Replace dialog box
- In the Find What field, enter one space character and the following characters, exactly as shown in red: {2,}
- In the Replace With field, enter ^t
- Click the More button
- Check the Use Wildcards option
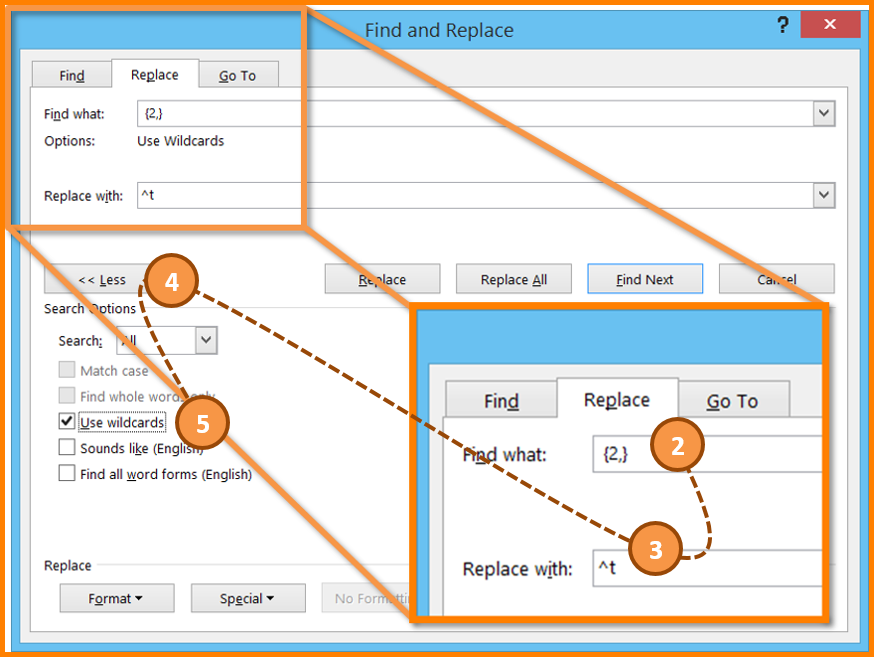
6. Click Replace All
7. Click Close
The result will appear as follows.
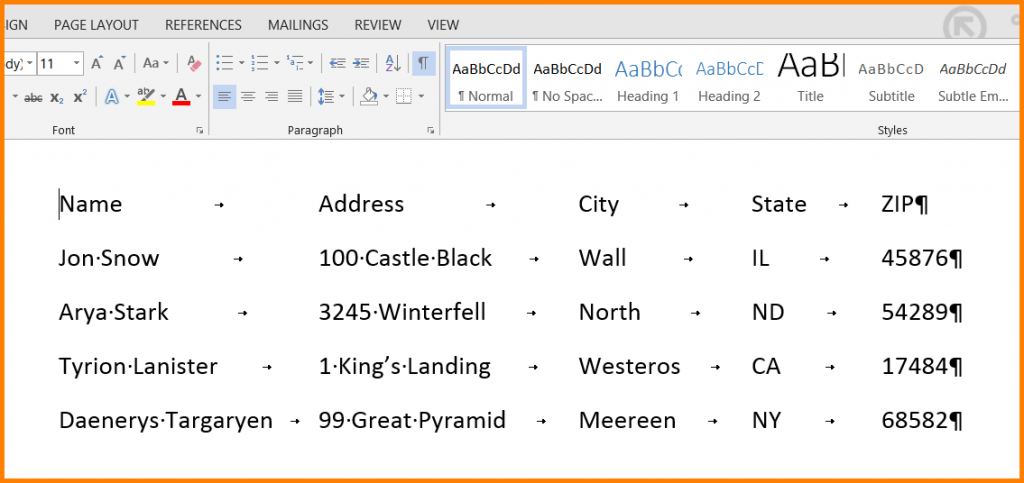
Now, to be perfectly honest, the list won’t look this pretty until you get your tab stops in position. I wanted you to be excited about the trick before I threw in the caveat.
The secret behind this is that the {2,} code instructs word to locate 2 or more in sequence of whatever character you placed before the open brace { character. You can actually place ANY character before the open brace and it will work all the same.
The ^t code represents a TAB character in Word. If you wish to have more than one TAB, simply type multiple ^t in a row without any spaces between them (ex: ^t^t^t^t).
If there are areas of your document where you do NOT want this global replacement to occur, highlight the area to be replaced prior to executing the Find/Replace operation.
Although this scenario is almost exclusively the province of Word, the replacement technique can be used in any Office application.
Check Out These Shortcuts for Find and Replace, Go To and Find in Microsoft Word
by Avantix Learning Team | Updated April 28, 2022
Applies to: Microsoft® Word® 2013, 2016, 2019, 2021 or 365 (Windows)
You can use several shortcuts to display Find and Replace, Go To and Find in Microsoft Word. There are both Ctrl key shortcuts as well as Alt shortcuts. In this article, we’ll review different shortcuts to access these useful tools. All three options appear as different tabs in the same dialog box.
Recommended article: How to Add Page Numbers in Word (Step by Step)
Do you want to learn more about Microsoft Word? Check out our virtual classroom or in-person Word courses >
Find and Replace shortcuts
You can display the Find and Replace dialog box by pressing Ctrl + H. Alternatively, you can also use a key tip shortcut by pressing Alt > H > R (Alt then H then R).
The Find and Replace dialog box appears as follows (with the Replace tab selected):

If you click More >>, you can perform more advanced find and replace tasks.
Go To shortcuts
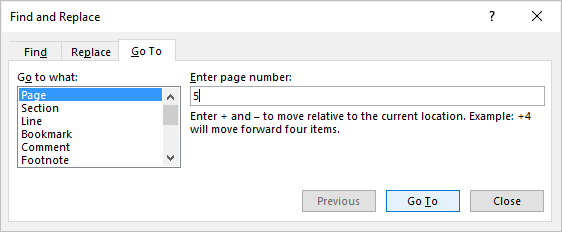
In Word documents, you can use Go To to quickly go to specific pages, sections or objects. It’s a great fast way to navigate in documents.
You can display the Go To tab in the Find and Replace dialog box by pressing Ctrl + G. Alternatively, press Alt > H > R (Alt then H then R) to display Find and Replace and then press Alt + G to select the Go To tab.
The Go To tab in the Find and Replace dialog box appears as follows:
Find shortcuts
There are two ways you can find in Word – using the Navigation Pane or a dialog box.
If you press Ctrl + F, Word displays the Navigation Pane and you can use it to find words, headings or even pages.
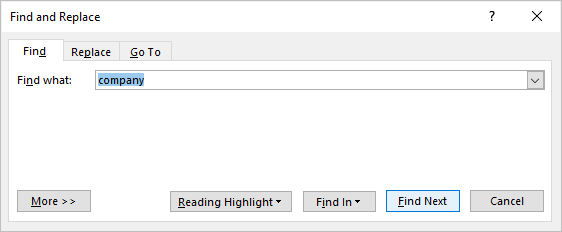
To display the Find in the Find and Replace dialog box (where you can perform more advanced finds), press Ctrl + H to display Find and Replace and then press Alt + D to select the Find tab. Alternatively, press Alt > H > R (Alt then H then R) to display Find and Replace and then press Alt + D to select the Find tab.
The Find tab in the Find and Replace dialog box appears as follows:
If you click More >>, you can perform more advanced tasks.
Subscribe to get more articles like this one
Did you find this article helpful? If you would like to receive new articles, join our email list.
More resources
How to Create a Table of Contents in Word
How to View Word Count in Word (4 Ways)
How to Double Space in Word (4 Ways + Shortcut)
How to Align or Justify Text in Word (4 Ways with Shortcuts)
10+ Great Microsoft Word Navigation Shortcuts for Moving Around Quickly in Your Documents
Related courses
Microsoft Word: Intermediate / Advanced
Microsoft Excel: Intermediate / Advanced
Microsoft PowerPoint: Intermediate / Advanced
Microsoft Word: Long Documents Master Class
Microsoft Word: Styles, Templates and Tables of Contents
Microsoft Word: Designing Dynamic Word Documents Using Fields
VIEW MORE COURSES >
Our instructor-led courses are delivered in virtual classroom format or at our downtown Toronto location at 18 King Street East, Suite 1400, Toronto, Ontario, Canada (some in-person classroom courses may also be delivered at an alternate downtown Toronto location). Contact us at info@avantixlearning.ca if you’d like to arrange custom instructor-led virtual classroom or onsite training on a date that’s convenient for you.
Copyright 2023 Avantix® Learning
Microsoft, the Microsoft logo, Microsoft Office and related Microsoft applications and logos are registered trademarks of Microsoft Corporation in Canada, US and other countries. All other trademarks are the property of the registered owners.
Avantix Learning |18 King Street East, Suite 1400, Toronto, Ontario, Canada M5C 1C4 | Contact us at info@avantixlearning.ca

on
August 8, 2012, 11:27 AM PDT
10 cool ways to get more from Word’s Find and Replace feature
Find and Replace can accomplish things most users never dreamed of. Here are some of the best ways to put this feature to use.
Find and Replace is one of Word’s most powerful and flexible features — but it’s considerably underused. Most people use it to find specific content, but they don’t realize it can also run rings around many tedious tasks. Start with these 10 easy-to-implement ways to use advanced Find and Replace settings and see what they inspire for your own day-to-day chores.
1: Replace two spaces with a single space
Some old school users still insert two spaces after a period. If you inadvertently do this, you can quickly replace two spaces with one:
- Press [Ctrl]+H to open the Find And Replace dialog box.
- Click inside the Find What control, delete any existing contents, and enter two spaces (just two).
- Click inside the Replace With control, delete any existing contents, and enter one space.
- Click Replace All or use the Replace and Find Next buttons to find (and replace — or not) each occurrence individually.
These settings will find all occurrences of two spaces, not just those at the end of a sentence. You can refine the search by prefacing both the find and replace strings with a period (or other punctuation mark).
2: Replace multiple spaces with a tab
One of the biggest mistakes novice Word users make is to enter multiple spaces instead of using a tab to position text on the page — and those spaces can wreck a document! Fortunately, you can replace them with a tab mark by using the {} code, as follows:
- Press [Ctrl]+H.
- In the Find What control, enter a single space, followed by {2,}.
- In the Replace With control, enter ^t, which represents a single tab mark.
- Click the More button and check the Use Wildcards option, as shown in Figure A.
- Click Replace All.
The {2,} code tells Word to find two or more literal characters; the space character you entered is the literal character.
Figure A
Use a wildcard to find multiple spaces.
3: Insert new text
Replacing existing text with new text is simple. But inserting new text without deleting anything is a bit harder. For instance, let’s suppose you want to insert the text “, Inc.” to each occurrence of a company name. You can update each individually or you can use the ^& code as follows:
- Press [Ctrl]+H.
- In the Find What control, enter the name of the company, Harkins and Son.
- In the Replace With control, enter ^&, Inc. as shown in Figure B.
- Click Replace All.
Figure B
Use the ^& code to retain the find string.
4: Apply a style
Styles provide a great way to apply consistent formatting. Using Find and Replace, you can do so after the fact as well. To apply a style using this feature, do the following:
- Press [Ctrl]+H.
- In the Find What control, enter the text to which you’re applying the format. (You can use literal text, codes, and wildcards.)
- Click inside the Replace With control (and delete any contents).
- Click the More button and click Format.
- Choose Style from the resulting list.
- In the Replace Style dialog, select the style you want to apply, as shown in Figure C.
- Click OK. Word will display the style under the Replace With control, as shown in Figure D.
- Click Replace All.
Figure C
Specify a style instead of a literal replacement string.
Figure D
The style you selected will be displayed under the Replace With control.
5: Replace a style
To change one style to another, you can use the Style pane to select all the text of one style and then select the new style. That technique is quick at around five clicks. You can also use the Find and Replace feature as follows:
- Press [Ctrl]+H.
- Click the Find What control and click More.
- Click Format and choose Style.
- Select the style you’re replacing and click OK.
- Click the Replace With control.
- Click Format and choose Style.
- Select the replacement style and click OK. Figure E shows the specified Find What and Replace With styles.
- Click Replace All.
This technique requires a few more clicks than the selection method, but it’s nice to have more than one solution in your toolkit.
Figure E
Select the replacement style and click OK.
6: Delete paragraphs
Now, suppose you want to delete several paragraphs and their only common attribute is their style. Using the Find and Replace feature, you can quickly delete them:
- Press [Ctrl]+H.
- Click the Find What control and click the More button.
- Click Format and choose Style.
- Select the style that the paragraphs share and click OK.
- Make sure the Replace With control is empty, as shown in Figure F.
- Click Replace All.
Figure F
Replace the find text (which is actually a style) with nothing.
7: Use a trick to replace a long text string
The Find What and Replace With controls are limited to 255 characters. When the replace string is longer, copy it to the Clipboard and use the ^c as follows:
- Press [Ctrl]+H.
- In the Find What control, enter the text or code to find the content you’re replacing. Don’t forget about wildcards.
- In the Replace With control, enter ^c.
- Click Replace All.
This technique will replace the find text with the contents of the Clipboard. Unfortunately, the ^c code doesn’t work in the Find What control.
8: Transpose data
Using Find and Replace, you can quickly transpose data. For instance, you might need to transpose a list of names in first name last name format into last name, first name format. Here’s how to do it:
- Select the list.
- Press [Ctrl]+H.
- In the Find What control, enter (<*>) (<*>) (Note: There’s a space between the two wildcard sets).
- In the Replace With control, enter 2, 1 (with a space between the two wildcard sets), as shown in Figure G.
- Click the More button and check the Use Wildcards option.
- Click Replace All.
Figure G
Using wildcards, you can transpose data.
Here’s how the wildcard components work:
- The brackets (<>) denote the beginning and ending of a word or phrase.
- The * character refers to any characters.
- The parentheses indicate a pattern.
- The slash () replaces characters and the number after it indicates the position of a bracketed component.
9: Insert special characters
Sometimes, you need to insert special characters into a document. For instance, you might want to insert a nonbreaking space between parts of a company or person’s name. If there are only a few instances of the name and the document is short, you can achieve this manually with little trouble. Otherwise, using Find and Replace might be a better choice:
- Press [Ctrl]+H.
- In the Find What control, enter the find text.
- In the Replace With control, enter the same text, but instead of entering spaces by pressing the Spacebar, press [Ctrl]+[Shift]+Spacebar. You can’t tell the spaces apart, but they’re different.
- Click Replace All.
10: Delete formatted text
Similar to #6, which uses styles to delete paragraphs, you can use Find and Replace to delete consistently formatted text. For example, you could use this feature to delete hidden text:
- Press [Ctrl]+H.
- Click the Find What control and click More.
- From the Format drop-down, choose Font.
- Check the Hidden option in the Effects section and click OK.
- As you can see in Figure H, Word will display the specified format under the Find What control.
- Click Replace All.
Figure H
Delete hidden text using these settings.
Most users don’t hide text, but you can use this method with any format. You can also enter a format in both the Find What and the Replace With controls to change one format to another.
Other tricks?
Have you found some clever ways to save time using Find and Replace? Share your techniques with fellow TechRepublic members.
-
Software
If you are looking for a simple approach (or shortcut) to find and replace text in Word, you’ll love this guide.
Without further ado, below is a quick guide on this task:
To find and replace text in Word, press Ctrl+H shortcut to display the Find and Replace dialog box. In the Find what: field, type the Word you want to replace. In the Replace with: field, type the replacement word. Click Replace to replace matches one after the other or Replace All to replace all at once.
For a more detailed tutorial with pictures, let’s break it down in steps.
Related Article: How to search in Word – Step by step
- Launch the Word Document where you want to find and replace text.
- Press Ctrl+H shortcut to display the Find and Replace dialog.
- In the Find what: text box, type the text or word you want to replace.
- In the Replace with: text box, type the replacement text or word.

- Click on the Replace button to replace the first found instance and find the next. Use this button if you want to replace matching instances one after the other.
- Click on Replace All to replace all matching instances. Of course, use this button if you want to replace all matching instances at once.
- Click on the Find Next button to find the first matching instance of the search term. Word will highlight the next matching instance in gray.
- If you use the Replace All button, Word will display a message box telling you that the search is complete and count the number of replacements made.
- Click on the OK button of the message box.
- After the replacements, click on the close button to dismiss the dialog.

These are the steps you may use to find and replace text in Word.
Safety tips: Save the work before you hit on the Replace All button. This way, if it turns out that clicking on the Replace All was a mistake, you can undo it by pressing Ctrl+Z shortcut.
Related: How to find and replace in Word for Mac
Find and Replace text Formatting
What makes Word’s Find and Replace feature so beautiful is its ability to find and replace fonts and text formatting.
For example, you may want to change all underlined formatting to italic. This way, the text itself will not change; it’s only the formatting that will change from underline to italic.
Using this trick is a little tricky, so you’ll need to pay attention!
Without further ado, let’s get started on how to find and replace text formatting in Word.
Our example will find all underlined formatting and replace it with italic.
- Press Ctrl+Home shortcut to position the insertion pointer at the top of the document.
- Press Ctrl+H shortcut to display the Find and Replace dialog box, with the replace tab active.
- Click on the More button to expand the dialog box.

- Click inside the Find what: text box and leave it blank.
- Click the Format button and choose Font from the drop-down list.

- The Replace Font dialog box will appear. Select the format you want to find. For our example, click the Underline style: drop-down and select single underline from the list.

- Click OK to close the Replace Font dialog box and navigate back to the Find and Replace dialog box.
- Click inside the Replace with: text box and leave it blank.
- Click the Format button again and select Font from the drop-down list.
- The Replace Font dialog box will appear. From the Font Style: list, choose Italic.
- From the Underline style: list, choose none.
What we did here will find all underline and replace them with italics.

- Click OK to close the Replace Font dialog.
- After successfully doing all the above steps, the Search and Replace dialog box should look similar to the screenshot below:

- Click on the Replace All button to search and replace the formatting throughout the document. A message box will appear to show that the task is complete and the number of replacements made. Now if you look into your Word document, all the underlined text will change to italic.
- Click the OK button to dismiss the message box.
- After successfully, replacing the formatting, click inside the Find what: text box and click on the No Formatting button. Do the same for the Replace with: text box. This step removes the formatting option for the next Find and Replace operation.

- Now close the dialog.
These are the basic and advanced ways to find and replace text in MS Word.