Вы когда-нибудь писали многостраничный документ только для того, чтобы понять, что вам нужно заменить все экземпляры слова другим? Мысль о необходимости прокручивать и сканировать каждое слово вручную мучительна.
К счастью, в Microsoft Word есть функция поиска и замены, которая может сделать всю работу за вас. Вот как вы можете использовать его, чтобы сэкономить время.
Что такое функция «Найти и заменить»?
Функция «Найти и заменить» позволяет заменить основной текст другим текстом. Например, вы можете использовать эту функцию, чтобы изменить одно слово или фразу на другое. Вы также можете использовать его для поиска и замены грамматических ошибок или ошибок форматирования, орфографических ошибок и специальных символов.
Поиск и замена доступны в MS Word и Excel.
Как использовать «Найти и заменить» в Microsoft Word
Вы можете найти и заменить текст в Word для Windows, macOS и веб-версии. Однако веб-версия имеет самый ограниченный функционал, поэтому, если вам нужны более разнообразные возможности, вам придется открывать документ в Word для рабочего стола.
Чтобы использовать поиск и замену в Windows:
- Убедитесь, что документ Word открыт, затем выберите вкладку «Главная».
- Перейдите на вкладку «Заменить».
- В поле «Найти» диалогового окна введите слово или фразу, которую хотите заменить. Рядом с «Заменить на» введите слово, на которое вы хотите его заменить.
- Выберите «Заменить», чтобы заменить слова по одному, или «Заменить все », чтобы заменить их все сразу. Кроме того, вы можете выбрать «Найти далее», чтобы просмотреть следующий экземпляр слова, не изменяя его.
Чтобы использовать функцию поиска и замены на Mac:
- Откройте документ и выберите увеличительное стекло, затем выберите «Заменить».
- В поле «Заменить на» введите слово или фразу, которую хотите заменить. Рядом с «Заменить на» введите слово, которое вы хотите заменить.
- Нажмите «Заменить» или «Заменить все».
Чтобы использовать поиск и замену в Интернете:
- Откройте документ Microsoft Word в веб-версии Word.
- Выберите стрелку вниз рядом с Найти и нажмите Заменить.
- В текстовом поле «Искать» введите конкретное слово или фразу, которую вы хотите заменить. Рядом с «Заменить на» введите слово, которое вы хотите заменить.
- Нажмите «Заменить» или «Заменить все».
Примечание. Вы также можете получить доступ к окну «Найти и заменить» с помощью сочетания клавиш. Нажмите Ctrl + H в Windows и Control + H в macOS.
Расширенные возможности поиска и замены
Помимо замены простого текста, существуют также расширенные функции поиска и замены. Эти расширенные параметры позволяют настроить поиск так, как вам нужно.
Чтобы получить доступ к дополнительным параметрам:
- Перейдите в раздел «Главная» > «Заменить».
- Нажмите «Еще».
Здесь вы увидите следующий список опций с флажками рядом с ними:
- Учитывать регистр : это позволяет вам искать слова с определенными заглавными буквами. Например, вы можете искать имена собственные, написанные строчными буквами (отсутствует заглавная буква).
- Найти только целые слова: это ограничивает возможность замены целыми словами. Например, если вы хотите заменить «конец», он не будет включать такие слова, как «расходовать» или «конец», содержащие это слово.
- Использовать подстановочные знаки : этот параметр позволяет добавлять «подстановочные знаки» для поиска практически всего в документе, включая различные типы форматирования. Чтобы использовать этот параметр, выберите «Использовать подстановочные знаки », затем нажмите «Специальный», чтобы увидеть, какие параметры можно искать во всплывающем меню.
- Звучит как (английский): Это поможет вам найти слова, похожие на введенное вами слово. Эта функция особенно полезна, если автор часто делает ошибки в написании похожих слов, таких как «там» и «их».
- Найти все словоформы (английский): эта функция находит все связанные слова на основе этимологии слова. Например, при поиске «съесть» также будут отображаться «съеденные» и «съеденные».
- Совпадать с префиксом: этот параметр поиска ограничивает результаты только словами, начинающимися с введенного вами слова.
- Совпадение суффикса: этот параметр поиска ограничивает результаты только словами, которые заканчиваются введенным вами словом.
- Игнорировать знаки препинания: этот параметр игнорирует слова, которые могут содержать знаки препинания, например дефис или апостроф. Например, при поиске «Джейнс» будут возвращены все экземпляры «Джейнс» и «Джейн».
- Игнорировать символы пробела: будут найдены все слова, которые могут содержать ошибочные пробелы (или двойные пробелы). Например, поиск «по всему» вернет «по всему» и «по всему».
Вы также можете заменить форматирование слова или фразы в документе. Для этого выберите Формат. Выпадающее меню предлагает несколько вариантов замены шрифта, форматирования, стиля и других характеристик. Например, если вы хотите выделить все экземпляры слова, вы можете выбрать «Выделить».
Больше никакого ручного сканирования
Наряду с другими замечательными функциями, такими как Диктовка, функция поиска и замены Microsoft Office значительно экономит время, особенно если вы имеете дело с большим документом, таким как диссертация или рукопись. Используйте его для поиска и исправления орфографических и грамматических ошибок, а также определенных проблем с форматированием в вашем документе, чтобы ускорить процесс редактирования.
When we see two lines of words in an MS Word document, we don’t get to see what is separating them. There are severl characters that act as line break. There are several names; line break, new line, carriage return, paragraph break etc.
Today, while doing a bit of data processing, I was required to remove all the line breaks (carriage return) in an MS-Word document and replace line breaks with a comma. I was processing a long list of email addresses with one email address per line. And I wanted this list to become a comma separated list (CSV); so as to use it somewhere else.
In MS-Word, paragraph break is represented by invisible character (¶) which looks like a horizontally flipped P letter. You can toggle the visibility of this character by clicking a button given on the Home tab in MS Word. The button bears the same ¶ symbol. You should click this button to be able to see what exactly is separating the lines.
Our tips on MS-Word make your life easier and increase your productivity at work.
If lines are breaking because of paragraph break then ¶ will appear at the end of the lines. If lines are breaking due to line break (carriage return), a left-angled arrow symbol will appear at the end. Let’s first see how to deal with paragraph break:
How to Remove / Replace Paragraph Break
- Open the Word document that you want to work on
- Press CTRL + H to bring up the Find and Replace box
- In the “Find what” box type ^p [this upward arrow character is called caret and is usually available on a number key]
- In “Replace with” box type a comma
- Click on Replace All button.
Thus all the paragraph breaks in you document will get replaced by a comma. You can use whatever character(s) you like in “Replace with” box. For example, if you want to replace every paragraph break with two paragraph breaks –then you should type ^p^p in “Replace with” box.
If you simply want to remove paragraph breaks; just leave the “Replace with” box blank. And you’ll get a monolithic chunk of text!
READ ALSO: How to find ant replace formatting
How to Remove / Replace Line Break, Carriage Return (Enter key)
Follow the same process as given above. Instead of finding paragraph sign (^p), now you should look for line break or carriage return sign (represented by ^l). Therefore, type ^l in “Find what” box and replace it something else (or with nothing).
NOTE: This article is part of my MS Word Guide. This guide solves your day to day MS Word problems. Easily!
So, this is how you can replace line breaks, paragraph breaks and carriage returns in MS Word document. Please le t me know if you have any questions about this topic. I will be glad to try and assist you. Thank you for using TechWelkin.
on
August 8, 2012, 11:27 AM PDT
10 cool ways to get more from Word’s Find and Replace feature
Find and Replace can accomplish things most users never dreamed of. Here are some of the best ways to put this feature to use.
Find and Replace is one of Word’s most powerful and flexible features — but it’s considerably underused. Most people use it to find specific content, but they don’t realize it can also run rings around many tedious tasks. Start with these 10 easy-to-implement ways to use advanced Find and Replace settings and see what they inspire for your own day-to-day chores.
1: Replace two spaces with a single space
Some old school users still insert two spaces after a period. If you inadvertently do this, you can quickly replace two spaces with one:
- Press [Ctrl]+H to open the Find And Replace dialog box.
- Click inside the Find What control, delete any existing contents, and enter two spaces (just two).
- Click inside the Replace With control, delete any existing contents, and enter one space.
- Click Replace All or use the Replace and Find Next buttons to find (and replace — or not) each occurrence individually.
These settings will find all occurrences of two spaces, not just those at the end of a sentence. You can refine the search by prefacing both the find and replace strings with a period (or other punctuation mark).
2: Replace multiple spaces with a tab
One of the biggest mistakes novice Word users make is to enter multiple spaces instead of using a tab to position text on the page — and those spaces can wreck a document! Fortunately, you can replace them with a tab mark by using the {} code, as follows:
- Press [Ctrl]+H.
- In the Find What control, enter a single space, followed by {2,}.
- In the Replace With control, enter ^t, which represents a single tab mark.
- Click the More button and check the Use Wildcards option, as shown in Figure A.
- Click Replace All.
The {2,} code tells Word to find two or more literal characters; the space character you entered is the literal character.
Figure A
Use a wildcard to find multiple spaces.
3: Insert new text
Replacing existing text with new text is simple. But inserting new text without deleting anything is a bit harder. For instance, let’s suppose you want to insert the text “, Inc.” to each occurrence of a company name. You can update each individually or you can use the ^& code as follows:
- Press [Ctrl]+H.
- In the Find What control, enter the name of the company, Harkins and Son.
- In the Replace With control, enter ^&, Inc. as shown in Figure B.
- Click Replace All.
Figure B
Use the ^& code to retain the find string.
4: Apply a style
Styles provide a great way to apply consistent formatting. Using Find and Replace, you can do so after the fact as well. To apply a style using this feature, do the following:
- Press [Ctrl]+H.
- In the Find What control, enter the text to which you’re applying the format. (You can use literal text, codes, and wildcards.)
- Click inside the Replace With control (and delete any contents).
- Click the More button and click Format.
- Choose Style from the resulting list.
- In the Replace Style dialog, select the style you want to apply, as shown in Figure C.
- Click OK. Word will display the style under the Replace With control, as shown in Figure D.
- Click Replace All.
Figure C
Specify a style instead of a literal replacement string.
Figure D
The style you selected will be displayed under the Replace With control.
5: Replace a style
To change one style to another, you can use the Style pane to select all the text of one style and then select the new style. That technique is quick at around five clicks. You can also use the Find and Replace feature as follows:
- Press [Ctrl]+H.
- Click the Find What control and click More.
- Click Format and choose Style.
- Select the style you’re replacing and click OK.
- Click the Replace With control.
- Click Format and choose Style.
- Select the replacement style and click OK. Figure E shows the specified Find What and Replace With styles.
- Click Replace All.
This technique requires a few more clicks than the selection method, but it’s nice to have more than one solution in your toolkit.
Figure E
Select the replacement style and click OK.
6: Delete paragraphs
Now, suppose you want to delete several paragraphs and their only common attribute is their style. Using the Find and Replace feature, you can quickly delete them:
- Press [Ctrl]+H.
- Click the Find What control and click the More button.
- Click Format and choose Style.
- Select the style that the paragraphs share and click OK.
- Make sure the Replace With control is empty, as shown in Figure F.
- Click Replace All.
Figure F
Replace the find text (which is actually a style) with nothing.
7: Use a trick to replace a long text string
The Find What and Replace With controls are limited to 255 characters. When the replace string is longer, copy it to the Clipboard and use the ^c as follows:
- Press [Ctrl]+H.
- In the Find What control, enter the text or code to find the content you’re replacing. Don’t forget about wildcards.
- In the Replace With control, enter ^c.
- Click Replace All.
This technique will replace the find text with the contents of the Clipboard. Unfortunately, the ^c code doesn’t work in the Find What control.
8: Transpose data
Using Find and Replace, you can quickly transpose data. For instance, you might need to transpose a list of names in first name last name format into last name, first name format. Here’s how to do it:
- Select the list.
- Press [Ctrl]+H.
- In the Find What control, enter (<*>) (<*>) (Note: There’s a space between the two wildcard sets).
- In the Replace With control, enter 2, 1 (with a space between the two wildcard sets), as shown in Figure G.
- Click the More button and check the Use Wildcards option.
- Click Replace All.
Figure G
Using wildcards, you can transpose data.
Here’s how the wildcard components work:
- The brackets (<>) denote the beginning and ending of a word or phrase.
- The * character refers to any characters.
- The parentheses indicate a pattern.
- The slash () replaces characters and the number after it indicates the position of a bracketed component.
9: Insert special characters
Sometimes, you need to insert special characters into a document. For instance, you might want to insert a nonbreaking space between parts of a company or person’s name. If there are only a few instances of the name and the document is short, you can achieve this manually with little trouble. Otherwise, using Find and Replace might be a better choice:
- Press [Ctrl]+H.
- In the Find What control, enter the find text.
- In the Replace With control, enter the same text, but instead of entering spaces by pressing the Spacebar, press [Ctrl]+[Shift]+Spacebar. You can’t tell the spaces apart, but they’re different.
- Click Replace All.
10: Delete formatted text
Similar to #6, which uses styles to delete paragraphs, you can use Find and Replace to delete consistently formatted text. For example, you could use this feature to delete hidden text:
- Press [Ctrl]+H.
- Click the Find What control and click More.
- From the Format drop-down, choose Font.
- Check the Hidden option in the Effects section and click OK.
- As you can see in Figure H, Word will display the specified format under the Find What control.
- Click Replace All.
Figure H
Delete hidden text using these settings.
Most users don’t hide text, but you can use this method with any format. You can also enter a format in both the Find What and the Replace With controls to change one format to another.
Other tricks?
Have you found some clever ways to save time using Find and Replace? Share your techniques with fellow TechRepublic members.
-
Software
Exchange one text string for another in any version of Word
Updated on October 29, 2021
What to Know
- Open the Find and Replace tool in Word with the keyboard shortcut CTRL+H.
- Find and Replace doesn’t take capitalization into account unless you specifically tell it to.
- To replace capitalization, select More in the Find and Replace box, then Match Case > Replace or Replace All > OK.
All editions of Microsoft Word offer a feature called Find and Replace. Use this tool to search for a specific word, number, or phrase in a document and replace it with something else. You can also make several replacements at once—like changing a name or fixing something you’ve consistently misspelled. Use it, also, to replace numbers or punctuation and cap or uncap words.
If you turn on Track Changes before you begin, you can reject the replacement or deletion of any unintended word.
Find and Replace a Word
The Microsoft Word Find and Replace dialog box, in its simplest form, prompts you to type the word you’re looking for and the word you want to replace it with. Then, click Replace, and either allow Word to change every entry for you or, go through them one at a time.
To open the tool, press Ctrl+H (Cmd+H on Mac).
Change Capitalization in Microsoft Word
The Find and Replace feature doesn’t take into account anything about capitalization unless you specifically tell it to. To get to that option you’ll need to click the More option in the Find and Replace dialog box:
- Open the Find and Replace dialog box using your favorite method. We prefer Ctrl+H.
- Click More.
- Type the appropriate entry in the Find What and Replace With lines.
- Click Match Case.
- Click Replace and Replace again, or, click Replace All.
- Click OK.
Advanced Options
When you select the More expander in the Search and Replace dialog box, you’ll encounter several customizations. The list of items varies according to which version of Word you’re running.
Search Options
Select the check boxes to include or exclude things like punctuation, white-space characters, or substrings. Plus, apply tools like word-form matching (i.e., walked also matches walking) and Soundex matching (Karin matches Karen).
Replace Options
Word supports more advanced substitutions, too. Use special characters to substitute text markup with symbols. For example, replace a character code like & with an ampersand. This approach is useful for de-cluttering pasted HTML text that uses HTML codes to render certain symbols.
Thanks for letting us know!
Get the Latest Tech News Delivered Every Day
Subscribe
While editing large documents in Microsoft Word, you want tools that will help you find and replace certain text. Here are a couple of keyboard shortcuts that will allow just that.
When you are editing a large document in Microsoft Word, you want simple and easy ways to help your editing process. One such tip is to use keyboard shortcuts to find and replace text in the document. That’s right; Keyboard Shortcuts aren’t just for Windows 10.
Here is a look at the keyboard shortcuts you need to know to do just that.
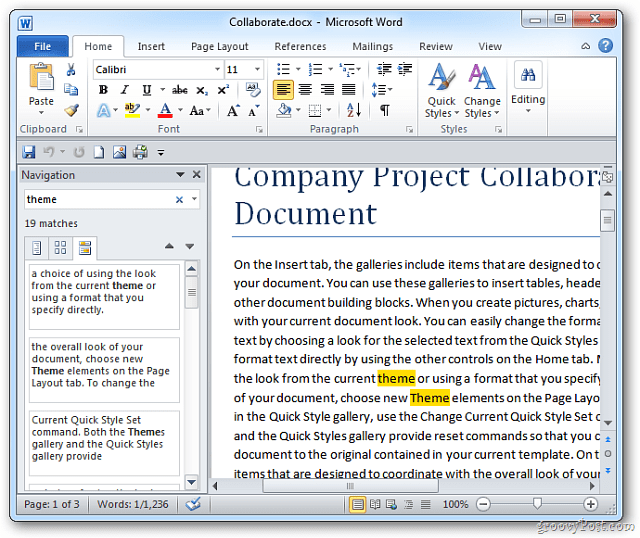
While you’re in a large Word document, you can easily find text by hitting Ctrl + F. Then, type the word or phrase you’re looking for in the navigation pane. When the word or phrase you are looking for is found, each instance will be highlighted in the document. Just this step alone makes it much easier to manage the specific text you’re looking for.
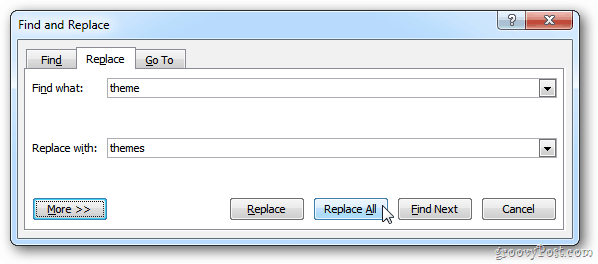
If you want to find and replace text in a Word document, use the key combo Ctrl + H. That will bring up the “Find and Replace” dialog box. Then type in the word or words you’re looking for and what to replace them with. Then click the “Replace All” button.
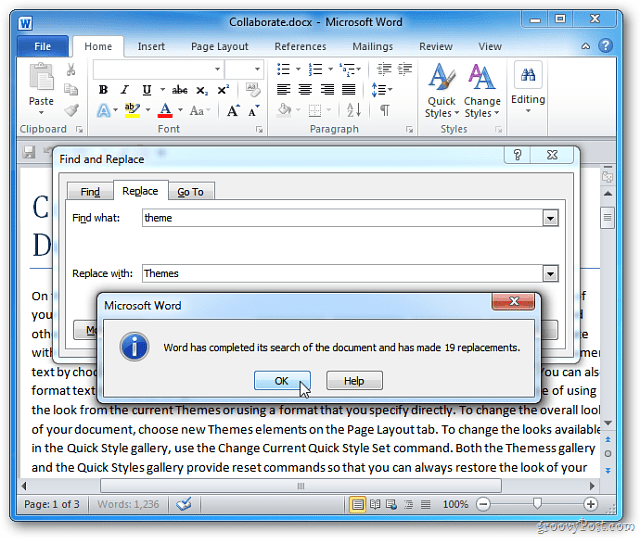
Word will go through and replace the text. When complete, it will display the following message letting you know the task is complete. Click OK.
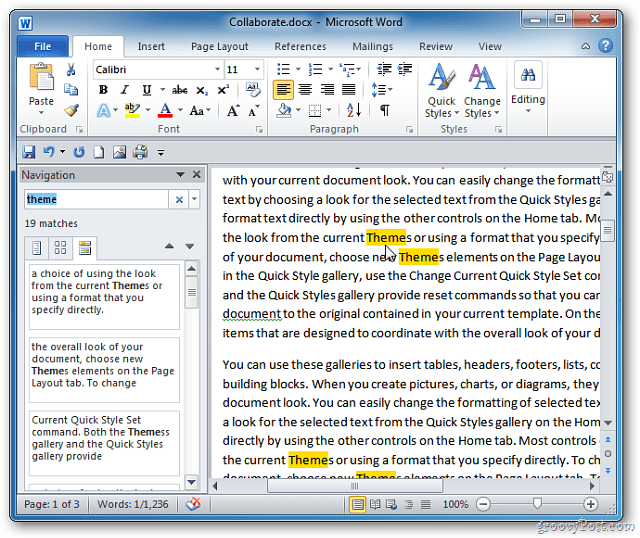
Use the Ctrl + F keyboard shortcut to find the text that was replaced. Looks good!


