
Find and replace text

-
Go to Home > Replace.
-
Enter the word or phrase you want to replace in Find what.
-
Enter your new text in Replace with.
-
Choose Replace All to change all occurrences of the word or phrase. Or, select Find Next until you find the one you want to update, and then choose Replace.
-
To specify only upper or lowercase in your search, select More > Match case. There are several other ways to search in this menu.
For other options, see Find and replace text
Find and replace basic text
In the upper-right corner of the document, in the search box  , type the word or phrase that you want to find, and Word will highlight all instances of the word or phrase throughout the document.
To replace found text:
-
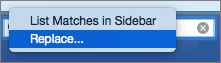
Select the magnifying glass, and then select Replace.

-
In the Replace With box, type the replacement text.
-
Select Replace All or Replace.
Tips:
-
You can also open the basic Find and Replace pane with the keyboard shortcut CONTROL + H.
-
When you replace text, it’s a good idea to select Replace instead of Replace All. That way you can review each item before replacing it.
-
You can find text with special formatting, such as bold or highlight, by using the Format menu.
-
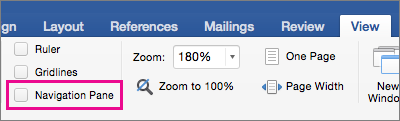
Select View > Navigation Pane.
-
In the Navigation Pane, select the magnifying glass.
-
Select Settings
, and then select Advanced Find & Replace.
Notes:
-
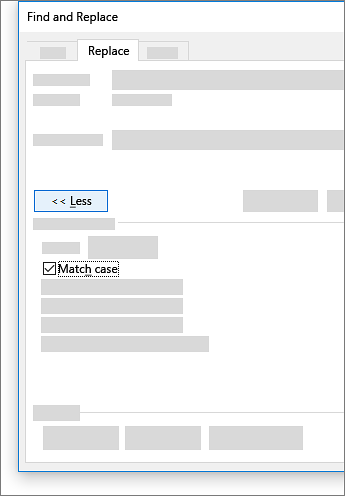
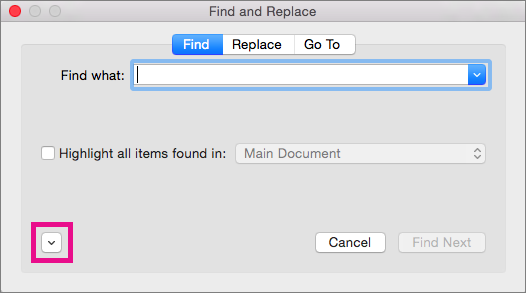
Select the arrow at the bottom of the Find and Replace dialog box to show all options.
-
-
-
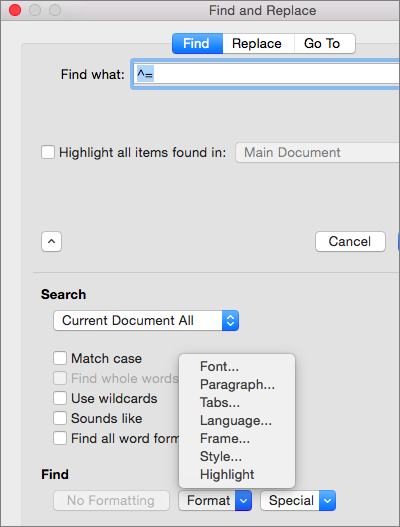
On the Format menu, select the option that you want.
If a second dialog box opens, select the options that you want, and then select OK.
-
In the Find and Replace dialog box, select Find Next or Find All.
 , and then select Advanced Find & Replace.
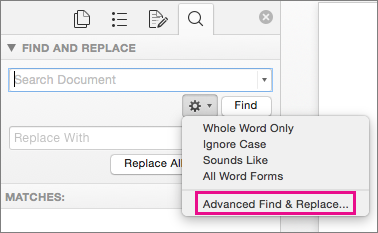
You can find and replace text with special formatting, such as bold or highlight, by using the Format menu.
-
Select View > Navigation Pane.
-
In the Navigation Pane, select the magnifying glass.
-
Select Settings
, and then select Advanced Find & Replace.
-
At the top of the dialog box, select Replace.
Notes:
-
Select the arrow at the bottom of the Find and Replace dialog box to show all options.
-
-
-
On the Find what box, type the text that you want to find.
-
On the Format menu, select the formatting that you want to find.
If a second dialog box opens, select the options that you want, and then select OK.
-
Select in the box next to Replace with.
-
On the Format menu, select the replacement formatting. If a second dialog box appears, select the formats that you want, and then select OK.
-
Select Replace, Replace All, or Find Next.
-
Select View > Navigation Pane.
-
In the Navigation Pane, select the magnifying glass.
-
Select Settings
, and then select Advanced Find & Replace.
Notes:
-
Select the arrow at the bottom of the Find and Replace dialog box to show all options.
-
-
-
On the Special menu, select the special character that you want to find.
-
Select Find Next.

-
Select View > Navigation Pane.
-
In the Navigation Pane, select the magnifying glass.
-
Select Settings
, and then select Advanced Find & Replace.
Notes:
-
Select the arrow at the bottom of the Find and Replace dialog box to show all options.
-
-
-
At the top of the Find and Replace dialog box, select Replace and then select in the Find What box, but don’t type anything there. Later, when you select a special character, Word will automatically put the character code in the box for you.
Note: Select the arrow at the bottom of the Find and Replace dialog box to show all options.
-
On the Special menu, select the special character that you want to find.
-
Select in the Replace with box.
-
On the Special menu, select the special character that you want to use as a replacement.
-
Select Replace or Find Next.
-
Select View > Navigation Pane.
-
In the Navigation Pane, select the magnifying glass.
-
Select Settings
, and then select Advanced Find & Replace.
-
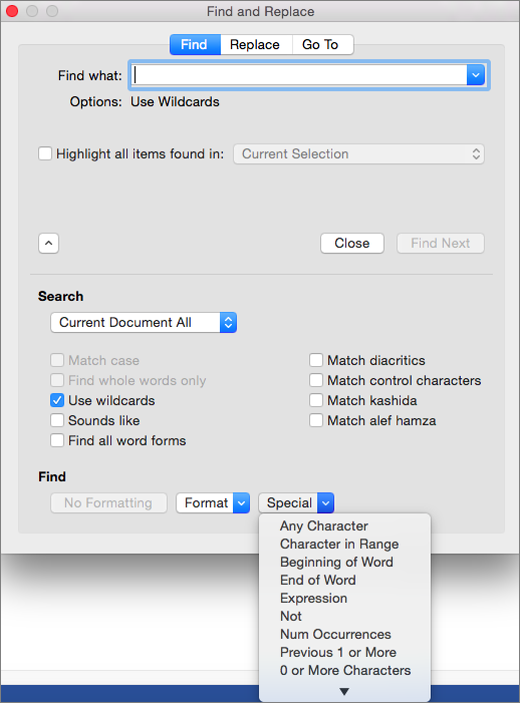
Select the Use wildcards check box.
If you don’t see the Use wildcards check box, select
. -
Select the Special menu, select a wildcard character, and then type any additional text in the Find what box.
-
Select Find Next.
Tips:
-
To cancel a search in progress, press
+ PERIOD. -
You can also enter a wildcard character directly in the Find what box instead of selecting an item from the Special pop-up menu.
-
To search for a character that’s defined as a wildcard character, type a backslash () before the character. For example, type ? to find a question mark.
-
You can use parentheses to group the wildcard characters and text and to indicate the order of evaluation. For example, search for <(pre)*(ed)> to find «presorted» and «prevented.»
-
You can search for an expression and use the n wildcard character to replace the search string with the rearranged expression. For example, type (Newman) (Belinda) in the Find what box and 2 1 in the Replace with box. Word will find «Newman Belinda» and replace it with «Belinda Newman.»
-
-
To replace found text:
-
Select the Replace tab, and then select the Replace with box.
-
Select Special, select a wildcard character, and then type any additional text in the Replace with box.
-
Select Replace All, Replace, or Find Next.
Tip: When you replace text, it’s a good idea to select Replace instead of Replace All. That way you can confirm each replacement to make sure that it’s correct.
-
 .
.
 + PERIOD.
You can refine a search by using any of the following wildcard characters.
|
To find |
Use this |
For example |
|---|---|---|
|
Any single character |
? |
s?t finds «sat» and «set.» |
|
Any string of characters |
* |
s*d finds «sad» and «started.» |
|
One of the specified characters |
[ ] |
w[io]n finds «win» and «won.» |
|
Any single character in this range |
[-] |
[r-t]ight finds «right» and «sight» and «tight.» Ranges must be in ascending order. |
|
Any single character except the characters inside the brackets |
[!] |
m[!a]st finds «mist» and «most» but not «mast.» |
|
Any single character except characters in the range inside the brackets |
[!x-z] |
t[!a-m]ck finds «tock» and «tuck» but not «tack» or «tick.» Ranges must be in ascending order. |
|
Exactly n occurrences of a character or expression |
{ n} |
fe{2}d finds «feed» but not «fed.» |
|
At least n occurrences of a character or expression |
{ n,} |
fe{1,}d finds «fed» and «feed.» |
|
A range of occurrences of a character or expression |
{ n, n} |
10{1,3} finds «10,» «100,» and «1000.» |
|
One or more occurrences of a character or expression |
@ |
lo@t finds «lot» and «loot.» |
|
The beginning of a word |
< |
<(inter) finds «interesting» and «intercept» but not «splintered.» |
|
The end of a word |
> |
(in)> finds «in» and «within,» but not «interesting.» |
Word for the web lets you find and replace basic text. You can match case or fine whole words only. For more varied options, open your document in Word for the desktop.
Need more help?
When we see two lines of words in an MS Word document, we don’t get to see what is separating them. There are severl characters that act as line break. There are several names; line break, new line, carriage return, paragraph break etc.
Today, while doing a bit of data processing, I was required to remove all the line breaks (carriage return) in an MS-Word document and replace line breaks with a comma. I was processing a long list of email addresses with one email address per line. And I wanted this list to become a comma separated list (CSV); so as to use it somewhere else.
In MS-Word, paragraph break is represented by invisible character (¶) which looks like a horizontally flipped P letter. You can toggle the visibility of this character by clicking a button given on the Home tab in MS Word. The button bears the same ¶ symbol. You should click this button to be able to see what exactly is separating the lines.
Our tips on MS-Word make your life easier and increase your productivity at work.
If lines are breaking because of paragraph break then ¶ will appear at the end of the lines. If lines are breaking due to line break (carriage return), a left-angled arrow symbol will appear at the end. Let’s first see how to deal with paragraph break:
How to Remove / Replace Paragraph Break
- Open the Word document that you want to work on
- Press CTRL + H to bring up the Find and Replace box
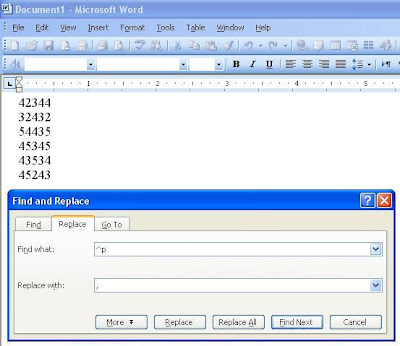
- In the “Find what” box type ^p [this upward arrow character is called caret and is usually available on a number key]
- In “Replace with” box type a comma
- Click on Replace All button.
Thus all the paragraph breaks in you document will get replaced by a comma. You can use whatever character(s) you like in “Replace with” box. For example, if you want to replace every paragraph break with two paragraph breaks –then you should type ^p^p in “Replace with” box.
If you simply want to remove paragraph breaks; just leave the “Replace with” box blank. And you’ll get a monolithic chunk of text!
READ ALSO: How to find ant replace formatting
How to Remove / Replace Line Break, Carriage Return (Enter key)
Follow the same process as given above. Instead of finding paragraph sign (^p), now you should look for line break or carriage return sign (represented by ^l). Therefore, type ^l in “Find what” box and replace it something else (or with nothing).
NOTE: This article is part of my MS Word Guide. This guide solves your day to day MS Word problems. Easily!
So, this is how you can replace line breaks, paragraph breaks and carriage returns in MS Word document. Please le t me know if you have any questions about this topic. I will be glad to try and assist you. Thank you for using TechWelkin.
Exchange one text string for another in any version of Word
Updated on October 29, 2021
What to Know
- Open the Find and Replace tool in Word with the keyboard shortcut CTRL+H.
- Find and Replace doesn’t take capitalization into account unless you specifically tell it to.
- To replace capitalization, select More in the Find and Replace box, then Match Case > Replace or Replace All > OK.
All editions of Microsoft Word offer a feature called Find and Replace. Use this tool to search for a specific word, number, or phrase in a document and replace it with something else. You can also make several replacements at once—like changing a name or fixing something you’ve consistently misspelled. Use it, also, to replace numbers or punctuation and cap or uncap words.
If you turn on Track Changes before you begin, you can reject the replacement or deletion of any unintended word.
Find and Replace a Word
The Microsoft Word Find and Replace dialog box, in its simplest form, prompts you to type the word you’re looking for and the word you want to replace it with. Then, click Replace, and either allow Word to change every entry for you or, go through them one at a time.
To open the tool, press Ctrl+H (Cmd+H on Mac).
Change Capitalization in Microsoft Word
The Find and Replace feature doesn’t take into account anything about capitalization unless you specifically tell it to. To get to that option you’ll need to click the More option in the Find and Replace dialog box:
- Open the Find and Replace dialog box using your favorite method. We prefer Ctrl+H.
- Click More.
- Type the appropriate entry in the Find What and Replace With lines.
- Click Match Case.
- Click Replace and Replace again, or, click Replace All.
- Click OK.
Advanced Options
When you select the More expander in the Search and Replace dialog box, you’ll encounter several customizations. The list of items varies according to which version of Word you’re running.
Search Options
Select the check boxes to include or exclude things like punctuation, white-space characters, or substrings. Plus, apply tools like word-form matching (i.e., walked also matches walking) and Soundex matching (Karin matches Karen).
Replace Options
Word supports more advanced substitutions, too. Use special characters to substitute text markup with symbols. For example, replace a character code like & with an ampersand. This approach is useful for de-cluttering pasted HTML text that uses HTML codes to render certain symbols.
Thanks for letting us know!
Get the Latest Tech News Delivered Every Day
Subscribe
I want to share with you very useful tip I got from my college.
There are cases when you need to generate a comma separated
string for ‘IN’ clause in a Select statement. For example:
SELECT *
FROM SomeTable
WHERE SomeColumn IN (xxx,yyyy,www,zzzz)
Let`s assume that you have some values separated by Enter,
like this:
42344
32432
54435
45345
43534
45243
This also can be the result of copying some column values
from a select in the SSMS:

Ok, suppose you copied these values and pasted them in MS Word
document. The quickest way to replace the Enters with commas
is to use Find and Replace option (Ctrl-H)

Press Ctrl-H and enter the following:
Now click on «Replace All» button:

Here are some more useful codes you can use:
TAB CHARACTER
Type ^t or type ^9
ANY DIGIT
Type ^#
ANY LETTER
Type ^$
You can see more codes here
Note: All this above can be also done in SSMS by using Regular Expressions:
See my post about it.
P.S: do you know the way how to do this in Notepad?
I think it is not possible , because the «Replace» dialog box
in Notepad does not work with non-printing characters.
I will be glad to know if I am wrong.
Let’s assume you’re a paralegal and you just finished typing a lengthy legal document or a contract for your client, only to discover that you misspelled your client’s name or a wrong company’s name multiple times throughout your document. And don’t have time to manually locate and replace every instance of the text. What would you do? Don’t panic – you can easily fix that with MS Word’s Find and Replace feature.
Find and Replace is one of the most useful features in Microsoft Word that can be used to find a character, a word, or phrase in a document and replace them. You can also find and replace text in a specific section of text or a whole document.
Not only can you find a particular word and replace it with another word, but you can also find text based on its formatting, using wildcards, and with matching prefix or suffix. It also allows you to find and replace text with specific formatting, non-printing characters, or special characters. In this post, you will learn how to find and replace text in MS Word.
Find Text in Microsoft Word
To start with, let’s see how to Find text in Excel using the navigational pane or the Find and Replace tool. Then we’ll explore how to use the Find and Replace tool to replace text based on different options.
Find Text
You can use the Navigation pane to search for a character, a word, or a group of words. And you can access this navigation pane from the Ribbon or by pressing a hotkey Ctrl + F.
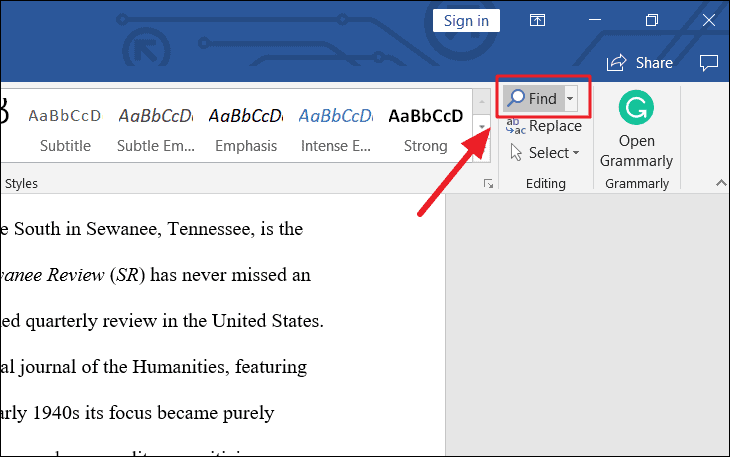
To access, the Navigation panel (Find Command), first, open the Word in which you want to search for text. Then, go to the ‘Home’ tab, and click the ‘Find’ button from the Editing group in the Ribbon. Or you can press the shortcut keys Ctrl + F in the keyboard.
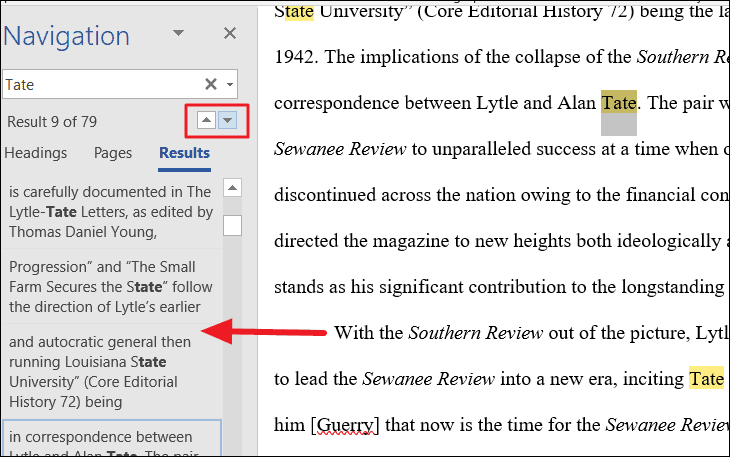
This will open up the Navigation pane on the left of the Window. Type the text or phrase you want to find in the ‘Search document’ text box in the Navigation pane and press ‘Enter’. As you type, the tool will show you all the related matches. In our example, we’ll type ‘Tate’.
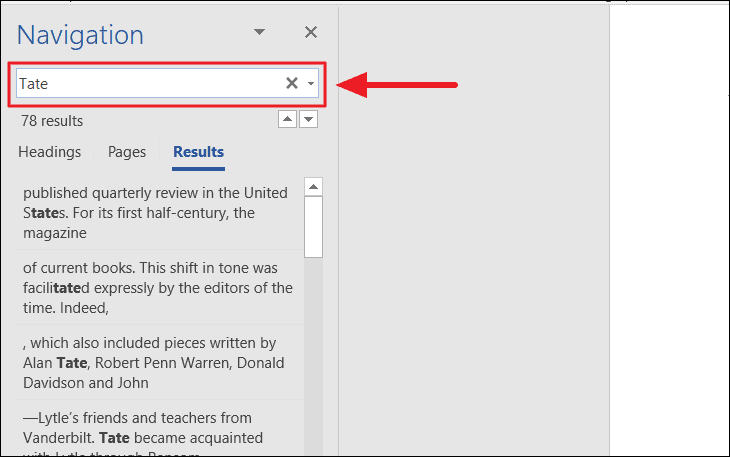
The Find command searches for all the matching text in the document and highlights them in yellow. The navigation pane shows all instances of the search word (Tate) as a preview of the results
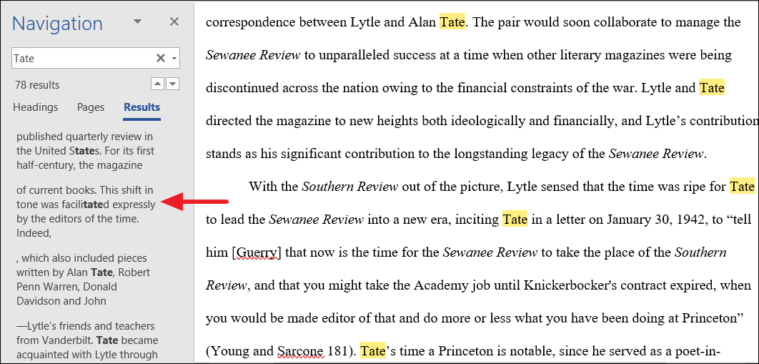
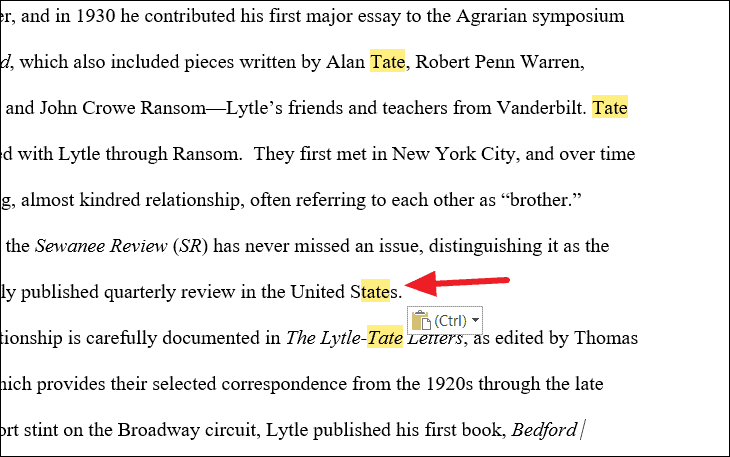
The tool not only highlights the exact words, it even highlights the partially matched words.
You can use the upward and downward arrows beside the text box to jump to the Previous or Next search result. Or you can click on one of the results below the search field to jump to it directly.
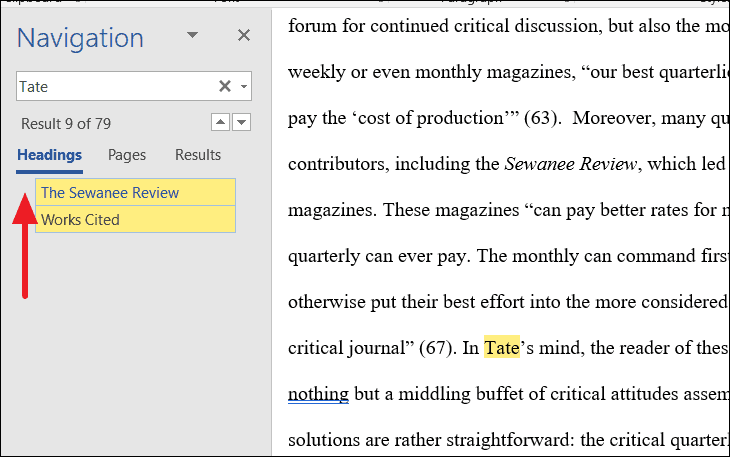
Instead of searching through an entire document for a text or phrase, you can also search a large document by headings. To do that, click the ‘Headings’ tab and select a heading in the Navigation pane to browse by headings in the document.
To search through pages in Word, click the ‘Pages’ tab in the Navigation pane and select one of the thumbnail images of all your pages that you want to see. Then, you can search for a specific text on that page.

Once you’re done editing the document, close the Navigation pane and the highlights will disappear.
Advanced Find
If you are looking for more specific words or phrases, for instance, words with a certain font or style, special characters, or only full words, you can use the Advanced Find feature to track them down. This tool lets you customize your search with various options. Here’s how:
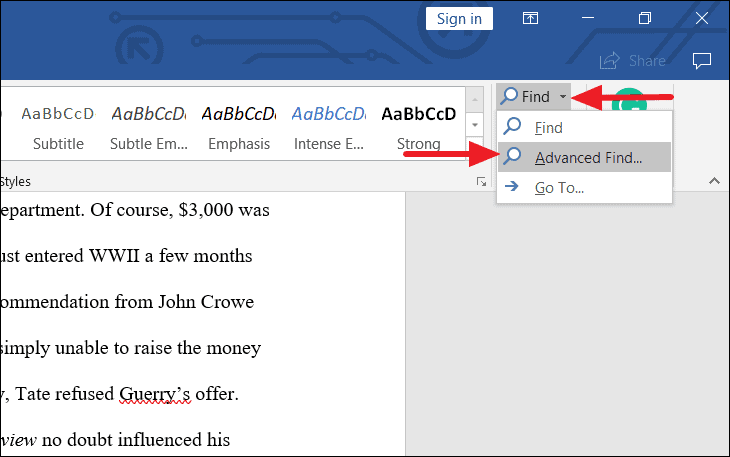
Go to the ‘Home’ tab, click the downward arrow next to the ‘Find’ icon in the Editing group, and select ‘Advanced Find’. Or press Ctrl + H shortcut keys to open the Find and Replace tool.
Or you can even launch the Find and Replace tool from the Navigation pane by clicking the magnifying glass icon in the Search Document text box and selecting the ‘Advanced Find’ option.

The Find and Replace dialog box will appear. Here, you can do a basic search, but if you want to customize your search with more options, Click the More >> button.

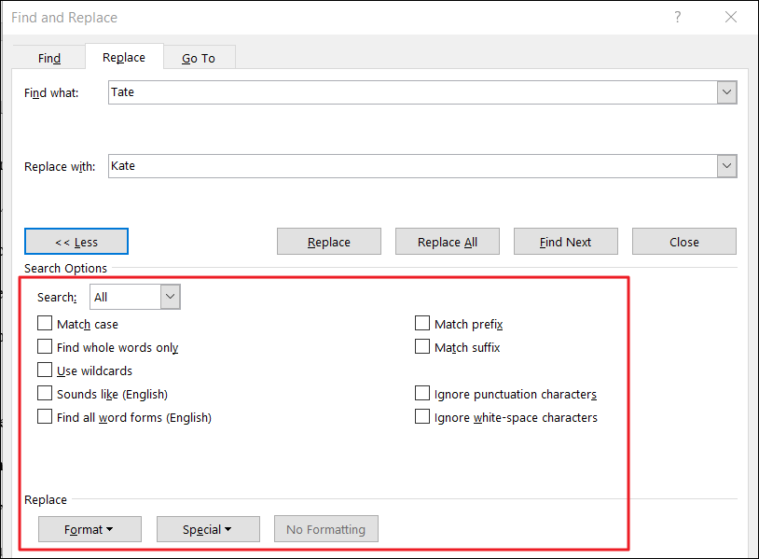
When you expand the More button, you would find more options with which you can do more advanced searches.
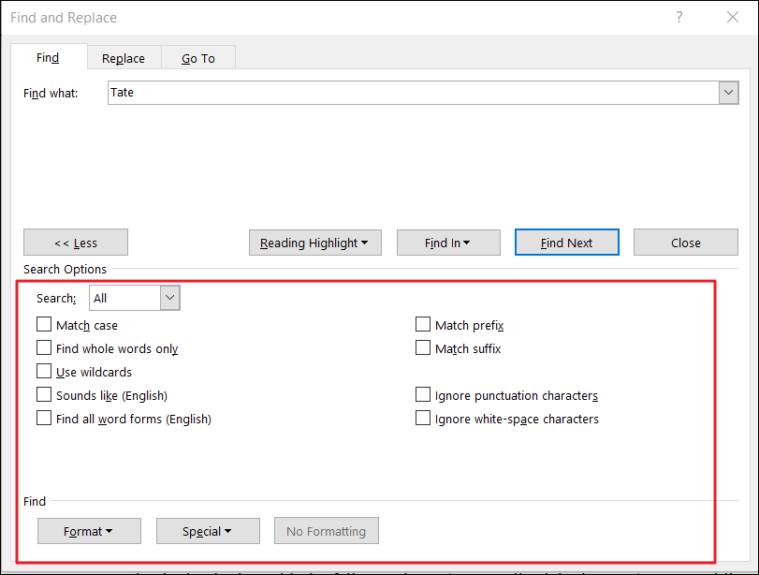
Select one or more options in the Search Options section and click ‘Find Next’ to view the result.
- Match Case: If the Match case box is checked, it searches for the text that exactly matches the uppercase and lowercase letters you type in the ‘Find what’ field.
- Find Whole Words Only: This option finds text that is not partial or part of another word, it only finds the whole words that are exactly matched.
- Use Wildcards: This option is the opposite of the ‘Find Whole Words only’ option. The wildcards you can use are single character (?) and multiple characters (*) wildcards. For example, when you are searching for “Wall*”, you’ll get Walls, Wallmart, or Wallpaper, etc.
- Sounds Like: This option finds words or phrases that sound phonetically similar such as ‘eyes’ when searching for ‘ice’ or ‘ant’ for ‘aunt’.
- Find All Word Forms: This option finds all variants of words (all verb forms). For example, when you search swim, you’ll get swim, swam, and swimming.
- Match Prefix: This searches for words with the same prefixes. For example, search for hype, and you may get hyperactive, hypersensitive, hypercritical.
- Match Suffix: This searches for words with the same suffixes. For example, search for less, and you may get endless, ageless, lawless, effortless.
- Ignore Punctuation Characters: This option lets you ignore punctuation characters in a text when searching. For instance, finding the word ‘Mrs. Jones’ when you searched for ‘Mrs Jones’.
- Ignore white-space characters: This option lets you ignore white spaces in between. For instance, finding the word ‘Days are good’ when you searched for ‘Daysaregood’.
We’ll apply few of these options and see how it works with an example.
Match Case
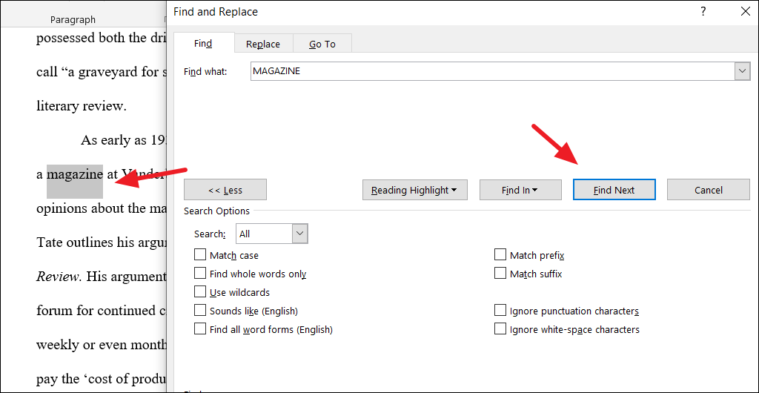
For example, let’s say we search the word ‘MAGAZINE’ in all caps without the match case option enabled. Type the word in the ‘Find what’ field and click the ‘Find Next’ button.

In the ‘Search’ drop-down under Search Options, you choose ‘Down’ to start looking from the top to bottom of the document, choose ‘down’ to start looking from the bottom to top of the document, or ‘All’ to search all over the document.
When you click ‘Find Next’, it will highlight the first instance of the word in grey. When you click ‘Find Next’ again, it will select the next instance of the word. As you click Find Next each time, it will highlight the matching word one at a time.
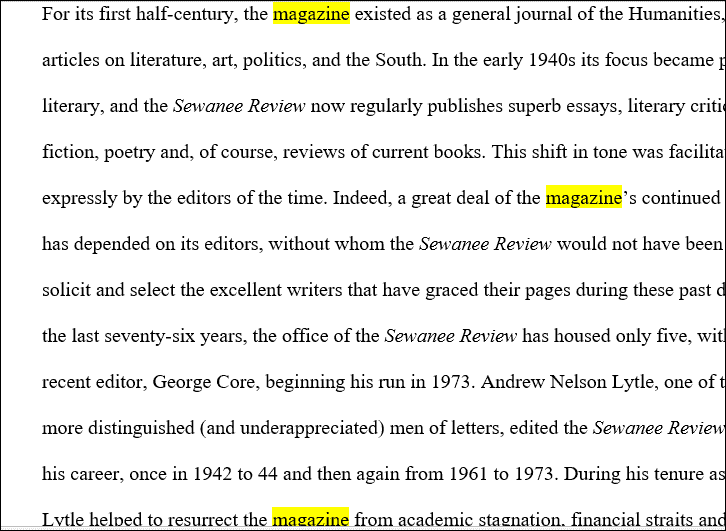
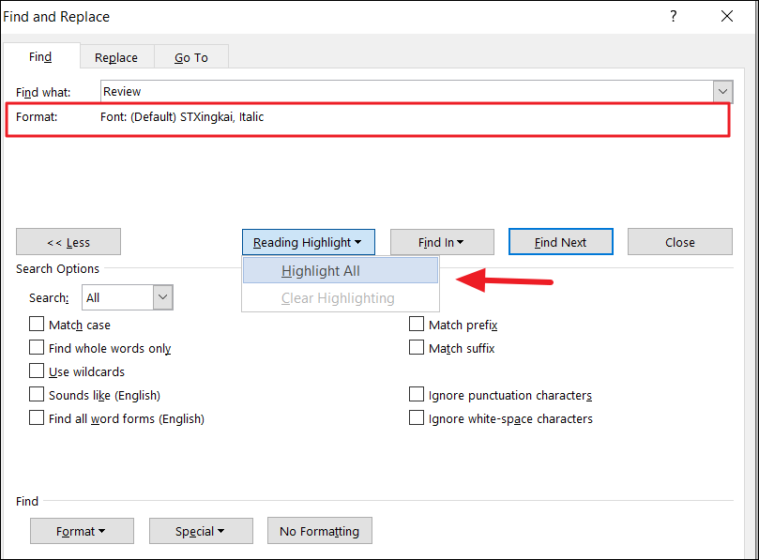
If you want to highlight all the instances of the word at once, click the ‘Reading Highlight’ button and select ‘Highlight All’.
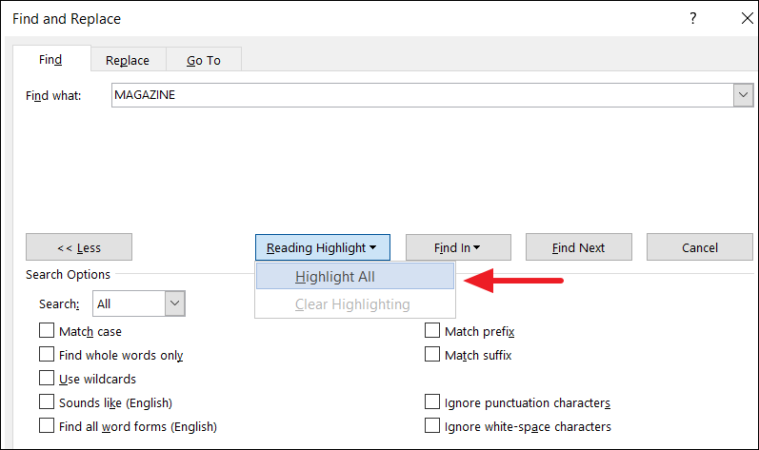
You would get several matches with the word all highlighted in yellow.
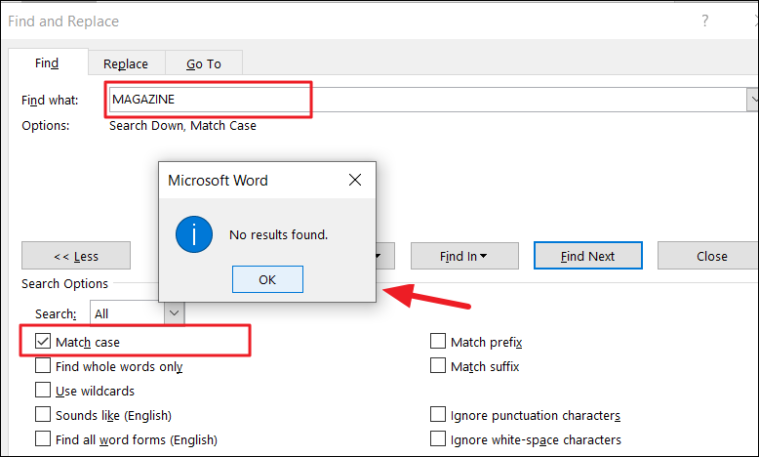
But if we searched the same word (capitalized) with match case enabled, we would get no results. Because the tool only looks for the word that exactly matches the uppercase letters we typed earlier.
Find All Word Forms
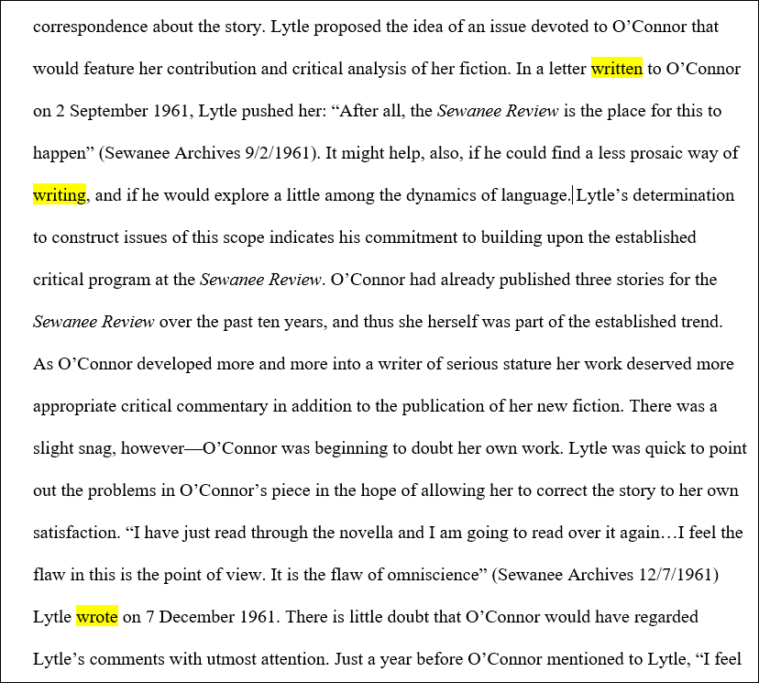
In another example, if we searched the word ‘write’ with the ‘Find all word forms (English)’ setting enabled, we would get all variants of the word.
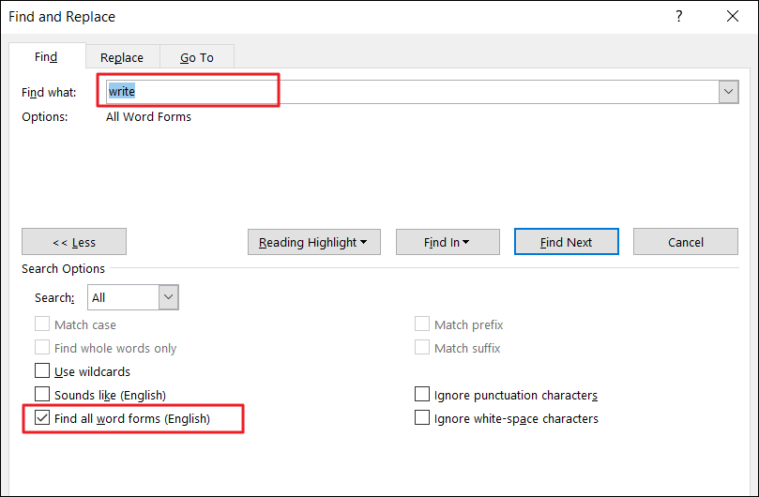
Word will find all verb forms of the word as shown below.
Advanced Find with Formatting
You can also search for certain word or phrase with specific formatting applied.
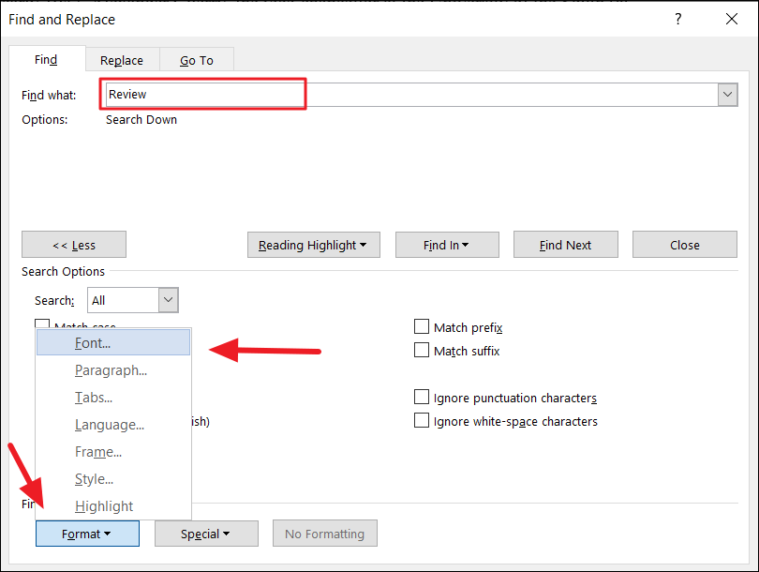
To find words with formatting, first, type the word in the ‘Find what’ box and click the ‘Format’ drop-down button at the bottom of the Find and Replace dialog box. Then choose the format in which you want to look for the word.
You can even find words with specific font format, paragraphs with specific alignment and format, tabs, words in a certain language, text frame, style, and highlight.
We are going to search for the word with a certain font format, so we are choosing ‘Font’. In the Find Font window, specify the format as shown below and click ‘OK’.
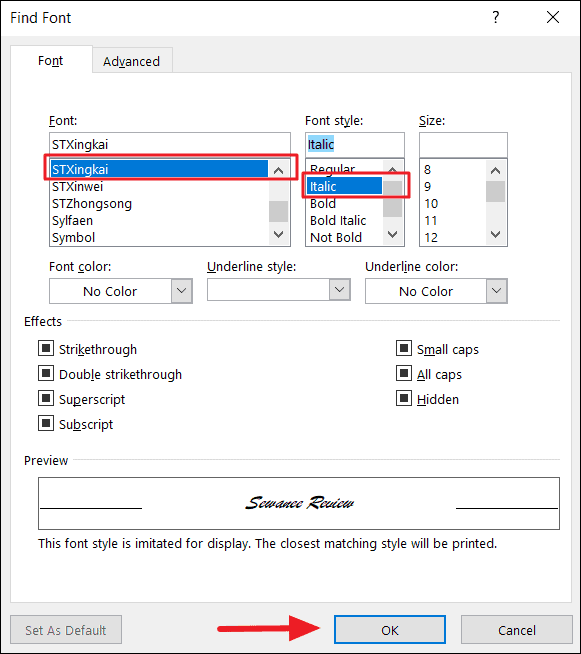
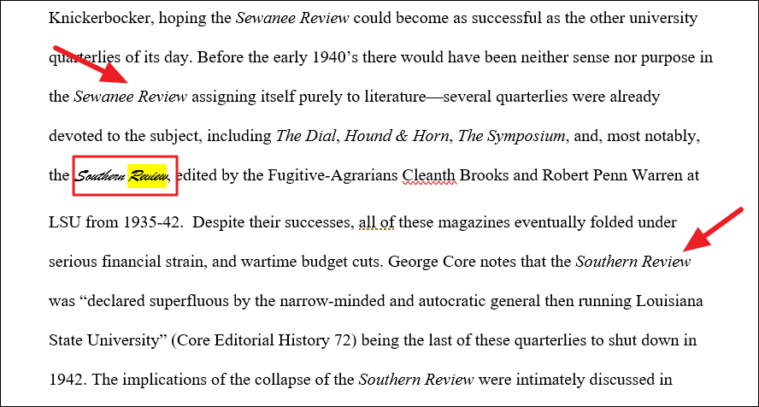
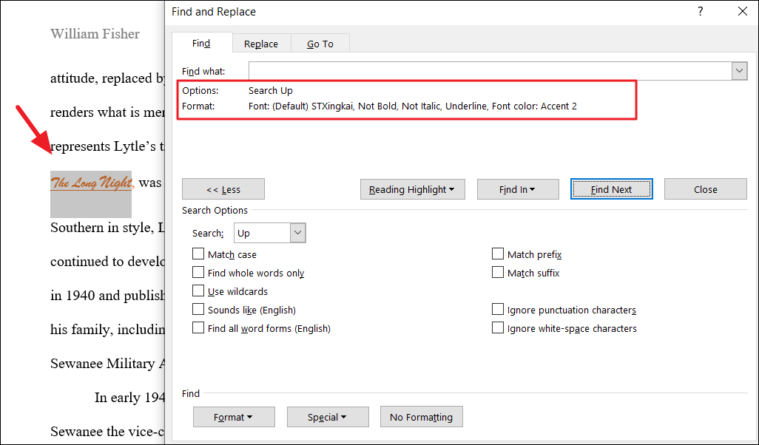
The chosen Format ‘Font: (Default) STXingkai, Italic’ will appear under the ‘Find What’ text box in the Find and Replace dialog box. Now click ‘Highlight All’ to find the matching words with that format.
As you can see, the tool only highlights the words with that specific font format, while it doesn’t highlight the same matching word in a different font format.
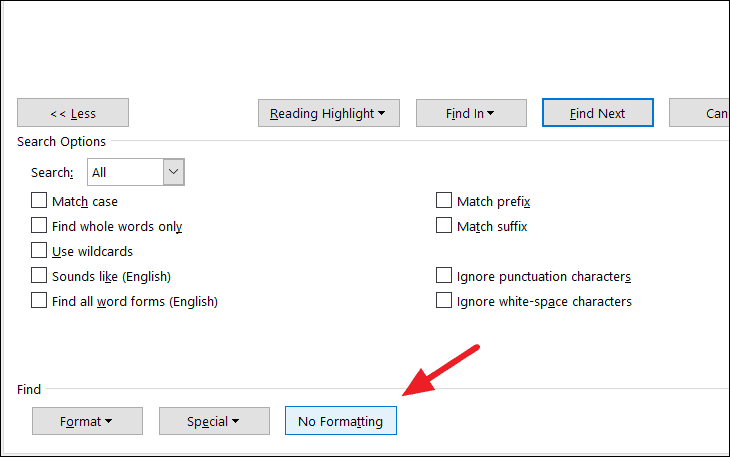
To clear the formatting for the search, click the ‘No Formatting’ button at the bottom of the Find and Replace dialog box.
Find Text with Only Formatting
You can even find texts with formatting alone. You don’t even have to type a word or phrase, you can just specify the only format of the text.
And the tool will find you all the words or phrases with the matching format.
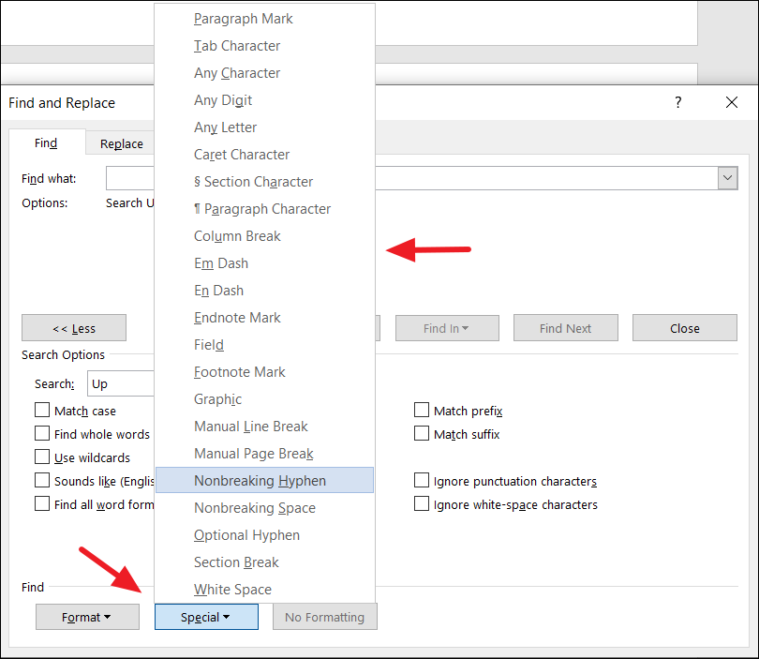
The Find and Replace tool also lets you find non-breaking characters/special characters or words with special characters by choosing the character(s) from the ‘Special’ drop-down button at the bottom of the Find and Replace dialog box.
Find and Replace Text in MS Word
So far, you have learned how to find text and how to find text with advanced options, now let us see how to replace the found text.
The Replace function allows you to find a word or a group of words and replace it with something else or find a word based on text formatting and replace it with other text, or find a specific word and replace its formatting, or find and replace characters with other special characters or words.
Find and Replace Text
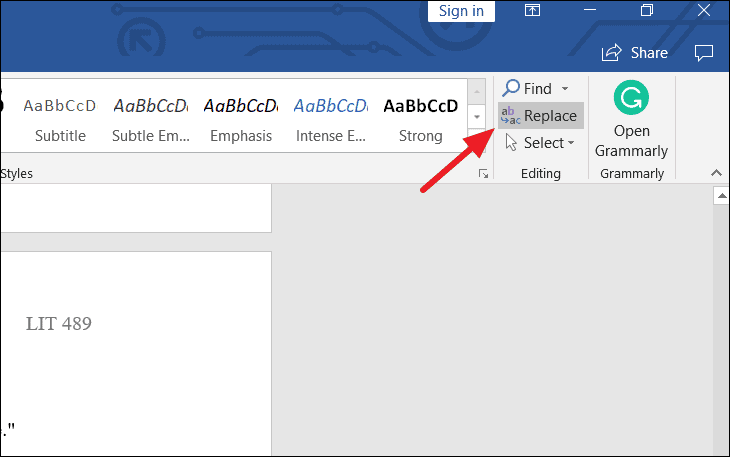
To find and replace a particular word or phrase for another, navigate to the Editing group in the ‘Home’ tab and click the ‘Replace’ command. Alternatively, you can also press the keyboard shortcut Ctrl + H.
This will open the Find and Replace dialog box. In the Find and Replace dialog box, fill out the two fields:
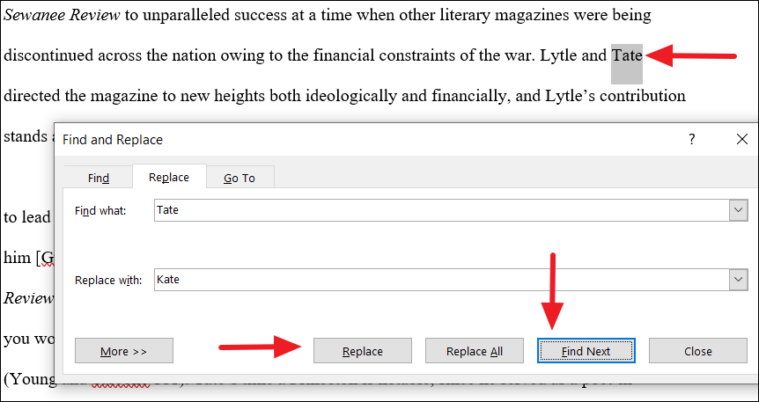
- Type the text you want to search for in the ‘Find what:’ field.
- Type the text you want to replace it with in the ‘Replace with:’ field.
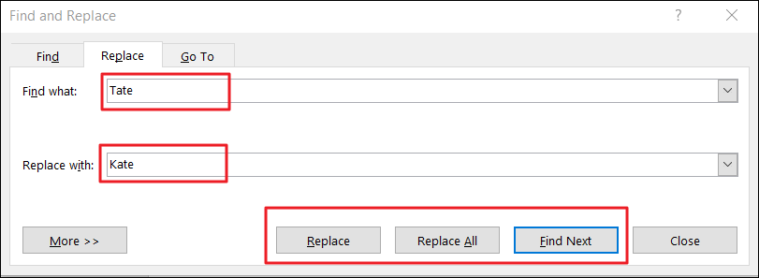
Once you enter the necessary texts, you can either click the ‘Replace’ button to replace the text one by one or ‘Replace All’ to replace all the instances of the word at once.
Replacing all the text together may cause errors in your document if you are not cautious. For example, if you are replacing all the ‘He’ words with ‘She’, it may also replace the words Head with Shead, help with Shelp, heat with Sheat, and so on. So sometimes, it’s better to replace them one at a time.
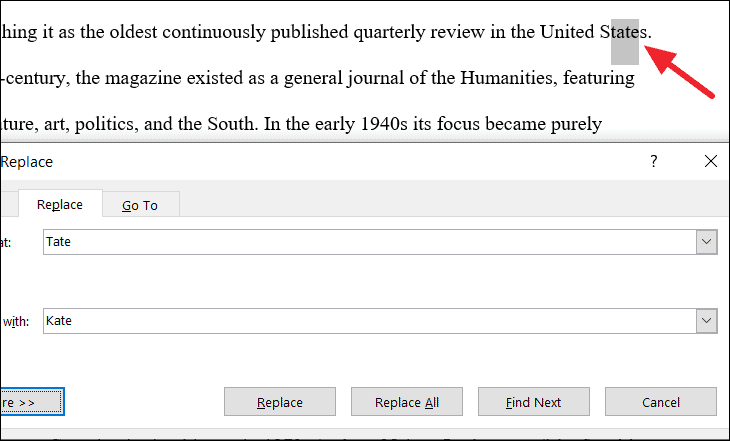
Click the ‘Find Next’ to find the first instance of the text highlighted in gray and click ‘Find Next’ again to jump to the next instance. Review each instance and click ‘Replace’ to exchange the currently highlighted text.
You can click the title bar of the Find and Replace dialog box and drag it out the way to see the results behind it.
Once you’re done, click the ‘Close’ button to close the dialog box.
Note: If you leave the ‘Replace With’ field blank, the search text in the ‘Find What’ field will be deleted from the document.
Advanced Find and Replace Text
If you are looking to replace more specific words such as words with punctuation, capitalization, certain font or style, or even special characters, you can use the advanced search options of the Find and Replace tool.
To access the advanced options of Find and Replace, click the ‘More >>’ button at the bottom of the dialog.
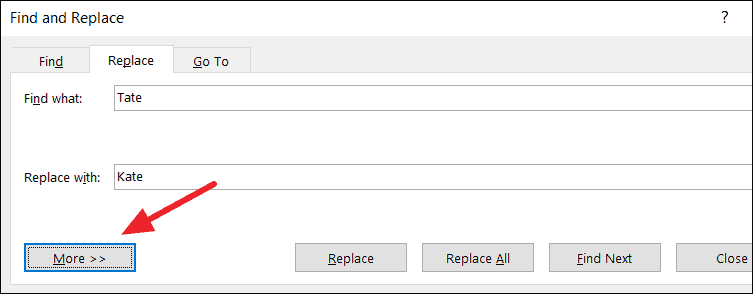
Here, you have various search and replace options that you can use to narrow down your search.
As we discussed earlier in the Advanced Find section, you already know what each option under the Search Options is used for.
Select one or more options under the Search Options and click ‘Find Next’ to find the matching words or click ‘Replace’ to replace one instance at a time or click ‘Replace All’ to exchange every instance at once.
Example:
As we mentioned before, this tool finds the combinations of characters of the given word, even as part of other words.
For example, when we search for the word ‘Tate’ in the document, it finds that combination of characters even as part of other words like ‘United States’.
And this is not ideal when we replace these words. Also if you hundreds of matches, it would take forever to replace words one by one.
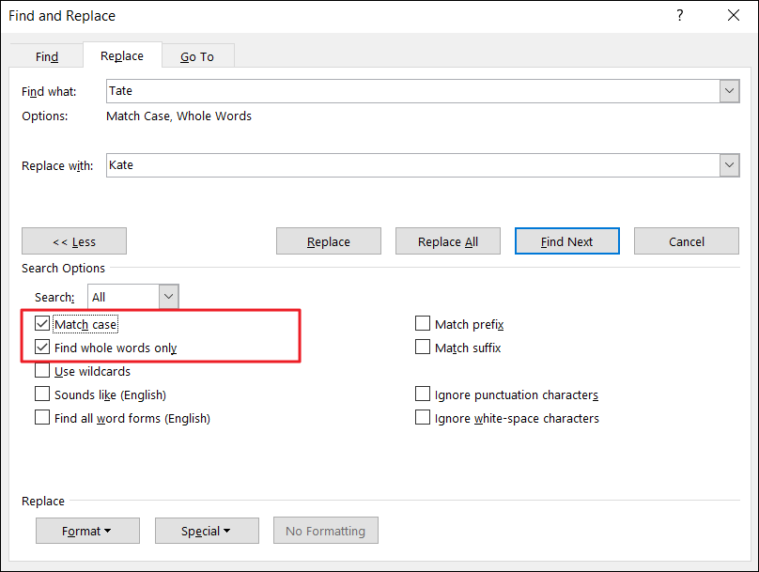
To fix this, check the ‘Find whole words only’ option, to find the words that are not partial or part of other words, it only finds whole words that are exactly matched. Here, we also checked the ‘Match case’ option to make sure it matches the exact uppercase and lowercase letters too. Then, click ‘Replace’ or ‘Replace All’ to replace the words.
You can use the rest of the above options in a similar fashion to customize your search to find specific words.
Find Text and Replace Formatting
You can also find a particular word and replace it with the same word but with specific formatting or replace it with another word with formatting.
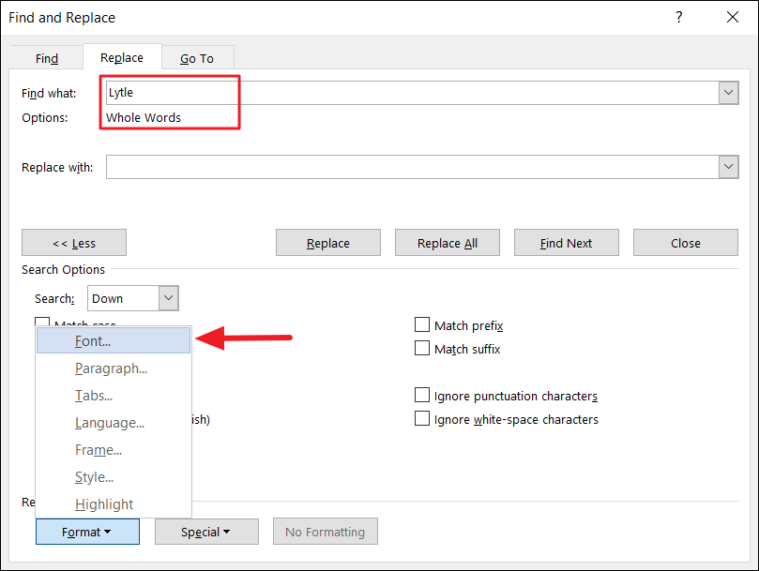
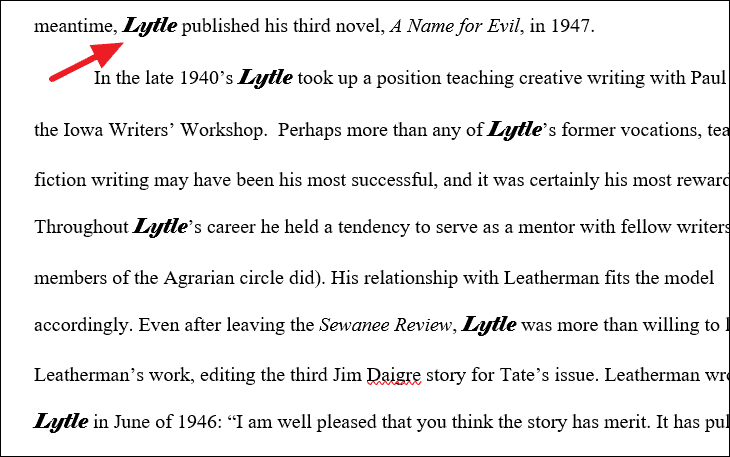
For example, we want to find and replace the whole word ‘Lytle’ with a specific font format. To replace formatting, type the word you want to find in the ‘Find what’ field and select the ‘Find whole words only’ option to search for only that whole word. Then, click the ‘Format’ button at the bottom of the dialog box and choose ‘Font’.
You can replace words with other formatting options such as Style, Paragraph, Frame, and so on.
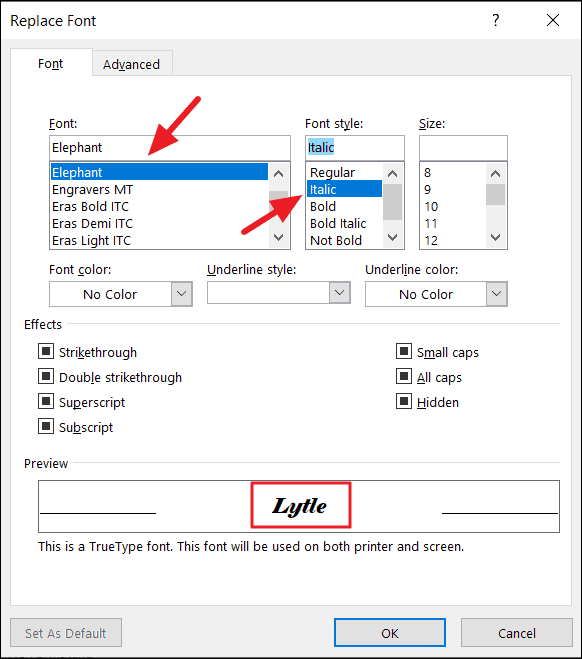
In the Replace Font dialog, choose your desired format style such as font, font style, font color, etc. In our case, we are choosing ‘Elephant’ font and ‘Italic’ style. Then, click ‘OK’ to apply.
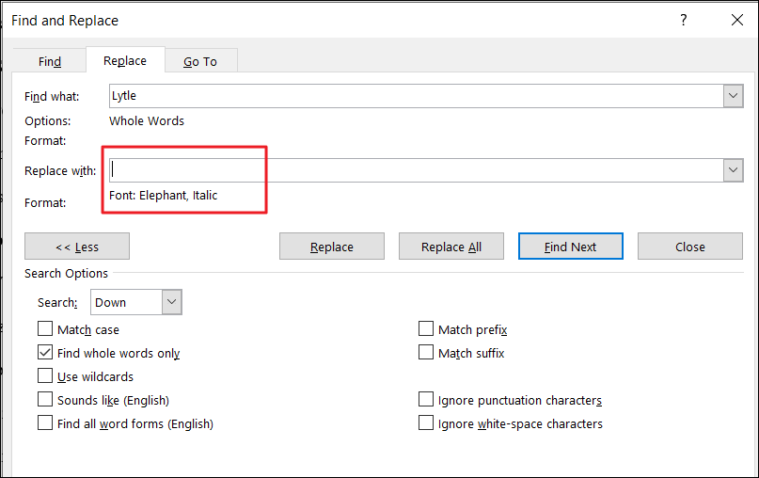
Back in the ‘Find and Replace’ dialog box, you can see the chosen formatting is set for the ‘Replace with:’. Since we are only replacing the formatting of the word, leave the ‘Replace with:’ field blank. Then, click either the ‘Replace’ or ‘Replace All’ button to replace the formatting.
Once you click the ‘Replace All’ button a message box will appear informing you how many replacements were made (In our case, 222).
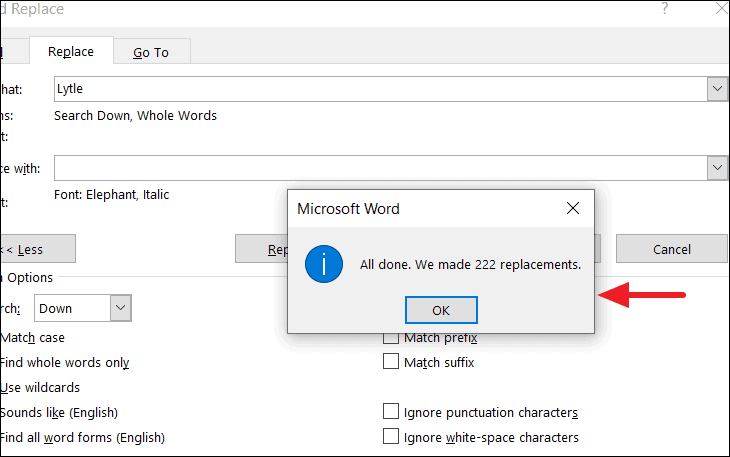
As you can see, all the instances of the word ‘Lytle’ is replaced with specified formatting.
Find Text with a Specific Formatting and Replace
If you want to find a text that has a certain formatting style and replace it with another text, without changing the formatting or with different formatting, you can do it by applying that formatting to the Find word. Here’ how you do this:
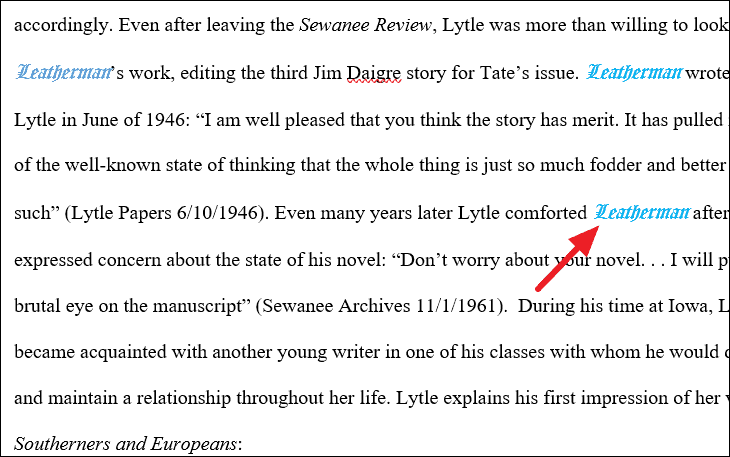
For example, we want to find and replace the text ‘Leatherman’, that has particular formatting (Font: Old English Text MT, Style: Italic, Color: Blue, Accent 5), with the text ‘Lincoln’ (without changing the formatting).
First, type the text you want to search for (in our case, Leatherman) in the ‘Find What’ field. Then, click on the ‘Format’ button and choose the options as required (Font).
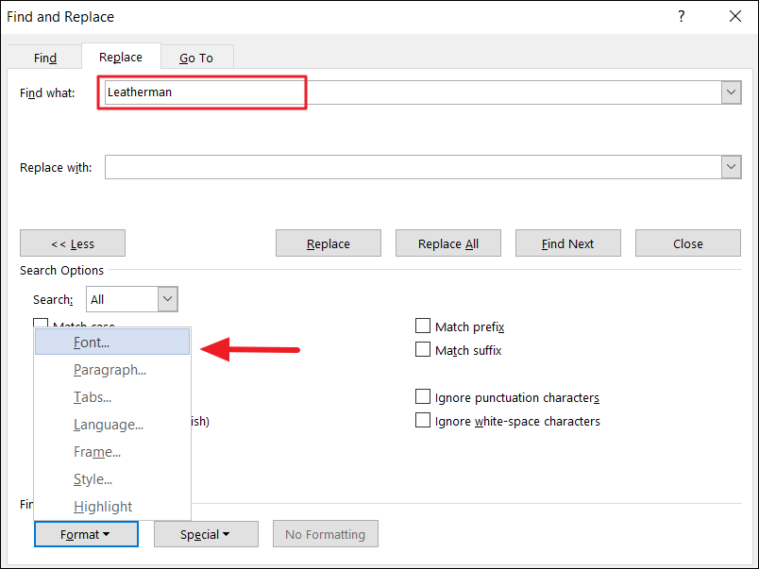
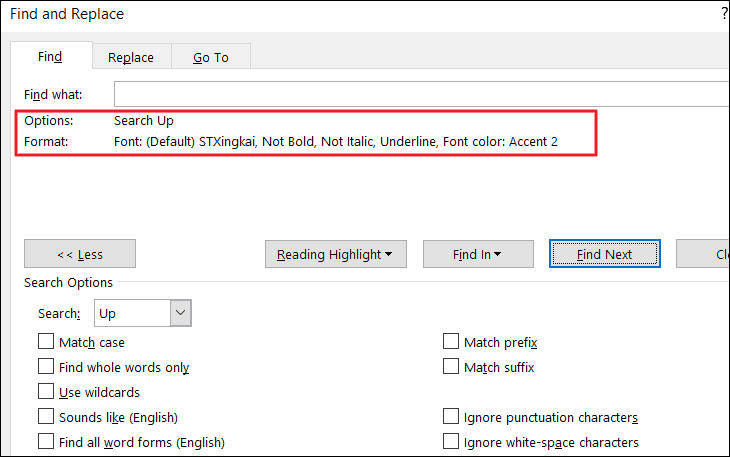
In the Find Font, dialog box, select the required formatting with which we’re going to find text. In our example, the text ‘Leatherman’ is in ‘Font: Old English Text MT, Style: Italic, and Color: Blue, Accent 5’ formatting. Once the options are selected, click ‘OK’.
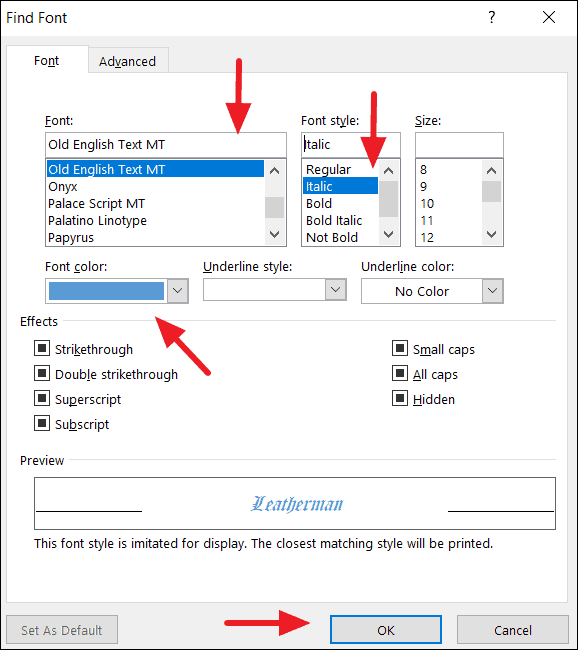
Now the selected formatting options should appear under the ‘Find What’ text field in the Find and Replace.
Next, type the text you want it to be replaced with (Lincon) in the ‘Replace with field:’ and click ‘Replace All’. You can also add formatting to the replacement text if you want.

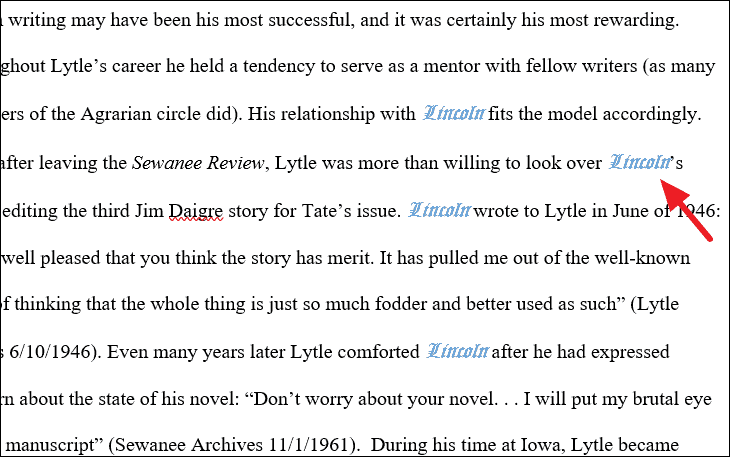
Once you click ‘Replace All’, all of the instances will be replaced and a prompt will show you how many replacements were made.

As you can see all the instances of the ‘Leatherman’ with formatting is replaced by the ‘Lincoln’ without changing the formatting.
Find and Replace Special Characters/Non-Printing Characters
The find and replace feature can also help you find special character characters and replace them with other special characters such as ®, é, ä, or any other character listed in the Symbol dialog. You can also find and replace non-printing characters such as manual line breaks, tab characters, paragraph marks, etc. You can even replace special characters with text and vice versa.
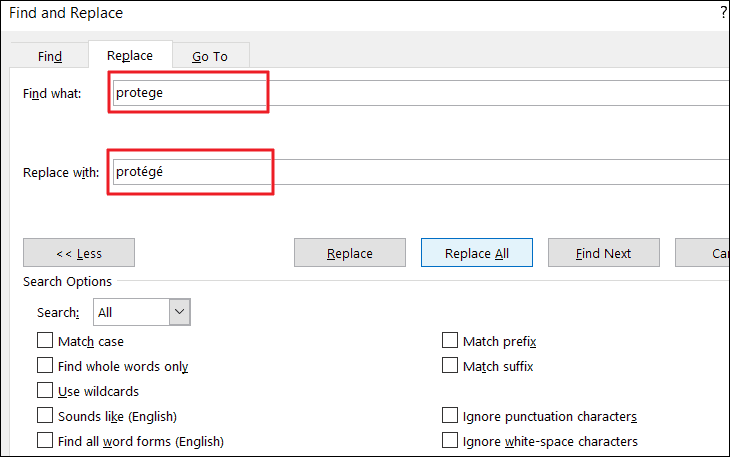
For example, if you want to find and replace the word ‘protege’ with ‘protégé’, type ‘protege’ in the Find what box and type ‘protégé’ in the ‘Replace with’ box. Then, click ‘Replace’ or ‘Replace All’ to replace them.
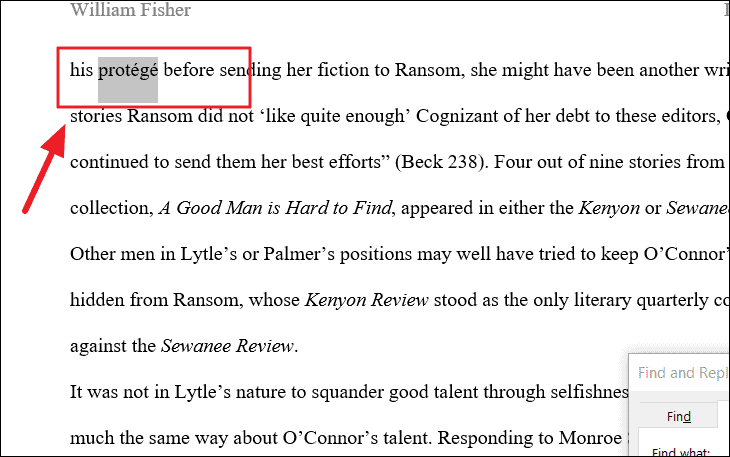
As you can see the found texts are replaced with replacement text with special characters.
Sometimes you want to replace manual line breaks (non-printing characters) with paragraph marks, in such cases, you need to insert respective character code in the ‘find what’ and ‘replace with’ boxes.
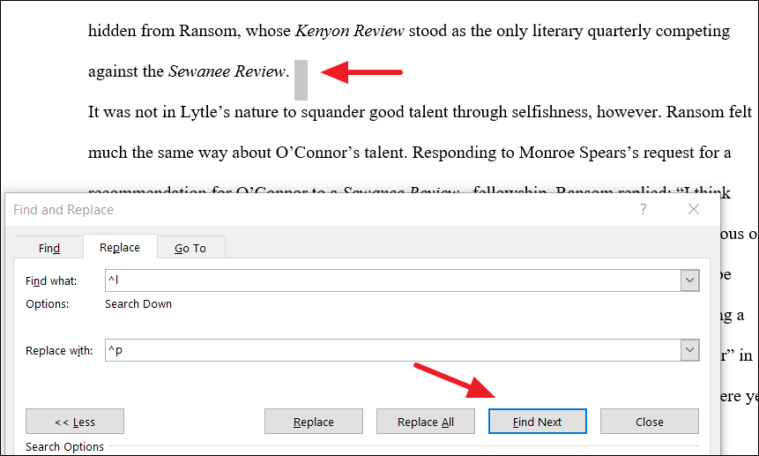
For example, we want to replace all manual line breaks in the documents with paragraph marks. The character code for a manual line break and paragraph mark is ‘^l’ and ‘^p’ respectively. You can either type the code or if you don’t know the code, use the ‘Special’ button to insert the code.
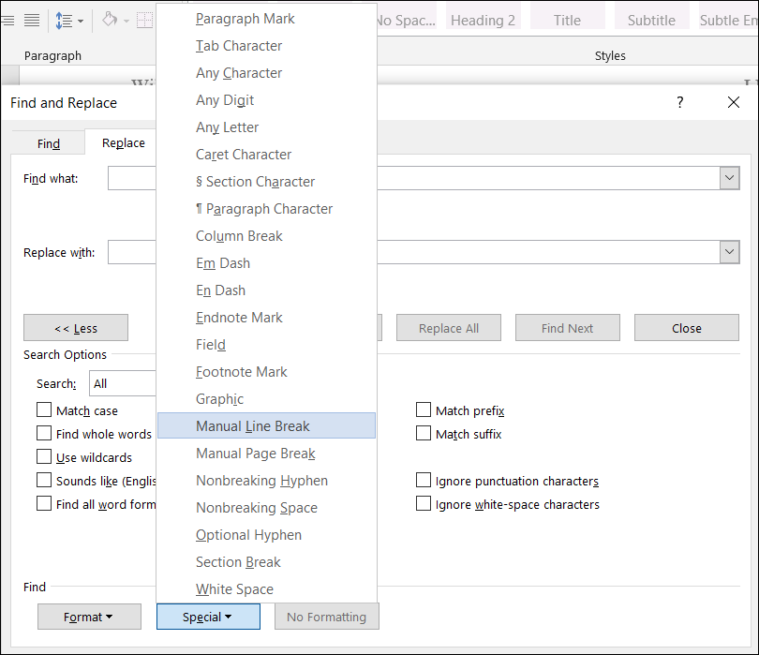
To insert non-breaking characters, first, select the text box where you want to insert. Then, click the ‘Special’ button at the bottom of the Find and Replace dialog box and select an item from the list. And the tool will automatically insert the respective character code in the text box.
In the example, we are choosing ‘Manual Line Break’ for the ‘Find what’ field.
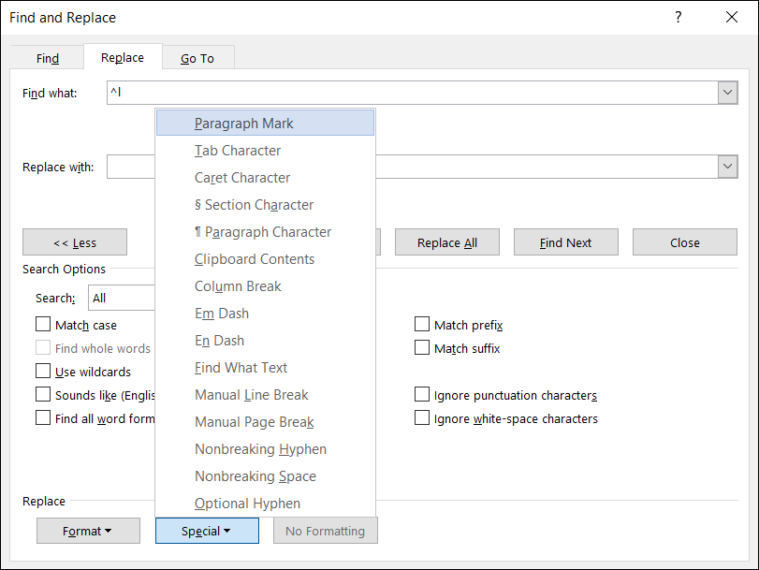
And ‘Paragraph Mark’ for the ‘Replace with’.
Then, click ‘Find Next’ to see where the line breaks are located. Now, click ‘Replace All’ to replace all the manual line breaks in the documents.
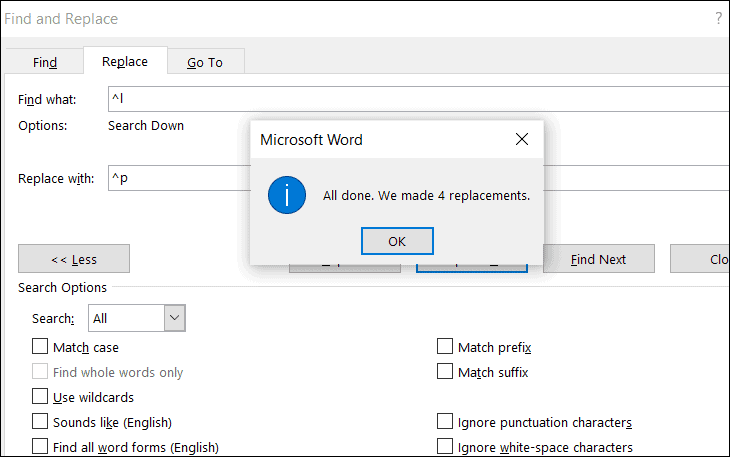
As you can see below, the manual line breaks are replaced with paragraph marks.
In the similar way, you can also replace non-breaking characters/special characters with text and vice versa.
That’s everything you need to know about finding and replacing text in Microsoft Word.