
Word for Microsoft 365 Word for the web Word 2021 Word 2019 Word 2016 Word 2013 More…Less
Moving or repositioning a picture on page in Word is as simple as dragging it with your mouse. But sometimes it doesn’t work. The key to getting the results you want is to select Layout Options.

-
Select a picture.
-
Select the Layout Options icon.
-
Choose the layout options you want:

-
To bring your picture in front of the text and set it so it stays at a certain spot on the page, select In Front of Text (under With Text Wrapping), and then select Fix position on page.
-
To wrap text around the picture but have the picture move up or down as text is added or deleted, select Square (under With Text Wrapping), and then select Move with text.
-
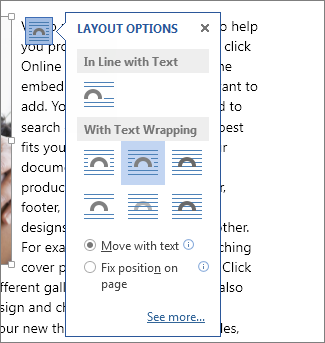
For or more information and examples of text wrapping, see Wrap text around pictures in Word
The picture is probably behind another object, like a block of text:

To select the picture, use the Selection pane:
-
Select Home > Select > Selection Pane.
-
In the Selection pane, select the picture.
To move a picture a tiny amount, select the picture, then hold down the Ctrl key and press an arrow key.
To move several objects at the same time, group them together:
-
Select the first object.
-
Hold down the Ctrl key and select the other objects.
-
Right-click one of the objects, point to Group, and then select Group.
Tip: If you are unable to group or multi-select pictures, it’s possible that the layout of your picture is inline with text. If so, please refer to Open Layout Options to change the picture layout to any option under With Text Wrapping.
For absolute control over the alignment and positioning of a picture, use the Layout box to set alignment relative to margins or columns, absolute position in inches, or relative position by percentage. This comes in handy when you want to place a picture a certain distance from something else, like a page margin.
-
Select the picture.
-
Select the Layout Options icon.
-
Select See more, and then make alignment and position adjustments on the Position tab.
If you can’t select any of the position options on the Position tab, select the Text Wrapping tab, and then select any option except the In line with text option.
If you have more than one picture that you want to overlap on a page, you can enable this in the Layout box.
-
Select a picture.
-
Select the Layout Options icon.
-
Select See more.
-
On the Position tab, in the Options group at the bottom, select the Allow overlap check box.
-
Repeat for each picture for which you want to enable overlapping.
In addition to aligning and positioning pictures on a page, you can also align pictures to each other, or to other objects on the page. Although picture-to-picture alignment is not available from the Layout Options icon or the Layout dialog box, it’s a common task that you might do while working with picture positioning and alignment.
-
Hold down the Ctrl key and select each object that you want to align.
-
Go to Picture Format or Picture Tools Format > Align, and then choose an option, such as Center, Top, or Bottom.
An object anchor  indicates where a picture or object is located in relation to the text in your document. Anchors do not appear for inline pictures; inline objects are tied to the place within the text where they were inserted and are treated like any text character—»in line with text.»
All other wrapping options (Square, Tight, Through, Top and Bottom, Behind Text, In Front of Text) are anchored to a particular place in the document; the anchor indicates the paragraph with which the object is associated. Select a picture, and then select the Layout Options icon to find out how your picture is inserted.
Notes: If you select a picture and it’s not inline with text, but you don’t see an object anchor, you can ensure that anchors are shown in two ways:
-
Show formatting marks On the Home tab, in the Paragraph group, select Show/Hide ¶.
-
Always show anchors Select File > Options > Display, and then select Object anchors.
Because anchors are simply a visual indication of a picture’s relative position on a page, they cannot be removed. However, by trying different text wrapping options, you should find all the flexibility you need in positioning a picture, regardless of its anchor.
For or more information and examples of text wrapping, see Wrap text around pictures in Word.
If you want to ensure that an image stays put even if the text around it is deleted, you can lock its anchor:
-
Select the picture.
-
Select the Layout Options icon.
-
Select See more, and then select Lock anchor.
Note: Because anchors are not used for pictures placed In Line with Text, anchor locking and all other positioning options are unavailable for inline images.
See also
Wrap text around pictures in Word
Rotate a text box, shape, WordArt, or picture in Word
Group or ungroup shapes, pictures, or other objects
If you inserted a picture into your document while using Word for the web, you can cut and paste it to move it within a document, and you can apply paragraph formatting, like vertical spacing and centering, to it. However, you cannot move a picture that was inserted while using the desktop version of Word if the picture has text wrapping or a fixed position on the page.
If you find that you cannot make changes to a picture, and you have the desktop version of Word, select Open in Word to open your document in Word and make changes to its layout.
When you are done, press Ctrl+S to save your document to its original location. You can then open the document again in Word for the web, and continue editing. Word for the web will retain the layout settings that you applied in the desktop version of Word.
Need more help?
Want more options?
Explore subscription benefits, browse training courses, learn how to secure your device, and more.
Communities help you ask and answer questions, give feedback, and hear from experts with rich knowledge.
snapdgn
-
#1
I have to set up a template for a Dictionary with pictures I have to make in
an Interior Design class. My definitions are on the left and pictures on the
right sized 2.5 x 2.5 inches and I don’t want to have to size every picture
for every section ( I have 4 seperate dictionaries to turn in) each time. Is
there are way to set the pictures up in a template where I can just replace
the picture, and have it the same size as I do each definition?
Advertisements
Graham Mayor
-
#2
Use a table with fixed column width for the pictures. This will lock the
size of the images to the width of the table cell. Provided all the pictures
have the same aspect ratio they should all be the same size.
—
<>>< ><<> ><<> <>>< ><<> <>>< <>><<>
Graham Mayor — Word MVP
<>>< ><<> ><<> <>>< ><<> <>>< <>><<>
Want to reply to this thread or ask your own question?
You’ll need to choose a username for the site, which only take a couple of moments. After that, you can post your question and our members will help you out.
Ask a Question
I am using Word 2003 but can use a higher version if necessary. I have a document that I need to embed an image onto at a specific position on every page.
I see an option for adding a background image but I see no option to display the image only once per page at a specific position.
Is there a way to do this?
![]()
Chenmunka
3,22813 gold badges28 silver badges37 bronze badges
asked Jan 11, 2011 at 23:30
![]()
Edit the page’s Header and Footer and embed it in that view.
It doesn’t have to be in the same region of the page as either the header or footer, but if you associate it that way, it will repeat on each page.
answered Jan 11, 2011 at 23:35
1
I used the (PNG) image as a texture and it repeated just fine in Office 2010.
answered Aug 30, 2015 at 7:33
![]()
PrasadPrasad
1012 bronze badges
1
You may have a few pictures in your Word document. To change several parameters of the pictures, you can edit them one by one. When you have a larger number of pictures, you may want to select them all at a time. This allows you to change them all at once. By default, Word does not allow you to select more than one picture at a time.
Word has two layout options for inserting pictures:
- In Line with Text
- With Text Wrapping
By default, Word inserts pictures In Line with Text in the document. That means Word will treat the inserted picture as a character. Word also treats other characters in the text in the same way. Therefore, Word will not allow selecting multiple pictures in your document when they are In Line with Text.
Therefore, you must change the layout of the pictures to With Text Wrapping. This will allow you to select multiple pictures at the same time.
- Using keyboard and mouse
- Using the Select Multiple Objects dialog
We will show you in simple steps how to go about selecting multiple pictures in your Word document.
Let us begin.
Method #1: Select using keyboard and mouse
Step #1: Open Word document
Open the Word document that has several pictures.

Step #2: Change to With Text Wrapping
Click on the first picture to select it.
Click on the icon for Layout Options that appears next to the picture.

The Layout Options menu will open.

Click on one of the icons under With Text Wrapping.
Exit the menu by clicking on the X on the top right-hand corner.
Repeat this step for all the pictures in the document.
Step #3: Select multiple pictures using keyboard
Click on the first picture to select it.
Press the CTRL button on your keyboard and hold it.
Click on the rest of the pictures.
Word will allow selecting multiple pictures.

Method #2: Select using Select Multiple Objects Dialog
Step #1: Open Word document
Open the Word document that has several pictures.

Step #2: Change to With Text Wrapping
Click on the first picture to select it.
Click on the icon for Layout Options that appears next to the picture.

The Layout Options menu will open.

Click on one of the icons under With Text Wrapping.
Exit the menu by clicking on the X on the top right-hand corner.
Repeat this step for all the pictures in the document.
Step #3: Get Select Multiple Objects icon in the Quick Access Toolbar
By default, Word does not show Select Multiple Objects icon in the toolbar. We must include it in the Quick Access Toolbar.
Click on the Customize Quick Access Toolbar icon.

This will open the Customize Quick Access Toolbar menu.
Click on More Commands.

This opens the Word Options dialog box.

Under Choose commands from, click on the expand button.
Click on Commands Not in the Ribbon.

Click inside the box under Commands Not in the Ribbon and type S on your keyboard.
This will bring all commands beginning with S into the box.
Scroll down and click on Select Multiple Objects.
Click on the Add button to include the selection in the right-hand side.
Exit the dialog box by clicking on the Ok button.
Word adds the Select Multiple Objects in the Quick Access Ribbon.

Step #4: Save your document in .doc format
Click on the File tab on the top menu bar to open the file menu.

Click on Save as and then click on Browse to open the File Manager.
Select Word 97-2003 Document against Save as type, and save the document.

Word will save and reopen the document in the .doc format.
Step #5: Select multiple pictures using Select Multiple Objects dialog.
Click on Select Multiple Objects icon in the Quick Access Ribbon.
This will open the Select Multiple Objects dialog box.

Word lists all the pictures within the dialog box.
Click on the names of the pictures you want to select.
Exit the dialog box by clicking on Ok.
Word will select the pictures you chose.

Conclusion
Follow our simple instructions above. You will be able to select multiple pictures in your Word document with ease.
- Remove From My Forums
-
Question
-
Hi
I have a client who wants to apply a watermark to the whole page. They don’t want it to appear once, they want «For client’s use only» repeated and repeated so it fills the whole page diagonally.
The only way I can think of this to happen is if that text is created over and over and saved as a jpeg or gif and that to be inserted as a picture in the page colour section.
Anybody think of another way or is it not possible?
Thanks, Viv
Viv Haig
Answers
-
You could create a picture (.jpg, .png or .gif) with a single occurrence of the text you want to display.
Instead of using Page Layout > Watermark, use Page Layout > Fill Effects > Picture.
Make sure that you have set Word to print background colors and images, in File > Options > Display, Printing Options section.
Regards, Hans Vogelaar
-
Marked as answer by
Saturday, October 20, 2012 11:50 AM
-
Marked as answer by