

A frequent reader question involves repeating text in a Word document. For example, Yassen wants to populate a combo box content control with three items. When users select an item from the control’s dropdown list, Word should repeat the selected value throughout the document.
Spend any time researching repeated content, and you’ll probably come across some difficult solutions, from mapped XML elements to bookmarked controls and form fields. If you’re an ordinary user without advanced skills, you’re out of luck. Fortunately, there are two ways to display repetitive data that don’t require any expert skills.
I’m using Word 2016 (desktop) on a Windows 10 64-bit system, but both techniques will work in older versions. The browser edition doesn’t support content controls. You can’t insert fields in the browser edition, but it will support them, to a degree. You won’t see the field’s results on screen, but Word will print them. There’s no downloadable demonstration file, because you won’t need one.
SEE: 50 time-saving tips to speed your work in Microsoft Office (free TechRepublic PDF)
The example content control
We’ll look at two methods to achieve Yassen’s goal, using the same example combo box content control in both:
- Position the cursor where you want to insert the content control and click the Developer tab. If this tab isn’t available, and you don’t know how to add it to the Ribbon, read Two easy ways to customize the Ribbon interface.
- In the Controls group, click the Combo Box Content Control to insert the control.
- Click Properties in the Controls group.
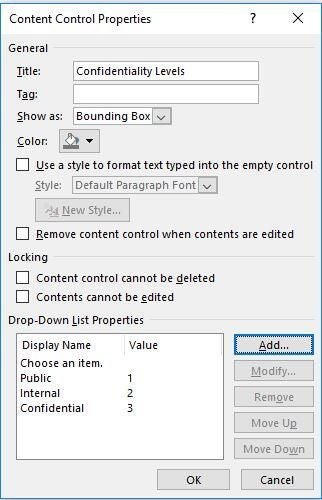
- Enter a meaningful title (name) for the control in the Content Control Properties dialog.
Now, you need to create the items that will populate the control’s dropdown list:
- Click Add.
- In the resulting dialog, enter the first item, Public. Then, enter the value 1 (Figure A) and click OK.
- Repeat those steps to add two more items: Internal, 2 and Confidential, 3. Figure B shows all three items.
Figure A

Add an item to the dropdown list.
Figure B
This dropdown will have three items.
Figure C shows the control with its populated dropdown list. In this example, we won’t use the values you used to define each item for the dropdown list, but we entered them in case you want to further customize yours. (The values are accessible via VBA.)
Figure C

Word populates the control’s dropdown list with the three items you added.
SEE: 20 pro tips to make Windows 10 work the way you want (free TechRepublic PDF)
A copy and paste method
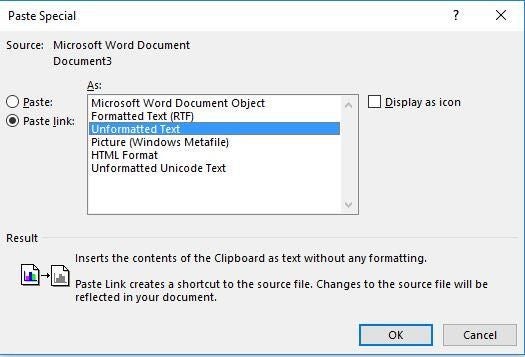
Now you need to paste the control into the areas where you want the selected confidentiality level to repeat. This is the tricky part because if you don’t select the control properly, Word won’t let you paste it as a link, and that’s what you need–a link.
To select the control, double-click it. If it’s aligned with the left margin, you can also click to the left in the margin. Press Ctrl+C to copy the control to the Clipboard. Position the cursor where you want to repeat the control’s selected value. Don’t press Ctrl+V as you normally would to paste something. Instead, choose Paste Special from the Paste dropdown in the Clipboard group on the Home tab (Figure D).
Figure D

Choose Paste Special; don’t use Ctrl+V.
In the resulting dialog, select the Paste Link command to the left, select the Unformatted Text option in the As list, as shown in Figure E, and then click OK. If the Paste Link option is disabled, exit out of the dialog, reselect the control, copy it, and try again.
Figure E
Paste the control as an unformatted link.
Yassen wants the repeated text in the document’s footer, which Word supports. Simply open the footer and paste the control. Figure F shows the copied control in the body of the document a few lines below the original and in the document’s footer.
Figure F

This document will repeat the selected value in the original control in the body of the document and in the footer.
The only thing left to do is to choose an item from the original control’s dropdown list and watch the other two controls update automatically. If you’re still in edit mode for the footer, exit out. Next, click the Confidentiality Levels dropdown and select Public (or any other item). Both copied controls update immediately–even the one in the footer, as shown in Figure G.
Figure G

The copied controls repeat the selected value.
When you open the file, Word will prompt you about the link. Click Yes; if you click No, your copied controls won’t update if you change the selected value in the original control.
You don’t need specialized development skills or even power-user confidence to make this work. If you can copy and paste, your document can support repetitive data.
Use StyleRef
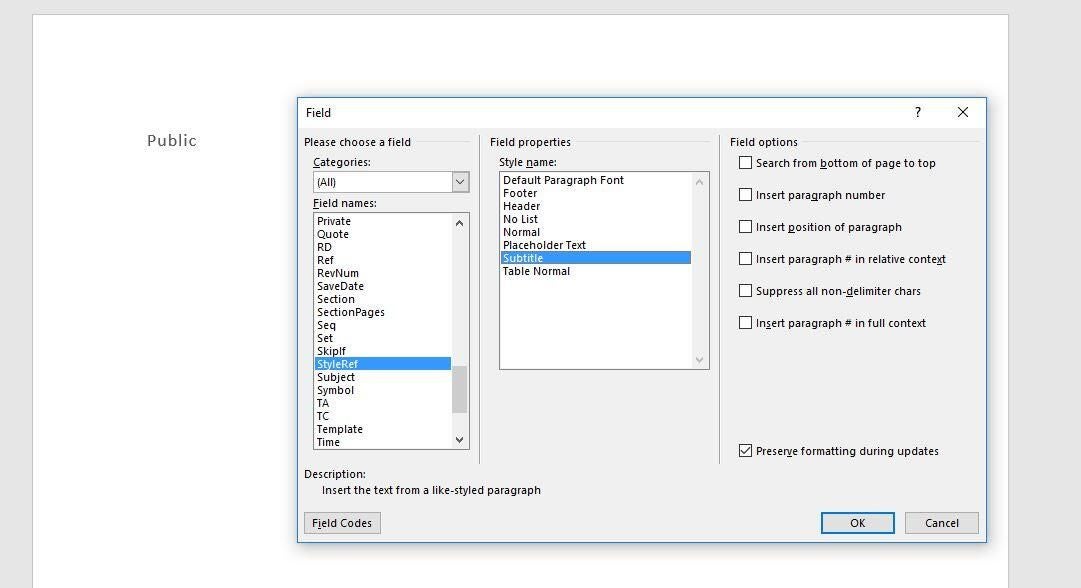
StyleRef is a reference field that automatically displays specifically styled text. In this example, we won’t copy and paste the control as we did before. Instead, we’ll apply a style and then insert a StyleRef field where we want to repeat the text. Unfortunately, this field looks for and displays the closest text formatted using the specified style–so it’s not quite as powerful as the linked solution.
First, apply a style to the original example control. Choose one that’s not currently in use; you must use a unique style. You can modify the style to meet your formatting needs or create a new style. In this example, we’ll use the built-in Subtitle style. Simply select the control and click Subtitle in the Styles gallery (Figure H).
Figure H

Apply a style to the control.
Now you’re ready to insert the fields as follows:
- Position the cursor where you want the text to repeat.
- Click the Insert tab.
- Choose Field from the Quick Parts dropdown in the Text group.
- In the resulting dialog, choose StyleRef from the Fields Name list.
- From the Style Name list, select Subtitle (Figure I).
- Click OK to insert the field.
Figure I
Choose the same style you applied to the control.
As you can see in Figure J, I added two StyleRef fields: one below the original control and one in the header. Unfortunately, this field looks for and displays the closest text formatted using the specified style (from the top of the page), so it’s not quite as powerful as the linked solution. However, you can change the default and force Word to search from the bottom of the page.
Figure J

StyleRef works with only one field.
Send me your question about Office
I answer readers’ questions when I can, but there’s no guarantee. Don’t send files unless requested; initial requests for help that arrive with attached files will be deleted unread. You can send screenshots of your data to help clarify your question. When contacting me, be as specific as possible. For example, “Please troubleshoot my workbook and fix what’s wrong” probably won’t get a response, but “Can you tell me why this formula isn’t returning the expected results?” might. Please mention the app and version that you’re using. I’m not reimbursed by TechRepublic for my time or expertise when helping readers, nor do I ask for a fee from readers I help. You can contact me at susansalesharkins@gmail.com.
Also read…
- Microsoft Certified Engineer 27-Course Super Bundle: Lifetime Access (TechRepublic Academy)
- Microsoft adds more business apps to Office 365 Business Premium subscriptions (ZDNet)
- Five ways to take advantage of Excel list features (TechRepublic)
- Office Q&A: A conditional formatting rule with multiple conditions (TechRepublic)
Scenario
You have some text in a Word document that you’d like to repeat later in that document. You don’t want to write it twice (or more), and you’d rather not copy/paste it from the other location as that means that you’ll have to remember to maintain it in both places if there are changes. If another author takes over the document, they may not know that they have to update this text in two or more places if there are changes, either.
Of course, it would be nice if you could use a tool designed to deal with this sort of single sourcing (such as Author-it), but you’re stuck with Word.
Solution
Bookmarks!
You assign a bookmark to the text you want to re-use, then insert a cross-reference to the bookmark text. Whenever you change the original text, you only need to update the fields in the document for the changes to apply to the second (or third) instance of that text.
Here’s how:
- Select the block of text you want to repeat later in the document. This text can be a phrase, one or more paragraphs, a bulleted list, a table, etc.
- Insert a bookmark for the selected text (Word 2007 and later: Insert tab > Bookmark).
- Give the bookmark a meaningful name, click Add, then click OK.
- Go to the place in the document where you want to re-use the selected text.
- Insert a cross-reference (Word 2007 and later: References tab > Cross-reference).
- Select Bookmark as the Reference Type, and Bookmark Text as the Insert option.
- Select the bookmark name you added in Step 3, then click Insert.
- Whenever you change any text in the original list, just click inside the other list, then press F9 to update it (or Ctrl+A then F9 to update ALL fields in the document).
Optional
In some situations, you might want to repeat a block of text in a document, but when the document’s finished, you might want to break the link between the two.
For example, a colleague had a PPE (personal protective equipment) list near the beginning of her document that she needed to repeat in the main procedure table. Once all the reviews were completed and the document signed off, the procedure table was to be split from the main document into a new document of its own. So she needed to break the link between the original PPE list and the one in the procedure.
To break the link:
- Select the field that contains the re-used text.
- Press Ctrl+Shift+F9.
[Links last checked January 2011]
Terry
-
#1
I have a problem with repetition of a heading in a table of contents. It is a
top level heading (H1), the second heading in the document and neither the
first H1 heading nor those after the second have the problem. I am using
Office 2007 and the document is 1997 – 2003 format.
Is there a solution to this, please?
Advertisements
Stefan Blom
-
#2
A heading sometimes repeats in the TOC if a manual page break has been added
to it. Remove the manual page break and then make use of «Page break before»
formatting (Paragraph dialog box) instead.
Want to reply to this thread or ask your own question?
You’ll need to choose a username for the site, which only take a couple of moments. After that, you can post your question and our members will help you out.
Ask a Question
| I have a problem with repetition of a heading in a table of conten | 4 | Mar 19, 2009 |
| TOC overlap | 0 | Nov 3, 2011 |
| Table of Content- The text overruns page numbers | 2 | Dec 2, 2014 |
| ToC, ToC Styles, and ToC Tabs | 3 | Mar 29, 2010 |
| Applying Multi-Level numbering to Table of Contents | 2 | Oct 16, 2009 |
| APA Headings | 1 | Apr 6, 2010 |
| Table of Contents in W2007 | 5 | Sep 8, 2008 |
| Sorting Table of Contents | 2 | Jan 29, 2010 |
I’ve got a table in an MS Word 2007 document in which the first two lines (not the heading line) are duplicated closer to the end, for an unknown reason.
I cannot select them using the mouse. O_O
What can I do to delete them?
I added a comment to the author by selecting one of the lines and adding a comment (because the «original» line can be selected and edited). Strangely, the comment duplicated closer to the end, where this line duplicates.
I’m translating this document and it’s the author’s business really to deal this bugs of this sort, but I’m curious.
P.S. I selected the whole table and copied it into another document, and voila, the repeating lines vanished. The repearing lines were just under where the table crossed a border between two pages.
P.P.S. However, when I return the «healthy» table into the original document, the two duplicate lines just below the page border appear again.
![]()
Download Article
![]()
Download Article
This wikiHow teaches you how to draw inside of a Microsoft Word document. You can do this on both Windows and Mac versions of Word.
Steps
-

1
Open Microsoft Word. Double-click the Word icon, which resembles a white «W» on a dark-blue background.
- If you want to draw on an existing document, double-click the document instead, then skip the next step.
-
2
Click Blank document. It’s in the upper-left side of the window. Doing so will open a brand-new document.
- If you’re on a Mac, a new, blank document will likely load by default. If so, skip this step.
Advertisement
-
3
Click the Insert tab. This option is in the left side of the blue ribbon that’s at the top of the Word window. Clicking it causes a toolbar to display below the blue ribbon.
- If you’re on a Mac, make sure you click Insert in the blue ribbon and not in the menu bar.
-
4
Click Shapes. It’s in the «Illustrations» section of the Insert toolbar. Clicking Shapes prompts a drop-down menu.
-
5
Select a line option from the drop-down menu. In the «Lines» heading, select a line type from the drop-down menu by clicking on it.
- You can select a pre-determined line by clicking one of the straight line icons or select the «freeform line» by clicking on the squiggly line icon on the far-right under the «Lines» heading.
-
6
Draw a line in your document. Click and drag to draw, then release the mouse button to cement the shape.
- You can click and drag the line around after it’s cemented.
- To delete a line, click it to select it and then press the Delete key.
-
7
Add more lines. To add another line once the one you created is cemented, simply select a line template from the Shapes menu and repeat the drawing process.


Advertisement
Add New Question
-
Question
How do I keep the line horizontal? I only want to place a short line for a signing position.

If you’re talking about keeping a line level while drawing it, press and hold the shift key while you draw the line.
-
Question
How do I draw lines on a phone?
With Word 2016 for iPhone you would click on the three dots on the right over the keyboard. Then on the left (where it says «Home»), go to «Insert.» Then choose «Shapes» and the line you want.
-
Question
Can I draw several lines without going back and forth to the insert shapes drop-down?
Draw one line, then copy that line and paste it. Modify as/if you wish, then again paste, and so on.
Ask a Question
200 characters left
Include your email address to get a message when this question is answered.
Submit
Advertisement
Video
-
Once you have a line in your Word document, you can type around or over it.
Thanks for submitting a tip for review!
Advertisement
-
Make sure you save your work before exiting Word.
Advertisement
About This Article
Article SummaryX
1. Open a new Microsoft Word document.
2. Click Insert
3. Click Shapes
4. Click a line type.
5. Click and drag your cursor over your document.
Did this summary help you?
Thanks to all authors for creating a page that has been read 476,400 times.