
Excel for Microsoft 365 Word for Microsoft 365 PowerPoint for Microsoft 365 Publisher for Microsoft 365 Excel for Microsoft 365 for Mac Word for Microsoft 365 for Mac PowerPoint for Microsoft 365 for Mac Excel for the web Word for the web PowerPoint for the web Excel 2021 Word 2021 PowerPoint 2021 Project Professional 2021 Project Standard 2021 Publisher 2021 Visio Professional 2021 Visio Standard 2021 Excel 2021 for Mac Word 2021 for Mac PowerPoint 2021 for Mac Excel 2019 Word 2019 PowerPoint 2019 Project Professional 2019 Project Standard 2019 Publisher 2019 Visio Professional 2019 Visio Standard 2019 Excel 2019 for Mac Word 2019 for Mac PowerPoint 2019 for Mac Excel 2016 Word 2016 PowerPoint 2016 Project Professional 2016 Project Standard 2016 Publisher 2016 Visio Professional 2016 Visio Standard 2016 Excel 2016 for Mac Word 2016 for Mac PowerPoint 2016 for Mac Excel 2013 Word 2013 PowerPoint 2013 Project Professional 2013 Project Standard 2013 Publisher 2013 Visio Professional 2013 Visio 2013 Excel for iPad Word for iPad PowerPoint for iPad Excel for iPhone Word for iPhone PowerPoint for iPhone Word for Android tablets Excel for Android tablets PowerPoint for Android tablets Excel 2010 Word 2010 PowerPoint 2010 Project 2010 Project Standard 2010 Publisher 2010 Visio 2010 Visio Standard 2010 Excel 2007 Word 2007 PowerPoint 2007 Excel for Android phones PowerPoint for Android phones Project for Office 365 Word for Android phones More…Less
If you’d like to change the name or location of a file without creating a new copy, follow these steps.
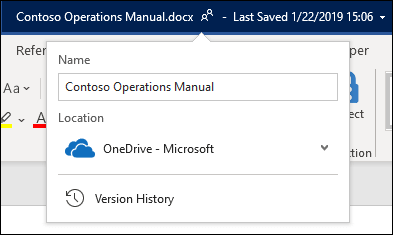
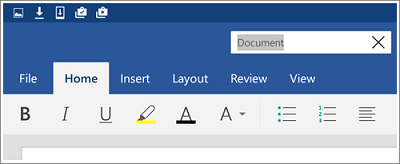
If you’re a Microsoft 365 subscriber, then the easiest way to rename or move an Office file is to open the file in your Microsoft 365 desktop application—such as Word—then select the file name on the title bar. In the menu that appears you can rename the file, select a new location to move it to, or see the version history for the file.
If the file isn’t a Microsoft Office file, or if you’re not a Microsoft 365 subscriber, then the easiest way to rename or move a file is to use File Explorer in Windows.
Open File Explorer by going to My Computer, or by pressing Windows Key + E on your keyboard. Find the file you want to rename, select it and select Rename on the ribbon (or press F2 on your keyboard). Type the new name you want the file to have and press Enter.
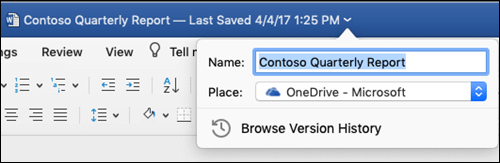
If you’re a Microsoft 365 subscriber, then the easiest way to rename or move an Office file is to open the file in your Microsoft 365 desktop application—such as Word—then select the file name on the title bar. In the menu that appears you can rename the file, select a new location to move it to, or see the version history for the file.
If the file isn’t a Microsoft Office file, or if you’re not a Microsoft 365 subscriber, then the easiest way to rename or move a file on your Mac is to use Finder. Find and select the file, then select File > Rename. Type the new name and press Enter.
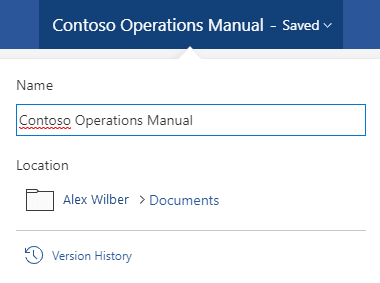
When you start a new, blank, document in Office for the web, your document gets a name like «Document4» or «Presentation2». To rename or relocate the document while you’re editing it, select the file name near the top of the browser window, and type the name you want.
If nothing happens when you type, check to make sure you’re in Editing view (select the View tab and look for a box that says Viewing or Editing. If it says Viewing, expand the box and select Editing).
Except in PowerPoint for the web, you won’t be able to rename a file if other people are working on it at the same time as you. Wait until you’re the only one in the document, then rename it.
To rename a file in Office on Android, simply open the file in the appropriate Office app (Word, Excel, etc.), then tap the file name at the top of the app. Type the new name you want and then tap Done on the keyboard.
You won’t be able to rename the file if other people are working on it at the same time as you. Wait until you’re the only one in the document, then rename it.
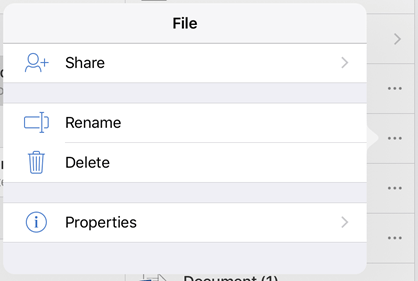
To rename your file in Office on iOS, open your Office app, find your file on the File menu and tap the More button (looks like 3 dots). Select Rename from the context menu, type your new name, and then tap Rename at the top right corner of the dialog box.
You won’t be able to rename the file if other people are working on it at the same time as you. Wait until you’re the only one in the document, then rename it.
For more information
-
Save a file
-
Rename a file, folder, or link in a document library
-
Where to store files
We’re listening
If you found this article helpful, and especially if you didn’t, please use the feedback controls below to give us constructive ideas on how we can make it better.
Need more help?
Want more options?
Explore subscription benefits, browse training courses, learn how to secure your device, and more.
Communities help you ask and answer questions, give feedback, and hear from experts with rich knowledge.
See all How-To Articles
This tutorial demonstrates how to rename a file in Excel and Google Sheets.
Rename an Excel File
The first way to rename an Excel file is to do it directly in that file in Excel.
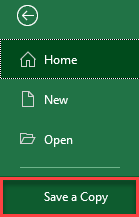
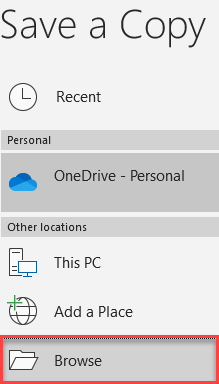
1. In the Ribbon, go to File > Save a Copy (or Save As).
2. Choose Browse in the right part of the window.
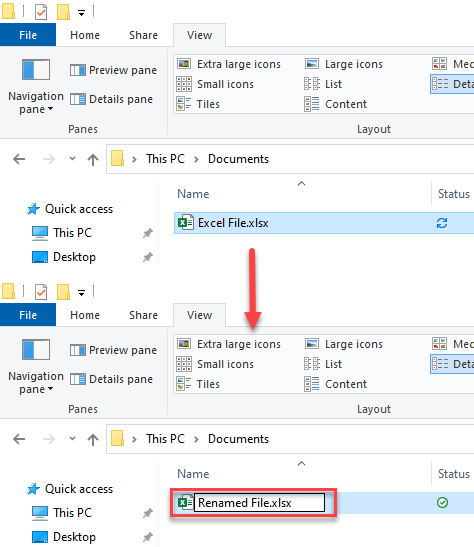
3. In the Save As window, right-click the file (e.g., Excel File.xlsx), and choose Rename.
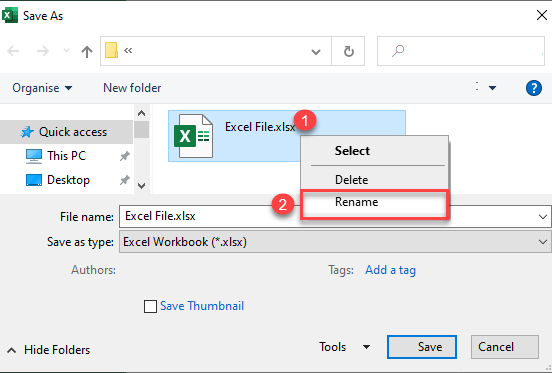
4. Enter a new name for the file (in this example, Renamed File.xlsx).

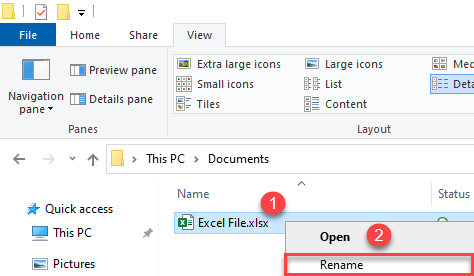
Rename a File in Its Folder
Another option is to rename a file in the folder.
1. In the folder, right-click the file you want to rename, and choose Rename.
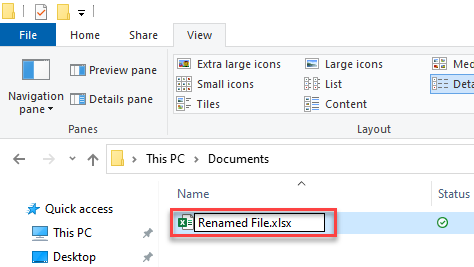
2. Enter a new name for the file.
See also:
- VBA Rename File
- How to Rename a Worksheet
Rename a Google Sheets File
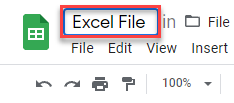
To rename a Google Sheets file, click on the file name in the top left corner of the file (Excel File).
Now type the new name of the file (Renamed File). As a result, your Google Sheets file is now renamed.

Rename a File in Google Drive
You can also rename a Google Sheets file through Google Drive.
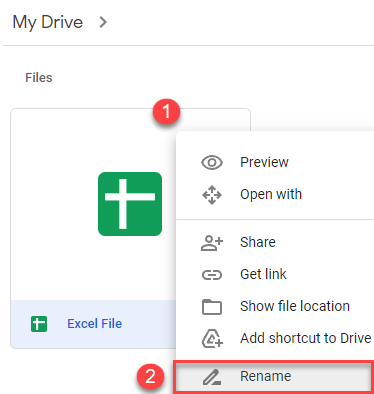
1. Right-click the file you want to rename (Excel File), and choose Rename.
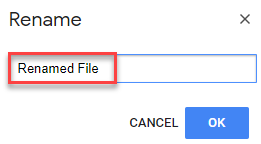
2. In the pop-up window, enter a new name (Renamed File) and click OK.
As a result, your Google Sheets file is now renamed.

This tutorial explains how to Bulk rename files using Excel. If you have a Excel which has information about old filenames and new filenames and you want to use that to rename files, then this tutorial will be handy for you.
I have covered multiple methods in this tutorial for the same. First is a software that takes input as csv file and then rename files accordingly. Then there are 3 methods using Excel directly, which do not need any third party software. After that, there are a few more bulk rename software that do half of the work: you need to select the files that you want to rename, but you can provide their new names via a file.
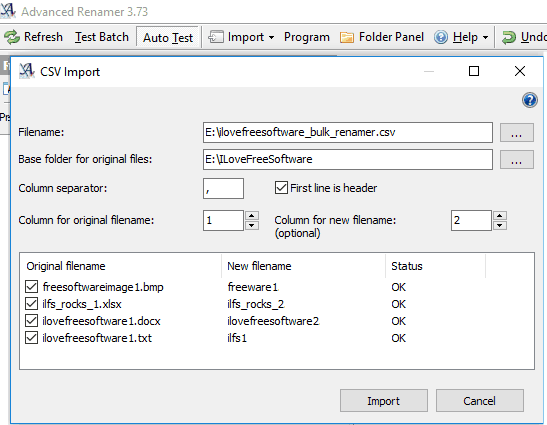
Advanced Renamer
Advanced Renamer is one of the best free batch file renamer to batch rename files using Excel. You can add original filenames as well as new filenames in Excel, save that file as CSV, and then provide that file as input to this freeware. It will rename the files as per the filenames provided in the CSV file. As simple as that.
How to Bulk Rename Files using Excel File with Advanced Renamer:
This software comes in both executable version as well as portable version. I used portable version in my testing. For that, download the zip file of this software from the link above, unzip it, and double click on “ARen.exe”. This will launch the portable version of this software.
When this batch renamer opens up, select option Import > CSV File from the top menu. This will open the pop-up window as the screenshot above. In this, you have to give path of the CSV file that has original filenames as well as the new names that you want. You can specify the column separators for your CSV file, as well as specify if the first line is a header.
Do note that the new filenames should not have file extension, as it will automatically add extension from original filenames.
The Excel file that you use can have relative paths or absolute paths of files. If you have relative paths, then you need to specify the base folder where the original files are located, otherwise it will use the full paths that are given in the excel.
Once done, click on “Import”. This will show its main interface where it will show the original filenames, and what they will be renamed to. This is an opportunity for you to check that everything looks good. Once all set, click on “Start Batch” button to bulk rename files as per the information you provided in CSV file. The operation is immediately done.
One very cool feature of this software is that you can revert back the changes in case something goes wrong. For that, click on “Undo Previous Batch” button, and it will Undo the file rename operation.
You can read its review here. You can also check out more free file renamers.
In this method, we will directly use the data present in Microsoft Excel to bulk rename the files. You can rename as many files as you want, the files can be in completely different directories, and can be of any formats. The best part is that this method does not require any other software.
Windows provides a command called “rename” (or “ren”) that can be used to rename files. The syntax of this command is:
ren old_file_name new_file_name
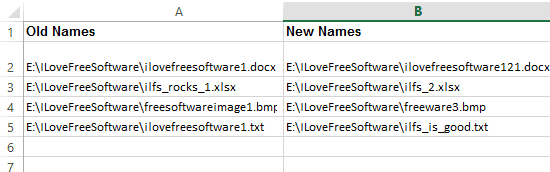
So, the trick is to create the above command from data in Excel file. This is pretty easy, actually. Let’s say your old names are in Column A, and new names in Column B, then in column C in cell C2, add a formula like this below:
=CONCATENATE("ren ", A2, " ", B2)
Drag the above formula from cell C2 to others cells in Column C. This will be done for all the rows which have values of old and new filenames. You will then get data like in screenshot below:
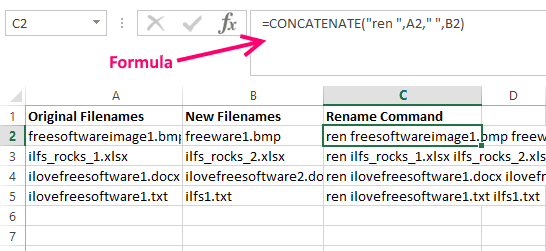
Once done, just copy all the values in column C.
Now open a command prompt. If your Excel file has file paths as well, then you can just copy the values from column C and paste it on command prompt. If the Excel does not have full file paths, then you need to first navigate to the directory in the command prompt which has images to be renamed. This can be done using cd command. Once done, just copy all the commands from column C and paste on command prompt. This will bulk rename all the files!
You can also create a batch file to bulk rename the files. For that, put all the commands from column C in a text file and name it anything.bat. Make sure the extension is “.bat” (and not .txt or .bat.txt).
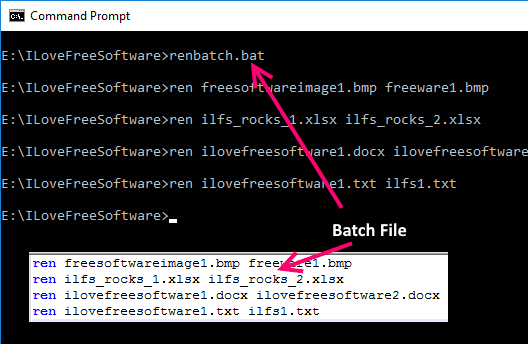
Once done, just go to the command prompt and run that batch file, and all your files will be renamed.
So, this is the pretty simple method to batch rename files using Excel file. It does not need any external software and is pretty versatile.
Bulk Rename Files Using Excel Macro:
The method above provides a pretty simple way to batch rename files by creating ren command. However, if you are a bit technical, then you can even get rid of the above process by creating an Excel macro to bulk rename files. This macro would make the process a whole lot easier. If you already have old file and new file information in Excel, then you can just create 1 macro that will rename the files based on that data. However, you can add another macro as well that can help you select the files that you want to rename and the macro will add information of the files in the Excel. This gives you a good starting point.
This solution has been covered in good detail here. Just go to this link and get the code. This link has code for both the macros. You can choose to get code for only the file rename macro, or file selection macro as well.
Once you have the code, create a macro in Excel and add code there (just do a Google Search if you don’t know how to add Macro to Excel).
Once your macros are ready, do the following:
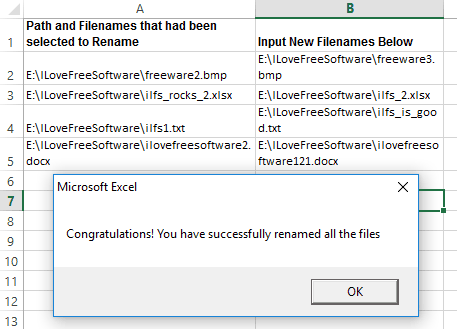
- If your Excel does not have names of the files that you want to rename, then run the first macro (“FileNametoExcel”) from the code above. This will open a File Picker using where you can select all the files that you want to rename. The macro will add the complete path, name, as well as extension to the first column of the Excel.
- Then, add new filenames that you want in column B. The filenames should have complete path as well as file extension, in the same manner as data is present in column A.
- Then run the second macro which is “RenameFile”. It does not have any options, and it will simply rename the files based on the information in column A and column B. Once done, it will show a success message. Do note that it does not really check if data is correct or not; just proceeds with renaming. So, before running this macro, make sure new filenames are correct.
The advantage of going with Macro based approach is that if you have to regularly rename files using Microsoft Excel, then you can just make these macros once, and keep reusing them to bulk rename files using data in Excel.
Batch Rename Files using Windows PowerShell:
If you are a power user and have played with Windows PowerShell earlier, then you’ll be happy to know that you can batch rename files using Windows PowerShell as well. I won’t delve deep into it, but you can see high level details here. Do note that it takes input as csv file, so remember to rename your Excel to csv before you run this. Unlike other Excel methods above, this method does not require you to generate ren commands or create Macro. Just add all the old filenames and new filenames in Excel, save it as csv, then use Powershell to rename all the files using the information stored in Excel file.
Bulk Rename Utility:
Bulk Rename Utility is another free software that can be used to rename files using Microsoft Excel. In this, you first need to select all the files that you want to rename. Then, you can provide their new names using a file, and this software will bulk rename all of them in one go.
I know that its not a very convenient step to first manually select all the files that have to be renamed, but this software makes that process pretty easy, and you can select all the files of a folder in one go. Even within them, you can choose the files that you want to rename.
Once you have installed this software, run it, and then click on folder icon to select the folder that has files that you want to rename. All the files of the folder will be displayed in its central pane. If you want to rename just some of those files, then click on those files in the pane to select them. Now you have selected all the files that you want to rename. Next step is to provide their new names.
For this, you would have excel which would have old names and new names. You need to combine them to form a string like this:
oldname1|newname1
oldname2|newname2
Do the same for all the entries in your excel. If you don’t know how to do that, follow this super easy tutorial. Then put all the values in a text file, with one entry per line. Once you have your text file ready, go to Bulk Rename Utility, and click on Menu Actions > Import Rename Pairs. Select the text file you created. You will see that its central pane will now start showing new names that were in your text file. The best part is that the order of the files need not be same as they are displayed in the central pane.

Once all the names look correct, click on “Rename” button and it will immediately rename the files based on the old name – new name combination that you had in excel file. So, this software is another easy way to bulk rename files using Excel file.
Apart from this, the software is very feature rich and provides a lot of other options for renaming. You can choose regex, change case, remove specific characters, add prefix, and a lot more.
Do note that this software is free for personal non-commercial use only, and needs to be purchased for commercial use.
vRenamer
vRenamer is another free software to bulk rename files using Excel. However, it does just half of the job. It does not takes the original filename as input from Excel or CSV file. You need to manually select all the files that you want to rename. But you can provide the output filenames. If you have the output filenames in a Excel, just copy the output filenames and paste them in the pop-up provided.
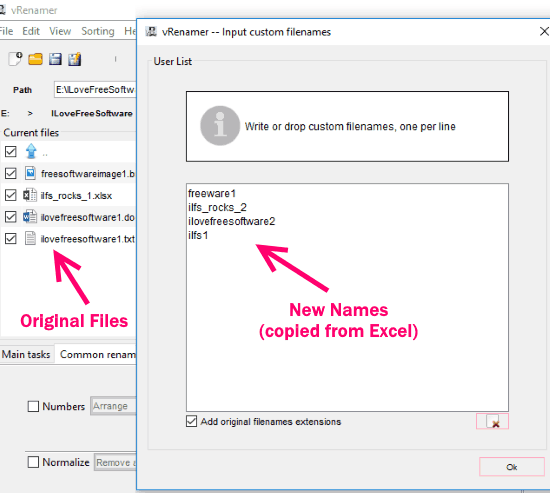
Here is a quick walkthrough of the steps involved:
- Run this software and open the folder where your files are located that you want to be renamed. You can either select all files of the folder or individual files. You can also specify filters to select files of a specific extension.
- Click on “File” menu, and click on “Input Custom Filenames”. This will open a pop-up window. In this you have to paste all the output filenames. You can just copy these from your Excel file. The most important thing to keep in mind is that the filenames should be in the same order as the original files.
- When you click on “OK” button, you can see the Preview window which shows the new filenames. Do check these carefully to ensure that everything looks good.
- Once you are ready, click on the big Green tick mark at top right corner to start rename process.
vRenamer will immediately rename the files to the filenames that you specified. Even though it does not takes Excel or csv as input, but it is still able to achieve a part of the purpose by letting us paste the final filenames. This means we can simply copy final filenames from any text / csv / excel file.
This software is a very powerful bulk file renamer and comes with options to specify multiple renaming rules, replace text in name, add tags to names, add numbers to files, change case, change file attributes, and a lot more. You can read detailed review of vRenamer.
Ant Renamer:
Ant Renamer is another free software that you can use to bulk rename files by taking filenames from a file. However, like the vRenamer above, this one also does half the job, and works pretty much in the similar manner.
- This software is available in both installer as well as portable version; you can choose whichever you like. Run the software and open its interface. On the menu, the first button is “Files”. Click on this, and then add the files that you want to rename. You can browse for files that you want to add, or browse for entire folder, or just drag and drop the files from Windows Explorer.
- Then click on “Actions” button. This will show the interface as in screenshot below. In this, select the option “Take names from List”. Now you can select file that contains new names that you want to give to your files. Do note that the file should have new names only. More importantly, the names have to be in exactly same order as the files that you chose in the first step. Unfortunately, it does not show old names and new names on a common interface so that you can verify that the names have been added in the same order, so you gotta be careful. Thankfully, it comes with a undo option, so if something goes wrong, you can undo the filename change.

- Once all set, click on the “Go” button on the interface. This will complete the rename operation and all your selected files will be bulk renamed as per the data that you provided from file. You can see details of the rename operation in “Log” tab. In case something doesn’t look right, you can use Undo option to Undo the file rename changes.
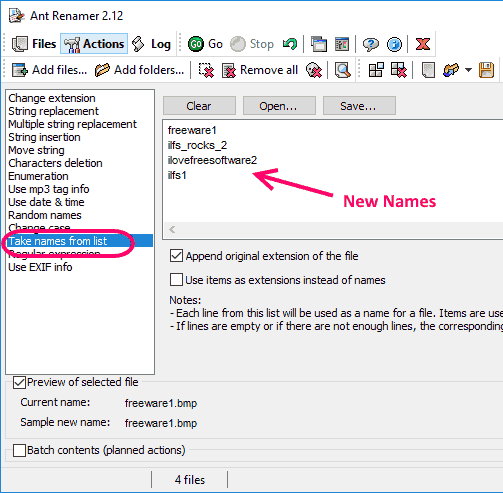
I like Ant Renamer for the fact that it is available in portable version and also that it is completely free. Also, the size is very small (just around 1 MB). However, I am not too happy with the interface, as it doesn’t show old and new filenames together, and that means you can easily make error while bulk renaming files using data from Excel files.
My Opinion:
I recently had a need to bulk rename files using information stored in Excel. I went with the method of using ren command at that time, but later tried to look for other methods too. I am quite happy that I found AdvancedRename software, as it can take csv file as input which will have both the old filenames as well as new filenames. That is really the best software in this list for this purpose. However, if you don’t want to go with a software, then you can use one of the Excel tricks I mentioned above. You can bulk rename from Excel using Ren command, or Macro, or even PowerShell, so whatever your preference might be, you will find a solution here.
Do let me know in comments below if you know of some other method as well to bulk rename files using Excel.
Содержание
- VBA Rename File
- Rename a File in VBA
- VBA Coding Made Easy
- VBA Code Examples Add-in
- Name statement
- Syntax
- Remarks
- Example
- See also
- Support and feedback
- Renaming files with VBA
- 2 Answers 2
- Linked
- Related
- Hot Network Questions
- Subscribe to RSS
- VBA Rename File (How to + 5 code examples)
- Rename a File VBA
- Example 1: Renaming a file
- Example 2: Rename a file based on cell values
- Example 3: Move a file with the Name command
- Example 4: Avoiding errors when renaming files
- Example 5: Reusable function
- Calling the function from a macro
- Calling the function from a worksheet
- Possible errors
- Notes on renaming files
- Как средствами VBA переименовать/переместить/скопировать файл
VBA Rename File
VBA allows you to rename an existing file, using the Name command. In this tutorial, you will learn how to rename a specific file.
If you want to learn how to copy and rename a file, you can click on this link: VBA Copy File
Rename a File in VBA
We will show how to rename the existing file Sample file 1.xlsx in the folder VBA Folder. The folder with the file now looks like in Image 1:

Image 1. File in folder C:VBA Folder
Here is the code which will rename the file:
After running the code, the file Sample file 1.xlsx is now renamed to Sample file 2.xlsx. The output is in Image 2:

Image 2. Renamed file in the folder C:VBA Folder
VBA Coding Made Easy
Stop searching for VBA code online. Learn more about AutoMacro — A VBA Code Builder that allows beginners to code procedures from scratch with minimal coding knowledge and with many time-saving features for all users! 

VBA Code Examples Add-in
Easily access all of the code examples found on our site.
Simply navigate to the menu, click, and the code will be inserted directly into your module. .xlam add-in.
Источник
Name statement
Renames a disk file, directory, or folder.
Syntax
Name oldpathname As newpathname
The Name statement syntax has these parts:
| Part | Description |
|---|---|
| oldpathname | Required. String expression that specifies the existing file name and location; may include directory or folder, and drive. |
| newpathname | Required. String expression that specifies the new file name and location; may include directory or folder, and drive. The file name specified by newpathname can’t already exist. |
The Name statement renames a file and moves it to a different directory or folder, if necessary. Name can move a file across drives, but it can only rename an existing directory or folder when both newpathname and oldpathname are located on the same drive. Name cannot create a new file, directory, or folder.
Using Name on an open file produces an error. You must close an open file before renaming it. Name arguments cannot include multiple-character (*) and single-character (?) wildcards.
Example
This example uses the Name statement to rename a file. For purposes of this example, assume that the directories or folders that are specified already exist. On the Macintosh, «HD:» is the default drive name, and portions of the pathname are separated by colons instead of backslashes.
See also
Support and feedback
Have questions or feedback about Office VBA or this documentation? Please see Office VBA support and feedback for guidance about the ways you can receive support and provide feedback.
Источник
Renaming files with VBA
I’m having issue renaming files in vba.
I only know a certain part of the files name, for instance that it starts with happy. I want to be able to rename this file to whatever I want. There will only be one file called happy*. I’ve got the below code but it’s giving me a «File not found» error on the Name ffile As NewName
I’m aware this is probably not the correct way to be doing it but the wildcard part of the problem is causing all the issues!
Any help would be great.
2 Answers 2
It’s probably best to be as specific and thorough as you can be given the available information.
Although the .xlsx is not necessary, it makes little sense to be renaming anything that wasn’t an .xlsx workbook to an .xlsx workbook.
The problem is that Dir() returns the file name but not the full path. You can put Debug.Print ffile after the Dir to see what it returns. If that file doesn’t exist in the directory that you are running your VBA script in then you will get that error. You could do something like:

Linked
Hot Network Questions
To subscribe to this RSS feed, copy and paste this URL into your RSS reader.
Site design / logo © 2023 Stack Exchange Inc; user contributions licensed under CC BY-SA . rev 2023.3.20.43331
By clicking “Accept all cookies”, you agree Stack Exchange can store cookies on your device and disclose information in accordance with our Cookie Policy.
Источник
VBA Rename File (How to + 5 code examples)

VBA in Excel does not restrict us to just a single application. VBA gives us access to the windows environment too. With this we can perform a lot of common file-based actions. One of the most common is to rename a file. In this post, we will look at 5 examples of renaming files with VBA.
Rename a File VBA
To rename a file with VBA we use the Name command. Name appears in blue because it is a reserved word within VBA.
Example 1: Renaming a file
This example renames a file from Example File.xlsx to Example File Renamed.xlsx.
Example 2: Rename a file based on cell values
In this example, we rename a file based on cell values. The screenshot below shows the current file name in Cell C2 and the new file name in Cell C4.

We can run the following macro to rename a file using these cell values.
Example 3: Move a file with the Name command
Did you notice the Name command requires the file path and file name? Therefore, the Name command doesn’t just rename files but can also move files. For example, the code below moves the file from C:UsersmarksDocuments to C:Usersmarks, but the file name remains the same.
Example 4: Avoiding errors when renaming files
Trying to move files that don’t exist, or are locked for editing can trigger errors. The errors are detailed in the section below.
If there is an error, we really want to avoid going through the Visual Basic error debugging process. Instead, a better option is to display a message box with an OK button.
Example 5: Reusable function
Finally, let’s create a reusable function for moving and renaming files.
The VBA function below accepts two string arguments; the existing file path and the new file path.
We can use this function in two ways.
- Calling the function from another macro
- Calling the function from a worksheet
Let’s look at both of these in turn.
Calling the function from a macro
The macro below calls the function and displays a message box with the following values:
- True = File renamed
- False = Error occurred.
Calling the function from a worksheet
Alternatively, we can call the function just like a normal worksheet function.
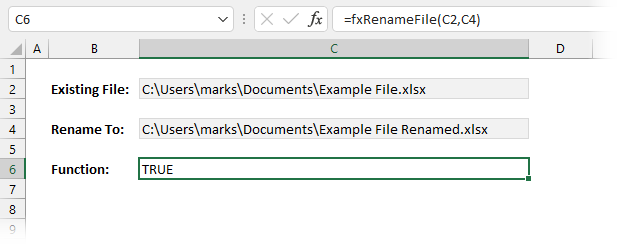
Look at the screenshot above, our custom function is used in Cell C6:
TRUE indicates that the file named in Cell C2 has been successfully renamed to the file named in Cell C4. If we run the function a second time, it will show FALSE, as the file has already been renamed.
Be aware the function executes each time cells C2 or C4 change, so be careful with the order in which you update the cells.
TOP TIP: If we use the fxRenameFile function inside an IF function, it will only executes when the condition is met. In the example below, the fxRenameFile function only executes if cell A6 equals Y.
Using this method, we can control when and how the function executes. We just need to change cell A6 to another value when we don’t the function to execute.
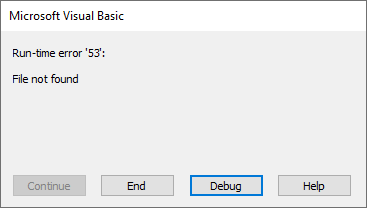
Possible errors
If we try to rename a file or folder path that does not exist, it triggers an error: Run-time error’53’: File not found.
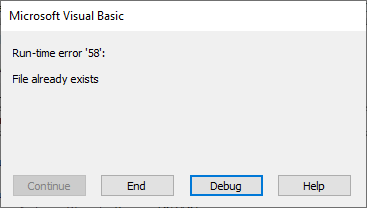
If the new file name is the same as an existing one, it triggers the following error: Run-time error ’58’: File already exists.
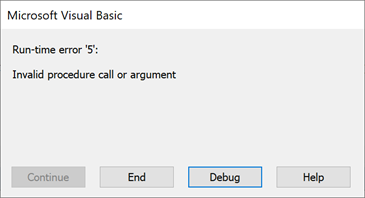
If either file name is not a valid format, it triggers the following error: Run-time error ‘5’: Invalid procedure call or argument
Notes on renaming files
We have used Excel workbooks in the examples, but we can use any file type. Also, we are not restricted to files; we can rename folders using the Name command too.
The Name command is core Visual Basic code. Therefore, it exists in other applications supporting VBA, such as Word and PowerPoint.
Related Posts:

About the author
Hey, I’m Mark, and I run Excel Off The Grid.
My parents tell me that at the age of 7 I declared I was going to become a qualified accountant. I was either psychic or had no imagination, as that is exactly what happened. However, it wasn’t until I was 35 that my journey really began.
In 2015, I started a new job, for which I was regularly working after 10pm. As a result, I rarely saw my children during the week. So, I started searching for the secrets to automating Excel. I discovered that by building a small number of simple tools, I could combine them together in different ways to automate nearly all my regular tasks. This meant I could work less hours (and I got pay raises!). Today, I teach these techniques to other professionals in our training program so they too can spend less time at work (and more time with their children and doing the things they love).
Do you need help adapting this post to your needs?
I’m guessing the examples in this post don’t exactly match your situation. We all use Excel differently, so it’s impossible to write a post that will meet everybody’s needs. By taking the time to understand the techniques and principles in this post (and elsewhere on this site), you should be able to adapt it to your needs.
But, if you’re still struggling you should:
- Read other blogs, or watch YouTube videos on the same topic. You will benefit much more by discovering your own solutions.
- Ask the ‘Excel Ninja’ in your office. It’s amazing what things other people know.
- Ask a question in a forum like Mr Excel, or the Microsoft Answers Community. Remember, the people on these forums are generally giving their time for free. So take care to craft your question, make sure it’s clear and concise. List all the things you’ve tried, and provide screenshots, code segments and example workbooks.
- Use Excel Rescue, who are my consultancy partner. They help by providing solutions to smaller Excel problems.
What next?
Don’t go yet, there is plenty more to learn on Excel Off The Grid. Check out the latest posts:
Источник
Как средствами VBA переименовать/переместить/скопировать файл
В этой статье я хотел бы рассказать как средствами VBA переименовать, переместить или скопировать файл. В принципе методы переименования, перемещения и копирования, так сказать, встроены в VBA. Это значит что можно без вызова сторонних объектов переименовать, переместить или копировать любой файл. Все это делается при помощи всего двух команд: FileCopy и Name [Исходный файл] As [Новый файл] . Притом команда FileCopy выполняет только копирование, а Name [Исходный файл] As [Новый файл] — как переименование, так и перемещение. Разница лишь в том, что при переименовании мы указываем только новое имя файла, а при перемещении — другую директорию(папку), в которую следует переместить файл. Плюс рассмотрим пример удаления файла.
Так же разберем методы копирования, перемещения, переименования и удаления файлов и папок через библиотеку FileSystemObject (FSO).
Работа с файлами встроенными командами VBA
Работа с файлами через объект FileSystemObject (FSO)
Работа с папками через объект FileSystemObject (FSO)
Во всех примерах работы с файлами встроенными функциями будет присутствовать проверка на наличие файла по указанному пути. Делать это будем при помощи встроенной функции Dir([PathName],[Attributes]) .
PathName — указывается полный путь к файлу
Attributes — указывается признак свойств файла. Вообще их несколько(скрытый, архивный и т.п.), но нас для наших задач будет интересовать пока только один: 16(vbDirectory). Он отвечает за проверку папок и файлов без специальных свойств(т.е. не архивные, не скрытые и т.д.). Хотя по сути его можно вообще не указывать, и тогда будет по умолчанию применен атрибут 0(vbNormal) — проверка файлов без определенных свойств. Ни в том ни в другом случае ошибкой это не будет.
Sub Copy_File() Dim sFileName As String, sNewFileName As String sFileName = «C:WWW.xls» ‘имя файла для копирования sNewFileName = «D:WWW.xls» ‘имя копируемого файла. Директория(в данном случае диск D) должна существовать If Dir(sFileName, 16) = «» Then MsgBox «Нет такого файла», vbCritical, «www.excel-vba.ru» Exit Sub End If FileCopy sFileName, sNewFileName ‘копируем файл MsgBox «Файл скопирован», vbInformation, «www.excel-vba.ru» End Sub
Sub Move_File() Dim sFileName As String, sNewFileName As String sFileName = «C:WWW.xls» ‘имя исходного файла sNewFileName = «D:WWW.xls» ‘имя файла для перемещения. Директория(в данном случае диск D) должна существовать If Dir(sFileName, 16) = «» Then MsgBox «Нет такого файла», vbCritical, «www.excel-vba.ru» Exit Sub End If Name sFileName As sNewFileName ‘перемещаем файл MsgBox «Файл перемещен», vbInformation, «www.excel-vba.ru» End Sub
Sub Rename_File() Dim sFileName As String, sNewFileName As String sFileName = «C:WWW.xls» ‘имя исходного файла sNewFileName = «C:WWW1.xls» ‘имя файла для переименования If Dir(sFileName, 16) = «» Then MsgBox «Нет такого файла», vbCritical, «www.excel-vba.ru» Exit Sub End If Name sFileName As sNewFileName ‘переименовываем файл MsgBox «Файл переименован», vbInformation, «www.excel-vba.ru» End Sub
Sub Delete_File() Dim sFileName As String sFileName = «C:WWW.xls» ‘имя файла для удаления If Dir(sFileName, 16) = «» Then MsgBox «Нет такого файла», vbCritical, «www.excel-vba.ru» Exit Sub End If Kill sFileName ‘удаляем файл MsgBox «Файл удален», vbInformation, «www.excel-vba.ru» End Sub
Как видно ничего сложного.
Так же можно проделать те же операции с файлами при помощи объекта FileSystemObject. Строк кода несколько больше и выполняться операции будут медленнее(хотя вряд ли это будет заметно на примере одного файла). Однако есть существенный плюс — при помощи FileSystemObject можно корректно производить операции с файлами и папками на сетевом диске. Хотя та же Dir(sFileName, 16) часто выдает ошибку при работе с сетевыми дисками.
Прежде всего следует, я думаю, пояснить что за зверь такой — FileSystemObject.
FileSystemObject (FSO) — содержится в библиотеке типов Scripting, расположенной в файле библиотеки scrrun.dll. Объектная модель FSO дает возможность создавать, изменять, перемещать и удалять папки и файлы, собирать о них различную информацию: имена, атрибуты, даты создания или изменения и т.д. Чтобы работать с FSO необходимо создать переменную со ссылкой на объект библиотеки. Сделать это можно двумя способами: через ранее связывание и позднее. Я не буду сейчас вдаваться в подробности этих методов — тема довольно обширная и я опишу её в другой статье.
Ранее связывание: для начала необходимо подключить библиотеку Microsoft Scripting Runtime. Делается это в редакторе VBA: References-находите там Microsoft Scripting Runtime и подключаете. Объявлять переменную FSO при раннем связывании следует так:
Dim objFSO As New FileSystemObject
Плюсы раннего связывания: с помощью Object Browser можно просмотреть список объектов, свойств, методов, событий и констант, включенных в FSO. Но есть значительный минус: если планируется использовать программу на нескольких компьютерах, то есть большая вероятность получить ошибку(читать подробнее).
Позднее связывание: ничего нигде не надо подключать, а просто используем метод CreateObject(именно этот способ используется мной в примерах ниже). Методы таким образом просмотреть не получится, но зато работать будет без проблем на любых компьютерах без дополнительных действий.
Sub Copy_File() Dim objFSO As Object, objFile As Object Dim sFileName As String, sNewFileName As String sFileName = «C:WWW.xls» ‘имя исходного файла sNewFileName = «D:WWW.xls» ‘имя файла для переименования ‘создаем объект FileSystemObject Set objFSO = CreateObject(«Scripting.FileSystemObject») ‘проверяем наличие файла по указанному пути If objFSO.FileExists(sFileName) = False Then MsgBox «Нет такого файла», vbCritical, «www.excel-vba.ru» Exit Sub End If ‘копируем файл Set objFile = objFSO.GetFile(sFileName) objFile.Copy sNewFileName MsgBox «Файл скопирован», vbInformation, «www.excel-vba.ru» End Sub
Sub Move_File() Dim objFSO As Object, objFile As Object Dim sFileName As String, sNewFileName As String sFileName = «C:WWW.xls» ‘имя исходного файла sNewFileName = «D:WWW.xls» ‘имя файла для переименования ‘создаем объект FileSystemObject Set objFSO = CreateObject(«Scripting.FileSystemObject») ‘проверяем наличие файла по указанному пути If objFSO.FileExists(sFileName) = False Then MsgBox «Нет такого файла», vbCritical, «www.excel-vba.ru» Exit Sub End If ‘перемещаем файл Set objFile = objFSO.GetFile(sFileName) objFile.Move sNewFileName MsgBox «Файл перемещен», vbInformation, «www.excel-vba.ru» End Sub
Sub Rename_File() Dim objFSO As Object, objFile As Object Dim sFileName As String, sNewFileName As String sFileName = «C:WWW.xls» ‘имя исходного файла sNewFileName = «WWW1.xls» ‘имя файла для переименования ‘создаем объект FileSystemObject Set objFSO = CreateObject(«Scripting.FileSystemObject») ‘проверяем наличие файла по указанному пути If objFSO.FileExists(sFileName) = False Then MsgBox «Нет такого файла», vbCritical, «www.excel-vba.ru» Exit Sub End If ‘переименовываем файл Set objFile = objFSO.GetFile(sFileName) objFile.Name = sNewFileName MsgBox «Файл переименован», vbInformation, «www.excel-vba.ru» End Sub
Хочу обратить внимание, что при переименовании файла через FileSystemObject необходимо указать только имя нового файла — путь указывать не надо. Иначе получите ошибку.
Sub Delete_File() Dim objFSO As Object, objFile As Object Dim sFileName As String sFileName = «C:WWW.xls» ‘имя файла для удаления ‘создаем объект FileSystemObject Set objFSO = CreateObject(«Scripting.FileSystemObject») ‘проверяем наличие файла по указанному пути If objFSO.FileExists(sFileName) = False Then MsgBox «Нет такого файла», vbCritical, «www.excel-vba.ru» Exit Sub End If ‘удаляем файл Set objFile = objFSO.GetFile(sFileName) objFile.Delete MsgBox «Файл удален», vbInformation, «www.excel-vba.ru» End Sub
Точно так же можно перемещать, копировать и удалять целые папки:
Sub Copy_Folder() Dim objFSO As Object Dim sFolderName As String, sNewFolderName As String sFolderName = «C:test» ‘имя исходной папки sNewFolderName = «D:tmp» ‘имя папки, в которую копируем(нужен слеш на конце) ‘создаем объект FileSystemObject Set objFSO = CreateObject(«Scripting.FileSystemObject») ‘проверяем наличие папки по указанному пути If objFSO.FolderExists(sFolderName) = False Then MsgBox «Нет такой папки», vbCritical, «www.excel-vba.ru» Exit Sub End If ‘копируем папку objFSO.CopyFolder sFolderName, sNewFolderName MsgBox «Папка скопирована», vbInformation, «www.excel-vba.ru» End Sub
Sub Move_Folder() Dim objFSO As Object Dim sFolderName As String, sNewFolderName As String sFolderName = «C:test» ‘имя исходной папки sNewFolderName = «C:tmptest» ‘имя папки, в которую перемещаем(нужен слеш на конце) ‘создаем объект FileSystemObject Set objFSO = CreateObject(«Scripting.FileSystemObject») ‘проверяем наличие папки по указанному пути If objFSO.FolderExists(sFolderName) = False Then MsgBox «Нет такой папки», vbCritical, «www.excel-vba.ru» Exit Sub End If ‘перемещаем папку objFSO.MoveFolder sFolderName, sNewFolderName MsgBox «Папка перемещена», vbInformation, «www.excel-vba.ru» End Sub
Sub Rename_Folder() Dim objFSO As Object, objFolder As Object Dim sFolderName As String, sNewFolderName As String sFolderName = «C:test» ‘имя исходной папки ‘имя папки для переименования(только имя, без полного пути) sNewFolderName = «new folder name» ‘создаем объект FileSystemObject Set objFSO = CreateObject(«Scripting.FileSystemObject») ‘проверяем наличие папки по указанному пути If objFSO.FolderExists(sFolderName) = False Then MsgBox «Нет такой папки», vbCritical, «www.excel-vba.ru» Exit Sub End If ‘переименовываем папку ‘получаем доступ к объекту Folder(папка) Set objFolder = objFSO.GetFolder(sFolderName) ‘назначаем новое имя objFolder.Name = sNewFolderName MsgBox «Папка переименована», vbInformation, «www.excel-vba.ru» End Sub
Sub Delete_Folder() Dim objFSO As Object, objFolder As Object Dim sFolderName As String sFolderName = «C:test» ‘имя папки для удаления ‘создаем объект FileSystemObject Set objFSO = CreateObject(«Scripting.FileSystemObject») ‘проверяем наличие папки по указанному пути If objFSO.FolderExists(sFolderName) = False Then MsgBox «Нет такой папки», vbCritical, «www.excel-vba.ru» Exit Sub End If ‘удаляем папку objFSO.DeleteFolder sFolderName MsgBox «Папка удалена», vbInformation, «www.excel-vba.ru» End Sub
FSO, конечно, способен на большее — но цель данной статьи была показать основные операции с папками и файлами как стандартными методами, так и более продвинутыми.
Статья помогла? Поделись ссылкой с друзьями!
Источник
Here’s what I need to do. I have these two columns in an excel sheet. With file names. First column has the current filename and the second column has the names I want the files to be renamed to. I need to use this as there’s no pattern in renaming. For example, the below may be a set of files …
Current Name >  Rename To
---------------------------
Abc.jpg       >   Dinner.jpg

Xyz.jpg       >  Driving.jpg

123.jpg       >  Sunset.jpg
I know it should be easy to do this in VBA, but not exactly sure how. Any help would be much appreciated.
![]()
Jay
55.8k10 gold badges98 silver badges122 bronze badges
asked Sep 22, 2011 at 1:38
![]()
redGREENblueredGREENblue
3,0668 gold badges38 silver badges57 bronze badges
I think you could do something like this, using the Name function to rename the files, however, you will probably need to make sure the 2 columns have the complete file path, i.e. «C:TempABC.jpg»
Dim Source As Range
Dim OldFile As String
Dim NewFile As String

Set Source = Cells(1, 1).CurrentRegion

For Row = 1 To Source.Rows.Count
    OldFile = ActiveSheet.Cells(Row, 1)
    NewFile = ActiveSheet.Cells(Row, 2)

    ' rename files
    Name OldFile As Newfile

Next
answered Sep 22, 2011 at 1:51
![]()
1