
Remove Paragraph Marks or Hard Returns in Microsoft Word Documents
Article by: Avantix Learning Team | Updated January 10, 2021
Applies to: Microsoft® Word® 2010, 2013, 2016, 2019 or 365 (Windows)
You can easily remove or delete hard returns or paragraph marks in Microsoft Word using Find and Replace. In order to view and delete hard returns, you should display paragraph marks or symbols. In Word, it’s better not use use hard returns (where you’ve pressed Enter or Return) to handle spacing after paragraphs or create new pages. The fastest way to remove extra hard returns (typically two hard returns) is to use Word’s Find and Replace command and special characters.
Recommended article: How to Add or Remove Page Breaks in Microsoft Word
Do you want to learn more about Microsoft Word? Check out our virtual classroom or live classroom Word courses >
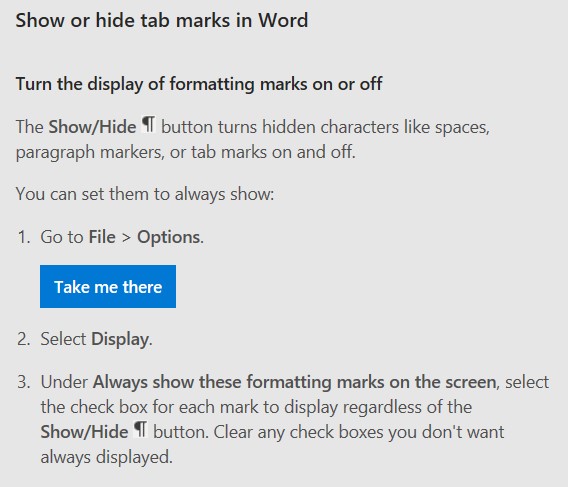
Showing hard returns or paragraph marks
To view hard returns or paragraph marks and other nonprinting characters in Microsoft Word:
- Click the Home tab in the Ribbon.
- Click Show/Hide ¶ in the Paragraph group. Paragraph marks, tabs, spacing and manual page breaks will display but will not print. Click the same command to hide the paragraph marks and other nonprinting characters.
Removing a single hard return or paragraph mark
You can remove a single hard return or paragraph mark by dragging over it and pressing Delete.
Removing hard returns or paragraph marks using Find and Replace
Although you can select hard returns and press Delete to delete them, if you have a long document, it’s easier to use Find and Replace to delete extra hard returns. Typically, you’ll want to replace two hard returns with one.
To remove two hard returns or paragraph marks and replace with one using Find and Replace:
- Save a copy of the Word document.
- In the copy, position the cursor at the beginning of the document.
- Click the Home tab in the Ribbon.
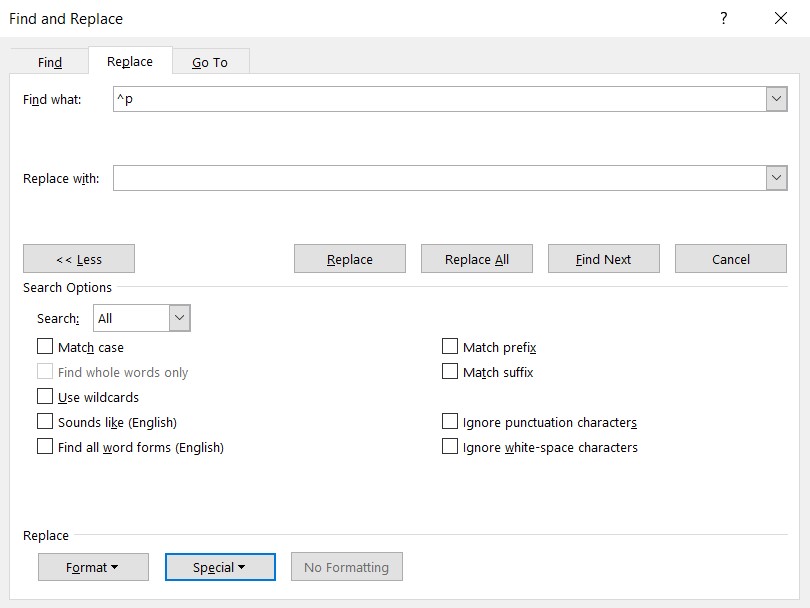
- Click Replace in the Editing group or press Ctrl + H. The Replace dialog box appears.
- Click More >> to expand the dialog box (if necessary).
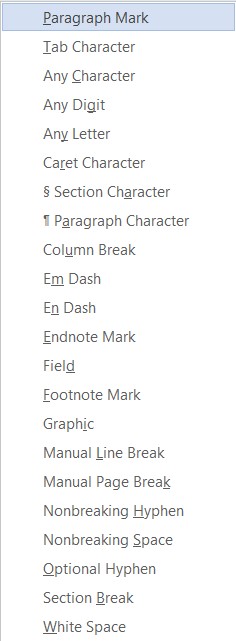
- Click in the Find what box.
- From the Special menu, choose Paragraph Mark. The characters «^p» will appear.
- From the Special menu, choose Paragraph Mark again. Two paragraph mark codes should appear (his represents two hard returns).
- Click in the Replace with box.
- Ensure there is nothing in the Replace with box by pressing Delete (multiple times if necessary).
- From the Special menu, choose Paragraph Mark. The characters «^p» will appear.
- Click Find Next.
- Click Replace and then click Find Next to go to the next instance. Repeat for each instance. If you want to remove all instances of two hard return and replace with one hard return, click Replace All.
Below is the expanded Find and Replace dialog box:

Find and Replace is an extremely useful dialog box in Word. You can use it to find and replace formatting, styles and other special characters.
Moving forward, it’s best practice to use paragraph spacing (before and after paragraphs) to handle spacing rather than pressing Return or Enter twice after titles, subheadings and body paragraphs.
Subscribe to get more articles like this one
Did you find this article helpful? If you would like to receive new articles, join our email list.
More resources
How to Create a Table of Contents in Word
How to Insert a Watermark in Word (like DRAFT)
How to View Word Count in Microsoft Word (4 Ways)
How to Superscipt or Subscript in Word (with Shortcuts)
How to Insert the Not Equal Sign in Word (5 Ways to Type or Insert ≠)
Related courses
Microsoft Word: Intermediate / Advanced
Microsoft Excel: Intermediate / Advanced
Microsoft PowerPoint: Intermediate / Advanced
Microsoft Word: Long Documents Master Class
Microsoft Word: Styles, Templates and Tables of Contents
Microsoft Word: Designing Dynamic Word Documents Using Fields
VIEW MORE COURSES >
Our instructor-led courses are delivered in virtual classroom format or at our downtown Toronto location at 18 King Street East, Suite 1400, Toronto, Ontario, Canada (some in-person classroom courses may also be delivered at an alternate downtown Toronto location). Contact us at info@avantixlearning.ca if you’d like to arrange custom instructor-led virtual classroom or onsite training on a date that’s convenient for you.
Copyright 2023 Avantix® Learning
Microsoft, the Microsoft logo, Microsoft Office and related Microsoft applications and logos are registered trademarks of Microsoft Corporation in Canada, US and other countries. All other trademarks are the property of the registered owners.
Avantix Learning |18 King Street East, Suite 1400, Toronto, Ontario, Canada M5C 1C4 | Contact us at info@avantixlearning.ca
Written by: Hrishikesh Pardeshi, Founder at Flexiple, buildd & Remote Tools.
Last updated: Mar 03, 2023
If your job heavily revolves around writing or formatting content, you might be well acquainted with how unnecessary paragraph marks become a nuisance. Even if you have encountered them for the first time, it’s likely that their use has left you confused.
So, we’ve compiled the below points to help you understand more about paragraph marks in Word and how to remove them. This will help you churn out well-formatted docs every time with ease.
You can also skip directly to How to remove paragraph marks in Word.
TABLE OF CONTENTS
- What is a hard return?
- How can you display paragraph marks in a document?
- How to remove hard returns
- Remove paragraph marks in Word — Find & replace paragraph marks
- How to remove paragraph marks: Step-wise summary
What is a hard return?
A hard return or paragraph break is essentially the ending of a line and beginning of a new paragraph. Pressing the Enter key while editing the document results in the word processor inserting a hard return. The enter key forces the line to break to the next paragraph.
On the other hand, soft returns allow you to continue typing without needing to press enter to go to the next line. With a soft return, words that go beyond the right end of the text-box are automatically transferred to the next line, without having to press Enter. This is also called ‘word wrapping’.
How can you display paragraph marks in a document?
A backward ‘P’ symbol (¶), known as a ‘pilcrow’, is used to represent a hard return. You can choose to display paragraph marks in your Word document.
To do so, go to the ‘Home’ tab -> ‘Paragraph’ group. You will find a pilcrow as shown below, select it by clicking on it. This is called the ‘Show/ Hide Paragraph mark’ option.
Alternatively, you can use the keyboard shortcut ‘Ctrl + *‘ to enable it. This function displays all the characters that won’t be printed (hidden characters). With this function enabled, you can see where hard returns occur and spot where the text breaks at the wrong places.

Hard returns tend to create all sorts of errors in the formatting of content.
However, when word wrapping is enabled, soft returns make sure that your formatting remains intact. Soft returns are represented by an arrow which faces downwards then to the left side. You could also invoke a soft return via the keyboard shortcut ‘Shift + Enter’.
How to remove hard returns
One direct way of removing paragraph marks in Word is to do it manually. You can edit the text by manually deleting the extra hard returns and adding a space or any other punctuation you prefer. Cleaning the document in this way is tedious, though, and there is a simpler way of going about with it, as we explain in detail below.
Remove paragraph marks in Word — Find & replace paragraph marks
You can remove paragraph marks in Word by using the ‘Find’ and ‘Replace’ commands, which are present on the right side of the ‘Home’ tab. Alternatively, you can use ‘Ctrl+F’ for ‘Find’ and ‘Ctrl+H’ for ‘Replace.’
Since it is a special display character and hence not available on most keyboards, you can’t simply type in the paragraph mark inside the text box. Therefore, you would need to open the Find and Replace dialog box, click on ‘More’ and select ‘Special’.
A list of characters and symbols that you can find and replace in any line is shown here. ‘Paragraph mark’ will be shown at the top of this list.
However, you could also just insert ‘^p’ in the ‘Find what’ textbox to save time. In the ‘Replace with’ text box, insert the character you want to replace it with.
Now, there may be some places where you actually want to retain paragraph marks, like at the end of a true sentence. Removal of these along with the rest would alter your text and you’d not be able to distinguish an actual paragraph end from an unnecessary hard return. In such a case, you’d need to find where there are two hard returns, at the end of the true sentences. You can then replace all such instances with a desired placeholder. It may be something like a set of asterisks (***) or any symbol of choice which isn’t normally present in your text. You can do so either by using the ‘Find next’ option followed by ‘Replace’, or by using ‘Replace All’ to clean all at once.
For removing the unnecessary hard returns from the document:
Step 1: Simply enter a single ‘^p’ in the ‘Find what’ text box
Step 2: Enter what you want to replace it with (for this, you could use a space or leave it blank) and hit ‘Replace all’. Or, you could also do it one by one using ‘Find next.’
Step 3: Clean up the placeholders by copying them in the ‘Find what’ text box and inserting the ‘^p’ in the ‘Replace with’ text box.
Your document should now be good to go.
How to remove paragraph marks: Step-wise summary
To sum it up, the following set of steps should help you easily remove paragraph marks in Word:
- Make a copy of the document so you don’t affect the original
- Activate the ‘Replace’ command (Ctrl+H or Home->Replace)
- Go to ‘More’ -> ‘Special’ in the ‘Find and Replace’ dialog box
- Select ‘Paragraph mark.’ ‘^p’ will display in the ‘Find what’ text box
- Depending on your preference, use a space in the ‘Replace with’ field or leave it empty
- In case you deleted some of the paragraph marks you wanted to retain, find the placeholder you used and replace the desired ones with a paragraph mark
- Do a quick review of your document to make sure the text is formatted well
The above method can be used not only for Word, but for Excel and any other MS software you use. You can also watch the video below to understand the process in detail.
Too many or too few hard returns can damage an in any other case skilled trying Microsoft Word document. Fortunately, it is simple to add and substitute these hard returns utilizing Word’s Replace characteristic.
Image: iStock/Sonja Rachbauer
In a Word document, you normally enable Word to wrap to the following line as you enter content material. You press Enter solely if you’re prepared to begin a new paragraph. It’s not unusual although, particularly with older paperwork that you just inherit to discover multiple hard return between paragraphs. That’s as a result of somebody used hard returns as a substitute of altering the textual content model to add white area. It’s not proper or incorrect, however in this text, I’ll present you ways to use the Replace characteristic to delete and add hard returns.
SEE: 83 Excel ideas each person ought to grasp (TechRepublic)
I’m utilizing Microsoft 365 on a Windows 10 64-bit system, however you may use earlier variations. Word Online would not assist special-character searches but. There’s no demonstration file; you do not want one. Enter =Rand() into a clean document to create a few paragraphs of textual content, as I did.
What’s a hard return?
Before we get began, I would like to point out that the time period hard return refers to manually urgent Enter to wrap textual content to the following line. Word refers to it as a paragraph mark. You’ll see the phrases used interchangeably. In this text, I’ll use hard return when talking usually and I’ll use paragraph mark when referring to the precise image circled in Figure A. To see this image, click on Show/Hide in the Paragraph group on the Home tab.
As you may see in Figure A, there’s just one paragraph mark (hard return) between paragraphs. By default, newer variations of Word mechanically add white area between paragraphs utilizing a Spacing setting (extra about that later). That’s the way you get a lot white area between paragraphs with just one hard return. You can regulate the setting, however let’s do not. Instead, let’s remove it utilizing Replace and see what occurs.
Figure A
There’s just one paragraph mark between every paragraph.
Deleting hard returns utilizing Replace in Word
Now let’s suppose that you do not need all that white area between he paragraphs, and also you incorrectly assume that there are two hard returns as a substitute of 1 as a result of the paragraphs. In this case, you would possibly do the next utilizing Replace:
- On the Home tab, click on Editing after which select Replace, or click on Ctrl + G. Click the Replace tab if obligatory.
- Click More if obligatory to expose extra choices.
- Click contained in the Find What management.
- Click the Special button on the backside of the dialog and select Paragraph Mark from the ensuing record (Figure B). Do this once more, so Word appears to be like for 2 paragraph marks (Figure C). The characters ^p symbolize a paragraph mark. It’s price noting that it’s best to use the Special button to enter particular characters. Entering the carat character (^) manually would not at all times work.
- Click contained in the Replace With management.
- Use the Special button to enter just one Paragraph Mark (Figure C).
- Take a shortcut and click on Replace All. Word confirms the duty however makes no substitute (Figure D). (If you have got one, don’t be concerned, it is most likely an additional hard return on the finish of the textual content.)
Figure B
Enter two paragraph marks.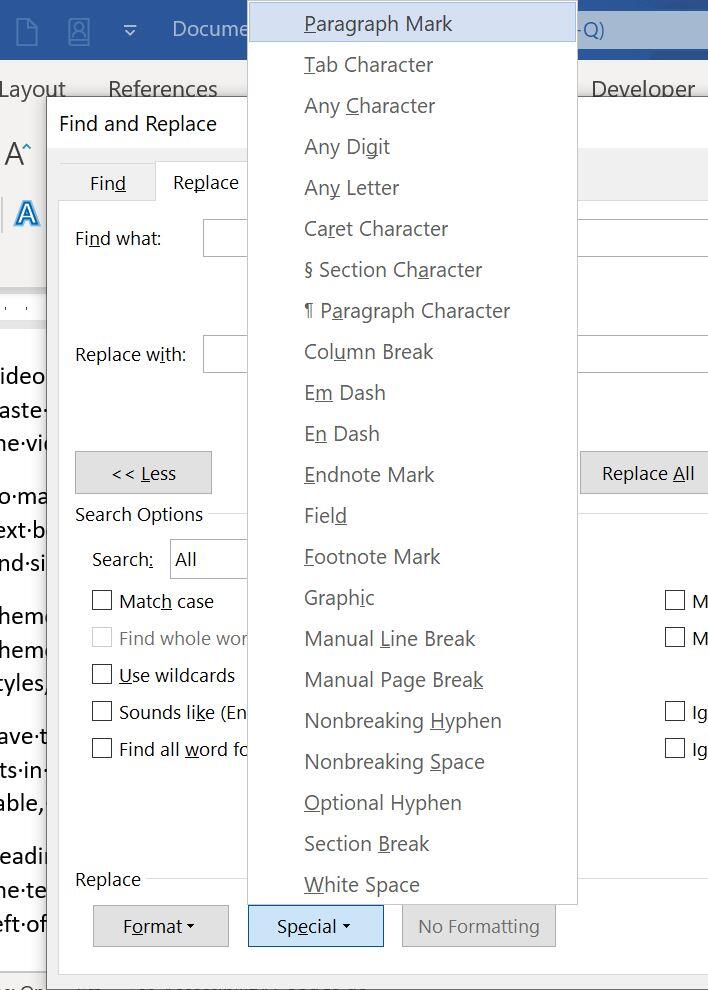
Figure C
Enter just one paragraph mark.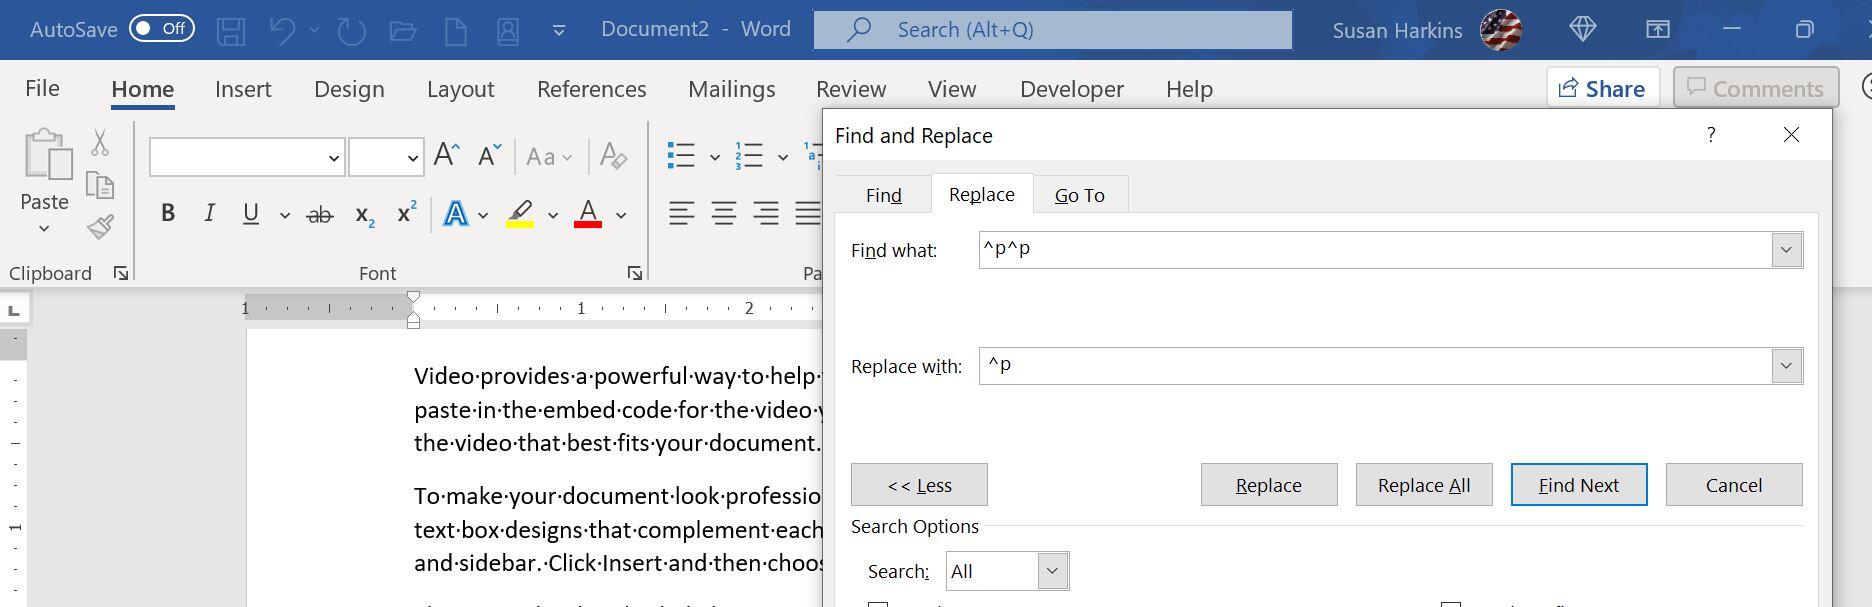
Figure D
Word confirms that no replacements had been made.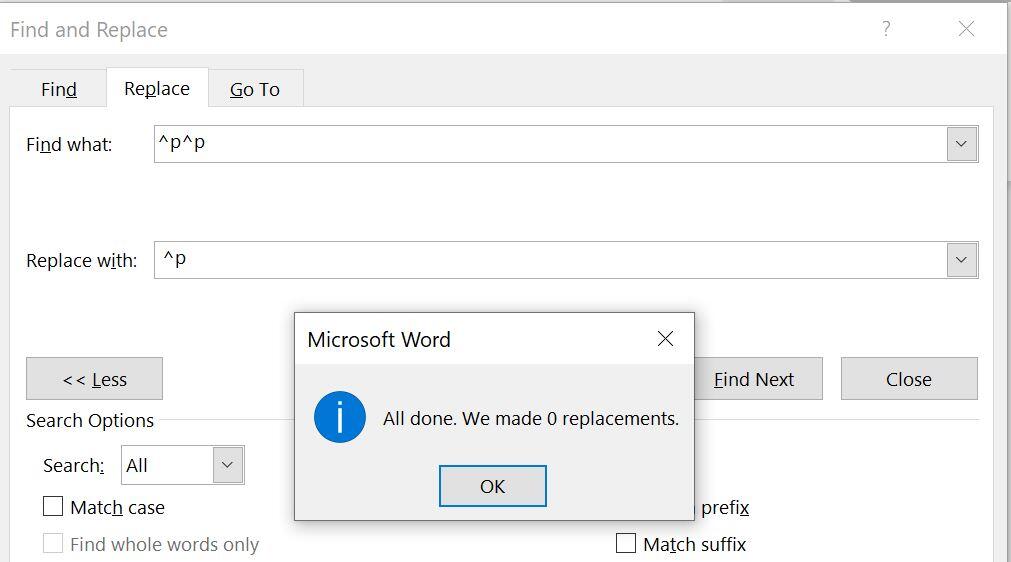
Are you stunned that nothing occurred? By changing two paragraph marks with just one, you would possibly assume you are eradicating a paragraph mark between every paragraph, however that did not work as a result of there’s just one paragraph mark. Word did not discover two paragraph marks collectively.
Let’s delete only one paragraph mark and see what occurs. Repeat the steps above, however in step 4, you want just one Paragraph Mark and in step 6, go away the Replace With management clean (delete the unique paragraph mark from the primary run if obligatory). When you click on Replace All, Word deletes the entire paragraph marks (a complete of 5) and you find yourself with the only paragraph proven in Figure E.
Figure E
Removing the hard returns creates a little bit of a mess.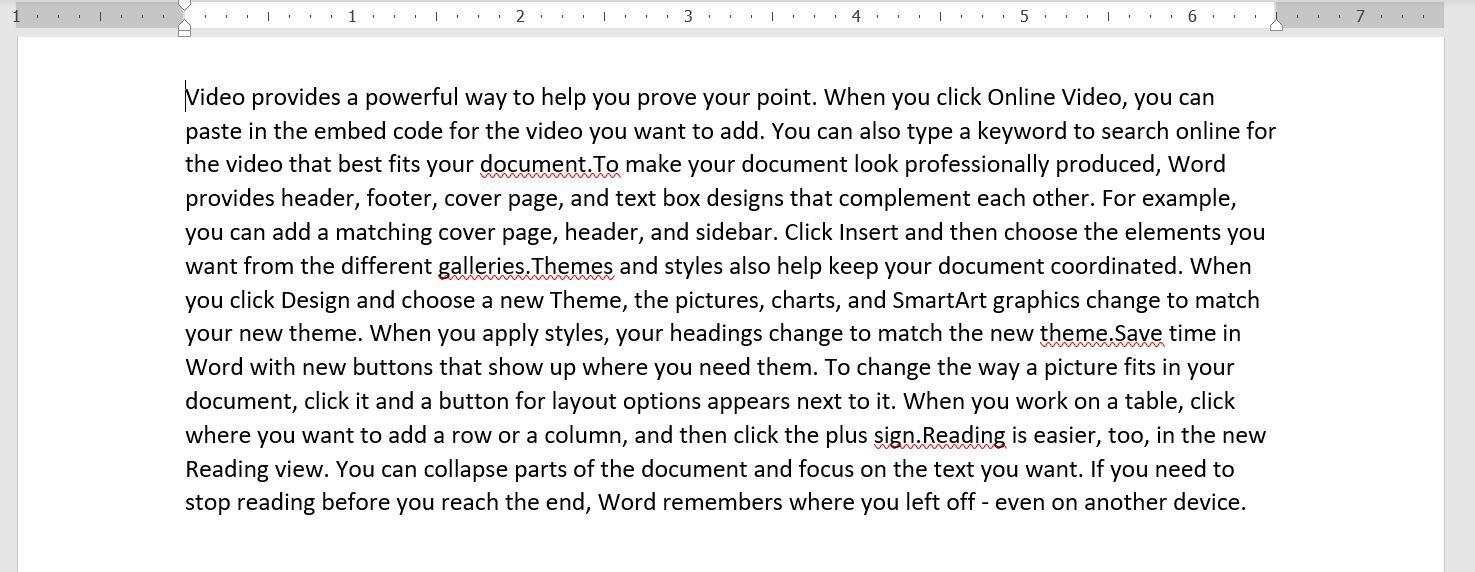
Before we transfer on to the part on including hard returns, press Ctrl + Z to undo the Replace process and reset the textual content to its unique area formatting.
SEE: Windows 10: Lists of vocal instructions for speech recognition and dictation (free PDF) (TechRepublic)
How to add hard returns utilizing Replace in Word
Now we already know that there is just one hard return between every paragraph and that a area setting is creating all that white area, so let’s delete it so we are able to follow including a hard return utilizing Replace. First, let’s change that area setting as follows:
- Select the content material (all of it).
- Click the More button in the Paragraph group on the Home tab.
- On the Indents and Spacing tab, verify the Don’t Add Space Between Paragraphs of the Same Style choice (Figure F).
- Click OK.
Figure F
Remove the extraneous spacing between the paragraphs.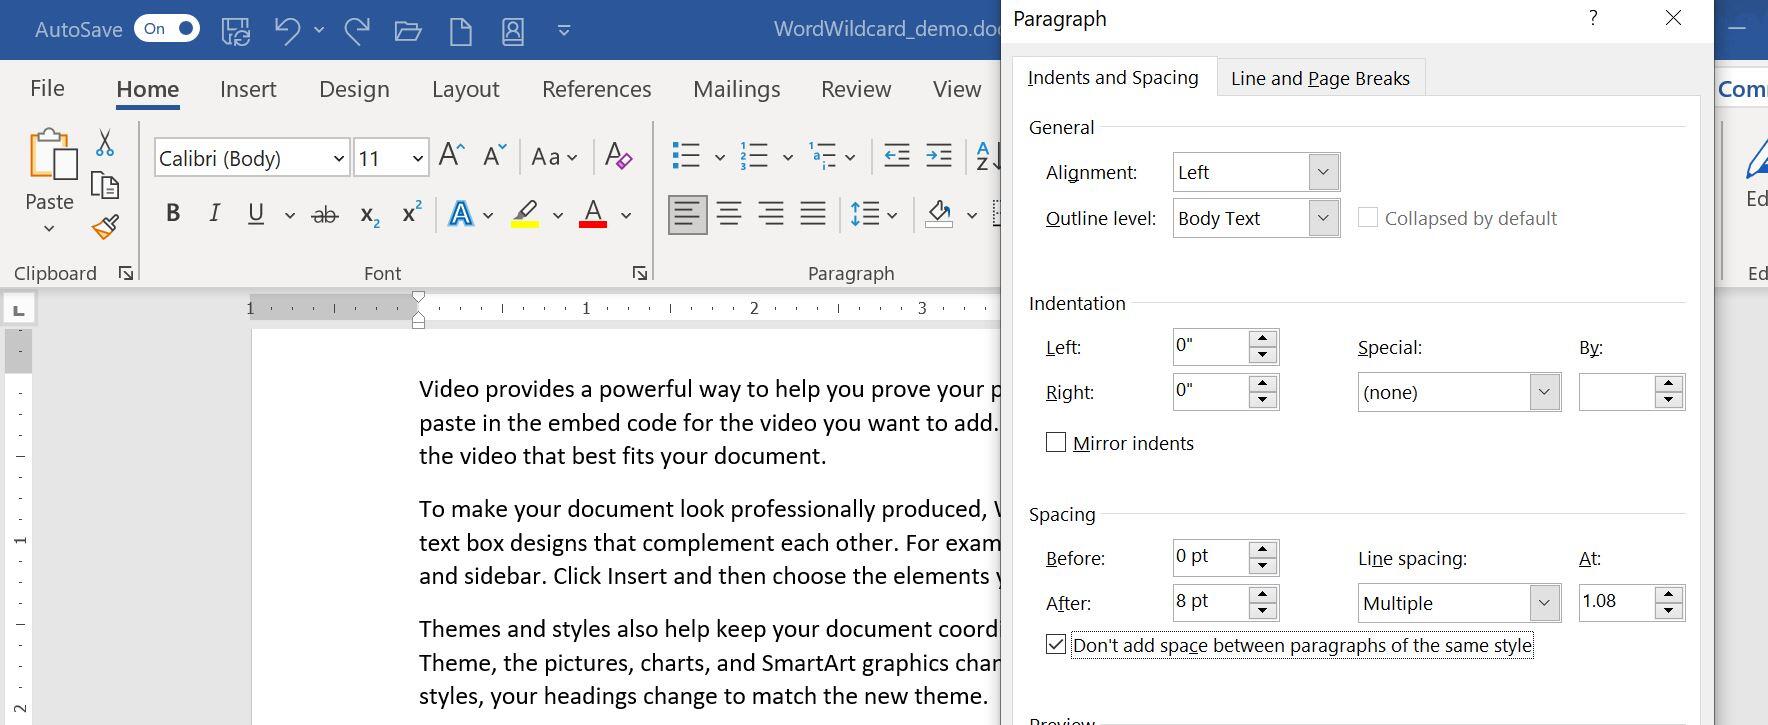
The additional spacing is gone, however the single hard returns are nonetheless in place. What we’d like to do now could be add a hard return to add extra spacing. (I do know it looks like we’re not truly fixing something, and we’re not; we’re merely working by way of examples of how to add and delete paragraph returns utilizing Replace.)
Repeat the directions for the substitute process used above. You’re in search of one paragraph return (^p), and also you need to substitute it with two (^p^p). You’re reversing the primary substitute process. Figure G reveals the outcomes. The spacing is analogous to the sooner area setting.
Figure G
Add one other hard return to improve the white area between paragraphs.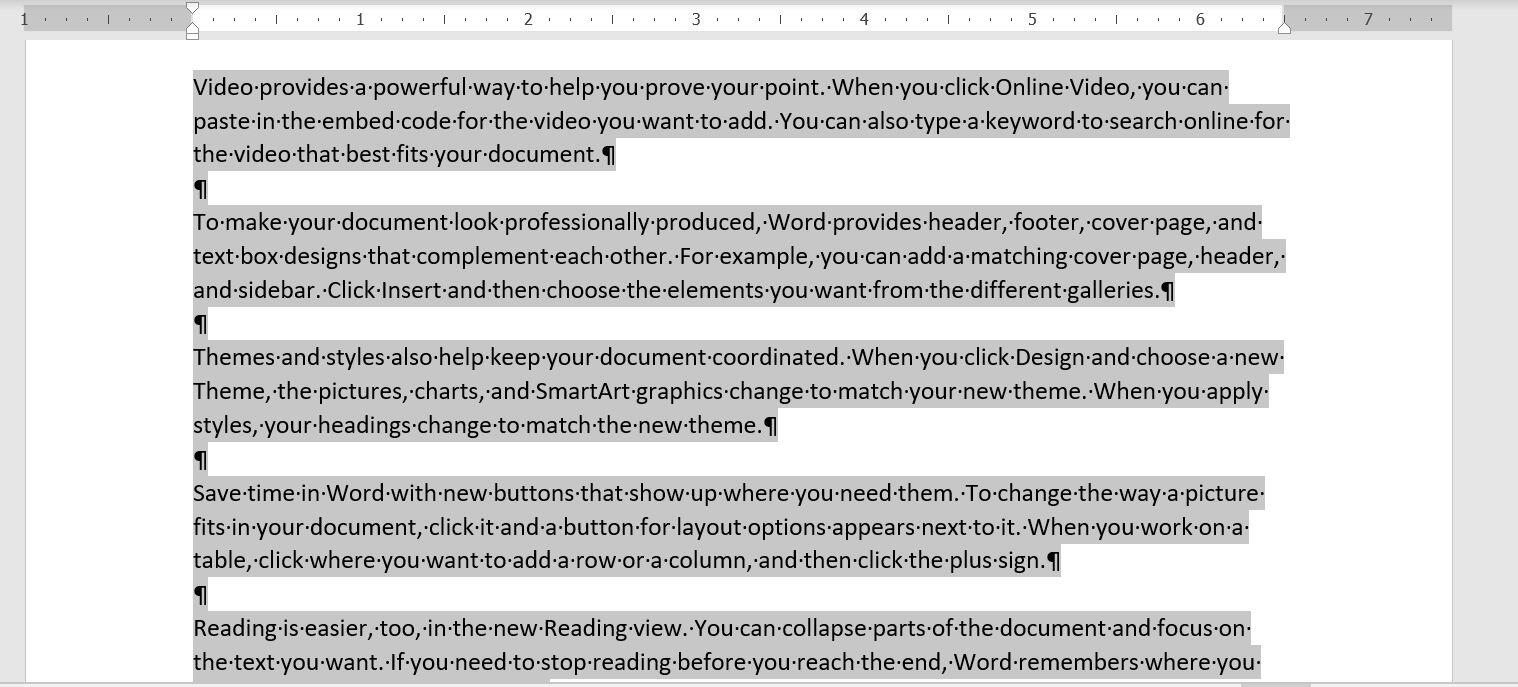
I’m not suggesting that you just get rid of the default spacing between paragraphs after which substitute it with two hard returns utilizing Replace. That’s not the purpose of the workout routines. We’re deleting and including hard returns utilizing Replace as a result of it is simpler than manually eradicating and including them. You’ve realized which you could use Replace to add and delete them and that ^p represents a paragraph mark when looking out a document.

Microsoft Weekly Newsletter
Be your organization’s Microsoft insider by studying these Windows and Office ideas, tips, and cheat sheets.
Delivered Mondays and Wednesdays
Sign up right this moment
Also see
Too many or too few hard returns can ruin an otherwise professional looking Microsoft Word document. Fortunately, it’s easy to add and replace those hard returns using Word’s Replace feature.

Image: iStock/Sonja Rachbauer
In a Word document, you usually allow Word to wrap to the next line as you enter content. You press Enter only when you’re ready to start a new paragraph. It’s not uncommon though, especially with older documents that you inherit to find more than one hard return between paragraphs. That’s because someone used hard returns instead of altering the text style to add white space. It’s not right or wrong, but in this article, I’ll show you how to use the Replace feature to delete and add hard returns.
SEE: 83 Excel tips every user should master (TechRepublic)
I’m using Microsoft 365 on a Windows 10 64-bit system, but you can use earlier versions. Word Online doesn’t support special-character searches yet. There’s no demonstration file; you don’t need one. Enter =Rand() into a blank document to create a few paragraphs of text, as I did.
What’s a hard return?
Before we get started, I want to mention that the term hard return refers to manually pressing Enter to wrap text to the next line. Word refers to it as a paragraph mark. You’ll see the terms used interchangeably. In this article, I’ll use hard return when speaking generally and I’ll use paragraph mark when referring to the actual symbol circled in Figure A. To see this symbol, click Show/Hide in the Paragraph group on the Home tab.
As you can see in Figure A, there’s only one paragraph mark (hard return) between paragraphs. By default, newer versions of Word automatically add white space between paragraphs using a Spacing setting (more about that later). That’s how you get so much white space between paragraphs with only one hard return. You can adjust the setting, but let’s don’t. Instead, let’s remove it using Replace and see what happens.
Figure A
There’s only one paragraph mark between each paragraph.
Deleting hard returns using Replace in Word
Now let’s suppose that you don’t want all that white space between he paragraphs, and you incorrectly assume that there are two hard returns instead of one because the paragraphs. In this case, you might do the following using Replace:
- On the Home tab, click Editing and then choose Replace, or click Ctrl + G. Click the Replace tab if necessary.
- Click More if necessary to expose more options.
- Click inside the Find What control.
- Click the Special button at the bottom of the dialog and choose Paragraph Mark from the resulting list (Figure B). Do this again, so Word looks for two paragraph marks (Figure C). The characters ^p represent a paragraph mark. It’s worth noting that you should use the Special button to enter special characters. Entering the carat character (^) manually doesn’t always work.
- Click inside the Replace With control.
- Use the Special button to enter only one Paragraph Mark (Figure C).
- Take a shortcut and click Replace All. Word confirms the task but makes no replacement (Figure D). (If you have one, don’t worry, it’s probably an extra hard return at the end of the text.)
Figure B
Enter two paragraph marks.
Figure C
Enter only one paragraph mark.
Figure D
Word confirms that no replacements were made.
Are you surprised that nothing happened? By replacing two paragraph marks with only one, you might think you’re removing a paragraph mark between each paragraph, but that didn’t work because there’s only one paragraph mark. Word didn’t find two paragraph marks together.
Let’s delete just one paragraph mark and see what happens. Repeat the steps above, but in step 4, you need only one Paragraph Mark and in step 6, leave the Replace With control blank (delete the original paragraph mark from the first run if necessary). When you click Replace All, Word deletes all of the paragraph marks (a total of 5) and you end up with the single paragraph shown in Figure E.
Figure E
Removing the hard returns creates a bit of a mess.
Before we move on to the section on adding hard returns, press Ctrl + Z to undo the Replace task and reset the text to its original space formatting.
SEE: Windows 10: Lists of vocal commands for speech recognition and dictation (free PDF) (TechRepublic)
How to add hard returns using Replace in Word
Now we already know that there’s only one hard return between each paragraph and that a space setting is creating all that white space, so let’s delete it so we can practice adding a hard return using Replace. First, let’s change that space setting as follows:
- Select the content (all of it).
- Click the More button in the Paragraph group on the Home tab.
- On the Indents and Spacing tab, check the Don’t Add Space Between Paragraphs of the Same Style option (Figure F).
- Click OK.
Figure F
Remove the extraneous spacing between the paragraphs.
The extra spacing is gone, but the single hard returns are still in place. What we need to do now is add a hard return to add more spacing. (I know it seems like we’re not actually solving anything, and we’re not; we’re simply working through examples of how to add and delete paragraph returns using Replace.)
Repeat the instructions for the replace task used above. You’re looking for one paragraph return (^p), and you want to replace it with two (^p^p). You’re reversing the first replace task. Figure G shows the results. The spacing is similar to the earlier space setting.
Figure G
Add another hard return to increase the white space between paragraphs.
I’m not suggesting that you eliminate the default spacing between paragraphs and then replace it with two hard returns using Replace. That’s not the point of the exercises. We’re deleting and adding hard returns using Replace because it’s easier than manually removing and adding them. You’ve learned that you can use Replace to add and delete them and that ^p represents a paragraph mark when searching a document.
Microsoft Weekly Newsletter
Be your company’s Microsoft insider by reading these Windows and Office tips, tricks, and cheat sheets.
Delivered Mondays and Wednesdays
Sign up today
Also see
Denial of responsibility! TechNewsBoy.com is an automatic aggregator around the global media. All the content are available free on Internet. We have just arranged it in one platform for educational purpose only. In each content, the hyperlink to the primary source is specified. All trademarks belong to their rightful owners, all materials to their authors. If you are the owner of the content and do not want us to publish your materials on our website, please contact us by email – [email protected]. The content will be deleted within 24 hours.
 Please Note:
This article is written for users of the following Microsoft Word versions: 2007, 2010, 2013, 2016, 2019, and Word in Microsoft 365. If you are using an earlier version (Word 2003 or earlier), this tip may not work for you. For a version of this tip written specifically for earlier versions of Word, click here: Removing Return Addresses.
![]()
Written by Allen Wyatt (last updated March 6, 2021)
This tip applies to Word 2007, 2010, 2013, 2016, 2019, and Word in Microsoft 365
In other issues of WordTips you learned how to insert a graphic in a return address for creating envelopes or for creating labels. It seems that learning how to remove those special return addresses has resulted in the subject for another tip—this tip.
How you go about removing a return address that contains a graphic depends exactly on how it was created in the first place. There are a couple of things to try, each of which may result in the offending graphic being removed. The first method is to simply try to delete the return address. You do this by following these steps:
- Display the Mailings tab of the ribbon.
- Click the Envelopes tool in the Create group. Word displays the Envelopes tab of the Envelopes and Labels dialog box. (See Figure 1.)
- Click in the Return Address area and delete everything there. For good measure, replace the contents with a single space.
- Print your envelopes as normal. The return address should be gone.
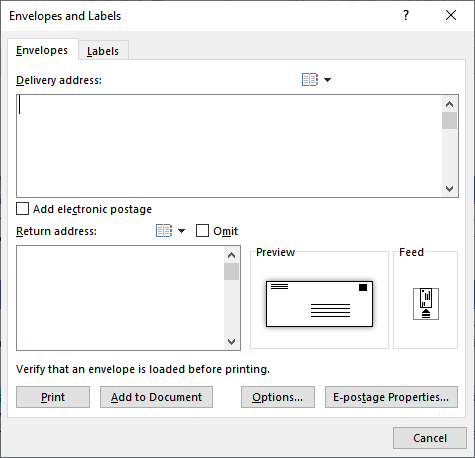
Figure 1. The Envelopes tab of the Envelopes and Labels dialog box.
If you simply want to remove the return address temporarily, you could click on the Omit check box in step 3. The contents of the return address are retained, but it should not print.
If this doesn’t work, take a look in the Word options for the return address stored there. You can get to it and get rid of it by following these steps:
- Display the Word Options dialog box. (In Word 2007 click the Office button and then click Word Options. In Word 2010 or a later version, display the File tab of the ribbon and then click Options.)
- Click Advanced at the left side of the dialog box.
- Scroll down through the options until you see the General section. (See Figure 2.)
- Click in the Mailing Address area and delete everything there.
- Click on OK to close the Word Options dialog box.
- Try to print your envelopes. The return address should not show up in the Envelopes and Labels dialog box.

Figure 2. The General section of the Word Options dialog box.
Finally, there is one other place to look if you still cannot get rid of the return address. Word allows you to define special building blocks that print as part of your return address. These entries normally have the names EnvelopeExtra1 and EnvelopeExtra2. To get rid of them, follow these steps:
- Display the Insert tab of the ribbon.
- Click the Quick Parts tool (in the Text group) and then click Building Blocks Organizer. Word displays the Building Blocks Organizer.
- Click the label at the top of the Name column. The building blocks should now be listed in alphabetical order.
- Scroll through the list of building blocks, looking for items such as EnvelopeExtra1 or EnvelopeExtra2. If you find one, select it.
- Click on the Delete button.
- Look for any other similarly named building blocks, repeating steps 4 and 5 as needed.
- Click on the Close button.
- Try to print your envelopes. The return address should not show up in the Envelopes and Labels dialog box.
For more information on the special EnvelopeExtra1 AutoText entry, see this page:
https://www.gmayor.com/Alternative_Return_Addresses.htm
WordTips is your source for cost-effective Microsoft Word training.
(Microsoft Word is the most popular word processing software in the world.)
This tip (10176) applies to Microsoft Word 2007, 2010, 2013, 2016, 2019, and Word in Microsoft 365. You can find a version of this tip for the older menu interface of Word here: Removing Return Addresses.
Author Bio
With more than 50 non-fiction books and numerous magazine articles to his credit, Allen Wyatt is an internationally recognized author. He is president of Sharon Parq Associates, a computer and publishing services company. Learn more about Allen…
MORE FROM ALLEN
Setting Web Fonts
If you intend to generate a Web page from your document, you need to be concerned with the fonts that Word will use. …
Discover More
Indenting Cell Contents
Excel allows you to apply several types of alignments to cells. One type of alignment allows you to indent cell contents …
Discover More
Specifying Print Quantity in a Cell
When you print a worksheet, you can specify in the Print dialog box how many copies you want printed. If you want the …
Discover More
More WordTips (ribbon)
Envelopes and Labels Dialog Box Slow to Open
We all like Word to be snappy and responsive. Sometimes, though, it can be much slower than what we desire. One such time …
Discover More
Automatically Printing an Envelope
When you create a letter, you may want to have Word print a single envelope for that letter. You can do so by following …
Discover More
Changing the Default Font for Envelopes
When you create an envelope, Word assumes you want to use the font it has decided should be used for the envelope. If you …
Discover More