
-
Select Design > Watermark. (In Word 2010 or 2007, select Page Layout > Watermark.)

-
Select Remove Watermark.

Remove a watermark by clicking the header area
If you can’t delete a watermark using Remove Watermark, try this:
-
Double-click near the top of the page to open the header area.
-
Put your cursor over the watermark until you see a 4-way arrow.
-
Select the watermark.
-
Press the Delete key on your keyboard.
-
Repeat as necessary to remove all watermarks.
-
Select Design > Watermark. (In Word for Mac 2011, select Page Layout > Watermark).
-
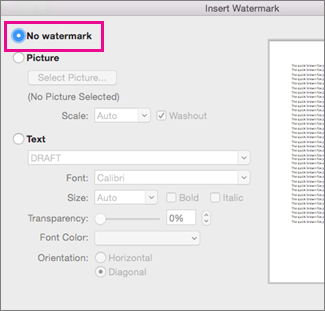
In the Insert Watermark box, select No watermark.
Remove a watermark by clicking the header area
If you can’t delete a watermark using Remove Watermark, try this:
-
Double-click near the top of the page to open the header area.
-
Click the watermark to select it.
-
Press the Delete key on your keyboard.

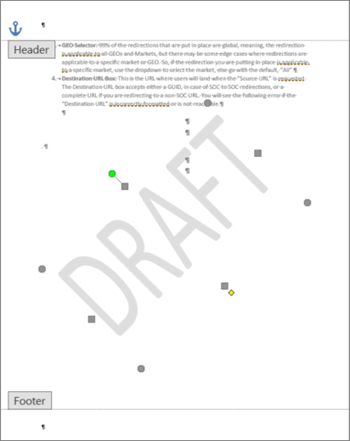
No longer a draft? Time to remove that watermark
Updated on November 29, 2021
What to Know
- Word for Windows or Word Online: Go to the Design tab and select Watermark > Remove Watermark.
- Word for Mac: Select the Design tab. In the Page Background group, choose Watermark. Select No Watermark.
- All versions of Word: If the document includes sections that are not linked, repeat these steps for each section.
This article explains how to remove watermarks in Microsoft Word. This information applies to Word 2019, 2016, 2010, 2007, Word for Mac, Word for Microsoft 365, and Word Online.
How to Remove a Watermark in Word for Windows or Word Online
Watermarks in Word mark pages of your document, protect your content, and identify the status or security needs of your project. Removing them when they’ve completed their purpose is as easy as adding them in the first place.
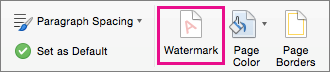
Under the Design tab, select Watermark, located on the far right of the screen. Select Remove Watermark. In Word 2010 and Word 2007, Watermark is found under the Page Layout tab, and in the Page Background group.
Microsoft Word 2016 allows for watermarks to be added or removed under the Design tab.
If the watermark is still there, it’s possible Word anchored the watermark in the header area if it’s tied to a specific section. Double-click the header area, select the watermark itself, and then press Delete.
If your document includes sections that are not linked together, these steps must be repeated to remove the watermark from each independent section.
How to Remove a Watermark in Word for Mac
Click the Design tab. In the Page Background group, click Watermark to display the Insert Watermark box. Select No watermark. In Word for Mac 2011, click the Page Layout tab, select the Page Background group and then click Watermark.
The No Watermark option in Word for Mac will remove a watermark from your document.
If the watermark is still there, it may be anchored to the header in a specific section. The solution is the same as the Windows version of Word: Double-click the header area to open it, click the watermark and select Delete.
As with Word for Windows, if your Word for Mac document contains multiple sections and section breaks that are not linked and contain watermarks, you need to remove the watermark from each section individually by repeating the steps above.
Thanks for letting us know!
Get the Latest Tech News Delivered Every Day
Subscribe

To remove a watermark from a Word document, go to Design > Watermark > Remove Watermark. You can also navigate to Insert > Header > Edit Header, then select and delete the watermark.
Are you looking to get rid of an existing watermark from your Microsoft Word document? If so, you have two ways to remove watermarks in Word. We’ll show you both.
Remove a Watermark in Word From the Watermark Menu
One way to delete a watermark from your Word document is to use the Watermark menu. This is the menu that you also use to add watermarks to your documents.
To start, open your document containing a watermark with Microsoft Word.
On the Word screen, in the ribbon at the top, click the “Design” tab.

On the “Design” tab, in the “Page Background” section, click “Watermark.”
If you are on Windows, then from the “Watermark” menu, select “Remove Watermark.” If you are on Mac, on the “Insert Watermark” window, select “No Watermark” at the top.
And Word will delete the watermark from your document.
It’s easy to re-add a watermark to your document, if you’d like to do that.
RELATED: How to Use Watermarks in a Microsoft Word Document
Remove a Watermark in Word by Editing the Header
The other way to remove a watermark in Word is by editing the header (or footer). When you do that, your watermark also becomes editable and removable.
To use this method, open your document with Microsoft Word.
In Word’s ribbon at the top, click the “Insert” tab.
On the “Insert” tab, in the “Header & Footer” section, click “Header.” You can use the “Footer” option, too, if you want.
In the menu that opens, at the bottom, click “Edit Header.”
Your document’s header is now editable, giving you access to the watermark. Find the watermark you want to remove in your document and click it.
While your watermark is selected, press the Delete key on your keyboard. Word will remove the selected watermark.
And that’s all there is to it. You can now add a new watermark, or just leave your document background blank. The choice is entirely yours.
Did you know you can add watermarks to Google Docs, too?
RELATED: How to Add a Watermark in Google Docs
READ NEXT
- › How to Remove a Background or Watermark in PowerPoint
- › How to Adjust and Change Discord Fonts
- › How Long Do CDs and DVDs Last?
- › Google Chrome Is Getting Faster
- › Liquid Metal vs. Thermal Paste: Is Liquid Metal Better?
- › HoloLens Now Has Windows 11 and Incredible 3D Ink Features
- › This New Google TV Streaming Device Costs Just $20
How-To Geek is where you turn when you want experts to explain technology. Since we launched in 2006, our articles have been read billions of times. Want to know more?