
Excel for Microsoft 365 for Mac Excel 2021 for Mac Excel 2019 for Mac Excel 2016 for Mac Excel for Mac 2011 More…Less
Workbook passwords can be changed or removed by anyone who knows the current password.
Caution: Passwords in Excel for Mac and Word for Mac have a 15-character limit. You cannot open a workbook or document that has been password protected in the Windows-based version of Excel or Word if the password is longer than fifteen characters. If you want to open the file in Office for Mac, ask the Windows-based author to adjust the password length.
-
Open the workbook that you want to change or remove the password for.
-
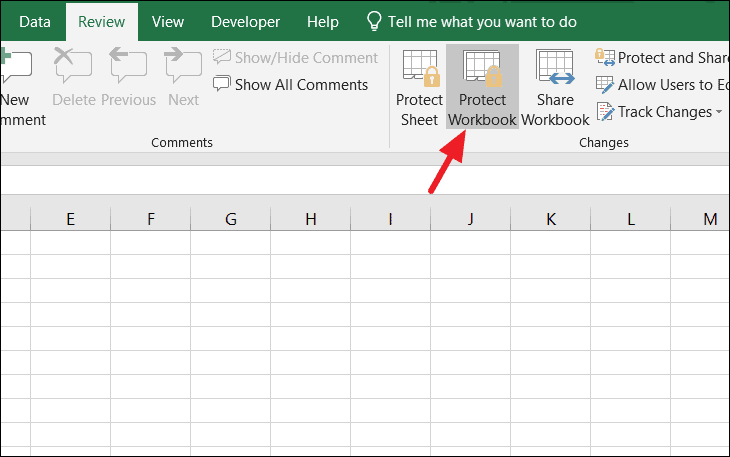
On the Review tab, click Protect Sheet or Protect Workbook.

-
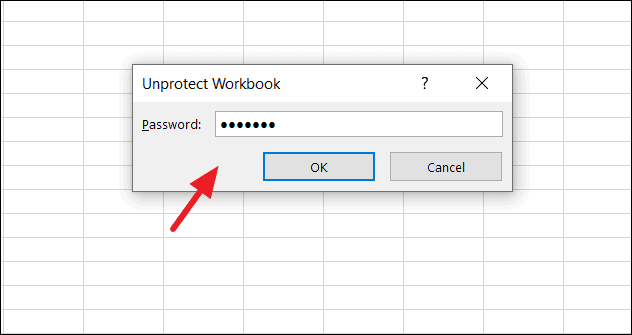
Click Unprotect Sheet or Protect Workbook and enter the password.
Clicking Unprotect Sheet automatically removes the password from the sheet.
-
To add a new password, click Protect Sheet or Protect Workbook, type and confirm the new password, and then click OK.
To remove a password from the workbook, click Protect Workbook, and then click OK without entering a new password.
Change a workbook password
-
Open the workbook that you want to change the password for.
-
On the Review tab, under Protection, click Passwords.
-
In the Password to open box or Password to modify box, select all contents.
-
Type the new password, and then click OK.
-
In the Confirm Password dialog box, type the password again, and then click OK.
-
Click Save
.
 .
.Remove a workbook password
-
Open the workbook that you want to remove the password from.
-
On the Review tab, under Protection, click Passwords.
-
Select all contents in the Password to open box or the Password to modify box, and then press DELETE.
-
Click Save
.
See also
Require a password to open or modify a workbook
Need more help?
Excel is a popular Microsoft office suite program used mainly for creating spreadsheets and compiling data. To help you protect your work, excel gives you options by providing security features including securing it with a passcode.
If you are tasked with preparing these files and want to ensure no one else tampers with them, you need to set a strong password on the program such that no unauthorized users can interfere with the content therein. Furthermore, there may arise circumstances that may require access to the file that may necessitate doing away with the password. For instance, when collaborating, or when the creator is unavailable. This post highlights ways you can remove an excel password on your Windows PC or Mac.
Why include a passcode in an Excel file?
A password is one of the many security features at your disposal to prevent work-tampering and unauthorized access. For instance, if you are working on a sensitive project, say a financial audit, then you need to secure it for enhanced protection.
Sometimes you can create a file for sharing on a read-only basis. Such files cannot be left unprotected to maintain the integrity of the content. Hence, you need to apply for password protection. A read-only document can be shared by multiple people over various platforms, but without permission to edit, one cannot change its content.
Method 1: How to remove password protection in Excel manually using the info feature
1. Go to your Microsoft Office Suite and launch the Microsoft Excel program.
2. Open the encrypted Excel spreadsheet file you want to remove the password. In case you have set opening password protection in the file, it means the file is locked. You will be required to enter it. Click OK when done.

3. On the upper left corner of your opened worksheet, click the File tab. Click on ‘Info.’

4. Click on ‘Protect Workbook’ to open a drop-down menu. Then, choose the type of password protection you had set to remove.

- For Encrypt with Password option, all you have to do is clear the password written and click OK to remove the password. It works mostly for Excel from 2019 to 2010.

- For the ‘Protect Current Sheet’ and ‘Protect Workbook Structure options,’ get an Unprotect Sheet window and enter a password. Click OK to remove the protection. It works for Excel 2007 and older versions.
Note that you can remove password protection from the Review tab and click Protect Sheet or Protect Workbook. Clicking on Unprotect Sheet or Protect Workbook will automatically remove the password from the sheet.

Method 2: How to remove a password in Excel using iSeePassword
iSeePassword Dr.Excel is a powerful third-party tool that can be used to recover Excel open passwords and remove protection passwords from Excel Worksheet. You can unlock the worksheet pretty quickly with this password removal software. When you forgot the Excel password and the above tricks didn’t work, Dr.Excel is the best solution out there to help you get away from an awkward situation.
First, please download iSeePassword Dr.Excel from this link:
Download from this source
Recover Open Password from Excel
Open Dr.Excel from your computer and click Recover Open Password from the Excel menu on the welcome screen.

Please import the password-protected Excel file from the new window with the Add File button. Next, choose a password attack module. Usually, we will use Brute-force with Mask Attack as it allows you to set a couple of parameters to shorten the password recovery time.

Hit the Settings button on the right side and make proper settings accordingly.

Save the changes, and Dr.Excel starts to recover Excel open password based on your settings. Once the password is found, it will be shown on the screen.

After the password was recovered, you can now remove the password using the methods shared previously in this article.
Remove worksheet protection password from Excel using Dr. Excel
Well, it is much easier to remove the Excel worksheet password with the Dr.Excel app. It is almost done instantly.
First, choose Remove Workbook, Worksheet Password from the main window. Now, locate Add File button in the upper left corner to import the Excel file into the program. Finally, click the Start button to remove the worksheet protection password from Excel. The password will be removed in seconds without waiting, even if it has a complex password.

The unlocked Excel file is saved in the same folder as the original one sits. If you try to open the unlocked file, you will find no password attached to it. iSeePassword Dr.Excel is by far the easiest way to remove a password from Excel when you forgot the password.
Method 3: How to remove a password in an Excel sheet using the Home tab
1. Launch the Excel program and open the worksheet. You need to remove the password.
2. On the main ribbon menu, go to the Home tab.
3. Under the Cells group, click Format’s drop-down arrow. From the list, select Unprotect Sheet.

4. Type in the password and then click OK to remove the password.

Method 4: Using Save As to remove password protection in Excel
1. Open the password-protected Excel worksheet. After this, go to the File tab and select Save As.

2. Click the drop-down arrow to display a pop-up window. On the window, click Tools, then select General Options from the drop-down menu.

3. In the dialogue box, clear the password to open and modify fields to remove them.
4. Click the OK button to save all changes made. Remember to click the save button to save your modified document.

Method 5: Remove Encryption with Excel VBA
Running a simple VBA code can prove significantly essential in unprotecting all sheets and workbooks in excel.
To remove protection from excel files, you need to open the file, access the basic visual tool, and write a VBA code in the Visual Basic Editor. Follow these steps;
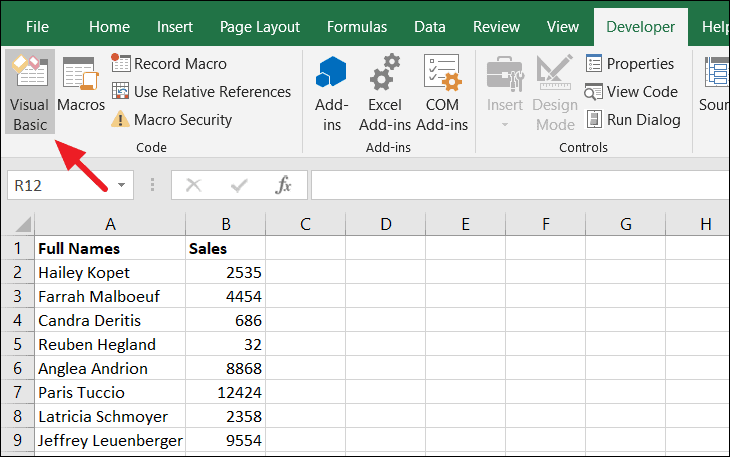
1. Find and click on Developer on the Excel ribbon.

2. Tap on the Visual Basic option

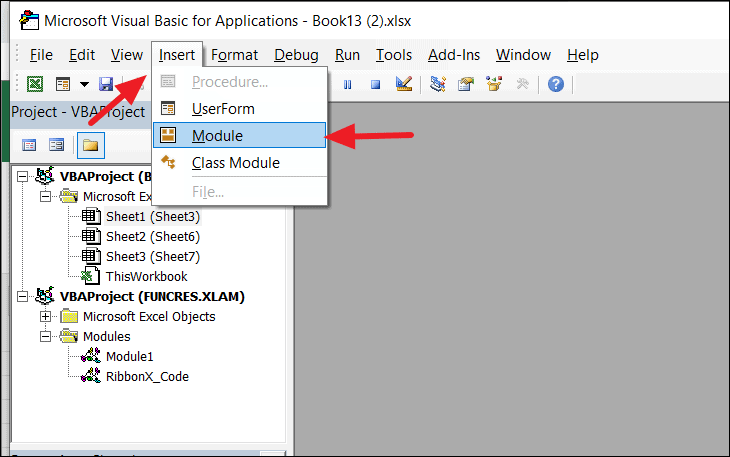
3. In this window, choose to Insert, and on the dropdown, select New Module

4. Input your code in the Visual Code Editor and run it, either by selecting the Run tab or press F5.

Use the following in the process above;
Password argument: worksheet.Unprotect method
Code: i. for a single password;
Sub UnprotectAllSheets()
     For Each wsheet In ActiveWorkbook.Sheets
         wsheet.Unprotect (123456)
      Next wsheet
End Sub
ii. for those secured with different passwords;
Sub UnprotectAllSheets()
    Sheets("January").Unprotect ("password")
    Sheets("February").Unprotect ("password")
    Sheets("March").Unprotect ("password")
    Sheets("April").Unprotect ("password")
End Sub
iii. for all sheets except some specified ones, say a sheet named January.
 Sub UnprotectAllSheets()
     For Each wsheet In ActiveWorkbook.Sheets
      If wsheet.Name = "January" Then
         wsheet.Protect
    Else
         wsheet.Unprotect
    End If
      Next wsheet
End Sub
Copy the codes above and paste them into the Visual Basic Editor for the specific scenarios.
Method 6: Remove Excel Passwords Using Zipping File Tool
The goal here is to do away with password protection. The process, therefore, involves compressing the file into a zip file, a little editing, then converting back to .xlsx format. Below are the steps;
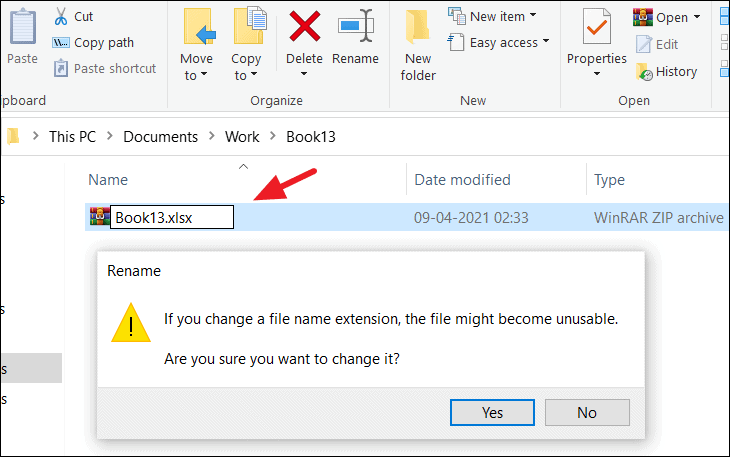
1. Click on View in the Windows File Explorer and tick the box enabling File Name Extension.

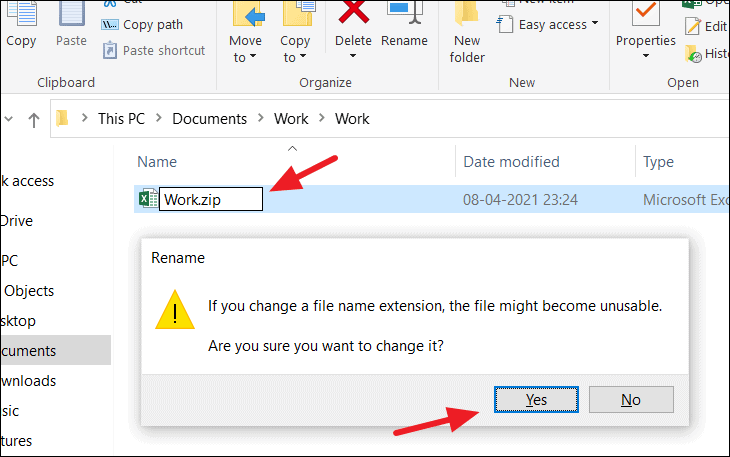
2. From the Home tab select the file and select Rename

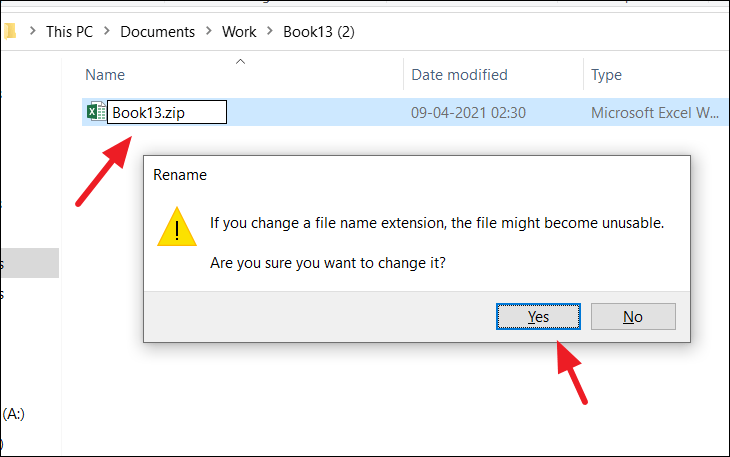
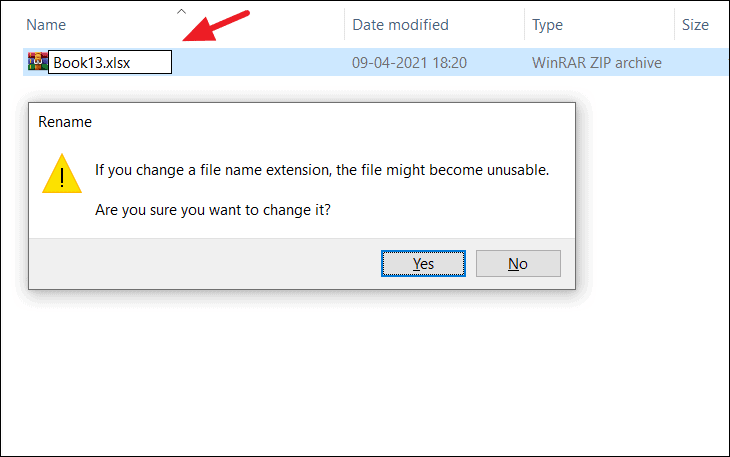
3. Remove the .xlsx extension from the name only and replace it with .zip. Press Enter
4. Click Yes on the warning popup window.

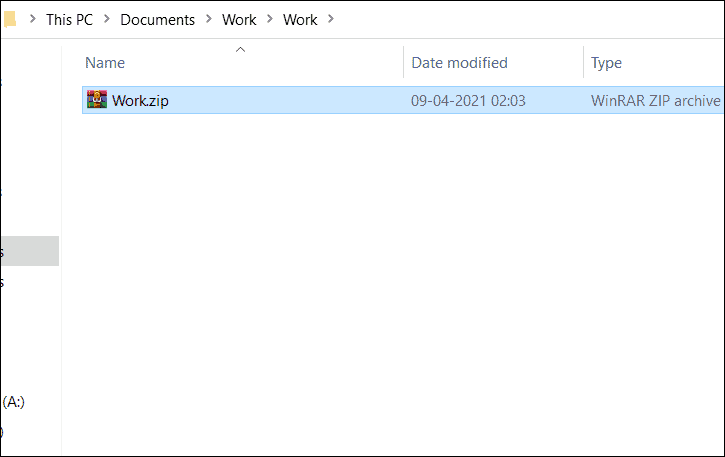
5. The .xlsx file changes to a .zip file
6. Open the zip file and select the xl folder

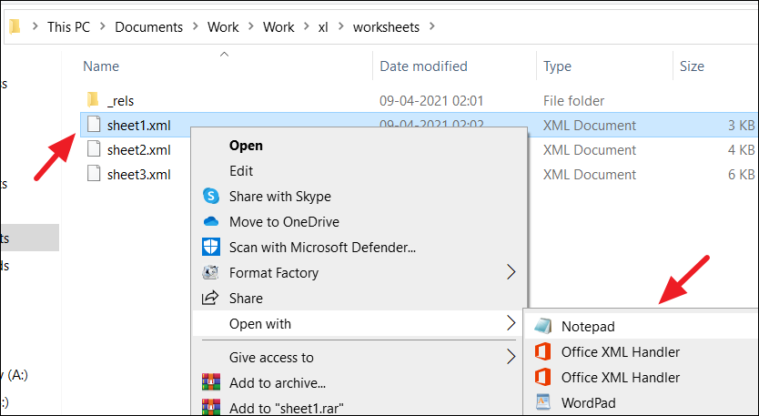
7. Click on the worksheets inside the xl folder.

8. Find the XML file

9. Select and right-click on the mouse; from the resulting menu window, choose Copy To

10. On the directory window, enter a directory and click OK
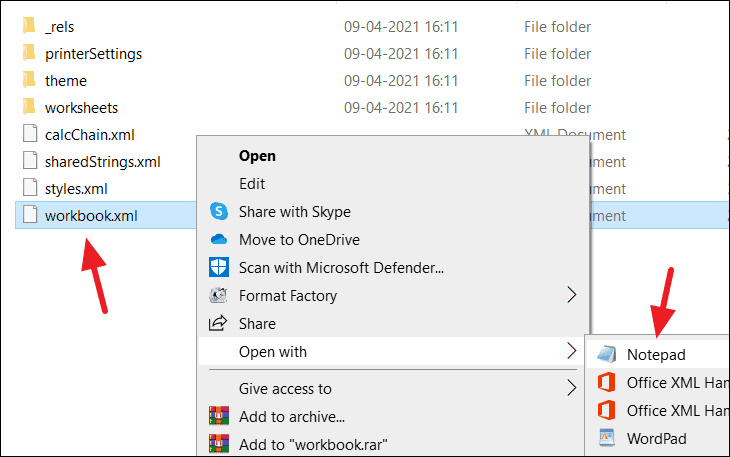
11. Go to the selected directory, select the file, and right-click the mouse. Hover the mouse on Open with from the context menu, then choose Notepad.

12. This will open the file on Notepad.

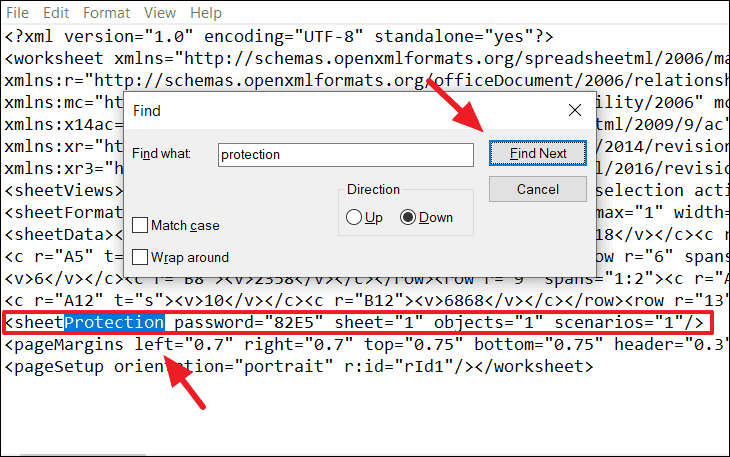
13. Press Ctrl+F on the keyboard to trigger the Find tool

14. Click Find Next on the window that opens.
15. The location of Protection shall be highlighted.

16. Select the part of the text from <sheetProtection … to scenarios=»1″/>

17. Press delete or backspace to wipe the text from the pad.

18. Press Ctrl+S to save the text.
19. Open Windows Explorer and select the original file.
20. Rename this file back to .xlsx from .zip

21. Open the Excel file
22. You can check that there is no protection by trying to edit the file or go to Click Format on the Home tab and confirm there is Protect Sheet from the dropdown menu. If there were a password, there would be Unprotect Sheet.
Method 7: Remove Protection from An Excel File Online
Groupdocs is the online tool used to clear passwords from excel files. It is, however, better suited when the password is known.
Here are the steps;
1. Log onto the Goupdocs

2. Click on the Click or drop your file here handle on the page
3. Select the file you want to unprotect, then hit on Open button

4. After the upload, input your password into the empty field shown

5. Then click UNLOCK
6. Wait until the process is complete, then click Download Now to download the file on your PC

Method 8: Remove Password Using the Review Tab
Follow these steps
1. Tap on the Review

2. Click on Protect subtab, then Protect Sheets.

3. Input your password into the popup window and click OK

4. Your sheet is now unprotected.
Method 9: Remove Password Using Unprotect Sheet Command
Follow the following steps:
1. Open the file, and from the Home tab, go to Cells.

2. Click Format, and on the dropdown menu, tap on Protect Sheet.

3. A box will pop up; input your password and click OK.

Conclusion
The article above provides some methods to remove password protection from your Excel files. The procedures mentioned above are some ways you will end up with the same results. Always remember to save your work again after making any changes to it.
![]()
Download Article
![]()
Download Article
Do you need to view or edit a protected Excel worksheet? If the sheet is locked with a password and you’re not sure what it is, you can easily use Google Sheets or a VBA script (in earlier versions of Excel) to remove the password. This wikiHow article will show you how to unlock a protected Excel spreadsheet with or without the password. If your entire Excel workbook is password-protected and you can’t open it, you’ll need to unlock the file first.
-
1
Open the workbook with a protected sheet in Microsoft Excel. You can usually do this by double-clicking the file’s name on your computer.
-
2
Right-click the tab for the protected sheet. Each sheet’s tab appears along the bottom of Excel. The protected sheet often has a padlock icon in some versions of Excel. Right-click the tab (or the lock icon) to open the context menu.[1]
- If multiple sheets are protected, you’ll need to remove protection on each sheet separately.
Advertisement
-
3
Click Unprotect Sheet. If the sheet is not password-protected, it will unlock immediately. If not, you’ll be prompted to enter a password into a pop-up window.
-
4
Enter the password and click OK. If the password is correct, the sheet will become unprotected.
- If you don’t know the password, see the Using Google Sheets method. This method lets you upload the file to Google Sheets, which removes all protections added in Excel.
- If you’re using Excel 2010 or earlier and prefer not to upload to Google Sheets, see the Using VBA Code in Excel 2010 and Earlier method.


Advertisement
-
1
Go to https://drive.google.com in a web browser. If you have a Google account, you can use Google Sheets (a free online app that’s similar to Excel) to remove protection from all sheets in a workbook—even if you don’t know the password.
- If you’re not already signed into your Google account, follow the on-screen instructions to sign in now.
- If you don’t have a Google account, see How to Make a Google Account.
-
2
Click + New. It’s at the top-left corner of the page.
-
3
Click File Upload. This opens your computer’s Open panel.
-
4
Select the Excel file you want to edit and click Open. This uploads the file to your Google Drive.
-
5
Double-click the Excel file in your Google Drive. You’ll probably have to scroll down to find it. This opens a preview of the file.
-
6
Click the Open with menu. It’s at the top of the preview. A menu will expand.
-
7
Click Google Sheets. Now that the file is open for editing in Google Sheets, any sheet protections added in Excel have been removed.
-
8
Re-download the file to your computer. If you want to keep working on the file in Microsoft Excel rather than Google Sheets, you can download this newly-unprotected version of your workbook using the following steps:
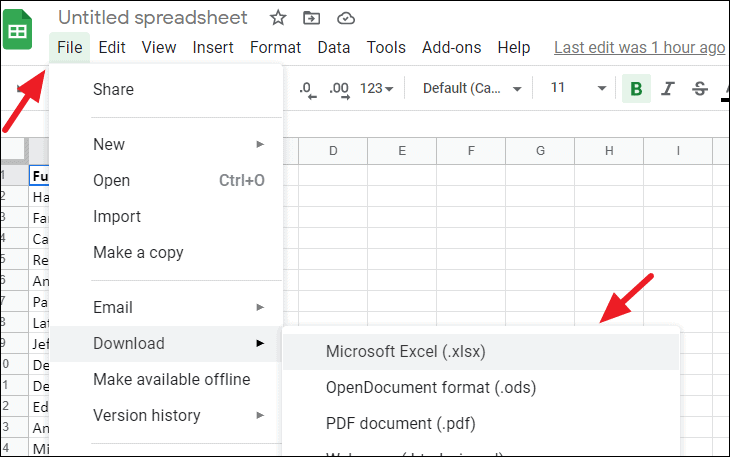
- Click the File menu at the top-left corner of your sheet.
- Click Download As.
- Click Microsoft Excel (.xlsx) .
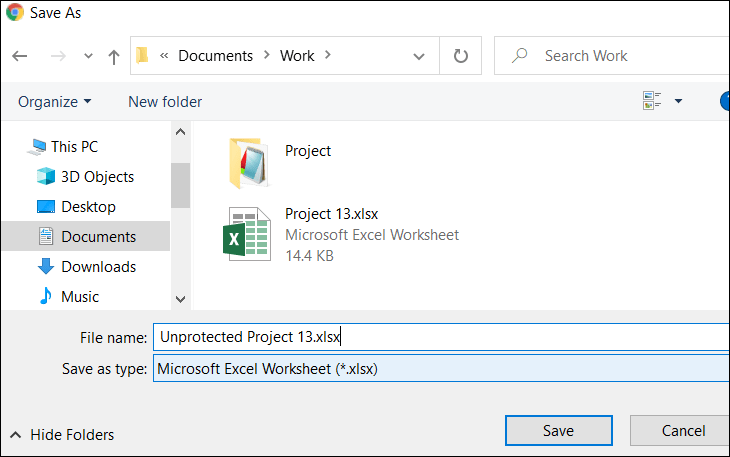
- Select a folder to save the file. If you want to keep the original version of the file (the one with a protected sheet) intact, type a new name for the file as well.
- Click Save to download the file.


Advertisement
-
1
Search «password find online» and find an online password removal service.
-
2
Click «Unprotect your file».
-
3
Click «Browse» and choose the protected file.
-
4
Choose «Remove password» radio button.
-
5
Wait while the service removes your password.
-
6
Download the unprotected file, if your file is small.
-
7
Download a demo-file if your file is big. To get the whole file, you’ll need to enter a license key.


Advertisement
-
1
Open the workbook that has a protected sheet in Excel. You can usually do this by double-clicking the file’s name on your computer. Excel files usually end with the file extension .xls or .xlsx.
- Use this method if you have already tried unlocking a sheet but found that it’s password-protected (and you don’t know the password).
- This method will not work in Excel 2013 or later.
-
2
Re-save the file in the xls format. If the file you’re working on has the «.xlsx» extension (common if it was created or edited in newer versions of Excel), you’ll only be able to use this method if you first convert it to the Excel 97-2003 (.xls) format. Here’s how to do this:[2]
- Click the File menu at the top-right corner.
- Click Save As.
- Go to the folder in which you want to save the file.
- Select Excel 97-2003 (.xls) from the «Save as type» or «File Format» menu.
- Click Save.
Follow the on-screen prompts to make any necessary conversions.
-
3
Press Alt+F11 to open the Visual Basic Editor.
-
4
Right-click the workbook’s file name in the «Project — VBAProject» panel. It’s at the top of the left panel. Make sure you right-click the option that contains the file’s name (ends with «.xls»), which should be at the top. A menu will expand.[3]
-
5
Click Insert on the menu. Another menu will expand.
-
6
Click Module. This inserts a new module in which you’ll paste some code.
-
7
Copy the code. Highlight the code that follows this text, then press Ctrl+C (PC) or ⌘ Command+C to copy it:
Sub PasswordBreaker()
'Breaks worksheet password protection.
    Dim i As Integer, j As Integer, k As Integer
    Dim l As Integer, m As Integer, n As Integer
    Dim i1 As Integer, i2 As Integer, i3 As Integer
    Dim i4 As Integer, i5 As Integer, i6 As Integer

    On Error Resume Next
    For i = 65 To 66: For j = 65 To 66: For k = 65 To 66
    For l = 65 To 66: For m = 65 To 66: For i1 = 65 To 66
    For i2 = 65 To 66: For i3 = 65 To 66: For i4 = 65 To 66
    For i5 = 65 To 66: For i6 = 65 To 66: For n = 32 To 126
         ActiveSheet.Unprotect Chr(i) & Chr(j) & Chr(k) & _
            Chr(l) & Chr(m) & Chr(i1) & Chr(i2) & Chr(i3) & _
            Chr(i4) & Chr(i5) & Chr(i6) & Chr(n)
         If ActiveSheet.ProtectContents = False Then
            MsgBox "Password is " & Chr(i) & Chr(j) & _
                Chr(k) & Chr(l) & Chr(m) & Chr(i1) & Chr(i2) & _
                Chr(i3) & Chr(i4) & Chr(i5) & Chr(i6) & Chr(n)
         	Exit Sub
         End If
    Next: Next: Next: Next: Next: Next
    Next: Next: Next: Next: Next: Next
End Sub
-
8
Right-click the new module and select Paste. The copied code now appears in the module window.
-
9
Press F5 to run the code. Excel will now run the code, which can take several minutes. Once the code is finished running, a new password will appear on a pop-up window.
- The new password will be a random number of «As» rather than the original password.
-
10
Click OK on the Password pop-up. A new password will appear but you won’t need to write it down. Clicking OK will remove sheet protection automatically.[4]
- If you had to convert the file to an earlier format, you can now save the workbook again as an .xlsx file.


Advertisement
Add New Question
-
Question
What if I forgot the password to the document?

Try to use method 2 above (Uploading to Google Sheets). The downloaded Excel sheet from Google Sheets will be unprotected, so no password is needed.
-
Question
The Google sheet method is not working.
Margot Fontenaut
Community Answer
It won’t work for a password to open the document, but it works fine for passwords restricting shared access. If you can open your file, but can’t edit it, this method will work. If you can’t open you file without entering password, it won’t work. In such case you will need to use password cracking tools like Password-find, Rixler password cracker, Password recovery lastic to remove protection from your file. It’s impossible to restore or bypass a password to open the document without special software.
-
Question
I received Compile error Syntax error.
Margot Fontenaut
Community Answer
You need to delete the phrase Breaks worksheet password protection. Compiler don’t understand it and there you have the compile error cause of the syntax error. If VBA code is not your thing, you can use password removal apps like Password-find or Password Lastic to remove the password from your sheet.

Ask a Question
200 characters left
Include your email address to get a message when this question is answered.
Submit
Advertisement
Video
Thanks for submitting a tip for review!
References
About This Article
Article SummaryX
To unlock a sheet in an Excel workbook, right-click the sheet’s tab and click Unprotect sheet. Enter the password, if prompted.
If you don’t know the password, upload the sheet to your Google Drive, open it in Google Sheets, then re-download it to your computer.
Did this summary help you?
Thanks to all authors for creating a page that has been read 562,695 times.
Reader Success Stories
-

«I had to save the Excel sheet as a Google sheet and then download it again as Microsoft Excel, that is unless I…» more
Is this article up to date?
Password protection in Microsoft Excel is often used in workplaces to protect important data. Microsoft Excel allows users to protect the worksheets and prevents others from making changes to the original data.
There are two ways a spreadsheet can be secured. One of the ways is using no password, which can be unprotected by anyone. In the other case, the worksheet or workbook is password protected, which means you’ll need to have the password to unlock it. In this article, we will show you how to unprotect worksheets or workbooks with or without a password in Excel.
Unprotect Worksheets/Workbook in Excel. One of the best features of Excel is that it can protect your Excel files at the cell, spreadsheet, and/or workbook level. After locking and protecting worksheets or workbooks, if you want to allow others to edit data, you need to unprotect them.
If you know the password it’s really easy to unprotect a worksheet. Though unlocking an Excel spreadsheet without a password is not simple but you can still do it by using the following tricks.
How to Unprotect Excel Sheet with Password/No Password
It’s very easy to unprotect an Excel sheet and allow users to edit and modify the spreadsheets. If you already know the password of the protected sheet, you can easily remove protection. Just follow any of these steps:
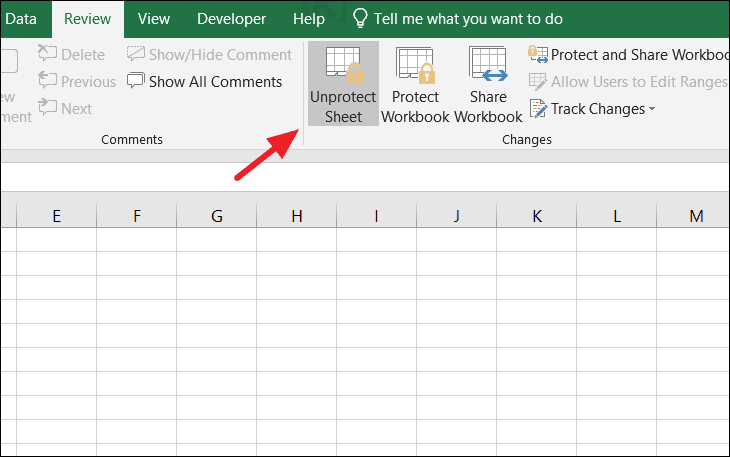
Open the protected spreadsheet, and switch to the ‘Review’ tab and click the ‘Unprotect Sheet’ icon in the Changes group.
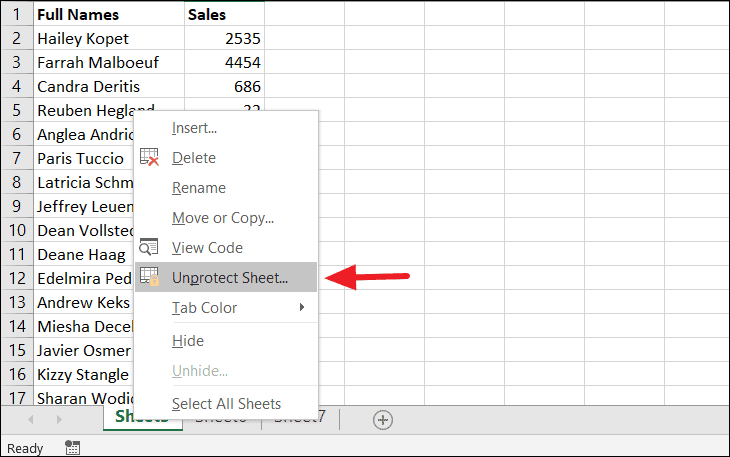
You can access the same above option by right-clicking the protected spreadsheet tab, then select the ‘Unprotect Sheet’ option from the context menu.
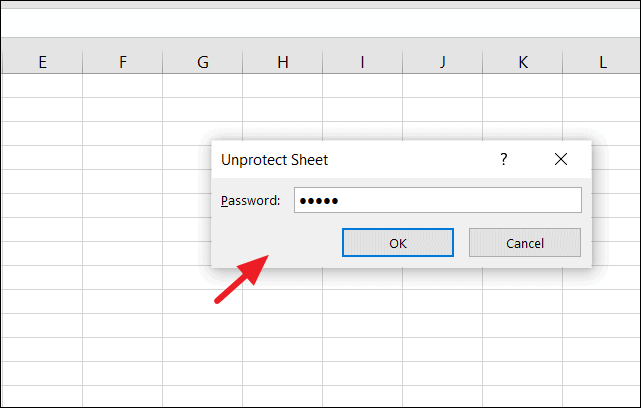
If your sheet is a password-protected worksheet, Excel will prompt you to enter the password. Type the password in the Unprotect Sheet dialog box and click ‘OK’.
If your worksheet was not protected with a password, clicking the ‘Unprotect Sheet’ option is enough to unlock your sheet.
How to Unprotect Excel Workbook with Password/No Password
When your password-protect your Excel workbook, you can’t change the structure of the workbook, such as add, move, rename, or delete worksheets, and view hidden sheets. But you still are able to edit the data on the worksheets even if your workbook is password-protected. If you wish to change the Excel workbook structure like adding or removing worksheets, you must unprotect the Excel Workbook structure first.
To remove the workbook protection, open the protected workbook, and click the ‘Protect Workbook’ button (option would be highlighted in gray color) under the Review tab.
Type the password in the Unprotect Workbook prompt box and save the workbook.
Now your workbook is unlocked, you are free to edit the Excel Workbook structure.
How to Unprotect Excel Worksheet Without Password
If you have a password secured worksheet and you have no idea what the password is or you haven’t unlocked it for a long time and you forgot it, there are few ways to unprotect that excel sheet.
Unprotect Excel Worksheet with VBA Code
Excel’s worksheet protection is based on a simple encryption algorithm. Even when you protect your Excel worksheet with a password, anyone with the below VBA code can crack it in minutes.
You can unlock a password-protected sheet by using a VBA code as a macro to identify the password. Here’s How:
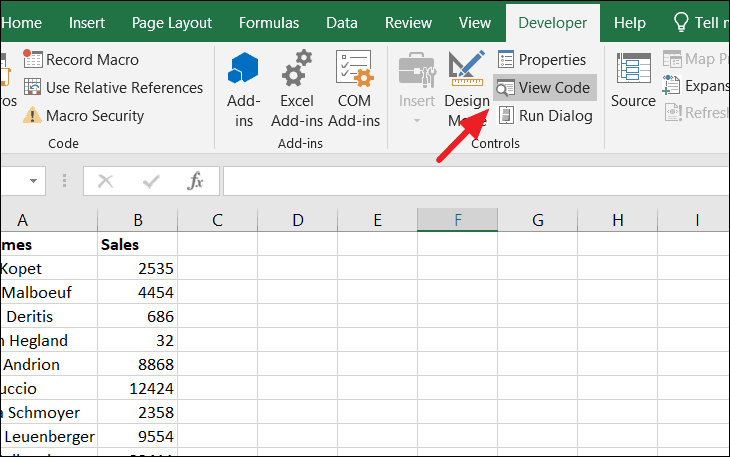
Open the password-protected sheet and go to the ‘Developer’ tab and click the ‘View Code’ button on the ribbon. This will open up the code editor window in Microsoft Visual Basic for Applications.
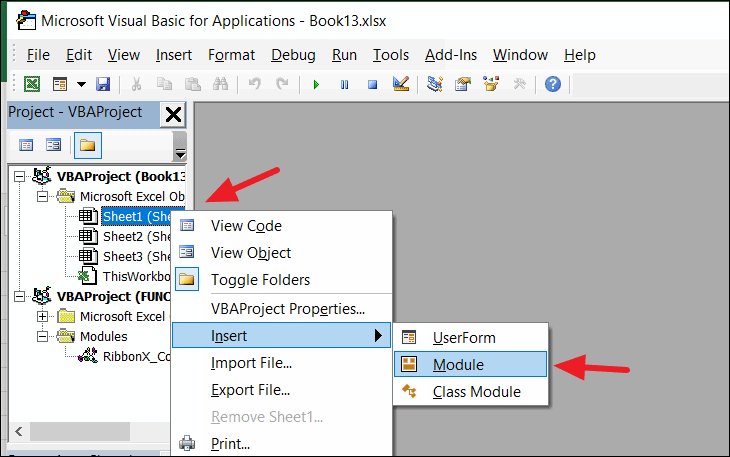
Or you can go to the ‘Developer’ tab and click the ‘Visual Basic’ button. In the Visual Basic code editor, expand the ‘Microsoft Excel Objects’ option on the left pane, right-click the worksheet that is password-protected, and select Insert –> Module from the context menu.
In the Code window of the protected sheet, copy and paste the following VBA code:
Sub PasswordBreaker()
Dim i As Integer, j As Integer, k As Integer
Dim l As Integer, m As Integer, n As Integer
Dim i1 As Integer, i2 As Integer, i3 As Integer
Dim i4 As Integer, i5 As Integer, i6 As Integer
On Error Resume Next
For i = 65 To 66: For j = 65 To 66: For k = 65 To 66
For l = 65 To 66: For m = 65 To 66: For i1 = 65 To 66
For i2 = 65 To 66: For i3 = 65 To 66: For i4 = 65 To 66
For i5 = 65 To 66: For i6 = 65 To 66: For n = 32 To 126
ActiveSheet.Unprotect Chr(i) & Chr(j) & Chr(k) & _
Chr(l) & Chr(m) & Chr(i1) & Chr(i2) & Chr(i3) & _
Chr(i4) & Chr(i5) & Chr(i6) & Chr(n)
If ActiveSheet.ProtectContents = False Then
MsgBox "One usable password is " & Chr(i) & Chr(j) & _
Chr(k) & Chr(l) & Chr(m) & Chr(i1) & Chr(i2) & _
Chr(i3) & Chr(i4) & Chr(i5) & Chr(i6) & Chr(n)
Exit Sub
End If
Next: Next: Next: Next: Next: Next
Next: Next: Next: Next: Next: Next
End Sub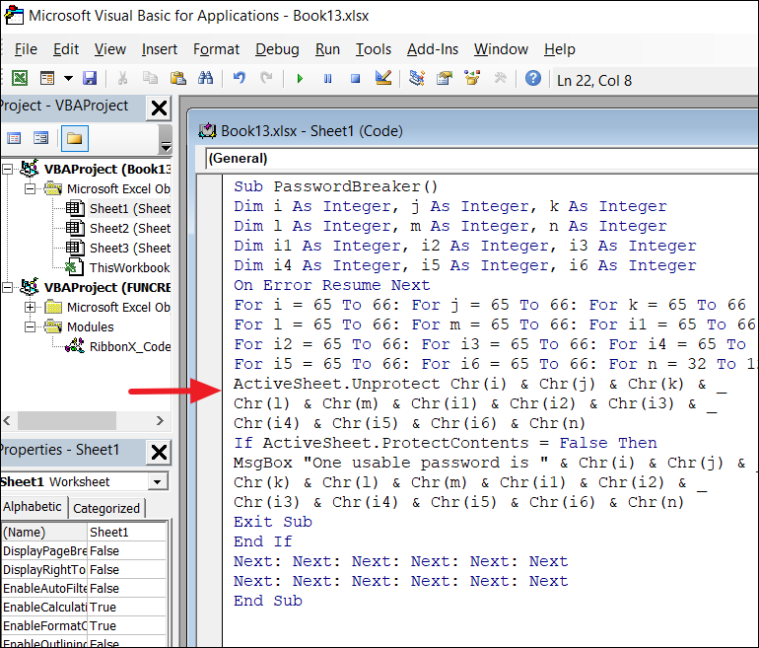
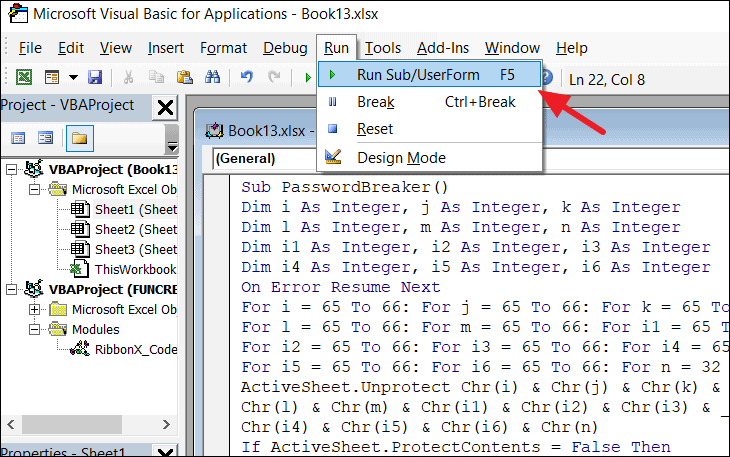
Click the ‘Run’ button on the toolbar and select the ‘Run Sub/UserForm’ option or press ‘F5’ to execute the code.
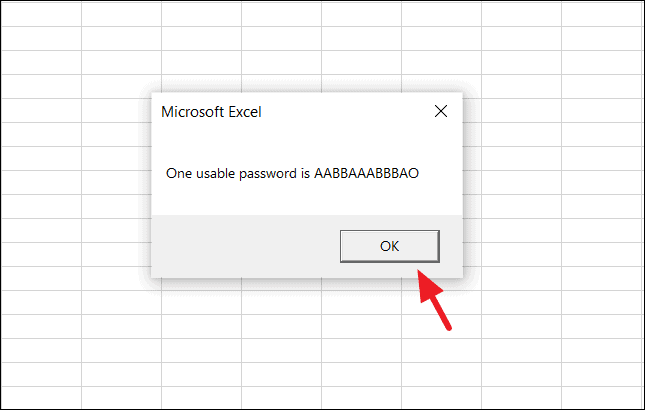
The code will take a couple of minutes to crack the password. Once it’s done, you’ll receive a pop-up with a cracked password, which is not the original one (it’s usually some combination of A’s and B’s), but still, it works. Click ‘OK’ and the sheet will be unprotected.
You need to save the Excel file before closing (as Macro-Enabled Workbook) after pasting the code to the module.
Unprotect Excel Sheet Without Password Using Zip
There’s another trick you can use to Unprotect a worksheet. Just follow theses steps:
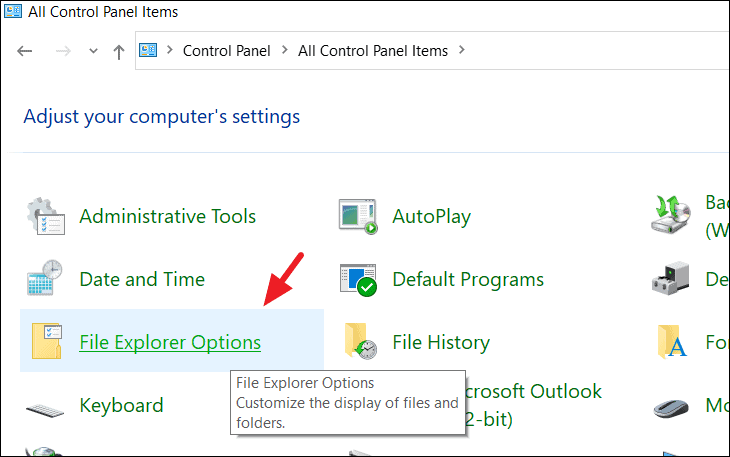
First, navigate to Control Panel and open ‘File Explorer options’.
In the File Explorer Options window, uncheck the ‘Hide Extensions for known file types’ to enable your file extensions. Then, click ‘Apply’ to apply the changes and click ‘OK’ to close the window. Now your file extensions of files will be visible.

Now located your protected excel file in your drive and rename and change its extension from .xlsx to .zip.
To change extension, right-click on the file, select ‘Rename’ option and replace ‘.xlsx’ with ‘.zip’. Then hit ‘Enter’ and click ‘Yes’ in Rename prompt box.
Now, your Excel file is a Zip file.
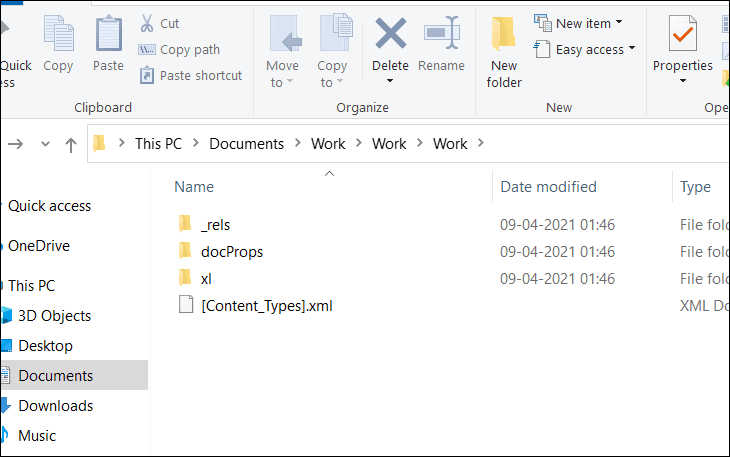
Next, extract the Zip file as shown below. In our case, the most important files to open are located in the /xl/ folder, where we have basically all that has been included in our Excel workbook. Now we can see it as separate .xml files.
Now navigate to ‘xl –>worksheets –> sheet 1.xml’ (which is the protected sheet). When you open the ‘/xl/worksheets/’ directory, you will see the list of all sheets (in XML format) available in your workbook. Then, open the sheet 1.xml file with Notepad or WordPad (right-click on the file and select a text editor from the ‘Open with’ context menu).
Find the following tag and delete it:
<sheetProtection password=… />
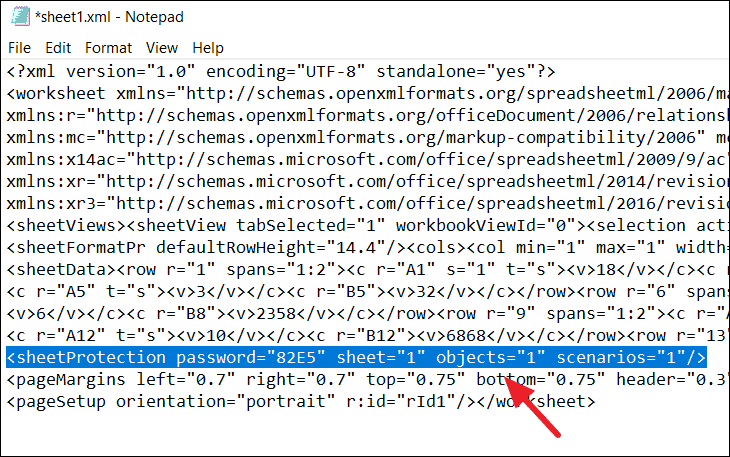
If you have a large amount of information in the worksheet, it will be hard to locate the ‘sheetProtection’ tag. So press Ctrl + F to open the Find feature, type ‘protection’ in ‘Find what’, and click ‘Find Next’. It will find the word ‘Protection’ and highlight it. Now, you can select the ‘sheetProtection’ and delete it.
After that, save the XML file and re-zip all the extracted files into a zip file again. Then, change the extension back from .zip to .xlsx.
Now, open and check your spreadsheet. It will be unprotected.
This method only works in password-protected workbooks. If the file is protected with the ‘Encrypt with Password’ feature, this method won’t work.
Unprotect an Excel Sheet with a Google Sheets
Yet another workaround that allows you to unprotect an Excel worksheet without a password. You’ll need a Google Drive account to do this.
Open your Google Drive account and click the ‘New’ button at the top left corner.
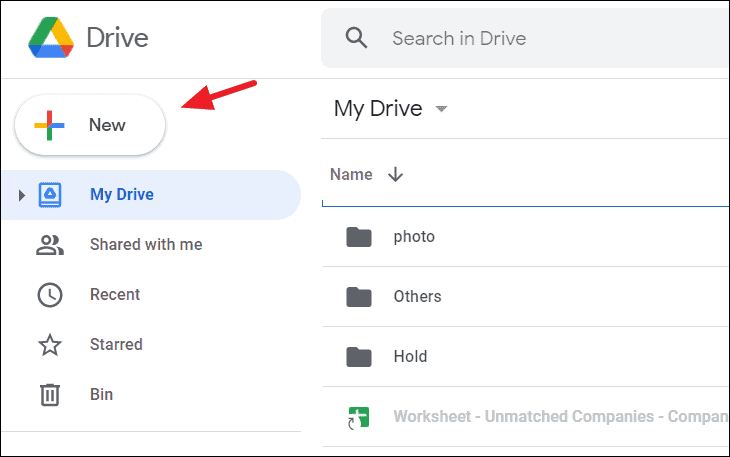
From the New menu, select ‘Google Sheets’ and click ‘Blank spreadsheet’.

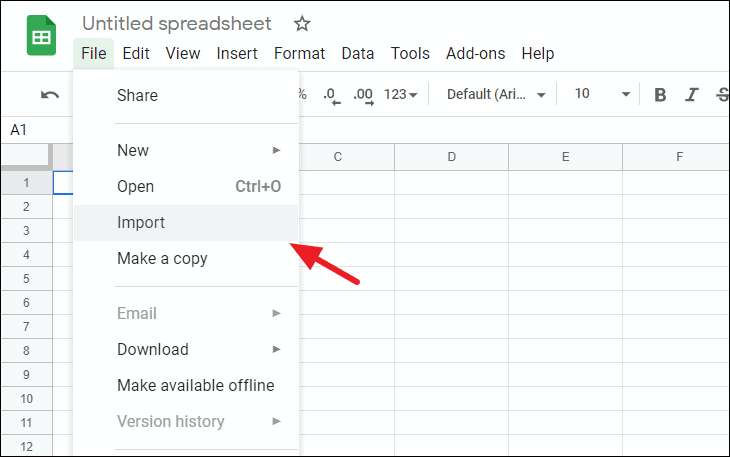
In the blank spreadsheet, click ‘File’ in the toolbar and select ‘Import’.
In the Import file dialogue box, select the ‘Upload’ tab from the menu and click the ‘Select a file from your device’ button.
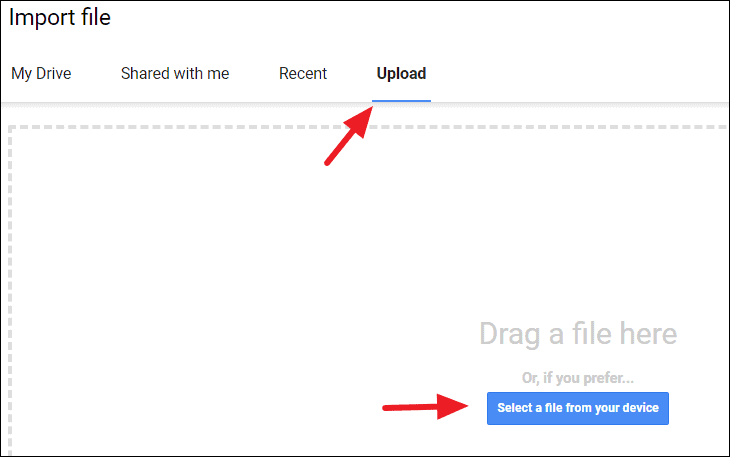
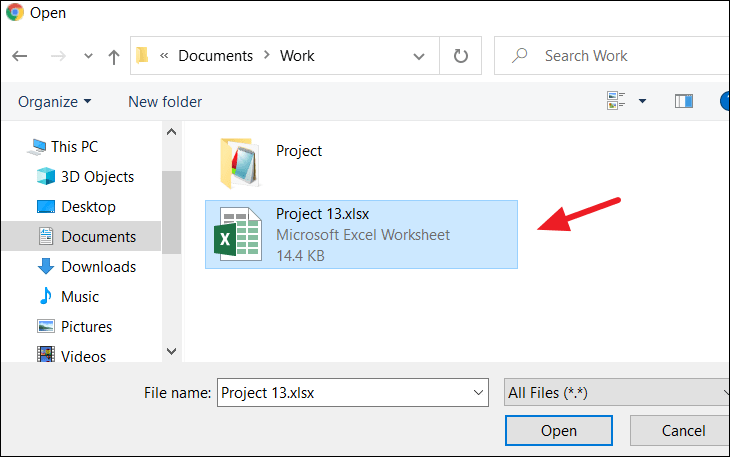
Browse and find the Excel workbook on your local drive, select it, and click ‘Open’ to upload. Or you can simply drag and drop the excel file into the Import file box.
In the Import file window, select the ‘Replace spreadsheet’ option and click the ‘Import Data’ button.
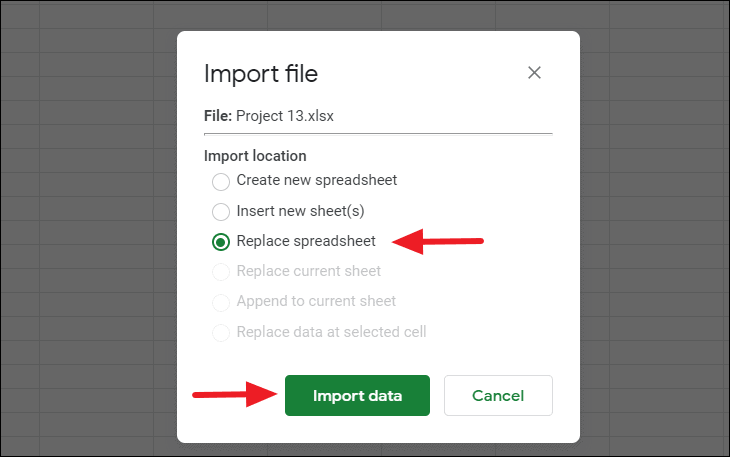
This will import your protected Excel worksheet into your Google Sheets with all the data. Now, you’ll notice that the worksheet is no longer protected and you are free to edit the data.
You can now export the worksheet back to Excel format again.
In the now unprotected Google sheet, click the ‘File’ menu from the toolbar and select the ‘Download’ option. Then choose ‘Microsoft Excel (.xlsx)’ from the context menu.
Then give the file a new name and click ‘Save’.
Now you have the same exact Excel sheet, but it is no longer password-protected.
How to Unprotect an Excel Workbook Without Password
If you have a password protected workbook for which you can’t remember the password, then use the VBA Code and ZIP methods to unprotect the workbook as discussed below.
Unprotect Excel Workbook Without Password Using VBA Code
You can also unprotect workbook structure in Excel using Microsoft Visual Basic for Application (VBA) feature. Here’s How:
Open the Excel file with the protected workbook structure and then go to the ‘Developer’ tab and click the ‘Visual Basic’ button.
In the Visual Basic code editor, click the ‘Insert’ tab and select ‘Module’ option.
On the popup module (code) window, copy and paste the following code to unlock the workbook structure.
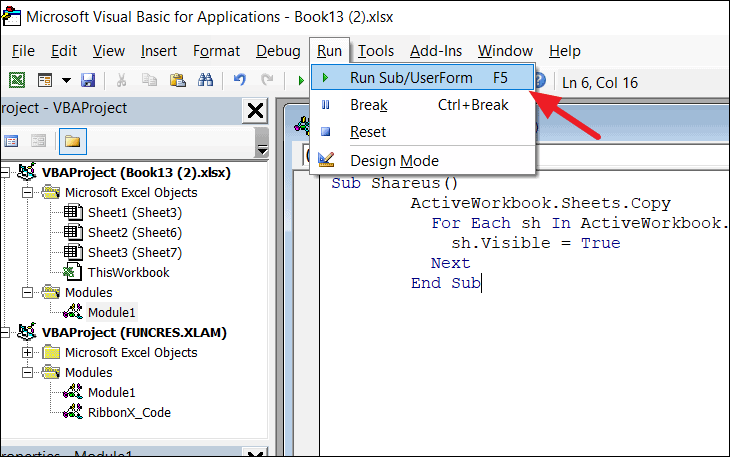
Sub Shareus()
        ActiveWorkbook.Sheets.Copy
          For Each sh In ActiveWorkbook.Sheets
            sh.Visible = True
          Next
        End Sub
Hit the ‘F5’ button or click the ‘Run’ button on the toolbar and select the ‘Run Sub/UserForm’ option to run the macro.
Then a new workbook opens up with a different name. It is the same as the original workbook but without workbook structure protection. Now you unprotected the workbook structure in Excel without knowing the password.
Unprotect Excel Workbook Without Password Using Zip
You can unprotect the Excel workbook safely without a password by changing the file extension and manipulating its constituents.
Get the excel file with the protected workbook structure, rename and change its extension from .xlsx to .zip as we did earlier for the protected worksheet. Before you do that make a copy of it for backup.
Then extract the zip file using some file archiver software like WinRAR or 7zip and you’ll get some folders and files as shown below.
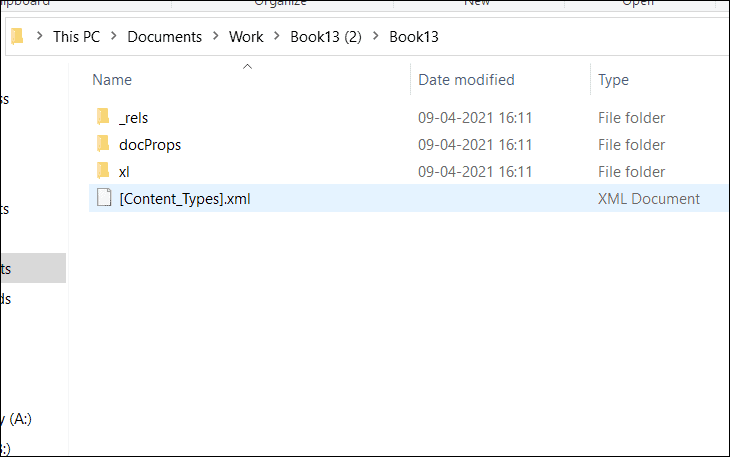
Then open the ‘xl’ folder and open the ‘workbook.xml’ file with Notepad (which contains protection tag)
Now find and select this whole protection tag and delete it:
<workbookProtection workbookPassword= …/>
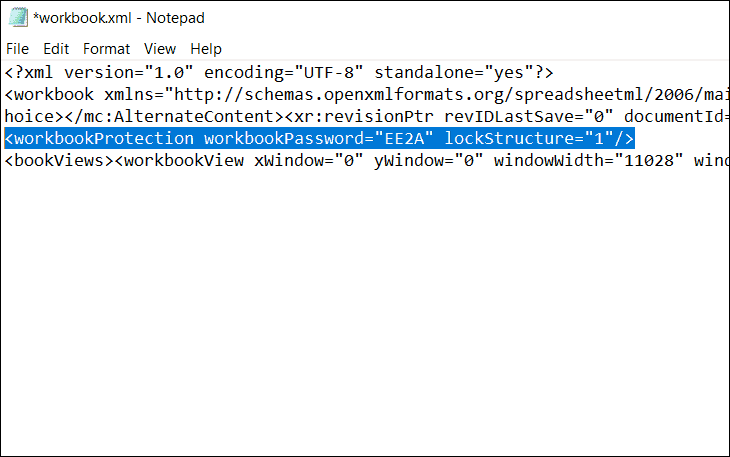
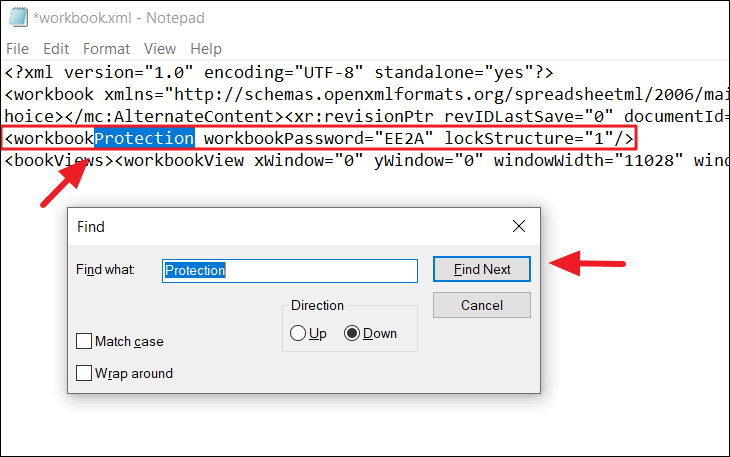
If you are having a hard time finding this tag, just press Ctrl + F to open the Find dialog, type ‘protection’ in ‘Find what’, and click ‘Find Next’. It will find the word ‘Protection’ and highlight it for you. Now, you can highlight the ‘workbookProtection’ tag and delete it.
After removing the protection tag, save the ‘workbook.xml’ file. Then, zip (compress) all the extracted files back into a zip file.
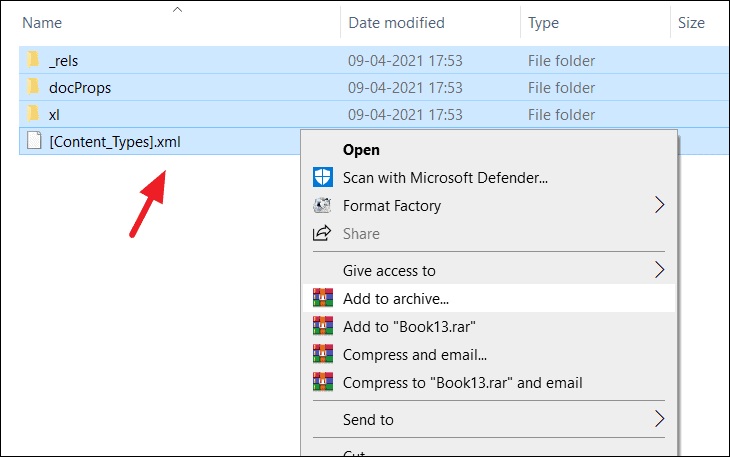
Now all you have to do is change the extension of the file from ‘.zip’ to ‘.xlsx’.
Now the zip file will be converted back to the Excel file and you will find the protected password has been removed from the workbook.
That’s how you unprotect Excel worksheet/workbook.
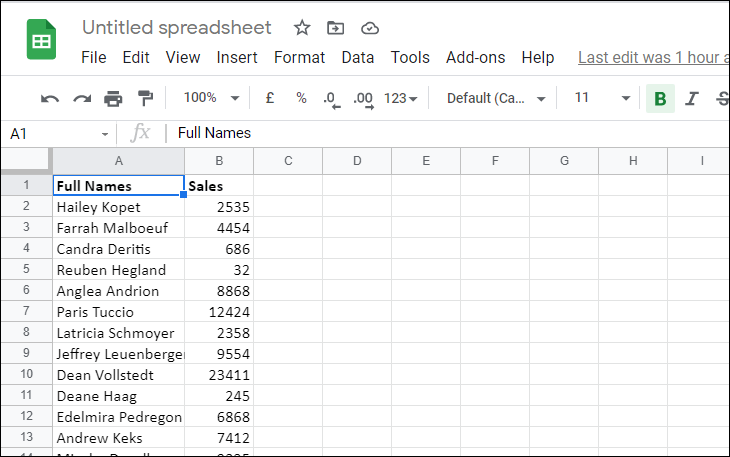
В Excel можно поставить защиту на лист и запретить изменение ячеек. Также можно запретить менять структуру книги, перемещение и переименование листов. Иногда это здорово, а иногда очень мешает. Например, когда в файле имеется ошибка, он работает неправильно, а вы не можете ее исправить. Или когда пароль забыт, а его требуется снять.
Можно встретить разные решения, например, открыть файл в других табличных редакторах — не Excel. Но тогда можно потерять некоторые настройки и пароль вы обратно уже не вернете.
Предлагаем вам способ: как снять пароль, используя стандартные средства Windows.
Посмотрим, как обычно устанавливают защиту в Excel на примере вот такого файла с двумя листами:
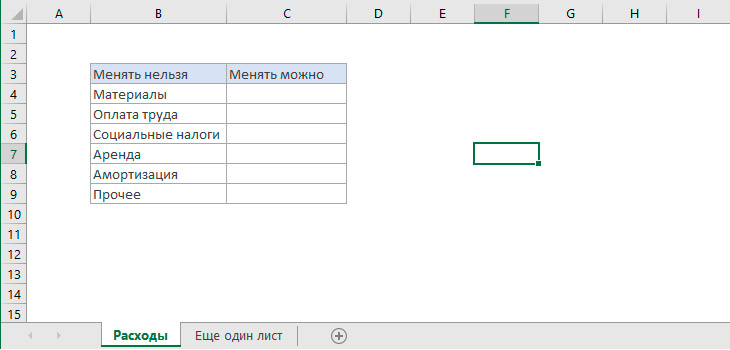
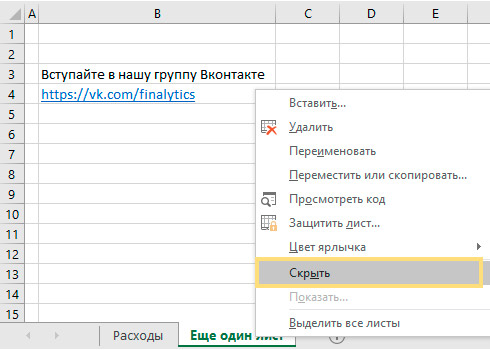
Первый лист в файле защитим. А второй скроем: щелкните по названию листа правой кнопкой мышки -> Скрыть.
Защита структуры книги и листов Excel
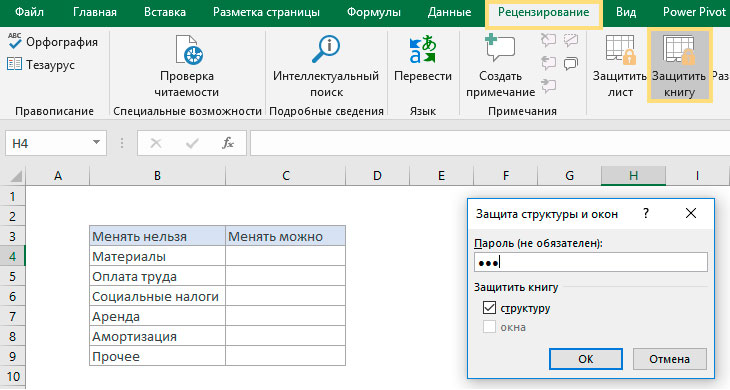
1. Чтобы защитить структуру книгу, перейдите в меню Рецензирование -> Защитить книгу. Поставьте галочку для «структура» и введите пароль.
2. А теперь посмотрим, как защищают ячейки на листе excel.
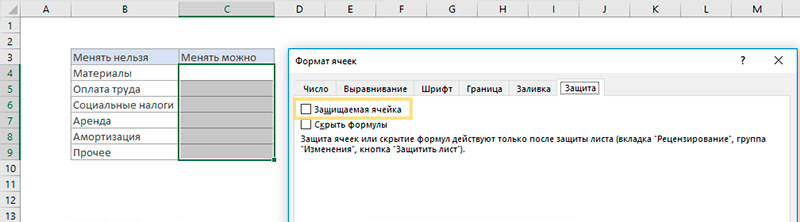
• Сперва выделите ячейки, которые будут незащищенными. Щелкните по ним правой кнопкой мышки, выберите в появившемся меню Формат ячеек -> перейдите на вкладку Защита и снимите галочку с «Защищаемая ячейка».
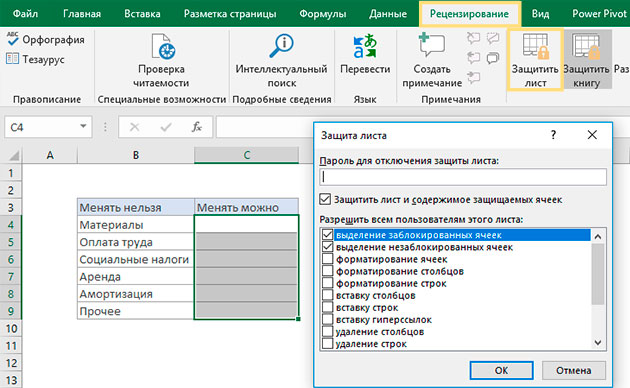
• Затем перейдите в меню Рецензирование -> Защитить лист. Введите пароль.
Теперь в файле ничего нельзя поменять в защищенных ячейках. Можно вводить данные только в незащищенные ячейки. При попытке ввода данных в защищенных ячейках появляется сообщение:

Снимаем защиту структуры книги и листов Excel
А теперь снимем защиту с листов Excel и со структуры книги.
1. Откройте папку, где лежит файл Excel и замените его расширение – вместо .xlsx введите .zip

2. Щелкните по архиву правой кнопкой мышки и выберите «Извлечь здесь».

3. Файл распаковался с такой структурой:
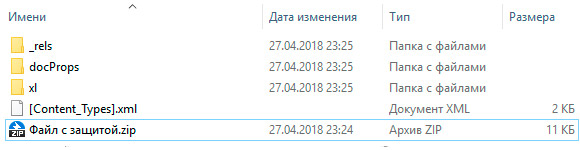
4. Откройте папку «xl». Файл workbook.xml – это настройки книги, а папка worksheets – это настройки листов.

5. Снимем защиту со структуры книги Excel.
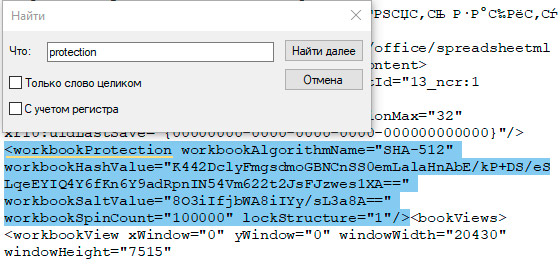
Откройте файл workbook.xml в текстовом редакторе и найдите слово «protection» — это защита структуры. Выделите всю конструкцию со словом workbookProtection, находящуюся внутри скобок < > и удалите ее (или скопируйте в отдельный файл, чтобы потом «вернуть» настройки на место). Сохраните файл.
6. Точно так же снимем защиту с листов Excel.
Перейдите в папку worksheets и откройте файл с нужным листом. Найдите конструкцию со словом sheetProtection внутри скобок < > и удалите ее. Сохраните файл.
7. Вернитесь обратно в папку с файлом и добавьте сохраненные файлы и папки в новый zip-архив.

8. Замените расширение созданного архива на .xlsx вместо .zip
Открываем сохраненный файл и видим, что защита листа и структуры книги снята.
«How to remove the password from my Excel file and sheet? What is the way of removing the protection?.»
Put it simply, you set a password to encrypt your workbook/spreadsheet, and now what to remove password protection from Excel, do you? OK, here you’ll find 7 effective solutions!
Hey, before you dive into it further, ask yourself if you know the Excel password. As you can see, the methods are divided into 2 groups.
Now, let’s check how to remove a password from Excel 2019/2017/2016/2013/2010/2007.
Way 1. Delete the Encrypted Password (Open Locked Microsoft Excel)
Way 2. Unprotect Excel Workbook or Spreadsheet
Way 3. Remove Read-Only Limit Protection on Excel
Part 2. Remove Password from Excel (You Forgot the Password)
Way 4. Unprotect Excel Spreadsheet without Password
Way 5. Crack/Break Excel Opening Password with Software
Way 6. Use Workbook Unprotect Genius
Way 7. Remove passwords from Excel files Online
Part 1. Remove Password from Excel (You Know the Password)
There are 4 types of Excel password encryption/protection. I’ll give brief introductions and show you how to remove.
Since you remember the passcode, it’ll be super easy for you to remove password from Excel File, Sheet, Workbook, and Read-Only Protection.
Way 1. Delete the Encrypted Password (Open Locked Microsoft Excel)
If it requires a password to open a password-protected Excel file, it means this workbook is locked. To remove Excel opening encrypted password, follow the steps below.
Step 1. Double-click your encrypted Microsoft Excel Workbook, then enter the password to open it.
Step 2. Click «File» in the top left corner and then select «Info».

Step 3. For Excel 2019/2017/2016/2013/2010, click on «Protect Workbook» and select «Encrypt with Password» from the drop-down list.
(For Excel 2007 and older versions, click on «Protect Document» and select «Encrypt with Password»)

Step 4. Clear the password box (make it empty) and then click OK.

After removing password in Excel file, don’t forget to save the file. Now you’ve successfully deleted the encryption protection.
Way 2. Unprotect Excel Workbook or Spreadsheet
Excel «Protect Workbook» password is set to protect its structure from being altered, hidden, and renamed. And the «Protect Sheet» password is to keep your important data safe in the worksheet.
Now let’s check how to remove password protect from Excel.
Step 1. Find and open the Excel Workbook/Worksheets.
Step 2. Click «Review» in the top menu bar.
Step 3. Select «Unprotect Sheet» or «Protect Workbook», and then enter your password. Lastly, click OK.

This will remove the password from encrypted Excel sheet or Workbook.
Way 3. Remove Read-Only Limit Protection on Excel
You can’t edit or modify the Excel spreadsheets if the read-only mode is turned on. If you know the password and want to turn it back off, here are the steps for you to disabled read-only restriction in excel document.
Step 1. Open the read-only protected Excel file and enter the password. Next, click OK.
Step 2. Go to the menu top toolbar and then click File > Save As > Browse (select a location) > Tools > General Options


Step 3. Locate «Password to modify» and empty the text box next to it. Click OK to continue.

Step 4. After that, click Save.
Part 2. Remove Password from Excel (You Forgot the Password)
What to do if you forgot Excel password? That’s OK. Even though you don’t know the passcode, there’re useful workarounds to help. In the following sections, you’ll learn methods that enable you to remove password from Excel without password.
Way 4. Unprotect Excel Spreadsheet without Password
With this trick, you can easily unprotect Excel spreadsheet/worksheet without knowing the password. Let’s see how to do it!
Note: make a backup of your Excel workbook and save it to another folder on computer.
Step 1. Change the extension of the protected worksheet: rename it from *.xlsx to *.zip.

Step 2. Open the ZIP File, double-click the «xl» folder, and then open the «worksheets» folder.

Step 3. In there, you can find the spreadsheets (in .xml format).

Step 4. Open a sheet file in Notepad. Now search for the content: <sheetProtection algorithmName=»SHA-512″ hashValue=».
Then, select the entire line (the characters between»<» and «> «) and delete it.

Step 5. Save the file to a new folder.
Step 6. Do the same steps for all other spreadsheets.
Step 7. When it’s done, drag and drop the modified .xml files to the «worksheets» folder. Make sure they overwrite all the original XML files.
Step 8. Rename the *.Zip file back into *.xlsx
Voila! Open it and check if the password protection for Excel Spreadsheet/worksheet is removed.
Way 5. Crack/Break Excel Opening Password with Software
Can you remove the opening password from excel without a password? Sure! FoneCope Excel Password Recovery can easily break Excel file password, and then you can use the passcode to delete the encryption.

Check how to crack forgotten Excel password:
Step 1. You can download FoneCope Excel Password Recovery for free and install it on your computer.
Step 2. Launch the software and select Recover Excel Open Password on the main interface.

Step 3. Import the excel file you need to crack the password, or directly drag the encrypted excel file into the add box. Then the software will start to detect the complexity of the encryption algorithm and password.


You can see that there are 3 modes of password recovery below, you can choose the appropriate mode according to the actual situation.
#1. Dictionary Attack: Import the used passwords you know into the software in txt format and automatically analyze them to find the correct password. Of course, the software also has the latest password dictionary.
1. After selecting this mode, click «Settings» at the back to download the latest password dictionary constructed by the software.

2. Click «Download Dictionary» and it will download automatically. After the download is complete, click OK to run the software.


3. You can put the previously used secret into txt text, and then insert the software, it will retrieve the password from the information you provide or recover the password from the built-in password dictionary.

#2. Brute Force with Mask Attack: If you still have a little memory of the forgotten password, such as length, characters, prefix, or suffix, then you can consider that choose this mode.
1. After selecting this mode, click Settings, and then in the settings panel, set the password information you remember. After the setting is completed, it will obtain the password intelligently.


#3. Brute Force Attack: If you really know nothing about the forgotten password, this will be your last choice.
1. After selecting this mode, then directly click the «Recover» to perform Excel password recovery.

Step 4. After selecting the mode you need, the software will start to recover the Excel password. After a few minutes, you will be able to see the password in a pop-up window.


PasswordFab for Excel can quickly remove password from excel. The three attack types provide the highest possibility to recover passwords. When you cannot open excel with a password for some reason, PassFab for Excel is a recommended tool. Additionally, there are more excel password removers that can help.
Way 6. Use Workbook Unprotect Genius
Likewise, you can use another assistant software Excel Workbook Unprotect Genius to remove sheet protection password, read-only password, and Workbook protection password.

How to use the Workbook Unprotect Genius
Step 1. Get the software downloaded on your computer. After that, click Open to import a password protected excel Workbook.
Step 2. Click the «Remove Password» button
Note: If the file is .XLS, you’ll need to convert it to .xlsx before password protection removal.
Way 7. Remove passwords from Excel files Online
In case you don’t want to install the program on your computer, you can an online tool (www.lostmypass.com).
It’s very convenient to use. Just go to the site and upload your password locked Excel document. A few minutes later, you will get the recovered password on screen.
The problem is, I don’t think it’s safe to upload important documents to an online site. Besides, the service pricing is higher than using software.

The Bottom Line
All in all, we talked about 7 solutions to remove password from Excel workbook and spreadsheet. As you can see, removing protection from Excel is not so much difficult.
As always, if any method helps you solve your problem, please leave a comment and let me know. Thanks a lot!