
Excel for Microsoft 365 for Mac Excel 2021 for Mac Excel 2019 for Mac Excel 2016 for Mac Excel for Mac 2011 More…Less
Workbook passwords can be changed or removed by anyone who knows the current password.
Caution: Passwords in Excel for Mac and Word for Mac have a 15-character limit. You cannot open a workbook or document that has been password protected in the Windows-based version of Excel or Word if the password is longer than fifteen characters. If you want to open the file in Office for Mac, ask the Windows-based author to adjust the password length.
-
Open the workbook that you want to change or remove the password for.
-
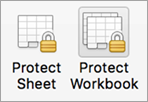
On the Review tab, click Protect Sheet or Protect Workbook.

-
Click Unprotect Sheet or Protect Workbook and enter the password.
Clicking Unprotect Sheet automatically removes the password from the sheet.
-
To add a new password, click Protect Sheet or Protect Workbook, type and confirm the new password, and then click OK.
To remove a password from the workbook, click Protect Workbook, and then click OK without entering a new password.
Change a workbook password
-
Open the workbook that you want to change the password for.
-
On the Review tab, under Protection, click Passwords.
-
In the Password to open box or Password to modify box, select all contents.
-
Type the new password, and then click OK.
-
In the Confirm Password dialog box, type the password again, and then click OK.
-
Click Save
.
 .
.Remove a workbook password
-
Open the workbook that you want to remove the password from.
-
On the Review tab, under Protection, click Passwords.
-
Select all contents in the Password to open box or the Password to modify box, and then press DELETE.
-
Click Save
.
See also
Require a password to open or modify a workbook
Need more help?
Содержание
- Видео инструкция
- Способ 1: Разблокировка книги
- Способ 2: Разблокировка листа
- Способ 3: Снятие защиты через изменение кода файла
- Способ 4: Использование сторонних приложений
- Вопросы и ответы
Установка защиты на файлы Excel – отличный способ обезопасить себя, как от злоумышленников, так и от собственных ошибочных действий. Существует два вида блокировки файла Excel: защита на книгу и защита на лист. Соответственно и алгоритм разблокирования зависит от того, какой способ защиты был выбран.
Урок: Как снять защиту с документа Microsoft Word
Видео инструкция
Способ 1: Разблокировка книги
Прежде всего, выясним, как снять защиту с книги.
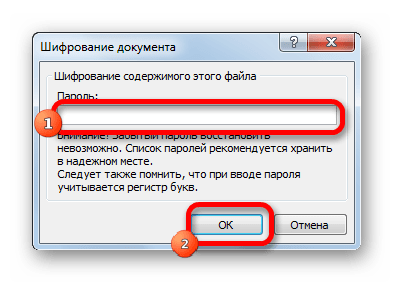
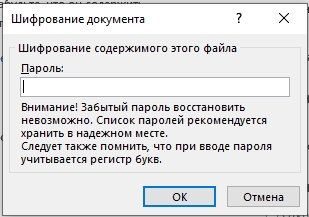
- При попытке запустить защищенный файл Excel открывается небольшое окно для ввода кодового слова. Мы не сможем открыть книгу, пока не укажем его. Итак, вводим пароль в соответствующее поле. Жмем на кнопку «OK».
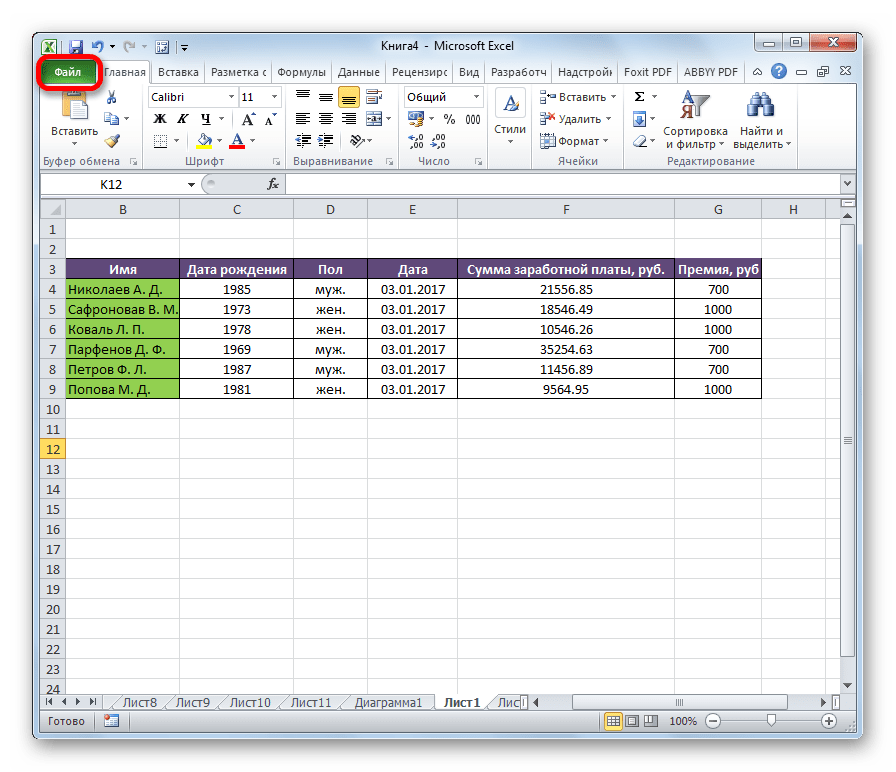
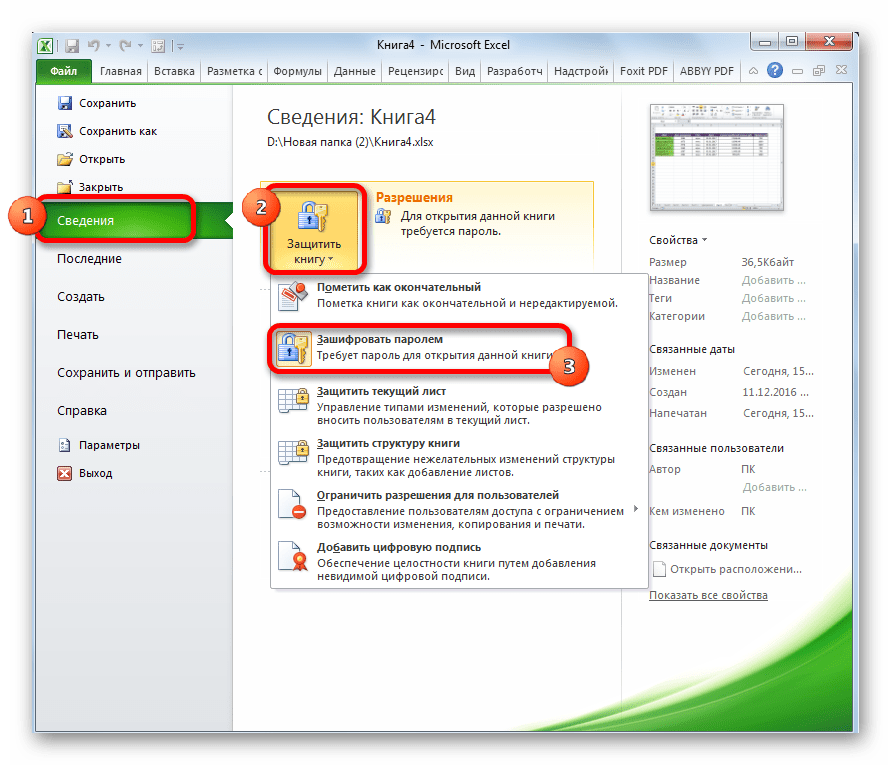
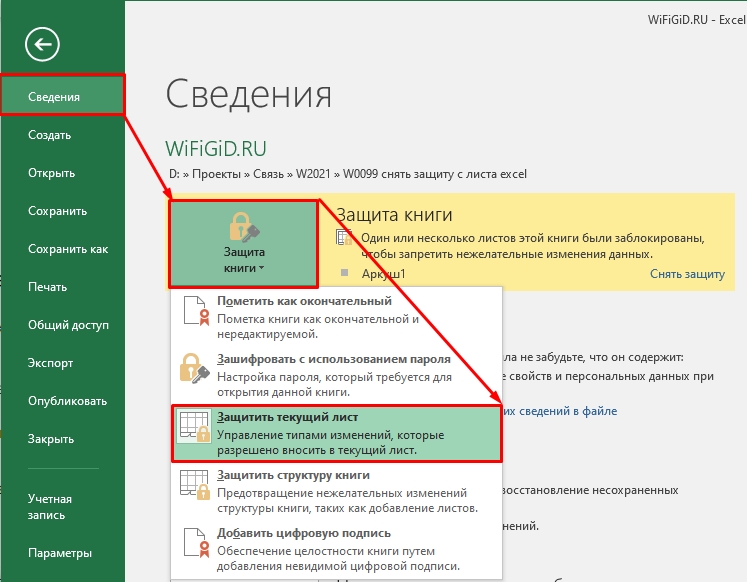
- После этого книга открывается. Если же вы хотите вообще снять защиту, то переходите во вкладку «Файл».
- Перемещаемся в раздел «Сведения». В центральной части окна жмем на кнопку «Защитить книгу». В раскрывающемся меню выбираем пункт «Зашифровать паролем».
- Опять открывается окно с кодовым словом. Просто удаляем пароль из поля ввода и жмем на кнопку «OK»
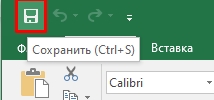
- Сохраняем изменения файла, перейдя во вкладку «Главная» нажав на кнопку «Сохранить» в виде дискеты в левом верхнем углу окна.


Теперь при открытии книги не нужно будет вводить пароль и она перестанет быть защищенной.
Урок: Как поставить пароль на файл Excel
Способ 2: Разблокировка листа
Кроме того, можно установить пароль на отдельный лист. При этом вы сможете открывать книгу и даже просматривать информацию на заблокированном листе, но изменять в нём ячейки уже не получится. При попытке редактирования появится сообщение в диалоговом окне, информирующее о том, что ячейка защищена от изменений.
Для того, чтобы получить возможность редактирования и полностью снять защиту с листа, придется выполнить ряд действий.
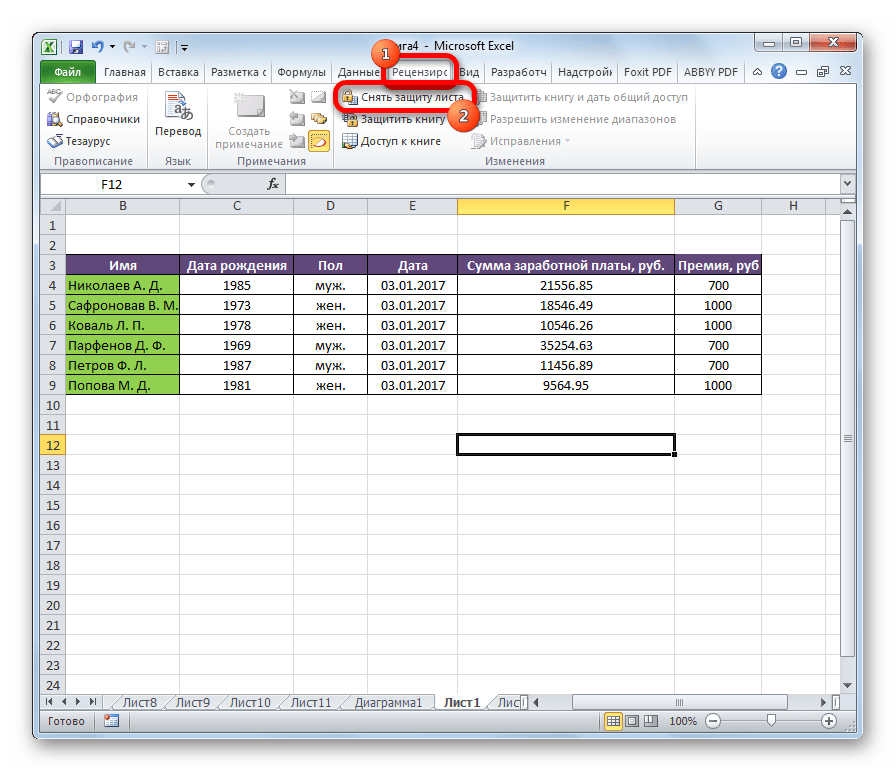
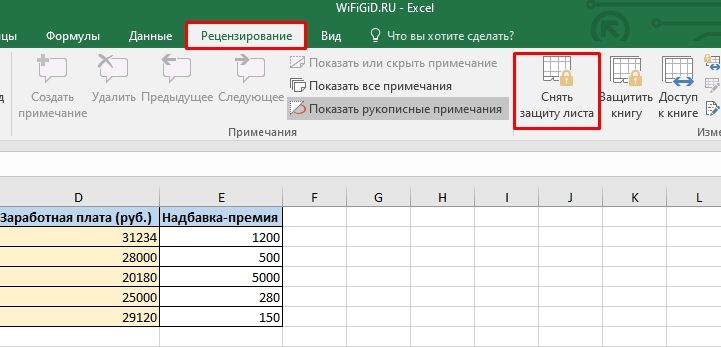
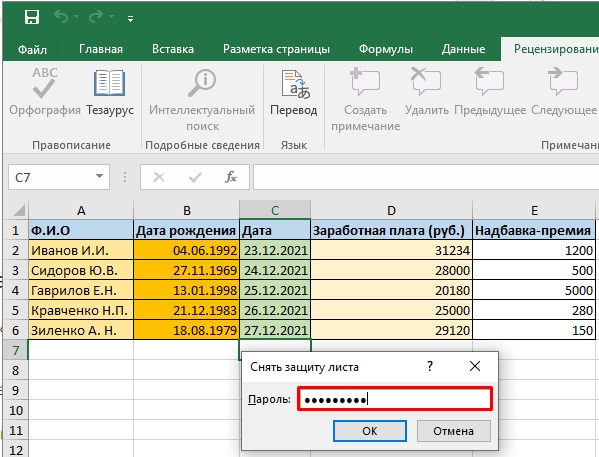
- Переходим во вкладку «Рецензирование». На ленте в блоке инструментов «Изменения» жмем на кнопку «Снять защиту листа».
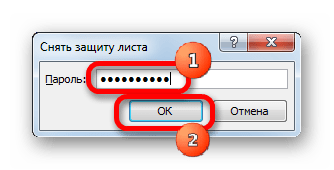
- Открывается окно, в поле которого нужно ввести установленный пароль. Затем жмем на кнопку «OK».

После этого защита будет снята и пользователь сможет редактировать файл. Чтобы снова защитить лист, придется устанавливать его защиту заново.
Урок: Как защитить ячейку от изменений в Excel
Способ 3: Снятие защиты через изменение кода файла
Но, иногда бывают случаи, когда пользователь зашифровал лист паролем, чтобы случайно не внести в него изменения, а вспомнить шифр не может. Вдвойне огорчает то, что, как правило, кодируются файлы с ценной информацией и утеря пароля к ним может дорого обойтись пользователю. Но, существует выход даже из этого положения. Правда, придется повозиться с кодом документа.
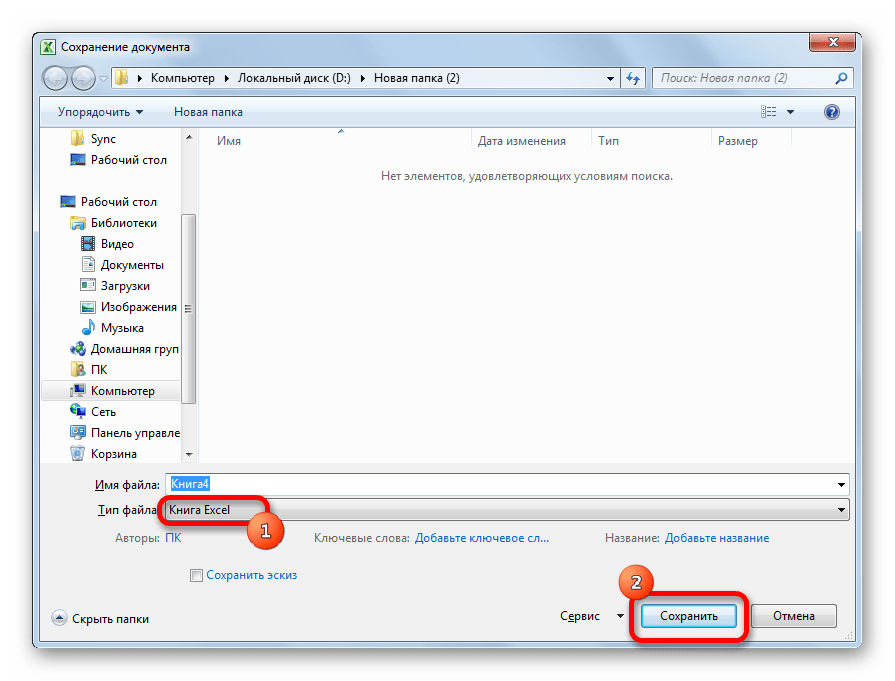
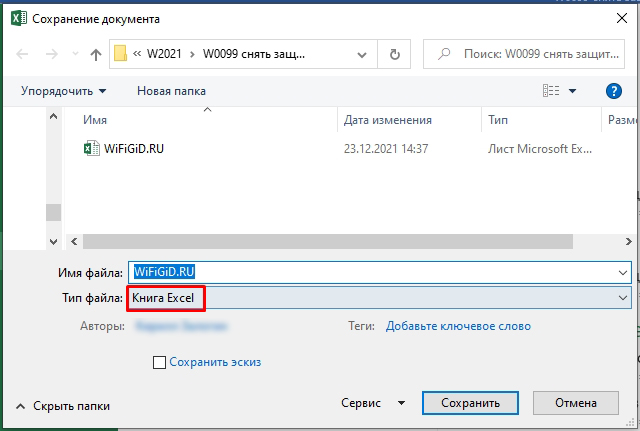
- Если ваш файл имеет расширение xlsx (Книга Excel), то сразу переходите к третьему пункту инструкции. Если же его расширение xls (Книга Excel 97-2003), то его следует перекодировать. К счастью, если зашифрован только лист, а не вся книга, можно открывать документ и сохранять в любом доступном формате. Для этого, переходим во вкладку «Файл» и кликаем по пункту «Сохранить как…».
- Открывается окно сохранения. Обязательно в параметре «Тип файла» устанавливаем значение «Книга Excel» вместо «Книга Excel 97-2003». Жмем на кнопку «OK».
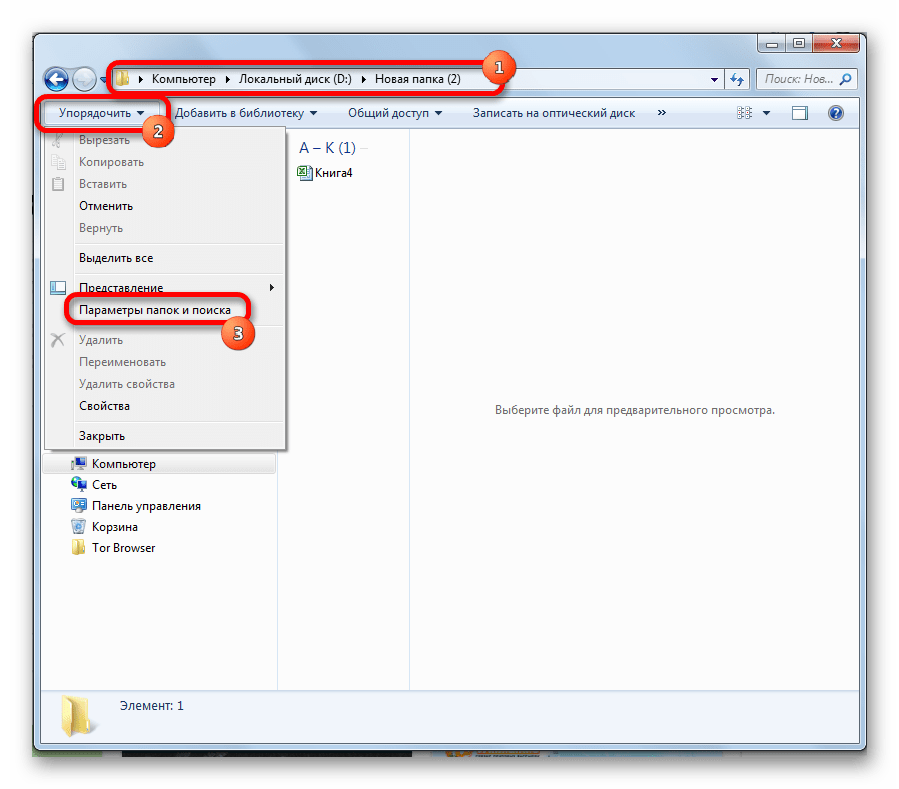
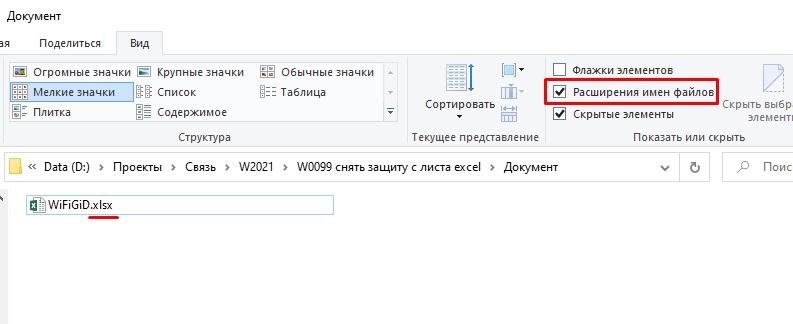
- Книга xlsx по сути является zip-архивом. Нам нужно будет отредактировать один из файлов этого архива. Но для этого сразу нужно будет поменять расширение с xlsx на zip. Переходим с помощью проводника в ту директорию жесткого диска, в которой находится документ. Если расширения файлов не видно, то кликаем по кнопке «Упорядочить» в верхней части окна, в раскрывшемся меню выбираем пункт «Параметры папок и поиска».
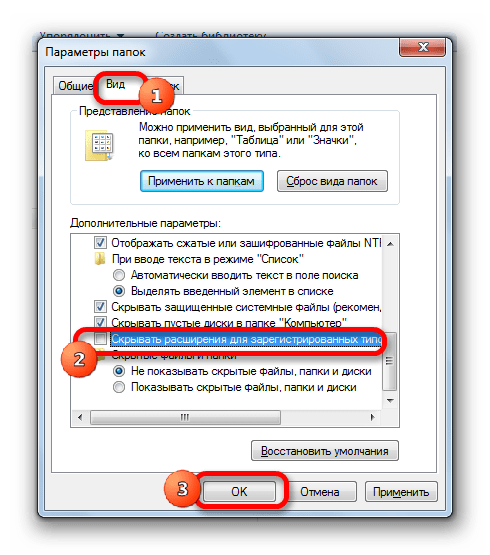
- Открывается окно параметров папок. Переходим во вкладку «Вид». Ищем пункт «Скрывать расширения для зарегистрированных типов файлов». Снимаем с него галочку и жмем на кнопку «OK».
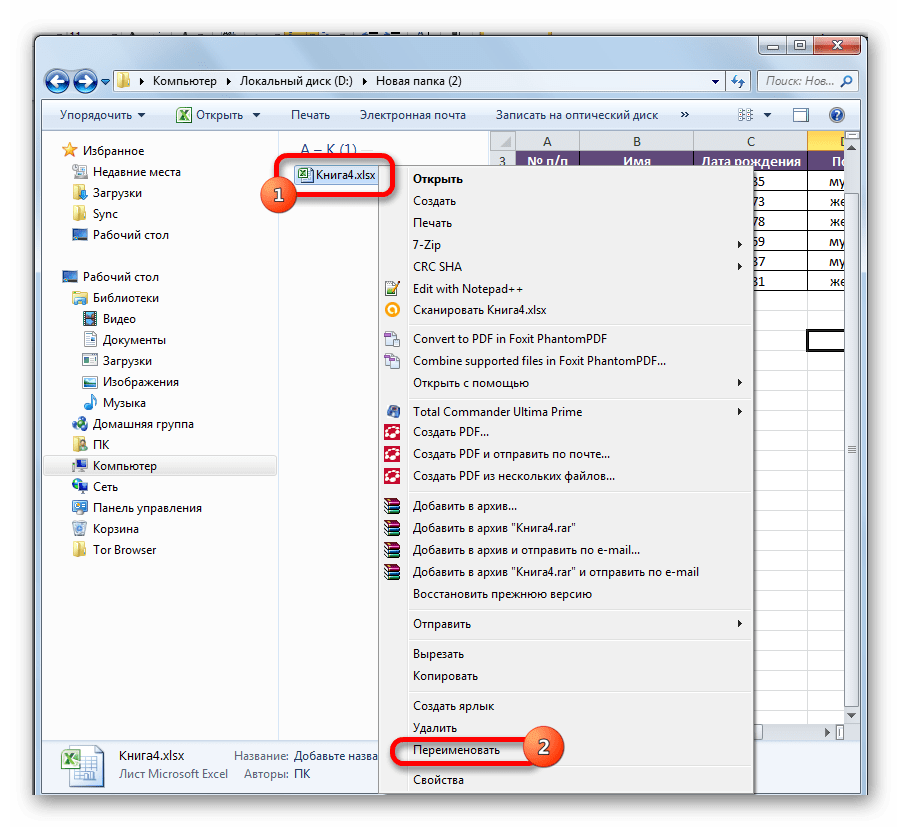
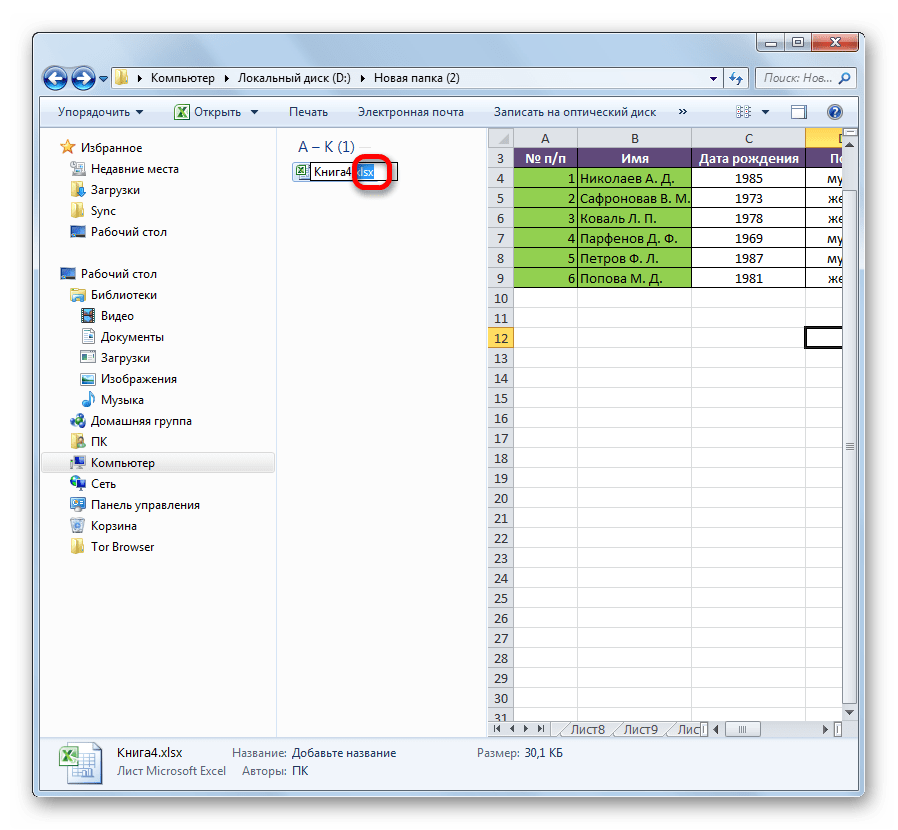
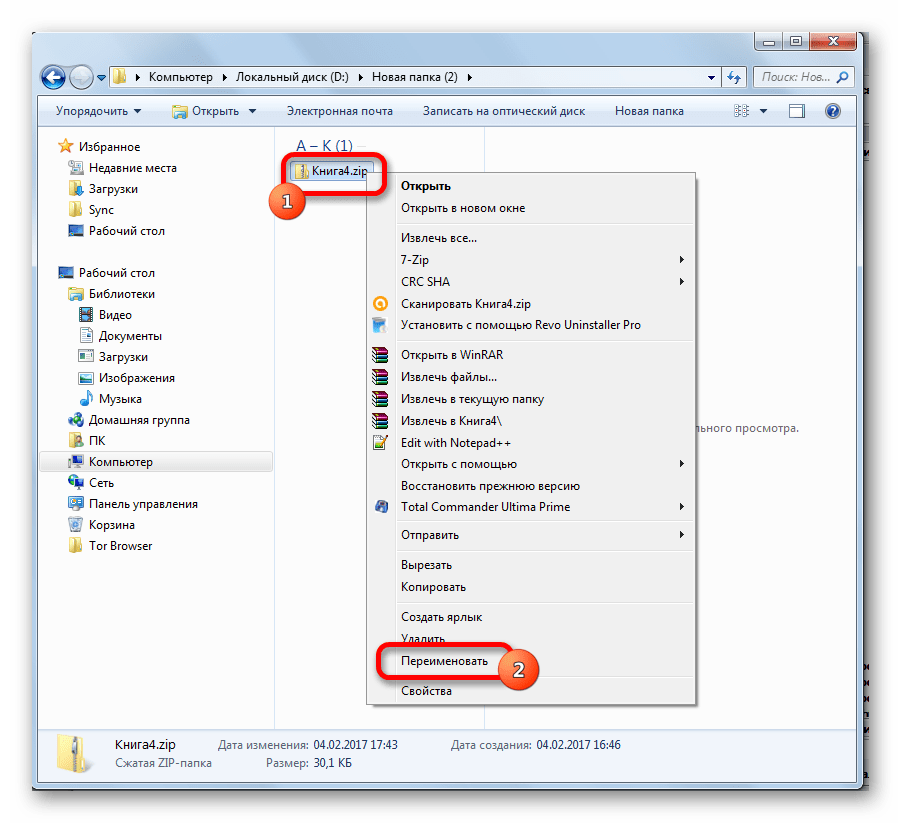
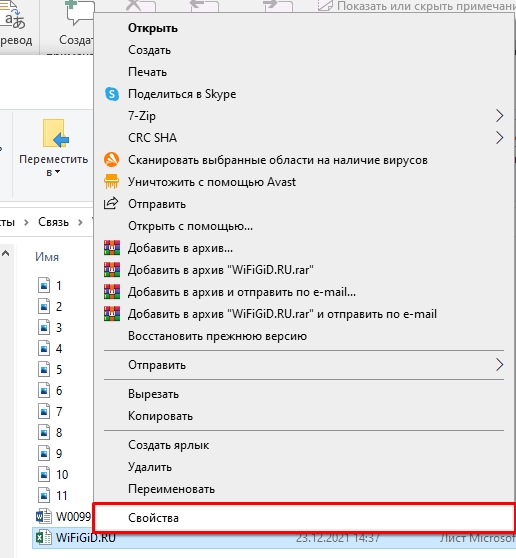
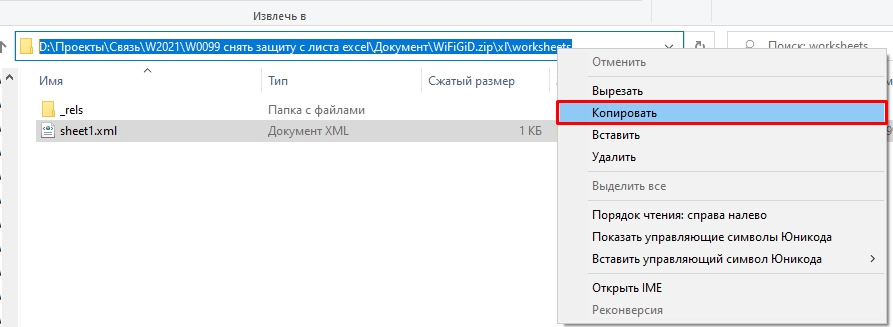
- Как видим, после этих действий, если расширения не отображалось, то оно появилось. Кликаем по файлу правой кнопкой мыши и в появившемся контекстном меню выбираем пункт «Переименовать».
- Меняем расширение с xlsx на zip.
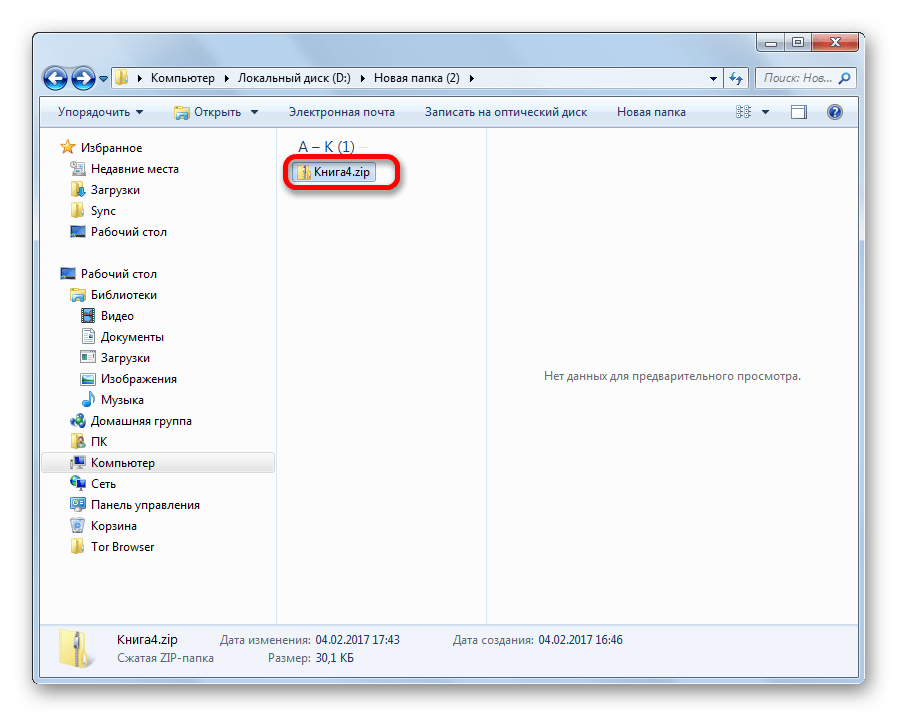
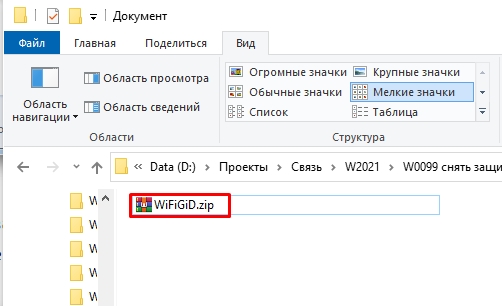
- После того, как переименование произведено, Windows воспринимает данный документ, как архив и его можно просто открыть с помощью того же проводника. Делаем двойной щелчок мыши по данному файлу.
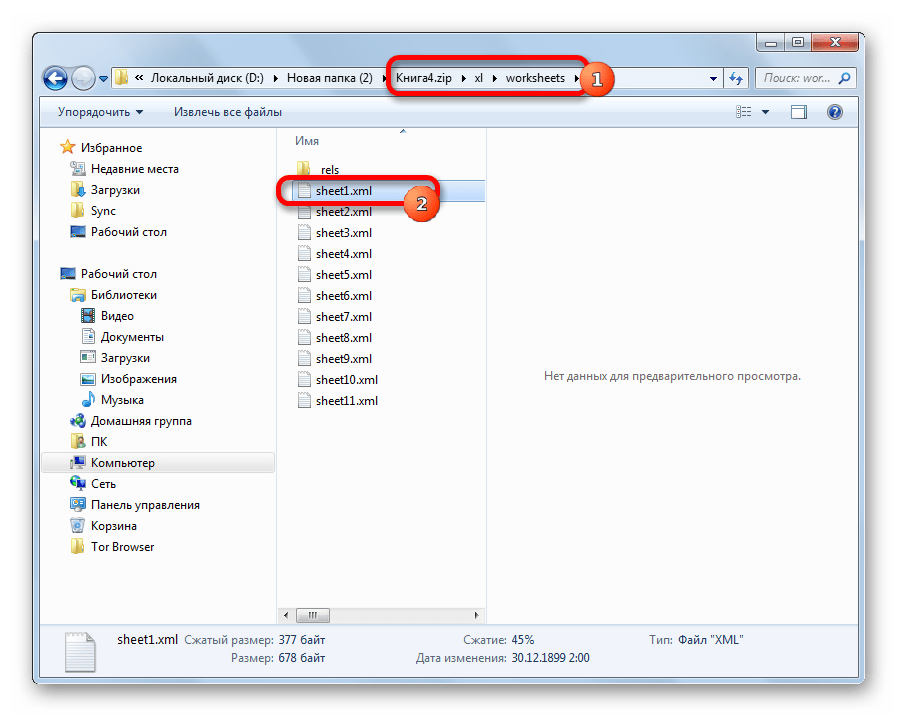
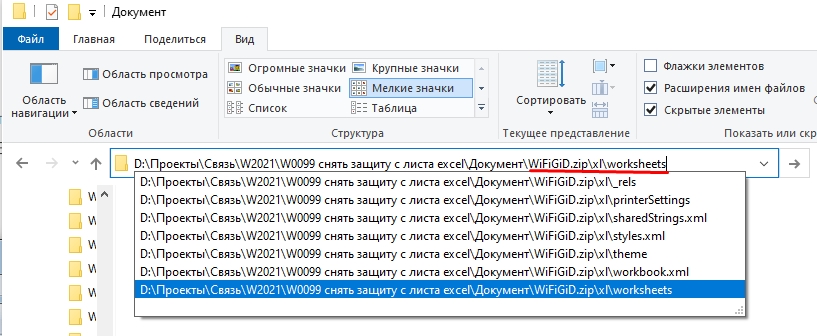
- Переходим по адресу:
имя_файла/xl/worksheets/Файлы с расширением xml в данной директории содержат информацию о листах. Открываем первый из них с помощью любого текстового редактора. Можно воспользоваться для этих целей встроенным Блокнотом Windows, а можно применить и более продвинутую программу, например, Notepad++.
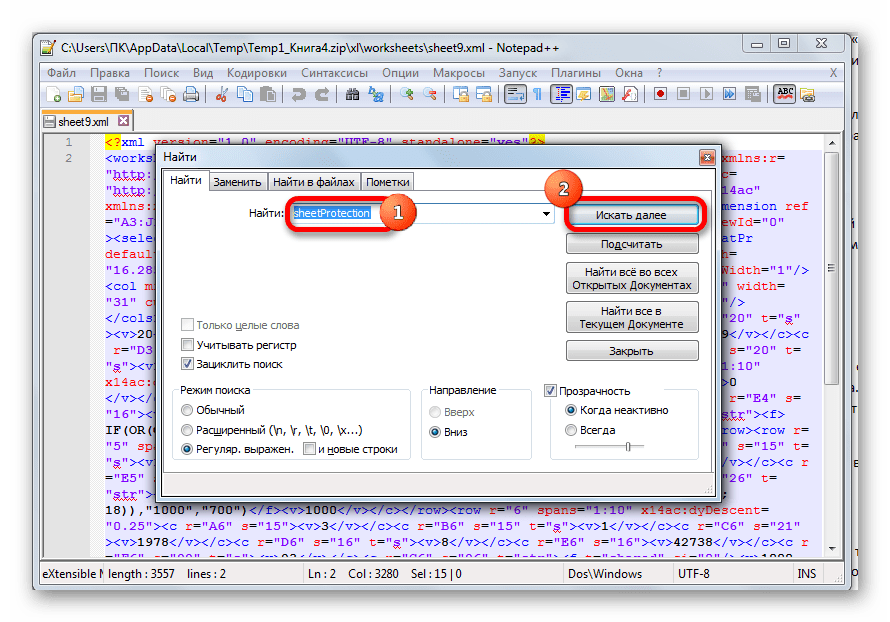
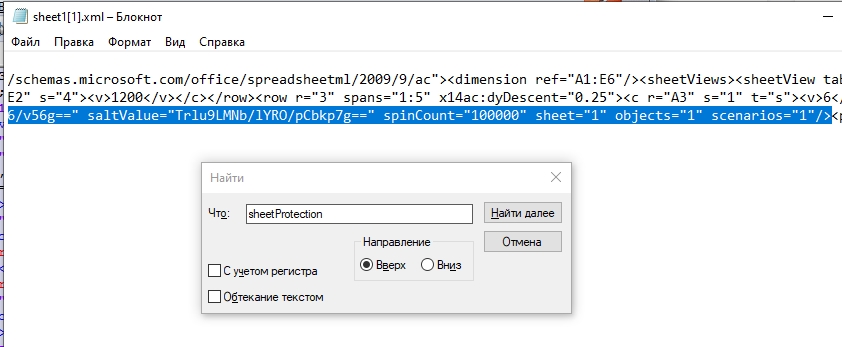
- После того, как программа открылась, набираем на клавиатуре сочетание клавиш Ctrl+F, чем вызываем внутренний поиск приложения. Вбиваем в поисковое окно выражение:
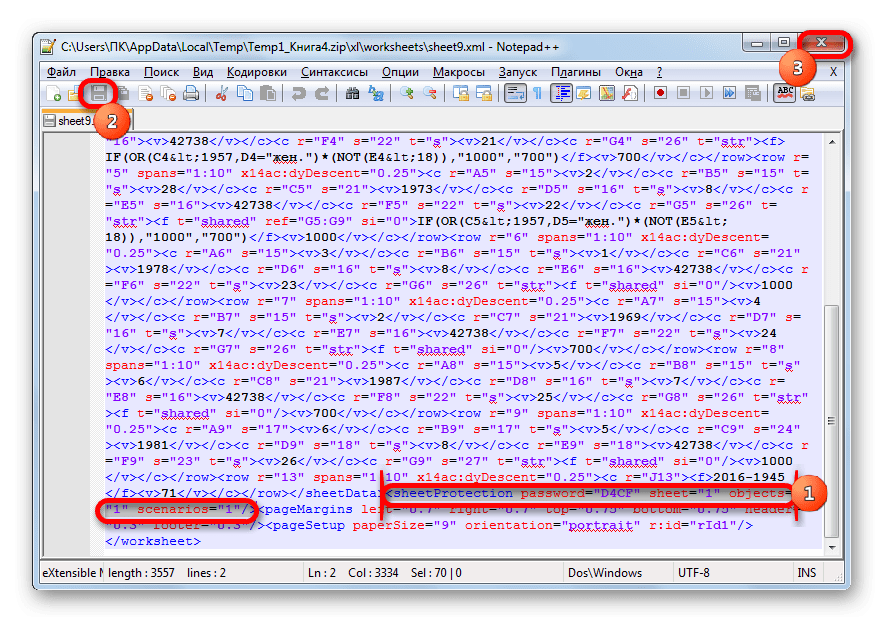
sheetProtectionИщем его по тексту. Если не находим, то открываем второй файл и т.д. Делаем так до тех пор, пока элемент не будет найден. Если защищено несколько листов Excel, то элемент будет находиться в нескольких файлах.
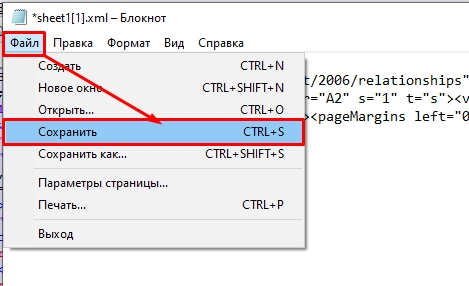
- После того, как данный элемент обнаружен, удаляем его вместе со всей информацией от открывающего тега до закрывающего. Сохраняем файл и закрываем программу.
- Возвращаемся в директорию расположения архива и опять меняем его расширение с zip на xlsx.
Теперь для редактирования листа Excel не понадобится знание забытого пользователем пароля.
Кроме того, если вы забыли кодовое слово, то блокировку можно снять с помощью специализированных сторонних приложений. При этом можно удалить пароль как с защищенного листа, так и со всего файла. Одним из самых популярных приложений данного направления является Accent OFFICE Password Recovery. Рассмотрим процедуру сброса защиты на примере данной утилиты.
Скачать Accent OFFICE Password Recovery с официального сайта
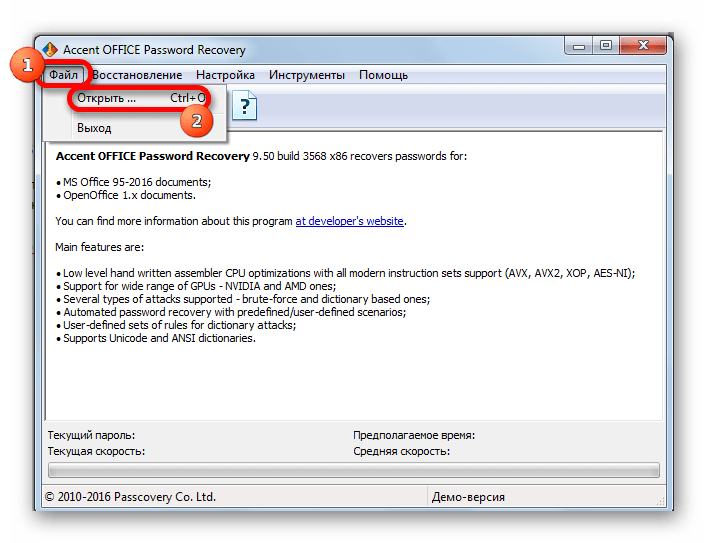
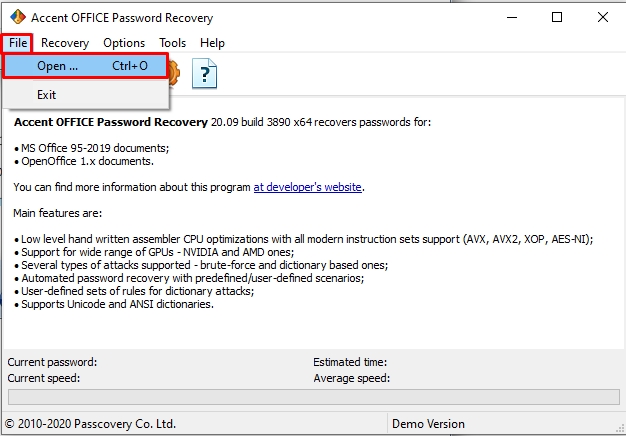
- Запускаем приложение. Кликаем по пункту меню «Файл». В выпадающем списке выбираем позицию «Открыть». Вместо этих действий также можно просто набрать на клавиатуре сочетание клавиш Ctrl+O.
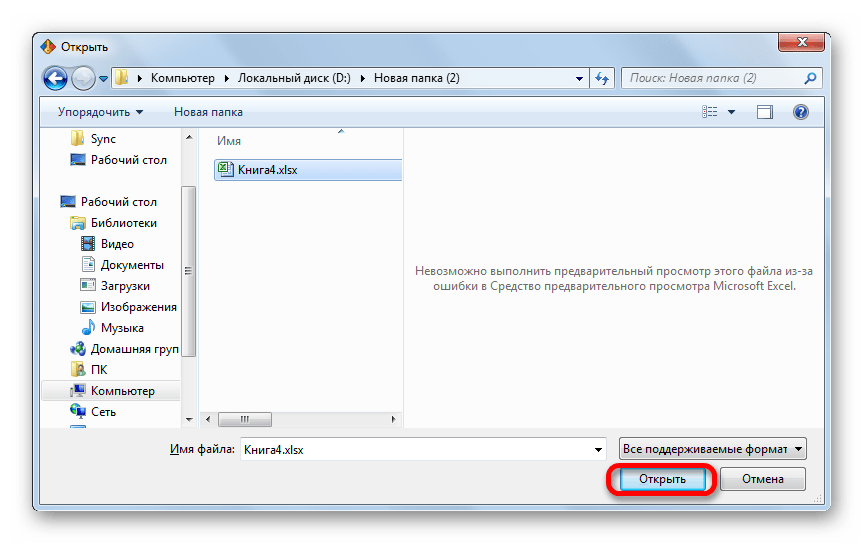
- Открывается окно поиска файла. С помощью него переходим в ту директорию, где расположена нужная нам книга Excel, к которой утрачен пароль. Выделяем её и жмем на кнопку «Открыть».
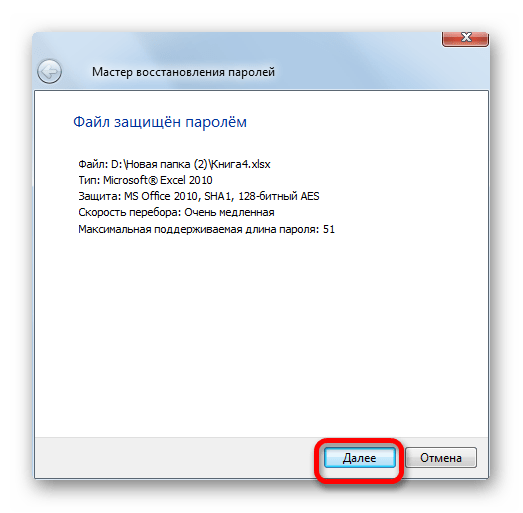
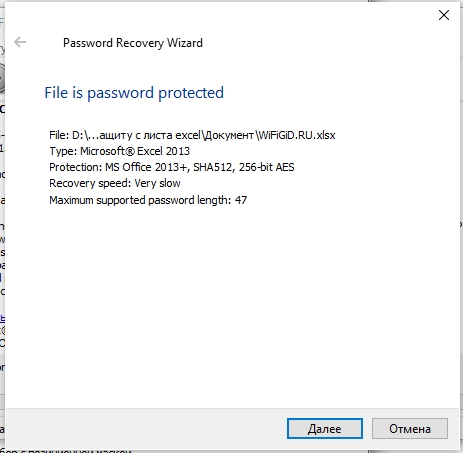
- Открывается Мастер восстановления паролей, который сообщает, что файл защищён паролем. Жмем кнопку «Далее».
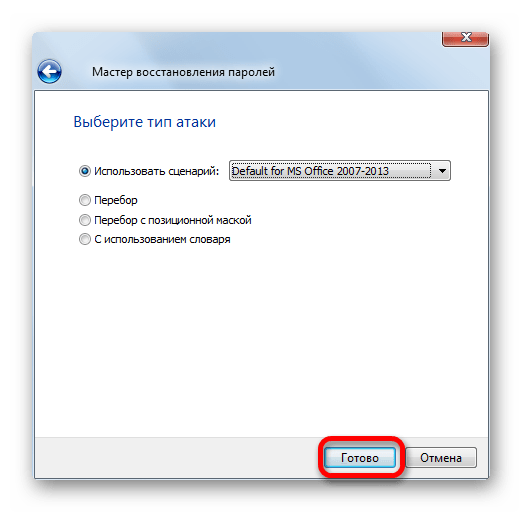
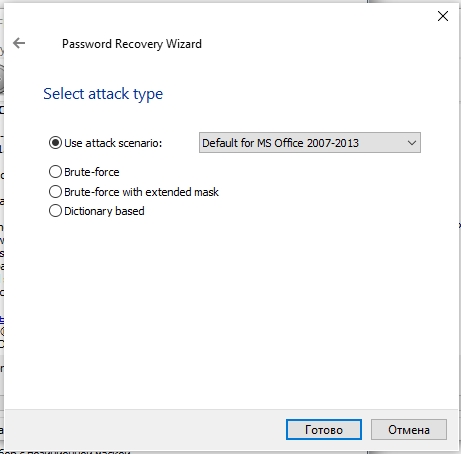
- Затем открывается меню, в котором предстоит выбрать, по какому сценарию будет производиться снятие защиты. В большинстве случаев наиболее оптимальным вариантом является оставить настройки по умолчанию и только в случае неудачи попробовать их изменить на второй попытке. Жмем на кнопку «Готово».
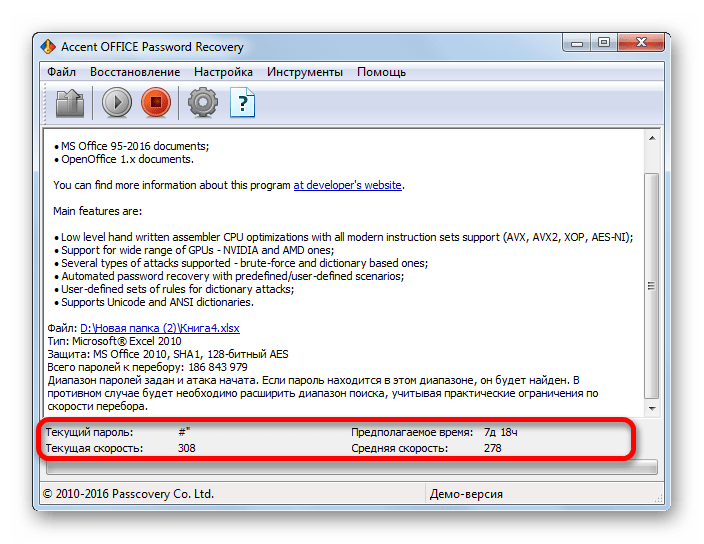
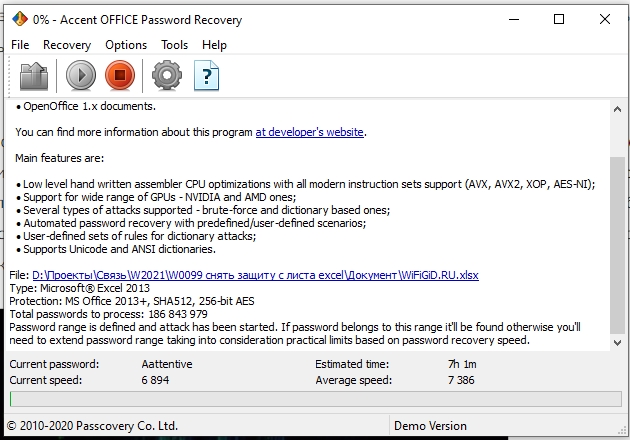
- Начинается процедура подбора паролей. Она может занять довольно продолжительное время, в зависимости от сложности кодового слова. Динамику процесса можно наблюдать в нижней части окна.
- После того, как перебор данных закончится, высветится окно, в котором будет записан действительный пароль. Вам только останется запустить файл Эксель в обычном режиме и вписать код в соответствующее поле. Сразу вслед за этим таблица Excel будет разблокирована.
Как видим, существует несколько способов снять защиту с документа Эксель. Каким из них воспользоваться пользователь должен выбрать в зависимости от типа блокировки, а также от уровня своих способностей и того, насколько быстро он хочет получить удовлетворительный результат. Способ снятия защиты с помощью текстового редактора быстрее, но требует определенных знаний и усилий. Использование специализированных программ может потребовать значительного количества времени, но зато приложение делает практически все само.
Еще статьи по данной теме:
Помогла ли Вам статья?
«How to remove the password from my Excel file and sheet? What is the way of removing the protection?.»
Put it simply, you set a password to encrypt your workbook/spreadsheet, and now what to remove password protection from Excel, do you? OK, here you’ll find 7 effective solutions!
Hey, before you dive into it further, ask yourself if you know the Excel password. As you can see, the methods are divided into 2 groups.
Now, let’s check how to remove a password from Excel 2019/2017/2016/2013/2010/2007.
Way 1. Delete the Encrypted Password (Open Locked Microsoft Excel)
Way 2. Unprotect Excel Workbook or Spreadsheet
Way 3. Remove Read-Only Limit Protection on Excel
Part 2. Remove Password from Excel (You Forgot the Password)
Way 4. Unprotect Excel Spreadsheet without Password
Way 5. Crack/Break Excel Opening Password with Software
Way 6. Use Workbook Unprotect Genius
Way 7. Remove passwords from Excel files Online
Part 1. Remove Password from Excel (You Know the Password)
There are 4 types of Excel password encryption/protection. I’ll give brief introductions and show you how to remove.
Since you remember the passcode, it’ll be super easy for you to remove password from Excel File, Sheet, Workbook, and Read-Only Protection.
Way 1. Delete the Encrypted Password (Open Locked Microsoft Excel)
If it requires a password to open a password-protected Excel file, it means this workbook is locked. To remove Excel opening encrypted password, follow the steps below.
Step 1. Double-click your encrypted Microsoft Excel Workbook, then enter the password to open it.
Step 2. Click «File» in the top left corner and then select «Info».

Step 3. For Excel 2019/2017/2016/2013/2010, click on «Protect Workbook» and select «Encrypt with Password» from the drop-down list.
(For Excel 2007 and older versions, click on «Protect Document» and select «Encrypt with Password»)

Step 4. Clear the password box (make it empty) and then click OK.

After removing password in Excel file, don’t forget to save the file. Now you’ve successfully deleted the encryption protection.
Way 2. Unprotect Excel Workbook or Spreadsheet
Excel «Protect Workbook» password is set to protect its structure from being altered, hidden, and renamed. And the «Protect Sheet» password is to keep your important data safe in the worksheet.
Now let’s check how to remove password protect from Excel.
Step 1. Find and open the Excel Workbook/Worksheets.
Step 2. Click «Review» in the top menu bar.
Step 3. Select «Unprotect Sheet» or «Protect Workbook», and then enter your password. Lastly, click OK.

This will remove the password from encrypted Excel sheet or Workbook.
Way 3. Remove Read-Only Limit Protection on Excel
You can’t edit or modify the Excel spreadsheets if the read-only mode is turned on. If you know the password and want to turn it back off, here are the steps for you to disabled read-only restriction in excel document.
Step 1. Open the read-only protected Excel file and enter the password. Next, click OK.
Step 2. Go to the menu top toolbar and then click File > Save As > Browse (select a location) > Tools > General Options


Step 3. Locate «Password to modify» and empty the text box next to it. Click OK to continue.

Step 4. After that, click Save.
Part 2. Remove Password from Excel (You Forgot the Password)
What to do if you forgot Excel password? That’s OK. Even though you don’t know the passcode, there’re useful workarounds to help. In the following sections, you’ll learn methods that enable you to remove password from Excel without password.
Way 4. Unprotect Excel Spreadsheet without Password
With this trick, you can easily unprotect Excel spreadsheet/worksheet without knowing the password. Let’s see how to do it!
Note: make a backup of your Excel workbook and save it to another folder on computer.
Step 1. Change the extension of the protected worksheet: rename it from *.xlsx to *.zip.

Step 2. Open the ZIP File, double-click the «xl» folder, and then open the «worksheets» folder.

Step 3. In there, you can find the spreadsheets (in .xml format).

Step 4. Open a sheet file in Notepad. Now search for the content: <sheetProtection algorithmName=»SHA-512″ hashValue=».
Then, select the entire line (the characters between»<» and «> «) and delete it.

Step 5. Save the file to a new folder.
Step 6. Do the same steps for all other spreadsheets.
Step 7. When it’s done, drag and drop the modified .xml files to the «worksheets» folder. Make sure they overwrite all the original XML files.
Step 8. Rename the *.Zip file back into *.xlsx
Voila! Open it and check if the password protection for Excel Spreadsheet/worksheet is removed.
Way 5. Crack/Break Excel Opening Password with Software
Can you remove the opening password from excel without a password? Sure! FoneCope Excel Password Recovery can easily break Excel file password, and then you can use the passcode to delete the encryption.

Check how to crack forgotten Excel password:
Step 1. You can download FoneCope Excel Password Recovery for free and install it on your computer.
Step 2. Launch the software and select Recover Excel Open Password on the main interface.

Step 3. Import the excel file you need to crack the password, or directly drag the encrypted excel file into the add box. Then the software will start to detect the complexity of the encryption algorithm and password.


You can see that there are 3 modes of password recovery below, you can choose the appropriate mode according to the actual situation.
#1. Dictionary Attack: Import the used passwords you know into the software in txt format and automatically analyze them to find the correct password. Of course, the software also has the latest password dictionary.
1. After selecting this mode, click «Settings» at the back to download the latest password dictionary constructed by the software.

2. Click «Download Dictionary» and it will download automatically. After the download is complete, click OK to run the software.


3. You can put the previously used secret into txt text, and then insert the software, it will retrieve the password from the information you provide or recover the password from the built-in password dictionary.

#2. Brute Force with Mask Attack: If you still have a little memory of the forgotten password, such as length, characters, prefix, or suffix, then you can consider that choose this mode.
1. After selecting this mode, click Settings, and then in the settings panel, set the password information you remember. After the setting is completed, it will obtain the password intelligently.


#3. Brute Force Attack: If you really know nothing about the forgotten password, this will be your last choice.
1. After selecting this mode, then directly click the «Recover» to perform Excel password recovery.

Step 4. After selecting the mode you need, the software will start to recover the Excel password. After a few minutes, you will be able to see the password in a pop-up window.


PasswordFab for Excel can quickly remove password from excel. The three attack types provide the highest possibility to recover passwords. When you cannot open excel with a password for some reason, PassFab for Excel is a recommended tool. Additionally, there are more excel password removers that can help.
Way 6. Use Workbook Unprotect Genius
Likewise, you can use another assistant software Excel Workbook Unprotect Genius to remove sheet protection password, read-only password, and Workbook protection password.

How to use the Workbook Unprotect Genius
Step 1. Get the software downloaded on your computer. After that, click Open to import a password protected excel Workbook.
Step 2. Click the «Remove Password» button
Note: If the file is .XLS, you’ll need to convert it to .xlsx before password protection removal.
Way 7. Remove passwords from Excel files Online
In case you don’t want to install the program on your computer, you can an online tool (www.lostmypass.com).
It’s very convenient to use. Just go to the site and upload your password locked Excel document. A few minutes later, you will get the recovered password on screen.
The problem is, I don’t think it’s safe to upload important documents to an online site. Besides, the service pricing is higher than using software.

The Bottom Line
All in all, we talked about 7 solutions to remove password from Excel workbook and spreadsheet. As you can see, removing protection from Excel is not so much difficult.
As always, if any method helps you solve your problem, please leave a comment and let me know. Thanks a lot!
Всем привет! Сегодня я расскажу вам, как снять защиту (пароль) с листа или целого файла в программе Microsoft Excel. Установка блокировки для листа и документа в Эксель делается по-разному. Поэтому и удаление пароля мы будем делать, используя разные инструкции. Смотрим оглавление и выбираем тот вариант, который нужен именно вам.
Содержание
- Способ 1: Снятие защиты с книги
- Способ 2: Разблокируем отдельный лист
- Способ 3: Снятие блокировки с листа, если забыл пароль
- Способ 4: Программа Accent OFFICE Password Recovery
- Видео инструкция
- Задать вопрос автору статьи
Способ 1: Снятие защиты с книги

Для начала нам нужно открыть заблокированный документ. Для этого вы должны знать от него пароль, поэтому просто вводим ключ в поле и жмем «ОК». Если вы забыли пароль смотрим последнюю главу этой статьи.
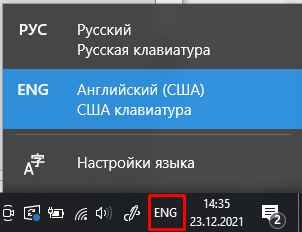
Если у вас не получается попасть внутрь, проверьте, чтобы был установлен правильный язык раскладки. Для смены языка используем комбинацию клавиш Ctrl + Alt. В более редких случаях используется Ctrl + Shift. Вы также можете изменить язык, нажав по языковой панели в правом нижнем углу экрана в трее. Также смотрите, чтобы был выключен режим заглавных букв – Caps Lock (клавиша находится слева между Shift и Tab).
Как только вы его откроете, проделываем следующие действия, чтобы убрать пароль с документа:
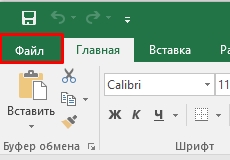
- Кликаем по первой вкладке «Файл».
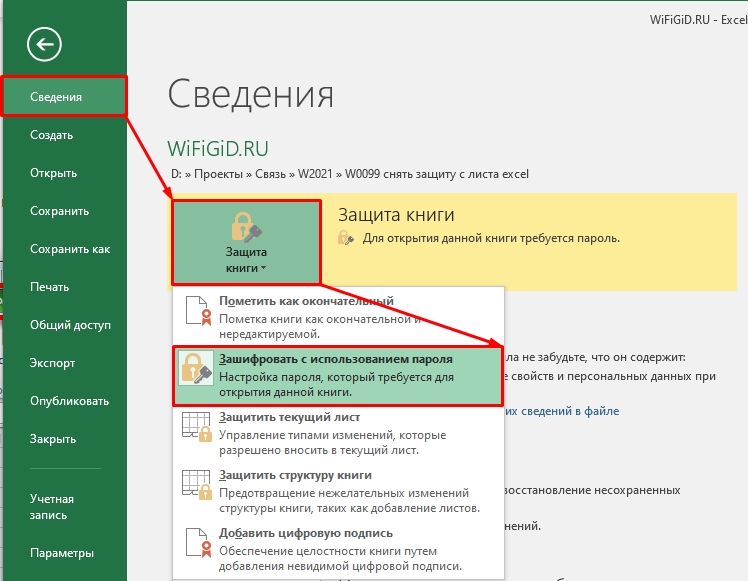
- В первом разделе «Сведения» выбираем кнопку в подразделе «Защита книги» (значок замочка и ключика). После этого из списка кликаем «Зашифровать с использованием пароля». В более старых версиях Microsoft Word пункт называется: «Зашифровать паролем».
- Теперь с помощью левой кнопки мыши выделите установленный пароль и нажмите по клавише Delete, чтобы его удалить.
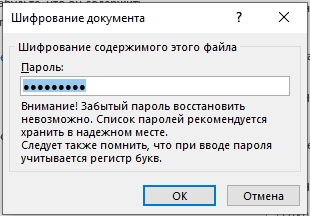
- Строка должна остаться пустой. Жмем «ОК».
- На всякий случай сохраняем документ, нажав по значку дискеты или используя горячие клавиши Ctrl + S.
После этого при открытии документа пароль больше не будет запрашиваться.
Способ 2: Разблокируем отдельный лист
Второй вариант, когда блокировка висит именно на выделенной странице. Причем блокировку мог установить сам автор, чтобы нечаянно не изменить некоторые данные (сам так частенько делаю). Зайдите на вкладку «Рецензирование» и в разделе «Изменения» (справа) находим кнопку с надписью «Снять защиту листа».
Второй вариант – это нажать «Файл», как мы это делали в первом способе. Далее открыть меню «Защиты книги» и выбрать пункт «Защитить текущий лист».
Далее очень важный момент. Если вы или автор документа установили пароль, то вылезет вот такое вот окошко – нужно просто ввести ключ. Но защиту на лист можно устанавливать и без пароля. В таком случае блокировка снимется, но вы визуально ничего не заметите.
ПРИМЕЧАНИЕ! Если вы не помните пароль, то смотрим следующую инструкцию.
Как проверить, что защита снята? Для этого посмотрите на кнопку, которую вы только что нажали – вы увидите другую надпись: «Защитить лист». Это очень удобно – вы можете постоянно блокировать и разблокировать лист.

Способ 3: Снятие блокировки с листа, если забыл пароль
Представим себе, что мы заблокировали лист паролем и нечаянно его забыли. К счастью данные то у нас есть. Да, мы можем создать новый документ и просто туда скопировать все строки, но это не очень удобно, особенно когда документ слишком большой. Давайте посмотрим еще один способ, как разрешить редактирование в Excel и убрать пароль с листа.
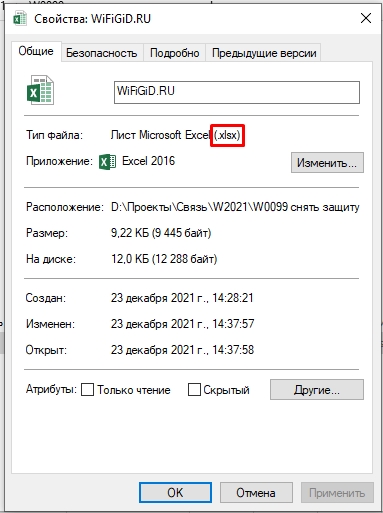
- Для начала проверяем, чтобы у файла был правильный формат – нажмите правой кнопкой мыши по документу и зайдите в «Свойства».
- Смотрим в строку «Тип файла» – в скобках должен быть формат «xlsx».
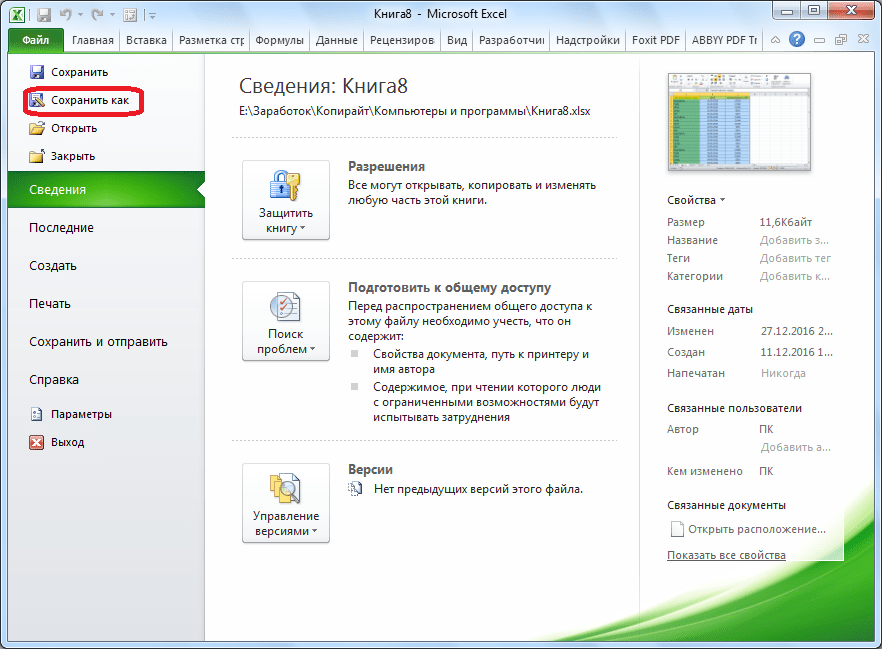
- Если он имеет другой формат, то жмем «Файл» – «Сохранить как» – «Обзор».
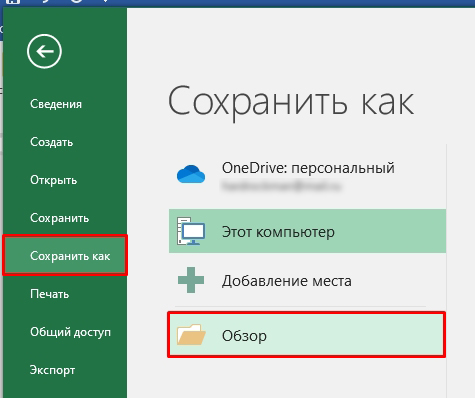
- В формате «Тип файла» выбираем «Книга Excel» и жмем «Сохранить».
- Далее открываем папку с файлом. Нам нужно изменить формат на другой. Если у вас в проводнике не отображается формат, то в окне сверху включите галочку «Расширения имен файлов».
- После этого кликаем правой кнопкой мыши и из списка выбираем команду «Переименовать».

- Стираем последние буквы после точки (.) и дописываем:
zip
- Жмем Enter, чтобы применить изменение. Теперь два раза кликните по адресной строке и допишите:
имя_файла.zipxlworksheets
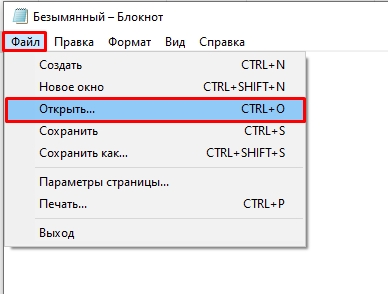
- Далее вы увидите файлы «sheet» – это и есть ваши листы. Откройте их в любом редакторе. В «десятке» есть небольшой баг: файлы XML нельзя напрямую открыть в текстовом редакторе. Поэтому если у вас это не получается – делаем следующее. Открываем программу «Блокнот» – через поиск Windows.

- Теперь копируем адрес до данного файла.
- В блокноте выбираем «Файл» – «Открыть». Или используем клавиши «Ctrl + O».
- В адрес вставляем скопированную строку.
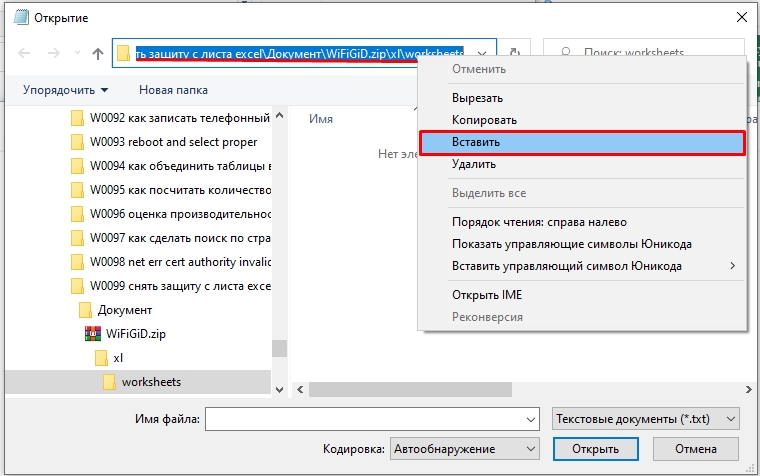
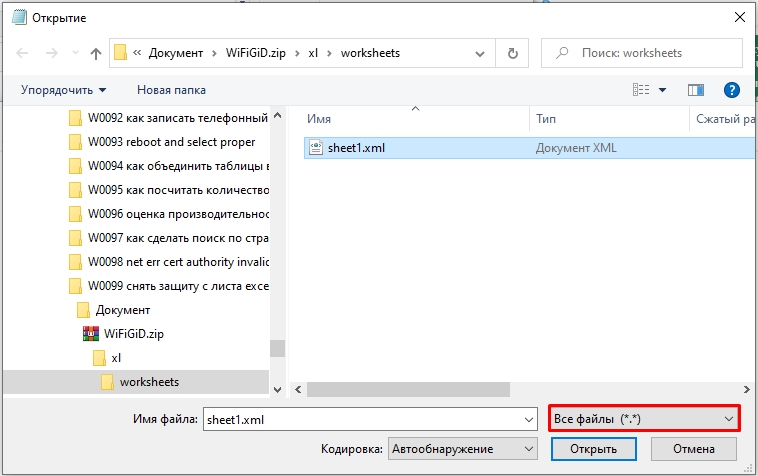
- В формате укажите «Все файлы», чтобы увидеть наши страницы. Теперь выбираем ту, которая заблокирована, и жмем «Открыть».
- Используя клавиши Ctrl + F находим строчку со значением:
sheetProtection
- Далее вам нужно выделить всю строку до закрывающей скобки (>):
<sheetProtection…>
- Удаляем её (Delete) и сохраняем файл (Ctrl + S).
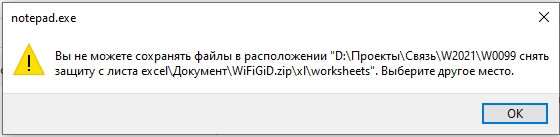
Если вы увидите вот такую вот ошибку, ничего страшного нет, просо нажмите «ОК» и закройте файл.
Теперь изменяем формат на «xlsx» и открываем страничку. Если до этого у вас вылезла ошибка, программа предложит вам восстановить данные – подтверждаем. Лист снимется с блокировки в любом случае.
Способ 4: Программа Accent OFFICE Password Recovery
Давайте посмотрим, как же открыть запароленный файл. Так как про данную программу пишут все, то я решил тоже её проверить. Но скажу сразу, что она не пытается дешифровать пароль, а просто использует перебор ключей, которые хранятся в её памяти. И если пользователь установил очень сложный пароль, то она его никаким образом не взломает. Есть еще один минус – перебор очень долгий и может занять несколько часов. Так что заранее решайте – нужно оно вам или нет. Успех не гарантируется.
- Скачиваем и устанавливаем программу с официального сайта.
- Открываем файл.
- Выбираем наш документ.

- Далее идет предупреждение, что файл заблокирован.
- Есть несколько сценариев перебора, оставляем настройки и жмем «Готово».
- А теперь очень и очень долго ждем. Можете оставить перебор на ночь. Но еще раз повторюсь, что шанс, что подобная программа найдет ключ – очень и очень мал.
Видео инструкция
This tutorial shows how to remove password from Excel file using multiple methods. Some methods work even if you don’t know the password.
Whenever you send out an Excel file that you don’t want to be changed, it’s essential to protect the worksheets with a password. However, you will also need to be able to remove the password if you want to make changes later on. In this tutorial, you will learn how to:
- Remove password from Excel file if you know the password
- For PC users
- For Mac users
- Remove password from Excel workbook if you forgot the password
- Remove password from Excel workbook using an Online Service (like password-find.com)
- Remove password from Excel workbook using a 3rd Party Software
How to remove password protection from Excel workbook if you know the password
If you are the one who set the password or you were given the password to the Excel file via email, then you can follow a few simple steps to remove it.
Remove Excel spreadsheet password from the Info panel
1. Open the encrypted Excel file for which you want to remove the password.
2. Enter the Excel password and click OK.

3. On the upper left corner of the opened Excel spreadsheet, click the File tab.
4. In the left-hand panel, click Info and Protect Workbook to open the drop-down menu.

5. Select Encrypt with password in the drop-down list and delete the password that appears in the text field.

7. Delete the existing password and click OK.

6. Go to the File menu and click Save.
Remove Excel password from the Review tab
1. Open the encrypted Excel file for which you want to remove the password.
2. Enter the Excel password and click OK.
3. On the main ribbon menu of the opened Excel spreadsheet, click the Review tab.

4. Click the Unprotect Sheet option and enter the password.

5. To remove the password from the workbook but keep it locked from editing, select Protect Sheet and click OK without entering a new password.
6. Go to the File menu and click Save.
Alternatively, you can unprotect the sheet and remove the password from the Home tab using the Format menu.

Remove Excel password using the Save As method
1. Open the encrypted Excel file for which you want to remove the password.
2. Enter the Excel password, and then click OK.
3. On the upper left corner of the opened Excel spreadsheet, go to the File tab and select Save as.
4. Select a folder, and a pop-up window will appear.
5. Click Tools located at the lower right side of the window. Click the drop-down menu and select General Options.
6. The General Options dialog box will appear, which shows the encrypted passwords to open and edit the Excel file. Remove the passwords for both text fields and click OK.

7. Go to the File menu and click Save.
For Mac users
1. Open the Excel file for which you want to remove the password.
2. Enter the Excel password, and then click OK.
3. On the upper left corner of the opened Excel spreadsheet, click the File tab and select Passwords from the drop-down list.
4. The File Passwords dialog box will appear, showing the encrypted password to open and edit the excel file. Delete the passwords for both text fields, and then click OK.
5. Go to the File tab in the menu bar, and then click Save.
How to remove password from Excel workbook without the password
If you want to open an Excel file but don’t know the password, you can follow one of the below processes. You can also try using a 3rd party software if other methods have failed.
Always create a backup copy of your Excel files before attempting to remove the password.
Converting an Excel file into a Zip file
Below you can watch a video that shows this process step-by-step. I have also listed all the steps needed to remove the protection of your Excel file without using any additional software.
Note: This method doesn’t work in all versions of Excel. Some say that it stopped working in Microsoft 365, but I’ve seen people complaining about Excel 2016 as well. If you can’t use this, try one of the other methods shown below.
1. Right-click on your document and convert the file by renaming the extension from “.xlsx” to “.zip”.
2. You will get a warning asking if you want to change it. Click Yes.
3. To extract the zip file’s contents, right-click on the file and select Extract All.
4. A window will appear showing the folder where the files will be extracted. Click Extract.
5. In the extracted file, open the “XL” folder.
6. Inside the “XL” folder, open the “worksheets” folder.
7. You will see a list of XML files which are all your Excel worksheets within your password-protected Excel spreadsheet. The worksheets are listed as sheet1.xml, sheet2.xml, and so on.
8. To modify the XML file, open one XML file in notepad and search for a line with the word “protection”.
9. Select everything between and including these “<” and “>” characters and delete it.
10. Click the File menu in the notepad and click the Save button.
11. Repeat this process for every XML file within your Excel spreadsheet inside the “worksheets” folder. Make sure that all XML files are modified.
12. To add your modified XML files back into your zip file, go back to the extracted file and select all the files.
13. Right-click and select Send to > Compressed (zipped) folder.
14. This will create a new zip file. Rename the file extension from “zip” to “.xlsx”.
15. You will get a warning asking if you want to change it. Click Yes.
16. Open the Excel file.
You should now have access to view and edit the Excel data and information stored in your spreadsheet without typing the password.
How to remove password from Excel workbook using an Online Service
You can also use online services like Password-Find to remove passwords from your Excel spreadsheets. Unlike 3rd party software, most of these online services work on Mac, Windows, Android, Unix, and iOS.
Using Password-Find to remove Excel passwords
Please note that this is a paid service, and to get a full copy of your file after the password has been removed, you may need to purchase a license key.
Here’s a quick guide on using the Password-Find online service to recover or remove passwords from Excel files.
1. Go to https://www.password-find.com
2. From the home page, click Unprotect your file in the upper right corner.

3. In the file upload page, click Browse to select a file and click Next step.

4. In the next screen, you will find two options. To remove the Excel spreadsheet password, select the Remove password option. For the password recovery option, choose Find password.

5. Click Next step to remove the password or start the recovery. Removing a password or recovering it may take a while, depending on the password strength.

6. Once complete, you will see the result of the unprotection process. You will get a message when the password is recovered or deleted.

Other online password removal services you can try
If everything else has failed, it can be worth trying the additional services listed below:
- LostMyPass
- Password-Online
- Straxx Excel Password Remover
How to remove password from Excel workbook using a 3rd Party Software
Whether you remember the password or not, there is 3rd party software you can download and install on your computer to remove passwords from the Excel files. One of these tools is ISeePassword Dr. Excel.
Download the software from this link: https://www.iseepassword.com/online-help/excel-password-recovery.html
The nice part is that ISeePassword Dr. Excel can recover Excel passwords and remove worksheet/workbook protection without damaging the data and works with all versions of Excel files from 2003 to 2021.
Here’s a quick guide on how to recover or remove the workbook password using the ISeePassword Dr. Excel.
Recover open password
1. Open ISeePassword Dr.Excel from your computer, and click the Recover Open Password from the Excel option on the home screen.

2. Click the Add File button to import the password-protected Excel spreadsheet. Choose the type of attack from the given options: Dictionary Attack, Brute-Force with Mask Attack, and Brute-Force. Select Brute force with Mask Attack as the attack type. This method allows you to set several parameters to shorten the password recovery time.

3. Click the Settings button on the right side to set up the proper settings and click Ok.
4. Click Start to recover the Excel password.

A new pop-up window will be displayed once the password is retrieved.

5. Click Copy, and you should be able to open the Excel document with this password.
Remove the password from the Excel document
1. Open ISeePassword Dr.Excel from your computer, and click the Remove Workbook, Worksheet Password option from the home screen.
2. Click the Add File button to import the password-protected Excel file.

3. Click the Start button to remove the Excel password from the workbook.
4. Once the password has been removed, you will see a “Remove Finished” message.

Other 3rd party software you can use
If everything else fails, below is a list of additional software you can download and install to recover or remove passwords in Excel spreadsheets:
- PassFab for Excel
- iSunshare Excel Password Remover
- Passper for Excel
What to do next?
I hope that after reading this guide, you were able to remove the password from your Excel file. Some methods work better than others, and some may not work on Excel from Microsoft 365 subscription. However, if you have forgotten the password to your precious file, make sure to try the services shown in this tutorial. They could save you countless hours by recovering the open password without damaging your file.
And remember, it’s always wise to make a full backup of your Excel file before attempting to make any changes that could result in data loss.
Excel is a popular Microsoft office suite program used mainly for creating spreadsheets and compiling data. To help you protect your work, excel gives you options by providing security features including securing it with a passcode.
If you are tasked with preparing these files and want to ensure no one else tampers with them, you need to set a strong password on the program such that no unauthorized users can interfere with the content therein. Furthermore, there may arise circumstances that may require access to the file that may necessitate doing away with the password. For instance, when collaborating, or when the creator is unavailable. This post highlights ways you can remove an excel password on your Windows PC or Mac.
Why include a passcode in an Excel file?
A password is one of the many security features at your disposal to prevent work-tampering and unauthorized access. For instance, if you are working on a sensitive project, say a financial audit, then you need to secure it for enhanced protection.
Sometimes you can create a file for sharing on a read-only basis. Such files cannot be left unprotected to maintain the integrity of the content. Hence, you need to apply for password protection. A read-only document can be shared by multiple people over various platforms, but without permission to edit, one cannot change its content.
Method 1: How to remove password protection in Excel manually using the info feature
1. Go to your Microsoft Office Suite and launch the Microsoft Excel program.
2. Open the encrypted Excel spreadsheet file you want to remove the password. In case you have set opening password protection in the file, it means the file is locked. You will be required to enter it. Click OK when done.

3. On the upper left corner of your opened worksheet, click the File tab. Click on ‘Info.’

4. Click on ‘Protect Workbook’ to open a drop-down menu. Then, choose the type of password protection you had set to remove.

- For Encrypt with Password option, all you have to do is clear the password written and click OK to remove the password. It works mostly for Excel from 2019 to 2010.

- For the ‘Protect Current Sheet’ and ‘Protect Workbook Structure options,’ get an Unprotect Sheet window and enter a password. Click OK to remove the protection. It works for Excel 2007 and older versions.
Note that you can remove password protection from the Review tab and click Protect Sheet or Protect Workbook. Clicking on Unprotect Sheet or Protect Workbook will automatically remove the password from the sheet.

Method 2: How to remove a password in Excel using iSeePassword
iSeePassword Dr.Excel is a powerful third-party tool that can be used to recover Excel open passwords and remove protection passwords from Excel Worksheet. You can unlock the worksheet pretty quickly with this password removal software. When you forgot the Excel password and the above tricks didn’t work, Dr.Excel is the best solution out there to help you get away from an awkward situation.
First, please download iSeePassword Dr.Excel from this link:
Download from this source
Recover Open Password from Excel
Open Dr.Excel from your computer and click Recover Open Password from the Excel menu on the welcome screen.

Please import the password-protected Excel file from the new window with the Add File button. Next, choose a password attack module. Usually, we will use Brute-force with Mask Attack as it allows you to set a couple of parameters to shorten the password recovery time.

Hit the Settings button on the right side and make proper settings accordingly.

Save the changes, and Dr.Excel starts to recover Excel open password based on your settings. Once the password is found, it will be shown on the screen.

After the password was recovered, you can now remove the password using the methods shared previously in this article.
Remove worksheet protection password from Excel using Dr. Excel
Well, it is much easier to remove the Excel worksheet password with the Dr.Excel app. It is almost done instantly.
First, choose Remove Workbook, Worksheet Password from the main window. Now, locate Add File button in the upper left corner to import the Excel file into the program. Finally, click the Start button to remove the worksheet protection password from Excel. The password will be removed in seconds without waiting, even if it has a complex password.

The unlocked Excel file is saved in the same folder as the original one sits. If you try to open the unlocked file, you will find no password attached to it. iSeePassword Dr.Excel is by far the easiest way to remove a password from Excel when you forgot the password.
Method 3: How to remove a password in an Excel sheet using the Home tab
1. Launch the Excel program and open the worksheet. You need to remove the password.
2. On the main ribbon menu, go to the Home tab.
3. Under the Cells group, click Format’s drop-down arrow. From the list, select Unprotect Sheet.

4. Type in the password and then click OK to remove the password.

Method 4: Using Save As to remove password protection in Excel
1. Open the password-protected Excel worksheet. After this, go to the File tab and select Save As.

2. Click the drop-down arrow to display a pop-up window. On the window, click Tools, then select General Options from the drop-down menu.

3. In the dialogue box, clear the password to open and modify fields to remove them.
4. Click the OK button to save all changes made. Remember to click the save button to save your modified document.

Method 5: Remove Encryption with Excel VBA
Running a simple VBA code can prove significantly essential in unprotecting all sheets and workbooks in excel.
To remove protection from excel files, you need to open the file, access the basic visual tool, and write a VBA code in the Visual Basic Editor. Follow these steps;
1. Find and click on Developer on the Excel ribbon.

2. Tap on the Visual Basic option

3. In this window, choose to Insert, and on the dropdown, select New Module

4. Input your code in the Visual Code Editor and run it, either by selecting the Run tab or press F5.

Use the following in the process above;
Password argument: worksheet.Unprotect method
Code: i. for a single password;
Sub UnprotectAllSheets()
     For Each wsheet In ActiveWorkbook.Sheets
         wsheet.Unprotect (123456)
      Next wsheet
End Sub
ii. for those secured with different passwords;
Sub UnprotectAllSheets()
    Sheets("January").Unprotect ("password")
    Sheets("February").Unprotect ("password")
    Sheets("March").Unprotect ("password")
    Sheets("April").Unprotect ("password")
End Sub
iii. for all sheets except some specified ones, say a sheet named January.
 Sub UnprotectAllSheets()
     For Each wsheet In ActiveWorkbook.Sheets
      If wsheet.Name = "January" Then
         wsheet.Protect
    Else
         wsheet.Unprotect
    End If
      Next wsheet
End Sub
Copy the codes above and paste them into the Visual Basic Editor for the specific scenarios.
Method 6: Remove Excel Passwords Using Zipping File Tool
The goal here is to do away with password protection. The process, therefore, involves compressing the file into a zip file, a little editing, then converting back to .xlsx format. Below are the steps;
1. Click on View in the Windows File Explorer and tick the box enabling File Name Extension.

2. From the Home tab select the file and select Rename

3. Remove the .xlsx extension from the name only and replace it with .zip. Press Enter
4. Click Yes on the warning popup window.

5. The .xlsx file changes to a .zip file
6. Open the zip file and select the xl folder

7. Click on the worksheets inside the xl folder.

8. Find the XML file

9. Select and right-click on the mouse; from the resulting menu window, choose Copy To

10. On the directory window, enter a directory and click OK
11. Go to the selected directory, select the file, and right-click the mouse. Hover the mouse on Open with from the context menu, then choose Notepad.

12. This will open the file on Notepad.

13. Press Ctrl+F on the keyboard to trigger the Find tool

14. Click Find Next on the window that opens.
15. The location of Protection shall be highlighted.

16. Select the part of the text from <sheetProtection … to scenarios=»1″/>

17. Press delete or backspace to wipe the text from the pad.

18. Press Ctrl+S to save the text.
19. Open Windows Explorer and select the original file.
20. Rename this file back to .xlsx from .zip

21. Open the Excel file
22. You can check that there is no protection by trying to edit the file or go to Click Format on the Home tab and confirm there is Protect Sheet from the dropdown menu. If there were a password, there would be Unprotect Sheet.
Method 7: Remove Protection from An Excel File Online
Groupdocs is the online tool used to clear passwords from excel files. It is, however, better suited when the password is known.
Here are the steps;
1. Log onto the Goupdocs

2. Click on the Click or drop your file here handle on the page
3. Select the file you want to unprotect, then hit on Open button

4. After the upload, input your password into the empty field shown

5. Then click UNLOCK
6. Wait until the process is complete, then click Download Now to download the file on your PC

Method 8: Remove Password Using the Review Tab
Follow these steps
1. Tap on the Review

2. Click on Protect subtab, then Protect Sheets.

3. Input your password into the popup window and click OK

4. Your sheet is now unprotected.
Method 9: Remove Password Using Unprotect Sheet Command
Follow the following steps:
1. Open the file, and from the Home tab, go to Cells.

2. Click Format, and on the dropdown menu, tap on Protect Sheet.

3. A box will pop up; input your password and click OK.

Conclusion
The article above provides some methods to remove password protection from your Excel files. The procedures mentioned above are some ways you will end up with the same results. Always remember to save your work again after making any changes to it.