
Word for Microsoft 365 Word 2021 Word 2019 Word 2016 Word 2013 Word 2010 Word 2007 More…Less
Delete lines or connectors
Click the line, connector, or shape that you want to delete, and then press Delete.
Tip:
If you want to delete multiple lines or connectors, select the first line, press and hold Ctrl while you select the other lines, and then press Delete.
If you can’t select a line to delete, it might actually be a horizontal line, which is a type of border.
Remove a horizontal line
-
Place the cursor immediately above the horizontal line.
-
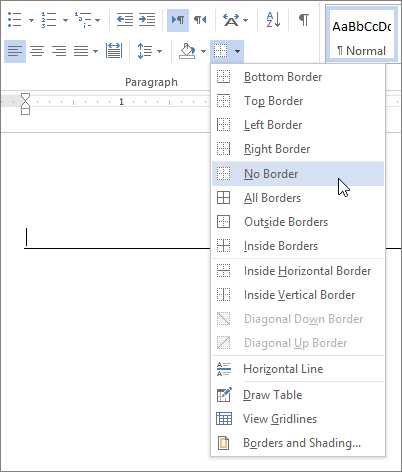
On the Home tab, click the arrow next to the Borders and Shading button, and click No Border.

For more on how lines work in borders, see Add, change, or delete borders from documents or pictures.
Need more help?
![]()
Download Article
Troubleshooting methods to remove a horizontal line in Word
![]()
Download Article
This wikiHow teaches you how to remove a border line in Microsoft Word that you may have inadvertently created by typing three hyphens (-), underscores (_), equal signs (=), or asterisks (*), and pressing «return.»
-
1
Click in the row immediately above the unwanted line. If there is any text immediately above the line, select the entire row above the line.
-
2
Drag the cursor to the row immediately below the unwanted line. The left end of the line will be highlighted.
Advertisement
-
3
Press delete. In many versions of Word, doing so will remove the line.


Advertisement
-
1
Click in the row immediately above the unwanted line. If there is any text immediately above the line, select the entire row above the line.
-
2
Drag the cursor to the row immediately below the unwanted line. The left end of the line will be highlighted.
-
3
Click the Home tab at the top of the screen.
-
4
Click the «Borders and Shading» icon. It’s a square divided into four panes in the «Paragraph» section of the ribbon.
-
5
Click No Borders. The border line will disappear.


Advertisement
-
1
Click in the row immediately above the unwanted line. If there is any text immediately above the line, select the entire row above the line.
-
2
Drag the cursor to the row immediately below the unwanted line. The left end of the line will be highlighted.
-
3
Click the Design tab at the top of the window.
-
4
Click Page Borders in the upper-right corner of the window.
-
5
Click the Borders tab at the top of the dialog box.
-
6
Click None in the left pane.
-
7
Click OK. The border line will disappear.


Advertisement
Add New Question
-
Question
I typed a couple of underscores and then pressed enter and it won’t go away. How do I get rid of them?

First, select part of your text which contains «Border Lines,» then go to the «Home» tab and select the «Paragraph» ribbon, click on «Borders» command and finally choose «No Border.»
-
Question
How do I identify an unwanted line on a page?
Press the backspace key. It is the one with an arrow going left on most keyboards. You can tell which way left is by making your hands into letters — the L is the left hand.
-
Question
What do I do if the print of a section I was trying to cut and paste became small, and I need it to be big again?
Press Control + Z (which is undo) and right-click on the passage to find Undo.
See more answers
Ask a Question
200 characters left
Include your email address to get a message when this question is answered.
Submit
Advertisement
Thanks for submitting a tip for review!
About This Article
Article SummaryX
1. Click the row above the line.
2. Drag the cursor below the line.
3. Press the Delete key.
Did this summary help you?
Thanks to all authors for creating a page that has been read 970,844 times.
Is this article up to date?
Содержание
- Убираем нарисованную линию
- Убираем вставленную линию
- Убираем линию, созданную с помощью инструмента “Границы”
- Убираем линию, добавленную в качестве рамки
- Убираем линию, созданную форматом или автозаменой символов
- Убираем линию в таблице
- Вопросы и ответы
Убрать линию в документе MS Word задача несложная. Правда, прежде, чем приступить к ее решению, следует понять, что это за линия и откуда она взялась, точнее, каким образом она была добавлена. В любом случае, все их можно убрать, и ниже мы расскажем, что для этого нужно сделать.
Урок: Как в Ворде нарисовать линию
Убираем нарисованную линию
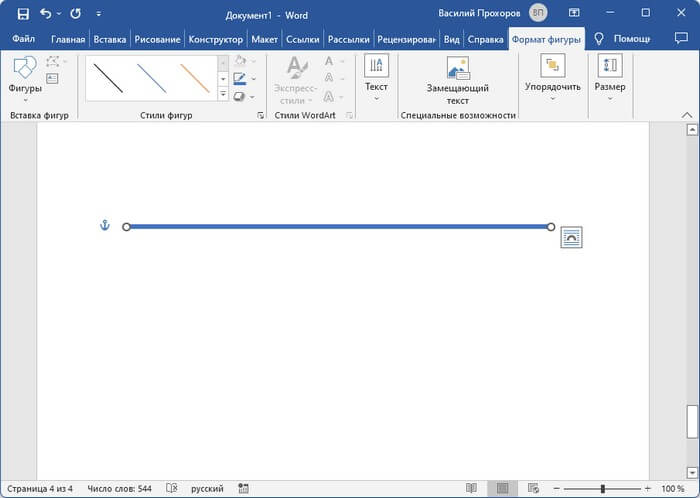
Если линия в документе, с которым вы работаете, нарисована с помощью инструмента “Фигуры” (вкладка “Вставка”), имеющегося в MS Word, удалить ее очень просто.
1. Кликните по линии, чтобы выделить ее.

2. Откроется вкладка “Формат”, в которой вы можете эту линию изменить. А вот для ее удаления просто нажмите кнопку “DELETE” на клавиатуре.
3. Линия исчезнет.
Примечание: Линия, добавленная с помощью инструмента “Фигуры” может иметь различный внешний вид. Вышеописанная инструкция поможет убрать двойную, пунктирную линию в Ворде, а также любую другую линию, представленную в одном из встроенных стилей программы.
Если же линия в вашем документе не выделяется после клика на нее, значит, добавлена она была другим способом, а для ее удаления необходимо воспользоваться иным методом.
Убираем вставленную линию
Возможно, линия в документ была добавлена иным образом, то есть, скопирована от куда-то, а затем вставлена. В таком случае необходимо выполнить следующие действия:
1. Выделите с помощью мышки строки до и после линии, чтобы линия тоже была выделена.
2. Нажмите кнопку “DELETE”.
3. Линия будет удалена.

Если этот метод вам тоже не помог, попробуйте в строках до и после линии написать несколько символов, а затем выделить их вместе с линией. Нажмите “DELETE”. Если линия не удалится, воспользуйтесь одним из следующих методов.
Убираем линию, созданную с помощью инструмента “Границы”
Бывает и так, что линия в документе представлена с помощью одного из инструментов в разделе “Границы”. В таком случае убрать горизонтальную линию в Word можно одним из следующих методов:
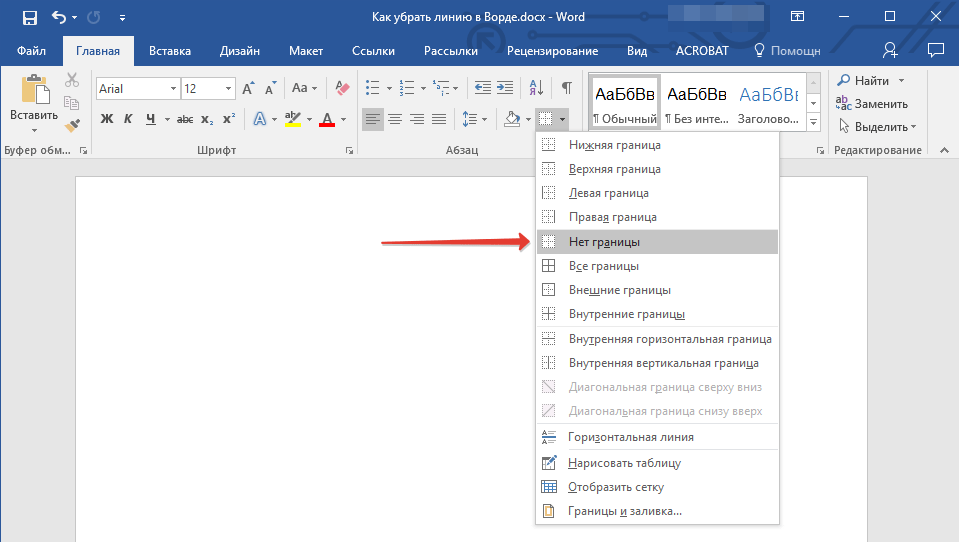
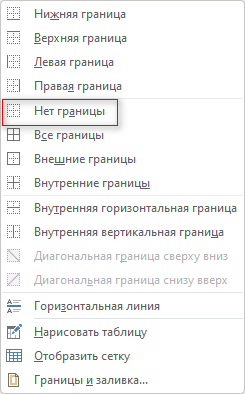
1. Откройте меню кнопки “Граница”, расположенной во вкладке “Главная”, в группе “Абзац”.
2. Выберите пункт “Нет границы”.
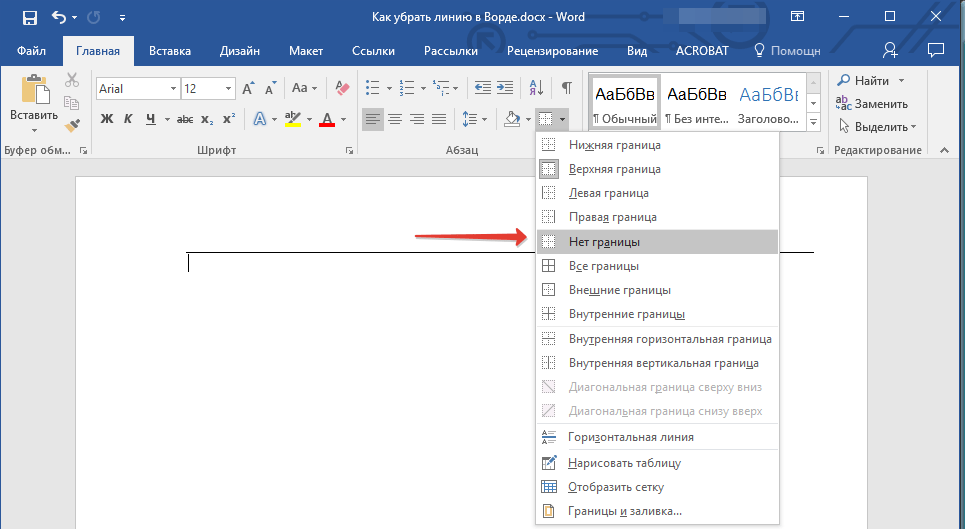
3. Линия исчезнет.
Если и это не помогло, скорее всего линия была добавлена в документ с помощью того же инструмента “Границы” только не в качестве одной из горизонтальных (вертикальных) границ, а с помощью пункта “Горизонтальная линия”.
Примечание: Линия, добавленная в качестве одной из границы, визуально выглядит немного жирнее линии, добавленной с помощью инструмента “Горизонтальная линия”.
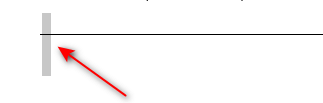
1. Выделите горизонтальную линию, кликнув по ней левой кнопкой мышки.
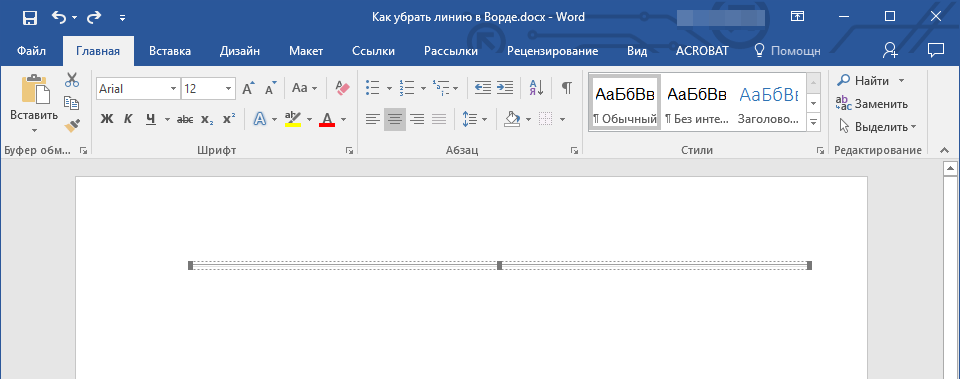
2. Нажмите кнопку “DELETE”.
3. Линия будет удалена.
Убираем линию, добавленную в качестве рамки
Добавить линию в документ можно и с помощью встроенных рамок, доступных в программе. Да, рамка в Word может быть не только в виде прямоугольника, обрамляющего лист или фрагмент текста, но и в виде горизонтальной линии, расположенной в одном из краев листа/текста.
Уроки:
Как в Ворде сделать рамку
Как удалить рамку
1. Выделите линию с помощью мышки (визуально выделится только область над ней или под ней, в зависимости от того, в какой части страницы эта линия расположена).
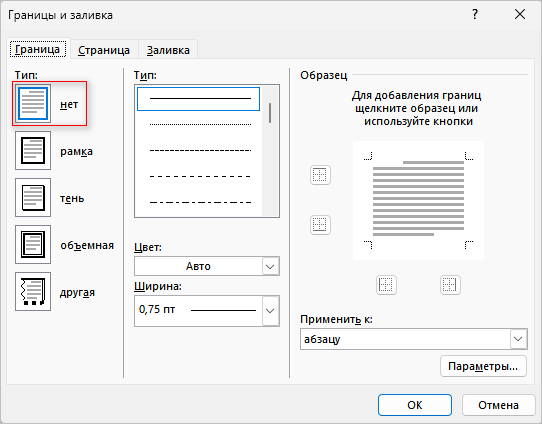
2. Разверните меню кнопки “Граница” (группа “Абзац”, вкладка “Главная”) и выберите пункт “Границы и заливка”.
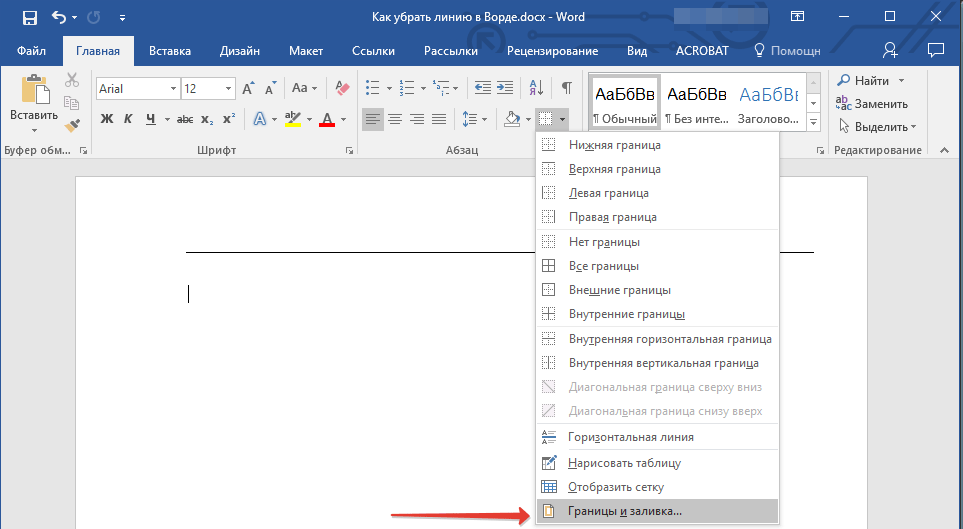
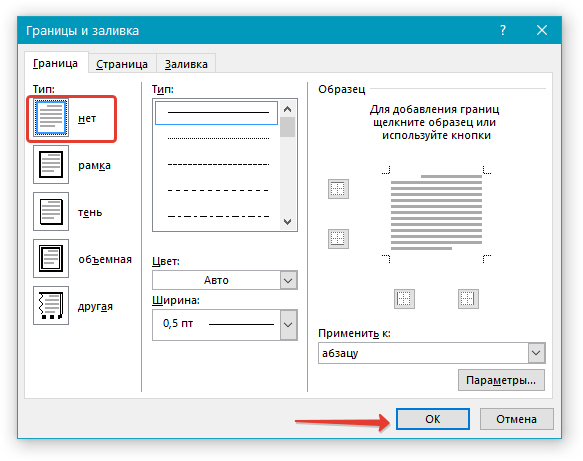
3. Во вкладке “Граница” открывшегося диалогового окна в разделе “Тип” выберите “Нет” и нажмите “ОК”.
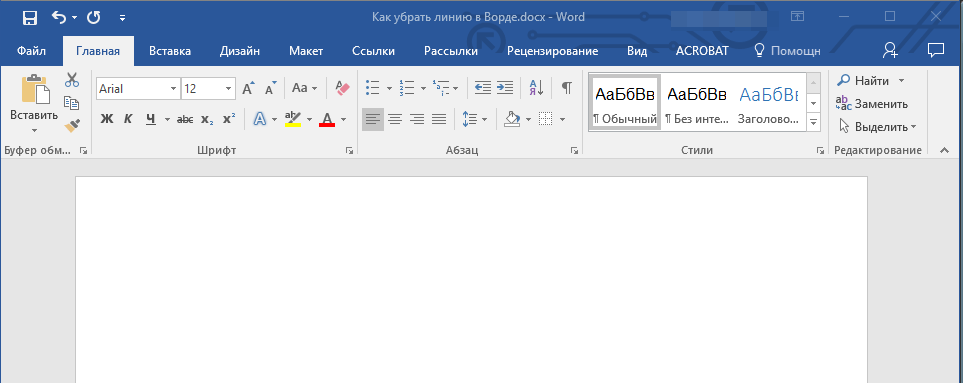
4. Линия будет удалена.
Убираем линию, созданную форматом или автозаменой символов
Горизонтальную линию, добавленную в Word из-за неправильного форматирования или автозамены после трех нажатий символов “-”, “_” или “=” и последующего нажатия клавиши “ENTER” выделить невозможно. Чтобы удалить ее выполните следующие действия:
Урок: Автозамена в Ворде
1. Наведите указатель курсора на эту линию, чтобы в самом ее начале (слева) появился символ “Параметры автозамены”.
2. Разверните меню кнопки “Границы”, которая находится в группе “Абзац”, вкладка “Главная”.
3. Выберите пункт “Нет границы”.
4. Горизонтальная линия будет удалена.
Убираем линию в таблице
Если ваша задача — убрать линию в таблице в Ворде, необходимо просто объединить строки, столбцы или ячейки. О последнем мы уже писали, объединить столбцы или строки можно походим способом, более подробно о котором мы и расскажем ниже.
Уроки:
Как в Word сделать таблицу
Как объединить ячейки в таблице
Как добавить строку в таблицу
1. Выделите с помощью мышки две соседних ячейки (в строке или столбце) в ряду, линию в котором вы хотите удалить.
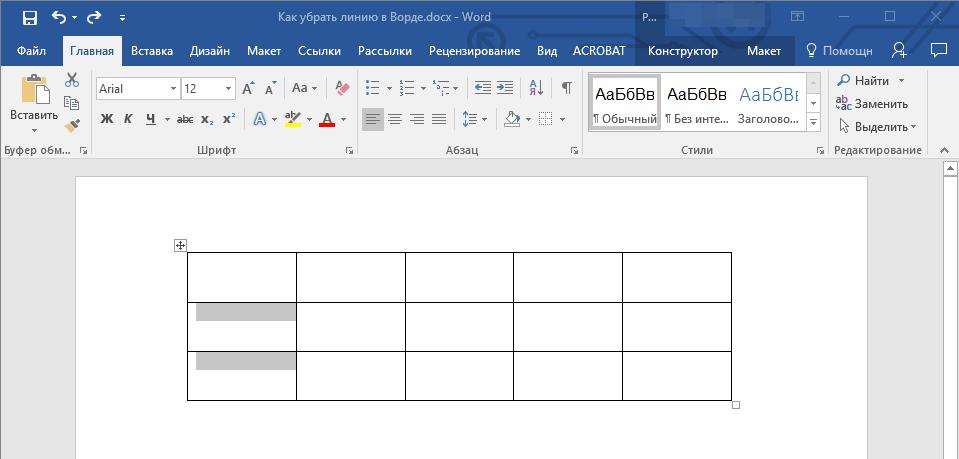
2. Кликните правой кнопкой мышки и выберите пункт “Объединить ячейки”.
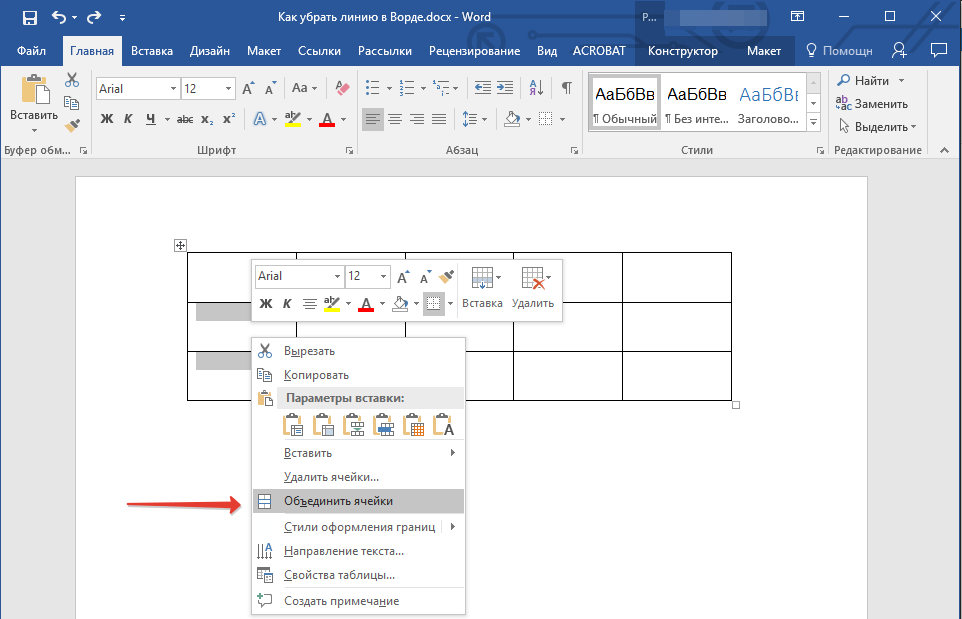
3. Повторите действие для всех последующих соседних ячеек строки или столбца, линию в которых вы хотите удалить.
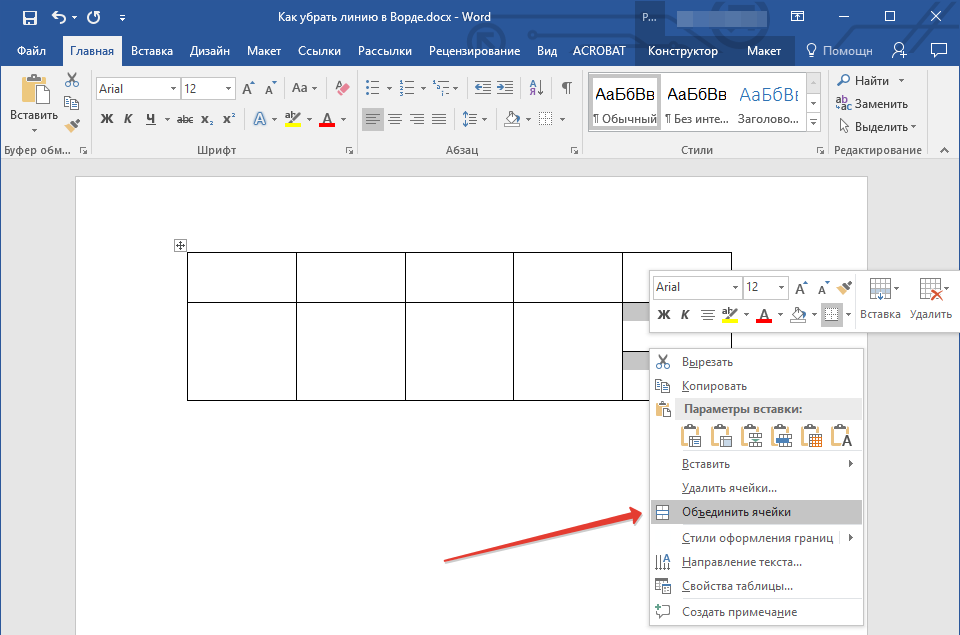
Примечание: Если ваша задача — удалить горизонтальную линию, необходимо выделять по паре соседствующих ячеек в столбце, если же вы хотите избавиться от вертикальной линии, выделять нужно по паре ячеек в строке. Сама же линия, которую вы планируете удалить, будет находится между выделенных ячеек.
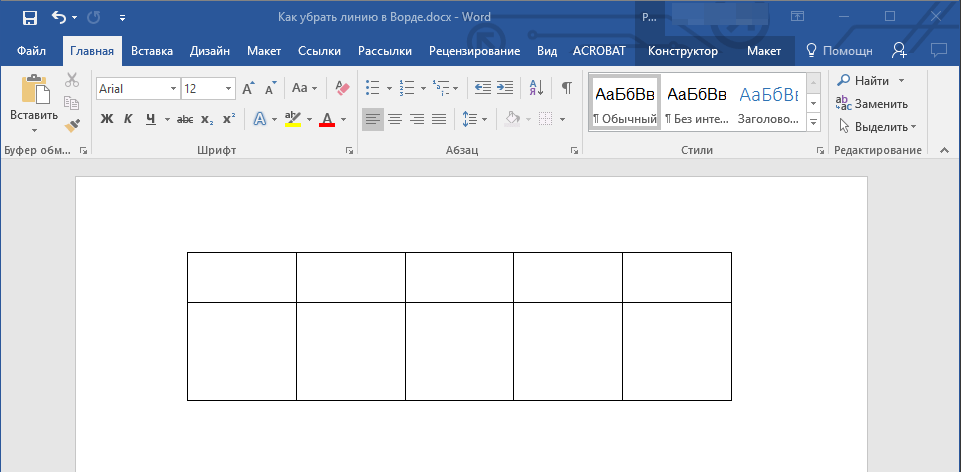
4. Линия в таблице будет удалена.
Вот и все, теперь вы знаете обо всех существующих методах, с помощью которых можно удалить линию в Ворде, вне зависимости от того, как она появилась в документе. Желаем вам успехов и только положительных результатов в дальнейшем изучении возможностей и функций этой продвинутой и полезной программы.
В некоторых случаях во время редактирования документа Word пользователям необходимо знать, как убрать горизонтальную линию в Ворде. Это требуется, когда подобный элемент дизайна не всегда бывает уместным.
Горизонтальная линия в Ворде добавляется несколькими способами, когда в текстовый документ вводится длинная строка в виде линии. Большинство пользователей используют эту горизонтальную линию в качестве заголовка или разделителя для удобства чтения и оформления в документе.
Содержание:
- Как убрать горизонтальную линию в Word с помощью функции отмены
- Простое удаление горизонтальной линии
- Как в Ворд удалить горизонтальную линию с помощью удаления границы
- Как убрать горизонтальную линию в Word с помощью границы страницы
- Нестандартные способы удаления линии
- Как отключить автоматическое создание горизонтальных линий
- Выводы статьи
- Как удалить горизонтальную линию в Word (видео)
Горизонтальная линия иногда появляется в документе автоматически, даже если вы этого не хотели. Возможно, вы сами поместили линию, чтобы ваш документ выглядел привлекательнее.
Но удалить строку с линией не так просто, как ввести ее в документ. Часто в Word горизонтальная линия сразу не удаляется по разным причинам.
Это зависит от способа, с помощью которого линия была вставлена в текущий документ. Дело в том, что существуют разные методы добавления горизонтальной линии в Word, которые существенно отличаются друг от друга.
Горизонтальные линии добавляются в документ Word, в основном, следующими способами:
- Линии, автоматически вставленные с помощью ввода нескольких символов.
- Линия, начерченная с помощью инструмента «Границы».
- Нарисованные линии с помощью функции «Фигура».
- Линии, возникшие в результате неправильного форматирования.
Вы можете прочитать подробную статью, которая размещена на этом сайте, о разных способах добавления горизонтальной линии в документ Word.
Из-за различий методов вставки линии в содержимое документа, иногда не удаляется горизонтальная линия в Ворде. Это значит, что вам потребуется использовать несколько вариантов, чтобы получить благоприятный результат.
В этом руководстве мы расскажем, как удалить горизонтальную линию в Word несколькими способами, а также, как отключить автоматическое размещение линий границ в Word с помощью функции автоформата.
Как убрать горизонтальную линию в Word с помощью функции отмены
Если вы уже изменяли и сохраняли документ Word, то этот метод не подходит для удаления горизонтальной линии. Этот способ можно использовать только в том случае, если последним, что вы сделали, было введение горизонтальной линии в документ.
Примените один из следующих способов:
- Нажмите одновременно на клавиши клавиатуры «Ctrl» + «Z».
- Нажмите значок «Отменить ввод» с изогнутой стрелкой, размещенный на панели быстрого доступа в верхнем левом углу окна программы.
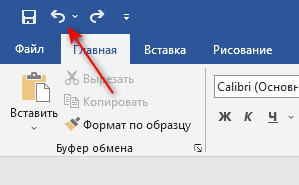
Для полного удаления линии может потребоваться несколько нажатий на клавиши или кнопку отмены ввода, если сразу вся линия не удаляется.
Простое удаление горизонтальной линии
Этим способом можно удалить нарисованную линию и линию, добавленную в документ с помощью функции вставки горизонтальной линии.
Выполните следующие действия, чтобы удалить нарисованную горизонтальную линию:
- Щелкните по линии, которую вы хотите удалить, после чего она выделится.
- Нажмите на клавишу «Del».
Вместо клавиши «Del» можно использовать функцию «Вырезать» из контекстного меню правой кнопки мыши.
Для удаления линии, добавленной с помощью функции «Горизонтальная линия», сделайте следующее:
- Щелкните по линии левой кнопкой мыши для выделения этого элемента.
- Нажмите на клавишу «Del».
Как в Ворд удалить горизонтальную линию с помощью удаления границы
Инструмент «Граница» используется для редактирования и ввода границ на страницах документа Word. Следовательно, вы можете удалить горизонтальную линию с помощью этой функции.
Мы покажем три варианта действий, которыми вы можете воспользоваться.
1 способ:
- Откройте документ Word.
- Щелкните мышью чуть выше начала горизонтальной линии.
- Во вкладке «Главная» перейдите в группу «Абзац».
- Щелкните по стрелке около кнопки «Границы».
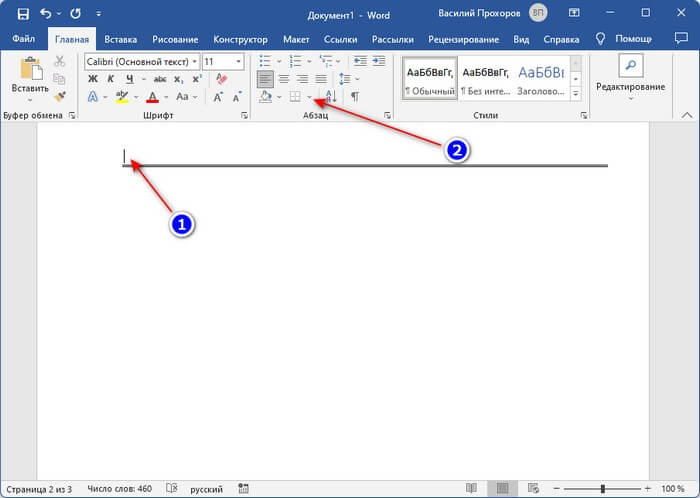
- В выпадающем списке нажмите «Нет границы».
2 способ:
- В окне открытого документа Word нажмите на клавиши «Ctrl» + «A», чтобы выделить все содержимое документа.
- Во вкладке «Главная» нажмите на стрелку около значка «Границы» в группе «Абзац».
- В открывшемся меню выберите «Нет границы».
Этот метод подходит для удаления всех линий из документа Word, кроме нарисованных и вставленных с помощью функции «Горизонтальная линия».
3 вариант:
- Выделите абзацы выше и ниже линии. Выделение произойдет вместе с линией.
- Во вкладке «Главная» в группе «Абзац» щелкните по стрелке около иконки «Границы».
- В открывшемся списке нажмите на пункт «Нет границы».
Как убрать горизонтальную линию в Word с помощью границы страницы
Вы также можете использовать функцию границы страницы в MS Word, чтобы удалить горизонтальную линию, поскольку она также действует как граница для разделения вашего документа.
Выполните следующие действия:
- Щелкните по строке над горизонтальной линией.
- Выделите горизонтальную линию, перетащив курсор на строку под линией.
- Перейдите на вкладку «Конструктор» («Дизайн» в некоторых версиях Word).
- Щелкните по кнопке «Границы страницы» в группе «Фон страницы».
- В открывшемся окне «Границы и заливка» войдите во вкладку «Граница».
- В опции «Тип:» выберите «нет».
- Нажмите на кнопку «ОК».
Если не получается применить предыдущий способ, выполните следующее:
- Выделите участок текста вместе с линией.
- Войдите во вкладку «Конструктор» (Дизайн).
- В группе «Фон страницы» нажмите на значок «Границы страницы».
- В окне «Границы и заливка» откройте вкладку «Граница».
- Сначала нажмите «нет» в типе границы, а затем «ОК».
Нестандартные способы удаления линии
Прочитайте про несколько вариантов удаления горизонтальной линии из документа Word, которая добавилась туда из-за неправильного форматирования.
В некоторых случаях разделительные линии образованы сносками, которые имеются в данном документе. Для удаления разделителя сноски используйте совет из другой статьи.
Если вам важнее удалить линию, чем сохранить исходное форматирование документа, используйте этот метод:
- Выделите текст вместе с линиями в документе Word.
- Нажмите на клавиши «Ctrl» + «X», чтобы вырезать это содержимое.
- Откройте программу Блокнот, а затем нажмите на клавиши «Ctrl» + «V», чтобы вставить скопированное.
- Снова переместите содержимое из Блокнота в файл Word, выбрав в параметрах вставки «Сохранить только текст».
- Линии исчезнут из вашего документа.
Иногда помогает такой вариант:
- Выделите текст и прилегающую линию.
Можно выделить весь документ, но тогда не сохранится форматирование.
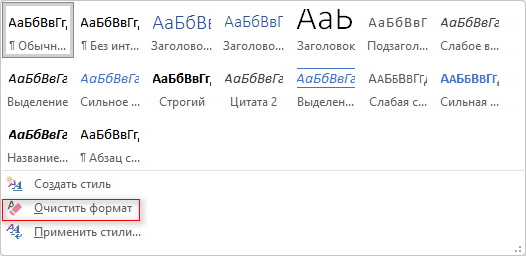
- Во вкладке «Главная», в группе «Стили» нажмите на стрелку в правом нижнем углу этого раздела.
- В окне «Стили» нажмите «Очистить все».
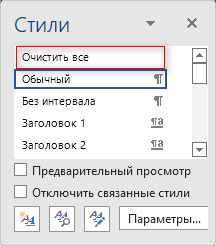
Или нажмите на стрелку «Дополнительные параметры», а в открывшемся меню выберите «Очистить формат».
Как отключить автоматическое создание горизонтальных линий
Автоматическое создание линий с помощью ввода символов помогают пользователям быстро оформить документ. Но бывают ситуации, когда эта функция мешает правильному форматированию документа.
Если вы не хотите, чтобы линии границ появлялись автоматически при обычном вводе текста, вы можете отключить эту функцию.
Пройдите шаги, чтобы отключить автоматические линии границ в Word:
- Откройте программу Word, нажмите на меню «Файл».
- Из боковой панели откройте «Параметры».
- В окне «Параметры Word» перейдите во вкладку «Правописание».
- Нажмите на кнопку «Параметры автозамены…».
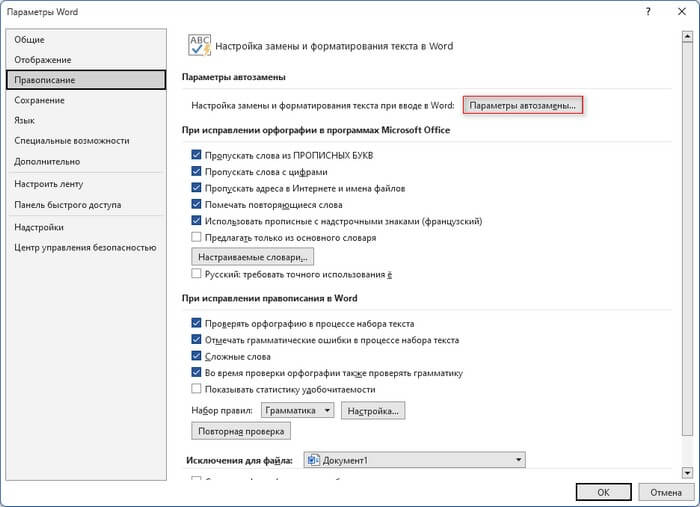
- В окне «Автозамена» войдите во вкладку «Автоформат при вводе».
- В разделе «Применять при вводе» снимите флажок в опции «Линии границ».
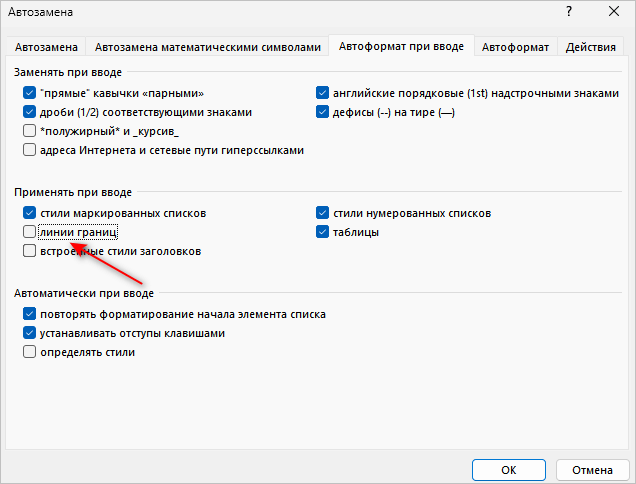
- Нажмите на кнопку «ОК» в этом и в следующем окне.
Вы можете в любой момент снова включить эту функцию, чтобы использовать функцию автоформата при вводе линий границ в приложении Microsoft Word.
Выводы статьи
В документах Word используются горизонтальные линии для удобства чтения или привлекательности. Если подобные линии вам не нужны, их можно удалить из документа. Из-за неправильного форматирования, не у всех пользователей сразу получается удаление ненужных линий. Некоторые типы линий удаляются просто, а в более сложных случаях необходимо использовать методы, описанные в этой статье.
Как удалить горизонтальную линию в Word (видео)
Похожие публикации:
- Как сделать междустрочный интервал в Word — 4 способа
- Как убрать красные подчеркивания в Word — 3 способа
- Как сделать обтекание текстом в Word — 3 способа
- Как сделать примечание в Word
- Голосовой набор текста в Word — 3 способа

Manually removing extra blank lines from a Microsoft Word document is tedious. Luckily, a feature built into Word can remove all empty lines at once. Here’s how to do it.
How Blank Lines Work in Microsoft Word
Microsoft Word adds a hidden tag (called a “paragraph tag”) to the end of each line whenever you hit Enter. You can see these tags in your document by clicking the paragraph icon (which looks like a backward “P” with two lines) in the “Home” tab of Word.

Using “Find and Replace” in Word, you can replace those double paragraph tags with a single tag. That removes the extra empty lines from your document.
How to Delete Extra Blank Lines in a Word Document
To start removing empty lines, open your document with Microsoft Word. Click “Home” in the menu and then select “Replace” on the right of the screen.
The “Find and Replace” window will open. Click the “Find What” box and type this:
^p^p
Each “^p” is a special code that stands for the paragraph tag. We’re going to replace instances of two-paragraph tags in a row with a single paragraph tag. In the “Replace With” box, type this:
^p
Then click “Replace All” at the bottom of the window.
After you click, all the blank lines will be removed from your document. When you see the confirmation pop-up, click “OK.”
If you still see any blank lines, that’s because there were more than two consecutive blank lines in place. In this case, click “Replace All” in the “Find and Replace” window again until all the extra lines are removed (or you can experiment with the number of “^p” codes that you find and replace until your needs are met).
When you’re all done, close the “Find and Replace” window. If you ever get annoyed with horizontal lines automatically appearing in Word when you type certain characters, you can replace those, too.
RELATED: How to Remove Automatic Horizontal Lines in Word
READ NEXT
- › How Long Do CDs and DVDs Last?
- › This New Google TV Streaming Device Costs Just $20
- › How to Adjust and Change Discord Fonts
- › HoloLens Now Has Windows 11 and Incredible 3D Ink Features
- › Google Chrome Is Getting Faster
- › Liquid Metal vs. Thermal Paste: Is Liquid Metal Better?
How-To Geek is where you turn when you want experts to explain technology. Since we launched in 2006, our articles have been read billions of times. Want to know more?
Horizontal lines in Microsoft Word don’t count as characters, so getting rid of them can be challenging—unless you use this tip!

If you want to split up a Microsoft Word document with simple dividers for readability, all you have to do is type three hyphens and press Enter for a long horizontal line to appear.
However, once it’s there, getting rid of it can prove challenging. You’d think using the Delete or Backspace keys would work, but they don’t—you seem to be stuck with that line. Don’t worry, though. Here’s how to remove a line in Microsoft Word.
How to Delete a Horizontal Line in Microsoft Word
While you can’t use the Backspace or Delete keys to get rid of it, you can still delete that line:
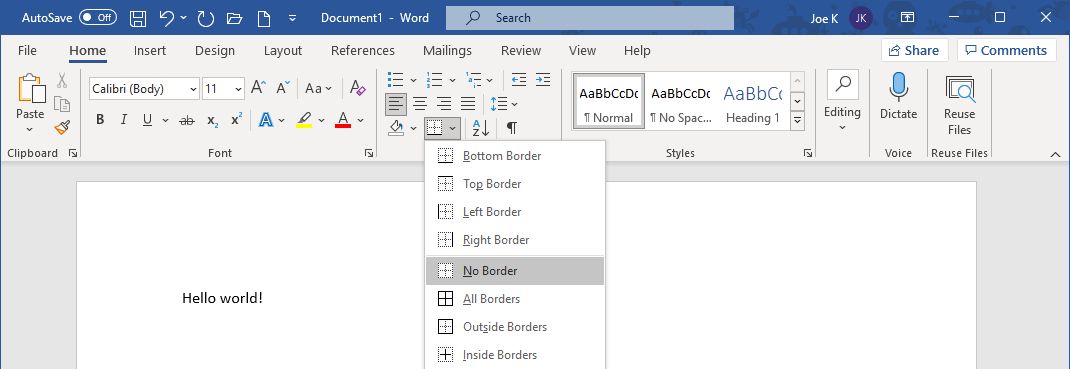
- Click directly above the line.
- Go to the Home tab in the Ribbon.
- Within the Paragraph section, click the dropdown arrow next to the Borders icon and select No Border.
How to Stop Word Automatically Creating a Horizontal Line
You might not want Word to automatically create a horizontal line when you type three dashes. If that’s the case, here’s how to disable that feature:
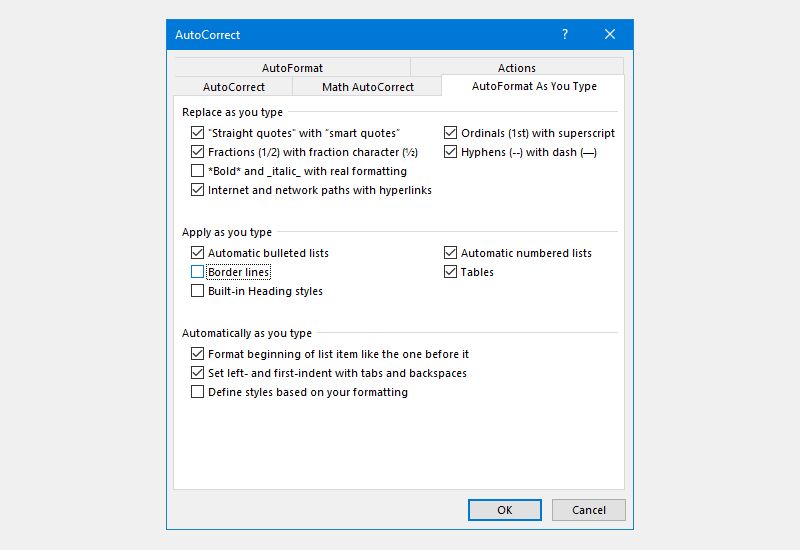
- Go to File > Options > Proofing > AutoCorrect Options > AutoFormat As You Type.
- Beneath Apply as you type, remove the tick from Border lines.
- Click OK.
How to Insert a Horizontal Line in Microsoft Word
If you want an alternative method to insert a horizontal line in Word, and one that is more obvious to delete, here’s how:
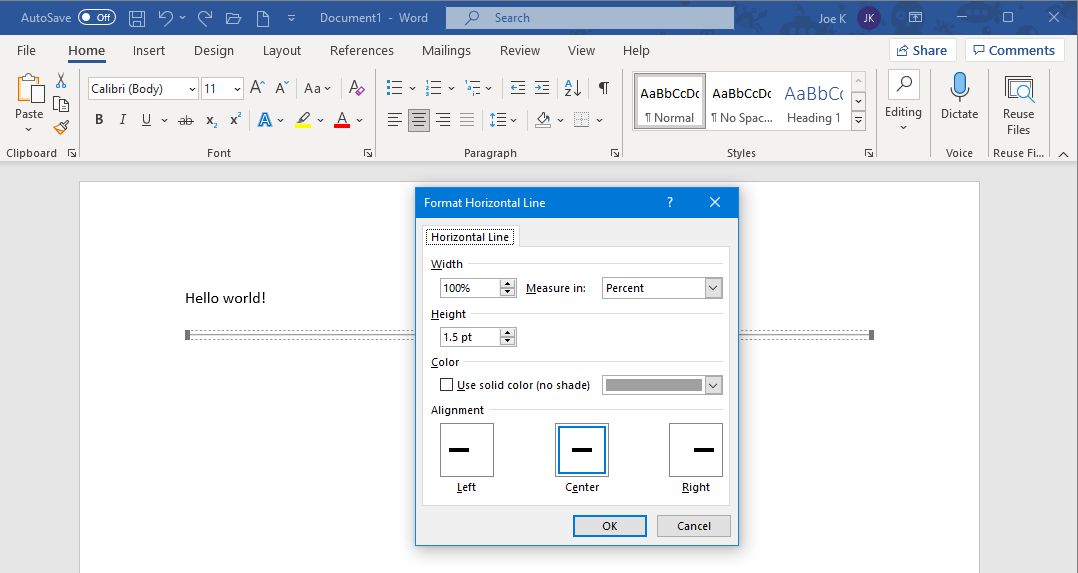
- Click where you want to place the line.
- Go to the Home tab in the Ribbon.
- Within the Paragraph section, click the dropdown arrow next to the Borders icon and select Horizontal Line.
- Double click the newly inserted line to format it, like adjusting width, height, and color.
If you ever need to remove the line, all you need to do is click on it and press the Delete or Backspace key.
There are numerous ways to insert lines into Microsoft Word, so be sure to check them all out.
Now you know how easy it is to remove a horizontal line in Word. This is just the tip of the iceberg when it comes to the great hidden features of Microsoft Word; it has plenty of advanced tools just waiting to be discovered, so don’t be afraid to experiment.
Contents
- 1 How to Remove an Automatic Horizontal Line in Word
- 2 Extra: How to Clear Formatting in Word
- 3 Extra: How to Delete Extra Pages in Word
Microsoft Word has several features to speed up your word processing experience, from hotkeys to autocorrect. One feature that’s particularly contentious, though, is the automatic insertion of a horizontal line when you type —, ===, or ___. Today we’re going to show you how to remove these lines in Word and how to stop it from happening again.
The first thing you should know is that when you accidentally insert a line in Word, you can always undo it with Ctrl + Z. If you press Enter immediately after that, Word shouldn’t create the line again.
If you use the symbols above a lot, though, you’re going to waste a lot of time undoing and not a lot of time actually writing. Before we can stop this from happening, though, you need to understand how the line is inserted in the first place.
Below, you’ll be showing you this, and in the process another method to delete a horizontal line in Word. We’ll then move on to how you can adjust your preferences to disable the feature:
When Word inserts a horizontal line, it doesn’t use the shape tool as you might expect. Instead, it inserts a border line at the location you pressed Enter. We can remove this border line in Word to get rid of the horizontal line. In settings, we can then disable automatic border lines to stop this behavior. Here’s how:
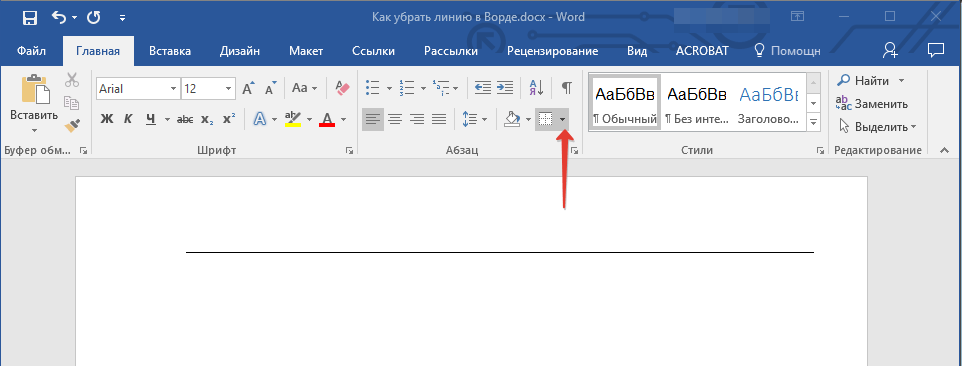
- Place your cursor above the horizontal line in Word and press the border line icon
You’ll find the border line icon in the “Home” tab of your ribbon, in the bottom middle row of the “Paragraph” section.

- Select “No Border” from the list
Pressing the No Border button will delete the horizontal line in Word immediately. You can now move on to disabling the automation insertion feature.

- Click “File” in the top-left corner

- Press “More… > Options” in the File menu

- Click “Proofing” in the sidebar, then “AutoCorrect Options…” in the main pane

- Open the “AutoFormat As You Type” tab and untick “Border lines” and press “OK”

- Press “OK” at the bottom of the main options window

- Type ‘—‘ and check whether the line is inserted


A blank page may be useful if you’re planning to continue your document, but it can look very unprofessional when you’re sending off a finished document and you might want to delete it. We show you a few different ways to delete a page in Word.

If you pasted text into your document from the internet or another document, you may find it necessary to learn how to clear formatting in Word. You can do this for an entire document or just a certain section that’s causing you trouble.
![]()
Insert Lines in Microsoft Word Documents
by Avantix Learning Team | Updated October 9, 2021
Applies to: Microsoft® Word® 2010, 2013, 2016, 2019 and 365 (Windows)
You can insert a line in Word using the Ribbon or by using keyboard shortcuts. It’s best to avoid drawing lines and instead insert border lines in Microsoft Word (normally paragraph borders) so the line or lines will move as you edit the document.
In this article, we’ll focus on inserting lines using borders attached to paragraphs. In Microsoft Word, anything with a hard return after it is a paragraph. If you use border lines, you can customize the type of border, line thickness and color. You can also include paragraph border lines in styles so they will appear throughout your document. If you draw lines using Insert Shapes, you’ll have to worry about the line being inline or floating.
You can insert a line in Word in 3 ways using borders:
- Use the Borders command on the Home tab in the Ribbon
- Select and apply different types of lines using the Borders and Shading dialog box
- Insert different types of lines using keyboard shortcuts (which add lines using AutoCorrect)
Recommended article: How to Keep Text Together in Microsoft Word
Do you want to learn more about Microsoft Word? Check out our virtual classroom or live classroom Word courses >
Inserting a line using the Borders button
To insert a line in Word above and / or below a paragraph using the Borders button:
- Select the paragraph(s) to which you want to add a line.
- Click the Home tab in the Ribbon.
- Click Borders in the Paragraph group. A drop-down menu appears.
- Select the line you want to use.
Below is the Borders command in the Ribbon in Word:
![]()
Removing lines using the Borders command
To remove a border line or lines from one or more paragraphs:
- Select the paragraph(s) with the border lines you want to remove.
- Click the Home tab in the Ribbon and then click Borders. A drop-down menu appears.
- Choose No Border from the drop-down menu.
Inserting a line using the Borders and Shading dialog box
You can apply a line or custom border lines to one or more paragraphs using the Borders and Shading dialog box.
To insert a line in Word above and / or below a paragraph using the Borders and Shading dialog box:
- Select the paragraph(s) to which you want to add a line.
- Click the Home tab in the Ribbon.
- Click Borders in the Paragraph group. A drop-down menu appears.
- Select Borders and Shading. A dialog box appears.
- Select a border style, color and width.
- Click between the guides in the sample area on the right (above or below the sample).
- Click Options (if required), enter any offset amounts to control the distance between the line and the paragraph and click OK.
- In Apply to, ensure Paragraph is selected.
- Click OK.
Below is the Borders and Shading dialog box where you can add a line or lines to paragraphs:

Removing lines using the Borders and Shading dialog box
To remove lines from one or more paragraphs using the Borders and Shading dialog box:
- Select the paragraph(s) with the lines you want to remove.
- Click the Home tab in the Ribbon and click Borders. A drop-down menu appears.
- Select Borders and Shading. A dialog box appears.
- Click None in the Setting area.
- In Apply to, ensure Paragraph is selected.
- Click OK.
Inserting a line using keyboard shortcuts
You can also insert a horizontal line using keyboard shortcuts (which insert border lines as AutoCorrect entries).
Type the following characters and then press Enter or Return to insert lines:
- To insert a plain single line, type three hyphens (—).
- To insert a plain double line, type three equal signs (===).
- To insert a dotted line, type three asterisks (***).
- To insert a bold single line, type three underlines (___).
- To insert a wavy line, type three tildes (~~~).
- To insert a triple line, type three number signs or hash tags (###).
To remove these lines, select the paragraph with the line, click the Borders button on the Home tab and select No Border.
Subscribe to get more articles like this one
Did you find this article helpful? If you would like to receive new articles, join our email list.
More resources
How to Double Space in Word (4 Ways)
14 Shortcuts to Quickly Select Text in Microsoft Word
4 Ways to Insert or Type the Pound Symbol in Word (£)
How to Create a Hanging Indent or First Line Indent in Microsoft Word
How to Insert an Em or En Dash in Microsoft Word (4 Ways with Shortcuts)
Related courses
Microsoft Word: Intermediate / Advanced
Microsoft Excel: Intermediate / Advanced
Microsoft PowerPoint: Intermediate / Advanced
Microsoft Word: Long Documents Master Class
Microsoft Word: Styles, Templates and Tables of Contents
Microsoft Word: Designing Dynamic Word Documents Using Fields
VIEW MORE COURSES >
Our instructor-led courses are delivered in virtual classroom format or at our downtown Toronto location at 18 King Street East, Suite 1400, Toronto, Ontario, Canada (some in-person classroom courses may also be delivered at an alternate downtown Toronto location). Contact us at info@avantixlearning.ca if you’d like to arrange custom instructor-led virtual classroom or onsite training on a date that’s convenient for you.
Copyright 2023 Avantix® Learning
Microsoft, the Microsoft logo, Microsoft Office and related Microsoft applications and logos are registered trademarks of Microsoft Corporation in Canada, US and other countries. All other trademarks are the property of the registered owners.
Avantix Learning |18 King Street East, Suite 1400, Toronto, Ontario, Canada M5C 1C4 | Contact us at info@avantixlearning.ca