
Bottom Line: Learn 5 different techniques to find and remove spaces in Excel. Spaces can cause formula errors and frustration with data preparation and analysis.
Skill Level: Intermediate
Watch the Tutorial
Download the Excel File
You can download the workbook that I use in the video, including the macro I wrote to remove blank spaces.
Space Hunting
Blank spaces can be a headache for data analysts and formula writers. That’s because they are not easy to spot, yet can cause frustrating calculation errors.
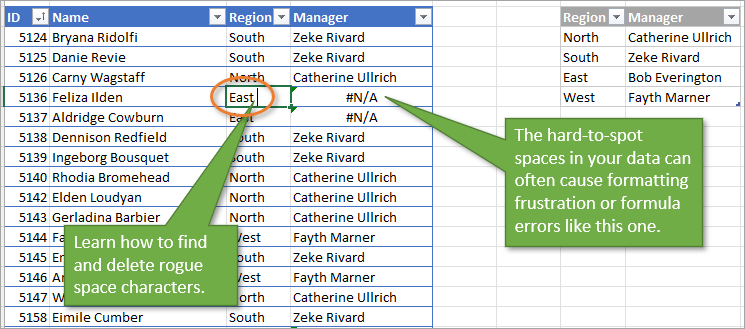
After many years of working with Excel, I’ve become a Space Hunter. That sounds like a sci-fi movie title, but it’s just someone who can quickly locate and delete superfluous spaces in cell values.
Based on my space hunting experience, here are five techniques I use frequently to clean up data.
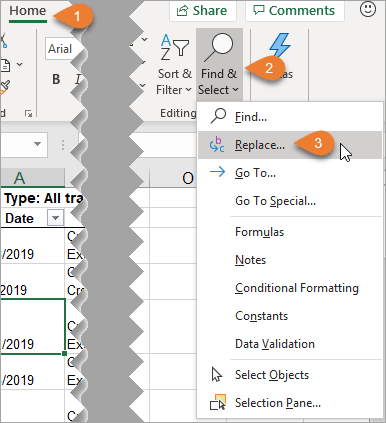
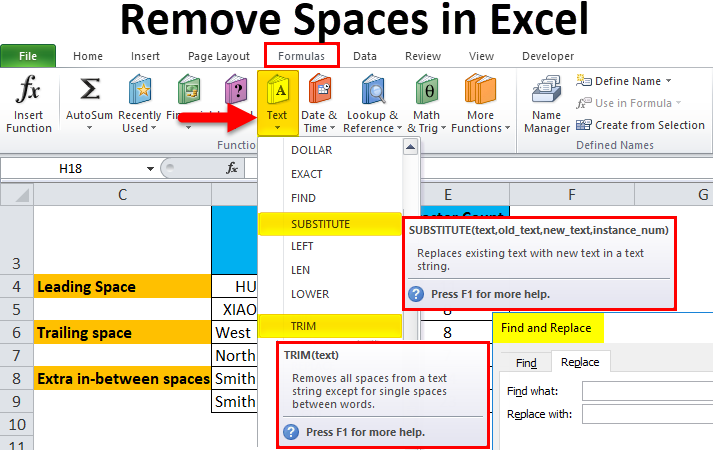
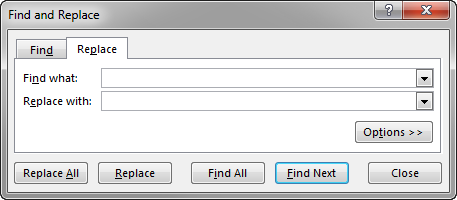
1. Find & Replace
The first method for space hunting is to use the Find & Replace feature.
After highlighting the cells that you want to search through, go to the Home tab. Then open the Find & Select dropdown menu. Select the Replace option. The keyboard shortcut for this is Ctrl + H.
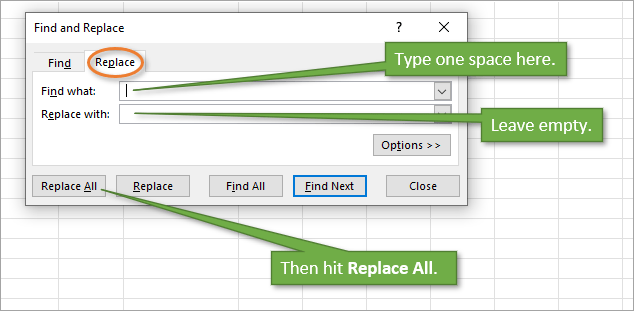
That will bring up the Find and Replace window. On the Replace tab, place one blank space in the Find what field. Make sure there is nothing in the Replace with field. Hitting Replace All (keyboard shortcut: Alt+A) will remove any instances of a space in the data set that you selected.
Although this method is really quick and easy, it’s only useful for data where you want ALL spaces removed. However, there are times when you want to keep spaces between words. For example, if your cells contain both first and last names, you will probably want to keep the space in between those names.
That scenario leads us to our second method for space hunting.
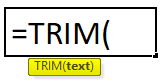
2. The TRIM Function
The TRIM function removes all spaces in a text string, except for single spaces between words.
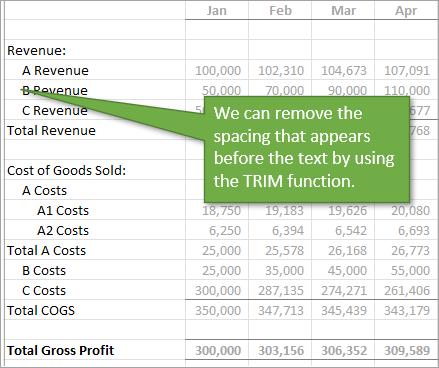
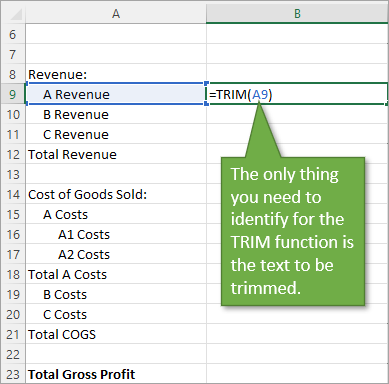
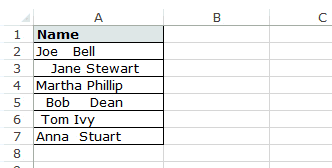
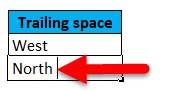
Below is an example of a report where some of the cells look like they are indented but the indentation is actually just extra spaces. Let’s say we want to remove those spaces for uniformity’s sake. We can use the TRIM function to do that.
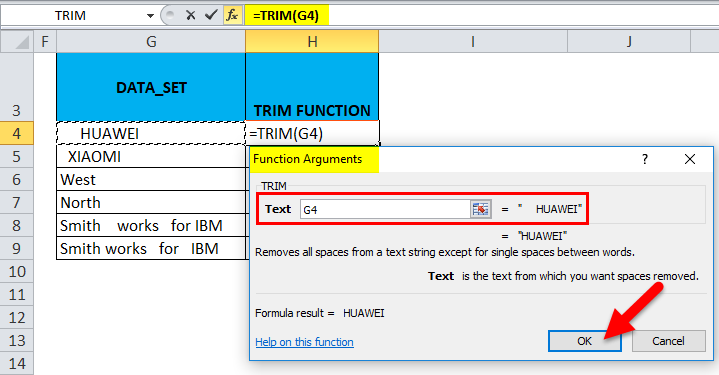
In a blank column, start by typing the equals sign (=) and the word TRIM, then tab into the TRIM function.
The only thing you need to identify for the TRIM function to work is the text that needs trimming. So either type the name of the cell or click on the cell that you want to trim and hit Enter. This will return the result you’re looking for: text with no spaces before or after it.
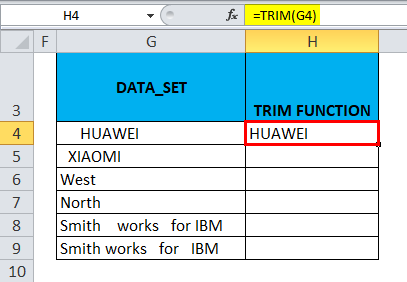
When you copy the formula down for the whole column, the result looks like this.
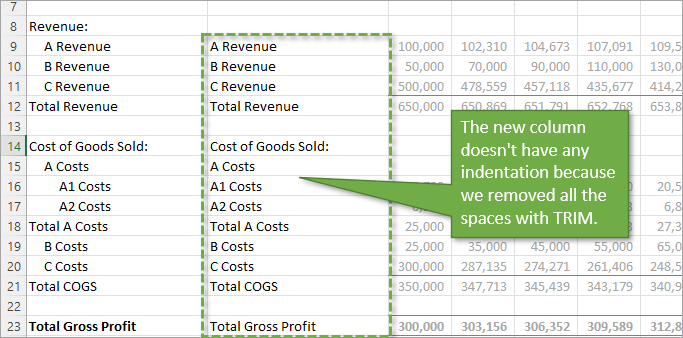
As you can see, the spacing between the words remains in place, but any spacing before or after the text is removed.
With this method, we had to create a whole new column, so you would have to add the additional step of replacing the original column with the new one using Copy and Paste Values. You can then delete the column with the formulas.
3. Power Query
Like functions and formulas, queries can also be tripped up by the inclusion of a stray blank space.
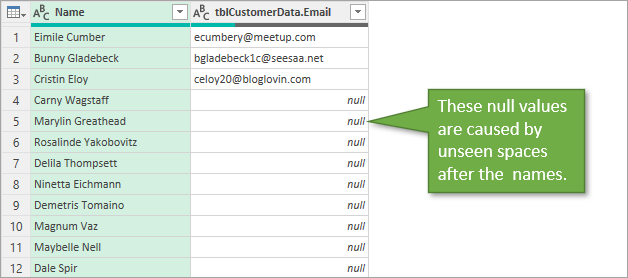
If you are unsure if blank spaces are what’s causing the problem, you can click into the Editor’s preview to see if there is a space or not.

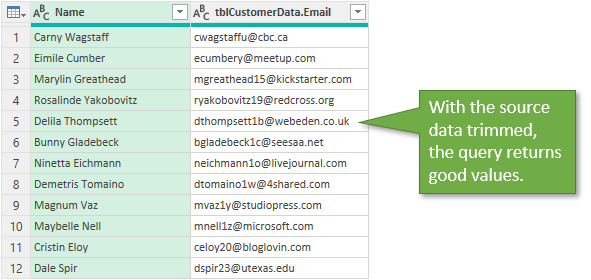
To remove the spaces, Power Query has a Trim feature found in the right-click menu. With the column that you want to fix selected, just right-click and choose Transform, and Trim.

This trims all the blank space before/after the text string so that the query will return the correct values.
If you are relatively new to Power Query, or could use a refresher, I recommend checking out my free webinar: The Modern Excel Blueprint.

4. Macros and VBA
Let’s look at the same example we used for the TRIM function, but this time we will use a macro to trim extra spaces from text.
Start by opening the VB Editor. Go to the Developer tab and select the Visual Basic Button. The keyboard shortcut is Alt + F11.
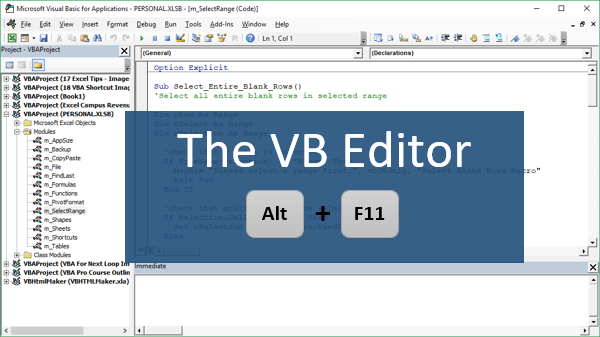
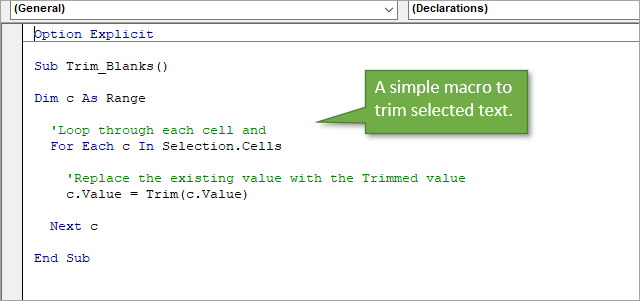
I’ve written a simple macro that loops through each cell and replaces the value of the cell with the trimmed value. If you’d like to copy this macro, you can find it in the download file at the top of this post.
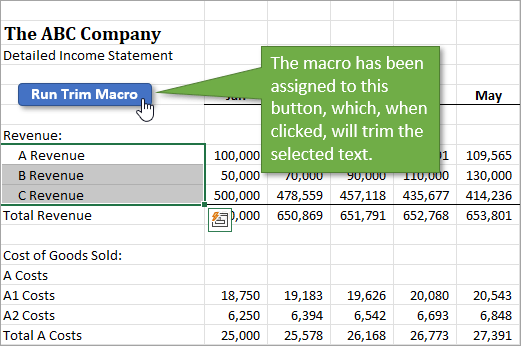
One of the benefits of using a macro is that you can assign it to a button. Here I’ve assigned it to a button on the actual worksheet.
And here, I’ve added it to the ribbon by including this macro in my Personal Macro Workbook and assigning a button to it.
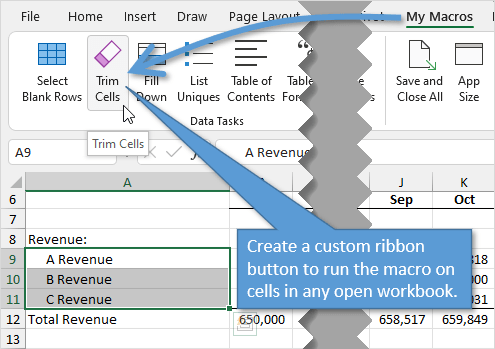
That way, I can use this macro on any workbook.
One downside to using the macro method for removing blank spaces is that you cannot undo the action once the macro has been run. In that case, it might be a good idea to save the file before running the macro, if you think you might need to un-trim the data for some reason.
It’s also important to note that the VBA Trim function does NOT trim extra blank spaces between words. Excel’s TRIM function will remove additional spaces between words. So if there are two spaces between the first and last name, TRIM will remove the additional space. VBA’s Trim will not do this. It only removes spaces from the beginning or end of the string. Thanks to Marvin (an Excel Campus Community Member) for bringing this to our attention!
Here are tutorials for how to create a Personal Macro Workbook as well as how to make Macro buttons, whether on the worksheet or in the ribbon.
How to Create a Personal Macro Workbook (Video Series)
How to Create Macro Buttons in Excel Worksheets
5. Trimming Other Characters
Sometimes after you have trimmed the spaces from your text, you might still get calculation errors. One reason for this could be that another hard-to-detect character might be in play. One such character is the non-breaking space. This is often used in HTML coding ( ) and is similar to a regular space, but would not be deleted by the TRIM function or our macro.
To determine which character might be gumming up the works, you can use the CODE function. By copying and pasting the invisible character into a blank cell, and then identifying that cell’s text in the CODE function (“text” is the only argument that needs to be identified for the CODE function), you will return a code number for that character. A quick Google search of that code number will reveal what type of character you are dealing with.
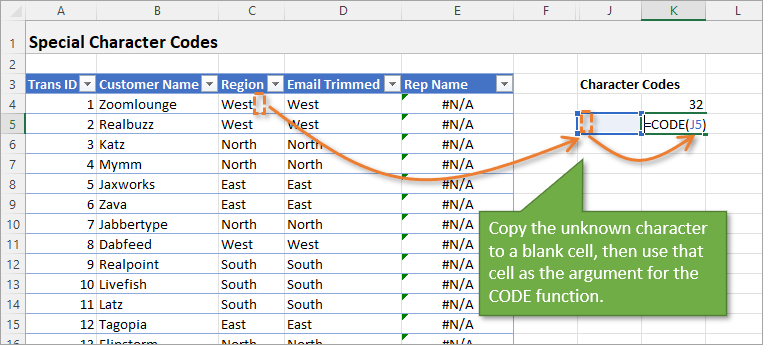
In this case, the non-breaking space character is code 160.
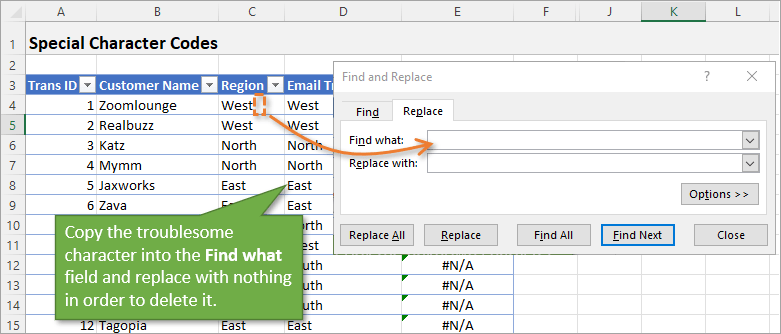
One way to remove that character from your text would be to use Find & Replace. You can simply copy the character and paste it into the Find what field.
You could also use the REPLACE function to do the same thing.
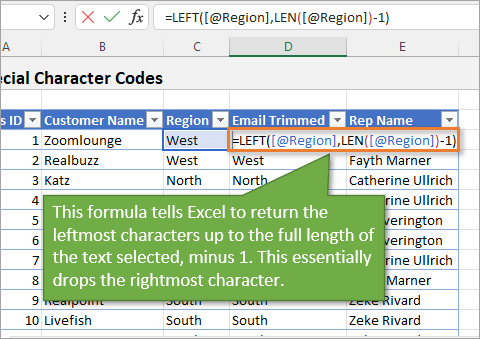
One other option, since we know we want to remove the last character in the text, would be to use the LEFT and LEN functions to essentially create a customized trim feature.
LEFT returns the leftmost characters in a cell, up to a designated amount. LEN (short for Length) returns the number of characters in a cell.
So combining those two functions and subtracting 1 from the LEN to remove that unwanted character would leave just the text without the additional character.
Conclusion
I hope this has been helpful for you. I also explain how spaces can cause errors in formulas in my video on an Introduction to VLOOKUP.
There are actually more than just five ways to go about this task, and if you’d like to add to the list, please leave a comment below. As always, you can ask questions there as well.
Thanks for following along. Until next time!
Remove Spaces in Excel
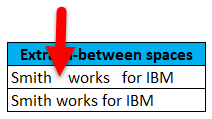
While importing or copy-pasting the data from an external source, extra spaces are also copied in Excel. This makes the data disorganized and difficult to be used. The purpose of removing unwanted spaces from the excel data is to make it more presentable and readable for the user.
For example, if a cell contains “ rose,” the leading spaces may be visible to the reader. However, if “rose ” is written in a cell, the two trailing spaces may not be easily caught by the user.
Since extra spaces may render the Excel formulas incorrect, it is essential to eliminate them.
Table of contents
- Remove Spaces in Excel
- Top 5 Methods to Remove Spaces in Excel
- #1 – TRIM Function
- #2 – “Delimited” Option of Text to Columns Wizard
- #3 – “Fixed Width” Option of Text to Columns Wizard
- #4 – Find and Replace Option
- #5 – SUBSTITUTE Function
- Frequently Asked Questions
- Recommended Articles
Top 5 Methods to Remove Spaces in Excel
The five methods to remove extra spaces in Excel are listed as follows:
- TRIM function
- “Delimited” option of text to columns wizard
- “Fixed width” option of text to columns wizard
- Find and replace option
- SUBSTITUTE function
The user can select any of the techniques depending on the requirement. Let us discuss all the methods one by one, along with examples.
You can download this Remove Spaces Excel Template here – Remove Spaces Excel Template
#1 – TRIM Function
The TRIM functionThe Trim function in Excel does exactly what its name implies: it trims some part of any string. The function of this formula is to remove any space in a given string. It does not remove a single space between two words, but it does remove any other unwanted spaces.read more removes all spaces from a text string except for the single space between the words.
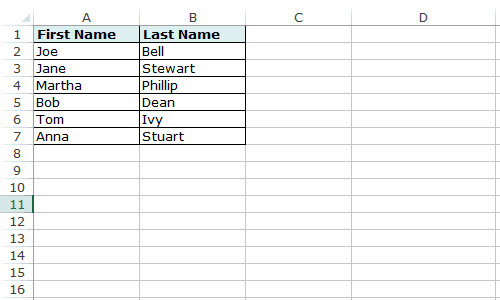
The following data contains extra spaces in column A. We want to rewrite the data without these spaces in column B with the help of the TRIM function.

Step 1: In cell B1, enter the TRIM function.

Step 2: Select the cell A1.

Step 3: Press the “Enter” key. The extra spaces from the name are removed in cell B1, as shown in the following image.

Step 4: Copy or drag the formula to the remaining cells, as shown in the following image.

#2 – “Delimited” Option of Text to Columns Wizard
The text to columnsText to columns in excel is used to separate text in different columns based on some delimited or fixed width. This is done either by using a delimiter such as a comma, space or hyphen, or using fixed defined width to separate a text in the adjacent columns.read more wizard helps remove spaces in excel by splitting the data strings into separate columns. It works on cells containing numerical and textual values.
The following data contains spaces in column A. We want to split the words of column A into separate cells in such a way that the space between the strings is eliminated.
Use the “delimited” option of the text to columns wizard.

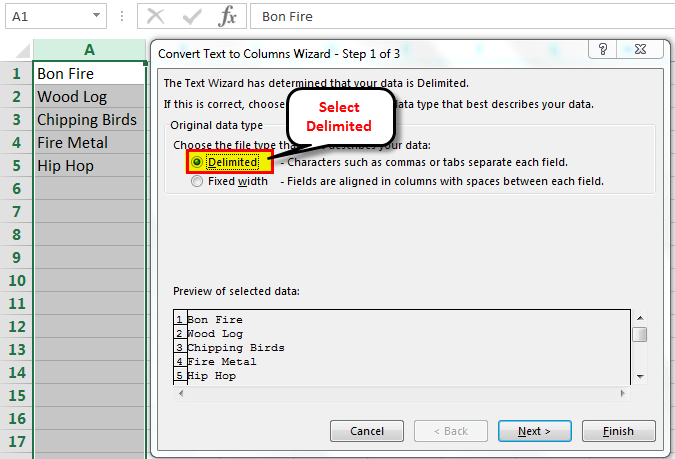
Step 1: Select column A. In the Data tab, click “text to columns” from the “data tools” group. The same is shown in the following image.

Step 2: The “convert text to columns wizard” appears, as shown in the following image. Select the option “delimited” in “choose the file type that best describes your data.” Click “next.”
Step 3: Select “space” as the delimiter and click “finish.”

Step 4: The text strings of column A are split into two columns. The second half of the strings is placed in column B. The spaces between the strings have also been removed.

#3 – “Fixed Width” Option of Text to Columns Wizard
The “fixed width” option of the text to columns wizard helps remove extra spaces from numerical and textual data in Excel. For this, all the strings before the space should contain the same number of characters.
The following data contains random text and numbers with spaces in column A. We want to remove the spaces and split the strings into two separate columns.
Use the “fixed width” option of the text to columns wizard.

Step 1: Select column A. In the Data tab, click “text to columns” from the “data tools” group. The same is shown in the following image.

Step 2: The “convert text to columns wizard” appears, as shown in the following image. Select the option “fixed width” in “choose the file type that best describes your data.” Click “next.”

Step 3: Place the cursor at the position of the space. Click “finish.”

Step 4: The strings of column A are split into two columns. The second half of the strings is placed in column B. The spaces between the strings have also been removed.

Note: The text to columns wizard (methods #2 and #3) splits the data into different columns.
#4 – Find and Replace Option
The find and replaceFind and Replace is an Excel feature that allows you to search for any text, numerical symbol, or special character not just in the current sheet but in the entire workbook. Ctrl+F is the shortcut for find, and Ctrl+H is the shortcut for find and replace.read more option helps remove spaces from numerical and textual data in Excel.
Working on the excel data under the heading “TRIM function” (method #1), we want to remove spaces with the find and replace option.

Step 1: Press “Ctrl+H” and the “find and replace” dialog box is displayed, as shown in the following image.

Step 2: Enter a space in the “find what” box. Leave the “replace with” box blank. Click “replace all.”

Step 3: Excel displays a message stating the number of replacements. Click “Ok.”

Step 4: All the spaces in column A have been removed, as shown in the following image.

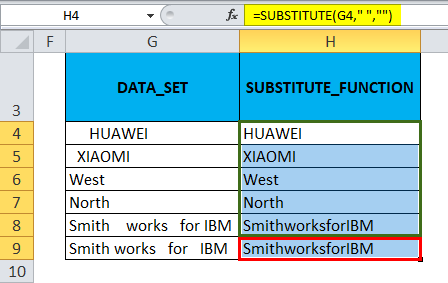
#5 – SUBSTITUTE Function
The SUBSTITUTE functionSubstitute function in excel is a very useful function which is used to replace or substitute a given text with another text in a given cell, this function is widely used when we send massive emails or messages in a bulk, instead of creating separate text for every user we use substitute function to replace the information.read more helps remove the spaces by replacing them with the existing data string.
Working on the data under the heading “TRIM function” (method #1), we want to remove spaces in excel with the SUBSTITUTE function.

Step 1: In cell B1, enter the SUBSTITUTE function. Click “insert function” in the Formulas tab. The “function arguments” dialog box appears, as shown in the following image.
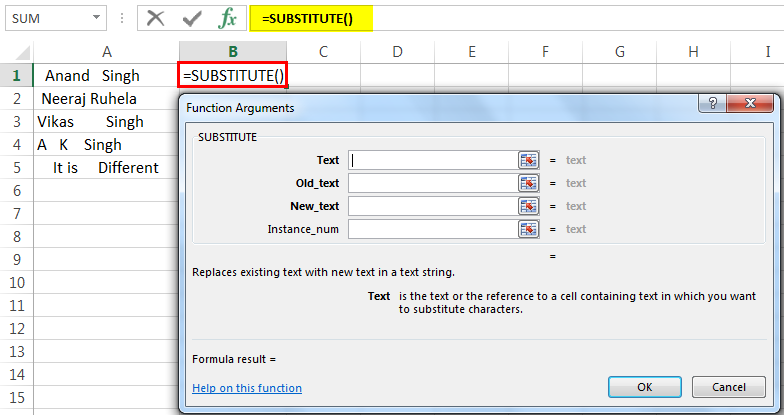
Step 2: Since the text in which characters are to be substituted is present in cell A1, enter the same in the “text” box.

Step 3: Since extra spaces are to be removed, enter “ ” in the “old_text” box. The blank between a pair of double quotation marks refers to a space.

Step 4: Since the space character is to be replaced with the existing text, enter “” in the “new_text” box. The pair of double quotation marks with no character in-between implies no spaces. Click “Ok.”

Step 5: The extra spaces from the name are removed in cell B1, as shown in the following image.

Step 6: Copy or drag the formula to the remaining cells, as shown in the following image.

Note: The find and replace option and the SUBSTITUTE function (methods #4 and #5) display the entire text string together without spaces.
Frequently Asked Questions
What does it mean to remove spaces in excel and why is it important?
While working with Excel, there might be extra spaces that are not easily visible to the user. It is important to eliminate them for the following reasons:
• The spaces at inappropriate places can make the data look untidy and disordered.
• The extra spaces have a negative impact on the quality of data presentation.
• The unwanted spaces can mess up with the formulas of Excel.
• Two cells with and without spaces are considered different entries even though the data in both may be identical.
Since it is difficult to remove the extra spaces manually, there are various techniques available in Excel for such deletions.
How to remove the leading and trailing spaces in Excel with the TRIM function?
Leading spaces are the extra space characters entered at the beginning of a data string. In contrast, the trailing spaces are found at the end of a string without any character following them.
The TRIM function helps remove all the unwanted spaces of the database. The exception to this rule is the single space character inserted between the words.
The syntax of the TRIM function is stated as follows:
“TRIM(text)”
The “text” represents the cell from which excess spaces are to be removed.
For example, the text string “ Chicago, United States ” in cell C2 is changed to “Chicago, United States” by the formula “=TRIM(C2).”
How to remove all the spaces in Excel?
To remove all the spaces in Excel, use the following formula:
“=SUBSTITUTE(C2,“ ”,“”)”
The space (“ ”) is replaced by the existing data (“”) in the cell C2.
For example, the text string “Chicago, United States” in cell C2 is changed to “Chicago,United States” by the given formula.
Note: Alternatively, the find and replace option can be used to remove all the spaces of a data string.
Recommended Articles
This has been a guide to removing spaces in excel cells. We discuss how to remove Leading, Trailing, Blank, Extra Spaces along with step by step examples. You may download an Excel template from the website. For more on Excel, take a look at the following articles –
- Randomize List ExcelRandomizing a list in excel means selecting a random value from the data, to randomize a whole list in excel. There are two excel formulae for this: the =RAND() function, which returns any random value to the cell and then allows us to sort the list, and the =RANDBETWEEN() function, which returns random values to the cell from a number range specified by the user.read more
- Hiding an Excel ColumnThe methods to hide columns in excel are — hide columns using right-click option, hide columns using shortcut cut key, hide columns using column width, hide columns using VBA code.read more
- Hide Formula in ExcelHiding formula in excel is used when we do not want the formula to be displayed in the formula bar when we click on a cell with formulas. We can format the cells, check the hidden checkbox, and protect the worksheet.read more
- Copy Sheet in ExcelThere are various ways to Copy or Move Sheets in Excel 1- By using the dragging method. 2 — By using the right-click method. 3 — Copy a sheet by using Excel Ribbon. 4- Copy Sheet from Another Workbook. and 5- Copy Multiple Sheets in Excel.read more
Watch Video – Remove Spaces in Excel
Leading and trailing spaces in Excel often leads to a lot of frustration. I can’t think of a situation where you may need these extra spaces, but it often finds its way into the excel spreadsheets.
There are many ways you can end up with these extra spaces – for example, as a part of the data download from a database, while copying data from a text document, or entered manually by mistake.
Leading, trailing, or double space between text could lead to a lot of serious issues.
For example, suppose you have a data set as shown below:

Now have a look at what happens when I use a VLOOKUP function to get the last name using the first name.

You might not be able to spot the difference with the naked eye that there is an extra trailing space in the name that is causing this error.

In this example, it was easy to spot the issue in such a small data set, but imagine having to check this for thousands of records.
To be on the safe side, it is always a good idea to clean your data and remove spaces in Excel.
How to Remove Spaces in Excel
In this tutorial, I will show you two ways to remove spaces in Excel.
- Using TRIM function.
- Using Find and Replace.
Using the TRIM Function
Excel TRIM function removes the leading and trailing spaces, and double spaces between text strings.
For example, in the above example, to remove spaces from the entire list if first names (in A2:A7), use the following formula in cell C1 and drag it down for all the first names:
=TRIM(A2)
Excel TRIM function would instantly remove all the leading and trailing spaces in the cell.
Once you have the cleaned data, copy it paste it as values in place of the original data.
This function is also helpful if you have more than one space character between words. It would remove the extra spaces such that the result always have one space character between words.
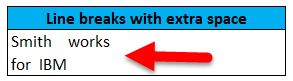
Excel TRIM function does a good job in removing spaces in Excel, however, it fails when you have non-printing characters (such as line breaks) in your data set. To remove non-printing characters, you can use a combination of TRIM and CLEAN functions.
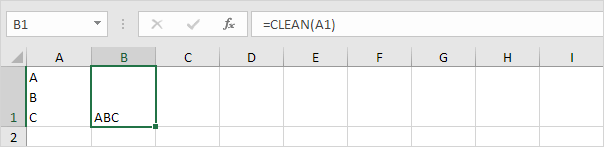
If you have some text in cell A1 from which you want to remove spaces, use the below formula:
=TRIM(CLEAN(A1))
Non-printing characters can also result from =CHAR(160), which can not be removed by the CLEAN formula. So, if you want to be absolutely sure that you have all the extra spaces and non-printing characters, use the below formula:
=TRIM(CLEAN(SUBSTITUTE(A1,CHAR(160)," ")))
Remove Extra Spaces in Excel using FIND and REPLACE
You can remove spaces in Excel using the Find and Replace functionality.
This is a faster technique and can be useful in the given situations:
- When you want to remove double spaces.
- When you want to remove all the space characters.
Removing Double Spaces
Note that this technique cannot be used to remove leading or trailing spaces. It will find and replace double spaces irrespective of its position.
Here are the steps to do this:
This will replace all the double spaces with a single space character.

Note that this will only remove double spaces. If you have three space characters in between 2 words, it would result in 2 space characters (would remove one). In such cases, you can do this again to remove and any double spaces that might have been left.
Removing Single Spaces
To remove all the space characters in a data set, follow the below steps:
This will remove all the space characters in the selected data set.

Note that in this case, even if there are more than one space characters between two text strings or numbers, all of it would be removed.
Remove Line Breaks
You can also use Find and Replace to quickly remove line breaks.
Here are the steps to do this:
- Select the data.
- Go to Home –> Find and Select –> Replace (Keyboard Shortcut – Control + H).
- In the Find and Replace Dialogue Box:
- Find What: Press Control + J (you may not see anything except for a blinking dot).
- Replace With: Leave it empty.

- Replace All.

This will instantly remove all the line breaks from the data set that you selected.
Based on your situation, you can choose either method (formula or find and replace) to remove spaces in Excel.
You may also like the following Excel tutorials:
- Find and Remove Duplicates in Excel.
- 10 Super Neat Ways to Clean Data in Excel.
- MS Help – Remove Space and Non-printing characters.
- How to Remove the First Character from a String in Excel
- How to Remove Time from Date in Excel
Содержание
- Remove Spaces
- Remove Extra Spaces in Excel (Leading, Trailing, Double Spaces)
- How to Remove Spaces in Excel
- Using the TRIM Function
- Remove Extra Spaces in Excel using FIND and REPLACE
- Removing Double Spaces
- Removing Single Spaces
- Remove Line Breaks
- How To Remove Extra Spaces In Excel (5 Super Easy Ways)
- What Are We Dealing With?
- Use TRIM Function to Remove Extra Spaces
- Use CLEAN and TRIM to Remove Extra Spaces and Line Breaks (and other non-printing characters)
- Use CLEAN, TRIM, & SUBSTITUTE Functions to Remove All the Spaces from a Cell (except single word spacing)
- Use CLEAN and SUBSTITUTE Functions to Remove All the Spaces from a Cell
- Use Find and Replace Option to Remove All the Spaces
- Subscribe and be a part of our 15,000+ member family!
Remove Spaces
The TRIM function in Excel removes leading spaces, extra spaces and trailing spaces. Use the SUBSTITUTE function to remove all spaces or non-breaking spaces.
1. The TRIM function below removes 2 leading spaces, 3 extra spaces and 2 trailing spaces.

Note: the TRIM function does not remove single spaces between words.
2. To get the length of a string, use the LEN function.

Explanation: the LEN function counts 2 spaces, 2 characters, 4 spaces, 3 characters and 2 spaces.
3. You can use the SUBSTITUTE function to remove all spaces.

Note: the SUBSTITUTE function substitutes spaces (second argument) with empty strings (third argument).
Text imported from other applications may contain ASCII characters. The CLEAN function removes the first 32 non-printable ASCII characters (codes 0 through 31).
4. The CLEAN function below removes a non-printable character, CHAR(7).

5. Simply combine CLEAN and TRIM to remove non-printable characters and spaces.

6. The CLEAN function removes line breaks. To enter a line break, press ALT + ENTER.
7. You can also use the SUBSTITUTE function to remove a line break, CHAR(10), and replace it with something else. For example, a comma and a space.

The CLEAN function doesn’t remove all ASCII characters. Simply use the SUBSTITUTE function to remove other ASCII characters.
8. First, find out the code number of the character.

9. Next, use SUBSTITUTE and CHAR to return the text string without this character.

10. If your text contains non-breaking spaces, CHAR(160), the TRIM function doesn’t work.

11. You can use the SUBSTITUTE function to substitute non-breaking spaces, CHAR(160) with normal spaces, CHAR(32). Don’t forget to add a TRIM function to remove the extra spaces.
Источник
Watch Video – Remove Spaces in Excel
Leading and trailing spaces in Excel often leads to a lot of frustration. I can’t think of a situation where you may need these extra spaces, but it often finds its way into the excel spreadsheets.
There are many ways you can end up with these extra spaces – for example, as a part of the data download from a database, while copying data from a text document, or entered manually by mistake.
Leading, trailing, or double space between text could lead to a lot of serious issues.
For example, suppose you have a data set as shown below:
Now have a look at what happens when I use a VLOOKUP function to get the last name using the first name.
You might not be able to spot the difference with the naked eye that there is an extra trailing space in the name that is causing this error.
In this example, it was easy to spot the issue in such a small data set, but imagine having to check this for thousands of records.
To be on the safe side, it is always a good idea to clean your data and remove spaces in Excel.
This Tutorial Covers:
How to Remove Spaces in Excel
In this tutorial, I will show you two ways to remove spaces in Excel.
- Using TRIM function.
- Using Find and Replace.
Using the TRIM Function
Excel TRIM function removes the leading and trailing spaces, and double spaces between text strings.
For example, in the above example, to remove spaces from the entire list if first names (in A2:A7), use the following formula in cell C1 and drag it down for all the first names:
Excel TRIM function would instantly remove all the leading and trailing spaces in the cell.
Once you have the cleaned data, copy it paste it as values in place of the original data.
This function is also helpful if you have more than one space character between words. It would remove the extra spaces such that the result always have one space character between words.
Excel TRIM function does a good job in removing spaces in Excel, however, it fails when you have non-printing characters (such as line breaks) in your data set. To remove non-printing characters, you can use a combination of TRIM and CLEAN functions.
If you have some text in cell A1 from which you want to remove spaces, use the below formula:
Non-printing characters can also result from =CHAR(160), which can not be removed by the CLEAN formula. So, if you want to be absolutely sure that you have all the extra spaces and non-printing characters, use the below formula:
Remove Extra Spaces in Excel using FIND and REPLACE
You can remove spaces in Excel using the Find and Replace functionality.
This is a faster technique and can be useful in the given situations:
- When you want to remove double spaces.
- When you want to remove all the space characters.
Removing Double Spaces
Note that this technique cannot be used to remove leading or trailing spaces. It will find and replace double spaces irrespective of its position.
Here are the steps to do this:
This will replace all the double spaces with a single space character.
Note that this will only remove double spaces. If you have three space characters in between 2 words, it would result in 2 space characters (would remove one). In such cases, you can do this again to remove and any double spaces that might have been left.
Removing Single Spaces
To remove all the space characters in a data set, follow the below steps:
This will remove all the space characters in the selected data set.
Note that in this case, even if there are more than one space characters between two text strings or numbers, all of it would be removed.
Remove Line Breaks
You can also use Find and Replace to quickly remove line breaks.
Here are the steps to do this:
- Select the data.
- Go to Home –> Find and Select –> Replace (Keyboard Shortcut – Control + H).
- In the Find and Replace Dialogue Box:
- Find What: Press Control + J (you may not see anything except for a blinking dot).
- Replace With: Leave it empty.

- Replace All.
This will instantly remove all the line breaks from the data set that you selected.
Based on your situation, you can choose either method (formula or find and replace) to remove spaces in Excel.
You may also like the following Excel tutorials:
Источник
You know what kind of data looks like a big piece of work the moment you see it; everything is so haywire and all over the place. Spaces are where they shouldn’t be, line breaks are stretching text all the way down, some symbols thrown in for good confusing measure. Yes, you have your work cut out for you but we’ll try to make it as breezy as possible.
Such Excel pandemonium is the result of badly copied data (or badly pasted, more like). If data is split into lines from where it is being copied, it might be pasted with many space characters or line breaks and sometimes we don’t just carry space characters, we may have introduced our sheets to other characters. Those characters and spaces that wouldn’t go no matter how much you’ve tried to maneuver them away without having to handpick them? Don’t worry, we’re not asking you to handpick them either.
This tutorial is about getting your data in the right shape in Excel. Some data anomalies can be fixed with Flash Fill but as other wholesome solutions, we’ll teach you how to remove extra spaces, line breaks, and nonprinting characters from cells. But first, let’s find out what these are and why are they a menace for our worksheets.
Table of Contents
What Are We Dealing With?
- Extra Spaces – Extra spaces are the spaces which we don’t require in our data. They can be several in number and also have types (mentioned ahead).
- Leading Spaces – are spaces at the start of the text in a cell.
- Trailing Spaces – are the spaces at the end of the text in a cell.
- Spaces in-between Text – are the extra spaces in word spacing. You may only need a single space or no space at all.
- Line Breaks – are new lines (manually entered with Alt + Enter keys).
- Nonprinting Characters – are characters displayed for content designing but are not displayed in prints.
Why are these problems?
While data mining or analyzing, it would be hard to trace text out because we’d be looking for «A» but couldn’t find it because the text in the cell is «space characterA». This is one of many problems. So let’s save the sheet aesthetics and analysis distress and learn how to trim away the unwanted characters.
The TRIM function removes all spaces from a text string except for single spaces between words. The TRIM function will remove all leading and trailing spaces and extra word spacing. This implies that if there are accidental extra spaces breaking a word, the function will eliminate the extra spaces but will treat one space as required. If you aim to remove all space characters from a cell, head to the last couple segments of this guide.
Now let’s watch the TRIM function removing leading and trailing spaces and extra word spacing. Here’s the formula:
The function only needs one argument, the reference to the cell with the text, to do its work. Below, we will use the TRIM function to eliminate all needless space characters from the list of names:

The TRIM function has cleaned up all unrequired spaces from the data above. If there were any accidental spaces splitting a name e.g. «John» was split to «Jo hn» with 3 space characters in between, the TRIM function would shorten it to «Jo hn» with a single space character. The function removes ALL leading and trailing spaces and removes all extra spaces between text & saves one space.
Use CLEAN and TRIM to Remove Extra Spaces and Line Breaks (and other non-printing characters)
As seen from above, the TRIM function removes all extra spaces in a cell. The CLEAN function removes all nonprinting characters from text. Together, we’ll use the CLEAN and TRIM functions to remove extra spaces, line breaks, and other nonprinting characters.
The combined functions will look like this:
The TRIM and CLEAN functions have been paired together to work on one argument; cell B3. The CLEAN function clears B3 of all the line breaks and nonprinting characters, leaving all the extra spaces to be passed onto the TRIM function for clear-up. The result is a tidied-up cell of text with the right spaces.

You may think the formula would still work with the functions switched the other way round but we suggest you stick with this order. Using the TRIM function first would leave the line breaks and nonprinting characters. Using the CLEAN function later would rid the cell of both of these but may sometimes leave a space behind; contributing to needless extra spaces in the results. Hence, we recommend the above formula for consistent results.
Use CLEAN, TRIM, & SUBSTITUTE Functions to Remove All the Spaces from a Cell (except single word spacing)
A quick recap; the TRIM function is for the extra spaces and the CLEAN function is for nonprinting spaces. The SUBSTITUTE function replaces existing text with new text in a text string. The SUBSTITUTE function here is being used for two things; to show you how to use SUBSTITUTE to remove nonbreaking spaces (a type of nonprinting character) from text and to remove the single spaces leftover from the TRIM function.
We’ll show you an all-exclusive formula below to eliminate the following characters:
- extra spaces,
- line breaks,
- nonprinting characters.
You can pick out your target functions from the formula and apply them to your scenario. This is the formula we have pieced together:
Before we get a grip on this formula, what is CHAR(160)? CHAR(160) is a nonbreaking space and we have set the SUBSTITUTE function to replace all CHAR(160) spaces with a simple space character which is enclosed in double quotes » «. If this still doesn’t remove the stubborn spaces, you may have to experiment with CHAR codes to see exactly which character you are dealing with and need to eliminate.
When the SUBSTITUTE function has removed all the CHAR(160) spaces from B3, the CLEAN function clears all the line breaks and nonprinting characters. Passed onto the TRIM function, TRIM removes all the extra space characters, leaving a single space between the names.

Now this formula was for working with text where you would need a single space between words (e.g. names, addresses). This is the prime job of the TRIM function, so if you want to remove all spaces, the formula would change a bit. Of course the first thing to go would be the TRIM function. The rest of the details are below.
Use CLEAN and SUBSTITUTE Functions to Remove All the Spaces from a Cell
Sometimes it may be necessary to remove all unwanted spaces and special characters to retrieve the text in one solid chunk (e.g. phone numbers). We will use a formula similar to the one above but without the TRIM function. With the TRIM function gone, we need its replacement with a function that will take care of all the space characters and that’s where the SUBSTITUTE function extends its help. The formula we have coined to remove all the space characters, line breaks, and nonprinting characters is:
The SUBSTITUTE function has made two appearances here; one for removing all regular space characters and one for removing a certain nonprinting character: CHAR(160) which is a nonbreaking space. If you’re still encountering persistent spaces after using this formula, you may need to find which CHAR code is causing trouble and adjust it in the formula.
The other SUBSTITUTE function will replace all space characters with empty text. This formula
can be used on its own to remove all regular space characters from a cell.
The CLEAN function then removes all nonprinting characters from the result of the SUBSTITUTE functions, delivering one string of numbers with all the spaces and characters removed.

Use Find and Replace Option to Remove All the Spaces
The Find and Replace feature can be used to remove all the spaces from a cell. We can also use Find and Replace to remove line breaks but each replacement has to be done separately. This is how to remove all spaces and line breaks from a cell:
- Select the cells from where you want to remove the spaces.
- In the Home tab’s Editing group, click on the Find & Select button and select Replace… from the list. This will open the Find and Replace dialogue box. You can also use the keyboard shortcut Ctrl + H for this action.

- In the Find what field, enter the character you want to replace (e.g. space character, hyphen, comma). We have entered a single space character. Leave the Replace with field blank so the space character can be replaced with empty text.

- Click on Replace All and then click on OK in the confirmation dialog that will pop up. Now that all of the spaces have been replaced, we’ll eradicate the line breaks too.
- Clear the Find what field in the Find and Replace dialog box (which will still be open after making the first replacement) and press Ctrl + J. You will only see a tiny blinking dot but this will replace line breaks.
- Leave the Replace with field blank again.

- Click Replace All, hit OK in the confirmation pop-up, close the Find and Replace dialog box if done.
If your data hasn’t been text wrapped already, you may need to adjust the row heights leftover from removing line breaks.
There’s the cleaned-up data ready to be used:

Time’s up! That was all on how to remove extra spaces in Excel. We hope to have solved some stubborn space issues for you so your data sweeping is not a manual nightmare. We’re up for solving more manual nightmares for smooth Excel daydreaming. See you with solutions!
Subscribe and be a part of our 15,000+ member family!
Now subscribe to Excel Trick and get a free copy of our ebook «200+ Excel Shortcuts» (printable format) to catapult your productivity.
Источник
The TRIM function in Excel removes leading spaces, extra spaces and trailing spaces. Use the SUBSTITUTE function to remove all spaces or non-breaking spaces.
1. The TRIM function below removes 2 leading spaces, 3 extra spaces and 2 trailing spaces.
Note: the TRIM function does not remove single spaces between words.
2. To get the length of a string, use the LEN function.
Explanation: the LEN function counts 2 spaces, 2 characters, 4 spaces, 3 characters and 2 spaces.
3. You can use the SUBSTITUTE function to remove all spaces.
Note: the SUBSTITUTE function substitutes spaces (second argument) with empty strings (third argument).
Text imported from other applications may contain ASCII characters. The CLEAN function removes the first 32 non-printable ASCII characters (codes 0 through 31).
4. The CLEAN function below removes a non-printable character, CHAR(7).
5. Simply combine CLEAN and TRIM to remove non-printable characters and spaces.
6. The CLEAN function removes line breaks. To enter a line break, press ALT + ENTER.
7. You can also use the SUBSTITUTE function to remove a line break, CHAR(10), and replace it with something else. For example, a comma and a space.
The CLEAN function doesn’t remove all ASCII characters. Simply use the SUBSTITUTE function to remove other ASCII characters.
8. First, find out the code number of the character.
9. Next, use SUBSTITUTE and CHAR to return the text string without this character.
10. If your text contains non-breaking spaces, CHAR(160), the TRIM function doesn’t work.
11. You can use the SUBSTITUTE function to substitute non-breaking spaces, CHAR(160) with normal spaces, CHAR(32). Don’t forget to add a TRIM function to remove the extra spaces.

Skip to content
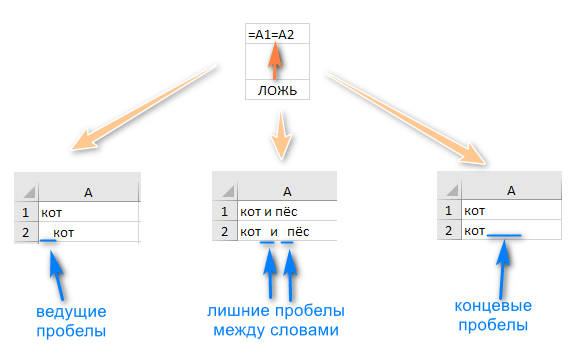
Вы узнаете, как с помощью формул удалять начальные и конечные пробелы в ячейке, лишние интервалы между словами, избавляться от неразрывных пробелов и непечатаемых символов.
В чем самая большая проблема с пробелами? Часто они невидимы для человеческого глаза. Внимательный пользователь может иногда заметить пустой интервал, скрывающийся перед текстом, или несколько ненужных пустот между словами. Но нет никакого способа визуально обнаружить конечные пробелы, те, которые находятся вне поля зрения в конце ячеек.
- Удаляем все пробелы при помощи «Найти и заменить»
- Используем формулу СЖПРОБЕЛЫ
- Удаление начальных и концевых пробелов формулой
- Как убрать разрыв строки и непечатаемые символы
- Формула для удаления неразрывных пробелов
- Как найти и удалить непечатаемый символ
- Как цифры с пробелами преобразовать в число
- Считаем пробелы при помощи формулы
- Простой способ удаления пробелов без формул.
Не было бы большой проблемы, если бы эти лишние интервалы просто существовали, но они могут повлиять на результаты ваших формул. Дело в том, что две ячейки, содержащие один и тот же текст с пробелами и без них, даже если это всего лишь один знак, считаются разными значениями. В результате вы можете ломать голову, пытаясь понять, почему очевидно правильная формула не может соответствовать двум, казалось бы, идентичным записям.
Теперь, когда вы полностью осознаете проблему, пришло время найти решение. Есть несколько способов удалить пробелы из строки, и это руководство поможет вам выбрать метод, наиболее подходящий для вашей конкретной задачи и типа данных, с которым вы работаете.
Как убрать пробелы в Excel при помощи «Найти и заменить»
Это более быстрый метод, который может быть полезен в следующих ситуациях:
- Удаление двойных интервалов.
Обратите внимание, что этот метод не рекомендуется использовать для удаления начальных или конечных пробелов, так как хотя бы один их них там все равно останется.
Итак, найдем и заменим двойные интервалы независимо от их расположения.
Вот как это можно сделать:
- Выделите ячейки, из которых вы хотите их удалить.
- Перейдите на главное меню -> Найти и выбрать -> Заменить.(Также можно использовать сочетание клавиш —
CTRL + H). - В диалоговом окне «Найти и заменить» введите:
- Найти: Двойной пробел.
- Заменить на: Одинарный.
Нажмите «Заменить все».
Обратите внимание, что если у вас есть три интервала между двумя словами, то теперь вы получите два (один будет удален). В таких случаях вы можете повторить эту операцию снова, чтобы удалить любые двойные пробелы, которые ещё могли остаться.
Недостатки этого метода вы видите сами: перед некоторыми из слов остался начальный пробел. Аналогично остались и конечные пробелы после текста, просто они не видны явно. Поэтому для текстовых выражений я не рекомендовал бы применение этого способа.
- Чтобы удалить все пробелы в тексте, выполните следующие действия:
- Выделите нужные ячейки.
- Перейдите в меню Главная -> Найти и выбрать -> Заменить. (Также можно использовать сочетание клавиш —
CTRL + H). - В диалоговом окне «Найти и заменить» введите:
Найти: одинарный пробел.
Заменить на: оставьте это поле пустым.
- Нажмите «Заменить все».
Это удалит все пробелы в выбранном диапазоне.
Вряд ли стоит производить такие манипуляции с текстовыми данными, а вот для чисел вполне подойдет. Интервалы между разрядами часто возникают при импорте данных из других программ через .csv файл. Правда, на рисунке вы видите, что цифры все равно остались записаны в виде текста, но вид их стал более упорядоченным. Как превратить их в настоящие числа — поговорим далее отдельно.
Функция СЖПРОБЕЛЫ.
Если ваш набор данных содержит лишние пробелы, функция СЖПРОБЕЛЫ может помочь вам удалить их все одним махом — ведущие, конечные и несколько промежуточных, оставив только один интервал между словами.
Стандартный синтаксис очень простой:
=СЖПРОБЕЛЫ(A2)
Где A2 — ячейка, из которой вы хотите удалить.
Как показано на следующем скриншоте, СЖПРОБЕЛЫ успешно удалила всё до и после текста, а также лишние интервалы в середине строки.
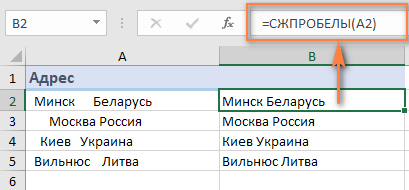
И теперь вам нужно только заменить значения в исходном столбце новыми. Самый простой способ сделать это — использовать Специальная вставка > Значения.
Формулы для удаления начальных и концевых пробелов.
В некоторых ситуациях вы можете вводить двойные или даже тройные интервалы между словами, чтобы ваши данные были более удобочитаемыми. Однако вам нужно избавиться от ведущих пробелов (находящихся в начале), например:

Как вы уже знаете, функция СЖПРОБЕЛЫ удаляет лишние интервалы в середине текстовых строк, чего мы в данном случае не хотим. Чтобы сохранить их нетронутыми, мы будем использовать немного более сложную конструкцию:
=ПСТР(A2;НАЙТИ(ПСТР(СЖПРОБЕЛЫ(A2);1;1);A2);ДЛСТР(A2))
Это выражение в начале вычисляет позицию первого знака в строке. Затем вы передаете это число другой функции ПСТР, чтобы она возвращала всю текстовую строку (длина строки рассчитывается с помощью ДЛСТР), начиная с позиции первого знака.
Вы видите, что все ведущие пробелы исчезли, хотя несколько интервалов между словами всё же остались.
В качестве последнего штриха замените исходный текст полученными значениями, как это было описано выше.
Если же нужно удалить только пробелы в конце каждой ячейки, то формула будет немного сложнее:
=ЛЕВСИМВ(A2;МАКС((ПСТР(A2&ПОВТОР(» «;99);СТРОКА(A2:A100);1)<>» «)*СТРОКА(A2:A100)))

И обратите снимание, что ее нужно вводить как формулу массива (с Ctrl+Shift+Enter). В столбце A выровнять по правому краю получилось плохо из-за разного количества концевых пробелов в каждой ячейке. В столбце B эта проблема решена, и можно красиво расположить текст.
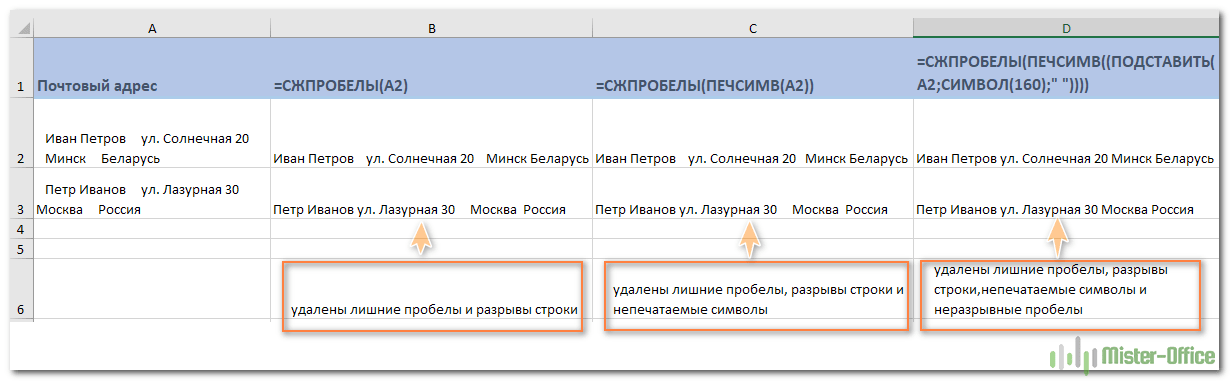
Как удалить разрывы строк и непечатаемые символы
При импорте данных из внешних источников появляются не только лишние пробелы, но и различные непечатаемые символы, такие как возврат каретки, перевод строки, вертикальная или горизонтальная табуляция и т.д.
Функция СЖПРОБЕЛЫ может избавиться от пробелов, но не может устранить непечатаемые символы. Технически она предназначена для удаления только значения 32 в 7-битной системе ASCII , которое как раз и является кодом пробела.
Чтобы удалить ещё и непечатаемые символы в строке, используйте её в сочетании с функцией ПЕЧСИМВ (CLEAN в английской версии). Как следует из названия, ПЕЧСИМВ предназначена для очистки данных от ненужного «мусора» и умеет удалять любой из первых 32 непечатаемых символов в 7-битном наборе ASCII (значения от 0 до 31), включая разрыв строки (значение 10).
Предполагая, что очищаемые данные находятся в ячейке A2, формула будет следующей:
=СЖПРОБЕЛЫ(ПЕЧСИМВ(A2))

Практически всегда, когда при помощи приведенного выше выражения вы удаляете разрывы строки, то отдельные слова оказываются «склеенными» друг с другом. Вы можете исправить это, используя один из следующих способов:
- Воспользуйтесь инструментом Excel «Заменить все»: в поле «Найти» введите возврат каретки, нажав сочетание клавиш
Ctrl+J. И в поле «Заменить» введите пробел. При нажатии кнопки «Заменить все» все разрывы строк в выбранном диапазоне заменяются пробелами. - Используйте следующую формулу для замены возврата каретки (код 13) и перевода строки (код 10) на пробелы:
=СЖПРОБЕЛЫ(ПОДСТАВИТЬ(ПОДСТАВИТЬ(A2; СИМВОЛ(13);» «); СИМВОЛ(10); » «))
Как видите, почтовый адрес в колонке С выглядит вполне читаемо.
Как убрать неразрывные пробелы в Excel?
Если после использования формулы СЖПРОБЕЛЫ и ПЕЧСИМВ некоторые упрямые знаки все еще остаются, то скорее всего, вы скопировали / вставили данные из интернета или из другой программы, и несколько неразрывных пробелов все же прокрались в вашу таблицу.
Чтобы избавиться от неразрывных пробелов (html-код ), замените их обычными, а затем попросите функцию СЖПРОБЕЛЫ удалить их:
=СЖПРОБЕЛЫ((ПОДСТАВИТЬ(A2;СИМВОЛ(160);» «)))
Чтобы лучше понять логику, давайте разберем формулу:
- Неразрывный пробел имеет код 160 в 7-битной системе ASCII, поэтому вы можете определить его с помощью СИМВОЛ(160).
- Функция ПОДСТАВИТЬ используется для превращения неразрывных пробелов в обычные.
- И, наконец, вы вставляете ПОДСТАВИТЬ в СЖПРОБЕЛЫ, чтобы окончательно удалить всё лишнее.
Если ваш рабочий лист также содержит непечатаемые символы, дополнительно к описанному выше используйте ещё функцию ПЕЧСИМВ, чтобы избавиться от пробелов и других ненужных знаков одним махом:
=СЖПРОБЕЛЫ(ПЕЧСИМВ((ПОДСТАВИТЬ(A2;СИМВОЛ(160);» «))))
Следующий скриншот демонстрирует разницу в результатах:
Как удалить определенный непечатаемый символ
Если взаимодействие трех функций, описанных в приведенном выше примере, не смогло устранить весь мусор из текста, то это означает, что оставшиеся знаки имеют значения ASCII, отличные от 0 до 32 (непечатаемые символы) или 160 (неразрывный пробел).
В этом случае используйте функцию КОДСИМВ, чтобы сначала идентифицировать код мешающего вам знака, а затем используйте ПОДСТАВИТЬ, чтобы заменить его обычным пробелом. А затем при помощи СЖПРОБЕЛЫ удалите его.
Предполагая, что нежелательные символы, от которых вы хотите избавиться, находятся в ячейке A2, вы пишете два выражения:
- В ячейке С2 определите код проблемного знака, используя одну из следующих функций:
- Ведущий пробел или непечатаемый символ в начале строки:
=КОДСИМВ(ЛЕВСИМВ(A2;1))
- Конечный пробел или непечатаемый символ в конце строки:
= КОДСИМВ(ПРАВСИМВ(A2;1))
- Пробел или непечатаемый символ в середине строки, где n — позиция проблемного знака:
= КОДСИМВ(ПСТР(A2, n, 1)))
В этом примере у нас есть неизвестный знак в середине текста, в 11-й позиции, и мы определим его код:
=КОДСИМВ(ПСТР(A2;11;1))
Получаем значение 127 (см. скриншот ниже).
- В ячейке C3 вы заменяете СИМВОЛ(127) обычным пробелом (» «), а затем просто удаляете его:
=СЖПРОБЕЛЫ(ПОДСТАВИТЬ(A2;СИМВОЛ(127); » «))
Если ваши данные содержат несколько разных непечатаемых символов, а также неразрывные пробелы, вы можете вложить две или более функции ПОДСТАВИТЬ друг в друга для одновременного удаления всех нежелательных знаков:
=СЖПРОБЕЛЫ(ПЕЧСИМВ((ПОДСТАВИТЬ(ПОДСТАВИТЬ(A2;СИМВОЛ(127);» «);СИМВОЛ(160);» «))))
Результат должен выглядеть примерно так:

Эту универсальную формулу мы и использовали. Как видите, успешно.
Как удалить все пробелы
В некоторых ситуациях может потребоваться удалить абсолютно все пробелы в ячейке, включая те, что находятся между словами или числами. Например, если вы импортировали в вашу таблицу числовой столбец, в котором пробелы используются в качестве разделителей тысяч. Конечно, разделители разрядов упрощают чтение больших чисел, но они же препятствуют вычислению ваших формул. Такие разделители нужно создавать при помощи форматирования, а не вручную.
Чтобы удалить все пробелы одним махом, используйте ПОДСТАВИТЬ, как описано в предыдущем примере, с той лишь разницей, что вы заменяете знак пробела, возвращаемый при помощи СИМВОЛ(32), ничем («»):
=ПОДСТАВИТЬ(A2; СИМВОЛ(32); «»)
Или вы можете просто ввести его (» «) в формуле, например:
=ПОДСТАВИТЬ(A2; “ “; «»)

Результатом этого будет текст, состоящий из цифр. Если же в качестве результата вам нужны именно числа, добавьте перед формулой два знака “-“ (минус). Любая математическая операция автоматически превращает цифры в число. А дважды применив минус, то есть дважды умножив на минус 1, мы не изменим величину числа и его знак.
Как посчитать пробелы в Excel
Чтобы получить общее количество пробелов в ячейке, выполните следующие действия:
- Вычислите всю длину строки с помощью функции ДЛСТР: ДЛСТР (A2)
- Замените все пробелы ничем: ПОДСТАВИТЬ(A2; » «; «»)
- Вычислить длину строки без пробелов: ДЛСТР(ПОДСТАВИТЬ(A2; » «; «»))
- Вычтите этот результат из первоначальной длины.
Предполагая, что исходная текстовая строка находится в ячейке A3, полная формула выглядит следующим образом:
=ДЛСТР(A3) — ДЛСТР(ПОДСТАВИТЬ(A3;» «;»»))
Чтобы узнать, сколько лишних пробелов в ячейке, получите длину текста без них, а затем вычтите ее из первоначальной длины:
=ДЛСТР(A3)-ДЛСТР(СЖПРОБЕЛЫ(A3))
На рисунке показаны обе формулы в действии:

Теперь, когда вы знаете, сколько пробелов содержит каждая ячейка, вы можете безопасно удалить лишние, используя функцию СЖПРОБЕЛЫ.
Простой способ удаления пробелов без формул.
Как вы уже знаете, лишние пробелы и другие нежелательные символы могут незаметно скрываться на ваших листах, особенно если вы импортируете данные из внешних источников. Вы также знаете, как удалять пробелы в Excel с помощью формул. Конечно, изучение нескольких формул – хорошее упражнение для оттачивания ваших навыков, но это может занять много времени.
Пользователи Excel, которые ценят свое время и ценят удобство, могут воспользоваться текстовыми инструментами, включенными в надстройку Ultimate Suite for Excel . Один из этих удобных инструментов позволяет удалять пробелы и непечатаемые символы одним нажатием кнопки.
После установки Ultimate Suite добавляет на ленту Excel несколько полезных кнопок, таких как «Удалить пробелы» , «Удалить символы» , «Преобразовать текст» и многое другое.
Всякий раз, когда вы хотите удалить лишние пробелы в таблицах Excel, выполните следующие 4 быстрых шага:

- Выделите ячейки (диапазон, весь столбец или строку), в которых вы хотите удалить лишние пробелы.
- Нажмите кнопку «Trim Spaces» на вкладке «Ablebits Data».
- Выберите один или несколько вариантов:
- Обрезать начальные и конечные пробелы.
- Удалить лишние пробелы между словами, кроме одного.
- Удалить неразрывные пробелы ( )
- Удалить лишние переносы строк до и после значений, между значениями оставить только один.
- Удалить все переносы строк в ячейке.
- Нажмите кнопку «Trim» .
Готово! Все лишние пробелы удалены одним щелчком мыши:

Здесь мы вместе с лишними пробелами удалили еще и переводы строки, чтобы значения располагались в привычном виде, в одну строку.
Вот как можно быстро удалить пробелы в ячейках Excel. Если вам интересно изучить другие возможности работы с текстовыми значениями (и не только), вы можете загрузить
ознакомительную версию Ultimate Suite. Благодарю вас за чтение и с нетерпением жду встречи с вами в нашем блоге на следующей неделе!
 Формула ЗАМЕНИТЬ и ПОДСТАВИТЬ для текста и чисел — В статье объясняется на примерах как работают функции Excel ЗАМЕНИТЬ (REPLACE в английской версии) и ПОДСТАВИТЬ (SUBSTITUTE по-английски). Мы покажем, как использовать функцию ЗАМЕНИТЬ с текстом, числами и датами, а также…
  Как убрать пробелы в числах в Excel — Представляем 4 быстрых способа удалить лишние пробелы между цифрами в ячейках Excel. Вы можете использовать формулы, инструмент «Найти и заменить» или попробовать изменить формат ячейки. Когда вы вставляете данные из…
  Функция СЖПРОБЕЛЫ — как пользоваться и примеры — Вы узнаете несколько быстрых и простых способов, чтобы удалить начальные, конечные и лишние пробелы между словами, а также почему функция Excel СЖПРОБЕЛЫ (TRIM в английской версии) не работает и как…
  Функция ПРАВСИМВ в Excel — примеры и советы. — В последних нескольких статьях мы обсуждали различные текстовые функции. Сегодня наше внимание сосредоточено на ПРАВСИМВ (RIGHT в английской версии), которая предназначена для возврата указанного количества символов из крайней правой части…
  Функция ЛЕВСИМВ в Excel. Примеры использования и советы. — В руководстве показано, как использовать функцию ЛЕВСИМВ (LEFT) в Excel, чтобы получить подстроку из начала текстовой строки, извлечь текст перед определенным символом, заставить формулу возвращать число и многое другое. Среди…
  5 примеров с функцией ДЛСТР в Excel. — Вы ищете формулу Excel для подсчета символов в ячейке? Если да, то вы, безусловно, попали на нужную страницу. В этом коротком руководстве вы узнаете, как использовать функцию ДЛСТР (LEN в английской версии)…
  Как быстро сосчитать количество символов в ячейке Excel — В руководстве объясняется, как считать символы в Excel. Вы изучите формулы, позволяющие получить общее количество символов в диапазоне и подсчитывать только определенные символы в одной или нескольких ячейках. В нашем предыдущем…
Excel Remove Spaces (Table of Contents)
- Introduction to Remove Spaces in Excel
- Different Types Of Spaces
- How to Remove Extra Spaces in Excel?
Introduction to Remove Spaces in Excel
There are multiple ways to remove spaces in excel. The first way we can remove the extra unwanted spaces with the help of the FIND and REPLACE option (Ctrl + H). There we need to put a space and replace that with Blank (Nothing kept). This removes the spaces anywhere from the selected cells. In another way, we can remove the spaces by using a TRIM function. This removes the spaces which are there at the start and end of the selected cell content. And we can also use the SUBSTITUTE function, where we can substitute space with blank to remove spaces completely.
Different Types Of Spaces
- It may contain extra spaces before text strings in cells; these spaces are called Leading spaces.

- It may contain extra spaces after text strings in cells; these spaces are called Trailing spaces.
- Datasets may contain extra in-between spaces, i.e.additional spaces in between text.
- Datasets may also contain Line breaks with extra space.
We can get rid of these types of spaces quickly & easily with the below-mentioned options:
- FIND AND REPLACE
- TRIM Function
- SUBSTITUTE Function
- CLEAN and TRIM function to Remove Extra Space of Line Break in excel
TRIM Function
TRIM function is a prebuilt integrated function categorized under Text functions. It Removes all extra spaces from text except a single space between words in excel.
The syntax or formula for the TRIM function in Excel is:
Trim function in Excel has only one compulsory argument or parameter, i.e. text.
- Text: It is cell content from where you need to remove extra spaces in excel.
The TRIM function only removes the ASCII space character (32) from the text.
How to Remove Extra Spaces in Excel?
Remove extra spaces in Excel is very simple and easy. Let’s understand the working of removing extra spaces in excel with the help of some examples.
You can download this Remove Spaces Excel Template here – Remove Spaces Excel Template
Example #1 – Remove Excel Spaces with the help of Find and Replace
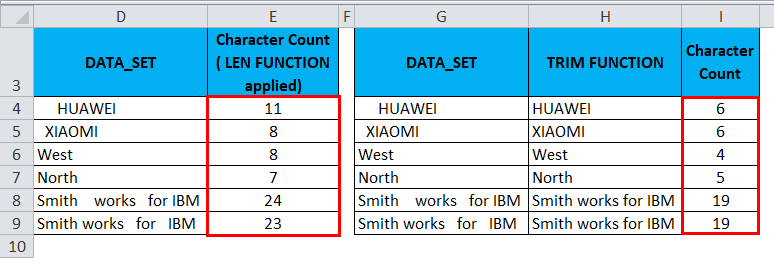
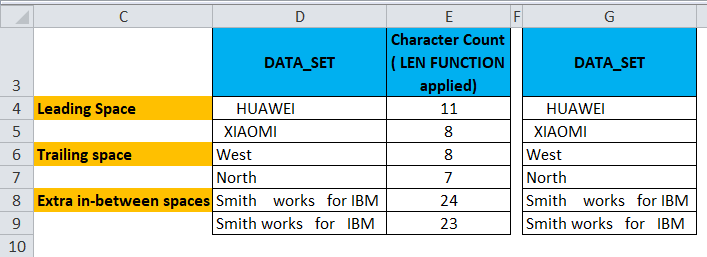
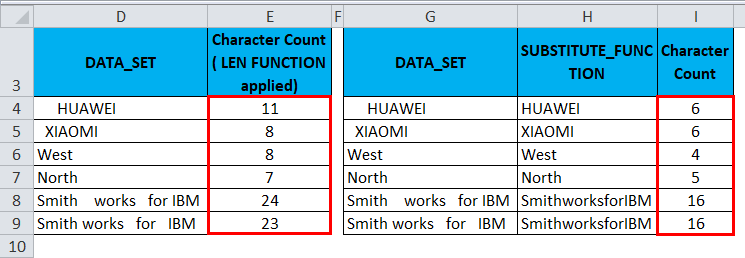
In the below-mentioned example, I have a dataset in column D that contains all three types of extra spaces, i.e. Leading spaces, Trailing spaces & Extra in-between spaces.
For reference, I have done a number of character count for the column D datasets. With the help of the LEN function in column E., I have taken this raw data to another new column (column H) to apply the Find and Replace task.

Now, I have to select the cell range where the Find and Replace parameter needs to be applied to remove extra spaces in excel.
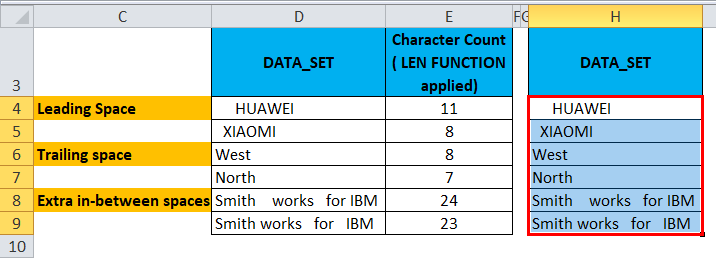
Now, to activate the find and replace option, press the shortcut key Ctrl + H, find and replace window appears.
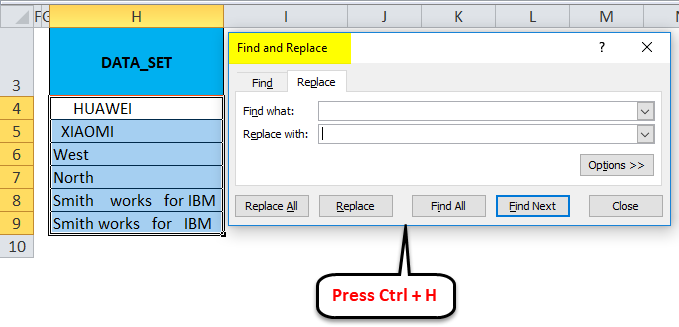
In Find what: input bar, insert a blank space with the help of the space bar once, and in Replace with no need to input anything, it should remain blank. Click on the Replace All button.
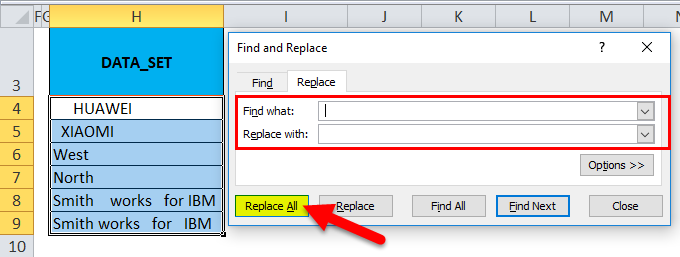
It replaces all the blank spaces in the cell.
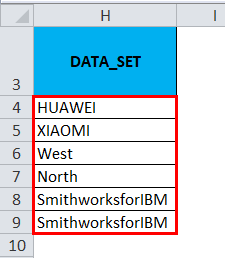
You can find a difference in character count between both datasets. Where Find and Replace remove all the blank spaces. In extra in-between spaces content also, it has removed all the blank spaces without retaining a single space between words (This can be rectified with the help of TRIM function).
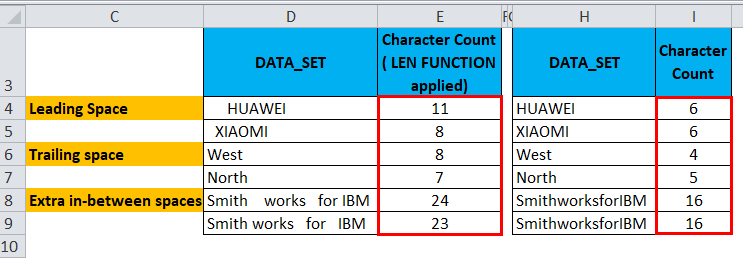
Note: This method is only used when you want to remove a leading & trailing type of extra spaces from selected cells or to remove all the spaces in the data range from excel completely.
Example #2 – Remove Excel Spaces with the help of TRIM Function
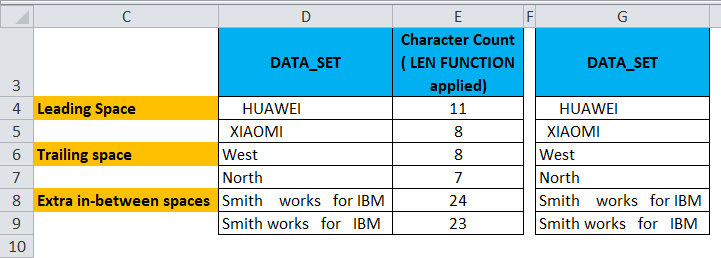
In the below-mentioned example, I have a dataset in column D that contains all three types of extra spaces, i.e. leading spaces, trailing spaces & extra in-between spaces.
For reference, I have done a number of character count for the column D datasets. With the help of the LEN function in column E., I have taken this raw data to another new column (column G) to apply the TRIM Function. The Excel TRIM function removes all spaces from text except a single space between words.
Now, In cell H4, let’s apply a TRIM function.
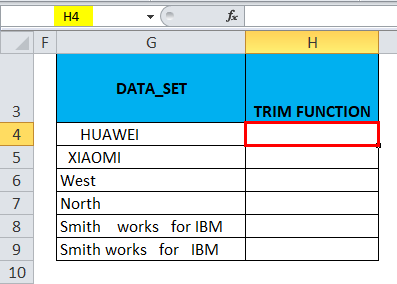
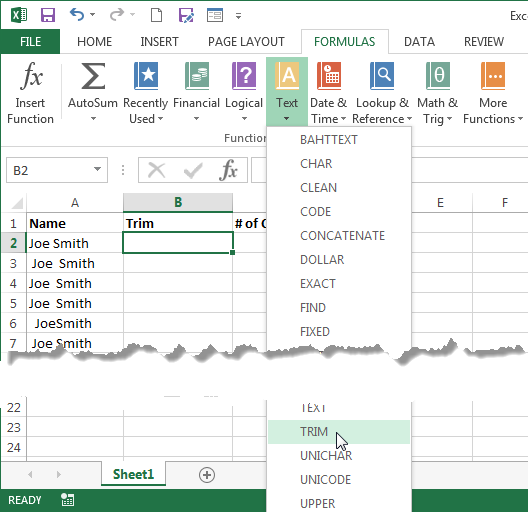
In the Formulas tab, click the Text drop-down menu in the Functions section and select TRIM.
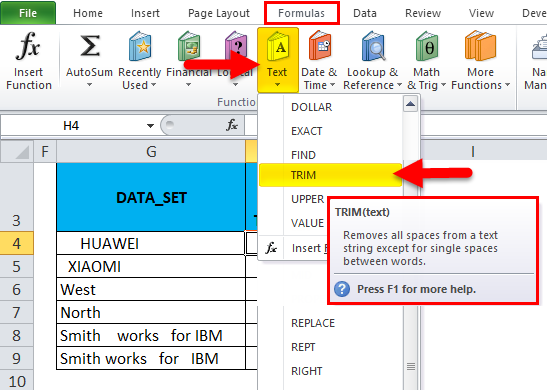
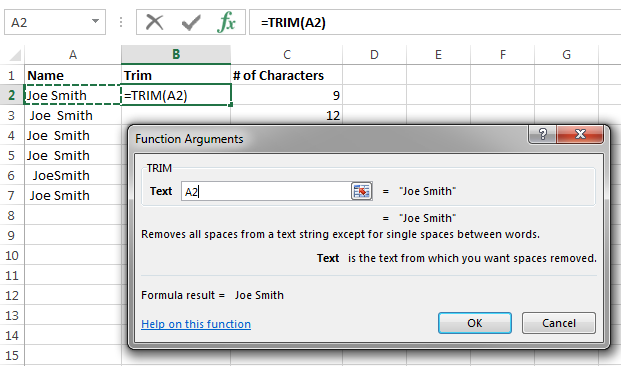
Now the function argument dialog box appears, click on the cell G4, which contains the text where I would like to remove spaces to complete the function, then click on OK.
Now, you can observe in cell H4, where trim function removes leading space in that cell.
Similarly, a TRIM function is applied to other range by selecting the cell H4 and drag it to H9 and click Ctrl+D to apply to the rest of the cells.
You can find a difference in character count between both datasets where TRIM Function removes all spaces before and after the text in the cell (i.e. G4, G5, G6 & G7) & consecutive spaces in the middle of a string in the cell G8 & G9.
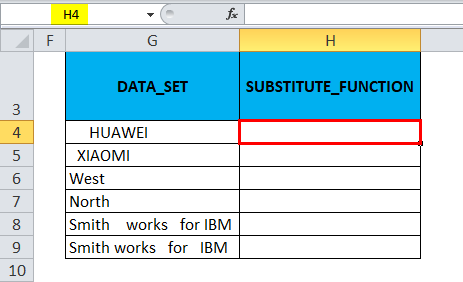
Example #3 – Remove Excel Spaces with the help of SUBSTITUTE Function
It will remove all the extra excel spaces, including single spaces between words or numbers.
In the below-mentioned example, I have a dataset in column D that contains all three types of extra spaces, i.e. leading spaces, trailing spaces & extra in-between spaces.
For a reference purpose, I have done a number of character count for the column D datasets. With the help of the LEN function in column E., I have taken this raw data to another new column (column G) to apply the SUBSTITUTE Function.
Now, In cell H4, let’s apply the SUBSTITUTE Function.
In a Formulas tab, click the Text drop-down menu in the Functions section and select SUBSTITUTE.
Now the function argument dialog box appears:
- Text Click on the first cell in the column that you need to be changed.
- In the Old_text, I need to enter the character that needs to be replaced; it should be entered between double-quotes. i.e. for removal of spaces, it will be ” “.
- Here, in the New text, I don’t want to replace anything; therefore, it is typed as “”.
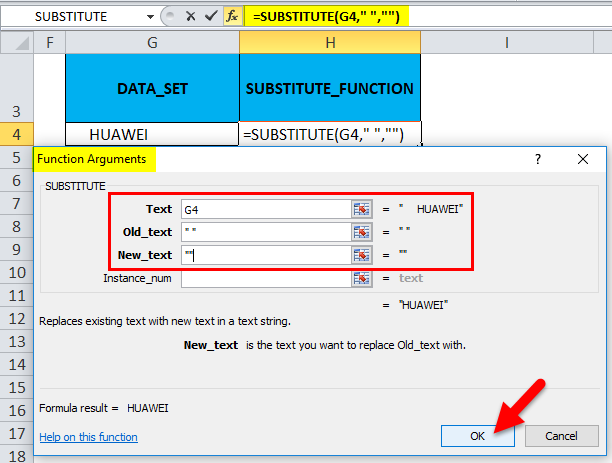
Now, you can observe in cell H4, where the Substitute function removes leading space in that cell.

SUBSTITUTE Function is applied to other ranges by selecting the cell H4 and drag it till H9 and click Ctrl+D so that it is applied to other cells.
You can find a difference in character count between both datasets. Substitute Function removes all the blank spaces; in extra in-between spaces content, it has removed all the blank spaces without retaining a single space between words.
Things to Remember about Excel Remove Spaces
- Since the extra space is also a character, therefore in ASCII (American Standard Code for Information Interchange) encoding, it has code number 32.
- Sometimes, the data appears as line breaks which may contain extra spaces between words; To remove those extra space, we can combine Excel TRIM and CLEAN function to Remove the Extra Space of Line Break.
Recommended Articles
This has been a guide to Remove Spaces in Excel. Here we discuss how to Remove Extra Spaces in Excel along with practical examples and a downloadable excel template. You can also go through our other suggested articles –
- Address Excel Function
- SUBSTITUTE Function in Excel
- LEN Function in Excel
- Excel SEARCH Function
Maintenance Alert: Saturday, April 15th, 7:00pm-9:00pm CT. During this time, the shopping cart and information requests will be unavailable.
Categories: Advanced Excel
Tags: Excel Formula Remove Spaces
Does this sound familiar? You are searching for data that you know you’ve entered, but a query for Joe Smith simply doesn’t return any results. Or, how about – you are trying to add up two columns of numbers, but you keep getting errors.
Often, these issues are caused by extra spaces hiding before, after or between the text and numbers in your data. Especially when information has been copy/pasted into a spreadsheet, extra spaces can come along for the ride and lurk unnoticed until something goes wrong.
Excel offers several ways to help you remove spaces and clean up your data, but you will want to choose the right technique for the type of data you are working with. The following tips will describe two methods using functions and formulas to remove unwanted spaces from your data.
These steps will apply to Excel 2007-2013. Images were taken using Excel 2013 on the Windows 7 OS.
Option 1
Use the Trim Function
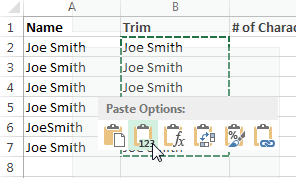
The TRIM function removes all spaces from text except a single space between words. Use this function when you have text data that contains hidden spaces in the cell. In our example, you’ll see that there are multiple “Joe Smiths” in our data. At a glance, several of them even look the same. However, the # of Characters column reveals that there are hidden spaces buried in the text.
Step 1
To use the TRIM function, you will need to create a temporary, or helper, column for the corrected data at the end of your spreadsheet. For the purposes of this demonstration, we’ve called the column “Trim.”

To follow using our example above, download Excel Remove Spaces Formula Template
Step 2
Click in the first cell of the Trim column. On the Formulas tab, click the Text dropdown menu in the Functions group and select TRIM.
Step 3
After the dialog box appears, click on the cell that contains the text you would like to remove spaces from to complete the function. Click OK.
Step 4
Copy the function to the remaining cells in the column to apply the function to the rest of the Name cells. You can see that the TRIM function cleaned up the extra spaces and the character counts are now all the same except for the “JoeSmith” that did not have any spaces between the first and last name. Note that TRIM will not ADD spaces.

Step 5
Now you just need to replace your original data with your clean data. To do this, select all of the cells in the Trim column, then hit CTRL+C to copy the cells to the clipboard.
Then, select the first cell in the Name column and right-click. Select Paste Values under the Paste Options heading. Now you can Delete the Trim helper column and your Name column is clean.
Option 2
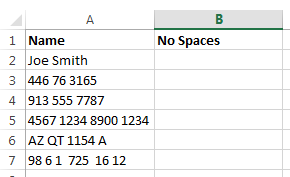
Use a Formula to Remove All Spaces
If you need to prepare your data for import into a database (such as MS Access) or have a combination of number and text data that simply needs ALL spaces removed, you can use a formula instead of the TRIM function to remove ALL blanks in a cell.
Step 1
Create a temporary, or helper, column for the corrected data at the end of your spreadsheet like you did for the TRIM function. In this example the column is called No Spaces.
Step 2
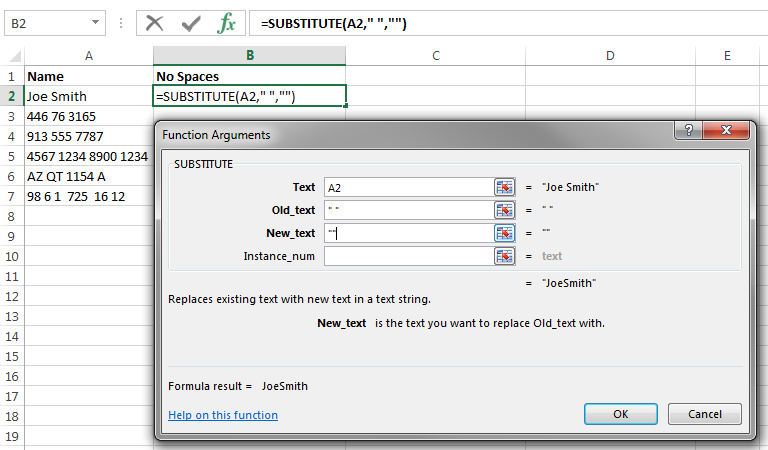
Click in the first cell of the Trim column. On the Formulas tab, click the Text dropdown menu in the Functions group and select SUBSTITUTE.

Step 3
When the dialog box appears:
- Click on the first cell in the column that you need changed
- In the “Old_text” field, enter the character you want replaced separated by quotes. To remove spaces this would then be ” “.
- In the “New_text” field, enter the character you want to appear instead. Since we want NO characters to replace the space, type “”.
Step 4
Click OK to apply the formula to the cell.
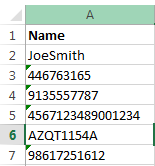
Step 5
Copy the formula to the remaining cells in the helper column. Then copy the data to the data column as you did before using CTRL-C and Paste Options.
Bonus Hint!
You can also remove spaces using the Find/Replace feature in Excel. Click CTRL+F to open the Find dialog box, then click the Replace tab. Enter one space ” ” in the Find what: field and leave the Replace with: field empty to remove all spaces.
Warning: This technique will search for and replace ALL spaces in the entire sheet or selection area. Use carefully so that you don’t remove spaces you still want or need!
With these tips, you can clean up data entered from multiple sources and ensure that it is consistent and less prone to unintended duplication. Use these tips to remove spaces when you want to:
- Find unintended duplicates in your data
- Prepare someone else’s data before you import it into your own spreadsheets
- Prepare your data for export into a database
When do you find the need to find and remove unwanted spaces?
PRYOR+ 7-DAYS OF FREE TRAINING
Courses in Customer Service, Excel, HR, Leadership,
OSHA and more. No credit card. No commitment. Individuals and teams.