
Excel for Microsoft 365 Word for Microsoft 365 Outlook for Microsoft 365 PowerPoint for Microsoft 365 Excel 2021 Word 2021 Outlook 2021 PowerPoint 2021 Excel 2019 Word 2019 Outlook 2019 PowerPoint 2019 Excel 2016 Word 2016 Outlook 2016 PowerPoint 2016 Excel 2013 Word 2013 Outlook 2013 PowerPoint 2013 Excel 2010 Word 2010 Outlook 2010 PowerPoint 2010 More…Less
You can remove a hyperlink from a single address, remove many links at once, turn automatic hyperlinks off, and turn off the requirement to press Ctrl to follow a hyperlink.
Remove a hyperlink
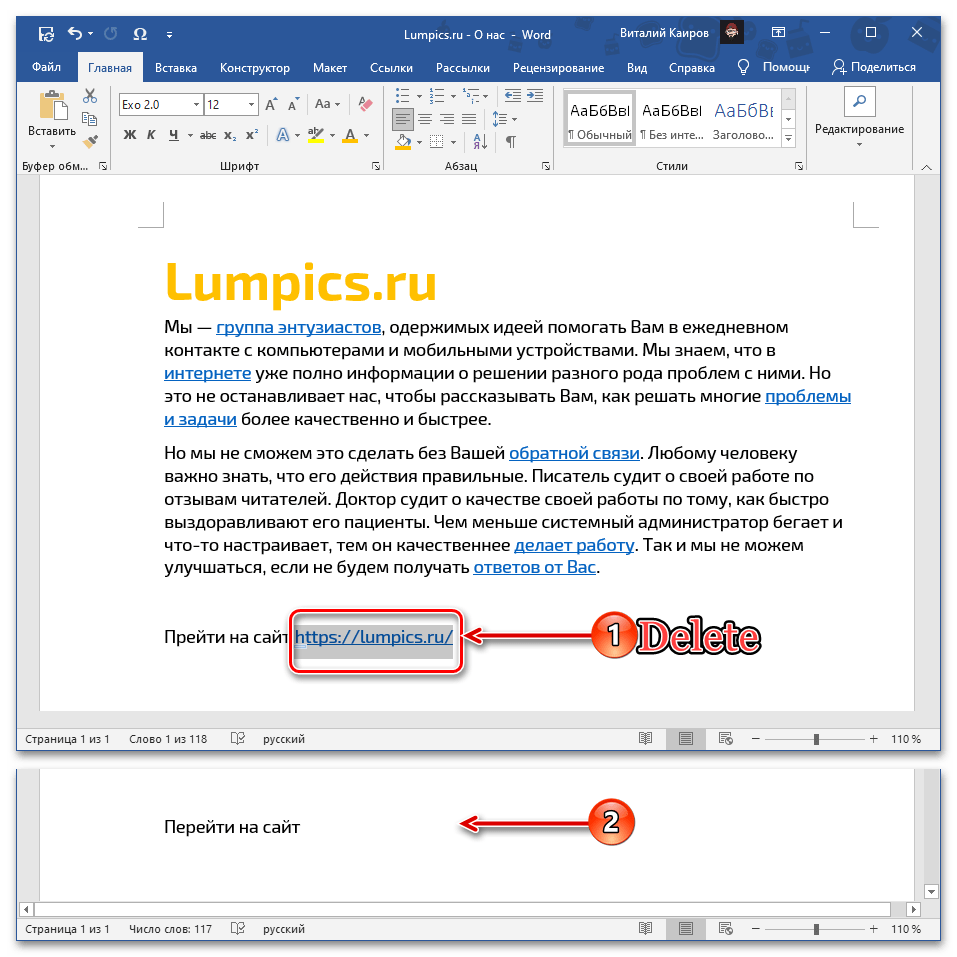
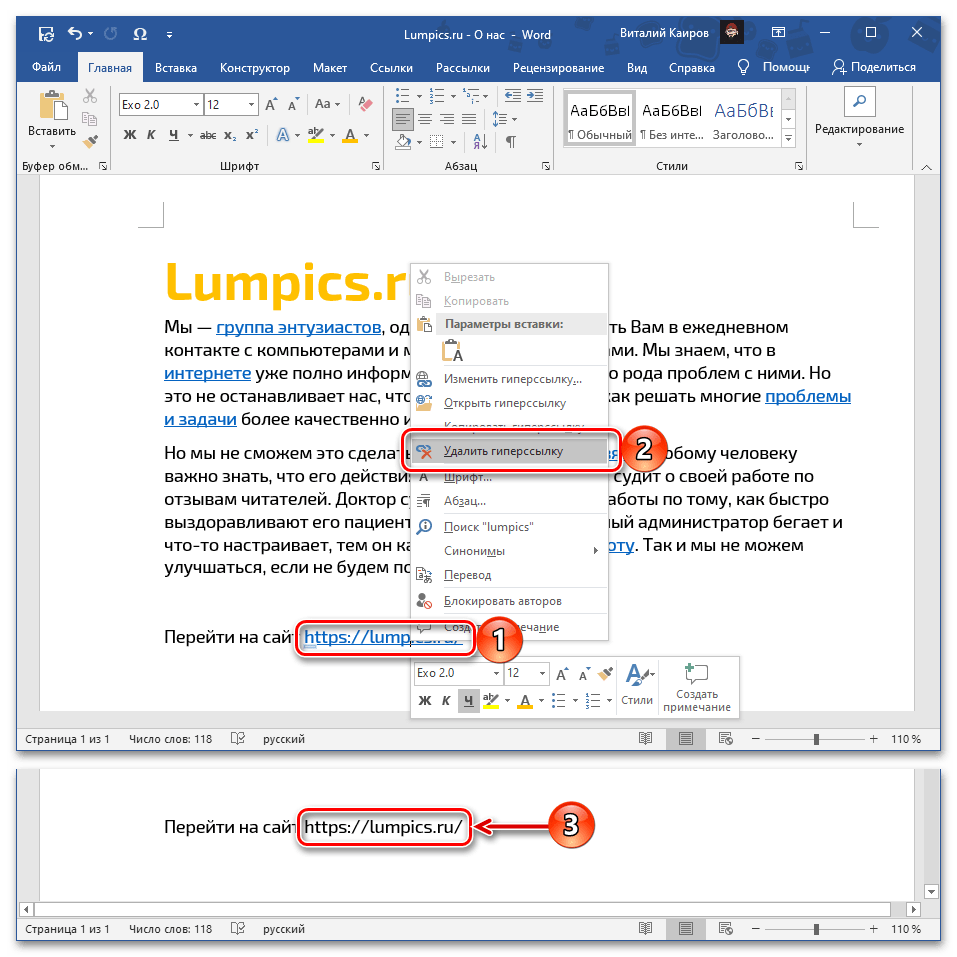
To remove a hyperlink but keep the text, right-click the hyperlink and click Remove Hyperlink.

To remove the hyperlink completely, select it and then press Delete.
In Excel:
If the hyperlink was created using the HYPERLINK function, you can remove the hyperlink by using the following steps:
-
Select the cell containing the hyperlink.
-
Press CTRL+C to copy the hyperlink.
-
Right Click and paste using the Values paste option.
Remove all hyperlinks at the same time
If you’re using Word, Outlook, or Excel, you can remove all hyperlinks in a file by using a keyboard shortcut.
In Word and Outlook:
-
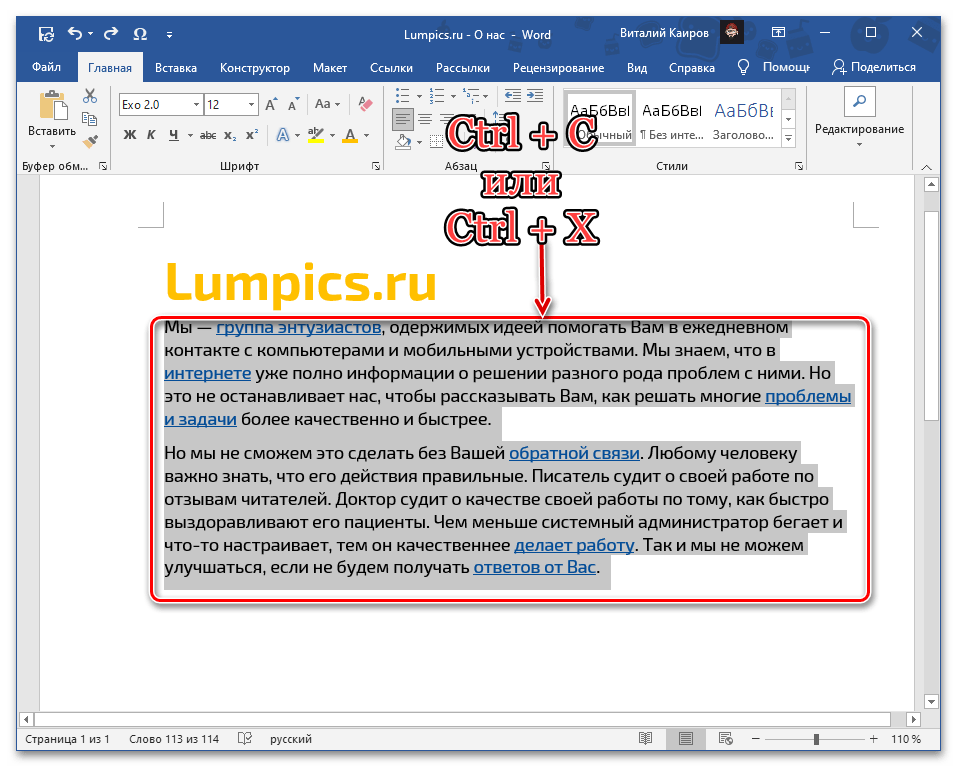
Press Ctrl+A to select all text.
-
Press Ctrl+Shift+F9.
In Excel:
-
Select all cells that contain hyperlinks, or press Ctrl+A to select all cells.
-
Right-click, and then click Remove Hyperlinks.
Turn off automatic hyperlinks
When it’s not convenient to have Office automatically create hyperlinks in your document as you type, you can turn them off.
-
In Office 2010 and later:
Click File > Options > Proofing.
(In Outlook, click File > Options > Mail > Editor Options > Proofing.)
-
Click AutoCorrect Options, and then click the AutoFormat As You Type tab.
-
Clear the Internet and network paths with hyperlinks check box.
Turn off Ctrl+Click to follow a link
By default, Word and Outlook require you to press Ctrl when you click to follow a hyperlink. This extra step keeps you from accidentally going to a linked destination while you’re editing a document.
If you want to click links without having to press Ctrl, try this:
-
In Word, click File > Options > Advanced.
In Outlook, click File > Options > Mail > Editor Options > Advanced.
-
Under Editing Options, clear the Use CTRL + Click to follow hyperlink check box.
See also
Create or edit a hyperlink
Need more help?
Want more options?
Explore subscription benefits, browse training courses, learn how to secure your device, and more.
Communities help you ask and answer questions, give feedback, and hear from experts with rich knowledge.
Содержание
- Вариант 1: Ссылки в тексте
- Вариант 2: Текст ссылок
- Дополнительно: Очистка скопированного текста от ссылок
- Вопросы и ответы
Вариант 1: Ссылки в тексте
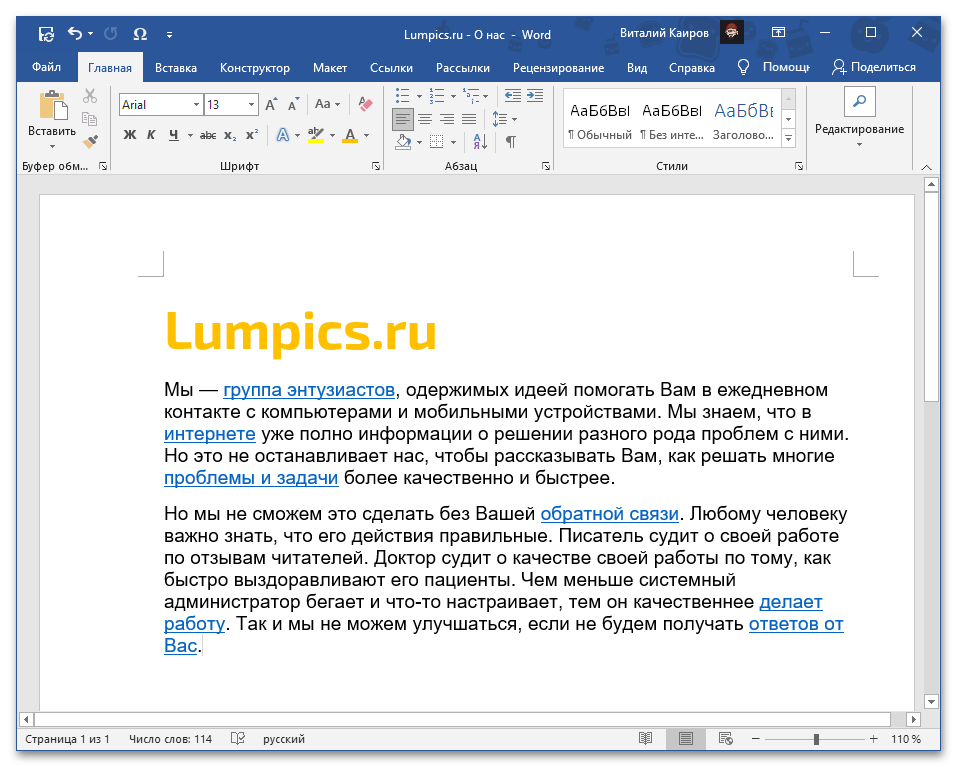
Для того чтобы удалить гиперссылки, внедренные в текст документа Word, необходимо воспользоваться специальным сочетанием клавиш. Сама же запись, хранящая в себе адрес для перехода, при этом останется.
Читайте также: Как вставить ссылку на сайт / на документ в Ворде
- Выделите текст, который требуется очистить от ссылок, воспользовавшись для этого клавишами «Ctrl+A» (если выделяется все содержимое документа) или мышкой (если выделяется фрагмент).

Читайте также: Как выделить страницу / все страницы в Word - Воспользуйтесь сочетанием клавиш «Ctrl+Shift+F9».
Обратите внимание! На некоторых ноутбуках, портативных и мультимедийных клавиатурах по умолчанию клавиши F-ряда могут отвечать за выполнение тех или иных функций (например, управление воспроизведением, изменение яркости и т. д.). В таком случае комбинация, которую требуется задействовать для решения задачи из заголовка статьи, будет выглядеть следующим образом: «Ctrl+Shift+Fn+F9».
Читайте также:
Как включить клавиши F1-F12 на ноутбуке
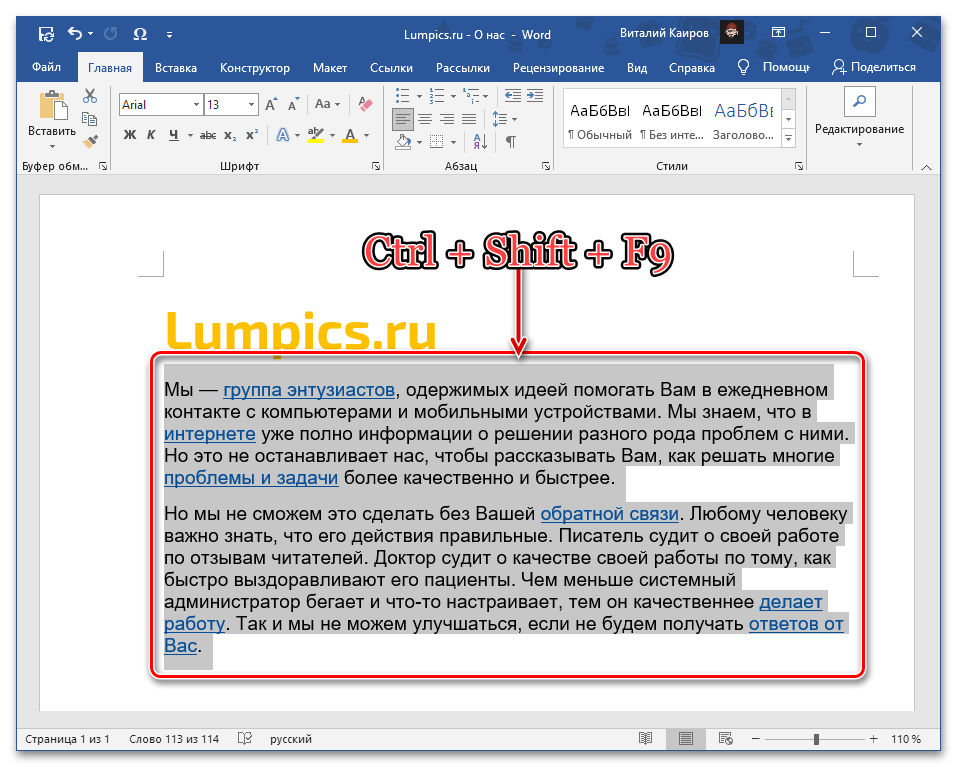
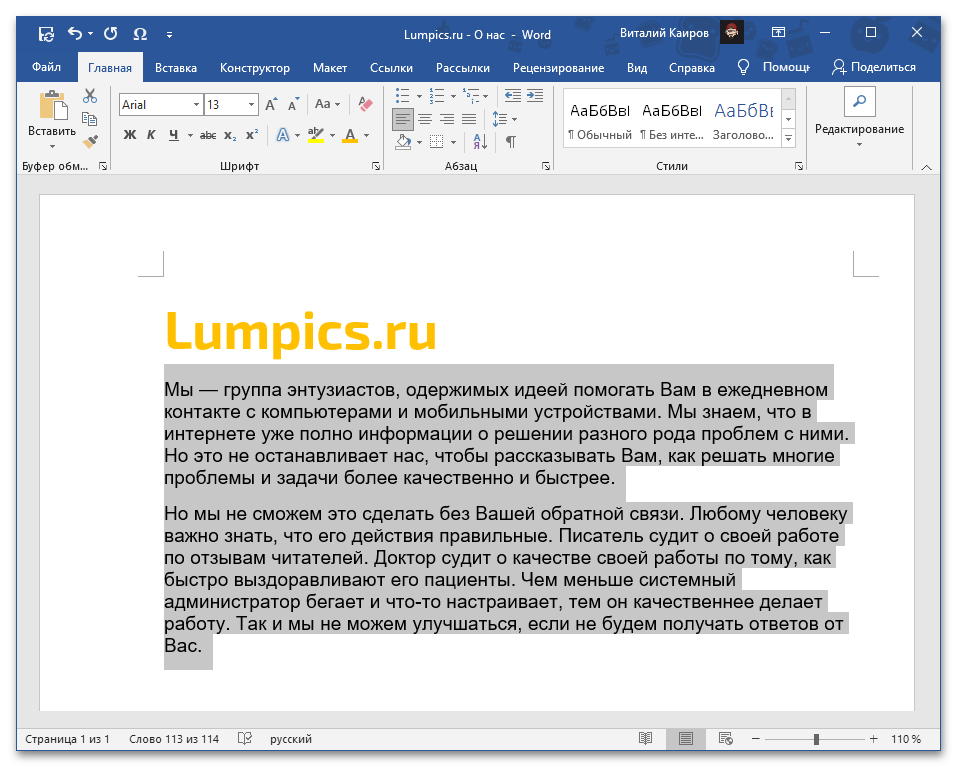
Как включить/отключить клавишу Fn на ноутбуке - Весь выделенный текст будет очищен от ссылок.
Читайте также: Горячие клавиши для быстрой и удобной работы в Ворде
Данный метод является единственным доступным решением в ситуации, когда из текстового документа или его части требуется удалить сразу все ссылки, сохранив при этом сам текст, в который были внедрены адреса.
Вариант 2: Текст ссылок
В том же случае, если помимо адресов, на которые ведут ссылки, требуется удалить и содержащий их текст, либо же если ссылка представлена в виде обычного и более ненужного URL, действовать придется только вручную, удаляя каждую такую запись отдельно.
Для этого выделите «подсвеченный» фрагмент текста, от которого требуется избавиться, и нажмите на клавишу «Delete» или «BackSpace».
Примечание: Если ссылка не «спрятана» в текст и представляет собой обычный URL-адрес, который все же требуется оставить в документе, но сделать его не активным, воспользуйтесь пунктом «Удалить гиперссылку» вызванного на этой записи контекстного меню. В качестве альтернативы также можно задействовать и предложенное в предыдущей инструкции сочетание клавиш, но в таком случае предварительно потребуется выделить фрагмент.
Читайте также: Как удалить гиперссылку в документе Microsoft Word
Дополнительно: Очистка скопированного текста от ссылок
Нередко необходимость удаления всех ссылок обусловлена задачей очистки исходного текста, скопированного, например, с веб-сайта или другого документа и содержащего в себе множество активных фрагментов с внедренными в них адресами. В таком случае достаточно вставить его не привычным для большинства способом, а несколько иначе. Отдельно стоит отметить, что при этом будет потеряно исходное форматирование.

Читайте также: Как форматировать текст в документе Ворд
Примечание: В качестве примера далее нами будет использован продемонстрированный в предыдущих частях статьи текстовый документ со ссылками, содержимое которого мы сначала вырежем, а затем вставим. Это же сработает при копировании текста со ссылками из любого другого источника.
Читайте также: Как вставить таблицу с сайта в Microsoft Word
- Выделите и скопируйте («Ctrl+C») или вырежьте («Ctrl+X») фрагмент или все содержимое документа, страницы веб-ресурса или любого другого источника, который требуется очистить от гиперссылок.
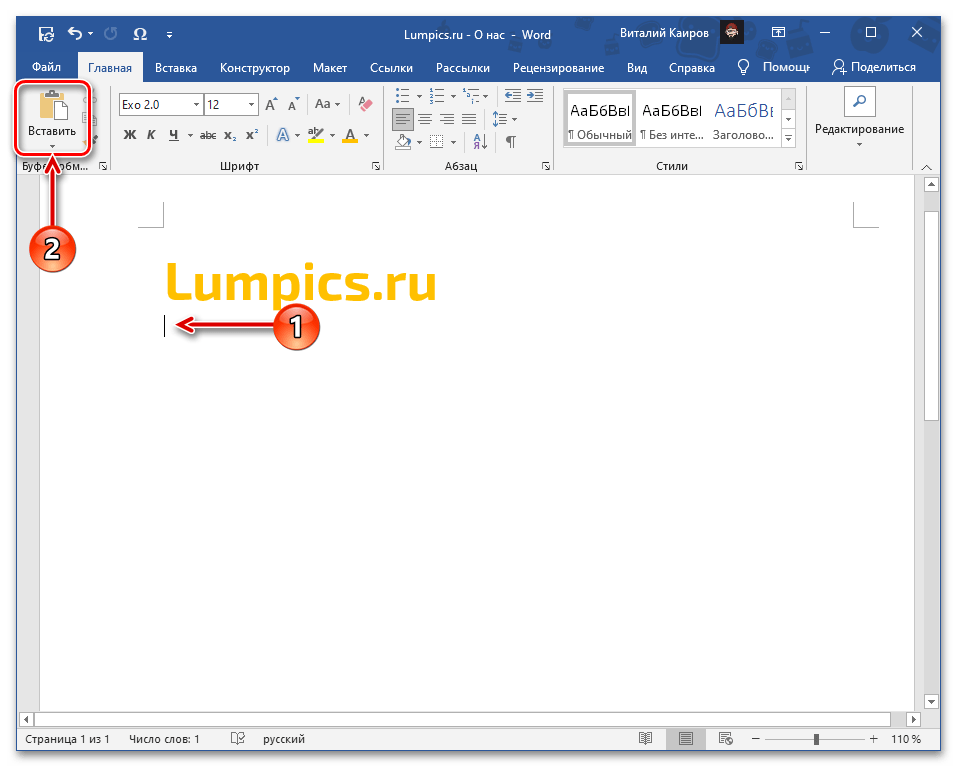
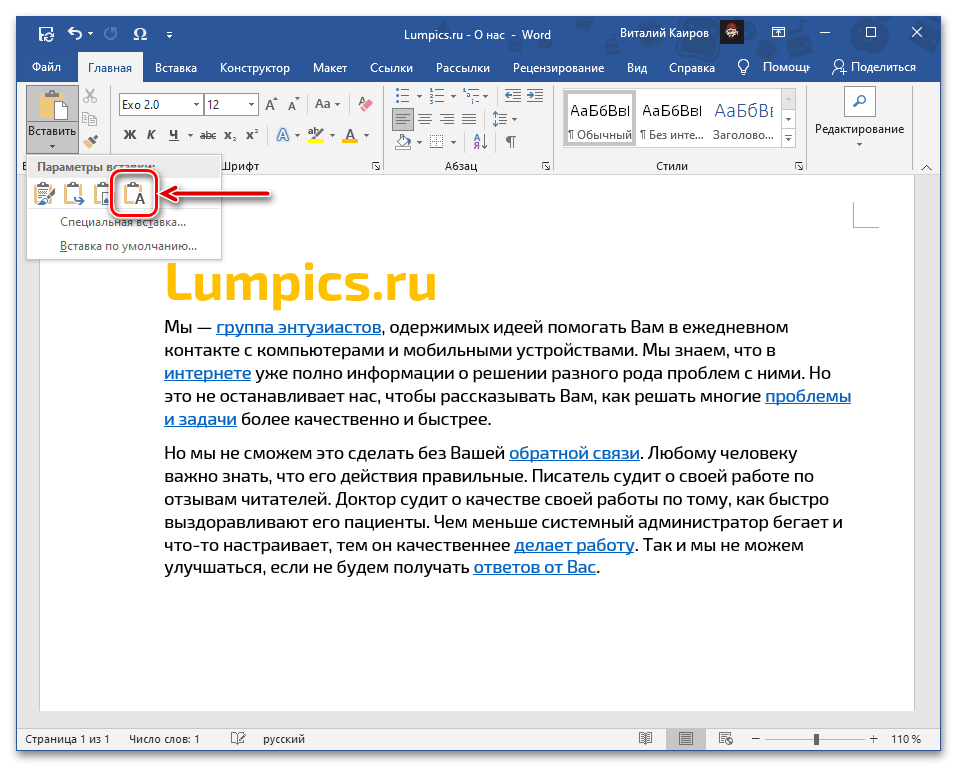
- Перейдите к документу Ворд, в который требуется добавить этот текст, установите указатель курсора в том месте, где он должен будет находиться, после чего разверните меню кнопки «Вставить», расположенной в группе инструментов «Буфер обмена» вкладки «Главная».
- Кликните по значку в виде планшета с буквой «А» в углу – «Сохранить только текст».
Читайте также: Как очистить форматирование в Microsoft Word
Скопированная запись появится в документе Ворд в чистом виде, то есть без каких-либо ссылок и любых других особенностей форматирования.
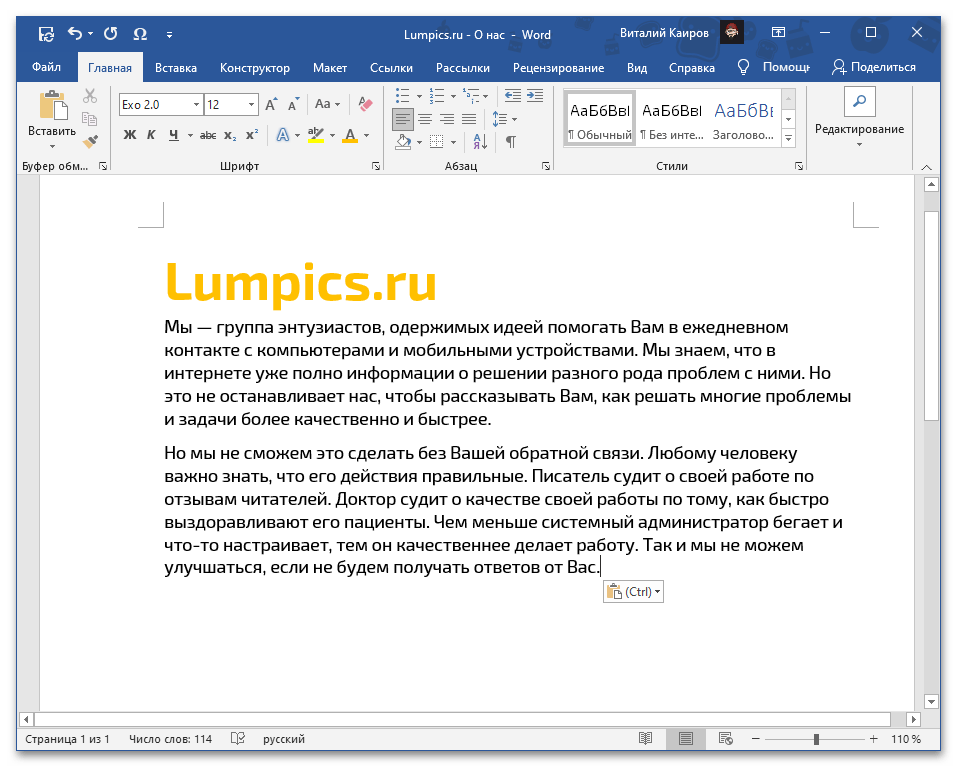
Отсутствие последнего, в зависимости от ситуации, может быть как достоинством, так и недостатком, но всегда исправимым путем изменения шрифта и/или стилей.
Подробнее:
Как изменить шрифт в Microsoft Word
Как создать свой стиль оформления в Ворде
Еще статьи по данной теме:
Помогла ли Вам статья?
Hyperlinks are links in documents or text that you can click if you want to be taken directly to a webpage containing additional information.
Hyperlinks enable you to summarise the content and add references if a reader wants to do additional reading. Hyperlinks are easy to identify in a document. Usually, they are underlined and blue in color.
If you are writing a document and realize that perhaps you have been asked not to include them, the good news is they can be removed: individually and at once.
Below are two methods you can use to remove hyperlinks from your document.
Method 1: Using the context menu.
This method is suitable if you are trying to remove one or a few hyperlinks, not all.
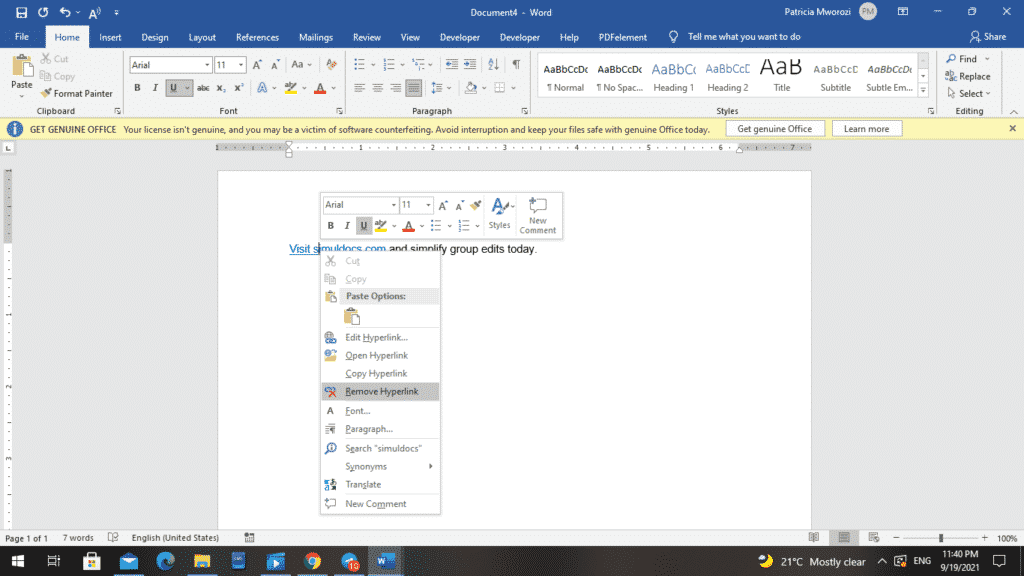
- Go to the hyperlink in your document.
- Right-click the hyperlink.
- MS Word displays a contextual menu.
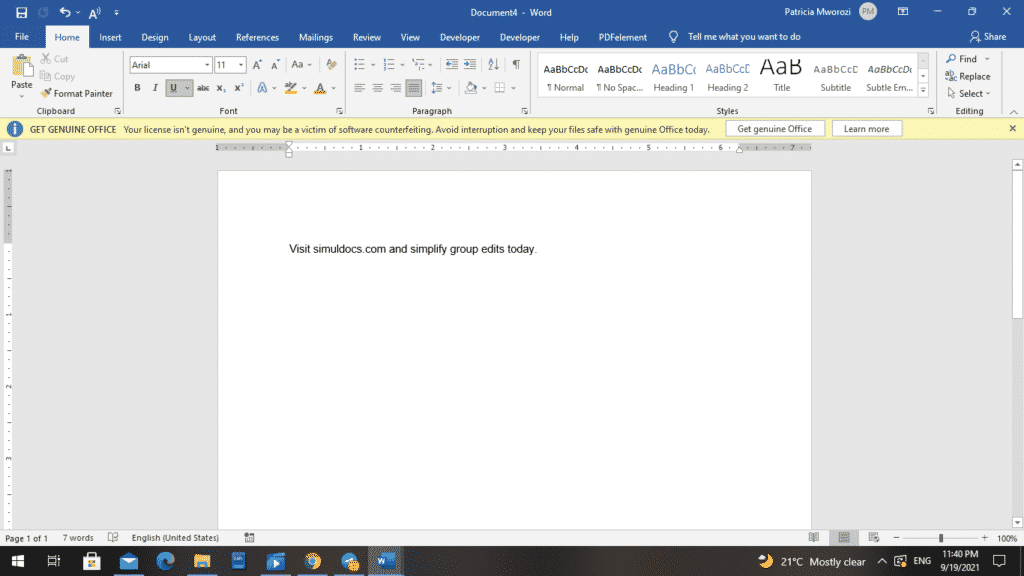
- From the menu, select ‘Remove Hyperlink.’
- The link now looks like the rest of the document and is not underlined.
- Alternatively, choose ‘Edit Hyperlink’ from the contextual menu.
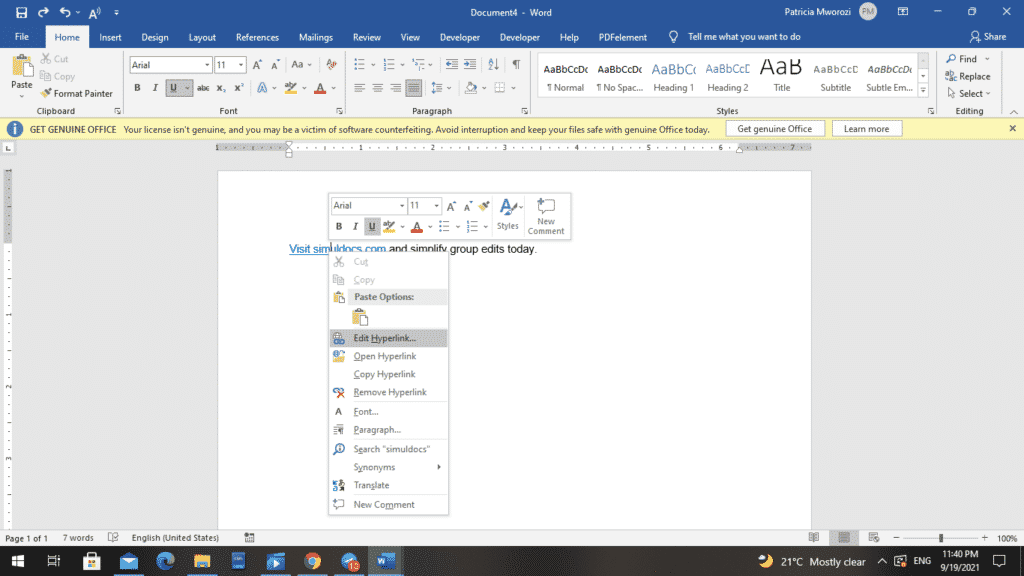
- A new window will open up on your screen.

- Select ‘Remove Hyperlink’ from the bottom left of your screen.
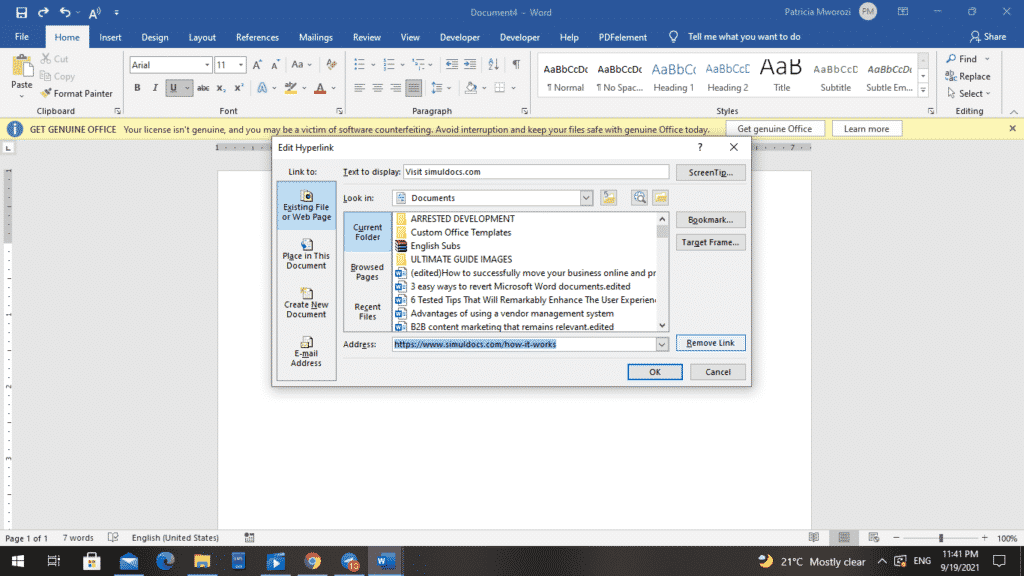
- Choose OK.
Method 2: Using keyboard shortcuts.
Removing hyperlinks one at a time can be time-consuming and exhausting. Therefore, this is a quick and suitable method only if you want to remove all the hyperlinks in your document.
- Press Ctrl + A. This selects all the text in the document.
- Then, press Ctrl + Shift + F9 to remove all the hyperlinks in the document.
Do you and your colleagues regularly have to work on written projects as a team?
Are you frustrated because of the difficulty in collaborating because of all the challenges associated with it? For instance:
- Difficulty in tracking changes
- Difficulty in knowing who edited what and when
- Difficulty in identifying recent or older versions
- You cannot work on the project simultaneously. The document has to move from one user to another.
I have the perfect solution for you! Simul Docs eliminates all these hurdles and comes with other helpful features, for example, adding comments.
Simul Docs is the solution for you.
The first step is downloading Simul Docs then you can get started.
After writing your first draft in Microsoft Word, upload it to Simul Docs. This will automatically make it the first version. Now, another colleague can open it and make their edits. This will create another version different from the first.
Whenever another person opens a version and makes edits, a new version is created with the latest changes, under a different name, and with the editor clearly highlighted. This is a great tool for tutors who want to ensure everyone participates in the writing and editing.
Sometimes, you might be in a rush and forget to turn on track changes so your modifications can be updated. You have nothing to worry about. Simul Docs automatically records these edits regardless of your online or offline status.
Since it is a collaboration, a bonus feature is the ability to add comments to the document. If you want a colleague to review the changes by a specific time, or any other instructions, you can let them know in the comment section. Later on, these comments can be removed after your groupmates have seen and executed the instructions.
Additionally, you and your groupmates can work on the document at the same time. There’s no need to sit around waiting for someone else to make edits. You might do your part in time, and the last person ends up costing the group credit because they work slowly. You can save time by working on a document at once, Simul Docs keeps each version separately.
Let us say another co-worker is supposed to include their input, but they do not have Simul Docs. Maybe they are not tech-savvy. All you have to do is download the document or forward it by email.
Alternatively, you can upload it to any storage software like one drive, and once their changes have been made, they can forward it to you once again, and you can open it in Simul Docs.
Once all the necessary edits have been made, you can save the final version containing all the modifications with one click.
Simul is the most convenient collaborative tool yet. Centralising your written project avoids mishaps like losing your work or losing its original format.
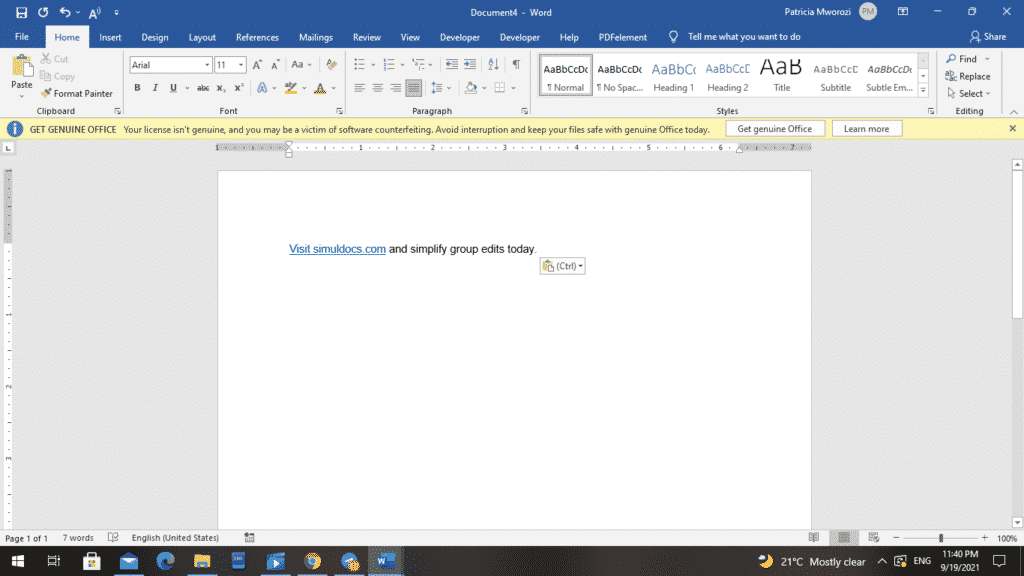
Visit simuldocs.com and simplify group edits today.
Во время редактирования в Microsoft Word может возникнуть необходимость в удалении часто используемых интерактивных объектов: гиперссылок, которые встраиваются в текст документа. В связи с этим у пользователя возникают вопросы о том, как удалить ссылку в Ворде или как удалить все гиперссылки в Word.
С помощью функции гиперссылок пользователь может получить дополнительную информацию о чем-либо, например, со страниц в Интернете. Используя ссылку, вы можете перейти на веб-ресурс, чтобы получить доступ к источнику данных, который относится к открытому документу.
Содержание:
- Как удалить ссылку в Ворде в тексте документа
- Как удалить все гиперссылки в Word сразу
- Как удалить ссылки из текста Word
- Как убрать все ссылки из документа Word с помощью VBA
- Как удалить ссылки «Оглавление» в Ворд
- Вставка текста в Word без гиперссылок с помощью параметров вставки
- Отключение гиперссылок в параметрах автозамены
- Как убрать гиперссылку из Word полностью
- Выводы статьи
- Как удалить ссылки в Word (видео)
Помимо гиперссылок на веб-страницы в Интернете и электронную почту, в документах используются ссылки на другие файлы MS Word или на определенные места в этих документах, на какой-либо текст или объект в текущем документе. Ссылки могут вести во всемирную сеть или использоваться только на локальном компьютере.
В некоторых случаях необходимо удалить ссылки в Word, чтобы в тексте документа отсутствовал этот элемент, служащий для перехода на источник информации.
Например, при копировании текста из Интернета, а затем вставке в Word, в документ переносится все содержимое, в том числе гиперссылки. Эти ссылки вам могут быть не нужны, потому что вам интересен только скопированный текст без отсылок к другим данным, или это отвлекает вас от чтения содержимого, если ссылок там слишком много.
Нередко встречаются ситуации, когда ссылки на другой документ Word или на элемент внутри другого документа становятся бесполезными на другом компьютере, потому что они перестают работать.
Можно использовать несколько методов для удаления гиперссылок из документа Word:
- Удаление ссылок вручную по одной.
- Удалить все гиперссылки в документе Word, используя сочетания клавиш.
- Удаление гиперссылок с помощью сценария VBA.
- Удаление лишних элементов при вставке текста в документ.
- Отключить в приложении параметры автозамены.
В этой статье вы ознакомитесь со всеми предложенными способами. Инструкции этого руководства подходят для разных версий текстового редактора Microsoft Word: Word для Microsoft 365, Word 2021, Word 2019, Word 2016, Word 2013, Word 2010, Word 2007.
Как удалить ссылку в Ворде в тексте документа
В некоторых документах содержится ограниченное число ссылок, которые можно удалить вручную. В других ситуациях, из документа Word необходимо удалить только некоторые ссылки, оставив активными другие гиперссылки.
В этом случае можно использовать два метода удаления ссылок.
1 способ:
- В окне открытого документа Word выделите ненужную гиперссылку.
- Откройте вкладку «Вставка».
- В группе «Ссылки» нажмите на значок «Ссылка» («Гиперссылка»).

- В окне «Изменение гиперссылки» нажмите на кнопку «Удалить ссылку».

- Ссылка исчезнет из документа, а текст гиперссылки приобретет обычный вид без синего цвета и подчеркивания.
2 способ:
- Выделите ссылку в тексте документа Word.
- Щелкните по ссылке правой кнопкой мыши.
- В открывшемся контекстном меню нажмите на пункт «Удалить гиперссылку».

Эти два варианта вы можете использовать для удаления отдельных ссылок из текста документа MS Word.
Но, бывают ситуации, когда необходимо в Ворд удалить все гиперссылки в документе. Для решения этой проблемы воспользуйтесь другими методами.
Как удалить все гиперссылки в Word сразу
Сейчас вы узнаете, как удалить все ссылки в Ворде сразу из всего документа. Этот случай подходит, когда вы скопировали и вставили в Word текст с сайта в Интернете, в котором имеется много ссылок, или для удаления всех гиперссылок в текущем открытом документе.
Если ссылок в тексте документа очень много, то удаление их по одной занимает много времени, это нерационально. Лучше использовать другой метод.
Мы рассмотрим простой способ, как удалить все гиперссылки в Ворде:
- Нажмите на клавиши «Ctrl» + «A», чтобы выделить все содержимое документа Word.
- Затем нажмите «Ctrl» + «Shift» + «F9».

- Все гиперссылки будут удалены из выделенного документа, при этом исходное форматирование текста сохраняется.
Если вдруг вы передумали, то отменить эту операцию можно с помощью сочетания клавиш «Ctrl» + «Z».
Как удалить ссылки из текста Word
В некоторых случаях, когда из документа нужно удалить только часть ссылок, а вручную по одной их удалять нецелесообразно, можно использовать похожий с предыдущим метод.
Сделайте следующее:
- Выделите часть текста в документе Word, откуда нужно убрать все ссылки.
- Нажмите на сочетание клавиш «Ctrl» + «Shift» + «F9», чтобы удалить все ссылки из выделенного текста.
В других частях документа MS Word активные гиперссылки сохранятся.
Как убрать все ссылки из документа Word с помощью VBA
Вы можете удалить все ссылки из текущего документа Word с помощью VBA (Visual Basic for Applications), реализации языка Visual Basic, который используется в продуктах Microsoft Office.
Пройдите шаги:
- Сначала понадобится включить вкладку «Разработчик» на ленте. Для этого из меню «Файл» войдите в настройки программы.
- В окне «Параметры Word» откройте вкладку «Настроить ленту».
- В разделе «Настройка ленты и сочетаний клавиш», в опции «Настроить ленту» установите галку в пункте «Разработчик», а затем нажмите на кнопку «ОК».

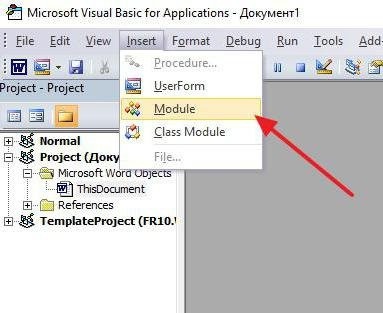
- Во вкладке «Разработчик» перейдите в группу «Код», нажмите на кнопку «Visual Basic».

- В окне «Microsoft Visual Basic for Applications» откройте меню «Insert» (Вставка), в а контекстном меню нажмите на «Module» (Модуль).

- В открывшееся окно вставьте следующий код:
Sub KillTheHyperlinks()

' -----------------------------------------------

' Removes all hyperlinks from the document:

' Text to display is left intact

' -----------------------------------------------

With ThisDocument

' Loop while there are hyperlinks afoot!

While .Hyperlinks.Count > 0

.Hyperlinks(1).Delete

Wend

End With

' Shut this off, don't need anymore popping up

Application.Options.AutoFormatAsYouTypeReplaceHyperlinks = False

End Sub
- Нажмите на кнопку «Run Sub/UserForm (F5)» (Воспроизвести).

После выполнения сценария все гиперссылки исчезнут из документа Word.
Вы можете использовать другой код, с помощью которого можно удалить все гиперссылки в сразу в нескольких открытых документах Word:
Sub KillTheHyperlinksInAllOpenDocuments()

' -----------------------------------------------

' Removes all hyperlinks from any open documents

' Text to display is left intact

' -----------------------------------------------

Dim doc As Document

Dim szOpenDocName As String

' Loop through all open documents:

For Each doc In Application.Documents

' Store the document name

szOpenDocName = doc.Name

' Remove the hyperlinks from that document

With Documents(szOpenDocName)

' Loop while there are hyperlinks afoot!

While .Hyperlinks.Count > 0

.Hyperlinks(1).Delete

Wend

End With

' Shut this off, don't need anymore popping up

Application.Options.AutoFormatAsYouTypeReplaceHyperlinks = False

Next doc

End Sub
Как удалить ссылки «Оглавление» в Ворд
В некоторых документах используется оглавление (содержание), заголовки которого ссылаются на другие части данного документа. По умолчанию, если нажать на клавишу «Ctrl», а затем щелкнуть по нужному заголовку (главе) в оглавлении, происходит переход к соответствующему разделу текущего документа.
Выполните следующие действия:
- В главном окне Word откройте вкладку «Ссылки».
- В группе «Оглавление» нажмите на кнопку «Оглавление».
- В открывшемся меню нажмите на пункт «Удалить оглавление».

Вставка текста в Word без гиперссылок с помощью параметров вставки
При копировании и вставке в Word информации из Интернета, со страниц веб-сайтов часто копируется много ссылок, которые не нужны пользователю. Подобная ситуация, иногда, случается при копировании содержимого из другого документа Word. Поэтому более целесообразно производить вставку скопированных данных сразу без ссылок.
1 способ:
- Скопируйте нужную информацию в Интернете или в другом документе Microsoft Word.
- В окне текущего документа Word установите курсор мыши в том месте, куда необходимо вставить скопированную информацию.
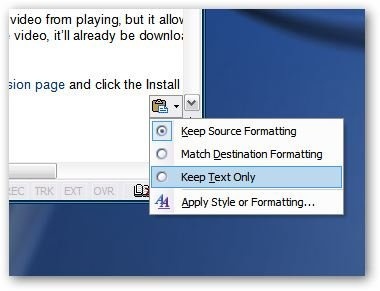
- Щелкните правой кнопкой мыши, а в открывшемся контекстном меню в опции «Параметры вставки:» вы увидите несколько иконок.
- Нажмите на значок «Сохранить только текст».

В результате в документ вставится очищенный текст без гиперссылок.
2 способ:
- Откройте вкладку «Главная» в окне документа Word.
- Затем нажмите стрелку внизу кнопки «Вставить».
- Щелкните по значку «Сохранить только текст».

К вставленному тексту применяется стиль «Обычный», а если он отличается от текущего, то вам может понадобиться изменить шрифт и форматирование в документе, чтобы привести все содержимое к единообразному виду.
Отключение гиперссылок в параметрах автозамены
При настройках по умолчанию, Word автоматически превращает вводимые в тексте веб-адреса в ссылки. Вы можете отключить на время на эту функцию, чтобы она не мешала редактированию документа.
Выполните следующее:
- Из меню «Файл» войдите в «Параметры Word».
- Откройте вкладку «Правописание», нажмите на кнопку «Параметры автозамены…».

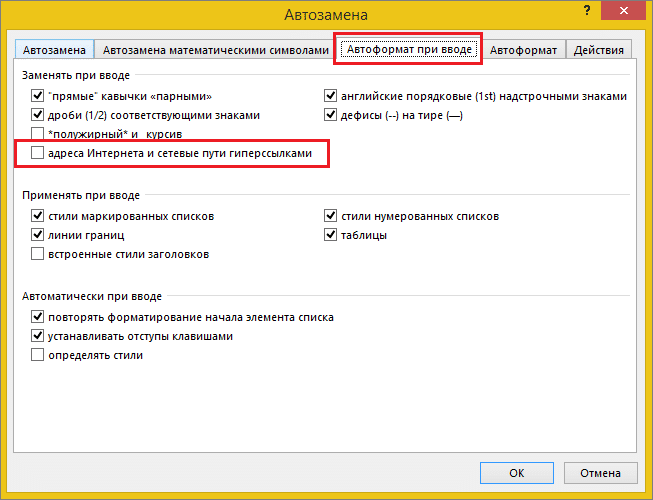
- В окне «Автозамена» войдите во вкладку «Автоформат при вводе».
- В разделе «Заменять при вводе» снимите флажок в пункте «адреса Интернета и сетевые пути гиперссылками».
- Нажмите на кнопку «ОК».

- Во вкладке «Автоформат» в разделе «Заменять» снимите галку в опции «адреса в Интернете и сетевые пути гиперссылками» и подтвердите это действие, нажав на «ОК».

Включение этого параметра влияет на появление только будущих гиперссылок, а текущие ссылки, которые уже есть в документе останутся нетронутыми. Их придется удалить вручную одним из описанных выше способов.
Как убрать гиперссылку из Word полностью
В случае необходимости можно полностью удалить ссылку как целый объект из документа:
- Выделите ссылку.
- Нажмите на клавишу «Del».
Из документа Word удалится текст и адрес ссылки.
Выводы статьи
В документах Word часто используется гиперссылки, ведущие на адреса в Интернете, на другие файлы или на определенное место в самом документе. В некоторых случаях пользователю необходимо убрать ссылки из документа Word, потому что они стали не нужны. Можно удалить из документа некоторые ссылки вручную или удалить все гиперссылки сразу несколькими способами.
Как удалить ссылки в Word (видео)
Похожие публикации:
- Как ограничить редактирование документа Word
- Как поставить знак градуса в Word
- Как вставить GIF в Word — 3 способа
- Как сделать вертикальный текст в Word — 5 способов
- Как убрать пустую страницу в Ворде — 6 способов
Microsoft Word is one of the best, if not ‘The Best’, document creating and editing software available to computer users. The application owes this to the long list of features Microsoft has incorporated over the years and the new ones it continues to add. It won’t be far fetched to say that a person familiar with Microsoft Word and its features is more likely to be hired for a post than the one who doesn’t. The proper use of hyperlinks is one such feature.
Hyperlinks, in their simplest form, are clickable links embedded in text that a reader can visit to get additional information regarding something. They are incredibly important and help seamlessly connect the World Wide Web by linking more than trillions of pages with each other. The use of hyperlinks in word documents serves a similar purpose. They can be used to refer to something, direct the reader to another document, etc.
While useful, hyperlinks can be infuriating too. For example, when a user copies data from a source like Wikipedia and pastes it in a Word document, the embedded hyperlinks follow too. In most cases, these sneaky hyperlinks are not required and useless.
Below, we have explained four different methods, along with a bonus one, on how to remove unwanted hyperlinks from your Microsoft Word documents.

Table of Contents
1
Removing hyperlinks from a word document is nothing to fear as it takes only a few clicks. One can either choose to remove a couple of hyperlinks manually from the document or say ciao to all of them by means of a simple keyboard shortcut. Word also has the feature (Keep Text Only paste option) to remove hyperlinks from copied text automatically. Ultimately, you can also choose to use a third-party application or a website to remove hyperlinks from your text. All of these methods are explained below in an easy step-by-step manner for you to follow.
Method 1: Remove a single hyperlink
More often than not, it is just a single or a couple of hyperlinks that need to be removed from a document/paragraph. The process to do so is-
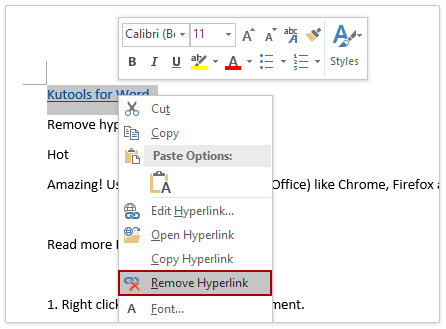
1. As obvious, start by opening the Word file you wish to remove hyperlinks from and locate the text embedded with the link.
2. Move your mouse cursor over the text and right-click on it. This will open a quick edit options menu.
3. From the options menu, click on Remove Hyperlink. Simple, eh?

For macOS users, the option to remove hyperlink isn’t directly available when you right-click on one. Instead, on macOS, you will first need to select Link from the quick edit menu and then click on Remove Hyperlink in the next window.
Method 2: Remove all hyperlinks at once
If you are one of those folks who copy heaps of data from websites like Wikipedia and paste in a Word document to edit later, removing all hyperlinks at once might be the way for you to go. Who would want to right-click about 100 times and remove each hyperlink individually, right?
Fortunately, Word has the option to remove all the hyperlinks from a document or a certain portion of the document using a single keyboard shortcut.
1. Open the document containing the hyperlinks you wish to remove and ensure your typing cursor is on one of the pages. On your keyboard, press “Ctrl + A” to select all the pages of the document.
If you want to remove hyperlinks from only a certain paragraph or portion of the document, use your mouse to select that specific section. Simply bring your mouse cursor at the start of the section and left-click; now hold the click and drag the mouse pointer to the end of the section.
2. Once the required pages/text of your document is selected, carefully press “Ctrl + Shift + F9” to remove all the hyperlinks from the selected part.

In some personal computers, the user will also need to press the fn key to make the F9 key functional. So, if pressing “Ctrl + Shift + F9” didn’t remove the hyperlinks, try pressing “Ctrl + Shift + Fn + F9” instead.
For macOS users, the keyboard shortcut to select all text is “Cmd + A” and once selected, press “Cmd + 6 ” to remove all hyperlinks.
Also Read: How to Rotate a Picture or Image in Word
Method 3: Remove hyperlinks while pasting text
If you have a hard time remembering keyboard shortcuts or don’t like using them in general (Why though?), you can also remove hyperlinks at the time of pasting itself. Word has three (four in Office 365) different pasting options, each one catering to a different need and we have explained all of them below, along with the guide on how to remove hyperlinks while pasting text.
1. First, go ahead and copy the text you wish to paste.
Once copied, open a new Word document.
2. Under the Home tab (if you aren’t on the Home tab, just switch to it from the ribbon), click on the downward arrow on the Paste option.
You will now see three different ways in which you can paste your copied text. The three options are:
- Keep Source Formatting (K) – As evident from the name, the Keep Source Formatting paste option retains the formatting of the copied text as it is, i.e, the text when pasted using this option will look as it did while copying. The option retains all formatting features like font, font size, spacing, indents, hyperlinks, etc.
- Merge Formatting (M) – The merge formatting paste feature is perhaps the smartest of all available paste options. It merges the formatting style of the copied text to the text surrounding it in the document it was pasted in. In simpler words, the merge formatting option removes all formatting from the copied text (except certain formatting that it considers important, for example, bold and italic text) and imparts the formatting of the document it is pasted in.
- Keep Text Only (T) – Again, as clear from the name, this paste option only retains the text from the copied data and discards everything else. Any and all formatting along with pictures and tables are removed when data is pasted using this paste option. The text adopts the formatting of the surrounding text or the entire document and tables, if any, are converted into paragraphs.
- Picture (U) – The Picture paste option is only available in Office 365 and allows users to paste text as a picture. This, however, makes it impossible to edit the text but one can apply any picture effects such as borders or rotation like they normally would on a picture or image.
Coming back to the need of the hour, since we only want to remove the hyperlinks from the copied data, we will be using the Keep Text Only paste option.
3. Hover your mouse over the three paste options, until you find the Keep Text Only option and click on it. Usually, it is the last of the three and its icon is a clean paper pad with a capitalized & bold A at the bottom-right.

When you hover your mouse over the various paste options, you can see a preview of how the text will look once pasted on the right. Alternatively, right-click on an empty area of a page and select the Keep Text Only paste option from the quick edit menu.
Also Read: 3 Ways to Remove Paragraph Symbol (¶) in Word
Method 4: Disable hyperlinks altogether
To make the typing and documentation process more dynamic & smart, Word automatically transforms email addresses and website URLs into hyperlinks. While the feature is quite useful, there is always a time when you just want to write an URL or mail address without turning it into a clickable hyperlink. Word allows the user to disable the auto-generate hyperlinks feature altogether. The procedure to disable the feature is as follows:
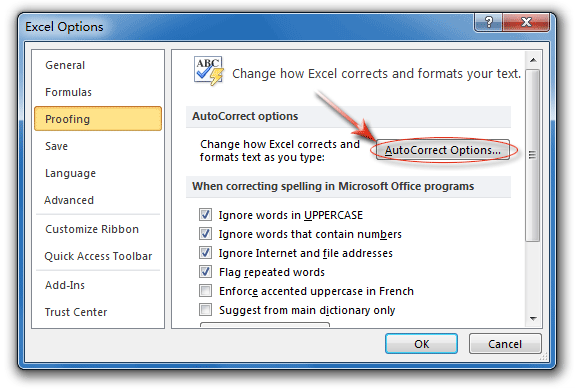
1. Open Microsoft Word and click on the File tab at the top-left of the window.

2. Now, click on Options located at the end of the list.

3. Using the navigation menu on the left, open the Proofing word options page by clicking on it.
4. In proofing, click on the AutoCorrect Options…button next to Change how Word corrects and formats text as you type.

5. Switch to the AutoFormat As You Type tab of the AutoCorrect window.
6. Finally, uncheck/untick the box next to Internet and Network paths with hyperlinks to disable the feature. Click on OK to save changes and exit.

Method 5: Third-Party applications for removing hyperlinks
Like everything nowadays, there are a number of third-party developed applications that help you remove those pesky hyperlinks. One such application is Kutools for Word. The application is a free Word extension/add-on which promises to make time-consuming daily actions a breeze. Some of its features include merge or combine multiple Word documents, split a single document into multiple infant documents, convert images to equations, etc.
To remove hyperlinks using Kutools:
1. Visit Free download Kutools for Word – Amazing Office Word Tools on your preferred web browser and download the installation file according to your system architecture (32 or 64 bit).
2. Once downloaded, click on the installation file and follow the on-screen prompts to install the add-on.

3. Open the Word document you wish to remove hyperlinks from.
4. The Kutools add-on will appear as a tab at the top of the window. Switch to the Kutools Plus tab and click on Hyperlink.
5. Finally, click on Remove to remove hyperlinks from the entire document or just the selected text. Click on OK when asked for confirmation on your action.

Apart from a third-party extension, there are websites like TextCleanr – Text Cleaner Tool that you can use to remove hyperlinks from your text.
Recommended:
- What is a Command Line Interpreter?
- How to Open Control Panel in Windows
- Unlock Android Phone If You Forgot the Password or Pattern Lock
I hope the above tutorial was helpful and you were able to Remove Hyperlinks from Microsoft Word Documents. But if you still have questions regarding this article then feel free to ask them in the comment section.
Word is the most widely used text format in our everyday lives. You may use it to edit abstracts, plans, papers, etc. However, often a hyperlink is created automatically whenever you copy/paste a reference to a Word file. By default, anytime you enter a web address in a Word document, Word will be able to recognize the URL and automatically generate a link that you can use to navigate the site. If you copy and paste content from an internet site to a Word file, the URL will be copied and will also display in the Word document.
If you would not want to switch to the page you refer to, what are you going to do? Moreover, if you ever get files that contain multiple links, how to remove multiple hyperlinks in Word? Follow this comprehensive guide below to discover the best available options. Occasionally, for whatever the reason is, you might not like a link to exist in your Word file. You should delete all of them at once.
If you are looking to find out how to remove hyperlink in Word, there are many ways you can do it such as:
- Erase all existing hyperlinks
- Disable the hyperlink when you type
- Paste content with no hyperlinks
- Delete single hyperlink one by one
- Remove a hyperlink in Word on Mac by using “Cmd.”
Let’s discuss all these methods in detail to make things clear.
Method 1: Delete all Links from the Word Document by Using the Shortcut key
Follow these steps to remove all hyperlinks from the Word document with a shortcut key:
Step 1: Open the Word document that contains a URL.
Step 2: Select all content by clicking “Ctrl+A” on the keyboard.
Step 3: Click on the combination “Ctrl + Shift + F9” to delete all current URLs in the Word text instantly. After this step, all the hyperlinks or URLs available inside the whole Word document will be deleted.
Method 2: Remove Hyperlinks when you Type in the AutoCorrect Word File
Step 1: Double click on the 2016 Word document to open it. Click on the “File” menu on the toolbar, and then select the “Options” button on the backdrop view.
Step 2: After the Word Options window is opened, press “Proofing” on the left sidebar, and then press the “AutoCorrect Options” to appear on the top pane.
Step 3: Once the “AutoCorrect” window is opened, pick the “AutoFormat As You Type” tab, delete the checkbox next to the Internet as well as the hyperlinked network routes. Now click on “OK” and tap “OK” again.
It will deter Word from generating hyperlinks when you type the URLs in the Word file, but this will not delete current hyperlinks.
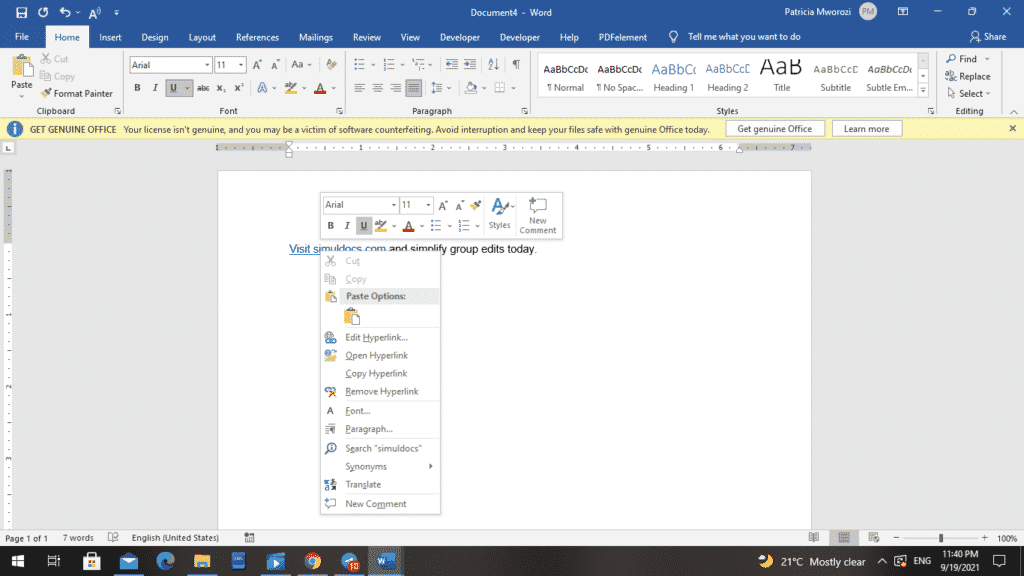
Method 3: Delete Hyperlinks to a Word Document through Paste Features
- After copying text with URLs, press the “Paste” button at the top hand side of the Word doc. Then pick the third alternative “Keep Text Only” beneath Paste Options.
- It will paste the text with no hyperlinks.
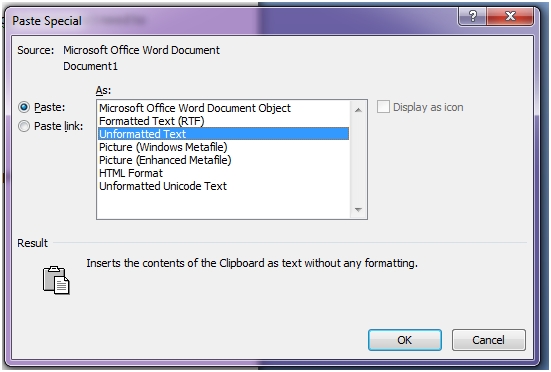
- After you copy a URL, press the “Paste” button, and then click on the “Paste Special” icon.
- Moreover, in Paste Special dialogue, click the “Paste Link” option, select “Unformatted Text” from the window, and click on OK.
- It will paste a URL without a hyperlink to it.
Method 4: Remove a Single Hyperlink on Microsoft Word
If you want to delete a single hyperlink, right-click the clickable link and choose “Remove Hyperlink” from the pop-up screen. This is how you can simply delete a single hyperlink.
However, it is only possible when you have 1 or 2 hyperlinks. It becomes almost impossible or irritating when you have multiple hyperlinks.
Method 5: Delete Hyperlink on Mac in Microsoft Word
If you are a Mac user, and you want to remove a hyperlink in Word on Mac document, it is easy for you to delete a single hyperlink same as above. What if you are in a hurry or can’t remove links one by one?
For this purpose, you need to remove them all. Follow the simple steps and get rid of unnecessary hyperlinks.
Step 1: Click on “Cmd” + “A” to pick all content.
Step 2: Then click on “Cmd” + “6” to delete all hyperlinks from the Word file.
There are many ways of getting rid of the hyperlinks in Word files. The process you choose depends on your needs.
Conclusion
There are five ways discussed in this article that you can use to delete or disable all links in the Word text that also refer to previous versions of Microsoft Word. Hyperlinks are immediately added by default when you enter emails and URLs in Microsoft word. Even though, if you do not want the hyperlinks to be added instantly, you can disable the feature too.
Now you are familiar and know how to remove multiple hyperlinks in word. Choose the best-fit option for you and remove all the unnecessary hyperlinks from your Word document. If you are a Mac user, you can also remove the hyperlinks that are not needed. You can remove hyperlinks in Word on Mac by very simple steps.
![]()
В сегодняшней статье мы опубликуем подробную инструкцию, как убрать сразу все гиперссылки в Word и Excel. Рассмотрим несколько способов удаления ссылок: вручную, автоматическое удаление, с помощью скрипта, а также как отключить функцию создания гиперссылок в документе.
Microsoft Word, без преувеличения, сегодня самый популярный текстовый редактор. Но, несмотря на всю свою популярность, очень немногие пользователи знают все функции этой программы. Например, не все знают, что в Word есть несколько простых способов одновременного удаления гиперссылок из текста.
Но это очень полезная функция для тех, кто часто работает с текстами, скачанными из Интернета. Но не волнуйтесь, вы можете узнать, как удалить гиперссылки в Word (сразу и по отдельности) из этой статьи.
Как убрать гиперссылки вручную
Если в тексте не так много гиперссылок, вы можете управлять ими, удаляя их вручную. Делается это довольно просто.
- Щелкните гиперссылку правой кнопкой мыши.
- В появившемся меню выберите «Удалить гиперссылку”.
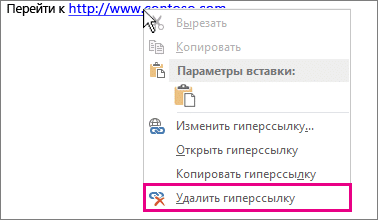
После этого гиперссылка будет удалена, а простой текст останется на месте.
Вам нужно будет повторить эту процедуру для каждой ссылки в тексте. Если их несколько, проблем не возникнет. Однако, если в тексте много гиперссылок, этот процесс может занять много времени. К счастью, у вас есть альтернативы удалению гиперссылки, о которых вы можете прочитать ниже.
Автоматическое удаление гиперссылок в Word
Следующая опция поможет вам удалить сразу все гиперссылки. В Word существует огромное количество различных сочетаний клавиш, среди которых есть одно, которое поможет нам в данной ситуации.
Вы можете удалить все гиперссылки, просто удерживая одновременно клавиши «Ctrl», «Shift» и «F9». Однако перед этим вам нужно выделить ту часть текста, из которой вы хотите удалить ссылки.
Если вам нужно удалить весь очень большой текст, чтобы ускорить этот процесс, вы можете нажать кнопку «Выбрать» в правом верхнем углу экрана и выбрать опцию «Выбрать все», удерживая указанную выше комбинацию, и все гиперссылки будут удаленный.
Как убрать гиперссылки в Ворде (сразу все) с помощью скрипта
Следующий способ удалить гиперссылки во всем документе немного длиннее. Однако вам нужно сделать это только один раз, но после этого вам нужно будет только нажать кнопку, и все гиперссылки будут удалены.
- Сначала откройте нужный документ.
- Затем зажмите комбинацию «Alt + F11”.
- После этого появится окно для работы со скриптами, в котором нужно нажать на вкладку «Вставка» в верхней панели.
- В появившемся меню выберите пункт «Модуль”.
После этого перед вами появится небольшое окошко, в котором вам нужно будет ввести скрипт. Есть два сценария, которые могут вам подойти.
Первый удаляет все ссылки в активном документе.
Sub KillTheHyperlink ()
‘ ————————————————
‘Удалите из документа все гиперссылки:
‘Текст для отображения остался нетронутым
‘ ————————————————
С этим документом
‘Цикл, пока есть гиперссылки пешком!
Пока .Hyperlinks.Count> 0
.Гипертекстовые ссылки (1) .Удалить
Wend
Конец с
« Выключи, мне больше не нужно ставить галочку
Application.Options.AutoFormatAsYouTypeReplaceHyperlinks = False
Конец подзаголовка
Второй удаляет гиперссылки во всех открытых в данный момент документах.
Sub KillTheHyperlinksInAllOpenDocuments () ‘——————————————— ————— — ‘Удалить все гиперссылки из любого открытого документа’ Отображаемый текст остается без изменений ‘—————— — ————- — ————— Dim doc As Document Dim szOpenDocName As String ‘Цикл по всем открытым документам: для каждого документа в Application.Documents ‘Сохранить имена документов zOpenDocName = doc.Name’ Удалить гиперссылки из этого документа с помощью документов (szOpenDocName) ‘Цикл, пока идут гиперссылки! В то время как .Hyperlinks.Count> 0 .Hyperlinks (1) .Delete Wend End With ‘Shut this off, больше нет необходимости вызывать Application.Options.AutoFormatAsYouTypeReplaceHyperlinks = False Next docEndSub
После этого вам просто нужно закрыть окно со скриптом, чтобы он сохранился. Когда скрипт создан, вы можете использовать его в любое время, просто нажав «F5”.
Как убрать гиперссылки заранее
Есть еще один способ удалить гиперссылки в Word. Все ссылки в скопированном документе можно удалить сразу перед вставкой. Сделать это достаточно просто.
- Скопируйте текст.
- Активируйте Word.
- Щелкните правой кнопкой мыши то место в тексте, в которое вы хотите вставить скопированный фрагмент.
- В появившемся меню наведите указатель мыши на раздел «Параметры вставки”.
- Выберите третий вариант под названием «Сохранить только текст”.
Впоследствии текст будет вставлен без ссылок. Однако при этом будут сброшены все настройки форматирования.
Как отключить создание гиперссылок
По мере ввода текста Word может автоматически создавать гиперссылки. Если вы этого не хотите, эту опцию можно отключить. Делается это так:
- Откройте вкладку «Файл», расположенную в правом верхнем углу.
- Откройте «Параметры”.
- На левой панели выберите вкладку «Орфография”.
- Затем нажмите кнопку с надписью «Параметры автозамены…”.
- Щелкните вкладку «Автоформат при вводе”.
- Снимите флажок «Пути сетевых гиперссылок”.
После этого гиперссылки не появятся в тексте сами по себе.
Как удалить гиперссылки в Excel
Что ж, в конце статьи мы поговорим об еще одной программе пакета Microsoft Office, которая также поддерживает гиперссылки. Удалить гиперссылку в Excel очень просто: просто выберите все ячейки, содержащие гиперссылки, затем щелкните одну из них правой кнопкой мыши и выберите «Удалить гиперссылку» в появившемся меню”.
Как удалить гиперссылки во всем документе
Теперь вы знаете все о том, как удалять гиперссылки в Word. Все ссылки сразу или каждая в отдельности не учитываются, потому что мы рассмотрели все способы. Кстати, есть и другие способы удаления гиперссылок для текста, но все они подходят только для определенных версий Word. А вышеперечисленные способы универсальны и подходят для любого варианта.