
 Please Note:
This article is written for users of the following Microsoft Word versions: 97, 2000, 2002, and 2003. If you are using a later version (Word 2007 or later), this tip may not work for you. For a version of this tip written specifically for later versions of Word, click here: Understanding Font Styles.
![]()
Written by Allen Wyatt (last updated July 1, 2021)
This tip applies to Word 97, 2000, 2002, and 2003
Word allows you to format your documents in many different ways. One of the ways you can format the characters within your document is through the use of font styles. The phrase «font styles» is easy to confuse with «character styles» and «paragraph styles.» In Word these latter two phrases refer to styles you can define to indicate how characters and paragraphs should look. Font styles, on the other hand, are not style definitions at all; they are variations of a font that indicate different ways that font can appear. While you can define a character or paragraph style, you cannot define a font style at all.
You probably already know that you can use different fonts for displaying characters. Each font typically comes with a number of styles in which it can be displayed. For instance, if you format a character as bold, then you have specified the Bold font style.
If you want to see the available font styles for a particular font, follow these steps:
- Select the text you want to affect.
- Choose the Font option from the Format menu. Word displays the Font dialog box. (See Figure 1.)
- From the Font list, select the font you want to use.
- Examine the Font Style list to see which styles are available for the font.
- When you are done, click on OK.
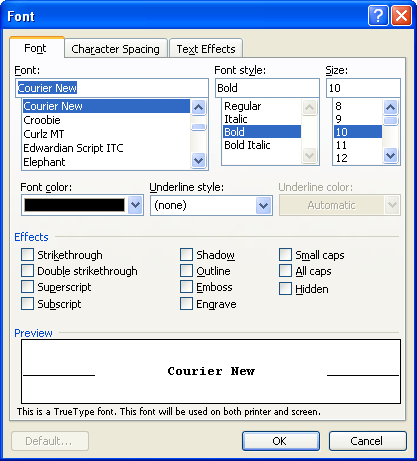
Figure 1. The Font dialog box.
You should note that different fonts have different font styles available. The most common font styles are Regular, Italic, Bold, and BoldItalic. This is not the limit, however, and not every font will include these four. Indeed, the styles available for a particular font are entirely up to the font designer.
WordTips is your source for cost-effective Microsoft Word training.
(Microsoft Word is the most popular word processing software in the world.)
This tip (1471) applies to Microsoft Word 97, 2000, 2002, and 2003. You can find a version of this tip for the ribbon interface of Word (Word 2007 and later) here: Understanding Font Styles.
Author Bio
With more than 50 non-fiction books and numerous magazine articles to his credit, Allen Wyatt is an internationally recognized author. He is president of Sharon Parq Associates, a computer and publishing services company. Learn more about Allen…
MORE FROM ALLEN
Styles for Lines, Dashes, and Arrows
Create a simple drawing object, and Excel makes some assumptions about how that object should appear. Excel provides a …
Discover More
Controlling Entry Order on Unprotected Cells
When you protect a worksheet, one of the benefits is that you can limit which cells can be used for data entry. How a …
Discover More
Adding a Border around Multiple Paragraphs
Word makes it very easy to apply formatting to the paragraphs in your documents. Some of that formatting may be …
Discover More
When it comes to creating a compelling and effective document, one of the most important tools at your disposal is the font (also known as «typeface»).
Fonts do much more than improve—or hamper—the legibility of your piece. They set a tone. They’ve got personalities. They evoke feelings. As such, fonts can either reinforce or undermine your brand.


Because fonts are so important, you may want to change the default fonts in Microsoft Word. In this article, you’ll see, step-by-step how to add fonts to Microsoft Word so you can change the default fonts in your document.
You’ll also learn tips on where to find the best Microsoft Word fonts and how to choose the best ones for your document.
(Note: In the tutorials below, I use Microsoft Word for macOS. If you’re on Windows or a different version of Word, then your interface will look different.)
Why Use Premium Fonts in Your Microsoft Word Document?
When it comes to creating documents that get and keep your readers’ attention, fonts are some of your most powerful tools. The right fonts:
- reinforce your branding
- express the right tone
- direct the reader’s attention
- improve readability
You might be tempted to use free fonts for Microsoft Word in your next document. But remember, those built-in MS Word fonts are exactly the same fonts that everyone else is using. Or, you might find a free Microsoft Word fonts download. But free fonts are often not as well-designed as premium fonts.
You can easily add fonts to Microsoft Word from outstanding sources like Envato Elements or GraphicRiver. To be able to download unlimited fonts, then look to Envato Elements. You get access to thousands of fonts. Download as many as you need for one small subscription price.


For one-off projects, GraphicRiver is a great source of the best Microsoft Word fonts on a pay-per-use basis.
And lastly, use the tips above to choose and use fonts effectively in your document. The misuse and overuse of fonts are sure signs of an amateur.
How to Change Microsoft Word Default Font
Word comes with default fonts, but you can change the font to match your branding or to change the tone and personality of the document.
You’ll find that dozens of fonts are already built into Word, and you can replace the default fonts with those. And you can also add new fonts. We’ll talk about how to add fonts to Microsoft Word later in this post.
To change the Microsoft Word default font, you’ve got three options:
1. How to Change the Microsoft Word Default Font for a Block of Text
This is a quick method that’s good to use if you want to change the default font only for one or a few bits of text. Here are the steps:
Step 1. Select the Text


Step 2. Open the Font Selection Tool


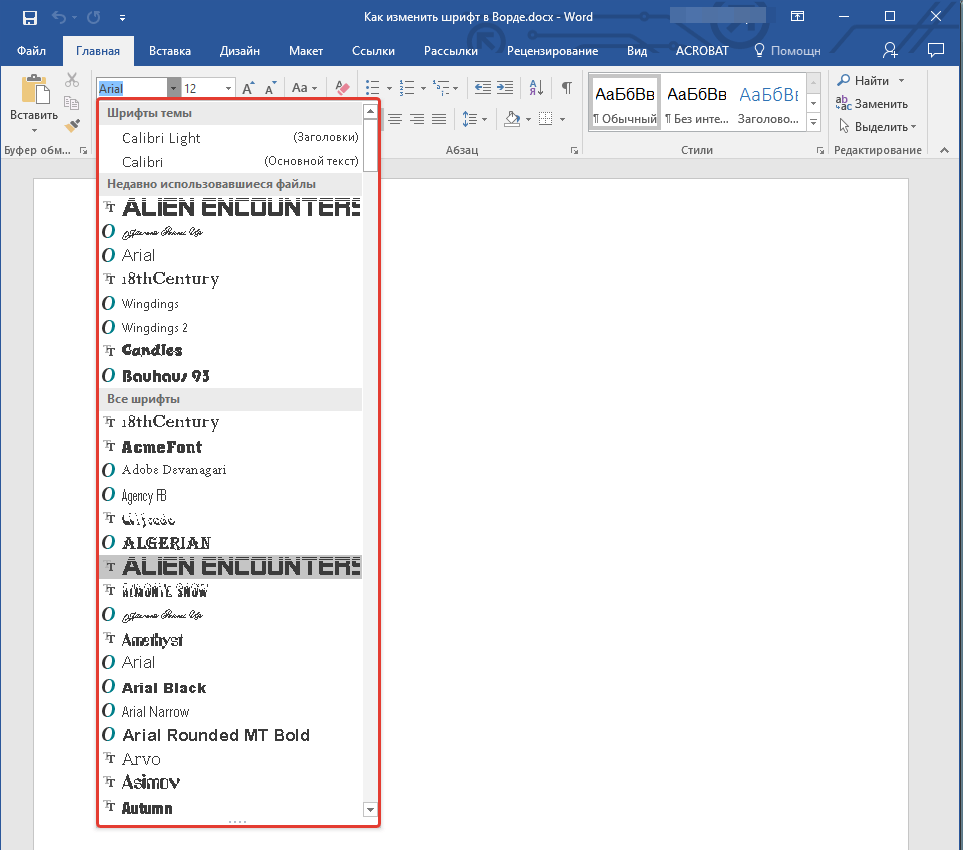
Click on the Font selection tool on the ribbon. You must be on the Home tab to see the buttons for formatting text. The Microsoft Word fonts list opens.
Step 3. Find the font you wish to use.
The Microsoft Word fonts list shows the Theme Fonts, Recent Fonts, and All Fonts. Scroll down farther to see all the fonts available on your computer. This includes fonts that are built-in as well as fonts you’ve added, listed in alphabetical order. The fonts list also gives you a preview of what each font looks like.
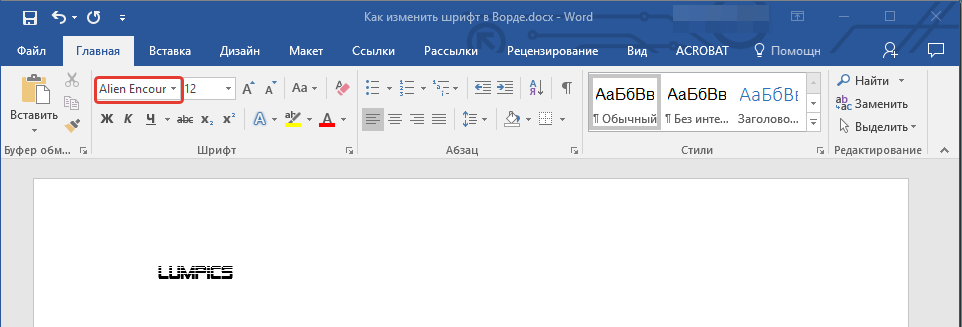
Click on the font you wish to use. A triangle next to the font means there are further selections you can make.


Step 4. Change the Font Size
Go to the font-size button to change the font size.


Or, click the Increase Font Size or Decrease Font Size buttons to change the font size by increments.
Step 5. Change Other Text and Paragraph Settings
Use the other buttons on the ribbon to add emphasis (bold, italics, underline), change the font color, and apply other effects.


We’ve now changed the default font in Microsoft Word.


2. How to Replace the Default Font Based on Paragraph Style
By changing the font used for a paragraph style, the change is applied globally in your document for all text with that paragraph style. Use this if you want to change the default font for large sections of text.
Follow the steps on how to change the Microsoft Word default font for a paragraph style:
Step 1. Select the Text
Highlight text that’s representative of the paragraph style you want to re-format. Make sure it’s got the paragraph style you want to change.


In this example, I’ll replace the default font for the Normal paragraph style.
Step 2. Apply the Font Settings You Wish to Use
Follow the steps in Method 1 to change the font, font size, font color, and apply other settings. You may also want to change the paragraph settings, such as alignment, line spacing, etc.


Step 3. Apply the New Formatting to the Paragraph Style
With the cursor in the paragraph you’ve formatted, click on the Styles button on the ribbon. This opens the paragraph Styles selection.


The current paragraph style will be highlighted. In this case, it’s the Normal style. Right-click on the Normal style, then click on Update Normal to Match Selection.


All other paragraphs with the Normal style are updated with the new font and settings you made.


3. How to Change the Font Based on Paragraph Styles Button
This method has the same end-result as Method 2. It changes the default font for a specific paragraph style. The steps are slightly different, as you’ll see:
Step 1. Open the Styles Settings
Click on the Styles button on the ribbon. This displays the paragraph styles.


Step 2. Modify the Paragraph Style
Right-click on the style you wish to change. Click Modify…


The Modify Style dialog opens.


Change the font, font size, and other settings. The box shows a preview of what the paragraph will look like when the settings you chose are applied. If you’re happy with the way it looks, click OK.


The new font (and other settings) will be applied to all paragraphs with that paragraph style.
How to Add Fonts to Microsoft Word
Right out of the box, Microsoft Word comes with dozens of fonts built in. But what if you want to use a font and you don’t see it on the Microsoft Word fonts list?
In that case, you add the font to Microsoft Word. I’ll walk you through how to do that in this section:
Step 1. Find New Fonts
The first step is to find the font you want to use. There are many sources of custom fonts. One to consider is Envato Elements, where you can download an unlimited number of fonts for one small subscription price.
To find a font you like, log into your Envato Elements account.


On the search bar, click on the downward arrow, then select Fonts.


Type a keyword into the search bar, depending on what kind of font you’re looking for. Click the search icon. The most relevant results appear.


Refine the results by Categories, Spacing, Optimum Size, and Properties. You can also sort the results by popularity (Popular) and newness (New).
Click on a font image or name to see its details.


When you find a font you like, click on any of the Download buttons on the page.


The Add this file to a project dialog box pops up.


Select a project to add the font file to. Or, click Create new project to add it to a new project. For this example, I’ll add the font to my existing tutorial project. Click the Add & Download button.
The file manager opens (Finder, if you’re on macOS; File Explorer, if you’re on Windows). Specify where you want to save the font file on your computer. Click Save.


The font files are now saved on your computer as a zip file.


Double-click on the zip file to unzip it.


Double-click on the font file itself to open it. It’ll usually have an extension like OTF or TTF. Click Install Font.


This adds the font to your computer’s fonts library.


The new font should now appear in the All Fonts list in Microsoft Word. To confirm, click on the Fonts button on the ribbon and scroll down the list until you see the new font. If you don’t see it, you may have to restart your computer.


Now, follow any of the methods above to change the default font with the new one.
2 Types of Fonts
Now that you know how to add fonts to Microsoft Word and replace the default fonts in your document, it would help for you to know more about fonts. This will help you choose the best fonts for your Word document.
There are two basic types of fonts you can use in your documents:
1. Serif Fonts
Serif fonts have little lines at the end of each stroke, like this:


Common examples of serif fonts include:


Various research studies have shown that, when it comes to printed matter, serif fonts are the easiest to read and result in the best comprehension.
2. Sans Serif Fonts
As the name implies, sans serif fonts don’t have little lines at the end of each stroke (“sans” means “without” in French):


These are some of the most common sans serif fonts:


Citing research by the Software Usability Research Laboratory, Drew E. Whitman in his book Ca$vertising, noted that sans serif fonts are the most legible fonts to use on a computer screen. Specifically, Arial, Courier, and Verdana were considered the best for online reading.
But these studies were conducted when the resolution of online screens was still very low (below 100 dpi) compared to printed materials (300 dpi). As computer screen resolutions get closer to 300 dpi, serif fonts may prove to be legible both online and offline.
In the meantime, you can use both serif and sans serif fonts in one document—if you know how. Read on for tips on how to use combine fonts.
5 Tips on Using Typography Effectively in Your Word Documents
It’s easy to get carried away with fonts! You may find that having so many kinds of fonts available at your fingertips unleashes your creativity. Yet, as with most things, fonts can either enhance or sabotage your document.
Follow these tips to harness the power of typography:
1. Keep It Simple
When it comes to choosing fonts, legibility is of utmost importance. Sure, it’s easier than ever now for you to find the most creative and outrageous fonts. But if nobody can read your text, then they defeat their purpose. If you must use an ornate font, restrict it to one letter or word.
2. Stick to Two Fonts
A document that’s dripping with many different fonts makes it look amateurish, confusing, and incoherent. For best results, stick to a maximum of two fonts: one serif and one sans serif. (More on this in tip #4).
Remember, use formatting like bold, italics, underlines, different font sizes and colors to add emphasis and variety.
3. Match the Tone and Goals for the Document
Fonts have personality, so pick the ones that match the tone and goals of the document. For example, the fonts for a 16th birthday party invitation will be different from the ones in a financial business report.
When in doubt, pre-test the document. Show it to other people, especially those who are like the intended audience. Make sure they can comprehend the document, first, and that they respond favorably.
4. Choose Fonts Appropriate for the Document’s Intended Use
Whether the document will be printed out or consumed on a computer screen will also affect your choice of fonts.
If you’re making a printed document, use the sans serif font for headings and the serif font for body text. For a web-based document, switch it: Use a serif font for headings and sans serif for body text.
5. Use Handwritten, Cursive, and Decorative Fonts Sparingly


There are other font types that may not fit easily in either serif or sans serif categories. These include handwritten, cursive, and decorative fonts. Handwritten fonts, as the name says, look like they were written by hand. These are extremely popular and useful for adding a warm, personal touch on materials. They can range from casual to glamorous.
Cursive fonts are a kind of handwritten font that look like they’re written in longhand. Beware of using cursive and handwritten fonts because they can be difficult to read. Use them for short bits of text you want to emphasize.
You can easily find handwritten fonts in marketplaces like Envato Elements or GraphicRiver.
Decorative fonts have special effects or treatments. They may be serif or sans serif. And some handwritten fonts can be considered decorative as well.
Here’s a sampling of the decorative fonts available in Envato Elements:
5 Best Font Styles for 2020
Designers come up with new fonts every day. Below are five of the best and freshest Microsoft Word font styles we’re seeing for 2020, along with two fresh examples of each style:
1. Vintage Fonts
Vintage fonts evoke the aesthetic of times past. If you’re working on a document that’s about a specific time, you’re bound to find a font to match.
Anthique — Vintage Typeface


Anthique is reminiscent of handmade Victorian hand lettering but with a modern flavor. It works best for materials that relate to the early 1800s. The font includes three variations in TTF and OTF formats. It also supports multilingual characters.
Middle Class Script


Middle Class is a script font that’s evocative of the bold style of the ’60s and ’70s. It’s got a hand-drawn and layered style, and includes punctuation, common ligatures, and extra swashes (lines).
2. Brush Script Fonts
Brush script fonts are handwritten fonts that look like they were written with a brush, such as a calligraphy or a paintbrush. These are increasingly popular as brands want to add a personal touch to their materials.
Eberthany Brush Script


Eberthany is a modern brush script signature font that works for:
- social media posts
- logos
- wedding invitations
- labels
- quotes
- and more
It works best with software that supports OpenType fonts like Adobe Illustrator CS, Adobe Photoshop CC, Adobe InDesign, and Corel Draw.
Mistrully Brush Script


Mistrully is a stylish brush script that looks like natural handwriting. It comes with special swashes or handwritten lines that you can use to add emphasis. Mistrully works well for logos, social media posts, advertisements, product designs and labels, stationery, among others.
3. Font Duos
Font Duos take the guesswork out of choosing fonts that work well together. These two-for-one font packages are designed to complement each other. You only need to pick the font duo that aligns with your branding and the tone of the material you’re designing. Examples of font duos include:
Chiladepia — Font Duo


The Chiladepia Font Duo is made up of two handwritten fonts. One’s a cursive font and the other’s a sans serif font. This font duo would work well on a computer screen. Use the cursive font for titles or headers and the sans serif font for the rest of the document.
Perkin | Duo Font Pack


The Perkin Duo Font combines a bold sans serif and a serif font. The sans serif font is best for titles and headings, while the serif font works great for body text. This duo is ideal for printed materials.
4. 3D Decorative Fonts
3D decorative fonts look like they’re popping off the pages. These fonts are incredibly eye-catching. For that reason, they’re great for titles. But, they’re not the most legible fonts, so use them sparingly for short bits of text.
Ultra — Modern Font


If you’re creating a futuristic document, then consider the Ultra — Modern Font. It’s got a modern and futuristic style. This pack is actually made up of four font styles: regular, bold, 3D, and bold 3D. It also comes in both OTF and TTF formats.
Under Construction 3D Color Font


Under Construction is a stunning 3D decorative font to use on materials related to industry, construction, technology, and the like. Each letter looks like it floats on top of the page. It’s a color or SVG OpenType font, which works only in Photoshop CC 2017+, Illustrator CC 2018, and some Mac apps.
5. Tech Sans Serif Fonts
Tech sans serif fonts have gone a long way since the pixelized arcade fonts of the ‘80s. Many are also much more legible and modern. Below are two examples:
Azuria — Technology Science Font


The Azuria — Technology Science Font evokes technology, science, and outer space. Its metallic, 3D look would work well in video games, movie titles, and tech-related branding. The font includes all Latin letters from A-Z, numbers, and punctuation marks.
Cyborg — Futuristic Technology Typeface


Cyborg is another futuristic tech font. Inspired by science fiction, it’s perfect for titles related to space, technology, and science. It comes in OTF, TTF, and WOFF formats.
Put Fonts to Work in Your Microsoft Word Document Today
As you’ve learned in this article, you don’t need to stick to the default fonts in Microsoft Word. Follow the steps outlined above to replace the default fonts with ones that are more appropriate to your document.
Now that you understand how to add fonts to Microsoft Word, you’re ready to start taking advantage of the unique look a professionally designed font can give your documents.
At Envato Elements and GraphicRiver we’ve got some of the best Microsoft Word fonts available. Take a look at our Microsoft Word fonts list today. Download your favorites for your next MS Word document.
 This tutorial shows how to find and replace font formatting in Microsoft Word. Font formatting includes style (i.e., italics or bold font), color, size, and underlining.
First, we will find and replace font formatting in the whole document. Then, we will find and replace font formatting applied to specific text. We will close with two important tips for finding and replacing font formatting.
Table of Contents:
- How to Find and Replace Font Formatting in the Whole Document
- How to Find and Replace Font Formatting Applied to Specific Text
- Two Tips for Finding and Replacing Font Formatting
Watch all the steps shown here in real time!
Explore more than 200 writing-related software tutorials on my YouTube channel.
The images below are from Word for Microsoft 365. These steps also apply to Word 2021, Word 2019, and Word 2016.
Are you on a Mac? Please see “How to Find and Replace Font Formatting in Word for Mac.”
How to Find and Replace Font Formatting in the Whole Document
For this example, we will replace all bold text with regular text. Please modify these steps according to your own needs.
- Select the Home tab in the ribbon.

- Select Replace in the Editing group.

- Insert your cursor into the Find what text box in the Find and Replace dialog box.

- Select the More button.

- Select All in the Search menu.

- Select the Format button.

- Select Font from the drop-down menu.

- Select Bold (or another option) from the Font Style menu in the Find Font dialog box.

- Select the OK button.

The words Font: Bold should appear under the Find what text box.

- Insert your cursor into the Replace with text box.

- Select the Format button (see figure 6).
- Select Font from the drop-down menu (see figure 7).
- Select Regular (or another option) from the Font Style menu in the Replace Font dialog box.

- Select the OK button.

The words Font: Not Bold, Not Italic should appear under the Replace with text box.

- Select the Replace All button to make all the replacements at once. Or, select the Find Next and Replace buttons to make one replacement at a time.

- If you selected Replace All, select OK in the dialog box telling you how many replacements were made.

- Select the Close button.

The font formatting should be replaced in your document.
How to Find and Replace Formatting Applied to Specific Text
For this example, we will find specific text formatted in red and replace that same text with green formatting. Please modify these steps according to your own needs.
- Select the Home tab in the ribbon (see figure 1).
- Select Replace in the Editing group (see figure 2).
- Type the text you want to find into the Find what text box.

- Select the More button (see figure 4).
- Select All in the Search menu (see figure 5).
- Select the Format button (see figure 6).
- Select Font from the drop-down menu (see figure 7).
- Select red (or other formatting) from the Font color menu in the Find Font dialog box.

- Select the OK button (see figure 9).
The words Font color: Red should appear under the Find what text box.

- Type the same text (or different text if desired) into the Replace with text box.

- Select the Format button (see figure 6).
- Select Font from the drop-down menu (see figure 7).
- Select green (or another formatting) from the Font color menu in the Replace Font dialog box.

- Select the OK button (see figure 13).
The words Font color: Green should appear under the Replace with text box.

- Select the Replace All button to make all the replacements at once. Or, use the Find Next and Replace buttons to make one replacement at a time (see figure 15).
- If you selected Replace All, select OK in the dialog box telling you how many replacements were made (see figure 16).
- Select the Close button to close the Find and Replace dialog box (see figure 17).
The font formatting should be replace for the specific text in your document.
Two Tips for Finding and Replacing Font Formatting
Finding and replacing font formatting can be messy. Here are two tips to consider before your next formatting session.
Tip 1: Use the No Formatting Button to Clear Formatting
When you add formatting to the Find and Replace dialog box, Word will normally keep that selection in the dialog box until you close the software. If you want to clear previously selected formatting from the Find and Replace dialog box before closing the software, place your cursor in the affected text box (Find what or Replace with) and then select the No Formatting button.

Tip 2: Experiment with Multiple Replacement Sequences
Occasionally, the formatting options entered into the Replace with text box don’t replace the options in the Find what text box; instead, they are added to the options in the Find what text box. When this occurs, experiment with multiple replacement sequences to reach the formatting you need.
For example, if you put the bold format into the Find what text box and put the italic format into the Replace with text box, Word won’t replace the bold text with italic text as you might expect. Instead, it will add italics to the bold words. But you can still remove the bold format if you do a second replacement sequence, this time replacing the bold format with the Not Bold format option.
Related Resources
How to Use the Format Painter in Microsoft Word (PC & Mac)
How to Find and Replace Special Characters in Microsoft Word
Updated December 03, 2022
Содержание
- 0.1 Как изменить шрифт?
- 0.2 Как изменить размер шрифта?
- 0.3 Как изменить толщину и наклон шрифта?
- 1 Как изменить цвет и фон шрифта?
- 1.1 Изменяем стиль шрифта
- 1.2 Изменяем фон за текстом
- 1.3 Изменяем цвет текста
- 1.4 Как установить понравившийся шрифт в качестве используемого по умолчанию?
- 1.5 Как изменить шрифт в формуле?
- 1.6 Помогла ли вам эта статья?
В текстовой программе Word по умолчанию стоит шрифт Calibri, который не очень удобен для работы и неприятен глазу. Я думаю, что многие меняют его на Times New Roman. Лично я работаю именно с этим шрифтом. Поменять на Таймс не очень сложно:
- Прямо в Ворде на панели инструментов, в главной вкладке Шрифт в нижнем правом углу есть стрелочка – нажимаем на нее. Если проще, то открыв программу, набираем комбинацию клавиш Shift+Ctrl+F.
- У вас появится диалоговое окно, в котором можно установить необходимый шрифт, его начертание, цвет и размер.
- Внизу окошка вы увидите кнопку «По умолчанию» — после настройки нажмите ее.
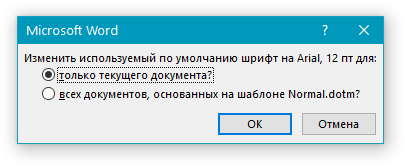
- Программа задаст вам вопрос «Изменить для текущего или для всех документов?». Выбираете «для всех» и нажимаете «Ок».
Все замечательно! Вы избавились от надоедливого Calibri. Но если у вас стоит не Word 2007, то настройки могут и не сохранится. Тогда можно использовать другой вариант для того, чтобы убрать стандартный шрифт и поставить свой по умолчанию вместе с изменением настроек форматирования текста в ворде:
- Опять возвращаемся к вкладке Главная и ищем функцию Стили, нажимаем стрелочку в нижнем углу окошка.
- Появится диалоговое окно стилей, где внизу, возле Параметров, вы увидите 3 кнопки. Нажимаем третью – «Управление стилями».
- Здесь выбираем «Обычный» и клацаем «Изменить». Тогда выставляем желаемые настройки – шрифт Times New Roman, устанавливаем междустрочный интервал, размер шрифта, способ выравнивания и отступы, если необходимо.
- Обязательно отмечаем «Использовать в новых документах» и нажимаем «Ок».
По идее в семерке и десятке проблем возникнуть с изменением стандартного шрифта не должно. А вот в XP в ворде иногда бывают глюки и приходится тогда лезть в реестр:
- Одновременное нажатие клавиш Win+R.
- В появившемся диалоговом окне набираем regedit.
- Находим папку HKEY_CLASSES_ROOT, а в ней папку «.docx». Переходим в ней в Word.Document.12 и затем в ShellNew.
- Справа вы увидите ключ реестра NullFile. Нажимаем на нем и клацаем правой клавишей мыши — выбираем «Удалить».
- Вместо NullFile создаем свой ключ. Называем его Filename (или как угодно). В его значении прописываем Wordshablon.docx.
- Теперь переходим по пути C:WindowsShellNew и создаем вордовский файл с таким же названием Wordshablon.docx, где можно установить по умолчанию все настройки – от шрифта до цвета текста. Сохраняем все и пользуемся.
В последнем варианте настройки уж точно сбоев никаких быть не должно. Если вы измените на Times, то он так и останется для всех документов.
В Word 2007 все документы создаются со стандартным шрифтом Calibri. Этот шрифт «зашит» в глобальный (общий) шаблон Normal.dotm. И хотя шрифт Calibri очень красив и приятно смотреть на документы, содержащие этот шрифт, тем не менее его можно легко заменить на более привычный шрифт Times New Roman.
Чтобы изменить шрифт выполните следующие действия.
- На вкладке Главная в группе команд Стили нажмите кнопку вызова диалоговых окон, чтобы открыть окно cтилей:
- В окне стилей в самом низу находятся три кнопки: Создать стиль, Инспектор стилей и Управление стилями:
- Нажмите кнопку Управление стилями. Откроется одноименное диалоговое окно:
- На вкладке Изменение выберите стиль Обычный.
- Нажмите кнопку Изменить. Откроется диалоговое окно Изменение стиля.
- В списке шрифтов найдите и выберите шрифт Nimes New Roman.
- Установите необходимые параметры шрифта (размер, начертание, цвет, отступы, междустроковый интервал и др.).
- Отметьте переключатель В новых документах, использующих этот шаблон. Это означает, что во всех документах, создаваемых на основе этого шаблона (в данном случае — Normal.dotm), будет использоваться выбранный вами шрифт.
- Нажмите ОК.

В программе MS Word имеется довольно большой набор встроенных шрифтов, доступных к использованию. Проблема в том, что далеко не все пользователи знают о том, как изменить не только сам шрифт, но и его размер, толщину, а также ряд других параметров. Именно о том, как изменить шрифт в Ворде и пойдет речь в этой статье.
Урок: Как установить шрифты в Word
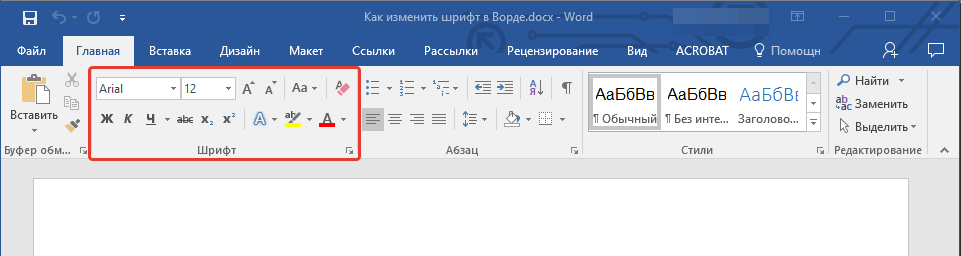
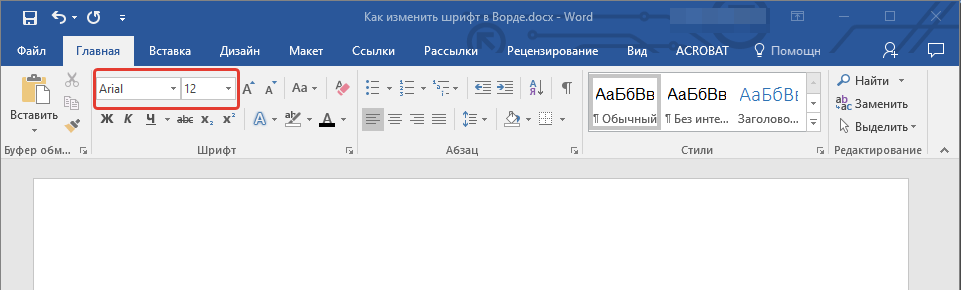
В Ворде есть специальный раздел для работы со шрифтами и их изменения. В новых версиях программы группа “Шрифт” расположена во вкладке “Главная”, в более ранних версиях этого продукта средства для работы со шрифтами находятся во вкладке “Разметка страницы” или “Формат”.

Как изменить шрифт?
1. В группе “Шрифт” (вкладка “Главная”) разверните окошко с активным шрифтом, нажав на небольшой треугольник возле него, и выберите в списке тот, который вы хотите использовать

Примечание: В нашем примере шрифт по умолчанию — Arial, у вас он может быть другим, к примеру, Open Sans.
2. Активный шрифт изменится, и вы сразу же сможете начать его использовать.

Примечание: Название всех шрифтов, представленных в стандартном наборе MS Word отображается в том виде, в котором будут отображаться буквы, напечатанные этим шрифтом на листе.
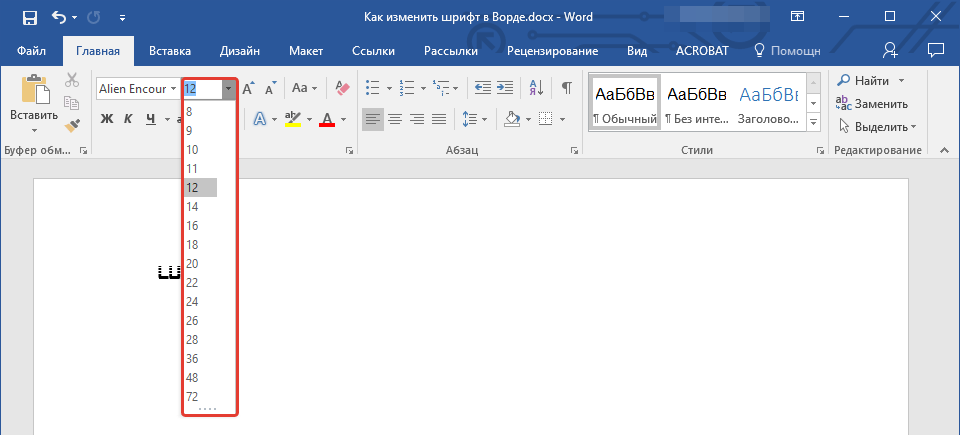
Как изменить размер шрифта?
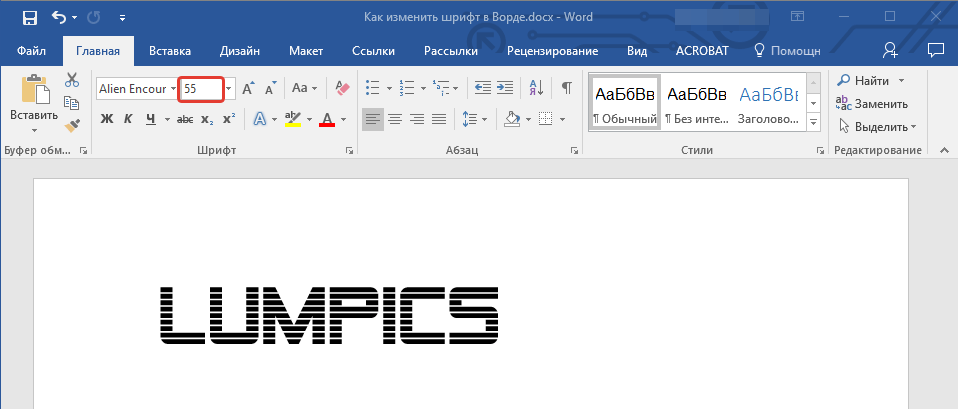
Прежде, чем изменить размер шрифта, необходимо усвоить один нюанс: если вы хотите изменить размер уже набранного текста, его сначала нужно выделить (это же касается и самого шрифта).
Нажмите “Ctrl+A”, если это весь текст в документе, или же используйте для выделения фрагмента мышку. Если же вы хотите изменить размер текста, который только планируете набирать, ничего выделять не нужно.
1. Разверните меню окошка, расположенного рядом с активным шрифтом (там указаны цифры).
Примечание: В нашем примере размер шрифта по умолчанию — , у вас он может быть другим, например, .
2. Выберите подходящий размер шрифта.

Совет: Стандартный размер шрифтов в Ворде представлен с определенным шагом в несколько единиц, а то и десятков. Если вас не устраивают конкретные значения, вы можете ввести их вручную в окне с активным размером шрифта.

3. Размер шрифта изменится.

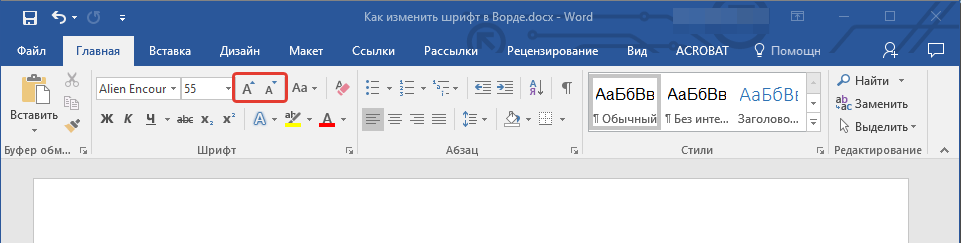
Совет: Рядом с цифрами, показывающими значение активного шрифта, расположены две кнопки с буквой “А” — одна из них больше, другая меньше. Нажимая на эту кнопку, вы можете пошагово менять размер шрифта. Большая буква увеличивает размер, а та что поменьше — уменьшает.

Кроме того, рядом с этими двумя кнопками находится еще одна — “Аа” — развернув ее меню, вы можете выбрать подходящий тип написания текста.

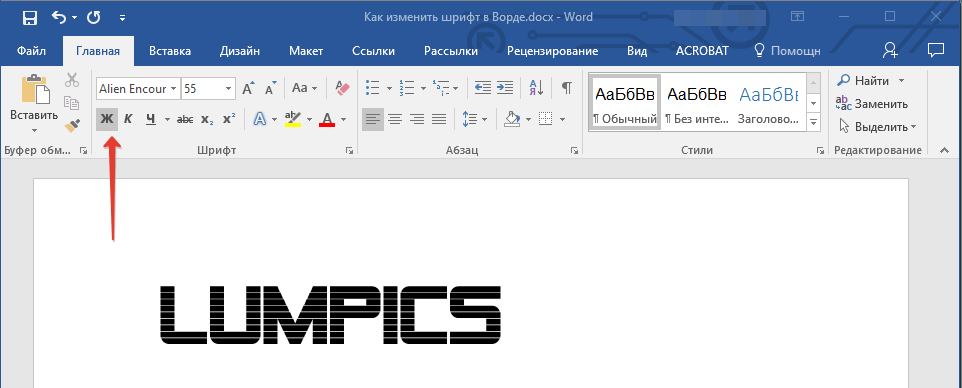
Как изменить толщину и наклон шрифта?
Помимо стандартного вида больших и маленьких букв в MS Word, написанных в том или ином шрифте, они также могут быть жирными, курсивными (курсив — с наклоном), и подчеркнутыми.
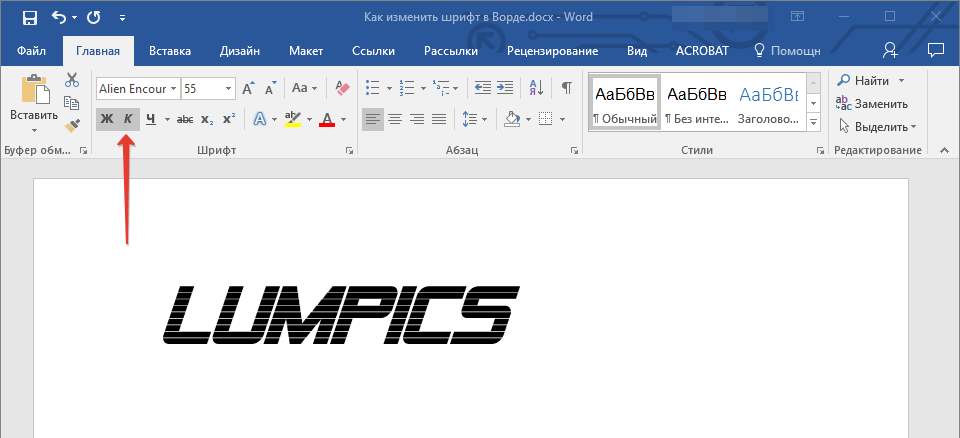
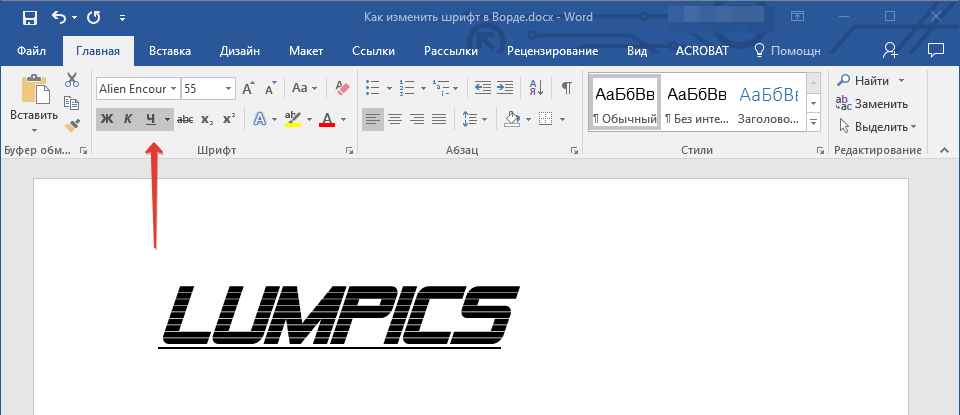
Чтобы изменить вид шрифта, выделите необходимый фрагмент текста (ничего не выделяйте, если вы только планируете что-то написать в документе новым типом шрифта), и нажмите одну из кнопок, расположенных в группе “Шрифт” на панели управления (вкладка “Главная”).

Кнопка с буквой “Ж” делает шрифт жирным (вместо нажатия кнопки на панели управления можно использовать клавиши “Ctrl+B”);

“К” — курсив (“Ctrl+I”);

“Ч” — подчеркнутый (“Ctrl+U”).

Примечание: Жирный шрифт в Ворде, хоть и обозначается буквой “Ж”, на самом деле является полужирным.
Как вы поняли, текст может быть одновременно жирным, курсивом и подчеркнутым.
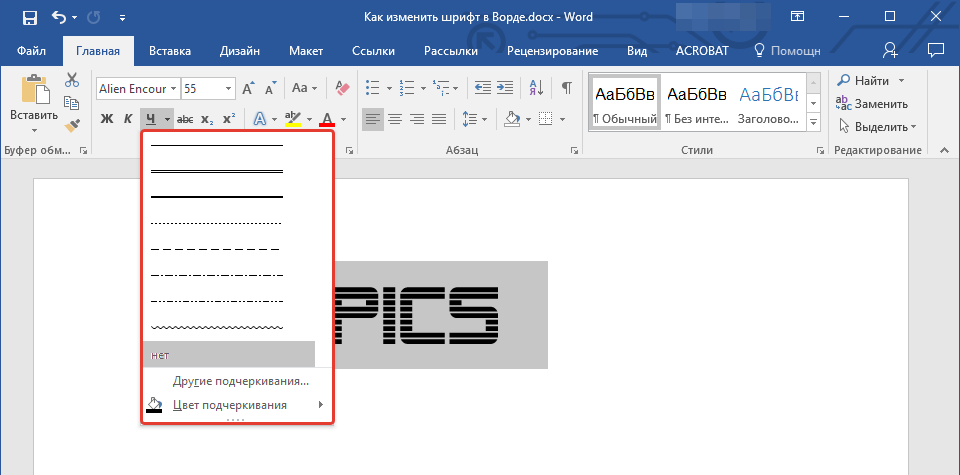
Совет: Если вы хотите выбрать толщину линии подчеркивания, нажмите на треугольничек, расположенный возле буквы “Ч” в группе “Шрифт”.

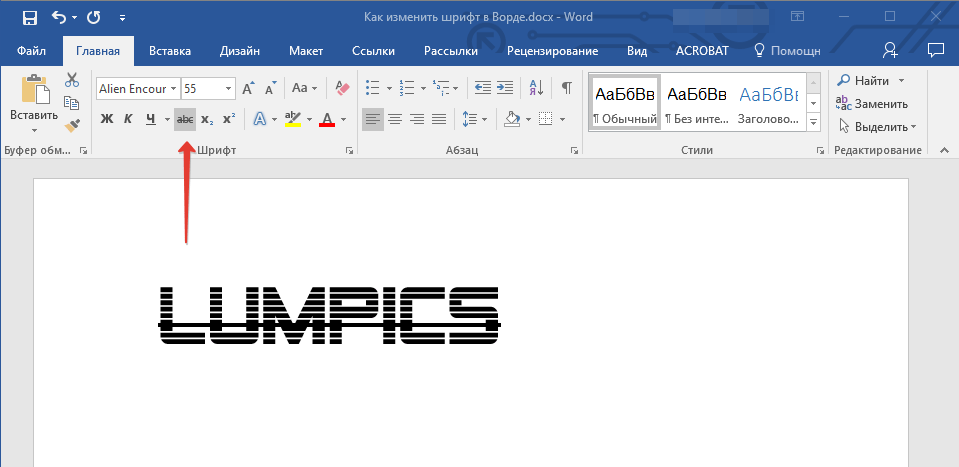
Рядом с буквами “Ж”, “К” и “Ч” в группе шрифт находится кнопка “abc” (зачеркнутые латинские буквы). Если вы выделите текст, а затем нажмете на эту кнопку, текст будет зачеркнут.

Как изменить цвет и фон шрифта?
Помимо внешнего вида шрифта в MS Word можно также изменить его стиль (текстовые эффекты и оформление), цвет и фон, на котором текст будет находиться.
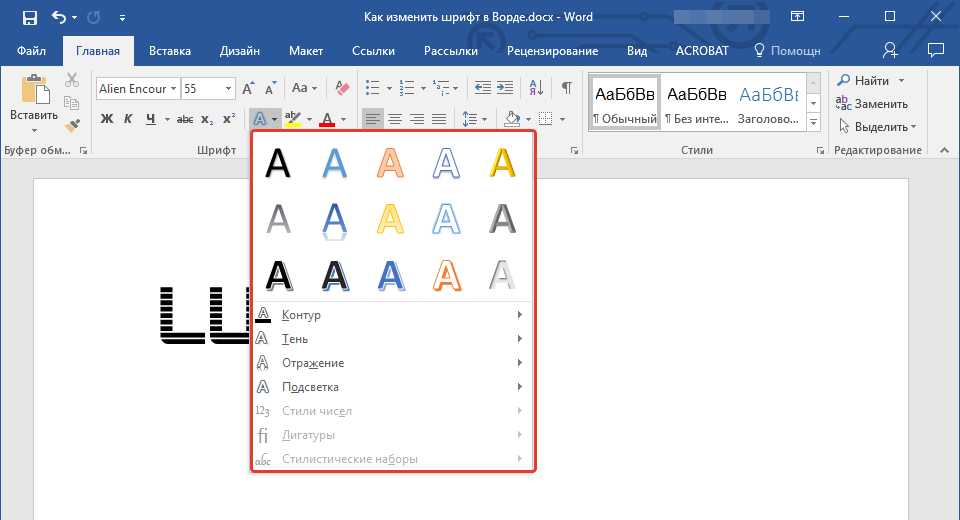
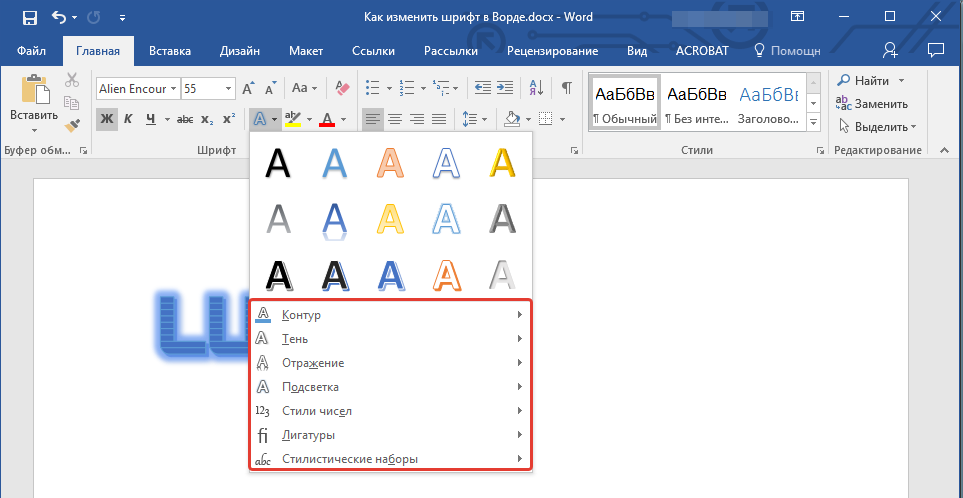
Изменяем стиль шрифта
Чтобы изменить стиль шрифта, его оформление, в группе “Шрифт”, которая расположена во вкладке “Главная” (ранее “Формат” или “Разметка страницы”) нажмите на небольшой треугольник, расположенный справа от полупрозрачной буквы “А” (“Текстовые эффекты и оформление”).
В появившемся окошке выберите то, что бы вы хотели изменить.
Важно: Помните, если вы хотите изменить внешний вид уже имеющегося текста, предварительно выделите его.
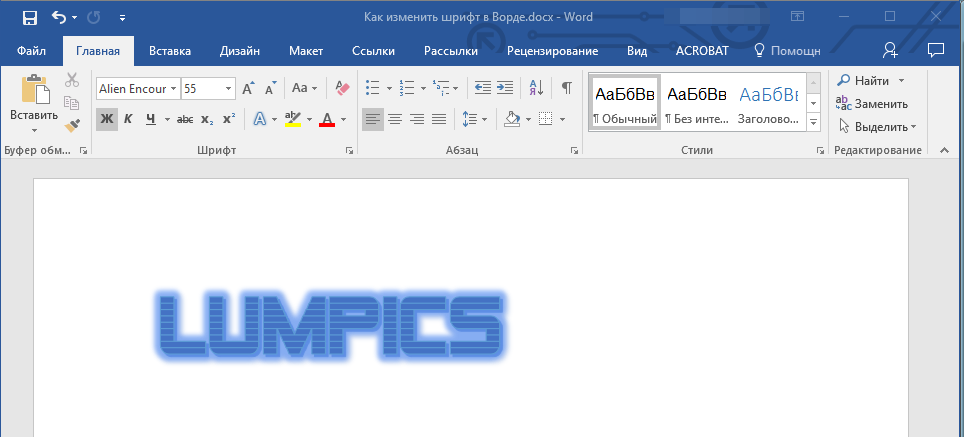
Как видите, один этот инструмент уже позволяет изменить цвет шрифта, добавить к нему тень, контур, отражение, подсветку и другие эффекты.
Изменяем фон за текстом
В группе “Шрифт” рядом с кнопкой, рассмотренной выше, находится кнопка “Цвет выделения текста”, с помощью которой можно изменить фон, на котором находится шрифт.

Просто выделите фрагмент текста, фон которого хотите изменить, а затем нажмите на треугольничек возле этой кнопки на панели управления и выберите подходящий фон.

Вместо стандартного белого фона, текст будет находиться на фоне того цвета, который вы выбрали.
Урок: Как убрать фон в Ворде
Изменяем цвет текста
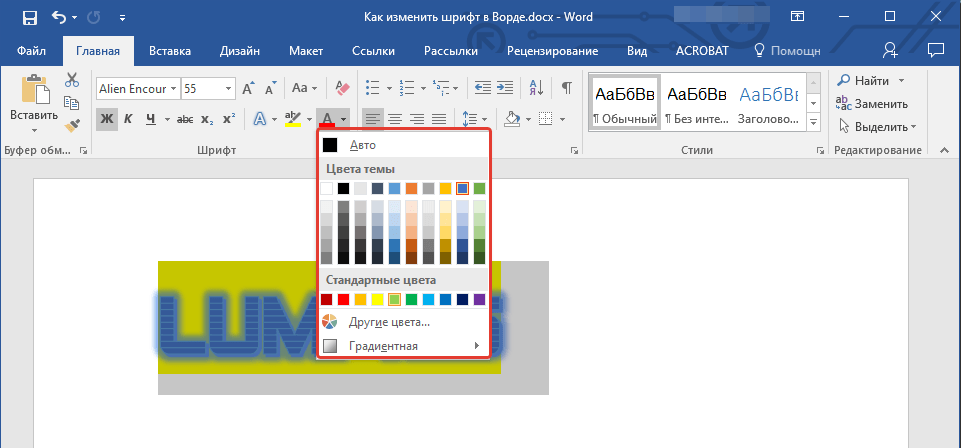
Следующая кнопка в группе “Шрифт” — “Цвет шрифта” — и, как понятно из названия, она позволяет этот самый цвет изменить.

Выделите фрагмент текста, цвет которого необходимо изменить, а затем нажмите на треугольник возле кнопки “Цвет шрифта”. Выберите подходящий цвет.

Цвет выделенного текста изменится.

Как установить понравившийся шрифт в качестве используемого по умолчанию?
Если вы часто используете для набора текста один и тот же, отличный от стандартного, доступного непосредственно при запуске MS Word, шрифт, не лишним будет установить его в качестве используемого по умолчанию — это позволит сэкономить немного времени.
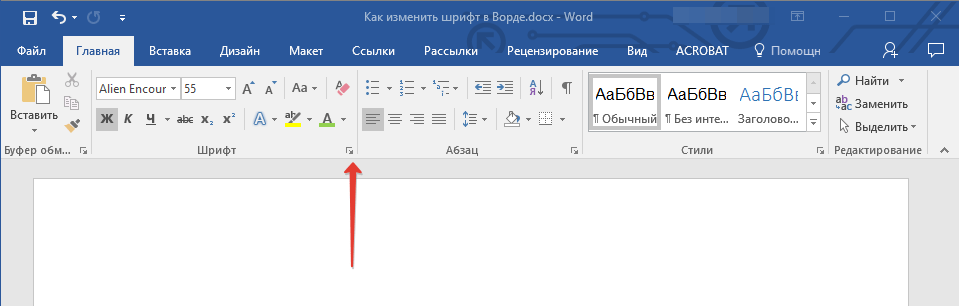
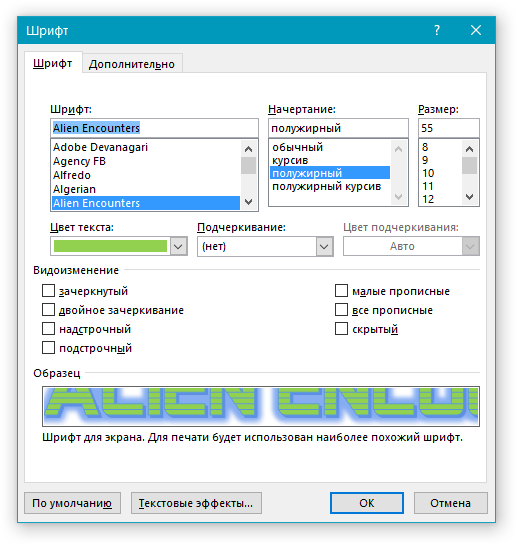
1. Откройте диалоговое окно “Шрифт”, нажав на стрелочку, расположенную в правом нижнем углу одноименной группы.

2. В разделе “Шрифт” выберите тот, который вы хотите установить в качестве стандартного, доступного по умолчанию при запуске программы.

В этом же окне вы можете установить подходящий размер шрифта, его начертание (обычный, полужирный или курсив), цвет, а также многие другие параметры.
3. Выполнив необходимые настройки, нажмите на кнопку “По умолчанию”, расположенную в нижней левой части диалогового окна.
4. Выберите, как вы хотите сохранить шрифт — для текущего документа или для всех, с которыми будете работать в дальнейшем.
5. Нажмите кнопку “ОК”, чтобы закрыть окно “Шрифт”.
6. Шрифт по умолчанию, как и все дополнительные настройки, которые вы могли выполнить в этом диалоговом окне, изменится. Если вы применили его для всех последующих документов, то при каждом создание/запуске нового документа Ворд сразу же будет установлен ваш шрифт.
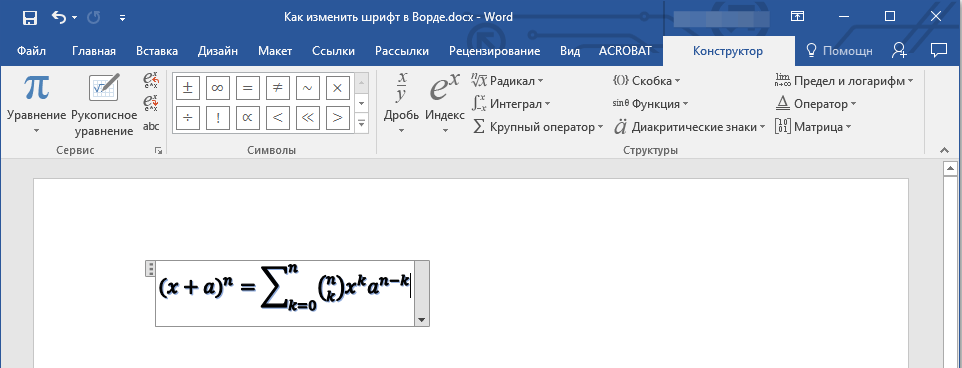
Как изменить шрифт в формуле?
Мы уже писали о том, как в Microsoft Word добавлять формулы, и как с ними работать, более подробно об этом вы можете узнать из нашей статьи. Здесь же мы расскажем о том, как изменить шрифт в формуле.
Урок: Как в Ворде вставить формулу
Если вы просто выделите формулу и попробуете изменить ее шрифт точно так же, как вы это делаете с любым другим текстом, ничего не получится. В данном случае действовать необходимо немного иначе.
1. Перейдите во вкладку “Конструктор”, которая появляется после клика по области формулы.
2. Выделите содержимое формулы, нажав “Ctrl+A” внутри области, в которой она находится. Для этого также можно использовать мышку.
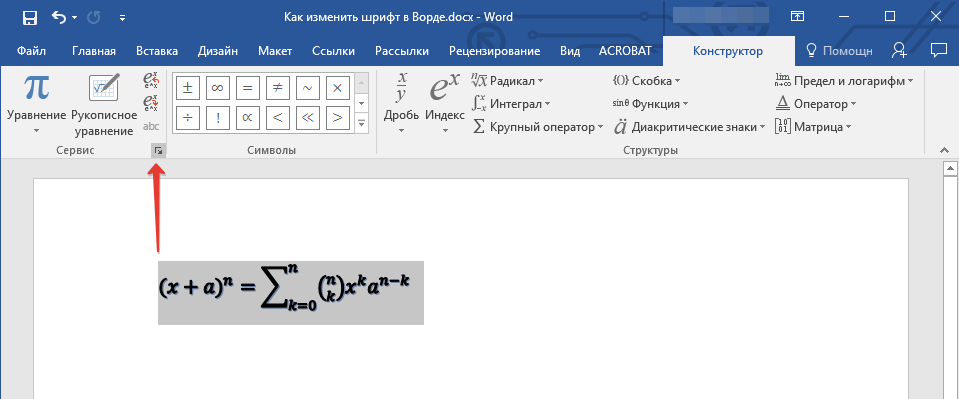
3. Откройте диалоговое окно группы “Сервис”, нажав на стрелочку, расположенную в правой нижней части этой группы.
4. Перед вами откроется диалоговое окно, где в строке “Шрифт по умолчанию для областей формул” можно изменить шрифт, выбрав понравившийся из доступного списка.
Примечание: Несмотря на то, что в Word имеется довольно большой набор встроенных шрифтов, далеко не каждый из них может быть использован для формул. Кроме того, возможно, что помимо стандартного Cambria Math вы не сможете выбрать никакой другой шрифт для формулы.
На этом все, теперь вам известно, как изменить шрифт в Ворде, также из этой статьи вы узнали о том, как настроить другие параметры шрифта, в числе которых его размер, цвет и т.д. Желаем вам высокой продуктивности и успехов в освоение всех тонкостей Microsoft Word.
Мы рады, что смогли помочь Вам в решении проблемы.
Задайте свой вопрос в комментариях, подробно расписав суть проблемы. Наши специалисты постараются ответить максимально быстро.
Помогла ли вам эта статья?
Да Нет
Содержание
- Как изменить шрифт?
- Как изменить размер шрифта?
- Как изменить толщину и наклон шрифта?
- Как изменить цвет и фон шрифта?
- Изменяем стиль шрифта
- Изменяем фон за текстом
- Изменяем цвет текста
- Как установить понравившийся шрифт в качестве используемого по умолчанию?
- Как изменить шрифт в формуле?
- Вопросы и ответы

В программе MS Word имеется довольно большой набор встроенных шрифтов, доступных к использованию. Проблема в том, что далеко не все пользователи знают о том, как изменить не только сам шрифт, но и его размер, толщину, а также ряд других параметров. Именно о том, как изменить шрифт в Ворде и пойдет речь в этой статье.
Урок: Как установить шрифты в Word
В Ворде есть специальный раздел для работы со шрифтами и их изменения. В новых версиях программы группа “Шрифт” расположена во вкладке “Главная”, в более ранних версиях этого продукта средства для работы со шрифтами находятся во вкладке “Разметка страницы” или “Формат”.
Как изменить шрифт?
1. В группе “Шрифт” (вкладка “Главная”) разверните окошко с активным шрифтом, нажав на небольшой треугольник возле него, и выберите в списке тот, который вы хотите использовать
Примечание: В нашем примере шрифт по умолчанию — Arial, у вас он может быть другим, к примеру, Open Sans.
2. Активный шрифт изменится, и вы сразу же сможете начать его использовать.
Примечание: Название всех шрифтов, представленных в стандартном наборе MS Word отображается в том виде, в котором будут отображаться буквы, напечатанные этим шрифтом на листе.
Как изменить размер шрифта?
Прежде, чем изменить размер шрифта, необходимо усвоить один нюанс: если вы хотите изменить размер уже набранного текста, его сначала нужно выделить (это же касается и самого шрифта).
Нажмите “Ctrl+A”, если это весь текст в документе, или же используйте для выделения фрагмента мышку. Если же вы хотите изменить размер текста, который только планируете набирать, ничего выделять не нужно.
1. Разверните меню окошка, расположенного рядом с активным шрифтом (там указаны цифры).
Примечание: В нашем примере размер шрифта по умолчанию — 12, у вас он может быть другим, например, 11.

2. Выберите подходящий размер шрифта.
Совет: Стандартный размер шрифтов в Ворде представлен с определенным шагом в несколько единиц, а то и десятков. Если вас не устраивают конкретные значения, вы можете ввести их вручную в окне с активным размером шрифта.

3. Размер шрифта изменится.
Совет: Рядом с цифрами, показывающими значение активного шрифта, расположены две кнопки с буквой “А” — одна из них больше, другая меньше. Нажимая на эту кнопку, вы можете пошагово менять размер шрифта. Большая буква увеличивает размер, а та что поменьше — уменьшает.
Кроме того, рядом с этими двумя кнопками находится еще одна — “Аа” — развернув ее меню, вы можете выбрать подходящий тип написания текста.

Как изменить толщину и наклон шрифта?
Помимо стандартного вида больших и маленьких букв в MS Word, написанных в том или ином шрифте, они также могут быть жирными, курсивными (курсив — с наклоном), и подчеркнутыми.
Чтобы изменить вид шрифта, выделите необходимый фрагмент текста (ничего не выделяйте, если вы только планируете что-то написать в документе новым типом шрифта), и нажмите одну из кнопок, расположенных в группе “Шрифт” на панели управления (вкладка “Главная”).

Кнопка с буквой “Ж” делает шрифт жирным (вместо нажатия кнопки на панели управления можно использовать клавиши “Ctrl+B”);
“К” — курсив (“Ctrl+I”);
“Ч” — подчеркнутый (“Ctrl+U”).
Примечание: Жирный шрифт в Ворде, хоть и обозначается буквой “Ж”, на самом деле является полужирным.
Как вы поняли, текст может быть одновременно жирным, курсивом и подчеркнутым.
Совет: Если вы хотите выбрать толщину линии подчеркивания, нажмите на треугольничек, расположенный возле буквы “Ч” в группе “Шрифт”.
Рядом с буквами “Ж”, “К” и “Ч” в группе шрифт находится кнопка “abc” (зачеркнутые латинские буквы). Если вы выделите текст, а затем нажмете на эту кнопку, текст будет зачеркнут.
Как изменить цвет и фон шрифта?
Помимо внешнего вида шрифта в MS Word можно также изменить его стиль (текстовые эффекты и оформление), цвет и фон, на котором текст будет находиться.
Изменяем стиль шрифта
Чтобы изменить стиль шрифта, его оформление, в группе “Шрифт”, которая расположена во вкладке “Главная” (ранее “Формат” или “Разметка страницы”) нажмите на небольшой треугольник, расположенный справа от полупрозрачной буквы “А” (“Текстовые эффекты и оформление”).
В появившемся окошке выберите то, что бы вы хотели изменить.
Важно: Помните, если вы хотите изменить внешний вид уже имеющегося текста, предварительно выделите его.
Как видите, один этот инструмент уже позволяет изменить цвет шрифта, добавить к нему тень, контур, отражение, подсветку и другие эффекты.
Изменяем фон за текстом
В группе “Шрифт” рядом с кнопкой, рассмотренной выше, находится кнопка “Цвет выделения текста”, с помощью которой можно изменить фон, на котором находится шрифт.
Просто выделите фрагмент текста, фон которого хотите изменить, а затем нажмите на треугольничек возле этой кнопки на панели управления и выберите подходящий фон.
Вместо стандартного белого фона, текст будет находиться на фоне того цвета, который вы выбрали.
Урок: Как убрать фон в Ворде
Изменяем цвет текста
Следующая кнопка в группе “Шрифт” — “Цвет шрифта” — и, как понятно из названия, она позволяет этот самый цвет изменить.

Выделите фрагмент текста, цвет которого необходимо изменить, а затем нажмите на треугольник возле кнопки “Цвет шрифта”. Выберите подходящий цвет.
Цвет выделенного текста изменится.
Как установить понравившийся шрифт в качестве используемого по умолчанию?
Если вы часто используете для набора текста один и тот же, отличный от стандартного, доступного непосредственно при запуске MS Word, шрифт, не лишним будет установить его в качестве используемого по умолчанию — это позволит сэкономить немного времени.
1. Откройте диалоговое окно “Шрифт”, нажав на стрелочку, расположенную в правом нижнем углу одноименной группы.
2. В разделе “Шрифт” выберите тот, который вы хотите установить в качестве стандартного, доступного по умолчанию при запуске программы.
В этом же окне вы можете установить подходящий размер шрифта, его начертание (обычный, полужирный или курсив), цвет, а также многие другие параметры.
3. Выполнив необходимые настройки, нажмите на кнопку “По умолчанию”, расположенную в нижней левой части диалогового окна.
4. Выберите, как вы хотите сохранить шрифт — для текущего документа или для всех, с которыми будете работать в дальнейшем.
5. Нажмите кнопку “ОК”, чтобы закрыть окно “Шрифт”.
6. Шрифт по умолчанию, как и все дополнительные настройки, которые вы могли выполнить в этом диалоговом окне, изменится. Если вы применили его для всех последующих документов, то при каждом создание/запуске нового документа Ворд сразу же будет установлен ваш шрифт.
Как изменить шрифт в формуле?
Мы уже писали о том, как в Microsoft Word добавлять формулы, и как с ними работать, более подробно об этом вы можете узнать из нашей статьи. Здесь же мы расскажем о том, как изменить шрифт в формуле.
Урок: Как в Ворде вставить формулу
Если вы просто выделите формулу и попробуете изменить ее шрифт точно так же, как вы это делаете с любым другим текстом, ничего не получится. В данном случае действовать необходимо немного иначе.
1. Перейдите во вкладку “Конструктор”, которая появляется после клика по области формулы.
2. Выделите содержимое формулы, нажав “Ctrl+A” внутри области, в которой она находится. Для этого также можно использовать мышку.
3. Откройте диалоговое окно группы “Сервис”, нажав на стрелочку, расположенную в правой нижней части этой группы.
4. Перед вами откроется диалоговое окно, где в строке “Шрифт по умолчанию для областей формул” можно изменить шрифт, выбрав понравившийся из доступного списка.

Примечание: Несмотря на то, что в Word имеется довольно большой набор встроенных шрифтов, далеко не каждый из них может быть использован для формул. Кроме того, возможно, что помимо стандартного Cambria Math вы не сможете выбрать никакой другой шрифт для формулы.
На этом все, теперь вам известно, как изменить шрифт в Ворде, также из этой статьи вы узнали о том, как настроить другие параметры шрифта, в числе которых его размер, цвет и т.д. Желаем вам высокой продуктивности и успехов в освоение всех тонкостей Microsoft Word.

Содержание
- Thorn valley
- Fantasque sans mono
- Bender
- Ibm plex serif
- 3m trislan
- Wes
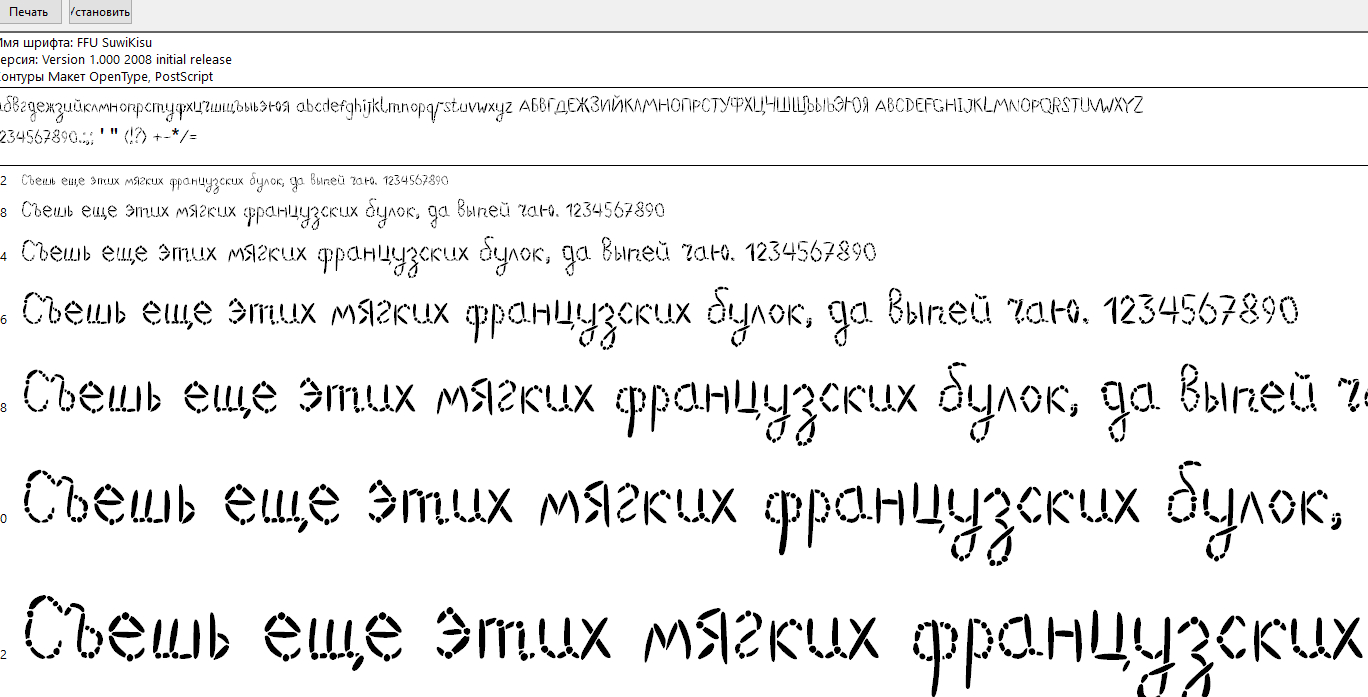
- Ffu suwikisu
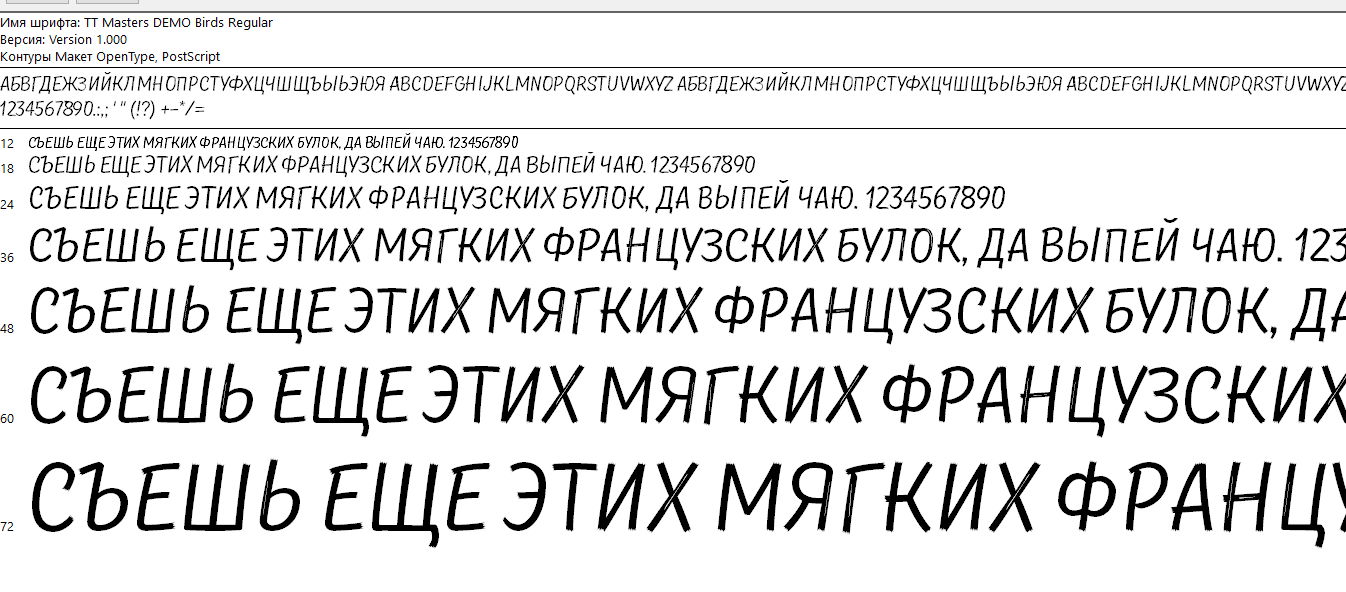
- Tt masters
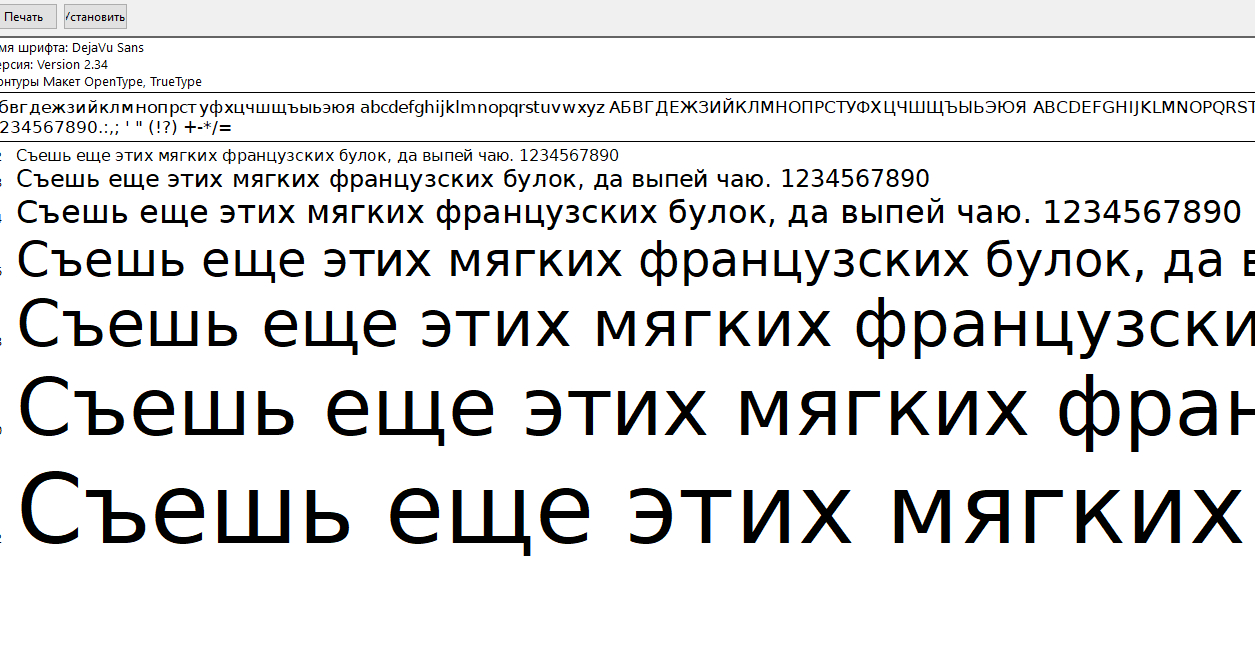
- Dejavu sans
- Marck script
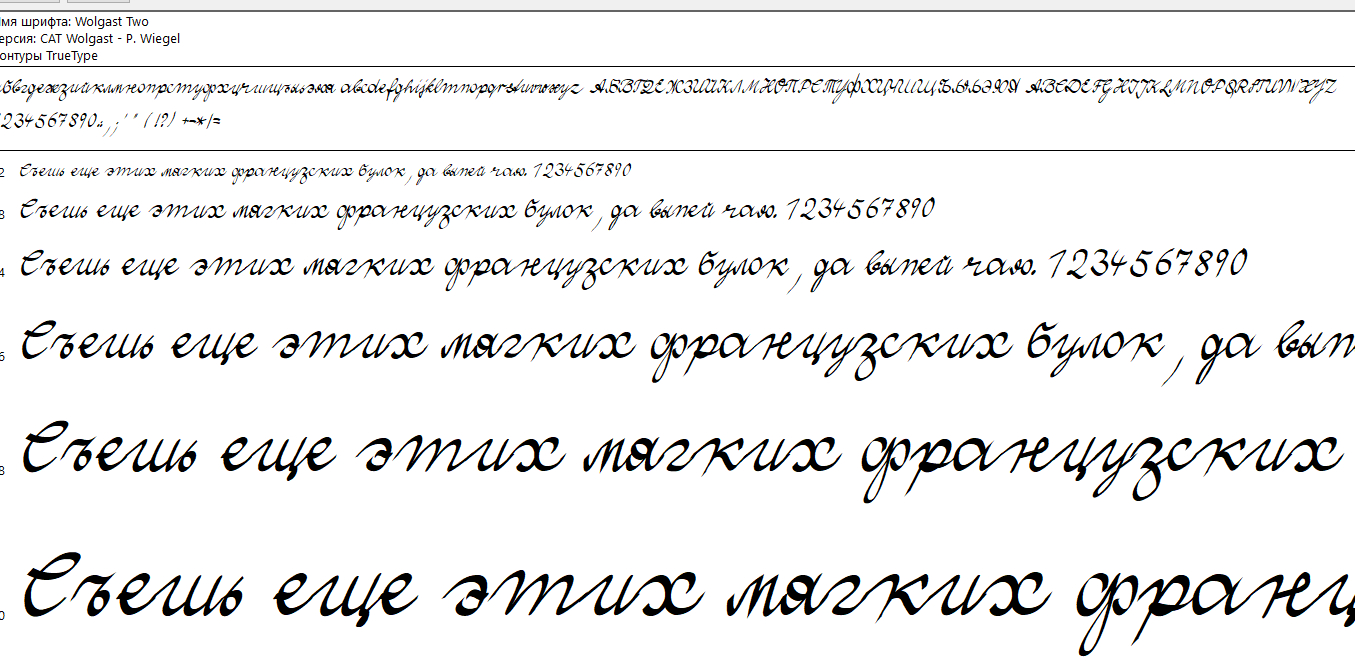
- Wolgast two
Тип шрифта Regular – это вид начертания, относящийся к основному, нормальному варианту. Это не курсивный, не жирный. Но этот вид начертания зависит от того, каким его создал автор шрифта. Если придуман был жирный шрифт, то тип начертания может быть жирным, а Bold будет еще жирнее. Иными словами Regular это не только тонкие прямые строгие буквы с засечками или без. Это может быть и рукописный стиль и замысловатый. Суть – в базовом начертании.
Мы подобрали для вас наиболее интересные и востребованные шрифты с видом начертания regular, который может быть самым разным. Здесь вы найдете и варианты для дизайна сайтов, постов, изображений, поздравлений или оформления брендов и многое другое.
Разумеется, что в каждом наборе шрифта вы найдете и иные виды начертания.
О том, как воспользоваться новыми шрифтами в Photoshop и как их правильно установить, можно ознакомиться в нашей Инструкции «Как установить шрифт в Photoshop»
Thorn valley
Формат: .ttf
Количество: 1
Размер файла: 1,2 МБ
Скачать
Fantasque sans mono
Формат: .otf
Количество: 4
Размер файла: 290 КБ 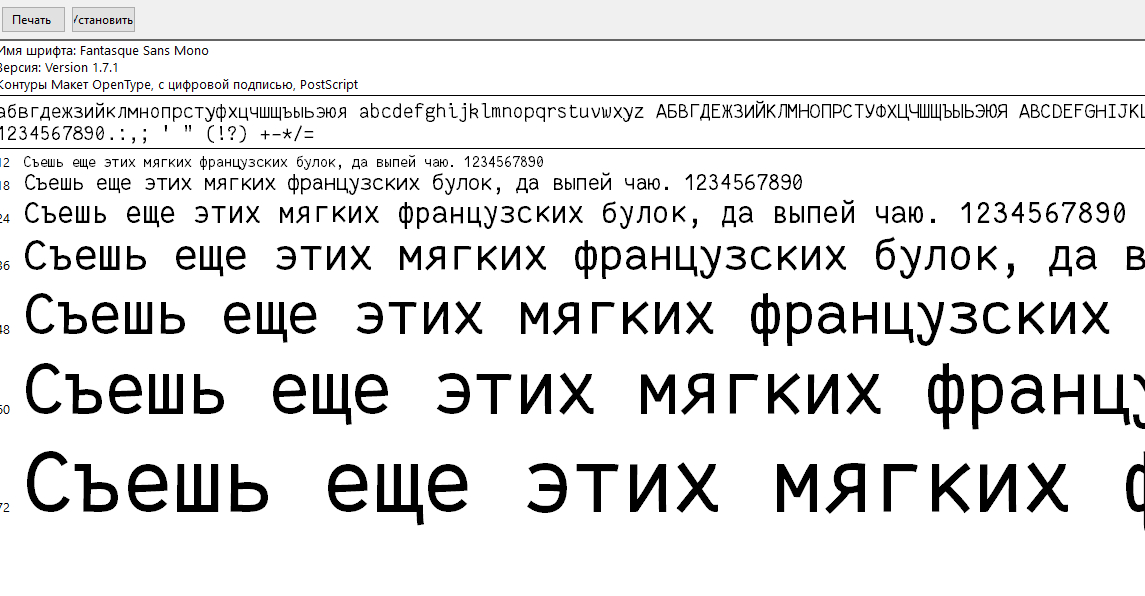
Скачать
Bender
Формат: .otf
Количество: 8
Размер файла: 218 КБ 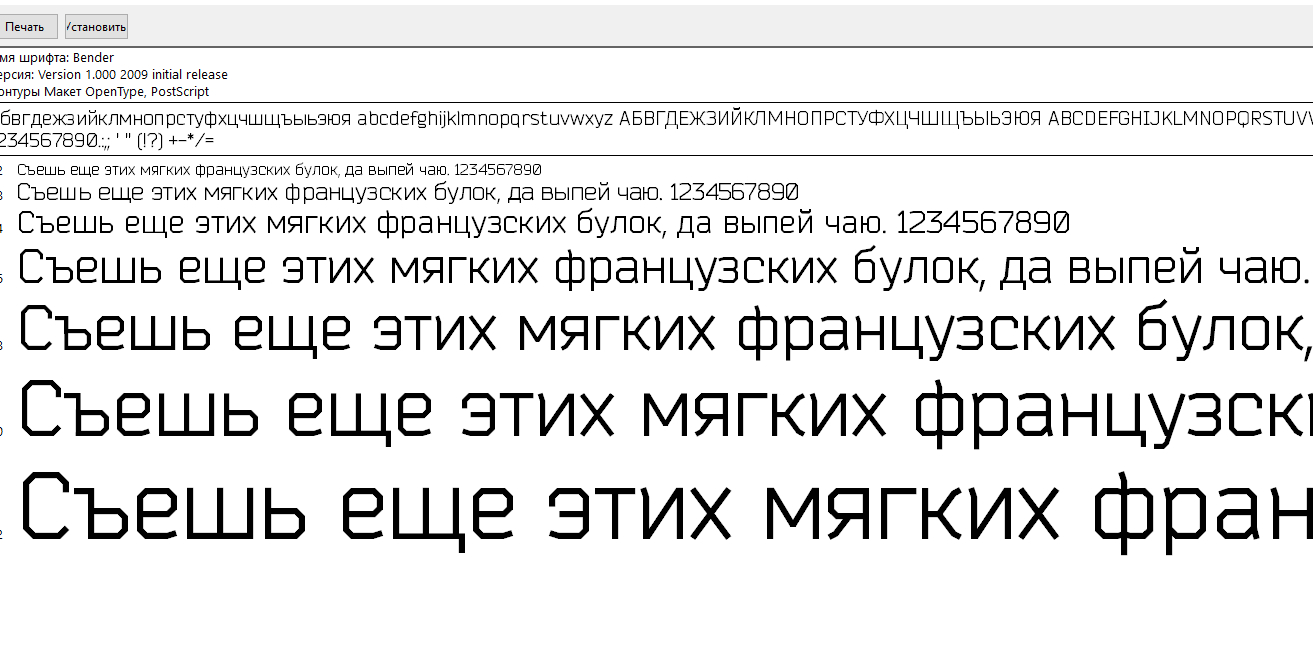
Скачать
Ibm plex serif
Формат: .ttf
Количество: 14
Размер файла: 1 МБ
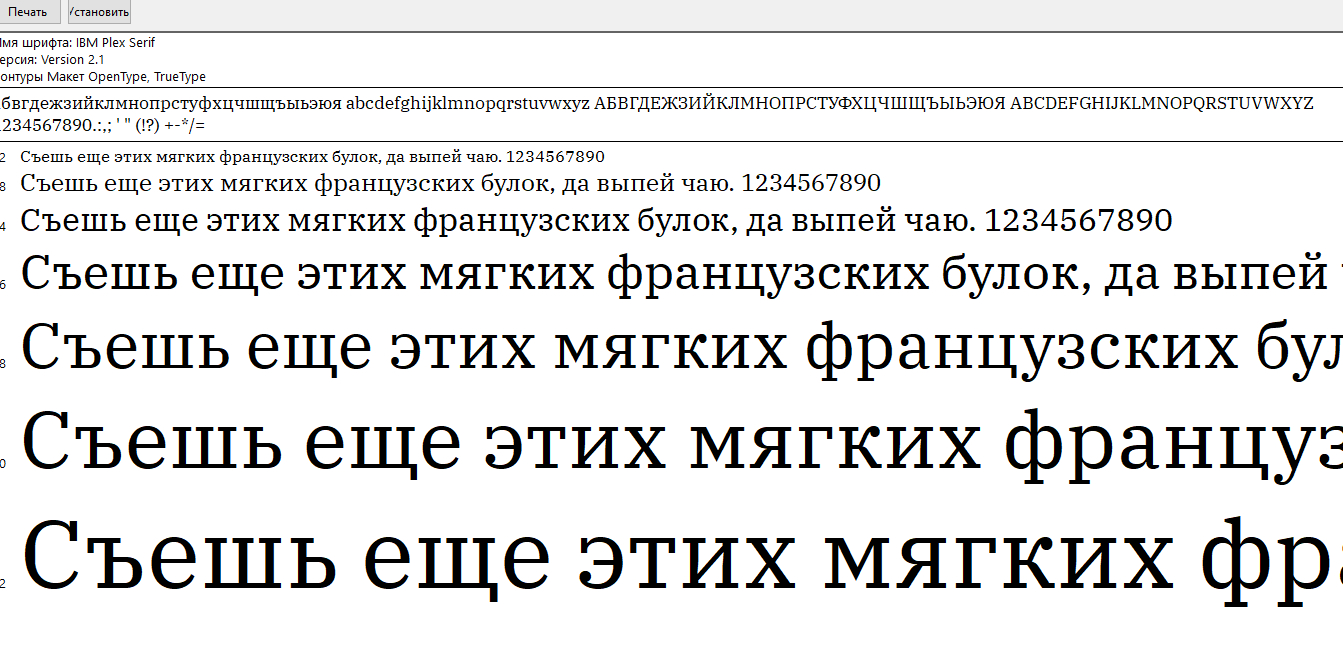
Скачать
3m trislan
Формат: .ttf
Количество: 1
Размер файла: 891 КБ

Скачать
Wes
Формат: .ttf, .otf
Количество: 2
Размер файла: 136 КБ
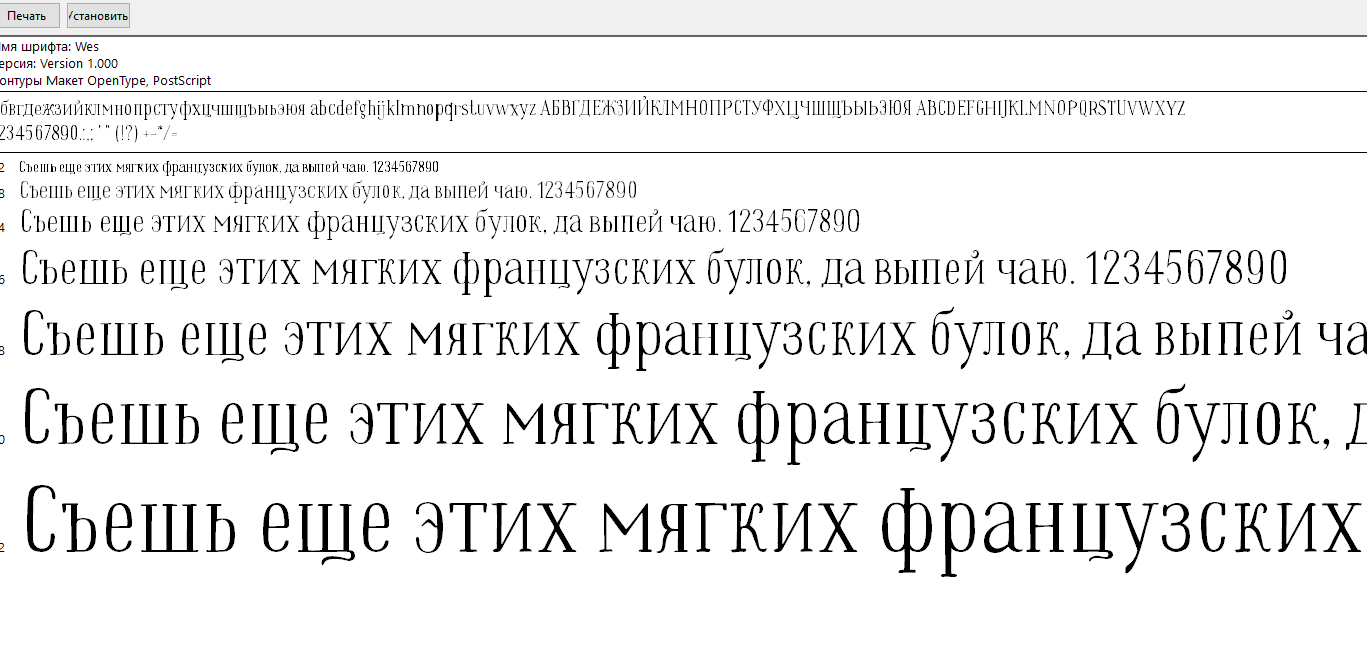
Скачать
Ffu suwikisu
Формат: .otf
Количество: 1
Размер файла: 40 КБ
Скачать
Tt masters
Формат: .otf
Количество: 3
Размер файла: 149 КБ
Скачать
Dejavu sans
Формат: .ttf
Количество: 9
Размер файла: 2,7 МБ
Скачать
Marck script
Формат: .ttf
Количество: 1
Размер файла: 39 КБ

Скачать
Wolgast two
Формат: .ttf
Количество: 2
Размер файла: 144 КБ
Скачать
Setting font styles & sizes in an equation is a simple process.
In Word 2016, you can change font sizes, styles, or even paragraph
style in every equation like a regular text.
To change font size & style in an equation (how to add an equation, see
Working with Microsoft Equation),
do the following:
1. Select an equation or part of it which you want to
change.
2. Under Equation Tools, on the Design tab,
in the Conversions group, click the button Text to highlight it (omit this step if this
button is highlighted already):

3. Right-click in it and choose Font… in the
popup menu (or click Ctrl+Shift+F):

4. Change the settings like a regular text in Word 2016.
To change a paragraph style, select an equation or part of it which you want to change,
right-click in it and choose Paragraph… in the popup menu. Then change the settings like a
usual paragraph in Word 2016.
See also this tip in French:
Définition de la taille de police et des styles dans une équation.
Please, disable AdBlock and reload the page to continue
Today, 30% of our visitors use Ad-Block to block ads.We understand your pain with ads, but without ads, we won’t be able to provide you with free content soon. If you need our content for work or study, please support our efforts and disable AdBlock for our site. As you will see, we have a lot of helpful information to share.
Просмотров 3.2к.
Устанавливаем нестандартный размер шрифта, меняем цвет, начертание, выбираем шрифт со стильным эффектом. Выясняем почему шрифт не всегда редактируется.
Все нужные инструменты, находятся на вкладке Главная в блоке Шрифт. Именно от туда будем совершать те действия, которые помогут изменить шрифт в word.

Содержание
- Меняем размер шрифта
- Устанавливаем регистр: верхний, нижний
- Меняем стиль шрифта
- Простые стили
- Текстовые эффекты и оформление
- Меняем цвет шрифта
- Выделяем текст цветом
- Устанавливаем шрифт по умолчанию
- Как изменить обычный текст на зачеркнутый
- Как изменить шрифт в формуле
- Как изменить шрифт в нумерации страниц
- Что делать если шрифт не меняется
Меняем размер шрифта
Здесь всё просто. Выделяем текст, раскрываем меню с размерами шрифтов, выбираем шрифт нужной величины. Таким способом мы сможем выбрать стандартное значение из списка размеров.

Предусмотрен и другой вариант — изменения высоты шрифта с добавлением промежуточных размеров. К примеру, вам нужен шрифт выстой 15,5 вы делаете двойной клик в окошке с размером шрифта и вручную проставляете 15,5.

Другим способом изменить размер шрифта можно в окне редактирования, которое открывается через контекстное меню.
Выделяем текст, жмем по нему правой кнопкой мыши, в контекстном меню выбираем «Шрифт».

Word отобразит окно Шрифт, где вы установите нужный размер.

Устанавливаем регистр: верхний, нижний
Для установки нужного регистра текста действуем по старой схеме: выделяем текст, жмем на кнопку Аа, выбираем нужный шаблон оформления.

Доступен комплект из 5 шаблонов:
- Как в предложениях. Стандартный вариант с привычной для Word структурой – заглавная буква в начале, после – прописные и точка в конце.
- все строчные. Приводит текст к нижнему регистру.
- ВСЕ ПРОПИСНЫЕ Приводит текст к верхнему регистру.
- Начинать С Прописных Эффект применяется ко всему тексту (или абзацу) и первую букву каждого слова делает заглавной.
- иЗМЕНИТЬ РЕГИСТР Меняет прописные буквы на строчные и наоборот для выделенного фрагмента текста.
Меняем стиль шрифта
Для изменения шрифта в Word предусмотрены простые стили: полужирный, курсив, подчеркнутый. Категория представлена на вкладке «Главная» в разделе «Шрифт».
Простые стили
Применить простые стили несложно – выделяем текст, кликаем по кнопкам «Ж», «К» и «Ч». При желании можно применить все три стиля к одному тексту. В результате мы можем получить полужирный подчеркнутый текст написанный курсивом.

Простые стили можно установить с помощью горячих клавиш: комбинация Ctrl + B выделяет текст полужирным начертанием, Ctrl + I добавляет курсив, а Ctrl + U – подчеркивает фрагмент выделенного текста.
Текстовые эффекты и оформление
Для нестандартного оформления текста в блоке «Шрифт» есть раздел «Текстовые эффекты и оформление». Здесь вы найдете комплект шаблонов, дополнительные категории, включающие параметры для настройки контура, теней, отражений, свечения и других стилистических приемов.

Взаимодействовать с разделом несложно – при наведении курсора Word продемонстрирует предстоящие изменения, а при нажатии – сразу применить эффект.
Применить эффекты можно вместе с простыми стилями: полужирным курсивом и подчеркнутым. В результате мы можем получить совершенно невообразимый эффект. Например, полужирный подчеркнутый текст написанный курсивом с лиловой подсветкой и тенью.

Меняем цвет шрифта
Цвет текста в ворде можно изменить. Чёрные буквы сделать красными или любого другого цвета, поддерживается вся палитра RGB.
Палитра цветов вызывается через раздел «Шрифт». Кнопка, буква А подчеркнутая красным, отобразит раздел со стандартными и дополнительными цветами. Достаточно навести курсор для «примерки» найденного шаблона.

Для настройки цвета по цветовой модели RGB выбираем пункт «Другие цвета» и переходим на вкладку «Спектр», выбираем цвет шрифта с нужными параметрами.
К примеру, если вам нужен текст с цветом букв как в газете Нью-Йорк таймс выберите параметры RGB: 51, 51, 51 и вы получите такой текст.

Среди дополнительных функций раздела – градиентная заливка текста. Меняется и настраивается параметр через одноименное меню.

Если стандартных настроек будет недостаточно можно воспользоваться специальным редактором и настроить градиент вручную. Перейти к настройке своего градиента можно через то же меню выбрав пункт «Другие градиентные заливки».
Выделяем текст цветом
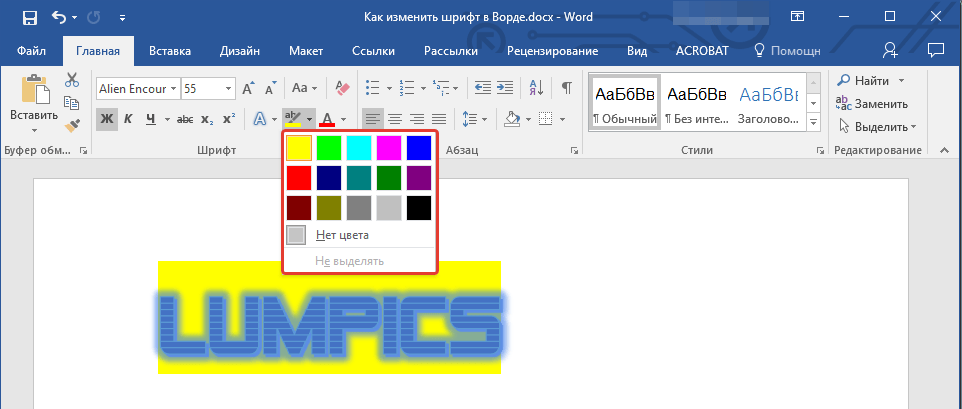
Один из способов выделить текст в ворде — выделить его цветом. Этот способ выделения аналогичен выделению текста маркером на листе бумаги. Кнопка выбора подходящего оттенка находится в категории «Шрифт».

Доступных цветов – 15 штук – от желтого до черного. Если выбран вариант «Нет цвета», то оформление для выделенного фрагмента сбросится. Отмена недавних изменений доступна через комбинацию клавиш Ctrl + C.
Устанавливаем шрифт по умолчанию
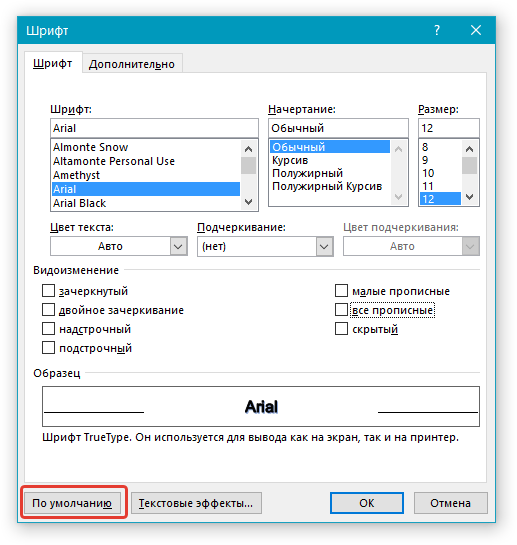
Допустим, вы пишите курсовую листов на 100, при этом нужно набрать текст шрифтом Arial. Но, Microsoft Word каждый новый документ будет открывать со шрифтом Calibri, который установлен по умолчанию. И вам придется, с каждый раз менять Calibri на Arial. Так вот, чтобы менять шрифт не пришлось нужно установить Arial шрифтом по умолчанию для всех документов ворда.
- Открываем новый документ
- В блоке «Шрифт» жмём на стрелку в правом нижнем углу или комбинацию клавиш Ctrl + D;
- Выбираем нужный шрифт, устанавливаем размер.

- В блоке «Образец» смотрим какой шрифт получился. В нашем случае — Arial размера 12.
- Жмём кнопку «По умолчанию»
- В открывшемся окне отмечаем пункт: «всех документов основанных на шаблоне Normal.dotm» и жмем OK.

Таким образом, мы установили Arial 14 размера в качестве шрифта по умолчанию для всех 100 листов нашей курсовой работы.
Как изменить обычный текст на зачеркнутый
Текст в Word можно зачеркнуть двумя способами. Первый связан с обращением к кнопке «Зачеркивание», расположенной под списком шрифтов.

Второй способ перечеркнуть текст — выделить фрагмент, правой кнопкой мыши, вызвать меню и выбрать пункт Шрифт.

Параметр Зачеркнутый появится в категории Видоизменение. Если поставить галочку, и нажать на кнопку ОК, то выделенный текст станет зачеркнутым.

Как изменить шрифт в формуле
Если вам нужно изменить в формуле размер, цвет, начертание шрифта проще действовать через контекстное меню. Выделяем формулу, кликаем по ней правой кнопкой мыши, в меню выбираем пункт «Шрифт».

Затем в окне с параметрами меняем размер, начертание и цвет шрифта, жмем OK.

Обратите внимание, для формул в Microsoft Word по умолчанию установлен только один шрифт Cambria Math и изменить его можно только в текущем документе.
Чтобы изменить шрифт формулы в текущем документе делаем следующее:
- Выделяем формулу
- Переходим на вкладку «Конструктор»
- Вместо «Профессионального» типа формулы выбираем «Обычный текст» и меняем шрифт формулы

Замечу, что вкладка «Конструктор» появится в верхней части окна Word после того как формула будет выделена.
Как изменить шрифт в нумерации страниц
К примеру, в нумерации страниц черные цифры надо сделать красными, с наклоном и сами цифры прописать шрифтом Times New Roman 18 размера.
- Делаем двойной клик левой кнопки мыши по номеру страницы.
- Выделяем номер страницы. Даже если вы видите, что цифра выделена все равно выделяем, потому что номер страницы может быть просто подсвечен.

- Правой кнопкой мыши вызываем контекстное меню, ставим шрифт Times New Roman, выбираем красный цвет букв и выбираем начертание с наклоном (курсив).

Что делать если шрифт не меняется
Бывает, вы скопировали текст из интернета, вставили его в вордовский документ, пытаетесь поменять на привычный Times New Roman, а шрифт не меняется. Причина может быть в том, что текст из интернета написан шрифтом, который не поддерживает кириллицу.
- Выделяем текст
- Открываем список доступных шрифтов
- Простым перебором выбираем шрифт который поддержит кириллицу и подойдет по стилю вашему тексту.

Если в списке подходящего шрифта не нашлось идем в сервис oFont или Google Fonts и подбираем шрифт там. Подходящие шрифты скачиваем, устанавливаем на свой ПК и снова простым перебором выбираем подходящий шрифт.
На нашем сайте, вы можете скачать шрифт Regular для своего сайта, или на свой компьютер, абсолютно бесплатно!
Добавляйте выбранные начертания и шрифты в «Коллекцию» нажав кнопку [+], чтобы скачать ZIP архивом только те файлы шрифтов, которые Вам нужны.
Съешь ещё этих мягких французских булок, да выпей же чаю.
The quick brown fox jumps over the lazy dog
1234567890 !@#$%^&*()_+-=
RegularLight.ttf Eot Woff
Как установить шрифт Regular Light
1. Для того, чтобы установить шрифт Regular Light в свой HTML-проект, сперва скопируйе содержимое архива в папку /fonts, которая должна лежать в той-же директории, что и папка /css вашего HTML сайта.
Структура проекта после установки шрифтов:
/ (корневой каталог шаблона или проекта)
    /fonts (Шрифты из архива распаковываем в папку /fonts)
        /RegularLight

    /css (Папка со стилями должна находиться в той-же категории, что и /fonts)
        /stylename.css (Файл стилей, в котором подключаются русские шрифты)
2. Далее вставляем код, указанный ниже, в файл стилей, который должен находиться в папке /css.
/* Код для подключения шрифта в /css/stylename.css */
@font-face {
    font-family: "RegularLight";
    src: url("../fonts/RegularLight/RegularLight.eot");
    src: url("../fonts/RegularLight/RegularLight.eot?#iefix")format("embedded-opentype"),
    url("../fonts/RegularLight/RegularLight.woff") format("woff"),
    url("../fonts/RegularLight/RegularLight.ttf") format("truetype");
    font-style: normal;
    font-weight: 300;
}
Съешь ещё этих мягких французских булок, да выпей же чаю.
The quick brown fox jumps over the lazy dog
1234567890 !@#$%^&*()_+-=
RegularRegular.ttf Eot Woff
Как установить шрифт Regular
1. Для того, чтобы установить шрифт Regular в свой HTML-проект, сперва скопируйе содержимое архива в папку /fonts, которая должна лежать в той-же директории, что и папка /css вашего HTML сайта.
Структура проекта после установки шрифтов:
/ (корневой каталог шаблона или проекта)
    /fonts (Шрифты из архива распаковываем в папку /fonts)
        /RegularRegular

    /css (Папка со стилями должна находиться в той-же категории, что и /fonts)
        /stylename.css (Файл стилей, в котором подключаются русские шрифты)
2. Далее вставляем код, указанный ниже, в файл стилей, который должен находиться в папке /css.
/* Код для подключения шрифта в /css/stylename.css */
@font-face {
    font-family: "RegularRegular";
    src: url("../fonts/RegularRegular/RegularRegular.eot");
    src: url("../fonts/RegularRegular/RegularRegular.eot?#iefix")format("embedded-opentype"),
    url("../fonts/RegularRegular/RegularRegular.woff") format("woff"),
    url("../fonts/RegularRegular/RegularRegular.ttf") format("truetype");
    font-style: normal;
    font-weight: normal;
}
Съешь ещё этих мягких французских булок, да выпей же чаю.
The quick brown fox jumps over the lazy dog
1234567890 !@#$%^&*()_+-=
RegularMedium.ttf Eot Woff
Как установить шрифт Regular Medium
1. Для того, чтобы установить шрифт Regular Medium в свой HTML-проект, сперва скопируйе содержимое архива в папку /fonts, которая должна лежать в той-же директории, что и папка /css вашего HTML сайта.
Структура проекта после установки шрифтов:
/ (корневой каталог шаблона или проекта)
    /fonts (Шрифты из архива распаковываем в папку /fonts)
        /RegularMedium

    /css (Папка со стилями должна находиться в той-же категории, что и /fonts)
        /stylename.css (Файл стилей, в котором подключаются русские шрифты)
2. Далее вставляем код, указанный ниже, в файл стилей, который должен находиться в папке /css.
/* Код для подключения шрифта в /css/stylename.css */
@font-face {
    font-family: "RegularMedium";
    src: url("../fonts/RegularMedium/RegularMedium.eot");
    src: url("../fonts/RegularMedium/RegularMedium.eot?#iefix")format("embedded-opentype"),
    url("../fonts/RegularMedium/RegularMedium.woff") format("woff"),
    url("../fonts/RegularMedium/RegularMedium.ttf") format("truetype");
    font-style: normal;
    font-weight: 500;
}
Съешь ещё этих мягких французских булок, да выпей же чаю.
The quick brown fox jumps over the lazy dog
1234567890 !@#$%^&*()_+-=
RegularSemiBold.ttf Eot Woff
Как установить шрифт Regular SemiBold
1. Для того, чтобы установить шрифт Regular SemiBold в свой HTML-проект, сперва скопируйе содержимое архива в папку /fonts, которая должна лежать в той-же директории, что и папка /css вашего HTML сайта.
Структура проекта после установки шрифтов:
/ (корневой каталог шаблона или проекта)
    /fonts (Шрифты из архива распаковываем в папку /fonts)
        /RegularSemiBold

    /css (Папка со стилями должна находиться в той-же категории, что и /fonts)
        /stylename.css (Файл стилей, в котором подключаются русские шрифты)
2. Далее вставляем код, указанный ниже, в файл стилей, который должен находиться в папке /css.
/* Код для подключения шрифта в /css/stylename.css */
@font-face {
    font-family: "RegularSemiBold";
    src: url("../fonts/RegularSemiBold/RegularSemiBold.eot");
    src: url("../fonts/RegularSemiBold/RegularSemiBold.eot?#iefix")format("embedded-opentype"),
    url("../fonts/RegularSemiBold/RegularSemiBold.woff") format("woff"),
    url("../fonts/RegularSemiBold/RegularSemiBold.ttf") format("truetype");
    font-style: normal;
    font-weight: 600;
}
Съешь ещё этих мягких французских булок, да выпей же чаю.
The quick brown fox jumps over the lazy dog
1234567890 !@#$%^&*()_+-=
RegularBold.ttf Eot Woff
Как установить шрифт Regular Bold
1. Для того, чтобы установить шрифт Regular Bold в свой HTML-проект, сперва скопируйе содержимое архива в папку /fonts, которая должна лежать в той-же директории, что и папка /css вашего HTML сайта.
Структура проекта после установки шрифтов:
/ (корневой каталог шаблона или проекта)
    /fonts (Шрифты из архива распаковываем в папку /fonts)
        /RegularBold

    /css (Папка со стилями должна находиться в той-же категории, что и /fonts)
        /stylename.css (Файл стилей, в котором подключаются русские шрифты)
2. Далее вставляем код, указанный ниже, в файл стилей, который должен находиться в папке /css.
/* Код для подключения шрифта в /css/stylename.css */
@font-face {
    font-family: "RegularBold";
    src: url("../fonts/RegularBold/RegularBold.eot");
    src: url("../fonts/RegularBold/RegularBold.eot?#iefix")format("embedded-opentype"),
    url("../fonts/RegularBold/RegularBold.woff") format("woff"),
    url("../fonts/RegularBold/RegularBold.ttf") format("truetype");
    font-style: normal;
    font-weight: 700;
}
Съешь ещё этих мягких французских булок, да выпей же чаю.
The quick brown fox jumps over the lazy dog
1234567890 !@#$%^&*()_+-=
RegularExtraBold.ttf Eot Woff
Как установить шрифт Regular ExtraBold
1. Для того, чтобы установить шрифт Regular ExtraBold в свой HTML-проект, сперва скопируйе содержимое архива в папку /fonts, которая должна лежать в той-же директории, что и папка /css вашего HTML сайта.
Структура проекта после установки шрифтов:
/ (корневой каталог шаблона или проекта)
    /fonts (Шрифты из архива распаковываем в папку /fonts)
        /RegularExtraBold

    /css (Папка со стилями должна находиться в той-же категории, что и /fonts)
        /stylename.css (Файл стилей, в котором подключаются русские шрифты)
2. Далее вставляем код, указанный ниже, в файл стилей, который должен находиться в папке /css.
/* Код для подключения шрифта в /css/stylename.css */
@font-face {
    font-family: "RegularExtraBold";
    src: url("../fonts/RegularExtraBold/RegularExtraBold.eot");
    src: url("../fonts/RegularExtraBold/RegularExtraBold.eot?#iefix")format("embedded-opentype"),
    url("../fonts/RegularExtraBold/RegularExtraBold.woff") format("woff"),
    url("../fonts/RegularExtraBold/RegularExtraBold.ttf") format("truetype");
    font-style: normal;
    font-weight: 800;
}
Съешь ещё этих мягких французских булок, да выпей же чаю.
The quick brown fox jumps over the lazy dog
1234567890 !@#$%^&*()_+-=
RegularBlack.ttf Eot Woff
Как установить шрифт Regular Black
1. Для того, чтобы установить шрифт Regular Black в свой HTML-проект, сперва скопируйе содержимое архива в папку /fonts, которая должна лежать в той-же директории, что и папка /css вашего HTML сайта.
Структура проекта после установки шрифтов:
/ (корневой каталог шаблона или проекта)
    /fonts (Шрифты из архива распаковываем в папку /fonts)
        /RegularBlack

    /css (Папка со стилями должна находиться в той-же категории, что и /fonts)
        /stylename.css (Файл стилей, в котором подключаются русские шрифты)
2. Далее вставляем код, указанный ниже, в файл стилей, который должен находиться в папке /css.
/* Код для подключения шрифта в /css/stylename.css */
@font-face {
    font-family: "RegularBlack";
    src: url("../fonts/RegularBlack/RegularBlack.eot");
    src: url("../fonts/RegularBlack/RegularBlack.eot?#iefix")format("embedded-opentype"),
    url("../fonts/RegularBlack/RegularBlack.woff") format("woff"),
    url("../fonts/RegularBlack/RegularBlack.ttf") format("truetype");
    font-style: normal;
    font-weight: 900;
}
Съешь ещё этих мягких французских булок, да выпей же чаю.
The quick brown fox jumps over the lazy dog
1234567890 !@#$%^&*()_+-=
RegularLightItalic.ttf Eot Woff
Как установить шрифт Regular LightItalic
1. Для того, чтобы установить шрифт Regular LightItalic в свой HTML-проект, сперва скопируйе содержимое архива в папку /fonts, которая должна лежать в той-же директории, что и папка /css вашего HTML сайта.
Структура проекта после установки шрифтов:
/ (корневой каталог шаблона или проекта)
    /fonts (Шрифты из архива распаковываем в папку /fonts)
        /RegularLightItalic

    /css (Папка со стилями должна находиться в той-же категории, что и /fonts)
        /stylename.css (Файл стилей, в котором подключаются русские шрифты)
2. Далее вставляем код, указанный ниже, в файл стилей, который должен находиться в папке /css.
/* Код для подключения шрифта в /css/stylename.css */
@font-face {
    font-family: "RegularLightItalic";
    src: url("../fonts/RegularLightItalic/RegularLightItalic.eot");
    src: url("../fonts/RegularLightItalic/RegularLightItalic.eot?#iefix")format("embedded-opentype"),
    url("../fonts/RegularLightItalic/RegularLightItalic.woff") format("woff"),
    url("../fonts/RegularLightItalic/RegularLightItalic.ttf") format("truetype");
    font-style: italic;
    font-weight: normal;
}
Съешь ещё этих мягких французских булок, да выпей же чаю.
The quick brown fox jumps over the lazy dog
1234567890 !@#$%^&*()_+-=
RegularMediumItalic.ttf Eot Woff
Как установить шрифт Regular MediumItalic
1. Для того, чтобы установить шрифт Regular MediumItalic в свой HTML-проект, сперва скопируйе содержимое архива в папку /fonts, которая должна лежать в той-же директории, что и папка /css вашего HTML сайта.
Структура проекта после установки шрифтов:
/ (корневой каталог шаблона или проекта)
    /fonts (Шрифты из архива распаковываем в папку /fonts)
        /RegularMediumItalic

    /css (Папка со стилями должна находиться в той-же категории, что и /fonts)
        /stylename.css (Файл стилей, в котором подключаются русские шрифты)
2. Далее вставляем код, указанный ниже, в файл стилей, который должен находиться в папке /css.
/* Код для подключения шрифта в /css/stylename.css */
@font-face {
    font-family: "RegularMediumItalic";
    src: url("../fonts/RegularMediumItalic/RegularMediumItalic.eot");
    src: url("../fonts/RegularMediumItalic/RegularMediumItalic.eot?#iefix")format("embedded-opentype"),
    url("../fonts/RegularMediumItalic/RegularMediumItalic.woff") format("woff"),
    url("../fonts/RegularMediumItalic/RegularMediumItalic.ttf") format("truetype");
    font-style: italic;
    font-weight: 500;
}
Съешь ещё этих мягких французских булок, да выпей же чаю.
The quick brown fox jumps over the lazy dog
1234567890 !@#$%^&*()_+-=
RegularBoldItalic.ttf Eot Woff
Как установить шрифт Regular BoldItalic
1. Для того, чтобы установить шрифт Regular BoldItalic в свой HTML-проект, сперва скопируйе содержимое архива в папку /fonts, которая должна лежать в той-же директории, что и папка /css вашего HTML сайта.
Структура проекта после установки шрифтов:
/ (корневой каталог шаблона или проекта)
    /fonts (Шрифты из архива распаковываем в папку /fonts)
        /RegularBoldItalic

    /css (Папка со стилями должна находиться в той-же категории, что и /fonts)
        /stylename.css (Файл стилей, в котором подключаются русские шрифты)
2. Далее вставляем код, указанный ниже, в файл стилей, который должен находиться в папке /css.
/* Код для подключения шрифта в /css/stylename.css */
@font-face {
    font-family: "RegularBoldItalic";
    src: url("../fonts/RegularBoldItalic/RegularBoldItalic.eot");
    src: url("../fonts/RegularBoldItalic/RegularBoldItalic.eot?#iefix")format("embedded-opentype"),
    url("../fonts/RegularBoldItalic/RegularBoldItalic.woff") format("woff"),
    url("../fonts/RegularBoldItalic/RegularBoldItalic.ttf") format("truetype");
    font-style: italic;
    font-weight: 700;
}
Съешь ещё этих мягких французских булок, да выпей же чаю.
The quick brown fox jumps over the lazy dog
1234567890 !@#$%^&*()_+-=
RegularSemiBoldItalic.ttf Eot Woff
Как установить шрифт Regular SemiBoldItalic
1. Для того, чтобы установить шрифт Regular SemiBoldItalic в свой HTML-проект, сперва скопируйе содержимое архива в папку /fonts, которая должна лежать в той-же директории, что и папка /css вашего HTML сайта.
Структура проекта после установки шрифтов:
/ (корневой каталог шаблона или проекта)
    /fonts (Шрифты из архива распаковываем в папку /fonts)
        /RegularSemiBoldItalic

    /css (Папка со стилями должна находиться в той-же категории, что и /fonts)
        /stylename.css (Файл стилей, в котором подключаются русские шрифты)
2. Далее вставляем код, указанный ниже, в файл стилей, который должен находиться в папке /css.
/* Код для подключения шрифта в /css/stylename.css */
@font-face {
    font-family: "RegularSemiBoldItalic";
    src: url("../fonts/RegularSemiBoldItalic/RegularSemiBoldItalic.eot");
    src: url("../fonts/RegularSemiBoldItalic/RegularSemiBoldItalic.eot?#iefix")format("embedded-opentype"),
    url("../fonts/RegularSemiBoldItalic/RegularSemiBoldItalic.woff") format("woff"),
    url("../fonts/RegularSemiBoldItalic/RegularSemiBoldItalic.ttf") format("truetype");
    font-style: italic;
    font-weight: normal;
}
Съешь ещё этих мягких французских булок, да выпей же чаю.
The quick brown fox jumps over the lazy dog
1234567890 !@#$%^&*()_+-=
RegularExtraBoldItalic.ttf Eot Woff
Как установить шрифт Regular ExtraBoldItalic
1. Для того, чтобы установить шрифт Regular ExtraBoldItalic в свой HTML-проект, сперва скопируйе содержимое архива в папку /fonts, которая должна лежать в той-же директории, что и папка /css вашего HTML сайта.
Структура проекта после установки шрифтов:
/ (корневой каталог шаблона или проекта)
    /fonts (Шрифты из архива распаковываем в папку /fonts)
        /RegularExtraBoldItalic

    /css (Папка со стилями должна находиться в той-же категории, что и /fonts)
        /stylename.css (Файл стилей, в котором подключаются русские шрифты)
2. Далее вставляем код, указанный ниже, в файл стилей, который должен находиться в папке /css.
/* Код для подключения шрифта в /css/stylename.css */
@font-face {
    font-family: "RegularExtraBoldItalic";
    src: url("../fonts/RegularExtraBoldItalic/RegularExtraBoldItalic.eot");
    src: url("../fonts/RegularExtraBoldItalic/RegularExtraBoldItalic.eot?#iefix")format("embedded-opentype"),
    url("../fonts/RegularExtraBoldItalic/RegularExtraBoldItalic.woff") format("woff"),
    url("../fonts/RegularExtraBoldItalic/RegularExtraBoldItalic.ttf") format("truetype");
    font-style: italic;
    font-weight: normal;
}
Съешь ещё этих мягких французских булок, да выпей же чаю.
The quick brown fox jumps over the lazy dog
1234567890 !@#$%^&*()_+-=
RegularBlackItalic.ttf Eot Woff
Как установить шрифт Regular BlackItalic
1. Для того, чтобы установить шрифт Regular BlackItalic в свой HTML-проект, сперва скопируйе содержимое архива в папку /fonts, которая должна лежать в той-же директории, что и папка /css вашего HTML сайта.
Структура проекта после установки шрифтов:
/ (корневой каталог шаблона или проекта)
    /fonts (Шрифты из архива распаковываем в папку /fonts)
        /RegularBlackItalic

    /css (Папка со стилями должна находиться в той-же категории, что и /fonts)
        /stylename.css (Файл стилей, в котором подключаются русские шрифты)
2. Далее вставляем код, указанный ниже, в файл стилей, который должен находиться в папке /css.
/* Код для подключения шрифта в /css/stylename.css */
@font-face {
    font-family: "RegularBlackItalic";
    src: url("../fonts/RegularBlackItalic/RegularBlackItalic.eot");
    src: url("../fonts/RegularBlackItalic/RegularBlackItalic.eot?#iefix")format("embedded-opentype"),
    url("../fonts/RegularBlackItalic/RegularBlackItalic.woff") format("woff"),
    url("../fonts/RegularBlackItalic/RegularBlackItalic.ttf") format("truetype");
    font-style: italic;
    font-weight: 900;
}
Съешь ещё этих мягких французских булок, да выпей же чаю.
The quick brown fox jumps over the lazy dog
1234567890 !@#$%^&*()_+-=
RegularRegularItalic.ttf Eot Woff
Как установить шрифт Regular Italic
1. Для того, чтобы установить шрифт Regular Italic в свой HTML-проект, сперва скопируйе содержимое архива в папку /fonts, которая должна лежать в той-же директории, что и папка /css вашего HTML сайта.
Структура проекта после установки шрифтов:
/ (корневой каталог шаблона или проекта)
    /fonts (Шрифты из архива распаковываем в папку /fonts)
        /RegularRegularItalic

    /css (Папка со стилями должна находиться в той-же категории, что и /fonts)
        /stylename.css (Файл стилей, в котором подключаются русские шрифты)
2. Далее вставляем код, указанный ниже, в файл стилей, который должен находиться в папке /css.
/* Код для подключения шрифта в /css/stylename.css */
@font-face {
    font-family: "RegularRegularItalic";
    src: url("../fonts/RegularRegularItalic/RegularRegularItalic.eot");
    src: url("../fonts/RegularRegularItalic/RegularRegularItalic.eot?#iefix")format("embedded-opentype"),
    url("../fonts/RegularRegularItalic/RegularRegularItalic.woff") format("woff"),
    url("../fonts/RegularRegularItalic/RegularRegularItalic.ttf") format("truetype");
    font-style: italic;
    font-weight: normal;
}
А лучше, используйте «коллекции» чтобы получить готовый архив с css файлом и нужными шрифтами, для этого жмите [+] и выбраный шрифт попадет в вашу коллекцию, можно добавлять разные шрифты и начертания, чтобы скачать только те, которые Вам нужны.
Кроме того, вы можете скачать сгенерированный плагин для WordPress сайта, и установить шрифты через менеджер плагинов в админке!
Вы можете скачать шрифт «Regular» одним zip-архивом, со всеми вариантами начертаний.
This is the second in a series on formatting books for print.
Part 1 is First Steps in Formatting for Print.
______________________________
In our first article in this series, we looked at three important topics for the writer who is self-publishing print books—trim, font, and margins. Before you begin formatting the text itself, you’ll want to choose trim size (the book’s dimensions), font and font size, and margin sizes.
Once you’ve made your decisions and set up your Word doc to reflect these choices—your paper size will match the trim size and will no longer be 8 1/2 x 11 or A4, and your margins will no longer be the typical one inch on each side—you can make other changes. (A reminder that the specifics of this series relate to MS Word, although you can use other software to prepare your manuscript for publishing.)
Be sure to save your formatted document with a new name so you can go back to your working manuscript in its original form if you need to.
Justified Text
While you probably worked with text that was aligned left and jagged on the right, you’ll now want to justify the text. Justification gives you straight margins on both sides rather than jagged ones on the right and is the typical setup for print books.
One easy way to justify your text is to highlight all of it (Ctrl+A) and type Ctrl+J.
A second way is to highlight all the text and click the justified text icon in Word’s toolbar.
With both options, all text will be justified. And that means your chapter titles as well as the story text. This isn’t really a problem, however, since chapter titles will require attention for other reasons and you’ll be changing the font for those eventually. (When you set the font style for chapter titles, it’s likely that you’ll center the title, but you don’t have to. You may align the title to the left or indent to allow room for a graphic.)
Beyond highlighting all the text and then justifying it, there are other ways to justify text. You could create a font style to set up your body text to include justified text. The use of font styles makes formatting a great deal easier.
We’re going to look at font styles in some detail in this article before we go into other specifics about formatting.
Font Styles
MS Word allows you to assign styles to each type of text in your document. Using font styles makes it easy to change all instances of one style at the same time without affecting text that uses any other style.
For a novel, you’ll typically have a style for your regular body text (with indented paragraphs), a style for body text that’s not indented (first lines of chapters and/or scenes), a style for chapter numbers and/or chapter titles, styles for author names and book titles in headers (which could be separate styles), a style for page numbers in either header or footer, and styles for the front matter, including copyright, acknowledgement, and title pages.
While novels typically include author name in the left page header and novel title in the right page header, nonfiction headers are often arranged differently. Nonfiction books often include the book title in the left page header and a chapter title in the right. Nonfiction books with multiple parts may include part and chapter titles in headers and the book title in the footer. Most nonfiction doesn’t include the author name in header or footer. And you may find you need a different font style for each element in your headers and footers.
For fiction and nonfiction, you may also need a separate font style or styles for the first line of a chapter—will you use small caps for the first few words or even for the entire first line? Will you use a drop cap for the first word of a chapter? What about the first line after a scene break—indented or not?
This would be a great time to pull out several dozen books and start studying the formatting. Looking at two or three books won’t be enough—expose yourself to twenty or thirty books and layouts. See which elements appeal to you. See if you can determine why choices were made for certain books.
Does a drop cap style better fit a certain genre?
Are page numbers in the header or in the footer? Centered in the middle or flush with the margins?
Are book titles and author names in different fonts in the header? Are the fonts the same but of a different size?
Do chapters begin halfway down the page or only one third of the way? And where do chapter titles fall, halfway between the top of the page and the first line of the chapter or closer to either the top or the center of the page?
______________________________
Once you decide on the options you want to try, it’s time to set up the text.
Make sure that you’ve changed the paper sizes and the margins before you start changing the text itself.
If you’ve used font styles all along, you’ll be ahead of the game. If you haven’t, you’ll need to take time to create styles as you format. Styles make the management of text easy and nearly automatic. Once you decide on a font style for a certain type of text, you simply apply that style each time you need it. And if you need to change one or more features of the style, you change the font style itself and not the text. When you modify the style, all text based on that style is changed as well.
You can also piggyback one style on another. If you have used one style for body text that’s indented but need a style that’s exactly the same—same font, same font size, same line spacing—except you want to eliminate the indent, you can create a new font style based on the original one and simply change the indent. Just save the new font style with a different name.
This may sound confusing, but it’s actually not. This is one instance, however, when trying the steps for yourself, using sample text, will likely be helpful for making sense of the tips.
For our purposes, I’m going to walk through the process of creating a few styles and applying them to the manuscript text only, meaning only body text and chapter titles. Styling for headers and footers and front matter can be achieved the same way.
Some formatters strip all formatting from text when they’re ready to format for print, and you may want to do that as well, especially if you’ve played with a lot of different fonts and spacing. But you don’t have to. If you work with styles all along and rely on those rather than on manual tabs or extra paragraph breaks, your manuscript may only need a little tweaking before it’s ready for formatting.
Did I mention that you can add spacing to your font styles? This means that with your chapter title, you can have it begin at a certain place on a page, no more inserting dozens of paragraph breaks to move the text into place. You can also build in line spacing to be included after a paragraph containing a certain font style. So if you want your chapter’s body text to begin four line spaces after the chapter title, you can include that detail in your font style for the chapter title. You could also include spacing before a particular font style. For a nonfiction book, you may want to increase the space between multiple examples or between the final example and the resumption of the regular body text. This is easy to set up with font styles.
Anything you can apply to text can be achieved through a font style.
______________________________
When you begin a new document in Word, you’re usually using the a font style called normal. Normal may be preset to something such as Times New Roman, 12 pt., aligned left, with no indents, line spacing at 1.15, and spacing of 10 points after each paragraph. This would be common for a letter or something similar.
When you format for a manuscript that you’re submitting to an agent or publisher or are printing for yourself, you probably changed your formatting at least once—to double space the text. You may have also changed the margins to make sure they were one inch on every side.
When you format a book for print, you again need to make changes to the text’s format.
Let’s assume that you’ve got body text (the bulk of the story itself) that’s aligned left (ragged on the right) and not indented, and you’ve got chapter titles (or numbers) that you’ve centered. You now want to set up styles that will format both these types of text (plus a couple of others).
If you have only a couple of different styles of text so far, that’s great. You can format for some additional styles as you go along.
If you didn’t set up styles beforehand, the easiest way to add styles is probably to first create a body text style and change all your text to that style.
There are a couple of ways to add and modify styles, and a couple of ways to move in and out of the styles pane; I suggest that once you’re familiar with the styles pane and style dialogue boxes, you find the best options for your workflow and your experience with Word.
On the home tab, click the arrow under change styles (or type Alt+Ctrl+Shift+S). Both of these open the styles pane (or window).
You can adjust the styles pane to show only the styles you’re using for the current document, but there are other options as well. Once you get used to working with styles, you may want to play around with the options here.
Word comes with some styles already set up (such as headings and subtitles), styles that you can modify, but we’re going to set up our own styles.
To set your first style, click on the new style icon on the bottom of the styles pane. A dialogue box will open, allowing you to create a new style. Note that you can base your new style on an existing style—that’s what we’re going to do.
Give your style a name. You won’t want to use a style name that Word has reserved, so try something that means something to you and to the specific text. Let’s call our first style novel body.
Next we add a few general bits of information.
The style type will be paragraph (more on this option later), style based on normal, and style in the next paragraph will be novel body as well.
After you enter that information, you’re ready to start styling. I’m going to skip some options since we won’t need all of them, at least not to get started.
Enter font and font size. (We talked about choosing fonts for print books in part 1.)
Click on the icon that will justify the text—this is the image whose lines evenly fill out the image from left to right.
Click on the format button on the bottom of the window and go to paragraph. Here you can set up indents on the indents and spacing tab—under special, try a first line indent of .2, .25, or .3 inches. (You can always modify your choices. It’s likely that you’ll try a couple of options and combinations before settling on one that works for your book’s needs.)
Left and right indents should be set at zero. Set spacing before and after the paragraph to zero and line spacing to something like multiple 1.1. (This is a measurement you should have already worked out as you were working through margins and trim size. Yet you can always make changes.)
Save your changes.
You now have a style called novel body.
If the manuscript contains only story text and chapter titles, highlight the entire doc (Ctrl+A) and then click on novel body in the styles window. All the text will change to the format you set up for novel body. To modify the style of your chapter titles—because you won’t use the same font size and maybe not the same font—create a new style, this one for titles.
If the manuscript contains a wide variety of text that will need different styles, and if there will be a lot of text in one or more of those styles, you could still change them all first to your body style, but you don’t have to. Still, this may be the quickest way to start adding styles.
For chapter titles, you may want to center the titles and change the font and font size. You will want to start a new page with every new chapter, place the chapter title partway down the page, and include a few line spaces after the title and before the chapter’s text begins.
You can do all of that with styles.
Create a new style, just as you did the first one. Name it chapter title or something similar. After choosing the font and font size and centering the text, click on format and then paragraph.
On the indents and spacing tab, find the spacing section near the bottom of the dialogue box. This is where you’ll enter the space requirements for spacing before and after the chapter titles.
Try something like 100 points before to get started. The actual amount of space you’ll want before your title will depend on the look you want, the page dimensions, the size of your title font (and the amount of space the chapter titles take up), and the amount of space you want between the chapter title and the header and between the title and the first line of the chapter.
Play around a bit—you can always change this later.
The size of your header may also affect where your title begins, so keep that in mind. (We won’t get into headers in this article, but don’t forget that your print book will likely contain headers and/or footers.)
Next, try something like 24 points after. The is the amount of space between your title and the first line of the chapter. Again you’ll want to play around with the way this looks. Print test pages to get a more accurate sense of what a printed page would look like. Make the space between your title bigger or smaller, depending on the look you want to create. (Keep in mind that chapter titles, especially in nonfiction, may be more than one line long. Longer titles may require a smaller font or may mean you’ll need to start the chapter title higher on the page.)
What this style setting does is locate your chapter title in the same place on every page. You won’t have to adjust the title using paragraph breaks (which you’ll never want to do now that you know how to add space before and after titles).
While you’re in the paragraph dialogue box, click the line and page breaks tab. Under pagination, click page break before. With this option checked, you’ve told Word to begin a new page at every line of text that uses the chapter title style. And that means you don’t have to manually insert page breaks. Be sure to save (okay) your changes.
As an alternative to creating your own style from scratch, you can use existing styles or you can rename and/or modify existing styles.
We won’t go into all the options you have for finding the style list and for modifying styles, but one detail that you will need to know about is the style type. You’ll find this in the create new styles dialogue box. Style type is in the properties section. You have options for character, paragraph, table and a few other choices.
When you create a new style, you’ll need to decide whether the style will apply to a character or a paragraph (or one of the other options). (You’re able to modify the style type of a style that you create, but you can’t modify the style type for one of Word’s default styles.)
If the style is set to paragraph and you use the style on even a single word in a paragraph, the entire paragraph is formatted to that style.
If the style is set to character, only the highlighted characters or words will be formatted to the style. So if you want to use small caps for the first three or four words of a chapter (or maybe the first line), you wouldn’t want the entire paragraph to be formatted with small caps. In this case you’d set up the style type for character, not paragraph.
You can modify font styles by right-clicking the style name in the styles list and choosing modify and then changing font or paragraph details, or you can change text in the document first. If you change a section of text first, highlight the newly formatted text and then right click on the font style you want to change in the style list. (Once you highlight text, the font style in the styles pane should also be highlighted.) Click update [style name] to match selection. This will update all sections of text using that style.
This gives you a couple ways of modifying styles—through changing the text first and then updating the style or changing the style through a dialogue box and then applying that style to a section of text.
Keep in mind that when you modify a style, all instances of that style in the text will also change. If you need to modify a style for only some sections of text but need to keep the first font style as well, add a new style based on the other style and then apply that new style only to the text that requires that style.
Say that most of your body text will be the same but you’ve got it set to indent at the beginning of every paragraph. What do you do for paragraphs that aren’t indented, such as those at the beginning of a chapter and after a scene break? Create a new style for those. Everything will be the same between the styles except for the indent. You might call this new style no-indent first line. (The more styles you have, the more you’ll appreciate how specific you should be when you name them.)
For nonfiction, you may have dozens of styles—example text, table headings, bulleted text, image descriptions, indexes, text with extra spacing, and much more.
______________________________
You can use font styles with any kind of document, but you definitely want styles in place when you format for print. (Formatting for e-books may require a different setup.) Set your styles up when you’re writing or wait until the manuscript is finished, but be prepared to work with styles. They give consistency to the text and will make formatting for print—whether done by you or a formatter—easier and faster. Font styles also allow you to do away with extra formatting that you’ve added willy-nilly throughout a document. Use styles so that every instance of one particular type of text is formatted the same as all others.
You can even save your font styles and manuscript setup as a template that you can use for other book projects.
***
Extra tip: You know how you get all kinds of wacky formatting when you copy and paste from the Internet? Use styles to clear that odd formatting. Highlight the text and click clear all on the styles list. The apply the style(s) you want for the text.
![]()
Tags: formatting Posted in: Self-Publishing