
Add citations to your document
- Click at the end of the sentence or phrase that you want to cite, and then on the References tab, in the Citations & Bibliography group, click Insert Citations.
- From the list of citations under Insert Citation, select the citation you want to use.
Contents
- 1 How do you put reference numbers in a document?
- 2 How do you reference with numbers?
- 3 How do I automatically insert references in Word?
- 4 How do I find my reference number?
- 5 Do we number references?
- 6 Can I use numbers for in-text citations APA?
- 7 How do I align references in Word?
- 8 How do you create a reference list?
- 9 Is reference number same as account number?
- 10 Is reference number and UTR same?
- 11 What is the form reference number?
- 12 Where do numbers go in APA references?
- 13 How do you write numbers in a research paper?
- 14 How do you reference small numbers?
- 15 How do I arrange numbers in ascending order in Word?
- 16 How do you format citations?
- 17 How do you left align references in Word?
- 18 How do I insert references in Word 2010?
- 19 How many digits is a reference number?
- 20 How do you write a reference number in a letter?
How do you put reference numbers in a document?
How to create, edit or delete references from your documents:
- Name. The name for the reference type.
- Type. This will indicate which type of document will use this reference.
- Title. This indicates the title of the document.
- Prefix. The desired prefix for the reference.
- Last Reference.
- Digits.
- Comments.
- Addendum.
How do you reference with numbers?
General rules of in-text citation:
- A number is allocated to a source in the order in which it is cited in the text.
- Use Arabic numerals (1,2,3,4,5,6,7,8,9).
- Either square [ ] or curved brackets ( ) can be used as long as it is consistent.
- Superscripts can also be used rather than brackets eg.was discovered.
How do I automatically insert references in Word?
In your Word document, click on the References tab in the Ribbon. In the Citations & Bibliography group, click the arrow next to Style. Click the style that you want to use for the citation and source. Click at the end of the sentence or phrase that you want to cite.
How do I find my reference number?
Typically, it’s at the end of an application form or provided in an email or letter from the company. Most reference numbers will be found at the top of the application submission form which shows up after submitting an application. It’s also usually quoted at the top of a follow-up email or letter from the company.
Do we number references?
A bibliography is a list of all works you used in preparation of the work, but which were not necessarily cited/referred to. This list must not be numbered.References in your reference list must be a full description of the in–text citations.
Can I use numbers for in-text citations APA?
Always include page numbers in the APA in-text citation when quoting a source. Don’t include page numbers when referring to a work as a whole – for example, an entire book or journal article.
How do I align references in Word?
Aligning references
- In a footnote, right-click and choose Style…
- The Footnote Text style should be selected in the Style dialog.
- In the Modify Style dialog, click Format, then Paragraph (or you can use the alignment, spacing, etc.
- In the Paragraph dialog, select the desired settings.
How do you create a reference list?
A reference list is arranged alphabetically by author. If an item has no author, it is cited by title, and included in the alphabetical list using the first significant word of the title. A reference list is generally placed at the end of a work. Commas are used to separate each item of the reference/citation.
Is reference number same as account number?
Whenever you pay taxes, you must enter a reference number
It is not enough to just state the bank account number. You must also enter the reference number.Correspondingly, every type of tax has their own reference number. Your reference numbers remain the same.
Is reference number and UTR same?
The Unique Transaction Reference number (UTR) or simply, reference number is a unique number generated for every transaction to recognize transactions involving fund transfer. The UTR number is created by the bank that facilitates the transaction.
What is the form reference number?
What is an Application Reference Number? The Application Reference Number (ARN) is provided to you by the financial service provider after you have completed the online application form for a financial product. This number is unique to your financial product application.
Where do numbers go in APA references?
In an APA reference page, numbers are alphabetized by how they are spelled out; therefore, a number or letter could come first on the references page. For example: Adams, J. Zachary, T.
How do you write numbers in a research paper?
MLA Style spells out numbers that can be written in one or two words (three, fifteen, seventy-six, one thousand, twelve billion) and to use numerals for other numbers (2¾; 584; 1,001; 25,000,000). APA Style, on the other hand, generally uses words for numbers below 10 and numerals for numbers 10 and above.
How do you reference small numbers?
Here are the steps to take:
- Place your cursor in the body text where you want the footnote superscript to appear.
- Select the References tab in the ribbon toolbar.
- Click Insert Footnote.
- Type your footnote according to style.
- Repeat the process for every additional footnote.
How do I arrange numbers in ascending order in Word?
Sort Numbers Not in Tables
- First you have to operate on the numbers to be sorted.
- Still select these numbers.
- Then click “Home”.
- Click “Sort” icon in “Paragraph” group.
- Now there should be a “Sort Text” window.
- Next choose “Number” for “Type”.
- Then choose the sorting order, ascending or descending.
How do you format citations?
“Title of the Source.” Title of the Container, Other contributors, Version, Number, Publisher, Publication date, Location. You only include the elements that are relevant to the type of source you’re citing. Use the interactive tool to see different versions of an MLA Works Cited entry.
How do you left align references in Word?
How to Adjust Paragraph Alignment in Word
- Click anywhere in a paragraph you want to align, or select multiple paragraphs.
- Click an alignment option in the Paragraph group. Shortcuts: To align left, press Ctrl + L. To align right, press Ctrl + R. To align center, press Ctrl + C. To justify, Ctrl + J.
How do I insert references in Word 2010?
- On the References tab, in the Citation & Bibliography group, choose the style of citation you want to use.
- Position the cursor where you want the citation to appear, and then click Insert Citation, Add New Source.
- In the Create Source dialog box, select the type of source and then fill in the fields shown.
How many digits is a reference number?
The bank reference number length varies between about 20 and 30 digits, depending on the country. The numbers are composed in such a way that a specific check can be performed to verify that the number is correct.
How do you write a reference number in a letter?
You write your correspondent’s reference in the form: ‘Your ref: 01234′. If you wish to include your own reference, you write: ‘My ref: 56789’ or ‘Our ref: 56789’. A letter in English almost always begins with ‘Dear…’, even if you do not know the person.
How do you make a numbered reference list in Word?
Place your cursor to where the reference is to be inserted, then click “Insert” -> “Reference” -> “Cross-reference”. In the dialog box, select “Numbered item”, “Paragraph number”, then the reference you want to insert, click “Insert”. This inserts the reference into the text.
What is included in reference list apa?
A references list is a formatted list of all sources you cited within your paper. Any time you quote, paraphrase, summarize, or include information that you’ve read from an outside source, you must include that source in your references list, correctly formatted in APA style.
How do you create a numbered reference list?

Create in-text citations
- Arrange the sources you cite alphabetically and then number them; or.
- Number the citations consecutively according to the first mention of each source in the text (using the same number for subsequent references to the same source).
What are the two main components of the APA citation format?
All APA reference list entries contain four main components: author, date, title, and source.
How should reference list be alphabetized?
Reference List Order

- Arrange entries in alphabetical order by the surname of the first author followed by the initials of the author’s given name(s).
- When alphabetizing names, disregard any spaces or punctuation marks in two-word surnames. Also disregard anything in parentheses or square brackets.
Is the reference page in APA double-spaced?
In general, the list of references is double-spaced and listed alphabetically by first author’s last name. For each reference, the first line is typed flush with the left margin, and any additional lines are indented as a group a few spaces to the right of the left margin (this is called a hanging indent).
What is a numbered reference style?
Numbered reference citations (also called author–number or Vancouver references) are often used in scientific and medical texts. In this system, each reference used is assigned a number. When that reference is cited in the text, its number appears, either in parentheses or brackets or as a superscript.
How do you organize a reference list in APA?
How to alphabetize your print sources
- Organize your Reference page by the last names of the authors (or editors).
- If a work has no author or editor, alphabetize by the first word of the title other than a, an, or the.
- Arrange same author sources using their last names every time.
How do you number references in EndNote?
Information
- Open EndNote, Edit> Output Styles> Open Style manager.
- Select the Output Style ‘Numbered. Click on Edit.
- On the Left, select Layout, under Bibliography.
- On the right, you will have “Bibliography Number.”.
- Click on File> Save As and save the file with the new name.
- Open Word, select the edited style.
Do you put page numbers in reference list?
Page numbers also appear in reference entries for book chapters, journal, magazine, and newspaper articles, if available.
- In the reference list entry, the page numbers indicate the start and end page of the entire article.
- If the document doesn’t have a page number, omit the page range from the reference list entry.
What is the purpose of a reference list in APA?
A reference list lists only the sources you refer to in your writing. The purpose of the reference list is to allow your sources to be be found by your reader. It also gives credit to authors you have consulted for their ideas.
Which reference style has square brackets?
IEEE citation style
What is reference document?
A reference document is a document that provides pertinent details for consultation about a subject. Context: – Reference document title is the title of the Reference document. – Reference document type description is a description of the type of Reference document.
What is the proper sequence of APA formatted citation?
Order: Entries should be arranged in alphabetical order by authors’ last names. Sources without authors are arranged alphabetically by title within the same list. The references are arranged alphabetically, by the last name of the first author or, if author is not available – by title.
Do you have any idea how to insert table of contents(TOC) in Microsoft Word? It is very easy. TOC are important as they help the reader to work with long documents. They make documents appear classy and simple to go through. Microsoft Word has made the creation of TOC easy by giving users an option of inserting them without using styles. What’s more they give you the option of marking one word or a number of words in the body of text to add the information on the table of contents.

Source: UGC
If you have been looking for tutorials on how to insert table of contents in Word as well as how to insert citations in Ms-Word 2013 and other versions, you are in the right place. Find below the steps on how to insert a table of contents in word 2013. The same process can be followed in other versions such as MS-Word 2007, 2010, and 2011, and 2016.
READ ALSO: How to recover unsaved word document
How do I create a custom table of contents in Word?
To create a customized TOC in Ms-Word, you will need to follow these important steps;
- First, select the text that will appear in the TOC. Then command Ms-Word to insert the TOCs. After creating the TOC, you can now customize it as you desire.
- Use the built-in header style to the title in your text.
- If you are using Word 2003 and the previous versions, select: Insert- Reference-Tables and Indexes. Then select table of contents and click okay.
- If using 2007 and 2010 versions, select: References-Table of contents then select a preference from the menu.
How do I add a section of a table of contents in Word?
Follow the steps below to learn how to add a section of TOC in Ms Word;
- Make the needed changes to the article directly.
- Do not edit the TOC directly.
- Highlight the title you just added to add a Heading on the TOC.
- Select the exact Heading at the style sector located at the Home Tab.
- Go to the Reference Tab, select the TOCs section, and click on the TOC.
- Using the drop arrow, select, “Insert table of contents” at the end.
READ ALSO: How to insert footnotes in Word
How do you insert references in Word?
Microsoft Word offers a great tool that aids users in referencing publications in the right way. It has a built-in reference utility at the references tab. You have a chance to make the entries manually or denote them in the document and make a list in the commonly used styles. The built-in utility is effective if your references are not many. If you learn how to add references in Word 2010, you can apply the same process to add references to other versions such as Word 2016.
Follow the steps below to learn how to insert references in Word 2010.
- Open Ms-Word and place the cursor where you would like your in-text reference to be. Select “References” at the very top and click on, “Citations and Bibliography”.
- Click on “insert citations”.
- Next, fill out the form giving details of your references.
- Choose «drop down» under «type» and then click okay. Drop down determines the type of fields you get into depending on whether you are referencing an essay or a book. After picking this, you can go ahead and fill in the important information as required.
- Next, click okay and your citations will be added.
How do I add reference numbers in Word?
Follow the steps below on how to insert references numbers in Ms Word.
- Place your pointer where you want the number to appear.
- Choose the reference number from the insert menu. Word will then display the number reference dialog box.
Follow these steps on how to insert citations in Mac. Mac has features that help you insert citations easily;
- Use a view that is compatible with the toolbox by selecting the print layout button located at the lower left corner of the article.
- Click on the citation bar to initiate the citation tab.
- The following options are available: Citation style. Click on the pop-up menu to select the style that you want to use (Chicago, MLA, APA and Turabian)
- Choose one citation and then click twice to insert it in your article.
How do you link citations with references in Word?

Source: UGC
It is easy to add citations when writing an article where citations for sources are needed. The citations can be added using different styles such as APA, MLA etc. A bibliography is later made listing the sources. You are required to add the sources first to add a citation. To do that, follow the steps listed below;
1. Click on the Reference tab; you will see a group titled, “Citations and Bibliography”. Click on the arrow next to “style” and select one that suits your sources and citation.
2. Click at the end of the phrase that needs citation.
3. Next, click on the “reference” tab and select “insert citation”. Then follow either of the steps below;
- Click on add new source to attach the origin of the information. A “create source” dialog box will appear. Click on the type of source and choose the suitable source. Click on add new placeholder.
- A question mark will appear next to placeholder sources in the source manager.
4. To add the source, fill in the details of the source. To fill in additional details of the source, click on show all bibliography fields box.
5. Click okay when done. A citation or citations will be added in your selected part of the document.
TOC normally includes descriptions of the first level headings or chapters. The amount of details in a table of contents is dependent on how long the content is. The longer the content the lesser the details. A TOC gives your paper a finishing touch, especially when working with long documents such as reports, academic papers, manuals or books. Luckily you do not need to learn how to insert table of contents in Word manually, as MS word has an already built-in TOC tool that does all the work for you. There are various table of contents Word template available on the internet.
Subscribe to watch new videos
READ ALSO: How to create hotspot using CMD
.
Source: TUKO.co.ke
Microsoft Word has rolled out many different features to address the changing needs of its users over the years. From students to professors to technical writers and across all industries, Word has been widely used for many word-processing applications. Now, with a cross-referencing feature that allows you to link numbered lists in Word, you can find it much easier to put together vast and long documents with many chapters. For research, manuscripts, and many other comprehensive documents, this feature can be greatly helpful. Word already has many cross-referencing features even before. This is particularly useful for very large documents so that readers can go back to relevant parts of your document for reference or for elaborating your ideas, as well as in giving examples or summaries.
For those who are not familiar with this feature, cross-referencing is a feature that allows you to go back to relevant, marked parts of the document to support a particular section of that same document. From the term itself, you are referencing to a specific section of the same document. This is widely used in academic work, research, and technical writing. In Word, you can cross reference or add references on almost any element in your document, including numbered lists. Here’s how to do it.
How to Reference Numbered Lists in Word
First, open the document that you want to use for your reference in your numbered list. Make sure that the numbered list you’re using is also in this same document. The paragraph or sentence you want to cross-reference should be in this same document as well.
Once you’re done, click in the document in the place where you want to reference the list item. Then, click on the Reference tab in the Ribbon. Click on the Cross-reference option to open a new window.
In this new Cross-reference window, go to Reference Type. Here, set the option to ‘Numbered item’. Then, in the ‘Insert reference to’ option, set it to ‘Page number (full context)’. Then, your list will be added in the window automatically. Here, you can select the item you want to reference so that it will be added to the document.
Also, make sure that you have the “Insert as hyperlink” option set up so that you can cross-reference automatically as a link when the document is read from a device such as a computer or a smartphone instead of as a hard copy. This way, when you press Ctrl+Click on the reference link, your view will jump to the list item.
Referencing an Item in a Bulleted List
Unfortunately, you can’t cross-reference using a bulleted list. You first have to change your list to a numbered list before you can do so. However, you have better control over how to use this cross-reference option whether you’re displaying the document as a hard copy or a soft copy.
When you set up the ‘Insert reference to’ option, you can choose the function depending on how you will display or present your document. If you set up using ‘Page number’ the reference will only add the page number where the list appears on. If you go with the ‘Page number (full context)’ option, the number of the item in the list will be inserted, which is very useful when reading as a soft copy version. You can play with these options depending on your needs.
Large Word documents are often sprinkled with references to information throughout a document. You can enter them manually, but they’ll be hard to maintain later. Instead, use this simple technique.

You often see text that references information on another page that includes the page number. For instance, you might see something similar to “To read more on this topic, please see page 14.” You could type the page number manually in Microsoft Word, but if you delete or add a page before page 14, that page number will be wrong. There’s a simple way to protect page number references: Bookmark them and then use a cross-reference to refer to the bookmark. It’s simple but does require a few steps. In this article, I’ll show you how to bookmark referenced text and then use a cross-reference to display the bookmark’s page number.
SEE: 83 Excel tips every user should master (TechRepublic)
I’m using Microsoft 365 on a Windows 10 64-bit system, but you can use older versions. You can create the example document or download the demonstration .docx and .doc files. This article isn’t appropriate for Word Online.
How to reference a page number in Word
Referencing a page number takes a few steps, but they’re not difficult:
- Add a page numbering scheme to a document’s header or footer. This step isn’t necessary, but in an example, it helps to see the page numbers.
- Enter the referenced text and bookmark it.
- Enter a cross reference that uses the bookmark.
Don’t worry if you don’t know some of the terms yet; you will by the time we’re done. We’ll be working with a mostly empty document that contains three pages so you can see the page number update when you add a page, which brings me to the only downside to this method: If you add or delete enough content that the referenced content moves to another page, you must manually update the cross-reference. It won’t update on its own. We’ll discuss this in more detail later.
1. Enter a page-numbering scheme
First, we need a document. Open a new blank document and use Ctrl+Enter to force two extra pages for a total of three pages. To add the page-numbering scheme, do the following:
- Open the header area of any page (double-click the top margin) so you can edit the header.
- To add a page-numbering scheme, click Page Number in the Header & Footer.
- Choose the first item in the dropdown list then choose the first item in the resulting list (see Figure A).
When you return to the document, you’ll see page numbers at the top of each page.
Figure A

This method will work with any built-in page-numbering scheme. We’re using the easiest to simplify things. Now let’s complete the next step.
2. Bookmark the referenced text
A bookmark is just what it sounds like. It’s a marker that identifies content or location for future reference. In our case, we want to know the page number of referenced text. By bookmarking that text, we can get information about that content in other areas of the document.
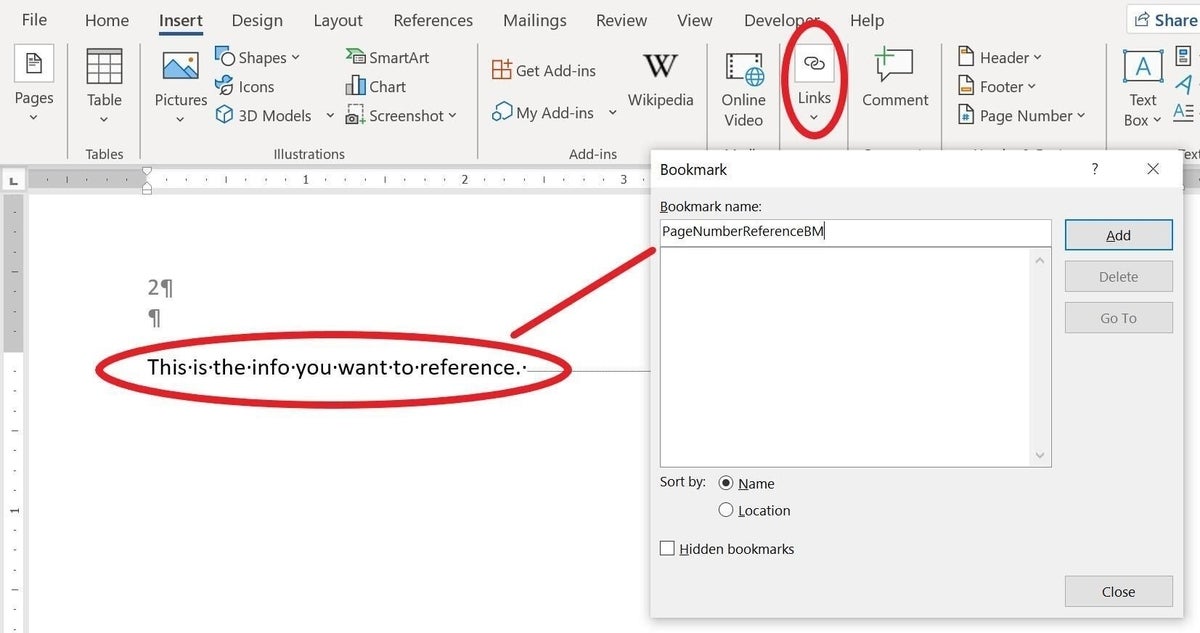
By referenced text, I mean the content (usually text) that you want to refer to later. For example, on page 2 enter, “This is the information you want to reference.” This is the information that might move from one page to another as you update, add, and delete content. You could bookmark a single word, a heading or the entire paragraph. Now, let’s create that bookmark:
- Select the text (the entire sentence in this case).
- Click the Insert tab.
- From the Links group, click Links.
- Choose Bookmark.
- In the resulting dialog, give the bookmark a name, as shown in Figure B. Don’t change any of the other settings; we want to identify this bookmark by name.
- Click Add.
Figure B
You’ll want to give bookmarks meaningful names so they’re easier to discern and manage later. Next up is the cross-reference that will use this bookmark.
3. Create the cross-reference
Within Word, a cross-reference is a link to another part of a document. It’s actually a field, { PageRef }, and you can enter and update it as you would any other field.
Our last step is to enter a cross-reference that links to the bookmarked content on page 2. We don’t want to display the actual text. Instead, we want to display the page on which the bookmarked text resides.
On page 3 of the example document, enter the text “You’ll find more information on page”. Notice that I didn’t type a page number. This is where we’ll create the cross-reference as follows:
- Position the cursor between the word page and the period character at the end of the sentence you entered on page 3.
- Click the References tab and click Cross-Reference in the Captions group. (I know, it does seem an odd place for it.)
- In the resulting dialog, choose Bookmark from the Reference dropdown.
- From the Insert Reference To dropdown, choose Page Number—you want to display the page the bookmarked text is on, not the bookmarked text.
- In the For Which Bookmark list, select PageNumberReferenceBM, as shown in Figure C.
- Click Insert and then Close.
Figure C

When you return to the document, the new cross-reference correctly displays 2, that’s where the referenced (bookmarked) text is right now. At this point, all the pieces are in place. It’s time to see how they all work together to always reference the right page, even if the page number changes.
How it all works together in Word
Initially, the cross-reference displays 2. What happens if you insert a page between 1 and 2, pushing the bookmarked content to page 3? Let’s find out—go to page 1 and press Ctrl+Enter to insert a new page. Then thumb down to page 2, which is empty. This is the new page you inserted. Thumb down to page 3 and you’ll find the bookmarked content. Finally, thumb down to page 4.
Are you surprised to see that it still displays 2 instead of 3? That’s because, for better or worse, cross-references don’t update automatically. You must update them. You can update all of them by pressing Ctrl+A to select the entire document and then pressing F9 to calculate all fields. If you want to calculate a single cross-reference, select that field individually and press F9. As you can see in Figure D, doing so updates the page number to 3.
Figure D

It seems like we’ve worked hard to update a page number that we could update manually, but what if you have lots of page numbers to update? You might miss one, and frankly, it’s tedious work. Not to mention that weeks down the road, you won’t remember to update the page numbers. Instead, bookmark and cross-reference those page numbers and let Word update them all as needed. In a future article, I’ll show you a few macros that can update references for you.