
4. Как добавить приложение Mendeley Cite в Word
Mendeley Reference Manager позволяет создать и организовать библиотеку Ссылок на литературные источники, аудио- и видео- материалы, патенты и т.д.
В то же время, для вставки Ссылок в текст документов и автоматического создания списков литературы необходимо приложение Mendeley Cite для Word.
Приложение Mendeley Cite можно добавить в Word только из магазина приложений Microsoft AppSource (Office Store).
Чтобы подключить Mendeley Cite вам необходимо авторизоваться со своей учетной записью Microsoft в программе Word и на странице подключения.
К слову, учетную запись Microsoft можно зарегистрировать бесплатно.
Чтобы войти в учетную запись в программе Word в верхнем меню кликните на пункт Файл и в открывшейся панели внизу выберите пункт “Учетная запись”. Введите e-mail и пароль.

Чтобы подключить приложение Mendeley Cite нужно в программе Reference Manager выбрать пункты меню Tools -> Install Mendeley Cite for Microsoft Word.
Страница подключения откроется в браузере.
Также можно просто перейти в браузере по ссылке на страницу подключения Mendeley Cite.

Чтобы авторизоваться со своей учетной записью Microsoft кликните по иконке в правом верхнем углу страницы.

В открывшейся панели введите e-mail и пароль от учетной записи Microsoft.
После авторизации нажмите кнопку “Получить” под названием приложения Mendeley Cite.

В обновившемся окне нажмите кнопку “Открыть в Word” и подтвердите действие при запросе на открытие ссылки ms-word.

В Word должен открыться файл “Mendeley-Cite.docx” и на вкладке “Ссылки” должна появиться панель меню “Cite with Mendeley” с кнопкой “Mendeley Cite”.
Этот документ можно закрыть. Панель Mendeley Cite станет доступна во всех новых файлах.

Учтите, что панель меню “Cite with Mendeley” запускает приложение прямо в окне Word и это приложение Cite получает данные с сервера Mendeley и никак не взаимодействует с Mendeley Reference Manager.
Таким образом, происходит разделение: Reference Manager позволяет создать и организовать библиотеку Ссылок и отправляет все данные на сервер Mendeley.
Приложение Word “Mendeley Cite” получает данные о Ссылках с сервера Mendeley и позволяет вставлять ссылки в текст документа Word и автоматически создавать списки литературы.
Работа Reference Manager и Mendeley Cite возможна только при наличии интернет-соединения.
5. Как вставить цитаты и библиографию в документ Word с Mendeley Cite
Создайте новый документ Word с произвольным текстом.
На вкладке “Ссылки” в панели меню “Cite with Mendeley” нажмите кнопку “Mendeley Cite”.
Откроется боковая панель Mendeley Cite. Внизу панели нажмите кнопку “Get started”.
В открывшемся окне нужно ввести данные учетной записи Mendeley – e-mail и пароль.

В боковой панели Mendeley Cite активна вкладка References (Ссылки) и ниже загружаются ранее добавленные ссылки.

По умолчанию открывается полная коллекция Ссылок – в первом поле сверху указано All References. Можно кликнуть по этому полю и выбрать нужную Коллекцию (Collections).

Для того, чтобы вставить ссылку в текст документа Word можно использовать такую последовательность действий:
- Кликнуть по полю All References и выбрать нужную Коллекцию (Collections). Название активной Коллекции появится в этом поле.
- Кликнуть мышкой, чтобы установить флажок рядом с нужной Ссылкой (одной или несколькими).
- На панели в верхней части окна проверить, верно ли выбраны ссылки.
- Нажать кнопку “Insert citation” в нижней части окна.

Ссылка появится в том месте документа Word, в котором был установлен курсор.

6. Как создать список литературы по ГОСТ с помощью Стилей цитирования
Список литературы в Mendeley Cite можно создать автоматически. После того, как нужные ссылки расставлены по тексту:
- Поместите курсор в нужное место документа.
- Кликните по вкладке “More” (Дополнительно) в верхней части панели.
- Выберите “Insert Bibliography” – “Вставить библиографию”.

Ссылки и созданный список литературы будут оформлены в соответствии с инструкциями, прописанными в файле Стиля цитирования. По умолчанию установлен стиль American Psychological Association 7th ed.
Для замены Стиля на вкладке “Citation Settiungs” нажмите кнопку “Change citation stile”.

Откроется список установленных стилей. Нужно опуститься в низ списка и нажать на поле “Search for another style”

В окне поиска напишите слово “gost”.
В итоге программа найдет несколько стилей Russian GOST в репозитории.
Кликните на название подходящего стиля и он активируется.

Ссылки в тексте документа и Список литературы будут отформатированы в соответствии с инструкциями стиля.
Есть возможность изменить язык терминов, использованных при форматировании библиографии.
Для этого на той же панели кликните на поле “Change citation language” и выбирите English GB или другой язык.

Кроме того, вы можете дополнительно изменить форматирование Ссылок в тексте.
Если кликнуть на Ссылку в тексте, то в панели Cite появится сообщение о возможности редактирования Ссылки.
Кликните на образец Ссылки в панели Cite.

Откроются дополнительные опции редактирования Ссылки. Здесь вы можете указать номер страницы в литературном источнике для отображения вместе с Ссылкой.

В репозитории Mendeley содержатся только те Стили, которые прошли валидацию. В то же время, для оформления ссылок в соответствии с ГОСТ и на двух языках (Ru – En) требуется использование дополнительных переменных, с которыми Стили не проходят валидацию.
Тем не менее, невалидные стили успешно обрабатываются процессором Mendeley Desktop и надстройкой Cite-O-Matic. В этой устаревшей версии программы возможно оформление Ссылок более близкое к требованиям ГОСТ.
Use the Source Manager to add a source
- On the Document Elements tab, under References, click Manage.
- At the bottom of the Citations tool, click.
- Click New.
- On the Type of Source pop-up menu, select a source type.
- Complete as many of the fields as you want.
- When you are finished, click OK.
Contents
- 1 What is manage source in Word?
- 2 Does Word have a reference manager?
- 3 How do you do APA format in Microsoft Word?
- 4 How do I get to the source manager?
- 5 How do I open researcher in Word?
- 6 How do I remove a source from a Word document?
- 7 How do you cite a new source in Word?
- 8 How do you capitalize each Word in Word?
- 9 How do I edit a source in Word?
- 10 How do you add a reference manager in Word?
- 11 What is reference in Microsoft Word?
- 12 Does Microsoft Word have APA format?
- 13 What is APA Format example?
- 14 How do you do APA referencing?
- 15 Where is the Tabs dialog box in Word?
- 16 How do I turn on Track Changes in Word?
- 17 Where is researcher in Word on Mac?
- 18 Where is the research pane in Word?
- 19 Where is the Research Task Pane in Word 2016?
- 20 How do I delete an existing source?
What is manage source in Word?
Source Manager in Microsoft Word helps if you have a lot of sources, or for some other reason you need to manage the sources of the document. This tool simplifies you work with citations.
Does Word have a reference manager?
Word has its own, basic referencing system available via the ‘References’ tab on the ribbon. This lets you add references to a document and then create a bibliography at the end of the text. References are stored in a master list, which can be used to add references to further documents.
How do you do APA format in Microsoft Word?
In your Word document, click on the References tab in the Ribbon. In the Citations & Bibliography group, click the arrow next to Style. Click the style that you want to use for the citation and source. Click at the end of the sentence or phrase that you want to cite.
How do I get to the source manager?
Open the Source Manager from References | Citations and Bibliography | Manage Sources. There is a Current List (at right) which is saved in the current document. On the left if the ‘Master List’ of sources that is saved separately and can be used in any document.
How do I open researcher in Word?
To use the Researcher tool, open the “References” tab of your Word document. Click “Researcher” from the “Research” section of the ribbon. When the pane opens on the right, type a term into the Search box and you’re on your way!
How do I remove a source from a Word document?
Deleting a Source
- From the References tab, in the Citations & Bibliography group, click MANAGE SOURCES. The Source Manager dialog box appears.
- From the Master List or the Current List scroll box, select the source you would like to delete from the list.
- Click DELETE. The source is removed from that list.
- Click CLOSE.
How do you cite a new source in Word?
Put your cursor at the end of the text you want to cite. Go to References > Style, and choose a citation style. Select Insert Citation. Choose Add New Source and fill out the information about your source.
How do you capitalize each Word in Word?
To use a keyboard shortcut to change between lowercase, UPPERCASE, and Capitalize Each Word, select the text and press SHIFT + F3 until the case you want is applied.
How do I edit a source in Word?
Edit a source
- On the References tab, in the Citations & Bibliography group, click Manage Sources.
- In the Source Manager dialog box, under Master List or Current List, select the source you want to edit, and then click Edit.
- In the Edit Source dialog box, make the changes you want and click OK.
How do you add a reference manager in Word?
Information
- Click on the File menu and select “Word Options.”
- Click on “Add-ins.”
- Change the “Manage” options to “Disabled Items.”
- Click Go.
- Highlight any Reference Manager item(s) and click “Enable.”
- Click OK.
What is reference in Microsoft Word?
You can add a footnote to your document from the References tab. It contains resources for researchers and anyone in the professional field. The References Tab allows you to now create a table of contents, footnotes, citations, cross-references, select MLA or APA or ISO formats and so on.
Does Microsoft Word have APA format?
Yes! The APA Paper Template in Microsoft Word 2019 is available in the APA Guide. For directions on how to use the template, click here.
What is APA Format example?
APA in-text citation style uses the author’s last name and the year of publication, for example: (Field, 2005). For direct quotations, include the page number as well, for example: (Field, 2005, p. 14).
How do you do APA referencing?
The APA referencing style is an “author-date” style, so the citation in the text consists of the author(s) and the year of publication given wholly or partly in round brackets. Use only the surname of the author(s) followed by a comma and the year of publication.
Where is the Tabs dialog box in Word?
Insert or add tab stops
- Go to Home and select the Paragraph dialog launcher .
- Select Tabs.
- Type a measurement in the Tab stop position field.
- Select an Alignment.
- Select a Leader if you want one.
- Select Set.
- Select OK.
How do I turn on Track Changes in Word?
Turn tracked changes on or off
- Open the document that you want to edit.
- On the Review tab, under Tracking, select the Track Changes switch to turn on track changes. Tips: Each reviewer’s changes are displayed in a different color. If there are more than eight reviewers, Word will reuses colors.
Where is researcher in Word on Mac?
You can access the Researcher pane by clicking the References tab and then click on Researcher. Learn more about Researcher in our help article: Research for your paper easily within Word.
Where is the research pane in Word?
To open the Research pane, do one of the following:
- Press Alt+Click the left mouse key in the selected word, phrase, or name.
- In different Microsoft Office applications: – In Microsoft Office Excel, Microsoft Office PowerPoint or Microsoft Office Outlook, on the Review tab, in the Proofing group, click Research:
Where is the Research Task Pane in Word 2016?
Review tab
Alt+click the word or words you want to research. (In Excel and PowerPoint, you can also click the Research button on the Review tab.) The Research task pane appears. If you’ve researched since you started running Word, the options you chose for your last research project appear in the task pane.
How do I delete an existing source?
To delete the reference in the document, select the citation from the document and click on Delete Once you have deleted all the citations from the document click on References< Manage Sources< highlight the citation from the current list and click Delete.
Information
- Click on the File menu and select “Word Options.”
- Click on “Add-ins.”
- Change the “Manage” options to “Disabled Items.”
- Click Go.
- Highlight any Reference Manager item(s) and click “Enable.”
- Click OK.
How do you reference References in Word?
Use the Citations tool to edit a source
- On the Document Elements tab, under References, click Manage.
- In the Citations List, select the citation that you want to edit.
- At the bottom of the Citations tool, click. , and then click Edit Source.
- Make the changes that you want, and then click OK.
Does Word have a reference manager?
Word has its own, basic referencing system available via the ‘References’ tab on the ribbon. This lets you add references to a document and then create a bibliography at the end of the text. References are stored in a master list, which can be used to add references to further documents.
What is the best reference manager for Word?
Top 10 Reference Management Software
- Mendeley.
- ReadCube Papers.
- EndNote.
- EasyBib.com.
- Zotero.
- Cite This For Me (formerly RefME)
- Sciwheel.
- RefWorks.
What is a reference manager?
When reading papers, reference managers allow you to take notes on and annotate PDFs without first printing them out. By using reference managers, it is no longer necessary to maintain a system of printing papers and putting them in binders.
How do you use reference Manager in Word?
Create a bibliography, citations, and references
- Put your cursor at the end of the text you want to cite.
- Go to References > Style, and choose a citation style.
- Select Insert Citation.
- Choose Add New Source and fill out the information about your source.
How do you align References?
Format each reference with a hanging indent, which means that the first line of each reference entry is aligned flush with the left margin and each subsequent line has a hanging indent of 1.27 cm or 0.5 in (American Psychological Association, 2010, p. 37).
What happened Reference Manager?
Updates. After abandoning the development of Reference Manager in 2008, Thomson Reuters discontinued its sale on December 31, 2015 to focus exclusively on EndNote. Reference Manager databases can also be imported into Citavi; Reference Manager formatted Word documents are converted into the Citavi format.
How to write Neutral Citation in McGill style?
In a neutral citation, it is abbreviated: 2013 ONSC 64 In parentheses (McGill style) it is abbreviated: 2008 CanLII 22122 (Ont Sup Ct J) Where a neutral citation is not available, and the jurisdiction and/or court are not evident from the title of the case reporter, indicate the jurisdiction and/or court in parentheses at the end of the citation.
Why is McGill University using Microsoft Office 365?
Office 365 is a cloud-based package of services from Microsoft including email, web communications, file storage and file sharing. Microsoft maintains and supports the infrastructure, and continually makes enhancements to features. With Office 365 we are able to provide enterprise-level cloud services, while saving costs to the university.
Where does Microsoft Store username and password at McGill?
Microsoft is a leader in providing enterprise solutions. Our contract with Microsoft upholds the importance of privacy and security, with the following commitments: User credentials verified at McGill – username and password authentication is done at McGill; these credentials are not stored on Microsoft servers.
Do you have to use supra references in McGill?
Contra McGill, Acts do not need supra references. More on the McGill with Footnotes page. Contra McGill, punctuation goes inside quotation marks. Contra McGill, don’t change “ The Queen ” to “ R ” in case names; follow the case name used by the reporter and/or court the author is citing.
References are an integral part of well-researched document. However, inserting reference in a manuscript created in MS Word can be a nightmare. If you are those who have similar nightmare, then you have come at the right place. Here you will learn how to automate complete process of referencing using free reference management software.
We can divide process of referencing into following minor tasks
- Importing fields like title, author, journal/site and many other things.
- Then referring them at an appropriate place in the document.
- Creating bibliography
As per the study, average researcher spend up to 7-10 hours of time inserting, updating and changing references in journal paper. For thesis or dissertation this time adds up to 2-3 days.
This time could be greatly reduced to less than an hour if done smartly.
This is a place where, reference manager or reference management software comes into picture. In this blog you will know how to automate complete process of referencing right from importing reference fields into Ms Word to making bibliography.
Why use reference manager over Ms Word built-in feature?
Ms Word has some build-in feature to import, manage and make bibliography which makes some of the adding reference little easy. But this is just the half way. However, a dedicated reference manager like Refworks, Mendeley, Endnore, Citavi, Zotero, Mendeley etc. takes automation to the next level. Some of them are free too.
So which one is the best reference manager?
After a lot of research & comparing various reference managers I finally narrowed down to Mendeley and have been using since then and never looked at any other reference manager.
Mendeley: Best free reference software that automates every step of referencing and citation
Mendeley is free and one of the referencing manager that helps you organize research, collaborate online and discover new research. One can sign up for a Mendeley account online and install the Mendeley Desktop Tool in your computer for free. Mendeley also have a plugin for browsers like Chrome etc, to import references from websites like science direct, Scopus, google scholar, Elsevier, etc.
Import reference automatically
Importing from file: You can import papers into Mendeley library from your hard drive by simply dragging and dropping files. After adding files, Mendeley will automatically extract relevant fields like paper title, authors, journal name, volume number, issue etc from paper. You just can sit and relax while Mendeley does all this laborious task automatically.
1-click import from web: You can also import reference list from other reference managers or by searching various web databases for papers through Mendeley Literature Search or simply from your browser. Mendeley desktop will display a PDF icon next to the paper if the full text is available. You can sync your libraries to the cloud to access them anywhere.
Other reference managers: You can also import reference into Mendeley from BibTeX, XML, RIS and Zotero
Search within reference text
With so many references to write text from, many times you write something but while referring want to confirm the exact source of information. Mendeley has a feature that by pressing “Ctrl”+m, inside Ms Word, pop-up will open where you can search for paper title, author, journal name etc and Mendeley will automatically populate reference for you to select. However when you require to search specific text inside document available locally then again Mendeley Desktop can come to rescue. It provides a centralized place where you can search text inside your references.
Cite reference inside text without even touching mouse
Citing reference in text is very simple with Mendeley. Just press “Ctrl”+m at the place where you need to refer, a pop up will open, where you can type author name, paper title, journal name or other fields of reference. Mendeley will automatically search and highlight the reference based on your input. After selecting the required reference, press enter and you are done. If your reference are numbered in text then Mendeley will take care of complete numbering. These reference numbering will be updated automatically whenever you add or delete any new reference in between. Complete process of referring could be completed without leaving keyboard. Believe me, this will saves lot of time and effort.
See Mendeley in Action
Create Bibliography / References with 1 click
With Mendeley you can generate references and bibliography with just one click. Be it apa citation, mla citation, IEEE or any other styles. Mendeley has lots of formats for bibliography, you name it and it will be there.
Conclusion
Mendeley is a versatile and complete reference manager available for free. It automates all the laborious task from importing reference to making bibliography. There are many other reference manager with similar feature but most of them are not free. The one which are free are not as smart and user friendly as Mendeley. So from the next time when you start writing some content in Ms Word that requires you to refer, give Mendeley a try. I bet you will never regret using it.
Tips of writing and formatting Scientific Manuscript in Ms Word
1 ) LaTeX like heading in Ms Word: Autoformat text in just 1 click using styles feature of Ms Word 2007/2010/2013/2016/2017.
2.) Automatic numbering of Figure | Table | Equation with auto update feature on adding/deleting new Figure | Table | Equation with just 1 click
3.) 3 different ways to type equation in MS Word, Complete guide in shortcut for writing|typing equation in Ms Word. and Writing equation in Ms Word like LaTeX | A short introduction)
a) Greek symbols: Shortcut for typing greek symbols in like LaTeX in Ms Word (Complete Guide)
b) Subscript and super script: For more details please click on this link -> Shortcut for typing subscript and superscript in Equation similar to LaTeX in Ms Word (Complete Guide)
c) Accents in word: For more details please click on this link -> Shortcut for typing accents like bar, vector, hat etc in Equation – Ms Word (Complete Guide)
d) Complete guide smart way of typing equation in Ms Word
4.) Three different ways to type chemical equation and shortcut for arrows (equilibrium, reversible, gas liberation, precipitation, etc), typing text above arrow, typing text below arrows, shortcut for writing chemical compounds etc.
5.) Multilevel list in Ms Word and numbering of heading and subheadings
6) Make table of content in Ms Word with just one click
Overall report/paper writing similar to LaTeX (in terms of easy, fast and simple) see Automated formatting in Ms Word document for Journals, Papers, Magazine etc
Most general purpose useful shortcut of Ms Word that every one should know to automate most of the task
TheTechieSenior.com is reader supported. We may earn a commission if you buy through links on this site. As an Amazon Associate, we earn from qualifying purchases. Learn more here.
Fiction and non-fiction writers do a lot of research in the process of writing their stories, documents, or books. This article will show you how to track references and citations in MS Word.
Table of Contents
Fiction writers wouldn’t normally cite sources except in the front or back matter where the author thanks a person or entity for their assistance. For fiction writers, there are more appropriate options available for handling research and sources than Microsoft Word. Scrivener is the best I know of for organizing research for fiction writers.
For non-fiction writers, it’s commonly necessary to track your references and to cite them properly. Later in this article, we’ll take a look at citations and bibliographies.
How to manage references and citations in MS Word
First, we’ll look at footnotes and endnotes, both of which can be used to cite references. They are flexible in their usage. In addition to citing references, they can be used to add important explanatory or background information that would make the main document more cumbersome and difficult to read if it was included inline.
In Microsoft Word footnotes and endnotes are basically the same thing. The primary difference is their location.
A second difference is that footnotes appear on the page where they are inserted and cannot be moved to the end of the book.
Endnotes can be suppressed—MS Word’s way of saying they can be hidden in the section or chapter where they were inserted, then pushed back and displayed on a page of their own.
There is no master list or other method of tracking the resources that are mentioned in footnotes and endnotes beyond the notes themselves.
As mentioned, a footnote will appear at the bottom of the page in which the reference mark citing the note occurred. An endnote will appear at the end of the section or document.
If you write for an organization or company, you may be required to use footnotes or endnotes specifically.
Note: The instructions given here are based on the latest version of Microsoft 365 that was available on the date of writing. However, they should be close enough to be useful back to Microsoft Word 2007.
I’ll start with a clarification. Technically, endnotes and footnotes are commonly used as citations referring to particular resources. However, Microsoft Word handles footnotes and endnotes together, but separately from citations and bibliographies.
To minimize confusion as much as possible, I’ll use Microsoft’s terminology. The point in a document where you insert a footnote or endnote will be a reference mark. For the feature that Microsoft calls Citations, we’ll insert a citation.
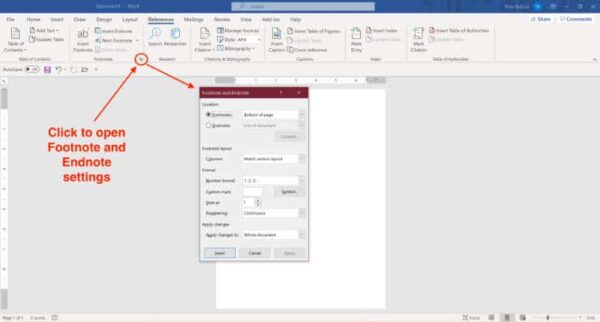
To insert a footnote or endnote, place your cursor where you wish the reference mark to be inserted.
- Go to the Reference tab on the Ribbon—the wide toolbar across the top of the document.
- Click the Footnote or Endnote icon.
- If the one you want to use appears greyed out or inactive, click on the Show Notes button. That will activate both note buttons. Then choose the one you want.
When you insert a footnote reference mark, you’ll see a very small superscript number added where your cursor was and Word will jump to the bottom of the same page where you will see the same number in a small font. Place your cursor just after that number and type the actual footnote.
To return to your place in the document, click the number beside the footnote.
Inserting an endnote works the same way except the endnote can be set to appear after the last paragraph of the section you’re working on or at the end of the entire document.
Go to the end of the section or document and place your cursor just after the endnote character. Type your note.
There are two ways endnotes can be displayed at the end of the document.
- Endnotes can be set to appear at the end of the section you are working on.
- They can be set to appear at the end of the entire document.
With endnotes set to appear at the end of a section, they can appear in some sections and be suppressed in other sections, thereby being pushed to the end of the entire document.
When using this method to have your endnotes display at the end of a book, you have to tell each section not to display them until you come to the last one – the one where you want them to be.
To tell Microsoft Word not to display your endnotes in a section, you must suppress them on a section by section basis.
Suppressing endnotes in MS Word for Windows
In Word for Windows, be sure your cursor is in the section where you do not want your endnotes to display.
- Open the Layout tab, then click in the lower corner of the page settings area (the first area on the left).
- A box will open which has three tabs.
- Click the Layout tab of that box.
- Near the top you’ll see a checkbox marked “Suppress Endnotes.”
If the checkbox is greyed out and unavailable:
- Open the References tab.
- Click the lower right corner of the Footnotes section.
- At the top of the box that opens you should see a section labeled Location.
- Tick Endnotes, then in the dropdown box beside it, select End of Section. End of Section allows endnote suppression. End of Document moves all endnotes to the end of the document with no possibility of keeping some at the end of a chapter or other section.
You should now be able to check the box to Suppress Endnotes which was mentioned earlier.
Suppressing endnotes in MS Word for Macs
The same options for suppressing endnotes until the end of the document are available in Microsoft Word for Macs but the path to them is different.
To be sure End of Section is selected:
- Go the Insert Menu and choose Footnote….
- In the first section labeled Location, open the dropdown box and choose End of Section.
- To tell Word to suppress endnotes as we discussed earlier in the instructions for Windows:
- Go to the Format menu.
- Select Document…
- You’ll find the checkbox to Suppress Endnotes in the first section of the box.
Bonus hint: I’ve rarely heard this tip mentioned, but in Microsoft Word for Windows and Mac, you can also open the options box where you check to suppress endnotes by carefully holding your mouse or trackpad in the top half of the ruler that sits just above your document. Hold your mouse or trackpad inside the ruler, but near the top edge and double-click.
If your double-click brings up a tab control panel, close that panel, move your mouse closer to the top edge of the ruler and try again. It’s a thin target to aim at and it can be tricky, but it can be done and it’s the fastest way to open that options panel.
Managing references in Word with citations and bibliographies
If your writing requires you to accurately keep track of references in your document and to include specific citation styles for each of them, keep reading.
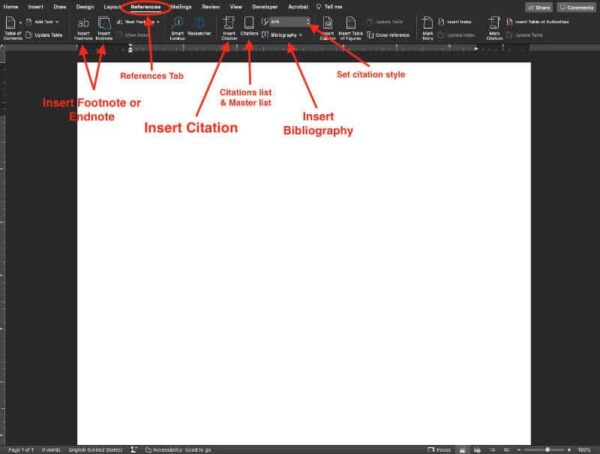
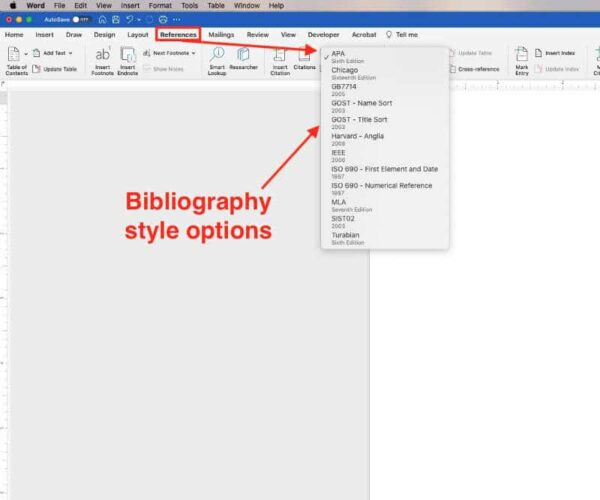
Microsoft Word’s citation system is easy to use once you get past the fear that it isn’t. First, you’ll need to set the style of citation you’d like to use.
- Open the References tab.
- In the citation section (probably the fourth section from the left), you’ll see a small window that will probably say APA. Click that and a list of about a dozen bibliography style choices will appear.
- Select the one you prefer.
To insert a citation:
- Place your cursor in your document where you want the citation to appear.
- Go to the References section of the Ribbon, the same place where you set the citation style.
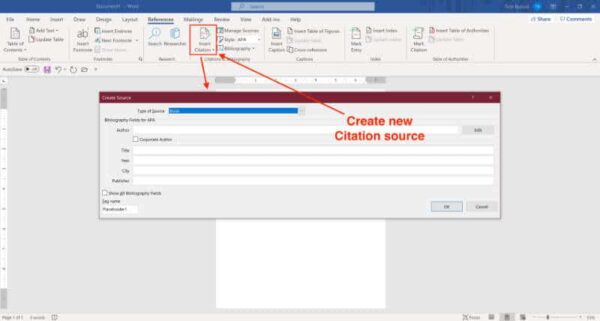
- Click Insert Citation.
At the top of the form that opens, you should see a dropdown box that will probably say “Book” if this is the first time you’ve used it. In the current version of MS Word there are sixteen different types of references listed, plus one for miscellaneous.
The numbers, types, and names of the fields in the form vary, depending upon the type of reference you are citing. For example, if you are citing a book and you’ve selected Book as the reference type, you’ll see slightly different fields to fill out than you might if you were citing a page on a website or a work of art.
MS Word will keep track of the references you cite by storing them in a Master list. If you need to cite the same source later in the current document, or even in a new document, you can search the list or master list, select the source and cite it without having to fill in the information again. Entries in the Master List are editable.
Locate the reusable Master Citation List in Microsoft Word
To use the Master List of citations in MS Word for Windows, click the References tab, then click the button labeled Manage Sources in the Citations & Bibliography section.
To use the Master List of citations in MS Word for Macs, click the References tab, then click the button labeled Citations in the Citations & Bibliography section. A sidebar will open. Locate and click the gear icon in the lower right corner of the sidebar. Select Citation Source Manager.
How to insert a bibliography in MS Word
One nice thing about the way Microsoft Word manages citations is that it is incredibly easy to create a bibliography based on those citations at the end of your document.
When you are ready to create the bibliography, just open the References tab, and in the same area where you chose which style of citation you would use, click the button labeled Bibliography. You will be given a choice to label it Bibliography or Works Cited.
A bibliography (or a list of works cited) will magically appear at the end of your document with the resources you cited presented in a list that is properly formatted according to the citation style you chose earlier.
You’ll find more information on using endnotes, footnotes, and citations in Microsoft Word here.
You’ll find more of our own Microsoft Word tutorials here.