
Compress individual pictures
When you don’t need every single pixel in an image to get an acceptable version of it, you can compress pictures to make the file size smaller.
-
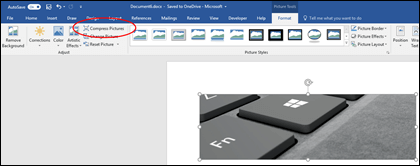
With your file open in your Microsoft Office application, select the picture or pictures that you want to compress.
-
Under Picture Tools, on the Format tab, in the Adjust group, click Compress Pictures.

If you do not see the Picture Tools — Format tab, make sure that you selected a picture. You may have to double-click the picture to select it and open the Format tab.
Also, depending on your screen size, you might only see the icons for the Adjust group. The Compress Pictures button appears without a label.
-
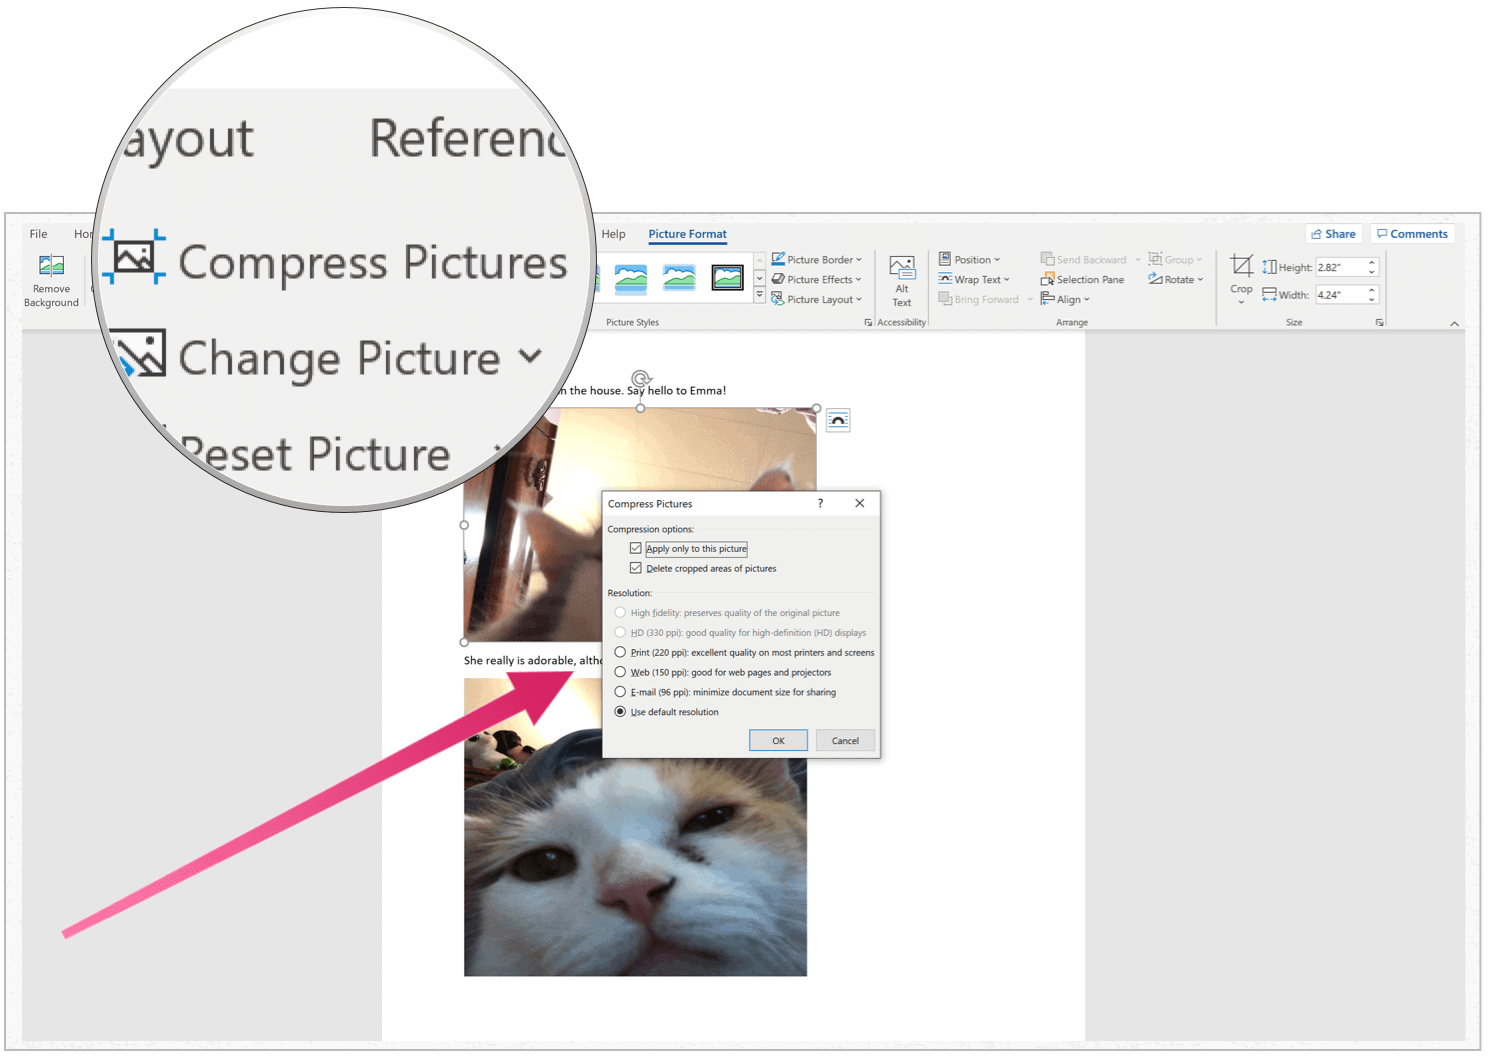
To compress the selected pictures only and not all of the pictures in the document, select the Apply only to this picture check box.
Clearing the Apply only to this picture checkbox will override any previous changes you have made for other individual pictures in this document.
-
Under Resolution, click the resolution that you want, then click OK.
Notes:
-
The default picture resolution in Office is 220 ppi. You can Change the default picture resolution or Turn off picture compression.
-
Compression changes are made when you close this dialog box. If you aren’t satisfied with the results, you can undo the changes.
-
Compressing a picture may make the image look different because of loss of detail. Because of this, you should compress the picture and save the file before applying an artistic effect.
Click the headings below for more information
-

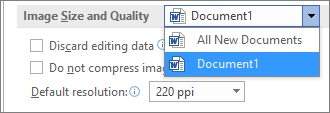
Important: This setting applies only to pictures in the current document or the document selected in the list next to Image Size and Quality. To make it the default for all new documents change the drop down.
Note that this feature is not available in Microsoft Project 2013 or in Office 2007.
-
Click the File tab.
-
Click Options and then click Advanced.
-
Under Image Size and Quality, use the drop down to select whether you want the change to apply to a specific document or all new (and future) documents.
-
Set the resolution that you want to default to, then click OK
Any info on the changes you’ve made to your picture are stored in your file. You can reduce the size of your file by deleting this editing data, but if you want to undo your edits you will need to reinsert the picture.
Note: This feature is not available in Microsoft Project 2013 or Microsoft Project 2016.
-
Click the File tab.
-
Click Options and then click Advanced.
-
Under Image Size and Quality, click the document that you want to remove picture editing data from.
-
Under Image Size and Quality, select the Discard editing data checkbox.
Note: This setting applies only to pictures in the current document or the document selected in the list next to Image Size and Quality.
See Also
Change the default resolution for inserting pictures in Office
Editing photos without Picture Manager
Compress the media files in your presentation
Crop a picture
Turn off picture compression
Compress individual pictures
-
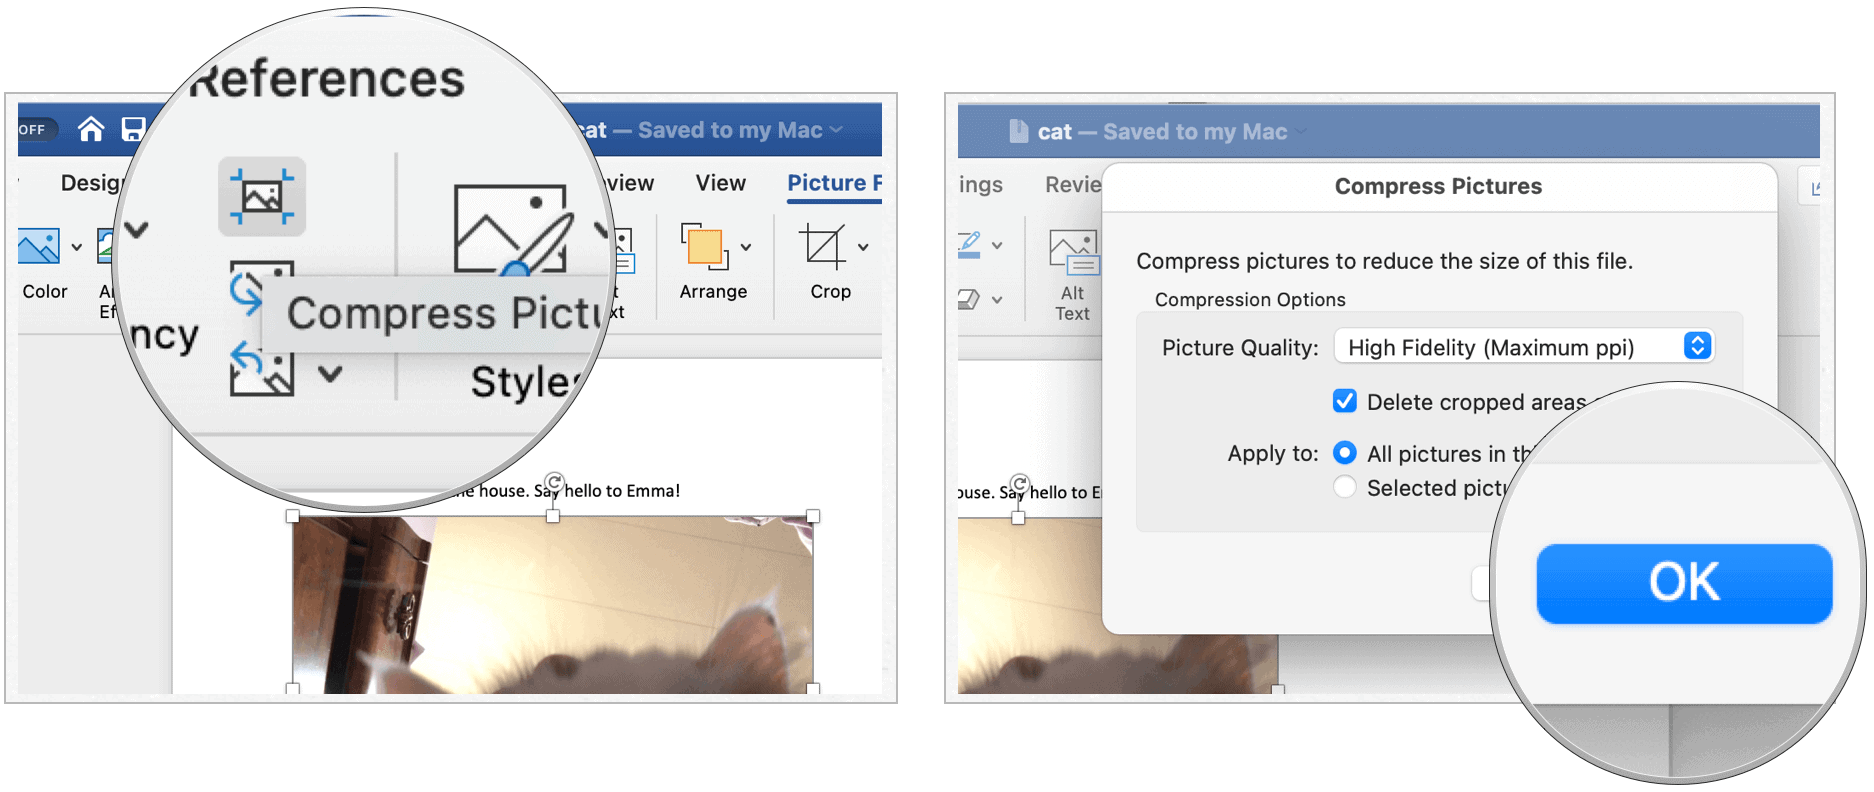
To compress all pictures in your document, on the ribbon, select File > Compress Pictures (or File > Reduce File Size).
To compress only selected pictures, hold down SHIFT, click the pictures you want to compress, and then click Compress Pictures
on the Picture Format tab. -
Select an option in the Picture Quality box. Highest resolution is listed first and the lowest resolution is listed last.
Tip: If you have cropped any pictures, you can reduce the file size even more by selecting the Delete cropped areas of pictures check box.
-
Click Selected pictures only or All pictures in this file.
Note: If you use the Filemenu to choose all pictures in step 1, these options will be unavailable. Compression will be applied to all pictures in your document.

 on the Picture Format tab.
If you use large pictures in a document, its file size increases rapidly. You can reduce this problem by
telling Word to compress the pictures.
Follow these steps:
1. If you want to compress only one picture, select it. Otherwise, click
one picture so that Word makes the Picture Format tab available.
2. On the Picture Format tab, in the
Adjust group, click Compress Pictures button:

or

3. Choose options in the Compress Pictures dialog box:
In the Compression options group:
- If you want to compress only the picture you chose in step 1, select the Apply only to this
picture checkbox. To compress all the pictures, leave this checkbox cleared. - Select the Delete cropped areas of pictures checkbox if you want Word to get rid of any parts
you crop off pictures. If you clear this checkbox, Word merely hides the «cropped» parts. This
hiding is good if you want to be able to restore the cropped parts, but it’s bad for file size, and
it may also have security implications. For example, a customer may be able to restore a part of a
graphic that you had intended to crop off a document.

The Resolution group selects:
- the HD (330 ppi) option button,
- the Print (220 ppi) option button,
- the Web (150 ppi) option button,
- the E-mail (96 ppi) option button.
Choose the option to tell Word what picture quality you need (ppi is pixels per inch, and a higher number indicates
higher quality). If you’re not sure, use the Use default resolution option — you can always
reduce it later, but you can’t restore information if you choose a lower setting.
4. Click the OK button. Word compresses the pictures in the
document.
See also this tip in French:
Comment compresser les images dans un document.
Please, disable AdBlock and reload the page to continue
Today, 30% of our visitors use Ad-Block to block ads.We understand your pain with ads, but without ads, we won’t be able to provide you with free content soon. If you need our content for work or study, please support our efforts and disable AdBlock for our site. As you will see, we have a lot of helpful information to share.
Update December 2021: This OfficeWatch article covers many of the settings and options for decreasing image size: https://office-watch.com/2021/smaller-images-make-smaller-documents-in-word-and-office/
Update November 2013: Most of this blog post’s contents apply to Word 2007. In Word 2010, picture compression seems to be ‘on’ by default.
Sometimes we have to insert large images (such as photos, maps, and diagrams) into a Word document. Unfortunately, large images can substantially increase your document’s file size.
What you may not realize is that Word automatically resizes a large image to fit within the page margins of your document, no matter how big your image is. You will see it at this smaller size and think it’s fine, but the ORIGINAL image size is actually stored behind the scenes in Word.
Adding one large image to your document is not really an issue. But if your document has lots of images, you can easily end up with a 20 page document that’s more than 50 MB.
So why are large file sizes a problem?
Large files:
- take longer to transfer to others, either to/from a server over a network, over the internet, or via email. Remember, not everyone works in the same office or has the same access speed as you
- can potentially get corrupted in the file save or file transfer stages
- take longer to open, to navigate, and to save
- take up excess space on a server/computer, in Inboxes etc.
In this blog post, I’ll show you how to reduce the size of large images in Word, without losing the quality of those images or the readability of any text on them. Of course, a better solution is to use a graphics editor to reduce the image size BEFORE you bring it into Word, but this may not be an option that everyone has access to.
I did some testing to show you how the image size can affect the size of the Word document, so let’s start there.
I created two empty Word 2007 documents — by default, an empty Word document is 13 KB in size (see Doc1). I then inserted a 1253 KB photo I took some years ago in Sequoia National Park, California, to Doc2. As you can see from the screen shot below, adding a 1253 KB object to a 13 KB file took the total file size for Doc2 to 1267 KB (approximately the total of the two separate objects).

When I inserted the picture into Doc2, Word automatically resized it to fit nicely within the page margins.

You can check the original file size by right-clicking on the image, then selecting Size (if you don’t see Size listed, select Format Picture instead, then the Size tab).

Here are the details of the photo I inserted into Doc2. You can see that the original size (1 in the screen shot) is some 80 x 60 cm — BIG! — and that it’s been rescaled by Word to some 26% of its original size (2), which equates to dimensions of some 21 x 16 cm (3).

Resize the image using picture compression
- Select the image in the Word document. This will add the Picture Tools > Format tab to the ribbon in Word 2007 and Word 2010 (Word 2003: Right-click on the picture, then select Format Picture > Picture tab).
- Click Compress Pictures (in the Adjust group). (Word 2003: Click Compress on the Picture tab.)
- On the Compress Pictures dialog box, click Options. (Word 2003: This step and the following one are all done on a single Compress Pictures dialog box.)
- Select the options you want to apply. I always select Automatically perform basic compression on save and Print (220 dpi) as the quality because I want the best quality possible.
- Click OK, then click OK again to close the Compress Pictures dialog box.
- Save your document, but don’t close it.
- Now, check that the image size has been reduced by right-clicking on the image again and selecting Size.
- Notice how the scaled and original dimensions are now the same (approx. 21 x 16 cm), and the scaling is 100% (i.e. no resizing). Click Close.
- Finally, check the document’s file size in Explorer. My Doc2 test document has been reduced by approximately 1 MB — it is now only 262 KB, down from 1267 KB.


Note: If your pictures won’t compress no matter what you do (and you’ll know this because the image’s dimensions and the file size doesn’t change at all), your image may have certain color properties, as described in this thread: http://answers.microsoft.com/en-us/office/forum/office_2007-powerpoint/can-not-compress-pictures-in-powerpoint-2007-but/d775b740-2d75-46e8-8e8f-9b1f332a637e?page=2. The solution is to copy the image to the clipboard (Ctrl+C), then go to the Home tab > Paste > Paste Special and select the relevant picture option — e.g. Picture (JPEG) for a photo — then click OK. You should find picture compression now works correctly.
Update: Also check your settings in case you have compression turned off (by default, it is turned on and set to 220 dpi in Word 2010). You can also change the settings for the entire document here too: File > options > Advanced > Image Size and Quality, then select the document you want to set the default picture resolution for and the default output resolution.
[Links last checked December 2021]
Answer
- There are a few ways to compress an image in Word.
- You can use the Image Size command, the Save As command, or the File Format command.
How to compress photo size in ms word | How to Compress Images in Microsoft Word
How do you compress in Word?
There are a few ways to compress in Word:
-Use the Compress Text button on the Home tab.
-Use the Compress Pictures button on the Picture Tools tab.
-Use the Compress Files button on the File tab.
-Use the Save As command (File > Save As…) and save the file as a .zip or .rar file.
Why can’t I compress images in Word?
There are a few reasons why compressed images may not work in Word. The most common reason is that the image format does not have a specific container format that Word can use to save the file. Other formats, like JPEG, can be saved in a variety of formats, but Word may not be able to open them. If you are using an image compression program like Photoshop or GIMP, make sure to save the image as a format that Word can use.
How do I compress an image?
There are a few different ways to compress an image. One way is to use a compression program like Photoshop or GIMP. Another way is to use a file compression utility like WinZip.
How do you compress a picture in Word 2010?
In Word 2010, you can compress a picture by selecting the picture and clicking on the Compress Pictures button in the Picture Tools Format tab.
How do I reduce the size of a picture in Microsoft?
There are a few ways to reduce the size of a picture in Microsoft. One way is to use the Picture Tools app in the Photos app. Another way is to use the Image Size dialog box.
How do I compress pictures in Word for Mac?
There are a few ways to compress pictures in Word for Mac. You can use the compression feature of the Photos app, which is built into macOS. You can also use third-party tools like Snagit or Pixlr to compress pictures.
Does Microsoft Word compress images?
Yes, Microsoft Word can compress images. However, there are some limitations to how well it can do so.
Does OneDrive compress photos?
Yes, OneDrive does compress photos.
How do I reduce the size of a PNG image?
There are a few ways to reduce the size of a PNG image. One way is to reduce the number of colors in the image. Another way is to reduce the size of the image’s pixels.
How do I make a JPEG less MB?
JPEG compression is lossy, so reducing the file size will result in some loss of image quality. There are a few ways to reduce JPEG file size without sacrificing image quality:
-Use a lower compression level: This will result in more loss of image quality, but the file size will be smaller.
-Remove unnecessary colors: Reducing the number of colors in an image can significantly reduce its file size without sacrificing image quality.
How do reduce file size?
There are a few ways to reduce file size. One way is to compress your files using a compression program. Another way is to delete unnecessary files. You can also try to optimize your images for web use.
How do I resize a photo in Windows 10?
In Windows 10, go to the Photos app and select a photo. On the left side of the window, click the three lines in the bottom left corner and then click “Resize.” Drag the resize handles to make the photo larger or smaller.
How do I reduce the size of a JPEG without losing quality?
JPEG is a compression format that uses lossy algorithms to reduce the file size of images. While the loss of quality may be acceptable for some applications, it is not ideal for others. There are a number of ways to reduce the size of JPEGs without sacrificing quality. Some common techniques include reducing the number of colors in an image, reducing the resolution, and using a lossless compression format like PNG.
How do I compress a DOCX file on a Mac?
There are a few ways to compress a DOCX file on a Mac. The simplest way is to use the “File” menu and select “Compress.” This will create a ZIP file of the document. You can also use the “Save As” menu and select “Compress” to create a ZIP file.
How do I reduce the size of a photo for emailing in Windows 10?
You can reduce the size of a photo for emailing by selecting it and clicking on the “File” menu, and then clicking on “Send To” and selecting “Email”. You can also click on the “Photo” button in the toolbar at the top of the Windows 10 screen, and then select “Save As…” to save the photo as a file that you can email.

Compressing images allows you to keep document sizes reasonable while still including a decent amount of art in your documents.
When size becomes a problem, you can easily compress the size of images in a Microsoft Word document. You can do so on both the Windows and Mac versions of the app. Here are the steps you should take on both operating systems.
Compressing Images on Microsoft Word for Windows
To decrease the size of images in documents on Windows:
- Click on the picture(s) you wish to compress.
- Choose Compress Pictures under Picture Tools on the Format tab.
- On the pop-up box, choose from among the choices. The smaller the DPI, the smaller the picture size becomes.
- Click OK to complete the process and reduce the resolution.
- If you aren’t happy with your choice, click Undo to remove the setting.
- Repeat Steps 1 through 4 as needed.

In the pop-up box, you can choose to change the DPI for an individual image or all images in the document. It’s up to you.
Compressing Images on Microsoft Word for Mac
Decreasing the size of images in Microsoft Word in Mac requires a slightly different approach. Using the same Word document as before, here’s how to compress images in your document on Mac:
- In Microsoft Word for Mac, choose File> Reduce File Size.
- Select your picture quality using the pull-down menu.
- Choose OK.
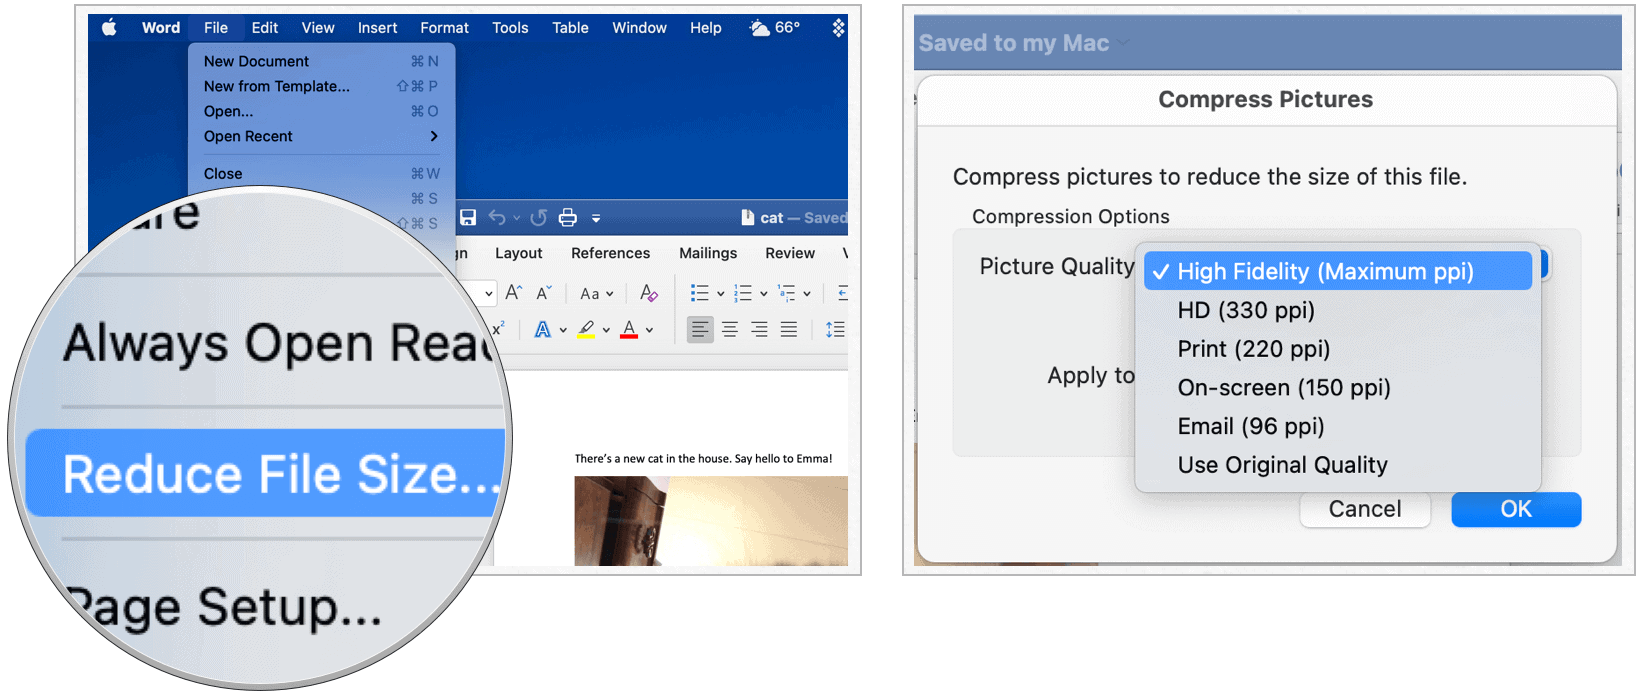
To compress select photos in your document:
- Hold down the SHIFT key on your keyboard, then individually click on the photos you want to compress.
- Click Compress Pictures on the Picture Format tab.
- Select your picture quality using the pull-down menu.
- Choose All pictures in this File or Selected images.
- Click OK.
Easy Does It!
That’s how you compress images in Microsoft Word documents on both Windows and Mac. Simple, no? This allows you to keep document sizes reasonable while still including a decent amount of art in your documents.
![]()