
When you are working on writing a text that includes foreign or slightly colloquial words to highlight a point in your writing, it is likely that the red or blue line will be automatically marked under those words or in a phrase or sentence. This is due to the spell checking activated on your computer.
Many dislike those red and blue lines, they even it is annoying and distracting, that’s why they deactivate it. If you want to know how to remove the red underline from spell checking and the blue underline from contextual errors in Word, read on, because in this article we will tell you how you can do it.
How to make single document red underline not appear in Word?
Spelling is very important when writing a text, because it allows it to be legible and understandable, it also says a lot about whoever writes it. Therefore, when you work with the Microsoft Word program you can easily see those errors and correct them, because it indicates to you by means of the red underline. But many do not like this because it distracts them in the writing process so they decide to disable it. If this is your case, see how it is done.
From Windows
From the Windows operating system you can remove the red underline in a current Word document. You follow the following route: File, Options and Review. In that option you must check the box to Hide spelling errors only in this document and hide grammar errors only in this document and click OK. This will apply the action implemented to that single Word document.
On Mac
On the other hand, if you have a Mac computer, then the procedure to remove the red underline in a Word document differs a bit. But there is no need to be alarmed, we show you how to do it. You go into the Word document and you click on the Tools option, located at the top. You will see a drop-down menu where you must select Spelling and grammar.
Immediately a side menu will be displayed with several options, choose Hide spelling errors. That way your Word document won’t show the red underline. As you can see, it is very easy to do it, you can enable or disable Word’s auto spell checker on Mac.

In Word online
In the case of Word online or for the web, if you want to eliminate the red underline in that document, what you should do is go to the option on the top bar of Review, click there and then on Editor. Next, you must click on set revision language. You will see a language box where you should select the option do not check spelling or grammar and click on OK for the changes to be made.
What boxes are unchecked to disable spell checking for all documents?
There are many functions that you can implement when you use the Word tool, such as when writing a text, you can find all the repeated words in a Word document. But also, you can use the spell checker, which is an excellent tool that allows you to write texts with a grammar and spelling error free.
But there are situations in which you may want to deactivate this option, especially when you do some work in Word in another language or with somewhat difficult words. In that case, it is better disable spell checking so you can work without having to see that red line under each word, signaling your poor spelling and writing.
This action can not only apply to a document, also you can disable spell check to all Word documents. That is why we show you which boxes you must uncheck to deactivate this spell check function. Take a look at the following:
Check spelling as you type
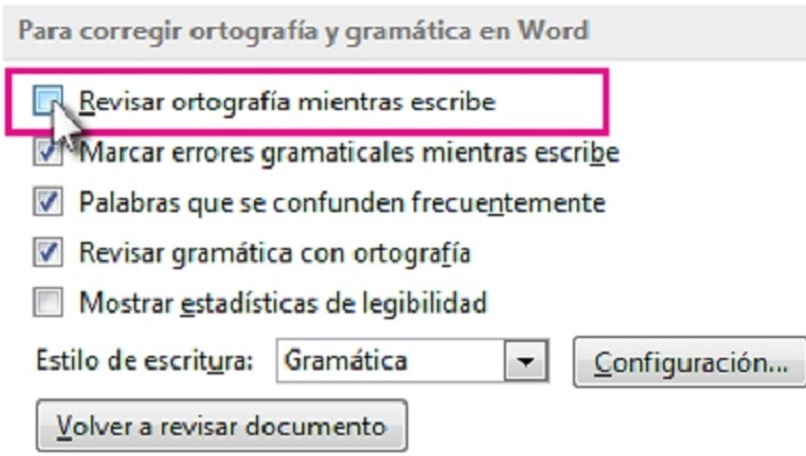
By unchecking the Check spelling while writing box, you are disabling this function, so you will not see the red line in the document you are writing at the moment as well as in all Word documents because simply the system will not spell check the document. After you have entered Files and then Options and Review. And in the To correct spelling and grammar in Word section, uncheck the Check spelling as you type box, and click OK.
Check grammar
On the other hand, when you uncheck the Check grammar box, the spell checker will not recognize misspelled words and that do not have concordance. Because the option that performs this function is disabled. So you will not know if your document meets the rules of grammar. But this is not a problem either because you can easily activate this action again and thus your documents have a better presentation.
How do you prevent the blue underlining of contextual errors from being marked?
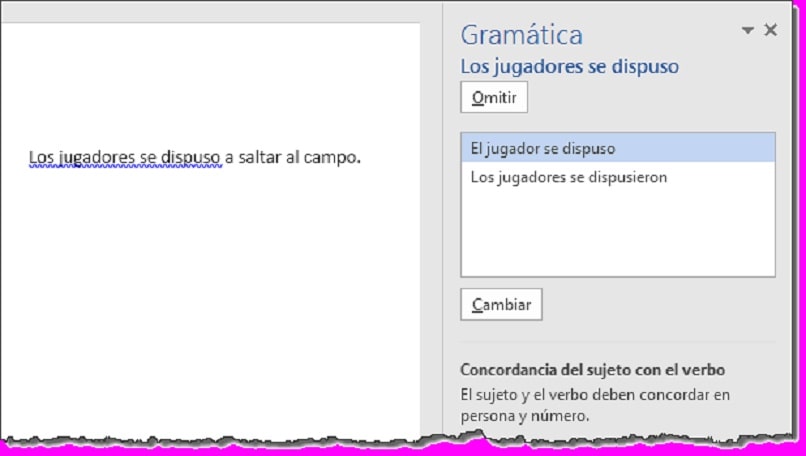
The Word tool allows you to edit coherent and understandable texts because it has functions that are predetermined for automatically correct the writing and spelling of the writing. And it does so by means of the blue underline that appears below the words, pointing out the contextual error. For this reason, when writing, some words in a sentence of the text may be highlighted with blue lines to indicate that an inconsistency has been verified in the checker, that is, a grammatical error, which you must correct.
Although this consistency marker may be activated by default on your computer, you can also deactivate it whenever you like. Take a good look at what you must do so that the blue underline of contextual errors is not marked.
You go to File, click on Options, Review and there uncheck the Mark grammar errors box while you write and click OK. As you can see, there are many functions that you can enable or disable in Word and all from the toolbar. That is why it is convenient for you to know the Word toolbar, its parts and what it is for.
Microsoft Word offers certain features to improve your writing experience and ensure you make the least number of mistakes while typing. Spell check is one such major feature that it has to offer. You may have noticed some red wavy lines beneath certain words in your Word document. This is the spell check feature in action. Many new Word users may not know what these lines mean, but that’s exactly what we’ll be talking about here. Not just that, we’ll be helping you remove red lines in Microsoft Word documents permanently if they bother you too much.
Word files working incorrectly might be the result of the document being damaged or corrupted. Word Repair tool is able to fix most existing issues and ensure correct function of the document.
Part 1. What Do the Red Lines in Word Mean?
Usually, when you see a red line under a word, it means that there’s a spelling mistake that you need to correct. However, this isn’t entirely accurate all the time. Any word that’s not in Word’s spell-check dictionary will be marked with a red wavy underline.
Although these red lines can be helpful in correcting your mistakes, they can also be quite annoying at times. Several technical terms and slang words aren’t present in this dictionary, and if you use them while you’re working on your Word document, it will end up having red lines even if you’re spelling it correctly. Hence, people who’re confident with their spelling may want to remove these unnecessary red lines in Word.
Part 2. How to Remove Red Underlines in Word
Typically, users would have to right-click on an underlined word and choose the ‘Ignore All’ option to remove it, but this is not ideal if there are too many red lines in your document. Rather than taking this time-consuming route, you can get rid of red lines altogether in Microsoft Word.
Depending on whether you want to remove the red lines for just the current document or for all the documents you’ll be working on, the steps you need to follow will vary. Here, we’ll be covering two different methods to remove red lines in Microsoft Word documents.
2.1. Remove Red Lines in All Word Documents
If you no longer wish to bother with these red lines whenever you’re working on Word documents, you can remove them permanently. This can be done by changing Microsoft Word’s Proofing settings. Here’s what you need to do:
Step 1. Assuming you have Microsoft Word open on your computer, click on ‘File’ from the menu bar.

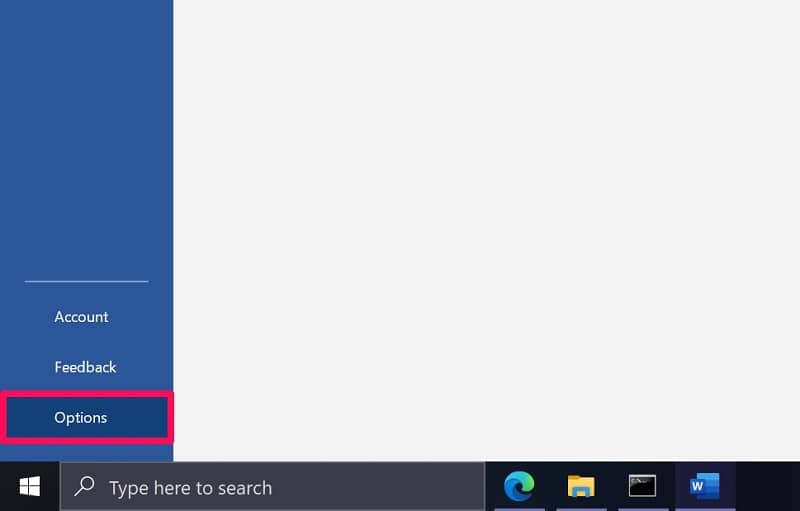
Step 2. This will take you to the File menu, where you’ll see all the Word documents you’ve worked on. Here, click on ‘Options’ located at the bottom-left corner of the Word window.
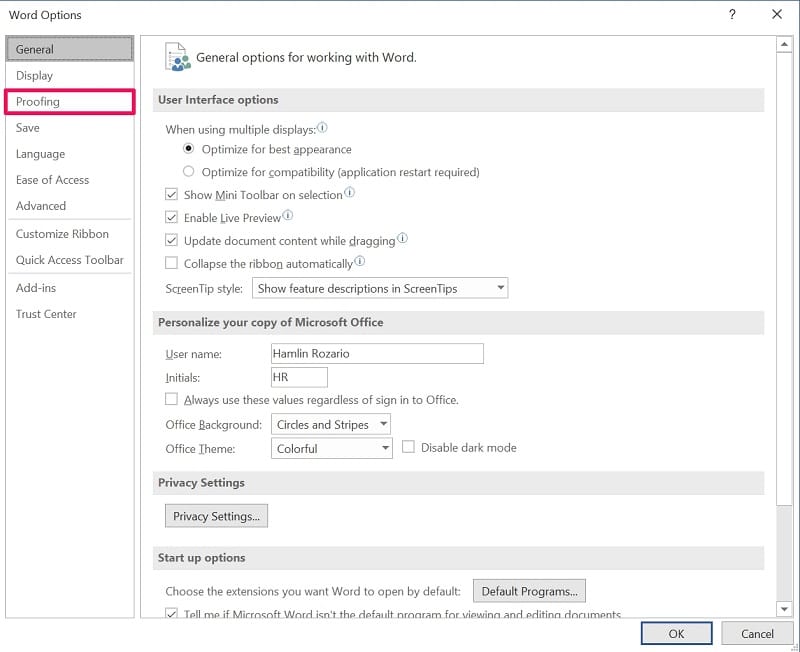
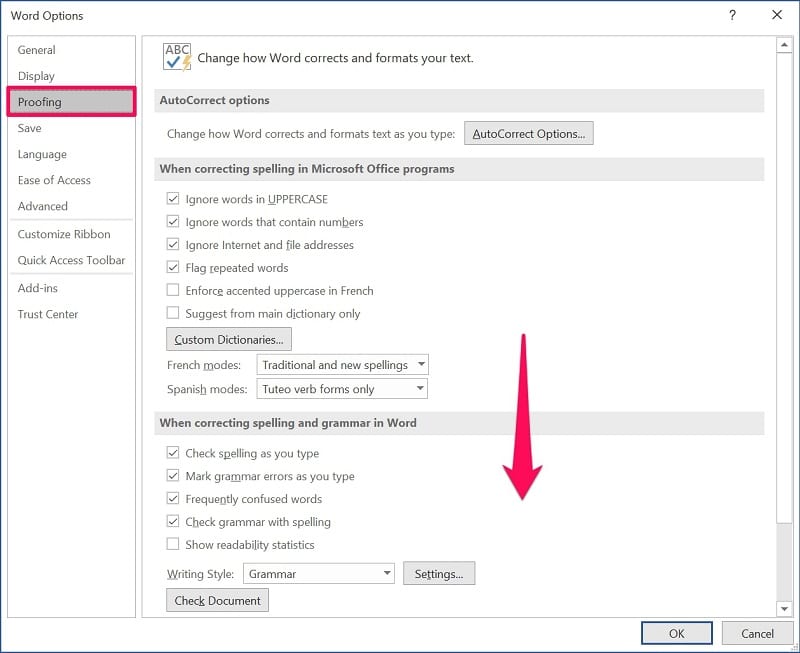
Step 3. A new ‘Word Options’ window will launch within Microsoft Word. You may be in the General section of Word Options. Click on ‘Proofing’ from the left pane to make changes for spell check.
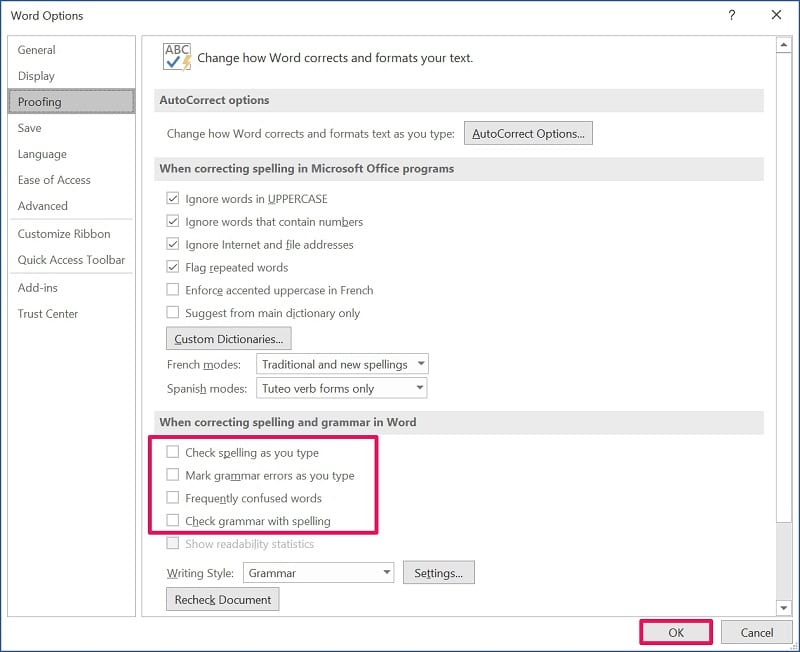
Step 4. Here, you’ll find a bunch of check boxes under the ‘When correcting spelling and grammar in Word’ section. Uncheck the boxes next to ‘Check spelling as you type’ and ‘Frequently confused words.’ Make sure to click ‘OK’ to save your changes.
There you go. Unchecking the boxes for grammar will remove green underlines from your Word document too. Either way, you will no longer find any red underlines in any of your Word documents.
2.2. Remove Red Lines in the Current Word Document Only
This method might be useful for those working on Word documents containing a lot of technical terms that aren’t available in the spell check dictionary. Follow the steps below to remove all the red lines from your current Word document:
Step 1. Just like the above method, head over to the ‘File’ section from the menu bar once you’ve opened up Microsoft Word.
Step 2. Next, click on ‘Options’ from the bottom-left corner of the window to access the Word Options menu.
Step 3. Now, click on ‘Proofing’ from the left pane and scroll down to the bottom to make spell check exceptions for your current document.
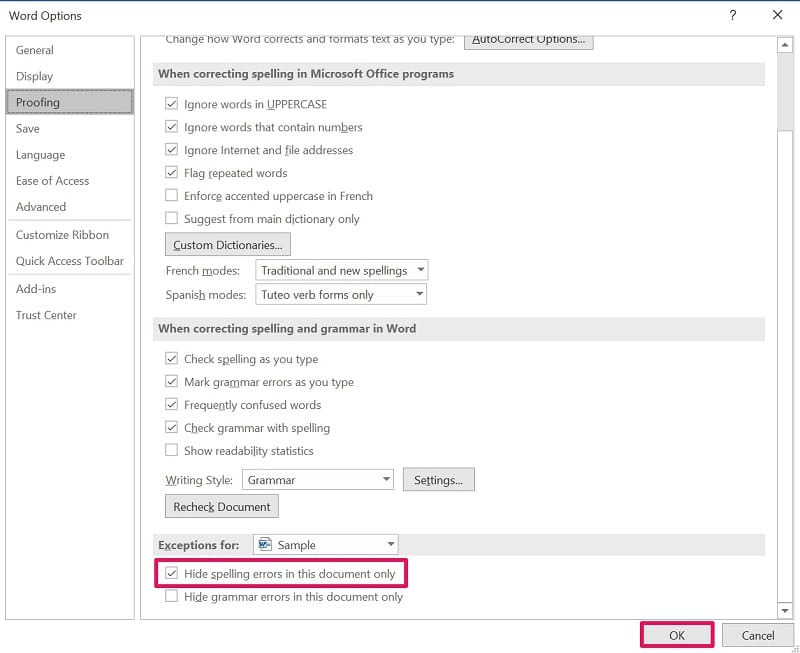
Step 4. Here, check the box next to ‘Hide spelling errors in this document only’ as shown in the screenshot below, and click on ‘OK’ to save your changes.
You can make exceptions for other documents here too. Here, the current document is selected by default, but you can click on it and select a different Word file instead. Also, if you want to get rid of green lines, you can check the box for hiding grammar errors.
Conclusion
As you can probably see, it’s not hard to turn off all the red lines in Word whenever it bothers you. For a handful of people who’re on point with their spelling in general, the feature does more harm than help. However, if you change your mind, you can always head back to the Proofing settings and toggle the feature on or off.
We hope you could finally learn multiple ways to get rid of red lines in Microsoft Word. Did you remove red lines from just your current document, or did you turn them off permanently? Do you know any additional ways to deal with red underlines in Word? Feel free to share your ideas, and don’t forget to leave your opinions in the comments section down below.
When that situation comes, just follow this easy guide to remove spelling and red lines in MS Word:
- Click on the File menu and then on Options.
- In the Options pop-up window, open Proofing.
- Untick the Check spelling as you type and Check grammar with spelling.
Contents
- 1 How do I get rid of the red underline in Word?
- 2 How do I get rid of underline in Word 2016?
- 3 Why are all my words underlined in red on word?
- 4 How do I get rid of red formatting in Word?
- 5 How do I remove the underline color in Word?
- 6 How do I get rid of the red underline in Word for Mac?
- 7 How do I get rid of the red underline in Word on Iphone?
- 8 How do you remove underline from hyperlinks?
- 9 How do you change the color of the underline in Word on a Mac?
- 10 How do you reset hyperlink color in Word?
- 11 How do I get rid of the red underline in pages?
- 12 How do I get rid of the red underline in Notes on Mac?
- 13 How do you remove the underline from a tag?
- 14 How do I get rid of the green underline in Word?
- 15 How do you underline red in Word Mac?
- 16 How do you change the color of an underline in HTML?
- 17 How do you underline in Word for Mac?
- 18 How do I make a Hyperlink not purple in Word?
- 19 How do I change the Hyperlink color?
How do I get rid of the red underline in Word?
If you don’t want to see the red, wavy underlines on-screen, you can turn this feature off by three simple clicks:
- Select Options on the File menu:
- On the Proofing tab, click the Hide spelling and grammar errors checkbox:
- Click OK.
How do I get rid of underline in Word 2016?
To remove single underlining from words and spaces, select the underlined text and press Ctrl+U. To remove other styles of underlining, press Ctrl+U twice.
Why are all my words underlined in red on word?
You have the Track Changes feature turned on – red underlining is the default markup used to identify Insertions. Go to the Review tab, turn Track Changes OFF, then Accept all changes in the document & save the file.
How do I get rid of red formatting in Word?
Clear formatting from text
- Select the text that you want to return to its default formatting.
- In Word: On the Edit menu, click Clear and then select Clear Formatting. In PowerPoint: On the Home tab, in the Font group, click Clear All Formatting .
How do I remove the underline color in Word?
In the “Font” tab, click the down arrow under the “Underline Style” option. Click “None” in the drop-down menu, then select the “OK” button. The underline is now removed from the selected hyperlinked text.
How do I get rid of the red underline in Word for Mac?
How do I get rid of the green/red underline on my text in Microsoft Office:Mac 2011 ?
- In the main menu bar, choose Word > Preferences.
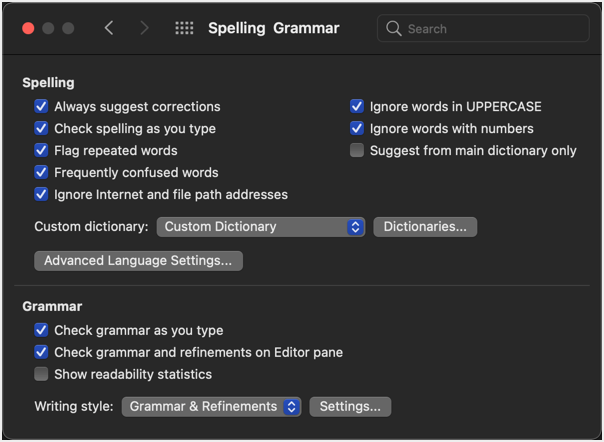
- Click on the third icon, Spelling and Grammar.
- In the Spelling section, disable Check spelling as you type.
- In the Grammar section, disable Check grammar as you type.
How do I get rid of the red underline in Word on Iphone?
Try Settings > General > Keyboard > Auto-Correction > Off. Try Settings > General > Keyboard > Auto-Correction > Off.
How do you remove underline from hyperlinks?
To remove the underline from all hyperlinks on a page, follow these steps:
- Open the page that you want to modify.
- Click the Codetab.
- Put the following HTML code before the tag:
- Click the Designtab. Your hyperlinks no longer contain underlines.
How do you change the color of the underline in Word on a Mac?
Use keyboard shortcut Command-T or Format:Font:Show Fonts. Select the text you wish to underline and, under the first icon (an underlined T) in the Font box, choose either single or double, then under the same icon, choose color. Then select the color you wish to use for the underline and apply it.
How do you reset hyperlink color in Word?
Word for Windows
- From the Home tab, click the small icon (
- In the Styles menu, hover your mouse pointer over Hyperlink, and click the triangle that appears to the right.
- From the drop-down menu that appears, select Modify….
- In the “Formatting” section, choose the color you want, and then click OK to save your changes.
How do I get rid of the red underline in pages?
With Spelling and Grammar check turned on, Pages will notify you of questionable misspelled words with a red underline and debatable grammar with a green underline. Proofreading. A pop-out box will appear. Slide down and click on Check Spelling as You Type or Proofread as You Type to turn off that feature.
How do I get rid of the red underline in Notes on Mac?
To do this, head to Edit > Spelling and Grammar. Turn off “Check Spelling While Typing” to disable the red underlines and turn off “Correct Spelling Automatically” to disable automatic replacement.
How do you remove the underline from a tag?
By setting the text-decoration to none to remove the underline from anchor tag. Syntax: text-decoration: none; Example 1: This example sets the text-decoration property to none.
How do I get rid of the green underline in Word?
Click on the name of the language in the status bar at the bottom of the screen. 2. Add a check mark in the Do not check spelling or grammar option and click OK. All the red and green squiggly underlines should be gone.
How do you underline red in Word Mac?
When your spelling is checked, misspelled words are underlined in red, and suggested corrections are shown. On your Mac, choose Apple menu > System Preferences, click Keyboard , then click Text. Select the “Correct spelling automatically” checkbox.
How do you change the color of an underline in HTML?
Change the underline to dots with the border-bottom style property a { text-decoration: none; border-bottom:1px dotted; }. Change the underline color by typing a { text-decoration: none; border-bottom:1px solid red; }.
How do you underline in Word for Mac?
The keystrokes for Mac are essentially the same as on Windows with the difference being to use the command key (macOS) instead of Control (Windows). Therefore, to underline, select text and the use the keyboard shortcut command+u.
How do I make a Hyperlink not purple in Word?
In the “Styles” menu, hover your mouse pointer over “Hyperlink“, and then click the triangle that appears to the right. From the drop-down menu that appears, select “Modify…“. In the “Formatting” section, choose the color you want to use, then click “OK“.
How do I change the Hyperlink color?
Change the color of a hyperlink
- Select the hyperlink you want to re-color. (How do I insert a hyperlink?)
- On the Home tab of the ribbon, select the Font Color arrow to open the menu of colors.
- Select the color you want for the hyperlink.
Microsoft Word is an indisputable leader among text processing applications. Whether you are using Windows or Mac, Microsoft 365 is an essential package for creating documents. However, Word can create some problems that can easily annoy you. Spelling and grammar checker not working issue is one of the problems many users face when using Microsoft Word. In this article, let us explain how to fox this issue and write error free content like a pro.
Earlier Word versions used to check two things – one is spelling and other is grammar. Word used to underline spelling errors with red wavy line and grammar errors with green wavy line. However, the new AI powered Editor interface has slew of checks like clarity, conciseness, formality, etc. including similarly checker in addition to spelling and grammar checks.

However, sometimes Word will not highlight the spelling / grammar checks making you crazy. You will not find any red or green lines even though the document has misspelled words and the Editor will also show you 100% perfect without detecting the errors.

Here are some of the suggestions that you can try to fix the spelling and grammar checker in Microsoft Word.
Fix Spelling and Grammar Checker in Word
Let us explain the available options primarily for Microsoft 365 for Windows. We have mentioned the applicable cases for Mac version since features like repairing Word are only available for Windows.
1. Check Dictionary Language
Proofing tools in Word uses the language set in the dictionary for checking errors. If the document language is different than your dictionary language, you will see all the words are underlined with red or green wavy line. You can simply check the status bar in Word to confirm the language. Click on the language in status bar to change to English or the document’s language to remove all the red/green underlines.

In addition, make sure the option “Do not check spelling or grammar” is not checked. Otherwise, Word will ignore the spelling and grammar errors leading to confusion that you might think it is not working. If the document language is not installed, Word will suggest installing the proofing language for checking spelling and grammar. You can opt to download and install the required language pack for proofing.

Good part is that this dictionary language check from the status bar option is available in Word app comes with Microsoft 365 subscription in Mac also.

2. Check Proofing Options
Word by default will check your document in the background while you type and suggest the spelling and grammar errors. If you have changed the default behavior, it will result in not showing any red or green lines while you type. In Windows, open “Word Options” dialog box by going to “File > Options” menu in Word app. When you are in “Word Options”, go to “Proofing” section and check the followings:

- Auto Correction – if Word is not capitalizing the first word and correct other suggestions automatically, then click on “AutoCorrect Options…” button. Check your settings and make sure everything is fine as per your need.
- Spelling Correction – by default Word ignores the words in capital, containing numbers and mark repeat words. You can check these options are set correctly in this section.
- Spelling and grammar checking – this is the main section that you might have changed. Make sure to enable “Check spelling as you type” and “Make grammar errors as you type” options. This will enable Word to show red and green underlines instantly after you type the words.
- Exceptions – under this section make sure the options “Hide spelling errors in this document only” and “Hide grammar errors in this document only” options. Ensure to check this especially when you have received the document from someone else. The author of the document might have set these options mistakenly or for different purposes.

In addition, check the proofing language under “Language” tab from the sidebar and make sure you have the required language installed for doing spelling and grammar check.

In Mac, you can check these settings under “Spelling & Grammar” section by going to “Word > Preferences…” menu.
Note: Changing settings may affect other Office applications like Outlook. Therefore, make sure to change the options with care.
3. Disable Add-ins
There are large number third-party add-ins available for Word Windows version. These add-ins can easily create problems with the default spelling and grammar checker. When you are in “Word Options” section, go to “Add-ins” tab. Select the type of add-ins from “Manage” dropdown box and click “Go…” button. Simply, disable the add-ins by unchecking the box. Now, check the problem is fixed and spelling checker is working. If yes, you can enable the add-ins one by one to find the actual one causing the problem.

4. Check in Safe Mode
Though the above method works to find the problematic add-in, it may take long time. The alternate option is to open Word in a safe mode which will automatically disable all installed add-ins.
- Press “Win + R” to open Run command prompt.
- Type winword / safe and press “OK” button.
- This will open Word in Safe mode and check the spelling checker is working.

If it is working, you can follow the above explained method to find and disable the add-in that causes the problem.
5. Repair Microsoft Word
If none of the above methods work and you also feel Word is not working properly on your computer, then you can use repair option to fix all problems in your installation. However, if you have Microsoft 365 subscription, this will repair the entire Office installation that includes other Office apps.
- Press “Win + I” keys to open Windows Settings app.
- Go to “Apps” section and click on “Apps & features” tab.
- Here you will find all installed apps in your computer. Search for 365 or Word to find the Office installation.
- Click on the three dots vertical icon and select “Modify” option.
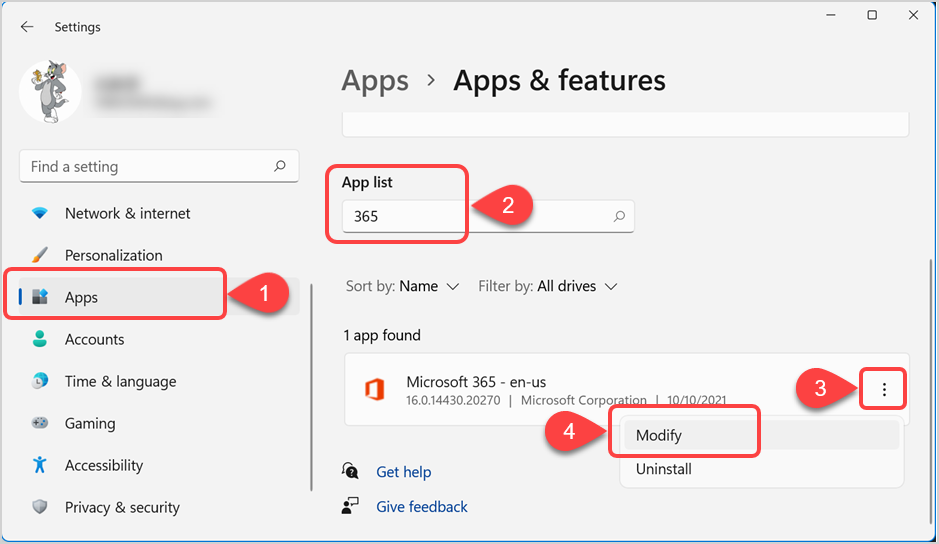
- This will open Office Repair wizard. First select “Quick Check” and click on the “Repair” button to start repairing the installation. If this did not fix the issue, then try “Online Repair” and follow the instructions to repair your Office applications.

Содержание
- Вариант 1: Microsoft Word 2013 – 2021
- Способ 1: Исправление ошибок
- Способ 2: Пропуск ошибок
- Способ 3: Полное отключение проверки орфографии
- Вариант 2: Microsoft Word 2007 – 2010
- Вариант 3: Microsoft Word 2003
- Вопросы и ответы

Обратите внимание! Помимо красных подчеркиваний, свидетельствующих о наличии орфографических ошибок в тексте, в Microsoft Word бывают еще зеленые и синие выделения, обозначающие проблемы с грамматикой. В отдельных статьях на нашем сайте подробно рассказывается, как от них избавиться. При необходимости рекомендуем с ними ознакомиться.
Подробнее: Как убрать синие / зеленые подчеркивания в Microsoft Word
Вариант 1: Microsoft Word 2013 – 2021
Важно! Все версии текстового процессора от Microsoft обладают примерно одинаковым набором функций и возможностей, но графическое оформление у них отличается. По этой причине детальное описание того, как устранить красные выделения слов, будет предоставлено только для программ, которые выходили с 2013 по 2021 год. Для остальных версий будут указаны отличительные особенности.
Способ 1: Исправление ошибок
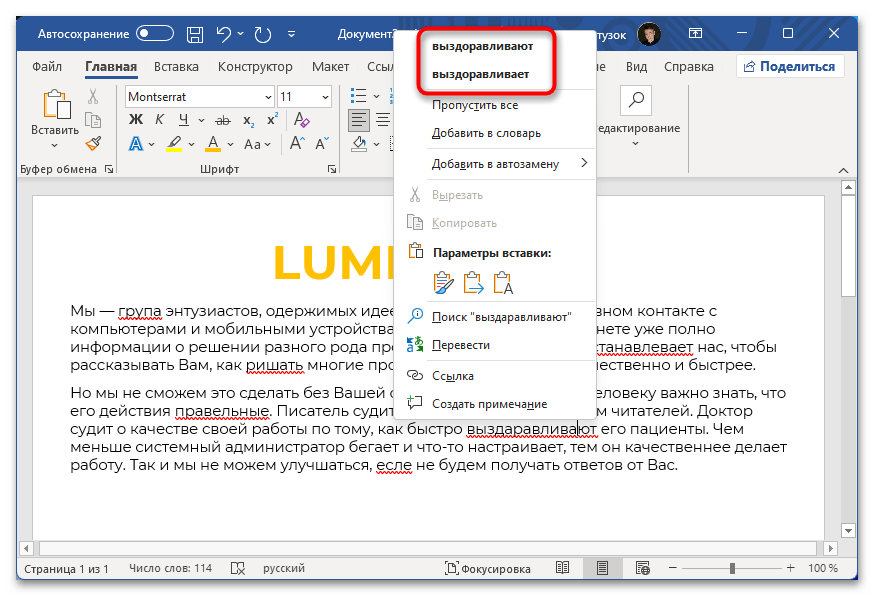
Красные подчеркивания в Microsoft Word свидетельствуют о наличии орфографических ошибок, допущенных при написании текста. Чтобы от них избавиться, потребуется внести правки в материал. Сделать это можно вручную, перечитав каждое слово и внеся исправления, которые соответствуют правилам русского языка. Но в случае возникновения трудностей, можно воспользоваться подсказками от программы, появляющимися при вызове контекстного меню выделенного слова. Для этого нажмите правой кнопкой мыши по ошибке и в отобразившемся списке выберите подходящий вариант написания.
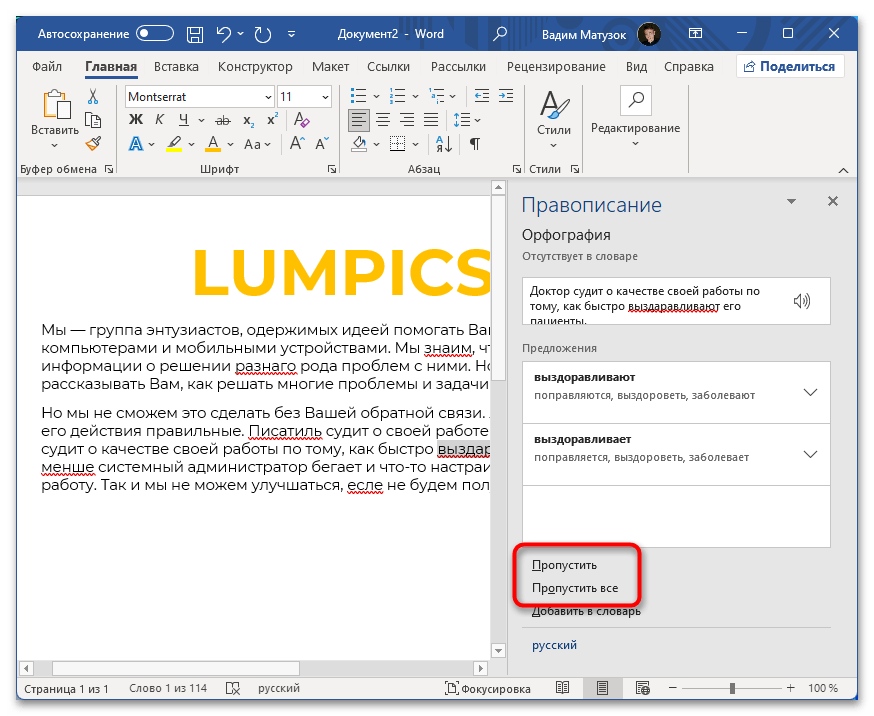
Если ошибок в документе немного, этот способ приоритетен. Но в случае необходимости обработки большого объема некачественно написанного текста рекомендуем воспользоваться специальным меню, позволяющим быстро вносить правки. Сначала перейдите на вкладку «Рецензирование», после чего в левой части панели инструментов раскройте выпадающий список пункта «Правописание», в котором выберите опцию «Правописание».

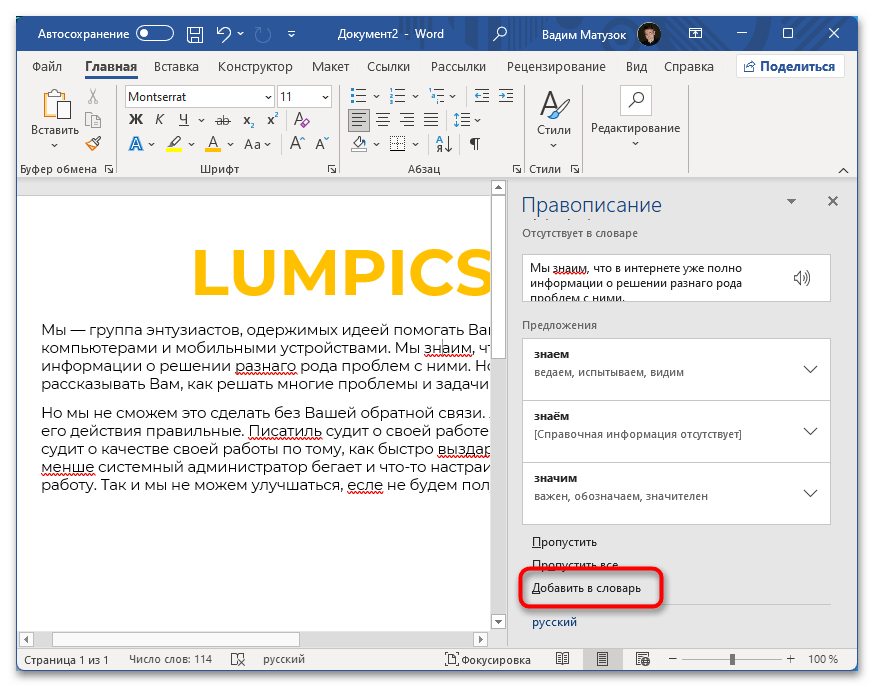
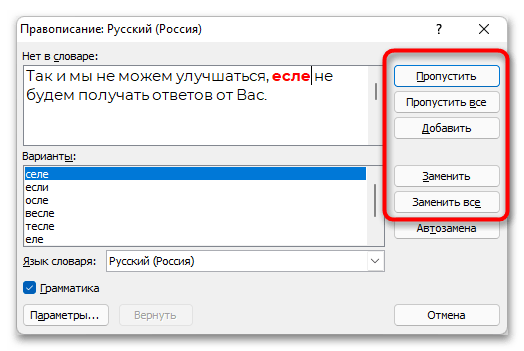
После появления панели справа необходимо выбрать подходящий вариант для замены неправильно написанного слова. Делается это в списке «Предложения». Затем курсор автоматически перейдет к следующей ошибке, с которой необходимо поступить точно так же.

Обратите внимание! Если слово изначально написано правильно, но программа выделила его красным цветом, потребуется осуществить добавление во внутренний словарь. После этого подчеркивание исчезнет и не будет появляться в будущем. Для этого на панели «Правописание» кликните по пункту «Добавить в словарь».
Способ 2: Пропуск ошибок
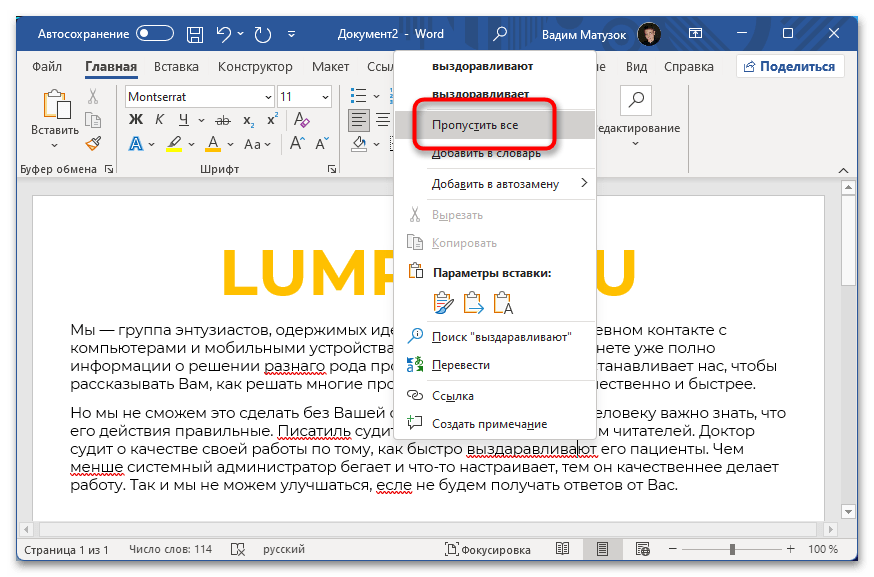
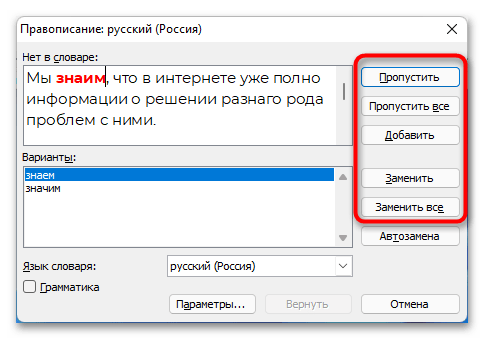
Если выделенное слово намерено написано неверно и необходимости добавлять его в словарь нет, тогда для устранения красного подчеркивания нужно осуществить пропуск. Сделать это можно двумя способами. Первый подразумевает вызов контекстного меню правой кнопкой мыши с последующим нажатием по пункту «Пропустить все». После этого все слова с выбранным написанием перестанут выделяться в открытом документе. Стоит отметить, что это не будет распространяться на другие текстовые файлы Microsoft Word.

Такую же процедуру можно произвести и через меню «Правописание», что актуально в случае наличия множества ошибок.
Более детально о способах пропуска ошибок рассказывается в другой статье на нашем сайте. Если в процессе выполнения описанных выше действий появились трудности, рекомендуем с ней ознакомиться.
Подробнее: Как пропустить все ошибки в Microsoft Word
Способ 3: Полное отключение проверки орфографии
Когда проверка орфографии и грамматики текста в документе не требуется, для избавления от красных подчеркиваний следует деактивировать соответствующую опцию в параметрах программы.
Внимание! Инструкцией, приведенной в этом способе, не рекомендовано пользоваться, если важно качество материала. Описанные действия приведут к перманентному отключению функции выделения некорректно написанных слов и предложений.
- Откройте в программе любой документ, после чего перейдите во вкладку «Файл», расположенную на верхней панели.
- Находясь в главном меню, нажмите по пункту «Параметры», расположенному в нижней части боковой панели слева.
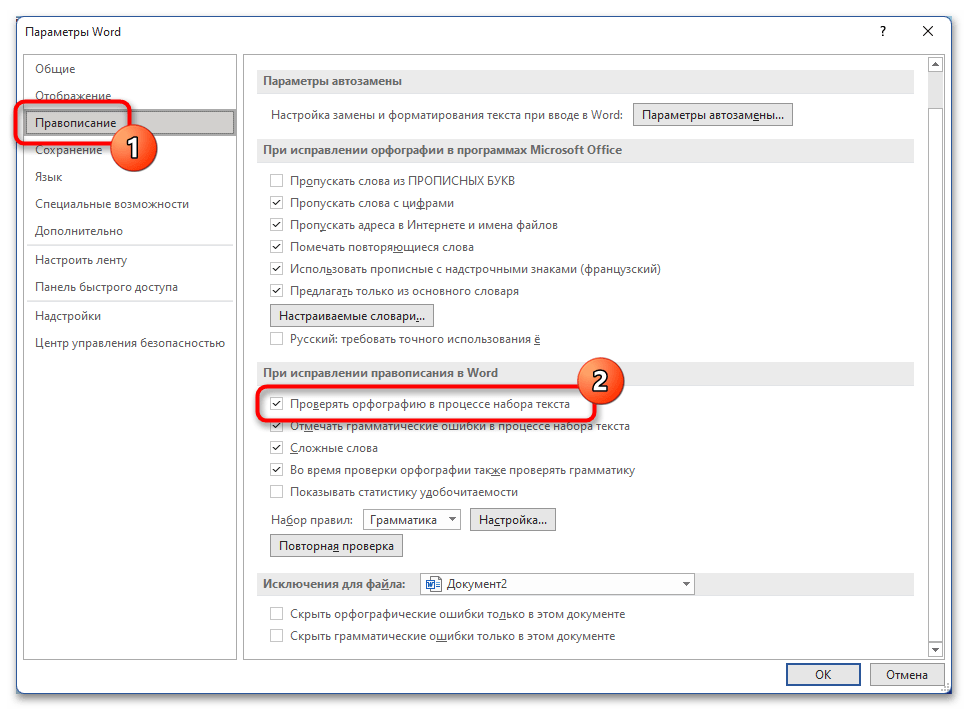
- Перейдите в раздел «Правописание» и в блоке «При исправлении правописания в Word» снимите отметку с пункта «Проверять орфографию в процессе набора текста».

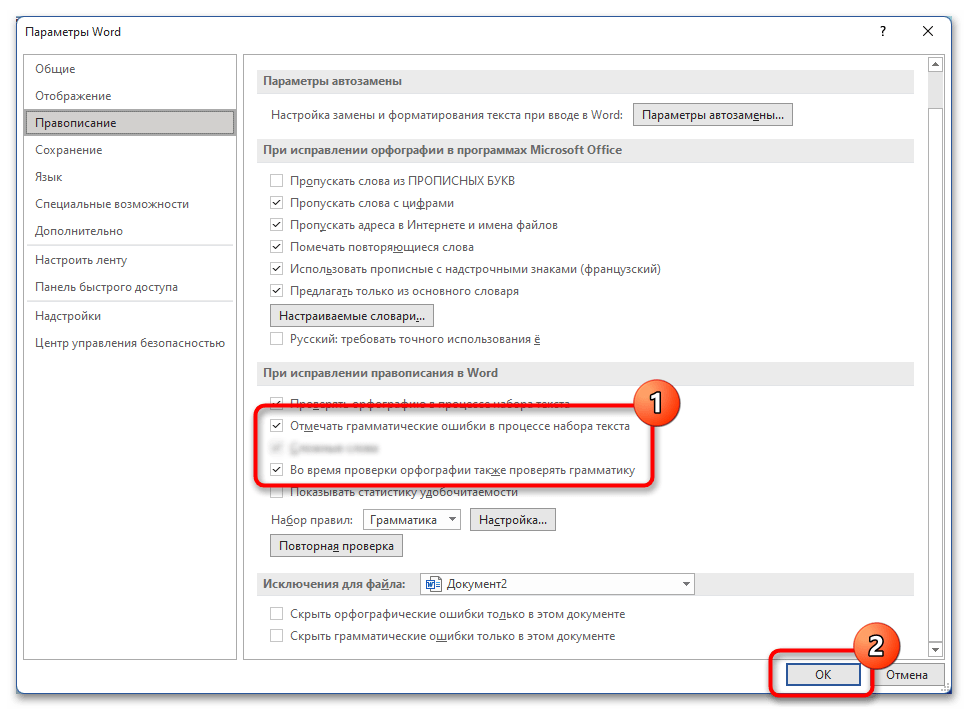
При необходимости можно это же сделать с опциями «Отмечать грамматические ошибки в процессе набора текста» и «Во время проверки орфографии также проверять грамматику», чтобы убрать выделения текста всех типов и цветов. В завершении нажмите кнопку «ОК», чтобы внесенные изменения сохранились.


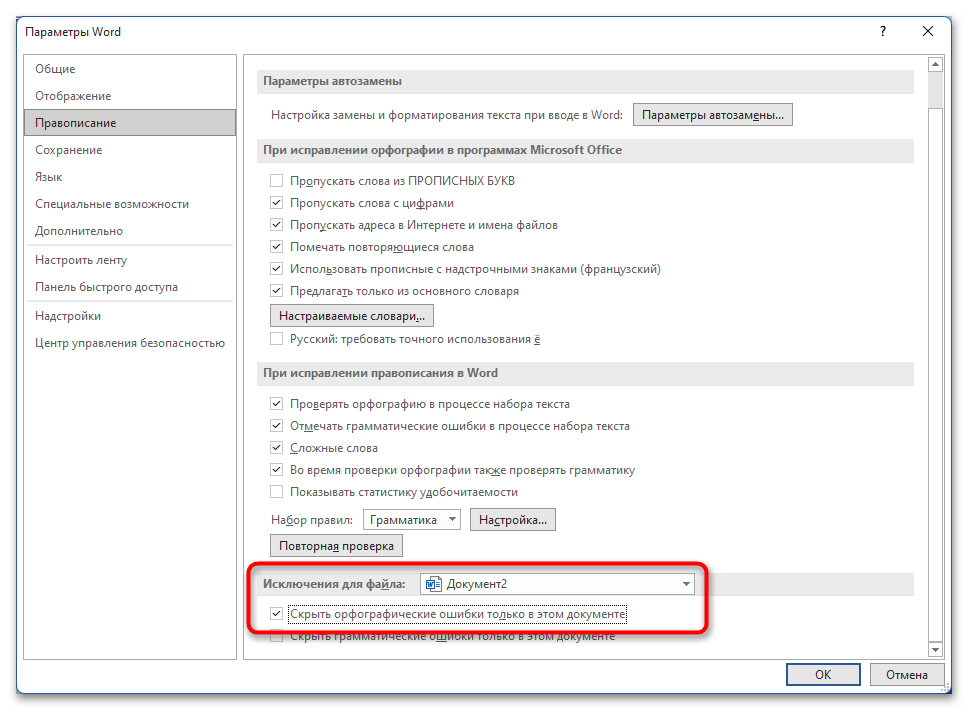
Обратите внимание! Также есть возможность отключить подчеркивания только в открытом документе или во всех последующих, которые будут создаваться. Делается это в блоке «Исключения для файла». Выберите из выпадающего списка подходящий вариант, после чего установите отметку рядом со строкой «Скрыть орфографические ошибки только в этом документе».
Вариант 2: Microsoft Word 2007 – 2010
Большая часть действий, описанных ранее, применима к версии Microsoft Word 2007 – 2010 годов, поэтому далее рассмотрены будут отличительные особенности, которые в большинстве своем связаны с расхождениями в графическом оформлении.
Например, вместо боковой панели «Правописание», появляется одноименное окно, предоставляющее те же функции. Соответственно, с его помощью можно заменить ошибочное слово, добавить его в словарь или пропустить.
Полное отключение функции автоматической проверки правописания происходит аналогичным образом, но запуск окна с этими параметрами отличается. Для этого потребуется раскрыть главное меню, кликнув по логотипу Microsoft Office, после чего нажать по кнопке «Параметры Word».

Вариант 3: Microsoft Word 2003
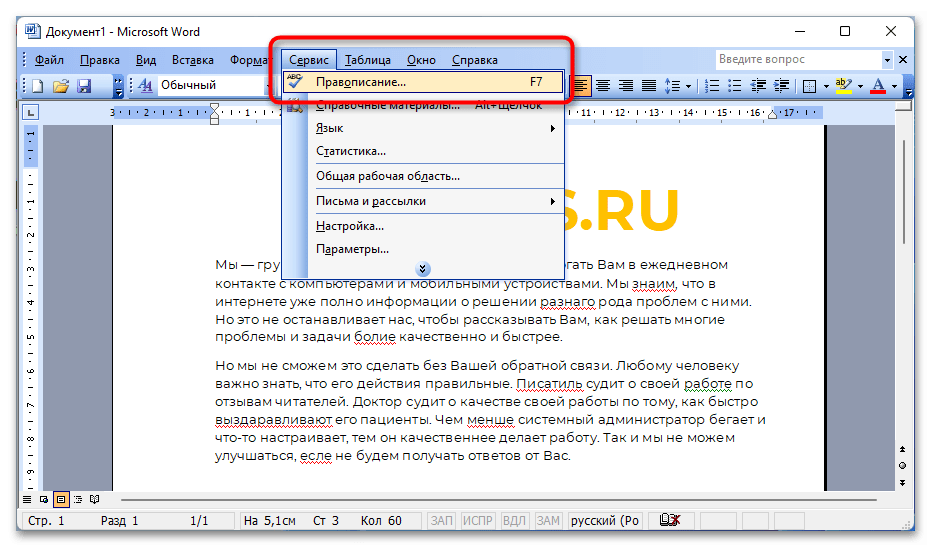
В версии офисной программы Microsoft Word 2003 кардинальные отличия заключаются в графическом оформлении и месторасположении некоторых элементов интерфейса. Например, чтобы вызвать окно «Правописание», необходимо развернуть меню «Сервис» и выбрать соответствующий пункт.
В остальном пропуск ошибок, замена варианта написания и добавление слова в словарь происходит по аналогии с Microsoft Word 2007 – 2010 годов.
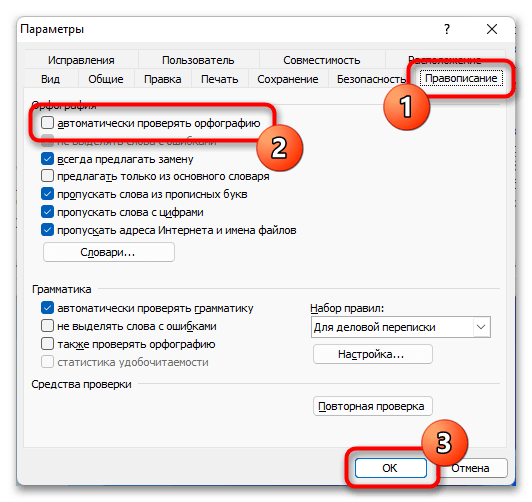
Полное отключение автоматической проверки текста на наличие орфографических ошибок осуществляется по-другому, нежели в иных версиях офисного процессора. Для этого необходимо сделать следующее:
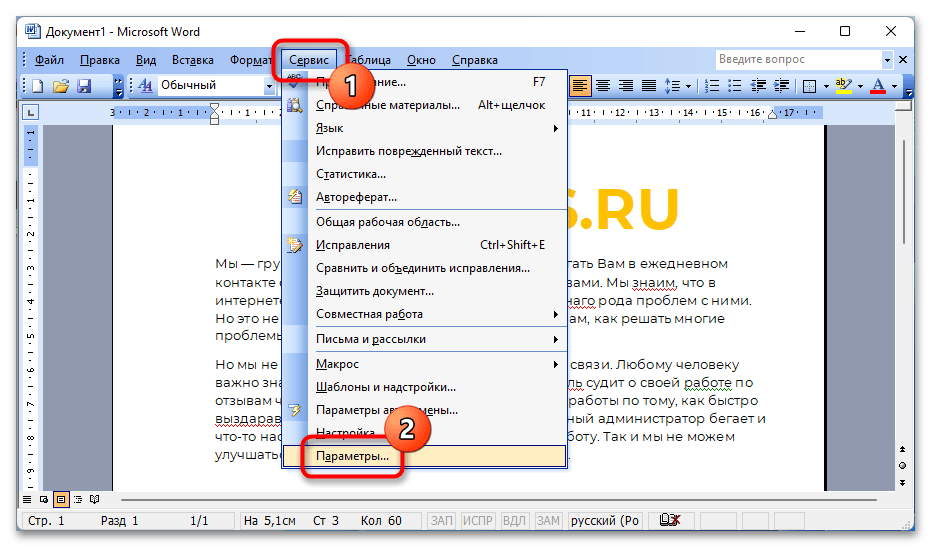
- Раскройте меню «Сервис» и выберите опцию «Параметры».
- В появившемся окне перейдите во вкладку «Правописание» и в блоке «Орфография» снимите отметку с пункта «автоматически проверять орфографию». После этого кликните по кнопке «ОК», чтобы сохранить внесенные изменения.

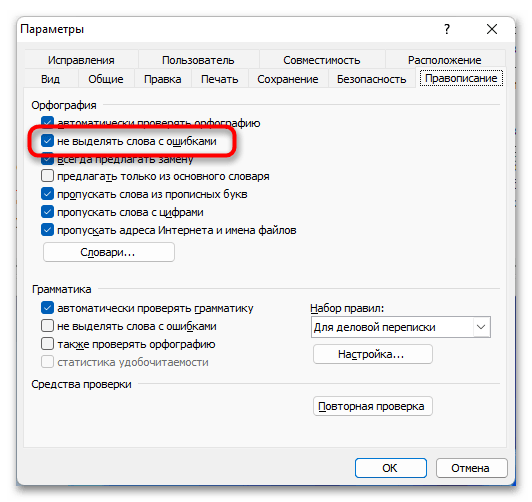
Если нужно сделать так, чтобы ошибки не подчеркивались красной линией только в открытом документе, следует активировать опцию «не выделять слова с ошибками».
Обратите внимание! Выполнение остальных действий для избавления от выделения ошибок производятся аналогичным образом, как было описано в инструкциях для Microsoft Word 2013 – 2021 годов.