
3 Ways To Remove Eliminate Red Lines in Word – When you make college assignments or work again using Microsoft Word.

How to Fix Red Line Feature Function in Microsoft Word 2023
When you type words, a wavy red line appears on each word.
Those red lines are really annoying, right? Yes, I also agree with you. When we do the red line task, we fail to focus.
Read more:
- Best Tricks To Activate Windows 8 Permanently Offline
- 6 Ways to fix the error “This copy of Windows is not Genuine”
- Best 4 Ways to Turn off Windows 10 Auto Updates
- Best Tricks To Activate Windows 10 Permanently Offline
No need to worry first, because there are still many ways to get rid of red lines in words. I am discussing this because it is my experience that is uncomfortable with this feature.
The Red Line Feature Function in Microsoft Word
Before we remove this feature, you should know what this feature was created for by Microsoft. Not only do red lines appear in words, but there are also green lines that also have their own function.
So, if you don’t know what its function is, I will briefly explain the use of the red and green line feature in Microsoft Word.
- Redline
The red line in Microsoft Word has a very useful use for some people as well. Usually, for foreigners who use English, this feature is very valuable.
This feature functions as a Check Spelling which is useful for correcting each perfect spelling of a word depending on the language you use.
In general, Word will always correct English users, so it would be very useful if you are one of those people who often type typos so that you realize typing mistakes.
- GreenLine
The green line is different from the red line, the green line doesn’t appear very often in MS. Word. The function of the green line is more detailed than the red line.
A green line will appear if the grammar of your typing is problematic. It will appear more often if you use English.
The green line in Microsoft Word is actually one of the advantages, although it is very annoying too. Just like red lines, green lines can also be removed.
Na, curious, right? How do you get rid of the red line in the word? Keep listening to our discussion until it’s finished so that you really understand.
How to Get Rid of Red Lines in Word
On this occasion, I will give you 2 ways to get rid of the red line in the word. The method I will teach you is the easiest way that you can immediately practice it yourself.
#1. Eliminating Red Lines in Word Through MS Settings. Word
How to get rid of the red line in word can be done manually on the settings menu. This method can immediately erase red lines or green lines permanently.
So, without the need for much further ado, please immediately follow some of the steps I teach you below.
- Step 1 – Open the Microsoft Word Office application on your Laptop / PC.
- Step 2 – After you open it, please click the File menu in the top menu bar.

- Step 3 – Then you click the Options menu at the bottom of the File menu.

- Step 4 – After that, the Options menu page will appear, please select the Proofing sub-menu.

- Step 5 – In the Proofing sub-menu there are many settings, you should pay attention to When Correcting Grammar in Word.
- Step 6 – Please remove the Check Spelling as you type the checklist column to remove the red line.
- Step 7 – Also remove the checklist in the Mark grammar errors as you type column to remove the green line.

Well, done! Now you can check the results of your typing, there are no red lines or green lines anymore. Good luck!
Apart from using the Microsoft Word settings menu, you can also use the Language menu in Word..
However, this method has a drawback, namely that you only delete the file you are working on. For example, a red line will appear again if you open a new file.
Even so, I will still teach you. The following is how to get rid of the red line in the word through the language menu, just follow the steps!
- Step 1 – Open the file in which you want to get rid of the red lines.
- Step 2 – After you block all the posts you have to type the command Ctrl + A.
- Step 3 – After completing all writing blocks, please click Language at the bottom. Make sure the Language menu is checked! If it is checked the menu will be like the image below.
- Step 4 – After that, you click the Language menu again, then the Language menu page will appear, please check Do not spell check or grammar.

Well, done! Please check your typing again whether the red line is gone. If so, then your writing will look cleaner and tidier.
It’s easy, isn’t it how do Get Rid of Red Lines in Word? Please practice it yourself in your Microsoft Word.
Read more:
- How To Fix Windows 10 License Will Expire Soon
- Best Ways To Activate Windows 7 Permanently Offline
- Best Tips To Disable SmartScreen Defender in Windows 10
Conclusion:
So, friends, This is the explanation of 3 ways to remove and eliminate red lines in words, Thank you for agreeing to read our article, if there is an error in the delivery of information, please comment in the section below.
Don’t forget to bookmark and always visit every day Technadvice.com because here you can find the latest technology information such as How-to Guide Tips and Tricks Blogging Digital Marketing Windows Android Root Social Media games, ETC. Best of luck
1. Remove the red underline in Word 2019 for all documents created
2. Delete the red underline in Word 2019 for the current document
3. Delete the red underline in Word 2019 for the current document using the Review menu
Since we have memory regarding the use of operating systems we have used various text processors in order to carry out the creation, edition and presentation of professional type documents . Not only with the text itself but many of us work on creative tasks and we like to add images, audios, effects to give a more personal and original touch to these. In this line Microsoft offers us Word as an integral solution for this type of task or projects.
As human beings we are prone to make some mistake while writing text in Microsoft Word. Many times this happens because time demands us to be agile and it is normal that we make writing mistakes that if they were sent, our image may not be very well valued. Microsoft Word integrates a self-corrector that analyzes what we are writing and based on the type of context it will highlight the words in the following way:
Underlined red
This will be applied at the moment when the affected word is with spelling errors.
Underlined green
This underline will be visible at the moment when a word has grammatical errors.
For example, we have written two normal words with spelling errors so that you understand what Microsoft Word analyzes in this case version 2019:
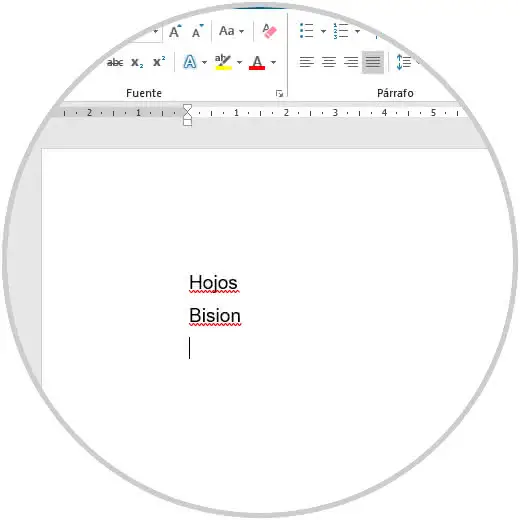
As you can see, Word detects these errors and underlines them with the red line , when we finish the writing process, just press the F7 key or go to the menu «Review», group «Review» and there click on the option «Spelling and grammar «to proceed with the revision of the document and deliver something aesthetic and professional.
It is ideal that Microsoft Word help us with this revision but if you consider that your writing is perfect and you do not want to lose the writing sequence observing red lines, TechnoWikis will explain how to eliminate these red lines of Word and thus prevent it from being automatically carried out This process.
To stay up to date, remember to subscribe to our YouTube channel! SUBSCRIBE
1. Remove the red underline in Word 2019 for all documents created
Step 1
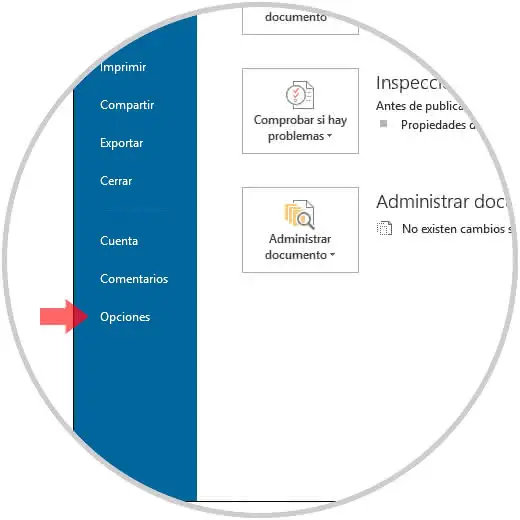
This is a process that will affect all the documents that are created taking as starting point the existing document, to achieve this, we will go to the «File» menu and in the lower part we select the «Options» line:
Step 2
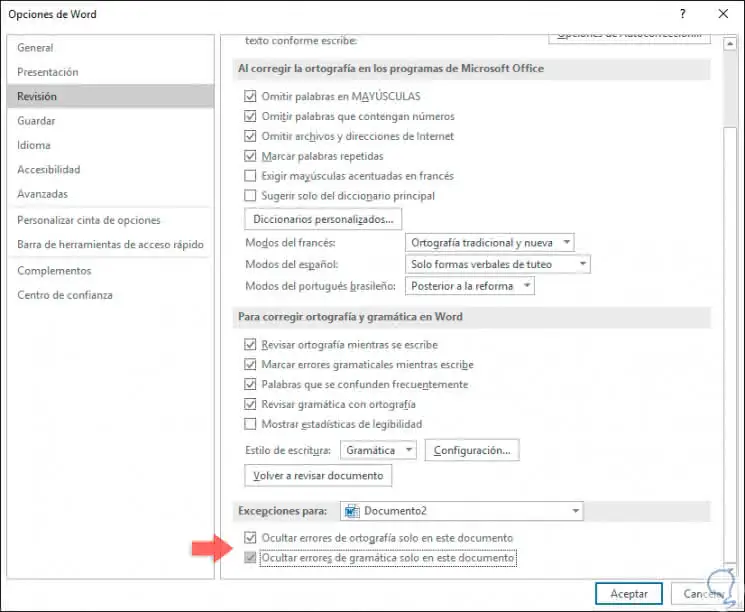
A pop-up window will be displayed in which we will go to the category «Revision» and in the right part we will locate the section «To correct spelling and grammar in Word:» where we will see the following: 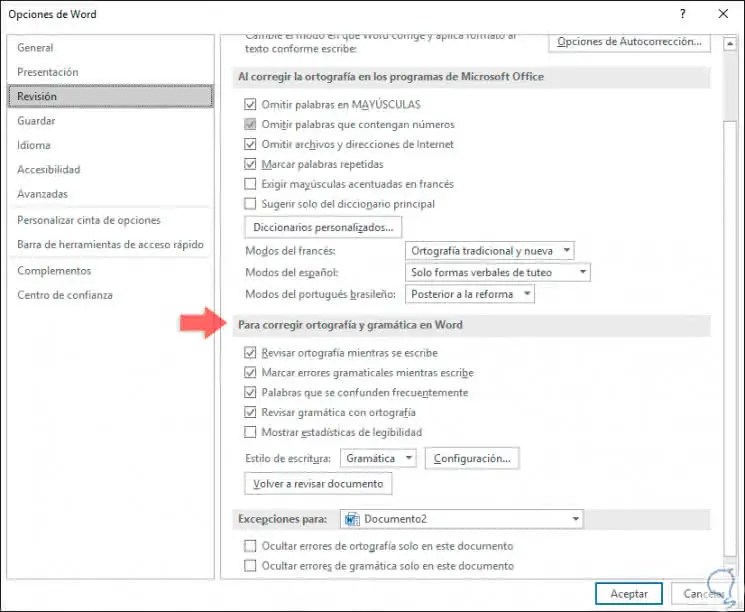
Step 3
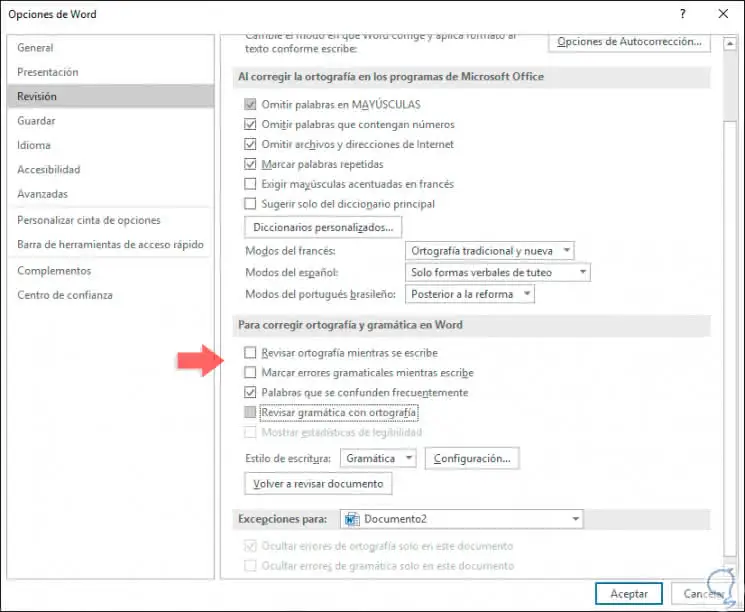
There we will unmark the following boxes. Click on the OK button to apply the changes and in this way all the documents that we create in Microsoft Word 2019 from now on will not be reviewed as far as spelling is concerned.
- Check spelling while writing.
- Mark grammatical errors while writing.
- Check grammar with spelling.
2. Delete the red underline in Word 2019 for the current document
Now, it is normal that we want that only in the document in which we are working does not apply the automatic revision of Word 2019
If this is the goal we will go back to the File / Options menu and in the category «Review» and on the right side we find the section «Exceptions for:» with the name of the current document and there it will be necessary to activate the following boxes. Press OK again to apply the changes.
- Hide spelling errors only in this document.
- Hide grammar errors only in this document.
3. Delete the red underline in Word 2019 for the current document using the Review menu
Microsoft Word 2019 integrates a review function which has been developed to help us correct all kinds of errors based on the language and the desired regional configuration.
Step 1
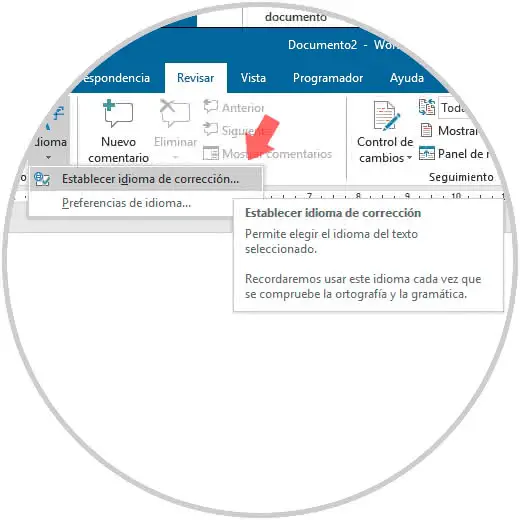
To use this method we will go to the «Review» menu and in the «Language» group and there we will click on «Language» and select the option «Set correction language»:
Step 2
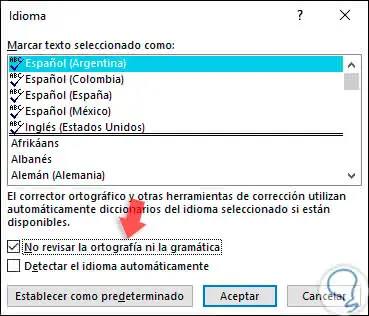
The following window will be displayed where we must activate the «Do not check the spelling or grammar» box. Click OK to apply the changes.
Note
It must be clarified that this process will only apply to the current Microsoft Word 2019 document, but not to everyone in general.
Step 3
By using any of these methods we can see that although the words are written incorrectly, Word 2019 will not underline them to indicate us about the error:
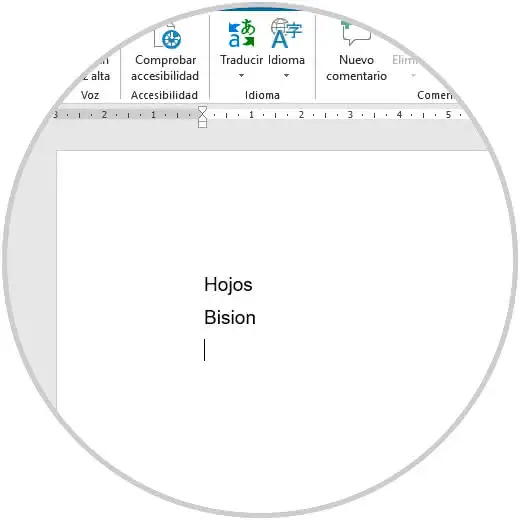
TechnoWikis recommends disabling this line only if we are sure that the writing will be 100% perfect, but remember that Word 2019 integrates this functionality to allow the general context of the document is adequate.
The red line indicates a misspelled word . The blue line indicates a grammatical error, including misused words.
…
To correct spelling errors:
- Right-click the underlined word. …
- Select the correct spelling from the list of suggestions. …
- The corrected word will appear in the document.
Furthermore, Is there a tracing font in Google Docs?
In GOOGLE DOCS there’s a Font! It’s called Raleway Dots! 🙂 Lifesaver!! Just click on Fonts-at the bottom- Add Fonts- then search Raleway Dots. =)
Simply so Why red squiggly underlines when words are not spelled wrong?
Automatic spelling and grammar checking. By default, Word automatically checks your document for spelling and grammar errors, so you may not even need to run a separate spelling and grammar check. These errors are indicated by colored wavy lines. The red line indicates a misspelled word.
Also, How do you fix an illegible text in Word? In Word, select the File Menu, and then select Open. In the Files of type box, select Recover Text from Any File(.). Select the document from which you want to recover the text. Select Open.
Where do I find format shape in Word?
On the Format tab, click the More drop-down arrow in the Shape Styles group. A drop-down menu of styles will appear. Select the style you want to use. The shape will appear in the selected style.
Can you trace a font? When copyrighted, only the font software is protected, not the artistic design of the typeface. In other words, only the software version (font) of a typeface is protected. … However, a designer can legally trace over a typeface (such as from a book or drawing) and use the resulting artwork as his or her original design.
How do I use Calligrapher font?
Just go to the ‘Templates’ section and start adding the characters that will make up your font. To speed up the process, you can choose some common character sets from the list on the left, such as standard English characters or basic punctuation.
How can I write my own font?
How to Turn Your Handwriting into a Font: Quick Steps
- Go to MyScriptFont.com.
- Download the printable template.
- Print the template.
- Complete the template.
- Scan the now filled-in template into your computer.
- Upload your file, name your font, and choose format.
- Download your font.
- Install it on your computer.
Why is my word document not showing spelling errors?
Select the File tab, and then select Options. In the Word Options dialog box, select Proofing. Make sure that the Check spelling as you type check box is selected in the When correcting spelling and grammar in Word section. Make sure that all check boxes are cleared in the Exception for section.
Why are my letters red and underlined in word?
It sounds as though you have toggled on Track Changes during your attempts to type French accents. Go to the Review Tab: in the Changes Group click Accept and choose Accept All Changes. Then in the Tracking Group, click on Track Changes to toggle off the mode.
Why does my word document say everything is misspelled?
Typically this is due to the context of the document being in a language that differs from the Language formatting of the text. Use Cmd+a [to select all] then go to Tools> Language to select the appropriate one. More details on Spelling, Language, Dictionary are available here.
How do I make a text unreadable?
- Launch Microsoft Word.
- Click “File” and select “Open” from the context menu.
- Select “Recover Text From any File” from the pull-down file type list at the bottom of the “Open” window.
- Find the unreadable file that you want to convert to Word.
Why does my Word document change formatting?
Why Does Word keep changing my formatting? This happens because Word can “absorb” explicit formatting changes into the underlying style. When this occurs, any other document elements that used that style automatically change to reflect the newly applied format. Choose Styles and Formatting from the Format menu.
What is x2 in Word?
x² is called superscript, the keyboard shortcut is Ctrl + Shift + = (Press and hold Ctrl, at the same time press and hold Shift, while holding Ctrl and Shift, press the equal = sign. Press the shortcut once to activate the superscript, type the character you want and press the shortcut again to deactivate.
How do I format text to fit a shape in Word?
Fit text in a shape
- Right-click the shape that contains the text that does not fit.
- On the shortcut menu, click Format AutoShape.
- In the Format AutoShape dialog, click the Text Box tab.
- Under Text autofitting, select the option you want.
How do I insert subtle effect in Word?
Under Drawing Tools, on the Format tab, in the Shape Styles group, click Shape Effects, and then do one of the following:
- To add or change a built-in combination of effects, point to Preset, and then click the effect that you want. …
- To add or change a shadow, point to Shadow, and then click the shadow that you want.
What word means changing shape?
reshape. verb. to change the shape of something so that it forms a new shape or returns to its original shape.
What happens if you use a font without license?
Forgetting or not understanding user license agreements or utilizing fonts incorrectly can lead to font copyright lawsuits. Many organizations are at risk due to font misuse, but your organization doesn’t have to be one of them.
How do I find out a font name?
How to identify fonts in pictures
- Step 1: Find a picture with the font you want identified. …
- Step 2: Open your favorite Web browser and navigate to www.whatfontis.com.
- Step 3: Click on the Browse button on the Web page and navigate to the picture you saved in Step 1.
How can I identify a font from an image?
How to identify fonts in an image
- Download the photo or copy the URL where the photo is hosted.
- Go to the Font Squirrel website.
- Click Upload image if you have the photo on your computer. …
- Now crop the image to highlight the text on the image. …
- Now click Matcherate It.
- You will see a bunch of options below the image.
How can I make my own font for free?
10 Free Tools To Create Your Own Fonts
- FontArk. FontArk is a browser-based font creator that lets you draw letters to make your own font. …
- PaintFont. …
- BirdFont. …
- FontForge. …
- FontStruct. …
- Glyphr Studio. …
- MyScriptFont. …
- Fontastic.
Can you sell your handwriting as a font?
Turning your handwriting into a font makes your design truly unique and will allow you the greatest creative freedom when trying to represent a brand. If you want you can even sell your font. Famous brands are known to have custom fonts that add extra oomph to their design.
How can I create my own font for free?
10 Free Tools To Create Your Own Fonts
- FontArk. FontArk is a browser-based font creator that lets you draw letters to make your own font. …
- PaintFont. …
- BirdFont. …
- FontForge. …
- FontStruct. …
- Glyphr Studio. …
- MyScriptFont. …
- Fontastic.
Microsoft Word comes with a powerful spelling and grammar checking module. World’s most popular word processing software, MS Word, can check your text for correctness and allows you to make amends. If there is a spelling mistake, the word gets underlined with a red color wavy / squiggly / zig-zag line indicating the error. For grammatical errors a wavy green line appears under the word or phrases.
So, all in all, these red-green wavy underlines indicate spelling and grammar mistakes.
This feature is very helpful and millions of users have become used to with it. Or may be I should say that they have become dependent on this feature for writing correct language!
At times, we find ourselves in a need of getting rid of all those red and green wavy underlines. This can happen, for example, when you are working with a non-English, let’s say Hindi, document and while using English language spelling checker. Such a document will get flooded with error indicating underlines because of mismatch between document language and the spell checker language.
ALSO READ: Time Saving MS Word Tips
Our tips on MS-Word make your life easier and increase your productivity at work.
You can always take a right click on a word (or a phrase) and select “Ignore” or “Ignore All” from popup menu to do away with the underline.
But if such errors are too many and you need to hide those irritating underlines in one go —then you can use the following method:
MS Word 2013 and 2010 and 2007
- Open the document
- Go to File > Options
- A box will appear. Select “Proofing” from the options given
- In the “Exceptions for” section, select the document in which you don’t want to see spell mistakes
- Check either or both of the following check boxes as per your need:
- Hide spelling errors in this document only
- Hide grammar errors in this document only
- Click OK
Earlier Versions of MS Word
- Open the document
- Go to Tools > Options > Spelling & Grammar
- Select “Proofing“
- Check the boxes for “Hide spelling errors in this document” and/or “Hide grammar errors in this document“
This method is useful because it hides spelling / grammar errors only in a particular document. It does not completely switch off the spell checker. Spell checker will duly show errors in all other existing and new documents that you’ll create.
I am hoping that in future versions of MS-Office, Microsoft will provide a single click option to do away with all the spelling and grammar error indications.
I hope this was useful for you. Please do let me know if you have another question.
![]()
Download Article
![]()
Download Article
«Redlining» is a form of editing in which red ink is used to indicate removal or addition of text in Microsoft Word. You can redline a Microsoft Word document by using Microsoft Word’s built-in «Track Changes» feature, or you can manually redline the document with font color changes and strike-throughs. «Track Changes» is perfect for large-scale editing and feedback, whereas manual redlining is better suited to smaller documents and papers that are sent between different versions of Word.
-

1
Open the document you wish to edit.
-
2
In the toolbar at the top of the screen, click the «Review» tab. This tab contains tools to help with spell checking and editing, including the «Track Changes» feature.
Advertisement
-
3
Click the «Track Changes» button to enable Track Changes. This feature places a red line in the margins next to any edited text. It also displays any added text in red.[1]
- You can also turn on «Track Changes» from any tab by pressing Control + ⇧ Shift + E.
-
4
Open the drop-down menu next to the «Track Changes» button. This menu lets you choose how advanced your change tracking is.
-
5
Select «All Markup». This option displays added or replacement text in red. It also adds comments to the right-hand edit bar that detail which action was performed (e.g., «inserted» or «deleted»).
- Your other options are «Simple Markup», which displays red lines next to edited lines of text but doesn’t show specifically what changed, «No Markup», which doesn’t display changes at all, and «Original», which draws a line through deleted text but doesn’t show replacement text.
- In «Simple Markup», you can click the red lines next to edited lines of text to show which changes were made (as in «All Markup»).[2]
-
6
Click the «Show Markup» drop-down menu. From here, you can choose which elements of «Track Changes» are displayed. Click each option to check it (enable) or uncheck it (disable).
- Checking «Comments» shows any editor comments in the margins.
- Checking «Ink» shows editor drawings.
- Checking «Insertions and Deletions» shows added and removed text.
- Checking «Formatting» shows changes to formatting (e.g., double-spacing or changing the margins).
-
7
Highlight some text, then click «New Comment» in the «Comments» section of the toolbar. This feature allows you to add feedback to highlighted text. Your feedback will appear in the right-hand edits bar.
-
8
Edit the document as you please. Whenever you delete or add a character, Microsoft Word will place a vertical red line next to the line of text in which the edit was made.
-
9
Click «Accept» to save your changes. Your document has been successfully redlined! Clicking «Accept» removes the red ink and other formatting indicators.[3]


Advertisement
-
1
Open the document you wish to edit. Manually redlining a document is preferable if you’re editing a document in an outdated version of Word or if you want more control over which changes are displayed. Manual redlining is compatible with all versions of Word.
-
2
Click the «Home» tab if it isn’t already open. This tab contains tools such as text bolding, italicizing, and underlining. The Home tab is in the blue toolbar at the top of the screen.
-
3
Find the «Strikethrough» button in the toolbar. It’s located right next to the «Underline» button. You’ll use strikethrough to cross out undesired text.
-
4
Find the «Font Color» button in the toolbar. It’s marked as a capital «A» with a colored (usually black) bar underneath. You’ll use this tool to write new text different-colored ink.
- You can change the «Font Color» selection by clicking on the bar underneath «A», then selecting a new color from the drop-down menu.
-
5
Click and drag the mouse cursor over an unwanted section of text to highlight it. While text is highlighted, any tool you use will affect it—for example, clicking the «Font Color» button will change the highlighted text to whichever color the bar on the button is.
-
6
Click the «Strikethrough» button to place a line through the highlighted text. This will demonstrate recommended deletion of the highlighted content.
-
7
Make sure there is a space between the end of your strikethrough and the next word. Otherwise, any following text that you type will automatically have a line through it.
-
8
Place your cursor at the end of the space after the strikethrough text. If you’re retyping the strikethrough text, you’ll want to do it in a different color than the default text.
-
9
Click the «Font Color» button. If your new text isn’t a different color than the document’s default text, change it to something highly visible (e.g., red or orange). This is your «editing» color.
-
10
Add your replacement text after the strikethrough text. The line through the former text combined with your new, red-ink text will clearly show which text was «deleted» and the text replacing it.
-
11
Make sure any additions are in your editing color. You need to clearly show which text you’ve added to the document.
- For example, use your editing color if you add a semicolon to a run-on sentence.
-
12
Repeat steps 5 through 11 until your document is completely edited.
-
13
Press Control + S to save your document. Your document has been successfully redlined!
- You can also click «File» in the upper left-hand corner of the screen and select «Save».


Advertisement
Add New Question
-
Question
What does a wiggly green underline mean?

The green line is usually a grammatical error, or at least what Word considers a grammatical error.
-
Question
How do you change the underlined words from red to black?
Right-click on the word and options will show. Click the correct one, and the word will be spelled correctly.
-
Question
How do I get rid of red lining in a document to make it a clean copy?
The following is from Microsoft’s OfficeSupport. «To delete the tracked changes permanently, accept or reject them. Word accepts the change or removes it and then moves to the next change. To accept all the changes at the same time, click the arrow by Accept and click Accept All Changes. To remove comments from your document, delete them.»
Ask a Question
200 characters left
Include your email address to get a message when this question is answered.
Submit
Advertisement
-
Manual redlining is perfect for small editing projects, like peer feedback in a classroom.
-
If you’re on a shared PC, you can lock the «Track Changes» feature with a password so other Word users can’t make changes under your name.
Thanks for submitting a tip for review!
Advertisement
-
Make sure you save your progress often!
Advertisement
About This Article
Article SummaryX
1. Click the Review tab.
2. Click Track Changes.
3. Click Simple Markup.
4. Click All Markup.
5. Click Show Markup.
6. Select options to show.
7. Highlight text and select New Comment.
8. Edit the document and click Accept.
Did this summary help you?
Thanks to all authors for creating a page that has been read 819,098 times.