
![]()
3DNews Новости Software Новости сети 4 способа восстановления повреждённого ф…
Самое интересное в обзорах
Партнёрский материал
17.10.2018 [10:00],

Полезные советы по использованию Microsoft Excel
Что делать если файл Microsoft Excel с данными перестал открываться? Можно ли вернуть ценные данные, ставшие недоступными?

Если вдруг вам не удаётся открыть рабочий файл с данными Excel, то какова вероятность успешного восстановления этих данных и что для этого надо сделать? К сожалению, это распространённая ошибка Microsoft Excel. У проблемы есть несколько вариантов решения. Только перепробовав все варианты можно сказать, возможно ли восстановить повреждённый Excel-файл.
Способы восстановления повреждённого Excel-файла:
- Использование встроенной функции Microsoft Excel.
- Открытие файла с помощью OpenOffice.
- Использование онлайн-сервиса.
- Восстановление с помощью сторонних утилит.
1. Встроенная функция Microsoft Excel
В последних версиях Microsoft Excel добавлена возможность восстановления файла. Ранее эта функция или отсутствовала, или была откровенно слабо работоспособной при использовании с реальными файлами. Сейчас эта функция помогает в 10–20 % инцидентов с повреждением файлов. Для этого достаточно произвести несколько простых действий:
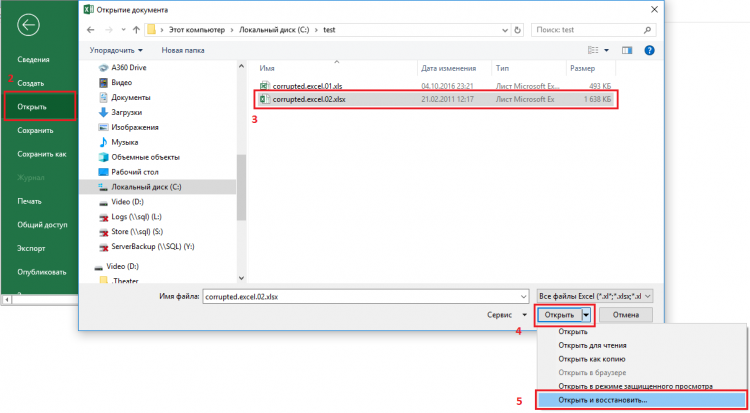
- Выбрать пункт меню «Файл».
- Выбрать пункт «Открыть».
- Выбрать повреждённый файл на диске.
- Щелкнуть на стрелку рядом с кнопкой «Открыть» в правом нижнем углу.
- Выбрать пункт «Открыть и восстановить» в выпадающем подменю.
Всё просто и не требует специальных знаний. Многим пользователям этой функции более чем достаточно для успешного восстановления повреждённого файла Excel. Если этим способом восстановить файл не получилось, то может помочь OpenOffice.org
2. Открытие файла с помощью OpenOffice
Файлы Microsoft Office, начиная с Office 2007, имеют общий формат с OpenOffice. Соответственно можно скачать и установить пакет программ с OpenOffice.org и попытаться восстановить им повреждённый файл.
Обращаем ваше внимание на то, что файл, восстанавливаемый с помощью OpenOffice, должен иметь расширение XLSX — это версия для файлов Excel 2007 и выше.
3. Использование онлайн—сервиса
Если варианты 1 и 2 не помогают восстановить файл, то необходимы специальные сервисы или программы, разработанные специально для восстановления данных из повреждённых файлов Excel.
Есть несколько доступных онлайн-сервисов восстановления повреждённых файлов Microsoft Excel. Наиболее удобный и доступный по цене (всего $5 за файл) находится по этому адресу: https://onlinefilerepair.com/ru/excel-repair-online.html.

Просто загрузите файл на сервис и дождитесь результата. Статистка от разработчиков сервиса утверждает, что в 40 % случаев данные из повреждённого Excel-файла удаётся восстановить в том или ином виде.
Сервис удобен тем, что работает на всех операционных системах (Windows, MacOS, iOS, Android и прочие) и на всех устройствах (компьютер, планшет, телефон и прочие).
4. Восстановление с помощью сторонних утилит
Если у вас много повреждённых Excel-файлов или вы не можете передавать эти файлы сторонним лицам из-за их конфиденциальности, то используйте специальные утилиты от сторонних разработчиков (не Microsoft).
Пример такой утилиты — это Recovery Toolbox for Excel: https://excel.recoverytoolbox.com/ru/.
Утилита развивается и распространяется с начала 2000-х годов, имеет многоязычный интерфейс (включая русский), восстанавливает все типы Excel-файлов всех версий, начиная с экзотического сейчас Excel 97.
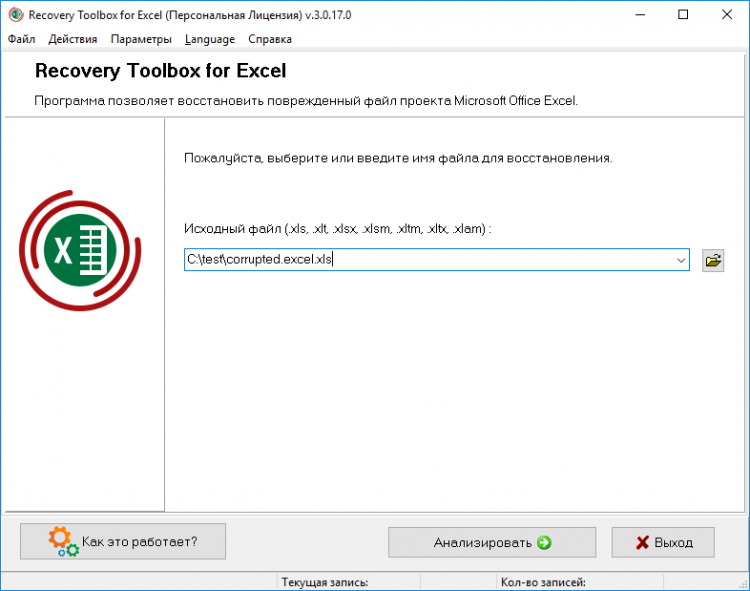
Внимание: утилита работает только на компьютерах с ОС Windows.
Полезные советы для пользователей Microsoft Excel
При работе с Microsoft Excel включите функцию автосохранения. Это исключит случаи, когда сбой в работе компьютера приводит к потере нескольких часов работы:
Если вы заметили ошибку — выделите ее мышью и нажмите CTRL+ENTER.
Самые обсуждаемые публикации
Summary: While there is no dearth of Excel file recovery software, choosing the right one among the plethora of options available can be an arduous task. To help you out, we have tested several tools and put together a list of Top 10 best Excel recovery software in 2023 that is worth trying.

Contents
- Stellar Repair for Excel (Excel Recovery Software)
- Kernel for Excel Repair Software
- SysTools Excel Recovery
- Recovery for Excel
- Recoveryfix for Excel
- ExcelFIX
- Recovery Toolbox for Excel
- Excel Repair Toolbox
- DiskInternals Excel Recovery
- Excel Repair Kit
When working on an Excel file, the data can go haywire due to system crash, human errors, virus/malware infections and other unknown issues. Even if you back up your Excel file quite often, corruption can still be a problem. Also, the backup won’t necessarily contain the most recent version of your Excel file. But with the help of Best Excel Recovery Software, you can easily recover corrupt data from an Excel file in a hassle-free manner. See the below listing and choose the right option.
Stellar Repair for Excel (Excel Recovery Software)
Stellar Repair for Excel offers a quick and hassle-free way of dealing with all common Excel file corruption errors like ‘unreadable content’, ‘unrecognizable format’, ‘Excel file is corrupt and cannot be opened’ etc. The software features a rich and intuitive GUI that helps repair corrupt Excel files and quickly restore the file data in 3 simple steps – load the corrupt file, repair & preview the file, and then save it.
Supported OS: Windows 11, 10, 8.1, 8, 7, Vista, XP
Supported MS Excel Versions: 2019, 2016, 2013, 2010, 2007, 2003 & 2000
Pros:

- Recovers every object in Excel files like tables, charts, chart sheets, cell comments, images, formulas, etc.
- Fixes freeze panes, gridlines, and other worksheet properties
- Retains original worksheet properties and cell formatting
- Restore corrupt or damaged Excel file of any size
- Batch repair multiple Excel files
- Option to find specific Excel files
- Previews recoverable Excel data
- Flexibility to save the repaired file at the default or user-defined location
- Option to save log information of the repairing process
- Supports latest MS Excel 2019 version
You can see the working of the software here:
Software with 100% integrity and precision
Cons:
- Allows to preview single worksheet from the repaired Excel file
Kernel for Excel Repair Software
This is another great Excel repair tool that allows repairing corrupt data from Excel files that cannot be recognized or accessed. It features a simple to use and easy to navigate GUI that makes the process of repairing Excel files a seamless process.
Supported OS: Windows 10, 8.1, 8, 7, Vista, XP, 2000, 98, NT & 95 Supported MS Excel Versions: 2019, 2016, 2013, 2010, 2007, 2003, XP, 2000, 97 & 95

Pros:
- Restores all types of Excel data objects like tables, charts, formulas, chart sheets, images, etc.
- Preserves cell’s properties and formatting
- Allows recovery of multiple Excel files at once
- Previews recoverable content of the repaired file
- Supports MS Excel version 2019
Cons:
- Does not provide the option to search for specific Excel files
- No option to save the log report
SysTools Excel Recovery software can help recover excel worksheet data after a system crash and can repair all types of MS Excel file errors. It allows to repair a single workbook or a complete folder to restore Excel spreadsheet data.
Supported OS: Windows 10, 8.1, 8, 7, XP, Vista, Windows 2008, 2003, 2000
Supported MS Excel Versions: 2019, 2016, 2013, 2010, & 2007

Pros:
- Recovers Excel data like pivot tables, cell commenting, formulas, graphical charts, images, etc.
- Repair and retrieve data from multiple worksheets
- Retrieves page layout with themes and gridlines
- Option to search for files on the drive
- Provides a preview of recoverable Excel data objects
Cons:
- Option to save the log report is not available
- Does not support the recovery of password-protected files
Recovery for Excel
Next, in the list of the Top 10 best excel file recovery software is Recovery for Excel. It efficiently repairs corrupt Excel spreadsheets and saves the data into a new spreadsheet, without changing the original data. The software scans the corrupt file and saves the preview of recovered data into a file.
Supported OS: Windows 2000, XP, Vista, 7, 8, 8.1, 10, 2003/2008 Server
Supported MS Excel Versions: 2016, 2013, 2010, 2007, 2003, 2002, 2000, 97, 95 & 5.0

Pros:
- Recovers tables, numbers, merged cells, chart sheets, hyperlinks, formulas, etc.
- Repairs frozen rows and columns
- Supports multiple recoveries of files in a single attempt
- Saves the preview of recoverable data
- Saves log report of the recovery process
Cons:
- Does not support the latest MS Excel version
- Does not retrieve cells’ names, VBA modules, and drawings
- Preview of recoverable Excel data is not available in the interface
Recoveryfix for Excel
Like any other Excel file recovery software, Recoverfix for Excel Repair to enables data recovery from corrupt or damaged Excel files. The software can fix all types of Excel corruption errors and recovers entire data stored in a corrupt file.
Supported OS: Windows 10 and all earlier versions
Supported MS Excel Versions: 2013, 2010, 2007, 2003 and 2000
Pros:
- Recovers all objects of Excel file including text, embedded texts, tables, chart sheets, images, etc.
- Retains original properties of the Excel file
- Repairs multiple Excel files simultaneously
- Offers preview functionality
Cons:
- Does not support MS Excel 2019 and 2016 versions
- No option to save log data
ExcelFIX
Another great recovery tool under the Top 10 best excel recovery software in 2023 list is by Cimaware, ExcelFIX helps extract data from the damaged MS Excel file and saves the data in a new Excel file. It can be used to fix most of the common Excel file errors.
Supported OS: Windows 8, 7, XP, Vista, Windows ME, NT, 2003, 98 & 95
Supported MS Excel Versions: 2019, 2016, 2013, 2010, 2007, 2003, 2002, 2000, 97 & 95.

Pros:
- Retrieves cell values, formulas, cell comments, structural elements, hyperlinks, images, etc.
- Supports multi-file recovery
- Allows to verify the recoverable Excel file data before saving it
- Multi-language support is included
Cons:
- Performs recovery of password-protected XLS files only
- Log report of the repair process cannot be saved
- May hang or crash in some instances
Choose Recovery Toolbox for Excel if you are looking for limited data recovery from a corrupt Excel file. However, the software allows to fix all types of Excel errors. Further, it has a clear and straightforward UI that can be used by a novice.
Supported OS: Windows 10, 8, 7, XP, Vista, Windows 2003, 2000, 98, Windows Me & NT
Supported MS Excel Versions: 2019, 2016, 2013, 2010, & 2007

Pros:
- Repairs all types of Excel errors including error code 1004, 13, 91, and other errors
- Recovers worksheets, workbook cell data, tables styles, fonts
- Repairs formulas, cell formatting values, table column width, and row height values
- Allows to save repaired data in existing or a new Excel file
Cons:
- Cannot repair spreadsheet properties like comments, VBA macros, merged cells, hyperlinks, etc.
- Does not support the recovery of multiple Excel files
- Does not support saving log information
This Excel repair utility can be used to restore data from a corrupt workbook and worksheet of any size.
Supported OS: Windows 10, 8, 7, XP, Vista, Windows 2000, Me, NT 4.0, 98 & 95
Supported MS Excel Versions: 97, 2000, XP, 2003, 2007, 2010, 2013 & 2016

Pros:
- Repair table styles, cell values, cell formatting, formulas
- Provide a preview of recoverable Excel file data
- Export data directly to MS Excel
Cons:
- Cannot recover merged cells, hyperlinks, VBA macros, and some other data types and objects
- Support for MS Excel 2019 version is not available
- Does not support batch repair of Excel files
DiskInternals Excel Recovery
DiskInternals Excel Recovery software can help you find and recover MS Excel files from any storage media. Unlike other software in the list, DiskInternals scans an entire drive to locate the Excel file you want to recover.
Supported OS: 95, 98, ME, NT, 2000, XP, 2003 Server & Vista
Supported MS Excel Versions: 97, 2000, XP, 2003, 2007, 2010, 2013 & 2016

Pros:
- Recovers unsaved or accidentally deleted Excel files
- Provides a detailed preview of recoverable workbooks and spreadsheets
- Allows to recover multiple Excel files at once
- Recovered files can be saved on any disk
Cons:
- Does not support MS Excel 2019 version
- Difficult to understand user interface for novices
Excel Repair Kit
This Excel repair software is capable of recovering Excel file data that gets corrupted due to an unexpected event. It only takes a few minutes to repair an Excel file and recover corrupt data by using Excel Repair Kit.
Supported OS: Windows 10, 8, 8.1, 7, XP, Vista, Windows 98, ME, NT 4.0 & 2000
Supported MS Excel Versions: 95, 98, 2000, XP, 2003, 2007, 2010, 2013 & 2016

Pros:
- Recovers Excel elements including cell data, formulas, cell formatting, links and much more
- Intuitive wizard-based UI
Cons:
- The option to search the file is not available
- Does not support Excel version 2019
Conclusion
Whatever the cause, losing critical Excel file data can be a horrendous experience. With Excel file recovery software the chances of retrieving lost or corrupt data are good.
Hopefully, the list of the Top 10 best Excel Recovery Software in 2023 covered in this post will help you pick a suitable tool to meet your data recovery needs.
About The Author
Priyanka
Priyanka is a technology expert working for key technology domains that revolve around Data Recovery and related software’s. She got expertise on related subjects like SQL Database, Access Database, QuickBooks, and Microsoft Excel. Loves to write on different technology and data recovery subjects on regular basis. Technology freak who always found exploring neo-tech subjects, when not writing, research is something that keeps her going in life.
Best Selling Products

Stellar Repair for Excel
Stellar Repair for Excel software provid
Read More

Stellar Toolkit for File Repair
Microsoft office file repair toolkit to
Read More

Stellar Repair for QuickBooks ® Software
The most advanced tool to repair severel
Read More

Stellar Repair for Access
Powerful tool, widely trusted by users &
Read More
СКАЧАТЬ
Описание
Отзывы


Выберите вариант загрузки:
- скачать с сервера SoftPortal
- скачать с официального сайта
Excel Recovery Toolbox — простой и удобный в использовании инструмент для быстрого восстановления поврежденных файлов Microsoft Excel. Программа позволяет при помощи пошагового мастера восстановить данные поврежденных таблиц, созданных в любой версии (полное описание…)

Рекомендуем популярное
![]() Recuva 1.53.2083
Recuva 1.53.2083
Recuva — мощная утилита для восстановления данных, которые были удалены на жестких дисках и…
![]() Macrium Reflect 8.0.7279 Free
Macrium Reflect 8.0.7279 Free
Macrium Reflect — шустрая программа для работы с образами жесткого диска и резервного…
![]() R-Studio 9.2 build 191126
R-Studio 9.2 build 191126
R-Studio — мощное приложение, позволяющее восстановить поврежденную или удаленную информацию…
![]() R.saver 9.5 / 2.5.1
R.saver 9.5 / 2.5.1
R.saver – бесплатная программа для восстановления данных с различных версий файловых систем…
![]() Puran File Recovery 1.2.1
Puran File Recovery 1.2.1
Puran File Recovery — утилита для восстановления удаленных или поврежденных файлов. Программа…
![]() HDD Regenerator 2011
HDD Regenerator 2011
HDD Regenerator — приложение для восстановления битых секторов жестких дисков, которое умеет…
Когда вы открываете книгу, которая была повреждена, приложение Excel автоматически запускает режим восстановления файлов и пытается открыть заново и одновременно восстановить ее.
Режим восстановления файлов в Excel не всегда запускается автоматически. Если вам не удается открыть книгу из-за повреждения, можно попытаться исправить ее вручную.
Если сделать это не удалось, вы можете попробовать восстановить ее данные другими способами. В качестве профилактической меры рекомендуется чаще сохранять книгу и создавать ее резервную копию при каждом сохранении. Вы также можно настроить приложение Excel так, чтобы оно автоматически создавало файл восстановления через определенные промежутки времени. При этом у вас всегда будет доступ к рабочей копии книги, если оригинал окажется случайно удален или поврежден.
Восстановление поврежденной книги вручную
-
На вкладке Файл выберите команду Открыть.
-
В Excel 2013 или Excel 2016 щелкните место, где находится таблица, и нажмите кнопку Обзор.
-
В диалоговом окне Открытие выберите поврежденную книгу, которую нужно открыть.
-
Щелкните стрелку рядом с кнопкой Открыть и выберите команду Открыть и восстановить.
-
Выполните одно из указанных ниже действий.
-
Чтобы восстановить максимально возможное количество данных книги, нажмите кнопку Восстановить.
-
Чтобы извлечь из книги значения и формулы, если восстановить ее не удалось, нажмите кнопку Извлечь данные.
-
Восстановление данных из поврежденной книги
Описанные ниже способы помогут вам сохранить данные, которые в противном случае могут быть потеряны. Если один способ не сработал, можно попробовать другой. Если все эти действия не принесли результата, попробуйте использовать сторонние решения для восстановления данных книги.
Важно: Если открыть книгу не позволяет ошибка на диске или в сети, переместите ее на другой жесткий диск или сохраните на локальный диск из сети, прежде чем пытаться восстанавливать ее перечисленными ниже способами.
-
Чтобы восстановить данные, когда книга открыта в приложении Excel, выполните одно из перечисленных ниже действий.
-
Возврат к последней сохраненной версии книги. Если при редактировании листа книга была повреждена до того, как изменения в ней были сохранены, можно восстановить исходный лист, вернувшись к последней сохраненной версии.
Чтобы вернуться к последней сохраненной версии книги, выполните указанные ниже действия.
-
На вкладке Файл выберите команду Открыть.
-
Дважды щелкните имя книги, которую необходимо открыть в приложении Excel.
-
Нажмите кнопку Да, чтобы снова открыть книгу.
Примечание: При этом будет восстановлена последняя сохраненная версия книги. Все изменения, которые могли привести к повреждению файла, будут удалены. Дополнительные сведения о восстановлении более ранних версий книги см. в статье Автоматическое сохранение и восстановление файлов Office.
-
-
Сохранение книги в формате SYLK (символьной ссылки). Сохранив книгу в формате SYLK, вы сможете отфильтровать поврежденные элементы. Формат SYLK обычно используется для устранения ошибок принтера.
Для сохранения книги в формате SYLK сделайте следующее.
-
Откройте вкладку Файл и выберите команду Сохранить как.
-
В списке Тип файла выберите пункт SYLK (Symbolic Link), а затем нажмите кнопку Сохранить.
Примечание: При использовании формата SYLK сохраняется только активный лист книги.
-
Если отображается сообщение о том, что выбранный тип файла не поддерживает книги, содержащие несколько страниц, нажмите кнопку ОК, чтобы сохранить только активный лист.
-
Если появилось сообщение о том, что книга может содержать возможности, несовместимые с форматом SYLK, нажмите кнопку Да.
-
На вкладке Файл выберите команду Открыть.
-
Выберите сохраненный SLK-файл, а затем нажмите кнопку Открыть.
Примечание: Чтобы увидеть SLK-файл, вам может понадобиться выбрать вариант Все файлы или Файлы SYLK в списке Тип файлов.
-
На вкладке Файл выберите команду Сохранить как.
-
В поле Тип файла выберите Книга Excel.
-
В поле Имя файла введите новое имя книги, чтобы создать ее копию, не удаляя оригинал, а затем нажмите кнопку Сохранить.
Примечание: Поскольку этот формат позволяет сохранить только активный лист книги, необходимо открыть поврежденную книгу несколько раз и сохранить каждый лист отдельно.
-
-
-
Для восстановления данных в том случае, если книга не может быть открыта в приложении Excel, выполните одно из следующих действий.
-
Настройка пересчета вручную в Excel. Чтобы открыть книгу, попробуйте отключить автоматический пересчет. Книга не будет пересчитываться и поэтому может открыться.
Чтобы настроить пересчет вручную в Excel, выполните указанные ниже действия.
-
Убедитесь, что в Excel открыта новая пустая книга. В противном случае выполните указанные ниже действия.
-
-
На вкладке Файл нажмите кнопку Создать.
-
В разделе Доступные шаблоны выберите вариант Пустая книга.
-
На вкладке Файл нажмите кнопку Параметры.
-
В категории Формулы в группе Параметры вычислений установите переключатель в положение Вручную.
-
Нажмите кнопку ОК.
-
На вкладке Файл выберите команду Открыть.
-
Выберите поврежденную книгу и нажмите кнопку Открыть.
-
-
Использование внешних ссылок для связи с поврежденной книгой. Если вы хотите извлечь из книги только данные, а не формулы или вычисляемые значения, для связи с поврежденной книгой можно использовать внешние ссылки.
Для этого выполните указанные ниже действия.
-
На вкладке Файл выберите команду Открыть.
-
Выберите папку, содержащую поврежденную книгу, скопируйте имя файла, а затем нажмите кнопку Отмена.
-
Откройте вкладку Файл и выберите пункт Создать.
-
В разделе Доступные шаблоны выберите вариант Пустая книга.
-
В ячейке A1 новой книги введите =имя_файла!A1, где имя_файла — это имя поврежденной книги, которое вы скопировали в действии 2, а затем нажмите клавишу ВВОД.
Совет: Достаточно ввести только имя книги без расширения файла.
-
Если появится диалоговое окно Обновить значения, выберите поврежденную книгу и нажмите кнопку ОК.
-
Если появится диалоговое окно Выбор листа, выберите нужный лист, а затем нажмите кнопку ОК.
-
Выберите ячейку A1.
-
На вкладке Главная в группе Буфер обмена выберите Копировать.
-
Выделите область приблизительно такого же размера (начиная с ячейки A1), что и диапазон ячеек, содержащих данные в поврежденной книге.
-
На вкладке Главная в группе Буфер обмена нажмите кнопку Вставить.
-
Пока диапазон ячеек выбран, на вкладке Главная в группе Буфер обмена снова нажмите кнопку Копировать.
-
На вкладке Главная в группе Буфер обмена щелкните стрелку под кнопкой Вставить, затем в группе Вставить значения выберите Значения.
Примечание: При вставке значений удаляются ссылки на поврежденную книгу и остаются только данные.
-
-
Извлечение данных из поврежденной книги с помощью макроса. Если поврежденная книга ссылается на диаграмму, попробуйте извлечь исходные данные диаграммы с помощью макроса.
Для использования макроса выполните указанные ниже действия
-
Введите на листе модуля следующий код макроса:
Sub GetChartValues()
Dim NumberOfRows As Integer
 Dim X As Object
Counter = 2
' Calculate the number of rows of data.
NumberOfRows = UBound(ActiveChart.SeriesCollection(1).Values)
Worksheets("ChartData").Cells(1, 1) = "X Values"
' Write x-axis values to worksheet.
With Worksheets("ChartData")
.Range(.Cells(2, 1), _
 .Cells(NumberOfRows + 1, 1)) = _
Application.Transpose(ActiveChart.SeriesCollection(1).XValues)
End With
 ' Loop through all series in the chart and write their values to
' the worksheet.
For Each X In ActiveChart.SeriesCollection
Worksheets("ChartData").Cells(1, Counter) = X.Name
With Worksheets("ChartData")
.Range(.Cells(2, Counter), _
 .Cells(NumberOfRows + 1, Counter)) = _
Application.Transpose(X.Values)
 End With
 Counter = Counter + 1
Next
End Sub
-
Вставьте новый лист в книгу и переименуйте его в ChartData.
-
Выделите диаграмму, из которой требуется извлечь значения данных.
-
Примечание: Ее можно внедрить в лист или поместить на отдельный лист диаграммы.
-
Запустите макрос GetChartValues.
-
Данные из диаграммы будут помещены на лист ChartData.
-
-
Автоматическое сохранение резервной копии книги
Функция автоматического сохранения создает резервную копию книги на случай, если ее оригинал будет случайно удален или поврежден.
-
На вкладке Файл выберите команду Сохранить как.
-
В Excel 2013 или Excel 2016 щелкните место, где находится таблица, и нажмите кнопку Обзор.
-
Щелкните стрелку вниз рядом с элементом Сервис, который находится около кнопки Сохранить, и выберите пункт Общие параметры.
-
Установите флажок Всегда создавать резервную копию.
Дополнительные сведения о сохранении и восстановлении более ранних версий книги, а также о восстановлении новых книг (которые еще не были сохранены) см. в статье Восстановление файлов Office.
Автоматическое создание файла восстановления через определенные промежутки времени
Функция периодического создания файла для восстановления создает резервную копию книги на случай, если ее оригинал будет случайно удален или поврежден.
-
На вкладке Файл нажмите кнопку Параметры.
-
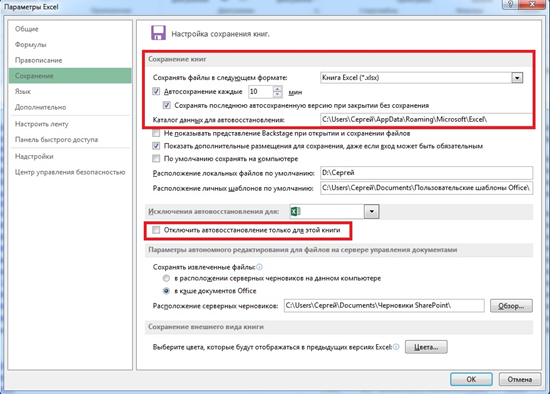
В категории Сохранение в группе Сохранение книг установите флажок Автосохранение каждые и укажите количество минут.
-
В поле Каталог данных для автовосстановления введите расположение, в котором необходимо сохранять файл восстановления.
-
Убедитесь, что флажок Отключить автовосстановление только для этой книги снят.
Дополнительные сведения о сохранении и восстановлении более ранних версий книги, а также о восстановлении новых книг (которые еще не были сохранены) см. в статье Восстановление файлов Office.
Дополнительные сведения
Вы всегда можете задать вопрос специалисту Excel Tech Community или попросить помощи в сообществе Answers community.
Let me tell you the shortest horror story ever.
Excel Crashed!
Imagine working on that urgent report or that extremely important dashboard where you have done such a fantastic job. You are proud of yourself and all the hard work you have put into it.
But you forgot a key step.
You didn’t save the Excel file (gasp!!!)
Ok, let me cut down on the dramatics and come straight to the point.
Excel has a tendency to crash, especially when you need it not to. Somehow, it happens at the worst possible time (not that there is a good time for this ever).
In such a scenario, your only option is to try and recover unsaved Excel files.
In some cases, you will be smiled upon by the Excel Gods and you’ll get the file, and in some cases, you may not.
In this article, I will share all there is to know when it comes to recovering unsaved Excel files. I will also show you the precautions and pre-emptive steps you need to take.
And if you want to absolutely make sure nothing goes wrong, I will also share a VBA code that will save a copy of your Excel file with a timestamp whenever you save the existing file.
Let’s get started!
All Possible Ways to Recover Unsaved Excel Files / Data
Excel (and even Windows) is highly unpredictable. It can crash anytime and can your Excel files with it.
It’s a bad situation to be in…
…but there are ways to tackle this.
Excel has a few functionalities where it can help you recover unsaved Excel files or data in some cases.
Here are three scenarios where Excel’s in-built checks can help you recover files/data:
- You are working on a new file (which you haven’t saved yet) and your system/Excel crashes.
- You updated a file which has been saved earlier and Excel crashes before you could save it.
- You made a mistake and saved the changes, but now want to go back to the previous version.
Let’s see how to tackle each of these.
Recover a New Unsaved Excel File (that has never been saved)
If you are working on something and Excel crashes (or your system crashes), you can still recover that unsaved file.
Note: This method works as Excel has an inbuilt AutoSave and AutoRecover functionality. It’s enabled by default so you should be able to use these methods to recover the files. In case it’s not enabled, you will have to do it to be able to use these functionalities. How to enable AutoSave and AutoRecover is covered later in this article.
Below are the steps to recover an unsaved Excel file:
- Open a new Excel workbook.
- Click the ‘File’ tab

- Click on ‘Open’

- Click the Recent Workbook option (it’s at the top-left)

- Click the ‘Recover Unsaved Workbooks’ button which is at the bottom

- In the dialog box that opens, scroll through the list of unsaved Workbooks and open the one you want.

- Save the file (using the ‘Save As’ option) with a different name in the location of your choice.


By default, Excel saves a copy of all the unsaved files at the following location:
C:Users[YourSystemName]AppDataLocalMicrosoftOfficeUnsavedFiles
In the above address, you need to replace [YourSystemName] with the name of your system (which is ‘Sumit’ in my case).
You can also go directly to this folder (where unsaved copies of Excel files are saved) by opening any browser and copy-pasting the address in it (in the place of URL).
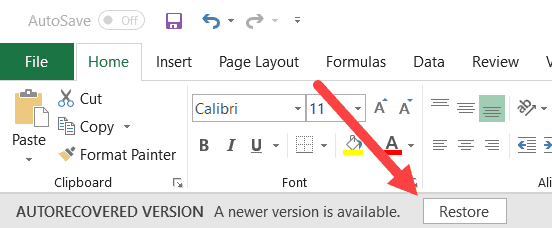
When you open any file from this folder, you will see a notification bar that will prompt you to save it.

Click on it and save it at a new location with a name of your choice.
Note: By default, all the recovered unsaved files are in the ‘XLSB’ format. When you save it, make sure you’re saving it in a format you want.
With this method, you can recover files which you created but never saved.
Recover Updated Excel Files (the previous version was saved)
This method can be used for files which you have saved earlier, and Excel crashed (or the system crashed or the power went off) when you were working on it.
So you still have the previously saved file, but you lost the changes you did.
Below are the steps to recover the updated Excel file:
- Open any of the existing Excel Workbook.
- As soon as it opens, you will see a document recovery pane that lists all the unsaved files. Click on any the file names to load the data.

- When you get the data you want, save the file with a different name.

Alternatively, you can also open the Excel application, and you will see the ‘Show Recovered Files’ option (as shown below).
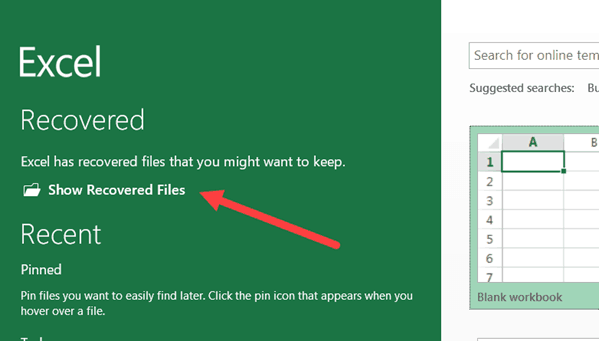
You can click on it and it will open the same Document Recovery pane.
Recover Overwritten Excel Files / Previously Saved Version (from within Excel)
While in the above two methods you can blame Excel or Windows for crashing or the power failure, this one is purely on you.
This is the case when you have a saved Excel file and you update the data and save it again.
But you end up making some changes you don’t want now (happens to me a lot).
What you really want is to get the previous version back.
While you can’t go back in life and correct your mistakes (unless you have a time machine of course), you can do that in the wonderful world of Excel spreadsheets.
In Excel 2010 and versions after that, Excel got an in-built feature to help you get the previous versions.
Below are the steps to revert to a previous version of Excel (even when you have updated and saved it):
- Click the File tab.
- In the Info page, click on Manage Workbook, you’ll find all the previous versions of that file.

- Click on the version you want to restore
- Save the file (preferably with a new name).

When you select a previously saved version and open it, Excel will show you a prompt as shown below. You can click on Restore to get the previous version that you have selected or can save it as a new file with a different name.
Note that for this to work, you need to make sure that AutoRecover option is enabled. While it usually is enabled by default, it’s something you can check and ensure. I cover how to enable ‘AutoRecover’ later in this tutorial.
When it comes to recovering unsaved Excel files or data, these are the three in-built options in Excel that can be used.
Another way (which I highly recommend) is to save your files on the cloud (OneDrive or DropBox). This takes away a lot of worries as the cloud services keep previous versions of your files.
Recover Overwritten Excel Files / Previously Saved Version (from the cloud – OneDrive/DropBox)
If you’re in the habit of saving your Excel files on the cloud – by using services such as OneDrive or DropBox, you don’t have to completely rely on Excel to help you recover unsaved files or lost data.
These cloud services also keep previous versions of your Excel files.
Let me show you how to get the previous versions from OneDrive and DropBox. I am sure there must be many more such services that have this functionality.
Getting the Previous Version of the Excel File from OneDrive
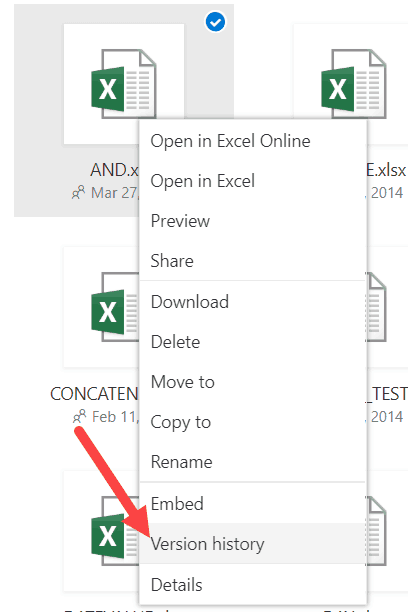
To get the previous version of an Excel file, right click on the current version in Onedrive and click on Version History.
This will open the file and you can see all the previous versions of the file in the pane on the left.
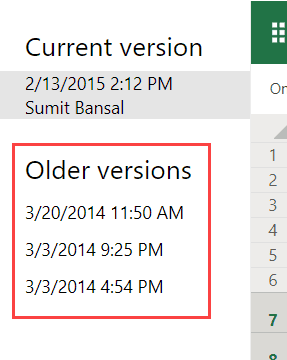
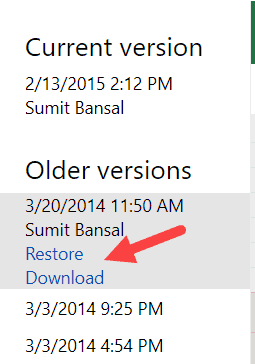
Click on the version that you want. It will show you the file content and also give you the option to download that file or restore it.
Getting the Previous Version of the Excel File from DropBox
Just like OneDrive, DropBox also keeps the past versions of the Excel files that you can revisit and download.
To get the previous versions, go to the file in Dropbox web-portal and click on the three dots for the file for which you want to see the previous versions.
Click on Version History option.
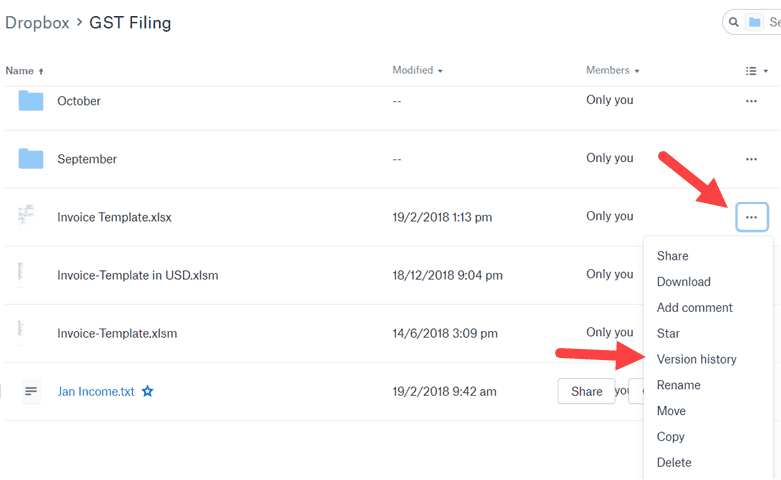
This will show you all the versions of that file. You can open and download this version from DropBox.
In case you have installed the DropBox folder on your system and keep your files there, you can simply right click on any of the files and click on Version History.
Doing this will take you to the web version of DropBox where you can see and download all the versions of the file.
Precautions to Enable Easy Recovery of Unsaved Files
While Excel has some default settings that make sure you have good chances of recovering Excel files, it’s still a good practice to make sure everything is enabled.
Enable AutoSave and AutoRecover
To make sure Excel automatically save your files and show recovery options, you need to have these enabled.
Although it should be enabled by default, in case it’s not, you can do that manually.
Below are the steps to enable AutoSave and AutoRecover functionality in Excel:
- Click the ‘File’ tab
- Click on ‘Options’
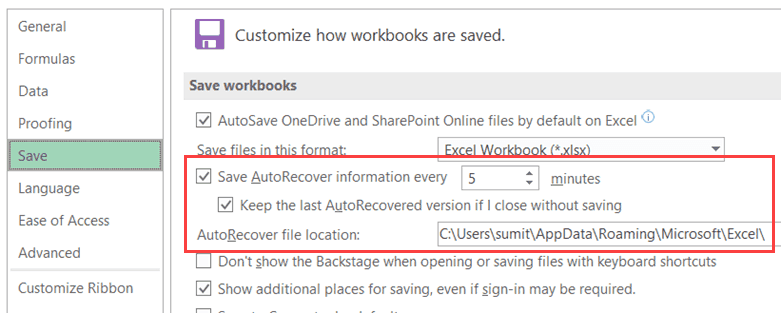
- In the Excel Options dialog box, click on Save (it’s in the left pane of the dialog box).
- Make sure the following settings are enabled (as shown below).
Let me quickly explain what these options mean:
- Save AutoRecover information every X minutes: This option will make sure that your files are saved every 5 minutes (or whatever time value you specify here). This is 10 minutes by default and I have changed this to 5 minutes. You can reduce this further if you want.
- Keep the last AutoRecovered version if I close without saving: This will ensure that in case your Excel/system crashes or you close a file without saving, a version is saved that can be auto-recovered.
- AutoRecover file location: This is the default location where auto-recovered files are saved. You can change this if you want.
Note: If you have a huge file with lots of formulas and charts, saving it every 5 minutes will lead to recalculation and some possible system freeze. If you don’t want that, you can choose a longer time duration (or can change calculation mode to manual).
Automatically Create a Backup Copy of the Saved Excel File
While Autosave and Autorecover options are useful when you forget to save the files and system crashes, auto-backup is something which creates a copy of the file whenever you save it.
For example, if I am working on a file with the name Test.xlsx and I save it in a folder, this would automatically create a copy with the name – ‘Backup of Test.xlk’
Now, whenever I save the Test file, all the changes are also saved in the backup copy.
This can be useful if you make some changes in a saved file and want to undo it. In that case, you can use the backup copy instead.
Or if your file crashes or gets corrupt, you will have the backup copy which will have the last saved content.
Below are the steps to enable the auto-backup feature for a workbook:
- Click the File tab.
- Click on ‘Save As’
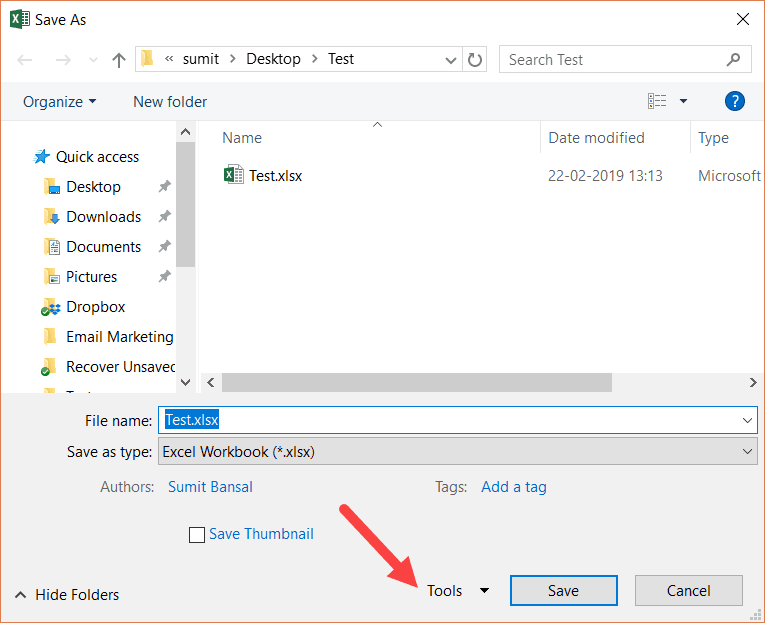
- Click on Browse to open the ‘Save As’ dialog box.
- In the Save As dialog box, click on the Tools option (it’s in the lower right part of the dialog box).

- Click on ‘General Options’.

- In the ‘General Options’ dialog box, check the ‘Always Create Backup’ option.

- Click OK.
- Save the file in the desired folder/location.


Now, whenever you save this file, an exact copy will be saved with the pre-fix ‘Backup of’.
Here are a few important things you need to know about using this auto-backup functionality in Excel:
- This is a workbook level setting. This means that if you enable it for one workbook, it will only work for that workbook. If you want it to work for others as well, you will have to manually enable it.
- This is different than Autorecover and Autosave options. These are independent settings and configuring one doesn’t impact the other. So you can have a workbook where AutoRecover, AutoSave, and AutoBackup all work.
- The backup file is saved with a .XLK extension. This is the extension for back-up files, and you may see a prompt when you open this file. Just click on Yes and it will open the backup file.
- The backup file is always one version behind your main file (except the time you save it for the first time). For example, if you create a new file and enable backup in it and do some changes and save it. This will save the new file as well as a backup copy of it. At this point, both the files (the main file and the backup) will be exactly the same. Now, if you make some changes in the main file and save it once, it will not be saved in the backup file. But if you save it again, it will be done in the backup file as well.
Auto-backup is a good feature as it gives you the file’s last saved version in case you make some unwanted changes and save the file. You can use the backup file to get the version before the last saved version.
Automatically Save a Time-Stamped Copy of the Excel Workbook
While all the methods covered so far rely on the Excel in-built features, you can also use a short VBA code to make sure you don’t lose your work ever.
With a VBA code, you save a timestamped copy of your Excel file as soon as you save it (or close it).
This ensures that you always have all the previous versions and you can go back and recover a file in case you mess up. Also, since these are time-stamped, you can easily find which version you want (or where you messed up).
Below is the code that will create a timestamped copy of the workbook as soon as you save it:
Private Sub Workbook_BeforeSave(ByVal SaveAsUI As Boolean, Cancel As Boolean)
Application.ScreenUpdating = False
Dim BackUpPath As String
BackUpPath = "C:UserssumitDesktopTest"
ThisWorkbook.SaveCopyAs BackUpPath & Format(Now, "dd-mm-yyyy hh:mm:ss") & " " & ActiveWorkbook.Name
Application.ScreenUpdating = True
End Sub
Note that you have to specify the location of the folder where you want to save the backup copies (change the path highlighted in bold in the above code).
This may mean that you end up with a lot of copies, but it can be a huge life-saver when you’re working on critical projects.
You can use a similar code to save a copy before you close the workbook (instead of saving a copy every time you save).
Private Sub Workbook_BeforeClose(Cancel As Boolean)
Dim BackUpPath As String
BackUpPath = "C:UserssumitDesktopTest"
ThisWorkbook.SaveCopyAs BackUpPath & Format(Now, "dd-mm-yyyy hh-mm-ss") & " " & ActiveWorkbook.Name
End Sub
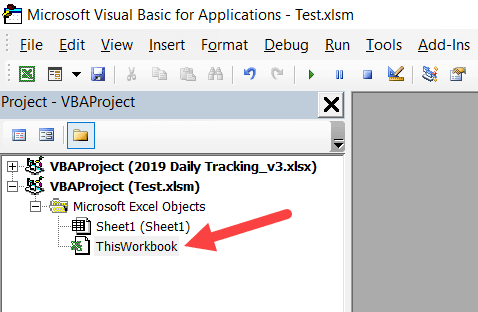
You need to put this code in the ThisWorkbook code window.
To do this, open the VB Editor (keyboard shortcut – ALT + F11) and double click on the This Workbook object in the project explorer.
Repairing Corrupt Excel Files
In case you find yourself with a corrupt Excel file, there are a few things you can do.
First and foremost, you can use the repair option that’s in-built in Excel.
Below are the steps to recover a corrupt file by repairing it:
- Open the Excel application.
- Click on ‘File’ and then click on ‘Open’ (or use the keyboard shortcut Control + O).
- Click the Browse button.
- In the dialog box that opens, select the file that has been corrupted.
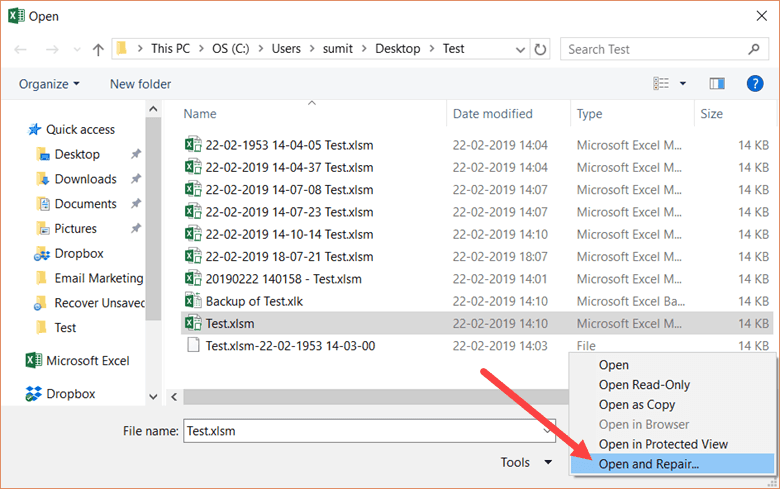
- Click on the small downward pointing triangle in the ‘Open’ button (as shown below).

- Click on Open and Repair.
- Excel will show you a prompt as shown below. Click on Repair.


If you’re lucky, everything would go smooth and you’ll be able to recover your data from the corrupt file.
In case repair option doesn’t work, follow the above steps till Step 5, and then instead of Repair, click on ‘Extract Data’. Excel will ask you whether you want to ‘Convert to values’ or ‘Recover Formulas’.

You can try using whatever option works for you. Excel will try and extract as much data as it can, and create a new workbook with the extracted data.
If this also doesn’t work. you may have to rely on third-party tools to recover corrupt Excel files.
You May Also Like the Following Excel Tutorials:
- Reduce Excel File Size
- How to Turn On AutoSave in Excel
- Clean Data in Excel.
- Excel Interview Questions.
- Excel Pivot Table
- Automatically Open Specific Excel Files on Startup
- How to Mark an Excel Workbook as Final?