
Excel для Microsoft 365 Excel 2021 Excel 2019 Excel 2016 Excel 2013 Еще…Меньше
Если при открытии книги Microsoft Excel обнаруживает, что она повреждена, автоматически запускается режим восстановления файла, чтобы восстановить книгу. Если данный режим не запускается, попробуйте восстановить книгу вручную, выполнив указанные ниже действия.
-
Выберите Файл > Открыть.
-
Выберите расположение и папку, в которой находится поврежденная книга.
-
Выберите поврежденную книгу в диалоговом окне Открытие документа.
-
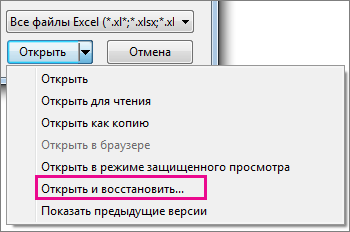
Щелкните стрелку рядом с кнопкой Открыть, а затем выберите команду Открыть и восстановить.

-
Чтобы восстановить максимально возможное количество данных книги, выберите Восстановить.
Если не удается восстановить данные с помощью команды Восстановить, выберите Извлечь данные, чтобы извлечь из книги значения и формулы.
Если ни автоматическое, ни ручное обновление не работают, существует несколько других способов восстановления, которые могут помочь сохранить данные. Вы также можете предотвратить потерю данных, автоматически сохраняя резервную копию книги или периодически создавая файл восстановления.
-
Восстановление данных из поврежденной книги
-
Автоматическое сохранение резервной копии книги
-
Автоматическое создание файла восстановления через заданные промежутки времени
Восстановление данных из поврежденной книги
Попробуйте восстановить данные с помощью одного из приведенных ниже способов. Если какой-то из них не сработает, можно попробовать другой. Кроме того, для восстановления книги можно воспользоваться решениями сторонних производителей программного обеспечения.
Важно: Если книгу не удается открыть из-за ошибки на диске или в сети, прежде чем пытаться восстановить ее каким-либо из следующих способов, переместите ее на другой жесткий диск или на локальный диск.
Восстановление данных, когда книга открыта в Excel
-
Восстановление книги до последней сохраненной версии Если книга повреждена во время работы до сохранения изменений, можно восстановить ее последнюю сохраненную версию.
-
Выберите Файл > Открыть.
-
Дважды щелкните имя книги, которую необходимо открыть в приложении Excel.
-
Нажмите кнопку Да, чтобы снова открыть книгу.
Книга откроется без внесенных вами изменений, которые могли привести к ее повреждению.
-
Восстановление данных, если не удается открыть книгу в Excel
-
Установка пересчета вручную в Microsoft Excel Попробуйте отключить автоматический пересчет. Книга не будет пересчитываться и поэтому может открыться.
-
Выберите Файл > Создать.
-
В разделе Создать нажмите Пустая книга.
-
Выберите Файл > Параметры.
-
На вкладке Формулы в разделе Параметры вычислений выберите параметр Вручную и нажмите кнопку ОК.
-
Выберите Файл > Открыть.
-
Найдите поврежденную книгу и откройте ее двойным щелчком мыши.
-
-
Использование внешних ссылок для связи с поврежденной книгой Чтобы извлечь из книги только данные (без формул или вычисляемых значений), попробуйте подключиться к поврежденной книге с помощью внешних ссылок.
-
Выберите Файл > Открыть.
-
Перейдите к папке, в которой находится поврежденная книга.
-
Щелкните имя файла правой кнопкой мыши, выберите команду Копировать, а затем нажмите кнопку Отмена.
-
Выберите Файл > Создать.
-
В разделе Создать нажмите Пустая книга.
-
В ячейке A1 новой книги введите =имя_файла!A1, где имя_файла — это имя поврежденной книги, скопированное в шаге 3, а затем нажмите клавишу ВВОД.
Примечание: Необходимо ввести только имя книги — вводить расширение имени файла не нужно.
-
Если появится диалоговое окно Обновить значения, выберите поврежденную книгу и нажмите кнопку ОК.
-
Если появится диалоговое окно Выбор листа, выберите нужный лист, а затем нажмите кнопку ОК.
-
Выберите ячейку A1.
-
Выберите Главная > Копировать или нажмите клавиши CTRL+C.
-
Начиная с ячейки A1, выделите область примерно такого же размера, что и диапазон ячеек с данными в поврежденной книге.
-
Выберите Главная > Вставить или нажмите клавиши CTRL+V.
-
Пока диапазон ячеек еще выделен, снова выберите Главная > Копировать или нажмите клавиши CTRL+C.
-
На вкладке Главная нажмите стрелку под кнопкой Вставить, а затем в группе Вставить значения выберите Значения.
При вставке значений удаляются ссылки на поврежденную книгу и остаются только данные.
-
-
Использование макроса для извлечения данных из поврежденной книги Если поврежденная книга ссылается на диаграмму, попробуйте извлечь исходные данные из диаграммы с помощью макроса.
-
Скопируйте код макроса, приведенный ниже, и вставьте его на листе модуля.
Sub GetChartValues()
Dim NumberOfRows As Integer
Dim X As Object
Counter = 2
‘ Подсчет количества строк данных.
NumberOfRows = UBound(ActiveChart.SeriesCollection(1).Values)
Worksheets(«ChartData»).Cells(1, 1) = «X Values»
‘ Запись значений по оси x на лист.
With Worksheets(«ChartData»)
.Range(.Cells(2, 1), _
.Cells(NumberOfRows + 1, 1)) = _
Application.Transpose(ActiveChart.SeriesCollection(1).XValues)
End With
‘ Перебор всех рядов в диаграмме и запись их значений
‘ на лист.
For Each X In ActiveChart.SeriesCollection
Worksheets(«ChartData»).Cells(1, Counter) = X.Name
With Worksheets(«ChartData»)
.Range(.Cells(2, Counter), _
.Cells(NumberOfRows + 1, Counter)) = _
Application.Transpose(X.Values)
End With
Counter = Counter + 1
Next
End Sub
-
Вставьте или удалите лист в книге, щелкните его ярлычок правой кнопкой мыши и назовите его ДанныеДиаграммы.
-
Выберите диаграмму, из которой необходимо извлечь исходные данные.
Примечание: Эту диаграмму можно внедрить в лист или поместить на отдельный лист диаграммы.
-
Запуск макроса.
-
Данные диаграммы будут помещены на лист ДанныеДиаграммы.
-
К началу страницы
Автоматическое сохранение резервной копии книги
Благодаря резервной копии книги у вас всегда будет доступ к данным, если книга будет случайно удалена или повреждена.
-
Выберите Файл > Сохранить как.
-
Выберите Компьютер, а затем нажмите кнопку Обзор.
-
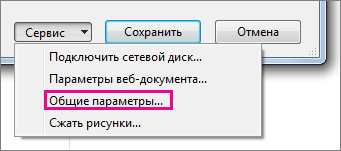
В диалоговом окне Сохранение документа щелкните стрелку на кнопке Сервис и выберите пункт Общие параметры.
-
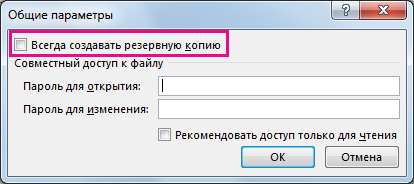
В диалоговом окне Общие параметры установите флажок Всегда создавать резервную копию.

К началу страницы
Автоматическое создание файла восстановления через заданные промежутки времени
Файл восстановления книги также помогает обеспечить доступ к данным, если книга будет случайно удалена или повреждена.
-
Выберите Файл > Параметры.
-
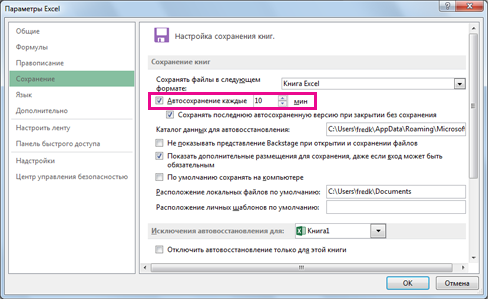
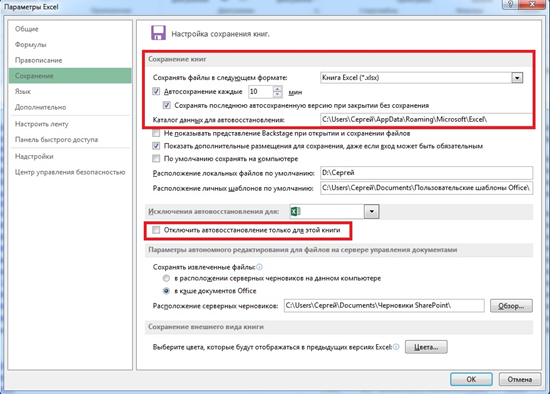
На вкладкеСохранение в разделе Сохранение книг установите флажок Автосохранение каждые и введите количество минут. (По умолчанию — 10.)
-
В поле Каталог данных для автовосстановления введите расположение, в котором необходимо сохранять файл восстановления.
-
Убедитесь, что снят флажок Отключить автовосстановление только для этой книги.
К началу страницы
Нужна дополнительная помощь?
Let me tell you the shortest horror story ever.
Excel Crashed!
Imagine working on that urgent report or that extremely important dashboard where you have done such a fantastic job. You are proud of yourself and all the hard work you have put into it.
But you forgot a key step.
You didn’t save the Excel file (gasp!!!)
Ok, let me cut down on the dramatics and come straight to the point.
Excel has a tendency to crash, especially when you need it not to. Somehow, it happens at the worst possible time (not that there is a good time for this ever).
In such a scenario, your only option is to try and recover unsaved Excel files.
In some cases, you will be smiled upon by the Excel Gods and you’ll get the file, and in some cases, you may not.
In this article, I will share all there is to know when it comes to recovering unsaved Excel files. I will also show you the precautions and pre-emptive steps you need to take.
And if you want to absolutely make sure nothing goes wrong, I will also share a VBA code that will save a copy of your Excel file with a timestamp whenever you save the existing file.
Let’s get started!
All Possible Ways to Recover Unsaved Excel Files / Data
Excel (and even Windows) is highly unpredictable. It can crash anytime and can your Excel files with it.
It’s a bad situation to be in…
…but there are ways to tackle this.
Excel has a few functionalities where it can help you recover unsaved Excel files or data in some cases.
Here are three scenarios where Excel’s in-built checks can help you recover files/data:
- You are working on a new file (which you haven’t saved yet) and your system/Excel crashes.
- You updated a file which has been saved earlier and Excel crashes before you could save it.
- You made a mistake and saved the changes, but now want to go back to the previous version.
Let’s see how to tackle each of these.
Recover a New Unsaved Excel File (that has never been saved)
If you are working on something and Excel crashes (or your system crashes), you can still recover that unsaved file.
Note: This method works as Excel has an inbuilt AutoSave and AutoRecover functionality. It’s enabled by default so you should be able to use these methods to recover the files. In case it’s not enabled, you will have to do it to be able to use these functionalities. How to enable AutoSave and AutoRecover is covered later in this article.
Below are the steps to recover an unsaved Excel file:
- Open a new Excel workbook.
- Click the ‘File’ tab

- Click on ‘Open’

- Click the Recent Workbook option (it’s at the top-left)

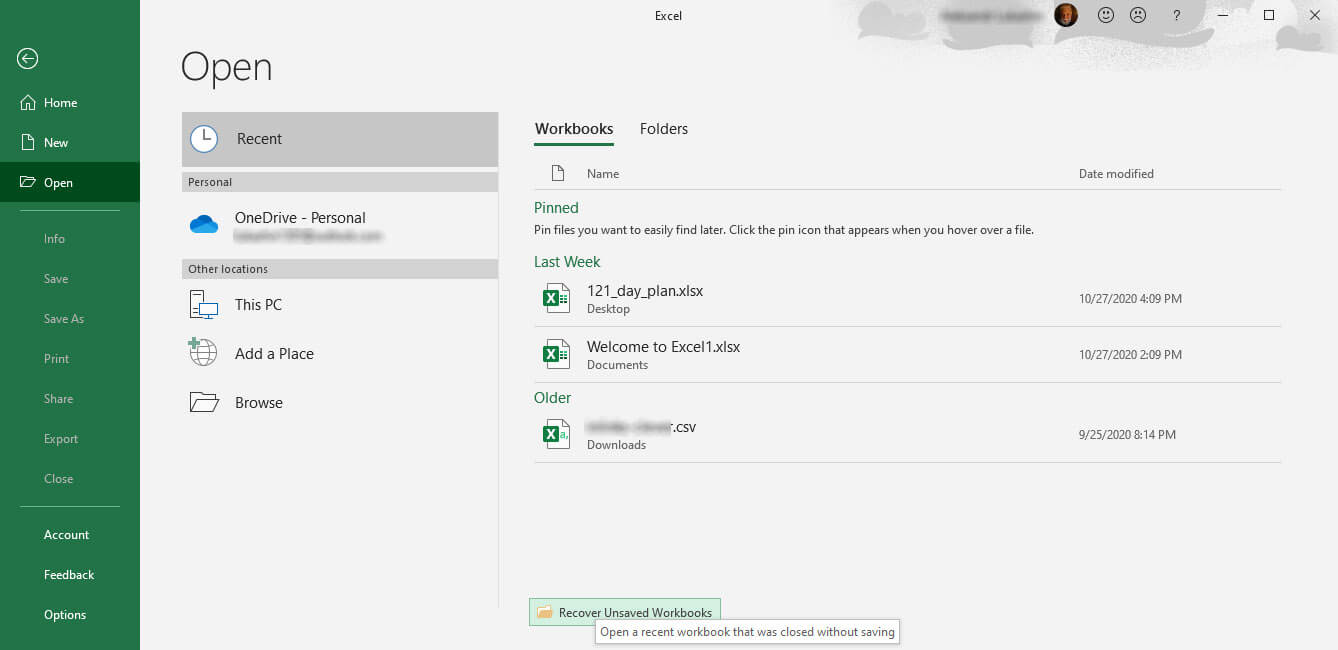
- Click the ‘Recover Unsaved Workbooks’ button which is at the bottom

- In the dialog box that opens, scroll through the list of unsaved Workbooks and open the one you want.

- Save the file (using the ‘Save As’ option) with a different name in the location of your choice.


By default, Excel saves a copy of all the unsaved files at the following location:
C:Users[YourSystemName]AppDataLocalMicrosoftOfficeUnsavedFiles
In the above address, you need to replace [YourSystemName] with the name of your system (which is ‘Sumit’ in my case).
You can also go directly to this folder (where unsaved copies of Excel files are saved) by opening any browser and copy-pasting the address in it (in the place of URL).
When you open any file from this folder, you will see a notification bar that will prompt you to save it.

Click on it and save it at a new location with a name of your choice.
Note: By default, all the recovered unsaved files are in the ‘XLSB’ format. When you save it, make sure you’re saving it in a format you want.
With this method, you can recover files which you created but never saved.
Recover Updated Excel Files (the previous version was saved)
This method can be used for files which you have saved earlier, and Excel crashed (or the system crashed or the power went off) when you were working on it.
So you still have the previously saved file, but you lost the changes you did.
Below are the steps to recover the updated Excel file:
- Open any of the existing Excel Workbook.
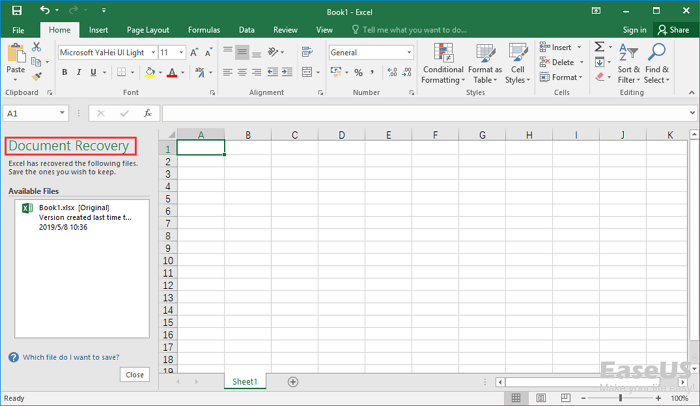
- As soon as it opens, you will see a document recovery pane that lists all the unsaved files. Click on any the file names to load the data.

- When you get the data you want, save the file with a different name.

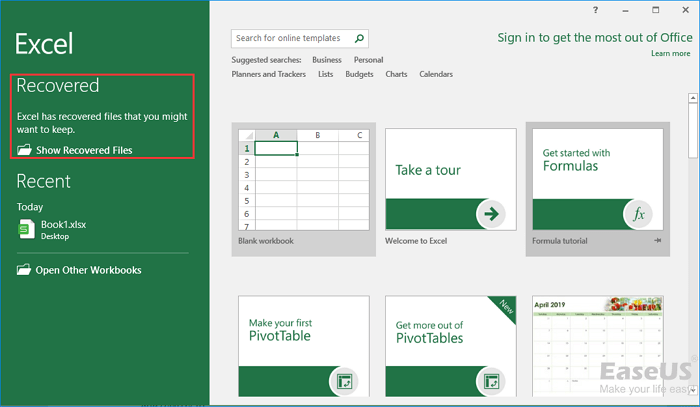
Alternatively, you can also open the Excel application, and you will see the ‘Show Recovered Files’ option (as shown below).
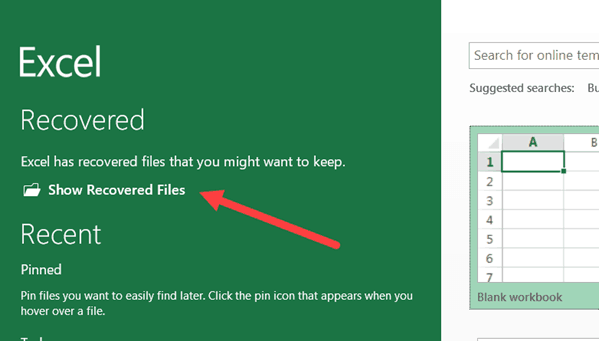
You can click on it and it will open the same Document Recovery pane.
Recover Overwritten Excel Files / Previously Saved Version (from within Excel)
While in the above two methods you can blame Excel or Windows for crashing or the power failure, this one is purely on you.
This is the case when you have a saved Excel file and you update the data and save it again.
But you end up making some changes you don’t want now (happens to me a lot).
What you really want is to get the previous version back.
While you can’t go back in life and correct your mistakes (unless you have a time machine of course), you can do that in the wonderful world of Excel spreadsheets.
In Excel 2010 and versions after that, Excel got an in-built feature to help you get the previous versions.
Below are the steps to revert to a previous version of Excel (even when you have updated and saved it):
- Click the File tab.
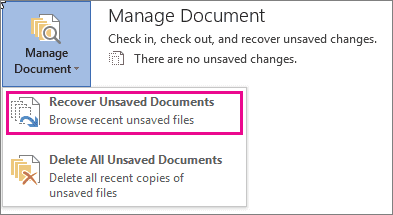
- In the Info page, click on Manage Workbook, you’ll find all the previous versions of that file.

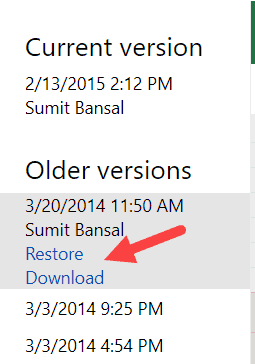
- Click on the version you want to restore
- Save the file (preferably with a new name).

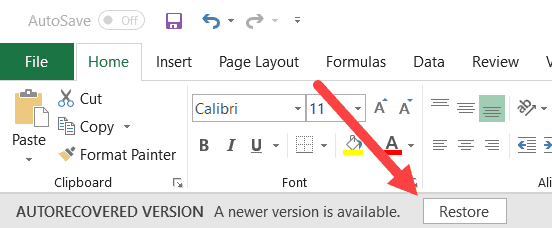
When you select a previously saved version and open it, Excel will show you a prompt as shown below. You can click on Restore to get the previous version that you have selected or can save it as a new file with a different name.
Note that for this to work, you need to make sure that AutoRecover option is enabled. While it usually is enabled by default, it’s something you can check and ensure. I cover how to enable ‘AutoRecover’ later in this tutorial.
When it comes to recovering unsaved Excel files or data, these are the three in-built options in Excel that can be used.
Another way (which I highly recommend) is to save your files on the cloud (OneDrive or DropBox). This takes away a lot of worries as the cloud services keep previous versions of your files.
Recover Overwritten Excel Files / Previously Saved Version (from the cloud – OneDrive/DropBox)
If you’re in the habit of saving your Excel files on the cloud – by using services such as OneDrive or DropBox, you don’t have to completely rely on Excel to help you recover unsaved files or lost data.
These cloud services also keep previous versions of your Excel files.
Let me show you how to get the previous versions from OneDrive and DropBox. I am sure there must be many more such services that have this functionality.
Getting the Previous Version of the Excel File from OneDrive
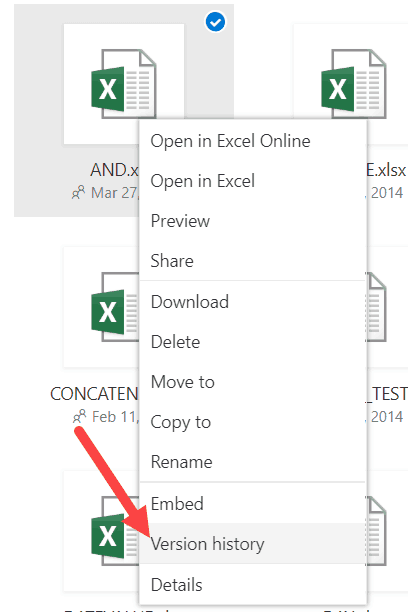
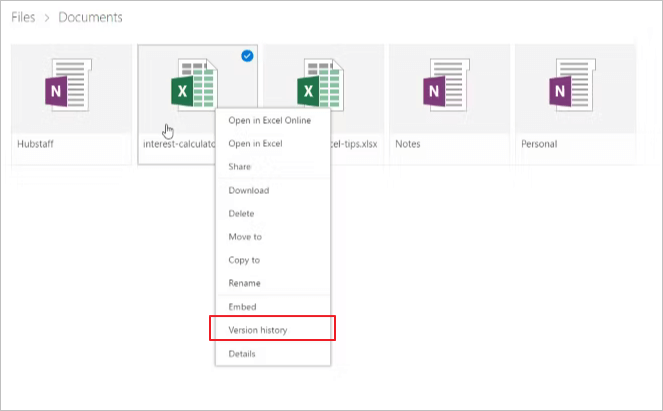
To get the previous version of an Excel file, right click on the current version in Onedrive and click on Version History.
This will open the file and you can see all the previous versions of the file in the pane on the left.
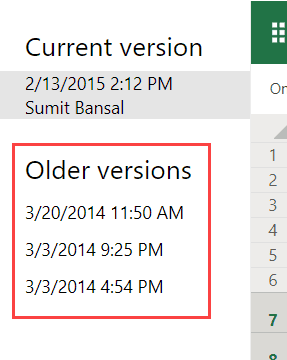
Click on the version that you want. It will show you the file content and also give you the option to download that file or restore it.
Getting the Previous Version of the Excel File from DropBox
Just like OneDrive, DropBox also keeps the past versions of the Excel files that you can revisit and download.
To get the previous versions, go to the file in Dropbox web-portal and click on the three dots for the file for which you want to see the previous versions.
Click on Version History option.
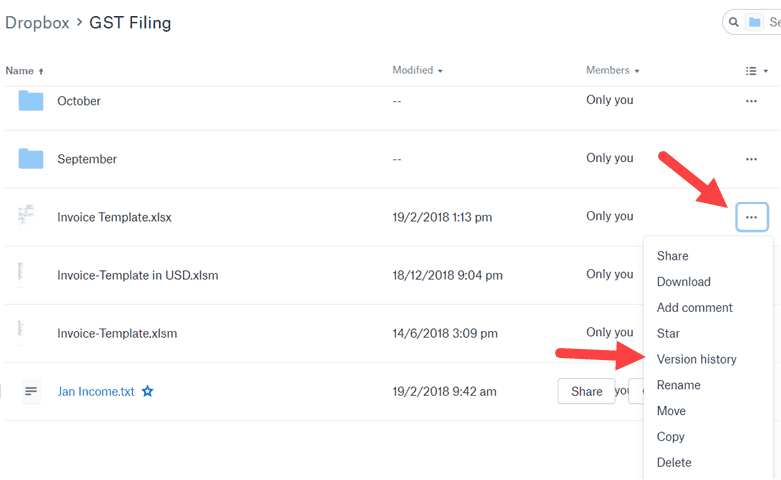
This will show you all the versions of that file. You can open and download this version from DropBox.
In case you have installed the DropBox folder on your system and keep your files there, you can simply right click on any of the files and click on Version History.
Doing this will take you to the web version of DropBox where you can see and download all the versions of the file.
Precautions to Enable Easy Recovery of Unsaved Files
While Excel has some default settings that make sure you have good chances of recovering Excel files, it’s still a good practice to make sure everything is enabled.
Enable AutoSave and AutoRecover
To make sure Excel automatically save your files and show recovery options, you need to have these enabled.
Although it should be enabled by default, in case it’s not, you can do that manually.
Below are the steps to enable AutoSave and AutoRecover functionality in Excel:
- Click the ‘File’ tab
- Click on ‘Options’
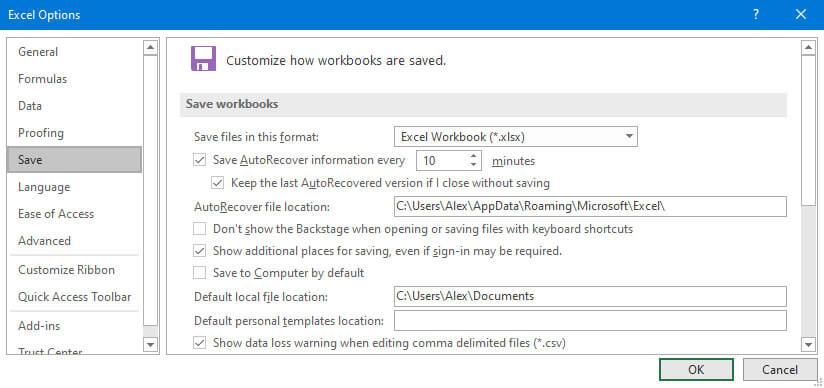
- In the Excel Options dialog box, click on Save (it’s in the left pane of the dialog box).
- Make sure the following settings are enabled (as shown below).
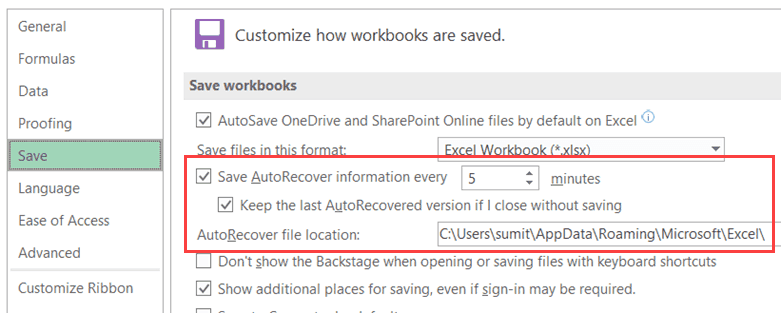
Let me quickly explain what these options mean:
- Save AutoRecover information every X minutes: This option will make sure that your files are saved every 5 minutes (or whatever time value you specify here). This is 10 minutes by default and I have changed this to 5 minutes. You can reduce this further if you want.
- Keep the last AutoRecovered version if I close without saving: This will ensure that in case your Excel/system crashes or you close a file without saving, a version is saved that can be auto-recovered.
- AutoRecover file location: This is the default location where auto-recovered files are saved. You can change this if you want.
Note: If you have a huge file with lots of formulas and charts, saving it every 5 minutes will lead to recalculation and some possible system freeze. If you don’t want that, you can choose a longer time duration (or can change calculation mode to manual).
Automatically Create a Backup Copy of the Saved Excel File
While Autosave and Autorecover options are useful when you forget to save the files and system crashes, auto-backup is something which creates a copy of the file whenever you save it.
For example, if I am working on a file with the name Test.xlsx and I save it in a folder, this would automatically create a copy with the name – ‘Backup of Test.xlk’
Now, whenever I save the Test file, all the changes are also saved in the backup copy.
This can be useful if you make some changes in a saved file and want to undo it. In that case, you can use the backup copy instead.
Or if your file crashes or gets corrupt, you will have the backup copy which will have the last saved content.
Below are the steps to enable the auto-backup feature for a workbook:
- Click the File tab.
- Click on ‘Save As’
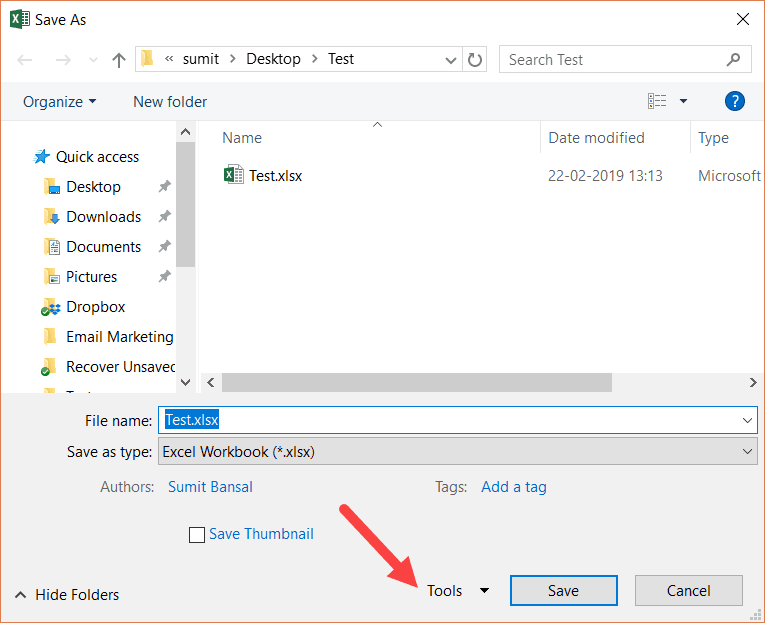
- Click on Browse to open the ‘Save As’ dialog box.
- In the Save As dialog box, click on the Tools option (it’s in the lower right part of the dialog box).

- Click on ‘General Options’.

- In the ‘General Options’ dialog box, check the ‘Always Create Backup’ option.

- Click OK.
- Save the file in the desired folder/location.


Now, whenever you save this file, an exact copy will be saved with the pre-fix ‘Backup of’.
Here are a few important things you need to know about using this auto-backup functionality in Excel:
- This is a workbook level setting. This means that if you enable it for one workbook, it will only work for that workbook. If you want it to work for others as well, you will have to manually enable it.
- This is different than Autorecover and Autosave options. These are independent settings and configuring one doesn’t impact the other. So you can have a workbook where AutoRecover, AutoSave, and AutoBackup all work.
- The backup file is saved with a .XLK extension. This is the extension for back-up files, and you may see a prompt when you open this file. Just click on Yes and it will open the backup file.
- The backup file is always one version behind your main file (except the time you save it for the first time). For example, if you create a new file and enable backup in it and do some changes and save it. This will save the new file as well as a backup copy of it. At this point, both the files (the main file and the backup) will be exactly the same. Now, if you make some changes in the main file and save it once, it will not be saved in the backup file. But if you save it again, it will be done in the backup file as well.
Auto-backup is a good feature as it gives you the file’s last saved version in case you make some unwanted changes and save the file. You can use the backup file to get the version before the last saved version.
Automatically Save a Time-Stamped Copy of the Excel Workbook
While all the methods covered so far rely on the Excel in-built features, you can also use a short VBA code to make sure you don’t lose your work ever.
With a VBA code, you save a timestamped copy of your Excel file as soon as you save it (or close it).
This ensures that you always have all the previous versions and you can go back and recover a file in case you mess up. Also, since these are time-stamped, you can easily find which version you want (or where you messed up).
Below is the code that will create a timestamped copy of the workbook as soon as you save it:
Private Sub Workbook_BeforeSave(ByVal SaveAsUI As Boolean, Cancel As Boolean)
Application.ScreenUpdating = False
Dim BackUpPath As String
BackUpPath = "C:UserssumitDesktopTest"
ThisWorkbook.SaveCopyAs BackUpPath & Format(Now, "dd-mm-yyyy hh:mm:ss") & " " & ActiveWorkbook.Name
Application.ScreenUpdating = True
End Sub
Note that you have to specify the location of the folder where you want to save the backup copies (change the path highlighted in bold in the above code).
This may mean that you end up with a lot of copies, but it can be a huge life-saver when you’re working on critical projects.
You can use a similar code to save a copy before you close the workbook (instead of saving a copy every time you save).
Private Sub Workbook_BeforeClose(Cancel As Boolean)
Dim BackUpPath As String
BackUpPath = "C:UserssumitDesktopTest"
ThisWorkbook.SaveCopyAs BackUpPath & Format(Now, "dd-mm-yyyy hh-mm-ss") & " " & ActiveWorkbook.Name
End Sub
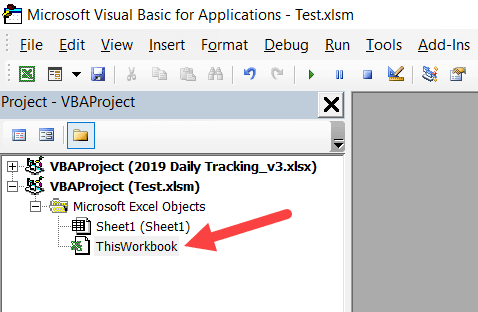
You need to put this code in the ThisWorkbook code window.
To do this, open the VB Editor (keyboard shortcut – ALT + F11) and double click on the This Workbook object in the project explorer.
Repairing Corrupt Excel Files
In case you find yourself with a corrupt Excel file, there are a few things you can do.
First and foremost, you can use the repair option that’s in-built in Excel.
Below are the steps to recover a corrupt file by repairing it:
- Open the Excel application.
- Click on ‘File’ and then click on ‘Open’ (or use the keyboard shortcut Control + O).
- Click the Browse button.
- In the dialog box that opens, select the file that has been corrupted.
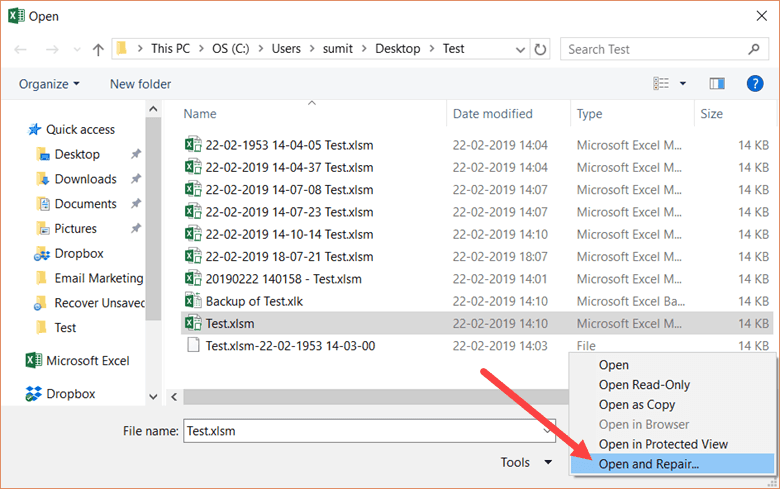
- Click on the small downward pointing triangle in the ‘Open’ button (as shown below).

- Click on Open and Repair.
- Excel will show you a prompt as shown below. Click on Repair.


If you’re lucky, everything would go smooth and you’ll be able to recover your data from the corrupt file.
In case repair option doesn’t work, follow the above steps till Step 5, and then instead of Repair, click on ‘Extract Data’. Excel will ask you whether you want to ‘Convert to values’ or ‘Recover Formulas’.

You can try using whatever option works for you. Excel will try and extract as much data as it can, and create a new workbook with the extracted data.
If this also doesn’t work. you may have to rely on third-party tools to recover corrupt Excel files.
You May Also Like the Following Excel Tutorials:
- Reduce Excel File Size
- How to Turn On AutoSave in Excel
- Clean Data in Excel.
- Excel Interview Questions.
- Excel Pivot Table
- Automatically Open Specific Excel Files on Startup
- How to Mark an Excel Workbook as Final?
![]()
3DNews Новости Software Новости сети 4 способа восстановления повреждённого ф…
Самое интересное в обзорах
Партнёрский материал
17.10.2018 [10:00],
Полезные советы по использованию Microsoft Excel
Что делать если файл Microsoft Excel с данными перестал открываться? Можно ли вернуть ценные данные, ставшие недоступными?

Если вдруг вам не удаётся открыть рабочий файл с данными Excel, то какова вероятность успешного восстановления этих данных и что для этого надо сделать? К сожалению, это распространённая ошибка Microsoft Excel. У проблемы есть несколько вариантов решения. Только перепробовав все варианты можно сказать, возможно ли восстановить повреждённый Excel-файл.
Способы восстановления повреждённого Excel-файла:
- Использование встроенной функции Microsoft Excel.
- Открытие файла с помощью OpenOffice.
- Использование онлайн-сервиса.
- Восстановление с помощью сторонних утилит.
1. Встроенная функция Microsoft Excel
В последних версиях Microsoft Excel добавлена возможность восстановления файла. Ранее эта функция или отсутствовала, или была откровенно слабо работоспособной при использовании с реальными файлами. Сейчас эта функция помогает в 10–20 % инцидентов с повреждением файлов. Для этого достаточно произвести несколько простых действий:
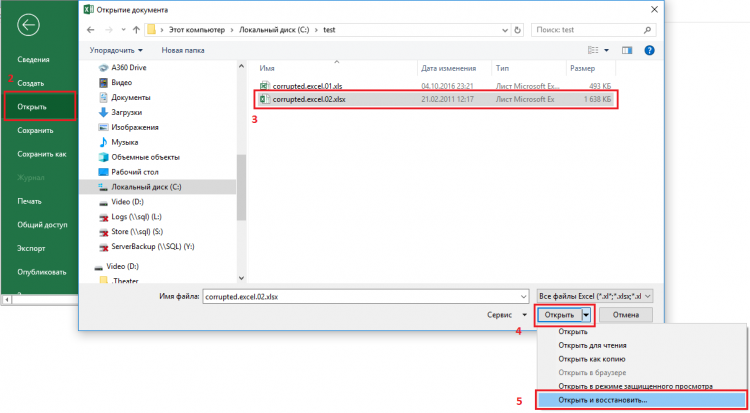
- Выбрать пункт меню «Файл».
- Выбрать пункт «Открыть».
- Выбрать повреждённый файл на диске.
- Щелкнуть на стрелку рядом с кнопкой «Открыть» в правом нижнем углу.
- Выбрать пункт «Открыть и восстановить» в выпадающем подменю.
Всё просто и не требует специальных знаний. Многим пользователям этой функции более чем достаточно для успешного восстановления повреждённого файла Excel. Если этим способом восстановить файл не получилось, то может помочь OpenOffice.org
2. Открытие файла с помощью OpenOffice
Файлы Microsoft Office, начиная с Office 2007, имеют общий формат с OpenOffice. Соответственно можно скачать и установить пакет программ с OpenOffice.org и попытаться восстановить им повреждённый файл.
Обращаем ваше внимание на то, что файл, восстанавливаемый с помощью OpenOffice, должен иметь расширение XLSX — это версия для файлов Excel 2007 и выше.
3. Использование онлайн—сервиса
Если варианты 1 и 2 не помогают восстановить файл, то необходимы специальные сервисы или программы, разработанные специально для восстановления данных из повреждённых файлов Excel.
Есть несколько доступных онлайн-сервисов восстановления повреждённых файлов Microsoft Excel. Наиболее удобный и доступный по цене (всего $5 за файл) находится по этому адресу: https://onlinefilerepair.com/ru/excel-repair-online.html.

Просто загрузите файл на сервис и дождитесь результата. Статистка от разработчиков сервиса утверждает, что в 40 % случаев данные из повреждённого Excel-файла удаётся восстановить в том или ином виде.
Сервис удобен тем, что работает на всех операционных системах (Windows, MacOS, iOS, Android и прочие) и на всех устройствах (компьютер, планшет, телефон и прочие).
4. Восстановление с помощью сторонних утилит
Если у вас много повреждённых Excel-файлов или вы не можете передавать эти файлы сторонним лицам из-за их конфиденциальности, то используйте специальные утилиты от сторонних разработчиков (не Microsoft).
Пример такой утилиты — это Recovery Toolbox for Excel: https://excel.recoverytoolbox.com/ru/.
Утилита развивается и распространяется с начала 2000-х годов, имеет многоязычный интерфейс (включая русский), восстанавливает все типы Excel-файлов всех версий, начиная с экзотического сейчас Excel 97.
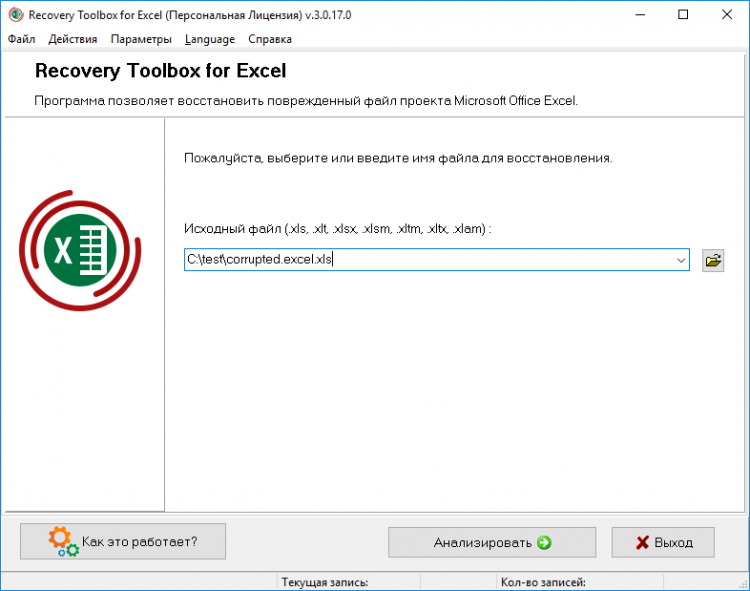
Внимание: утилита работает только на компьютерах с ОС Windows.
Полезные советы для пользователей Microsoft Excel
При работе с Microsoft Excel включите функцию автосохранения. Это исключит случаи, когда сбой в работе компьютера приводит к потере нескольких часов работы:
Если вы заметили ошибку — выделите ее мышью и нажмите CTRL+ENTER.
Самые обсуждаемые публикации
Looking for some quick solutions to recover deleted Excel sheet data? Stop searching here and there…!
As today through this article, I am going to answer this most frequently asked question of numerous Excel users i.e how to recover deleted data from Excel sheet?
I guess, we all have faced Excel sheet deletion issue meanwhile handling this application. Well, this is a really very miserable situation as this can leads to a serious dilemma. Losing data not only causes data loss, in fact, the hours which you have spent in maintaining, organizing Excel sheet data also go wasted.
So without wasting any more time let’s discuss each and every aspect, necessary to recover deleted Excel sheet data.
User Experience:
Let define it best with user’s experience:
HI soc! I’ve got a problem. I accidentally deleted the wrong Excel files, and now I need to recover them. But I have no idea how to do it? I’ve tried everything I know. Maybe anyone of you knows some programs or tools, which can help me?
My boyfriend will be shocked when he learns that I deleted his reports.
Please help me to hide this small crime ^^
Original Post from Microsoft Community…
Well, this is a serious issue or might be a SMALL CRIME as said in the user experience, but remember “Every Problem Comes With an Equal or Greater Opportunity.”
So, the deleted Excel file recovery is possible as there are some ways that you can try before opting for Excel recovery software.
Here check it out…
Before moving further, check out some important points that should be followed to recover deleted Excel file data.
What Guidelines Need To Be Followed To Recover Deleted Excel File Data?
Here are the guidelines that should be followed to recover deleted Excel sheet data:
- When your Excel file data are lost or deleted, DO NOT store any new data on the hard drive or on the storage medium where you have lots of your Excel sheets data. Storing new data can overwrite the lost or deleted data from the Excel sheet and you cannot restore lost Excel files.
- Try to recover lost or deleted data from Excel files immediately, because the longer you wait for the chances of deleted Excel file recovery becomes less.
- If you are looking to download and install Excel file recovery software then do not install it on the hard drive from which you lost Excel documents.
- To recover deleted data from SD card, mobile, USB, and others, connect your device to your PC.
Well, there are many reasons that cause data loss in Excel files such as accidentally deleting Excel sheets, hard drive failure, or unintentionally delete an XLS spreadsheet, file system corruption, or incorrect data operation on storage drive and many others can cause data loss.
And, to recover deleted data from Excel sheets follow the above-given points as soon as you lost data. Now know some manual ways to restore deleted Excel sheet data.
Follow the below mentioned fixes to recover Deleted Excel Sheet data:
Fix 1: Recover Deleted Excel Files By Restoring The Previous Version
Fix 2: Restore Excel Files From Recycle Bin
Fix 3: Use Excel Autosave and AutoRecover Features
Let’s discuss them briefly…!
Fix 1# Recover Deleted Excel Files by Restoring the Previous Version
This is a very helpful process for the users who are looking for deleted Excel file recovery or documents in partitions, not the desktop. Here follow the ways to do so:
- Open This PC/ My Computer.
- Locate the folder where you have saved the deleted Excel files.
- Right-click the folder and select Restore previous versions.
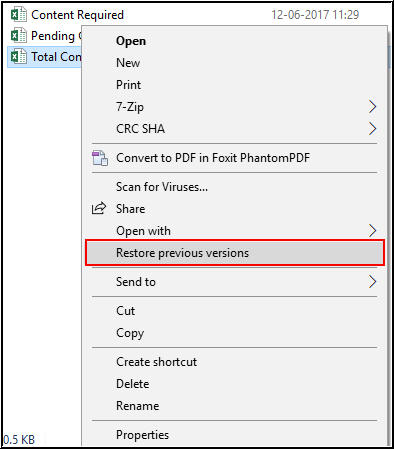
- Choose the versions that you need after then click Restore.
Please Note: This process only works when you have created backups by utilizing Windows Backup. But if this is not turned ON, then this might not work for you.
Fix 2# Restore Excel Files From Recycle Bin
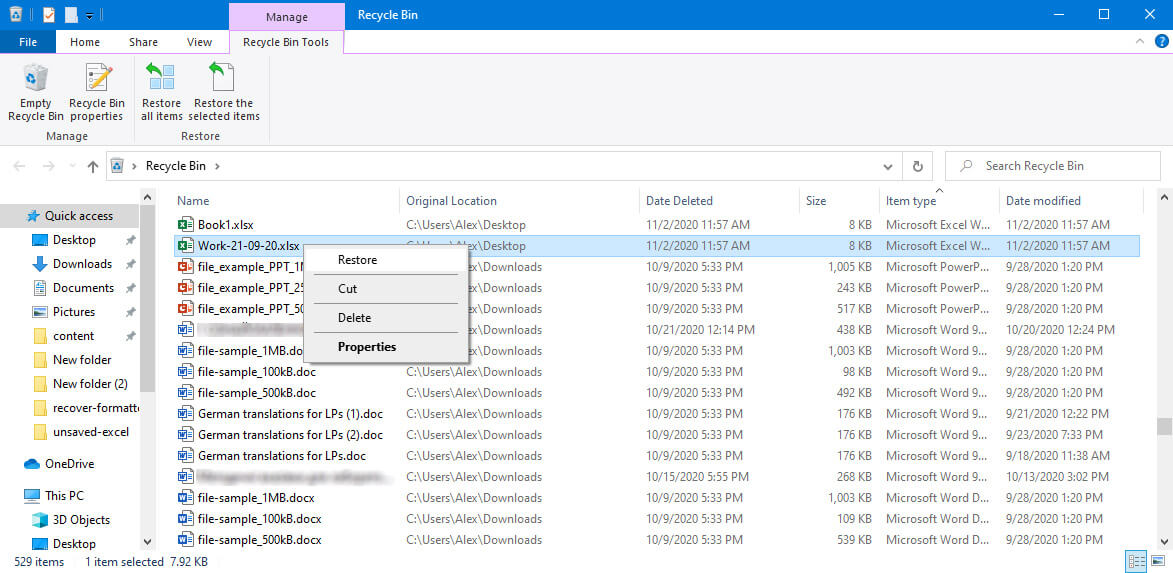
This is also an option to recover deleted Excel files. So if you have created Excel files on the desktop and gets deleted due to any reason, then the simple way is to look in your recycle bin to restore Excel files.
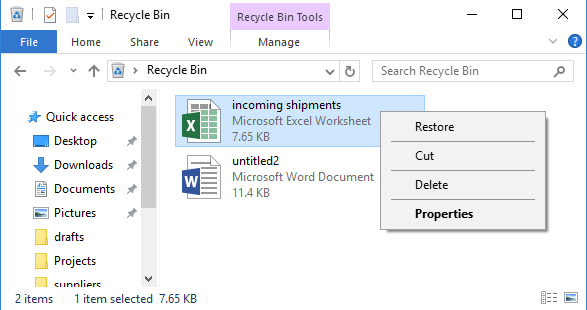
- Just open Recycle bin.
- Find and right-click the deleted Excel files.
- select Restore.
If you are unable to find your deleted Excel file in the recycle file then read this helpful article: 5 Quick Fixes To Recover Deleted Excel File Not In Recycle Bin.
Fix 3# Use Excel Autosave and AutoRecover Features
You can make use of the Excel Autosave and AutoRecover the two best features to restore Excel data but if they are enabled.
The Excel AutoSave is a tool that automatically saves the new document created just now but hasn’t saved yet.
Whereas on the other hand, Excel AutoRecover allows users to recover unsaved Excel files. With the help of this, you can recover the last saved version displayed in the Document Recovery Pane, when the Excel file is started next time.

You can also configure the AutoSave (AutoRecover) settings in Excel. Follow the steps to do so:
- Go to the File tab > choose Options > click Save on left side
- And assure both Save AutoRecover information every X minutes and also tick mark the Keep the last autosaved version if I close without saving option

- Next click OK.
However, the AutoRecover feature is by default set to automatically save changes every 10 minutes. You can increase or decrease the time period as per your recommendation.
You can also change the Excel AutoRecover file location and specify AutoRecover exceptions. These two Excel features are really very helpful for deleted Excel sheet data recovery.
Well, these are some of the manual ways that help you to recover deleted data from Excel sheets. But if still, you are unable to recover Excel data then restore it by making use of the trusted MS Excel Repair Tool.
Recover Deleted Excel File Data With MS Excel Repair Tool:
To recover deleted Excel sheet data easily and effortlessly try the professional recommended MS Excel Repair Tool. This tool allows to easily restoring all corrupt Excel file including the charts, worksheet properties cell comments, and other important data.
With the help of this, you can fix all sorts of issues, corruption, errors in Excel workbooks. This is a unique tool to repair multiple Excel files at one repair cycle and recovers the entire data in a preferred location. It is easy to use and compatible with both Windows as well as Mac operating systems. This supports the entire Excel versions and the demo version is free.
* Free version of the product only previews recoverable data.
Steps to Utilize MS Excel Repair Tool:
How To Avoid Excel Sheet Data Loss Situation?
Well, these are some of the tips that will help you to avoid major Excel sheet data loss like situations. You can consider all these points as a primary step towards deleted Excel file recovery.
- Always make the backup of the files, folder before deleting it.
- Make use of the “Delete” key during deleting Excel sheets as if you find it important, you can restore it easily from the recycle bin.
- Utilize good antivirus software to prevent the Excel files corruption with a virus.
- Do not add recovered files on the original location where you have lost XLXs files.
Follow these tips on a regular basis to avoid Excel sheet data loss and to recover deleted Excel file data.
Nevertheless, in case you have any additional workarounds that proved successful or questions concerning the ones presented. Do tell us in the comments section below or you can also visit our Repair MS Excel Facebook and Twitter account.
Good Luck….


Priyanka is an entrepreneur & content marketing expert. She writes tech blogs and has expertise in MS Office, Excel, and other tech subjects. Her distinctive art of presenting tech information in the easy-to-understand language is very impressive. When not writing, she loves unplanned travels.
Microsoft Excel is considered by many to be the standard in spreadsheet programs available for use on Windows 10/11 computers. Countless individuals and organizations use Excel to store important information including financial and other sensitive data. Excel spreadsheets are the kinds of files that you want to protect.
👀
Unfortunately, it is very easy to unexpectedly lose or delete one of these valuable items. It can happen due to human error, malware, or events completely out of your control. Don’t panic. We are going to show you how to recover your lost or unsaved Excel files on Windows 10/11 machines.
Quick Navigation:
|
Problem |
Solution |
|
I didn’t save the Excel file. |
Recovering an unsaved Excel file |
|
I recently deleted the Excel file. |
Recover from the Recycle Bin Recover from a backup Recover with data recovery software |
|
I deleted the file and it’s not in the Recycle Bin. |
Recover with data recovery software |
|
My Excel crashed and I didn’t save the file. |
Recovering an unsaved Excel file Recover from a backup |
|
I want to recover an accidentally closed Excel file. |
Recovering an unsaved Excel file |
|
I need to recover an Excel file that was saved over. |
Recovering an overwritten Excel file with Previous Versions Recover from a backup |
How to Recover an Unsaved Excel File
You can run into the problem of needing to recover an Excel file that has not been saved for several reasons. Among them are:
- 😱 Human error – You might have closed an Excel document without saving your file.
- 🚫 Application failure – The program can sometimes hang, making it necessary to perform a force quit which may result in an unsaved Excel file.
- 🖥️ PC crash – Your machine might suddenly stop working, leaving you with unsaved Excel files after the crash.
✅
Luckily, Microsoft has built an autosave function into the app that can help you get back an unsaved file. It’s called AutoRecover and here’s how to use it to get back an Excel file that was not saved.
- Launch Excel and go to the File tab.
- Click Open and then select the Recent Workbooks option on the top left.
- Scroll down and click the Recover Unsaved Workbooks button.
- Locate the lost file and double-click it to open the document.
- The file will open in Excel and you can use the Save As option to save it to your desired location.
You need to configure the AutoRecover settings in Excel to use the feature. You can control how often files are saved automatically or turn off the feature if you don’t want to use it. We recommend that you turn it on and set the save interval to a small number that eliminates the possibility of losing a lot of unsaved work. Use the following steps to configure AutoRecover in Excel.
- Go to the File tab and choose Options.
- Click on the Save tab.
- Ensure that both the ‘Save AutoRecover information every X minutes’ and ‘Keep the last autosaved version if I close without saving’ are checked.
- Click on OK.
How to Recover a Deleted Excel File
If you are faced with a lost or deleted Excel file, there are several methods with which you can attempt to recover it.
Method 1: Check the Windows Recycle Bin
The first place to look for a lost Excel file is the Windows Recycle Bin. The developers of the world’s most popular operating system knew that accidents can happen. It’s very easy to accidentally delete an important file that you immediately realize you need. The Recycle Bin was designed to take care of that.
There is no mystery to the Recycle Bin. It is merely a special folder that the Windows operating system uses to temporarily store deleted items. Here’s how to recover a deleted Excel file using the Recycle Bin.
- Open the Recycle Bin.
- Locate the item you want to retrieve.
- Right-click on the item and select the Restore option.
👀
The Excel file will be restored to its previous location where it can be used as if it was never lost.
Method 2: Check Your Backups
It is considered best practice for all computer users to regularly back up their data. This can be done through the native Windows operating system facility known as File History. You can also use other third-party backup solutions including backing up to the cloud. For this discussion, we will use backups made with File History as the media used to recover a deleted Excel file. For more information regarding backing up your Windows 10/11 system in this way, check out this article.
Follow these steps to recover files backed up by File History. Alternative backup and recovery solutions will use a similar procedure.
- In the taskbar’s search box, type restore files.
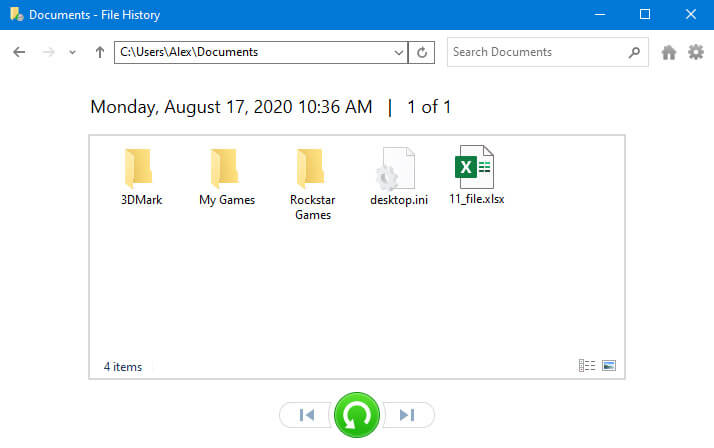
- Select Restore your files with File History.
- Locate the file you want to recover and use the arrow keys to see what versions are available.
- Select Restore to recover the file to its original location, or Restore to if you wish to save it to a different place.
⚠️
For this method to work, you need to have backed up the file in question. If changes were made to the document since the last backup, you may lose some data but can still get back most of your information that was saved in the original file.
Method 3: Try Data Recovery Software
You will not be able to recover your lost Excel file from the Recycle Bin if it has been emptied, which permanently deletes the items in the bin. If you don’t have a backup or it’s too old to be helpful, you can use data recovery software to restore a deleted Excel document or sheet.
👀
Data recovery software takes advantage of the way the Windows OS deletes data. When the operating system deletes a file from your computer, it does not physically remove the data. It simply deletes the logical links to the data and marks the space formerly occupied by the item as available for use when needed to save new information.
Until the original file or folder is overwritten by new data, it can be recovered by data recovery software. The application scans a storage device and repairs the logical links, making the data accessible to the operating system and other programs. The key is to use data recovery software quickly before the original files are overwritten.
🗨️
There are many data recovery products on the market. They distinguish themselves by the reliability of their recovery algorithms and the ease-of-use provided by their user interfaces. We have used many of these recovery applications over the years, and have had great success using Disk Drill Data Recovery from CleverFiles. It provides users with a simple recovery method that has been proven reliable time after time.
The following steps demonstrate how to recover an Excel file using this flexible software tool.
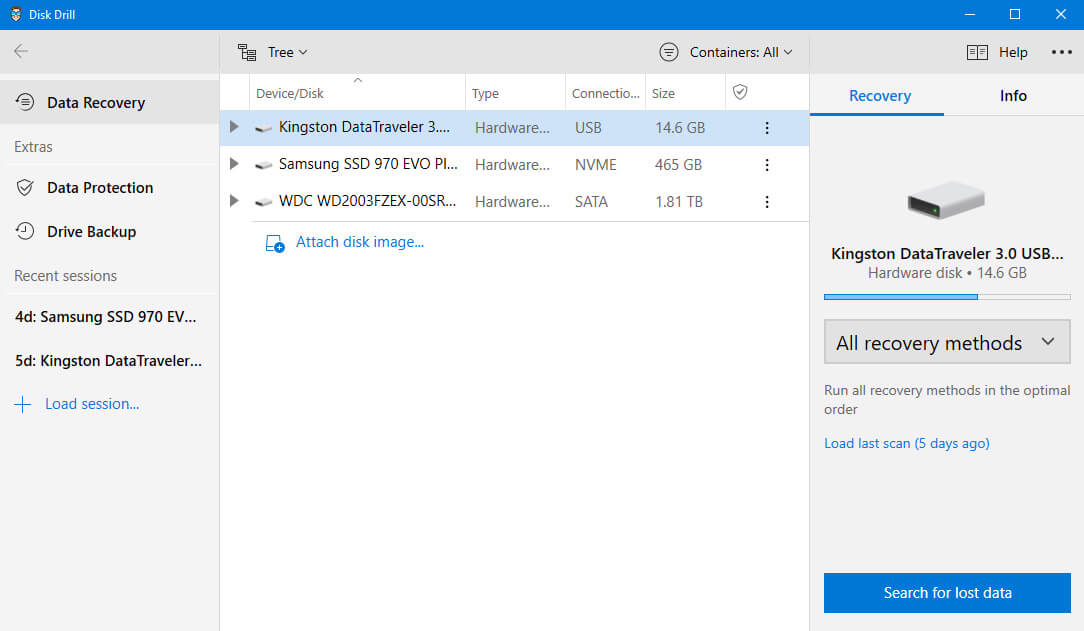
- Download and install Disk Drill.
- Select the storage device that contained the deleted Excel files.

- Scan for lost data using Disk Drill’s sophisticated recovery algorithms with just a click of a button.
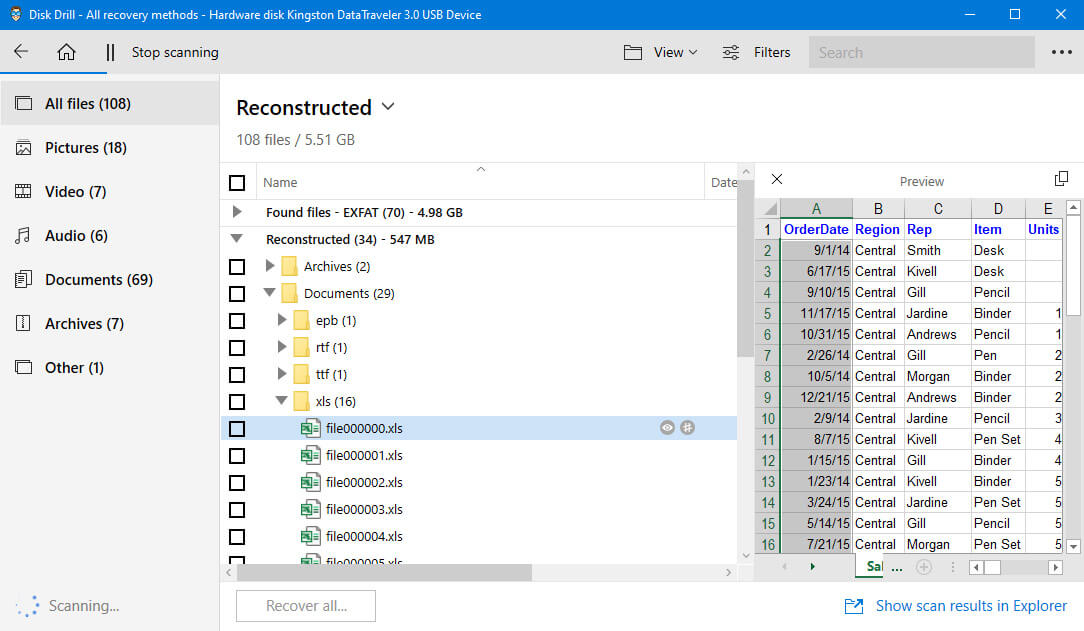
- Preview the files that can be recovered. You can limit the scan results so you only see the Excel files that have been found.
- Select the files you want to retrieve and choose a safe location to save them.
- Click the Restore button to get your lost files back.


Most other data recovery programs work similarly, though not many are as easy to use as Disk Drill. Some other recovery programs you might want to consider for a Windows 10/11 recovery of lost Excel files include:
- Recuva
- R-Studio
- Stellar Data Recovery
- PhotoRec
Whichever solution you choose, you will achieve the best results by acting quickly before deleted data is overwritten. We recommend you stop using the storage device that held the Excel files as soon as you realize there is an issue. Don’t save any new data to that device until the recovery is complete.
How to Recover an Overwritten Excel File
You may be able to use the recover Previous Versions facility of Windows 10/11 to revert to an older copy of a file using the following procedure. For this method to work, you need to have System Restore enabled which will create restore points from which the previous versions are recovered.
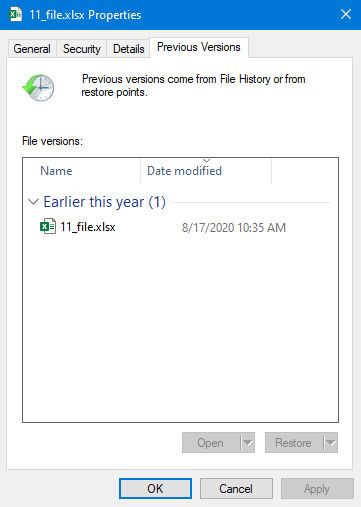
- Open File Explorer.
- Go to the file or folder you wish to recover.
- Right-click the item and select the Previous Versions option.
- Select the version you want to recover.
- Click on the Restore button.
Are There Differences in the Recovery Process for Different Excel Versions?
Yes, there are differences in the recovery process in Excel 2007/2010/2013/2016/ and Office 365. The major difference is the addition of the AutoSave feature to the well-known AutoRecover option that has been a part of Microsoft Office products for years. While you can still use AutoRecover to get back unsaved data, AutoSave keeps your files constantly updated when you use Office 365.
When you use Office 365, copies of your work are automatically saved by default. There is one change in your workflow that must be done to use this feature effectively. Instead of using File > Save As after making changes to an original document, you should use File > Save a Copy. This ensures that the original file will not be overwritten as AutoSave protects your data.
FAQ
By default, Excel temporary files on Windows 10/11 are saved in the following folder:
C:UsersUserNameAppDataLocalMicrosoftOfficeUnsavedFiles
Excel automatically starts File Recovery mode and attempts to reopen and simultaneously repair the workbook. You can also try to repair a reoccupied Excel file manually using the following procedure.
- Click Open on the File tab.
- Select the corrupted workbook that you want to open.
- Click the arrow next to the Open button and select Open and Repair.
- Select Repair to recover as much of the workbook’s data as possible. You can also choose to Extract Data to salvage values and formulas from the damaged spreadsheet.
Without software, the best way to recover a deleted Excel file is with the Windows Recycle Bin or a backup. Both methods are covered in detail in an earlier section of this article.
You may be successful using the procedure for recovering previous versions of a file that is detailed above or from a backup. Disk recovery programs may not be able to gain the necessary level of access on the network drive to perform a successful recovery.
Conclusion
There are many ways to get back lost or deleted Excel files. In most cases, the recovery will have a better chance of success if you act quickly after discovering the file has an issue. Stop using the storage device that contained the file until you have completed the recovery to avoid overwriting or further corrupting the data you wish to restore. We hope this information helps you recover your valuable Excel files and avoids losing important documents.
Robert Agar is the Content Writer & Managing Editor for Handy Recovery. Robert brings over 30 years of experience in data storage, security, compliance, backup, and recovery to the HandyRecovery team. Several years ago, he turned his attention from hands-on technical roles to develop a career as a freelance writer concentrating on technology and its impact on society. Areas of focus include the cloud, data recovery, artificial intelligence, and industrial automation.
Andrey Vasilyev is an Editorial Advisor for Handy Recovery. Andrey is a software engineer expert with extensive expertise in data recovery, computer forensics, and data litigation. Andrey brings over 12 years of experience in software development, database administration, and hardware repair to the team.
Imagine you had been working on a really important Workbook for hours and the system crashes. The file is not saved, and you just lost hours of work because you forget to hit the save button.
But what about when you realize that you made a mistake while working on the workbook an hour ago? How do you go back to an older version of the Excel file?
Well, don’t panic because we have compiled together some of the most efficient tips to recover unsaved Excel files and their older versions.
By default, Microsoft provides an AutoRecovery option which can recover files that were saved, but their latest version cannot be accessed because the system or Excel crashed.
Configure the AutoRecover Settings in Excel
- Go to the File tab and click on Options
- Click on the Save tab
- Make sure both ‘Save AutoRecover information every Z minutes’ and Keep the last autosaved version if I close without saving’ are checked. You can also keep the autorecover duration to the smallest to make sure every file is saved
- Click on OK
After this, whenever you open Excel after a crash, you will be able to see the files that can be autorecovered. But, this only applies to files that have been saved at least once. For files that haven’t been saved at all, follow the steps in the next section.
Recover unsaved Excel file
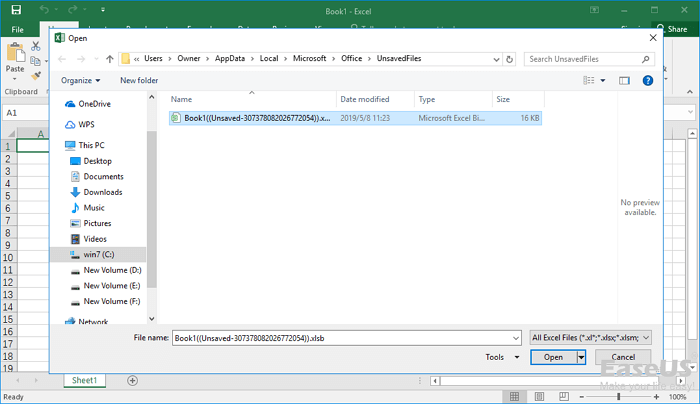
In order to recover an Excel file that you forget to save, follow the steps below
- Go to the file tab and click on ‘Open’
- Now click on the Recent Workbooks option on the top left
- Now scroll to the bottom and click on ‘Recover Unsaved Workbooks’ button
- Scroll through the list and search for the file you lost.
- Double-click on it to open it
- The document will open in Excel, now all you have to do is hit the Save As button
Recover overwritten Excel files
If you are using Excel 2010 or 2013, then you can easily recover an older version of the document. It is extremely helpful if you made a mistake on the Workbook and realized it late or you just want to see what the workbook looked like before.
To do this, here are the steps you need to follow
- Click on the File tab and select Info
- Now click on the manage versions tab. There you will be able to see all the versions that were autosaved by Excel
But you can also see these autosaved versions until you have saved the file. Once the current version of the file has been saved, all the previous autosaved files will disappear. To save them, you need to take the backup of the file.
Saving a backup of Excel file
Taking a backup of Excel files makes it possible to revisit older versions in case you made a mistake. This can be useful when you hit the save button when you didn’t mean it or when you delete the main original final.
Here is how you can take a backup in Excel 2010 and 2013
- Go to the File tab and click on ‘Save as’
- Now click on the Browse tab at the bottom
- A Save as window will open up. At the bottom of it, there is an option called Tools
- Click on Tools and select ‘General options’
- In the new Window, check on ‘Always create backup
Now every new Excel file that you create will have a backup file associated with it. But remember that backup Excel files have a different extension – .xlk
Overall, it’s very easy to recover Excel files even when you forgot to save them. All you have to do is not panic and follow the steps we mentioned.
How to Recover an Unsaved Excel File (4 Free Methods)
Losing an unsaved Excel file is a real pain🤕
Whether you lose an entire spreadsheet or just the latest round of edits, it can take a lot of time to fix the problem.
But don’t worry!
In this guide, I’ve compiled the 5 methods with the highest probability to recover unsaved Excel files.
Recover an unsaved Excel file with AutoRecover
So, you didn’t save the deleted file at all?
There’s still a good chance you’ll be able to recover your unsaved Excel file.
By default, Excel saves a temporary version of your Excel file (even if it’s unsaved) every 10 minutes.
You can access these temporary versions by following these steps.
1. In Excel, click on ‘Files’ in the ribbon and then go to ‘Open’.
2. Somewhere on the ‘Open’ screen, you will see an option called ‘Recover Unsaved Workbooks’ or something similar. Click it.
The exact words and placement of this button depend on your version of Excel. In Excel 2021 it looks like this:

3. Your unsaved Excel file may be in the folder that appears. If it is, just double-click to open it.
And do remember to save it this time💾

4. If the folder doesn’t contain your lost Excel file, close the dialog box and click on ‘Options’ (still from the ‘File’ tab in Excel).
5. Click on the ‘Save’ pane and see the AutoRecover file location.

Your lost Excel files may be there!
6. Navigate to that location and look for your unsaved Excel file.

If the file is not there, don’t panic yet✋
There are still plenty of methods to restore your lost data.
Read on!
If you’re running Windows, copy the AutoRecover file path from step 5, then press Windows Key + R to bring up the ‘Run’ command window.
Paste the file path and you are taken to the folder immediately.
Recover overwritten Excel files with OneDrive
If you’re not using OneDrive, skip to the next section.
Losing hours of work because you pressed save when you shouldn’t is a bummer👎
But if your file was overwritten, there are a few things you can do to restore a previous version of your Excel file.
1. Go to onedrive.live.com and locate the Excel file that was overwritten.
2. Right-click it and click ‘Version history’.

3. Identify the version of your Excel file you want to recover and choose whether to restore it (replacing the current version) or download it.

If you use the OneDrive application on your computer, you can just right-click the Excel file on your computer.
Then click ‘Version History’ to look for the version you want to recover.
Recover overwritten Excel files using File History
If you don’t use OneDrive (or didn’t keep the file in a OneDrive folder), you might still be able to recover a previous version of an overwritten Excel file.
1. Right-click on your file and click on ‘File history’.
2. Locate the version you want to restore in the dialog box.

3. Click the ‘Open’ or ‘Restore’ buttons to choose what you want to do with the file.
Did you find it? 🔍
Recover deleted Excel files
So, you deleted the file and want it back?
Here are a few things you can try, to recover your deleted Excel file.
Restore from Recycle Bin
1. Locate the Recycle Bin on your computer.
Read this guide if you have trouble finding it.
2. Find your Excel file (if it’s there) and right-click it.
3. Click on ‘Restore’ and your file is automatically put back to where it came from.

Unfortunately, this only works if you didn’t permanently delete your Excel file.
If you did, then there’s no way of getting it back without using 3rd party recovery software (and there’s still no guarantee).
But, if the deleted file was placed in a OneDrive folder, there’s a big chance you can get it back😊
Restore deleted Excel files from OneDrive Recycle Bin
Even if you permanently deleted your file, OneDrive still saves a version in its own Recycle Bin.
1. Go to onedrive.live.com and click on the ‘Recycle Bin’ in the left-side menu.
2. Find your lost Excel file and right-click it.
3. Click ‘Restore’ and your file is automatically restored to its previous location.

Prevent data loss with AutoRecover and AutoSave
Losing data is almost inevitable.
But you can make the process of recovering the data from an unsaved file a lot less painful if you’re prepared.
We recommend changing just a few settings to help prevent data loss in the future.
AutoRecover
AutoRecover saves a temporary version of what you’re doing in Excel every 10 minutes.
If Excel crashes, you can access this temporary version using the methods I explained earlier.
AutoRecover is active by default. If it somehow isn’t active on your computer, follow these steps:
1. Go to ‘File’ and ‘Options’.
2. In the ‘Save’ pane, make sure there’s a checkmark in ‘Save AutoRecover information every’ and ‘Keep the last AutoRecovered versions if I close without saving’.

3. Here you can also change when Excel should save this temporary version of your Excel file.
The default is every 10 minutes, but you can easily change that. Try 5 instead.
It might not seem like a big difference from 10 minutes, but it can save you a lot of work.
AutoSave
Of course, we recommend saving your changes often. Just hit Ctrl + S to overwrite the previous version of your document.
If you’re the type of person who forgets to do this (like me), you can toggle on ‘AutoSave’ on the top left side of the Excel interface.

AutoSave saves every single change you make in your Excel file – automatically.
And if you overwrite something, read here how you can recover overwritten versions of your Excel files.
That’s it – Now what?
I truly hope this guide helped you recover your unsaved files and restore your lost data.
Trust me, I’ve been through my fair share of rebuilding Excel files the hard way until AutoRecover and AutoSave/OneDrive came along.
But sometimes, other people are the cause of your data loss. If you share your Excel files with other people, I strongly suggest you learn a bit about file protection.
Read my guide here and learn to protect your Excel file from unintentional (and intentional) changes.
So, you might avoid being in a situation where you need to recover unsaved workbooks in the future.
See you around👋
![]() Written by Kasper Langmann, co-founder and Microsoft Office Specialist.
Written by Kasper Langmann, co-founder and Microsoft Office Specialist.
Updated May 27th, 2022.
Kasper Langmann2022-08-21T20:14:07+00:00
Page load link
Summary: Want to recover accidentally deleted or unsaved Excel file? Read this guide to learn how to recover excel file on your Windows PC. You may also try Stellar Data Recovery Free Edition to retrieve Excel documents quickly. Download now!

Contents
- How to Recover Unsaved Excel File in Windows 10 for Free?
- Recover deleted Excel files using Data Recovery Software?
- FAQ
There are times when your Microsoft Excel files get deleted either accidentally or unknowingly. Losing critical Excel files you have spent hours on is a painful experience. Fortunately, you may use a few methods for Excel document recovery. However, before you learn how to recover Excel file, let us understand what happens when an Excel document gets deleted.
What happens when you delete an Excel document?
When an Excel file gets deleted accidentally, it generally goes to the Recycle Bin. However, if they don’t show up in the Recycle Bin, they might be lost permanently.
So, where do the permanently deleted Excel spreadsheets go?
Permanently lost files stay in the folder or directory from where they got deleted, but become inaccessible to the user. The space from where the files got deleted is marked as free space by Windows, which means the Excel data still exists and can be recovered.
However, you can add new data to that free space.
If you keep adding data to it, the new data will overwrite the space, and you will not be able to perform Excel file recovery, even with data recovery tools.
Therefore, you must immediately stop using the location or drive from where you have lost your Excel files.

How to Recover Unsaved Excel File in Windows 10 for Free?
In this blog, you will learn how to recover unsaved Excel files using different methods based on how you lost the files, where they exist, and the chances of deleted Excel document recovery.
1. Recover Excel Files from Recycle Bin
Recycle Bin is the first place where you should look for the files when they get deleted. Recycle Bin in Windows acts as a container that holds all the recyclable items before getting lost permanently, i.e., after 30 days from the storage date.
If you have used the Del key to delete the files, you can recover deleted Excel documents from the Microsoft Windows Recycle Bin.
- Open Recycle Bin and locate the Excel app files you want to retrieve (See Image 1).

2. Select the files, right-click on them, and click Restore to recover deleted files in Excel. (See Image 2)

3. The deleted Excel files get saved to the folder from where they got deleted.
4. You may also drag and drop the recovered Excel files to the desired location.
Important Note:
Using the Shift + Del key to remove the files or emptying the Recycle bin will lead to permanent data loss. To recover permanently deleted Excel files, you will need a backup of the lost Excel files or reliable data recovery software. You must learn how to automatically backup an Excel file so that you can recover it when and if required.
2. Restore deleted Excel files from backup
If you have a Microsoft Excel backup file, you can use it to retrieve the lost data. Try out the following methods to recover unsaved Excel file:
[Note: Always use a different Windows partition or external storage media drives, such as HDD, SSD, etc., to save Excel recovered files from an existing backup file and prevent data overwriting.]
- Use Windows Backup & Restore (Windows 7)
Windows 7 has a built-in backup utility called Backup and Restore (Windows 7). It lets you create a backup of the system files and folders daily, weekly, or monthly. If you have a backup Excel recovery file, you can restore the previous version of the Excel file from the backup.
How to recover a deleted excel file from a backup copy:
- Connect an external storage media (HDD, SSD, USB, etc.) to your PC.
- Go to Control Panel > System and Security.
- Navigate to Backup and Restore (Windows 7) or directly go to Restore files from backup option. (See Image 3)

4. Next, click Restore my files or Restore all users’ files. (See Image 4)

5. Select a file you want to auto recover in Excel. (See Image 5)

6. Now, choose to Browse for files or a Folder. Click Next. (See Image 6)

7. Finally, select the folder where you want to recover unsaved Excel files.
- How to Recover an Unsaved Excel File with File History
File History is a backup utility by Microsoft Windows to help recover Excel file not saved or deleted from your system. It backs up the files stored in Documents, Pictures, Music, Videos, and Desktop folders, and the OneDrive files saved offline on your system.
You may also set up a drive for File History. If you have saved your essential excel files to these folders and kept File History ON, you can restore Excel file not saved or deleted from your drive.
How to Recover an Excel File that was Not Saved:
- Open Control Panel and navigate to File History option. (See Image 7)

2. Click Restore Personal Files, and you will see the files as per the backup time. (See Image 

3. Now, choose the Excel files to recover and click Restore. (See Image 9)

4. Select the location where you want to save lost Excel files.
- How to Recover Previous Version of Excel File
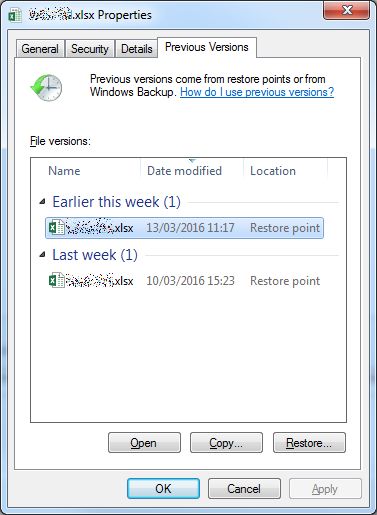
You can also recover previous versions of excel files with the help of the Previous Version utility. The Previous Versions can are the copies of the files and folders saved by Windows automatically as part of a restore point. You can also refer to the Previous Version as the copies of files created by Windows backup. You can recover files using the Previous Versions that were accidentally deleted or modified.
Note: This unsaved Excel file recovery utility will keep your files but delete the applications and drivers installed after upgrading to the latest version and reset any changes you made.
3. How to Recover Excel File with Google Drive Backup
If you have backed up your files on Google Drive, you can also use Google Drive backup to recover deleted excel files or unsaved workbooks.
How to recover an Excel file using Google Drive Backup:
- Log into your Google Account.
- You will be able to see all the files on the available on your account. (See Image 10)

3. Choose Excel files to retrieve, right-click on them, and select Download. (See Image 11)

4. Save the recovered Excel files at a different location or use an external storage media drive.
Recover deleted Excel files using Data Recovery Software?
If you do not have a backup of the deleted file and have permanently lost it, you can use data recovery software such as Stellar Data Recovery – Free Edition. This DIY software can extract files, folders, documents, emails, photos, videos, audio files, etc. It supports recovery from Windows PCs, laptops, HDDs, SSDs, USB, SD, etc.
The software can recover data in case of accidental deletion, formatting, corruption, or malware infection. Follow the below-said steps to recover permanently deleted excel files in windows 10.
How to Recover Deleted or Unsaved Excel Files With Stellar Data Recovery – Free Edition
- Download, install and run Stellar Data Recovery – Free Edition on your system.

2. The Home Screen of Stellar unsaved Excel file recovery software helps you Select What to Recover.
3. You may select whatever you want to recover, such as Office documents, Folders, etc.
4. Click Next to recover unsaved or permanently deleted Excel files. (See Image 12)

5. Select the folder from where you lost Excel files on the Recover From screen and click Scan.

6. Let the scanning process complete; the deleted files will appear on the screen.
7. Select the Excel files to retrieve. You can also preview them and click Recover. (See Image 14)

8. Now, click Browse to choose a location where you want to store the recovered Excel file.
9. Finally, click Start Saving to save the recovered excel files. (See Image 15)

Note: Do not save the recovered Excel file in the same drive/location to prevent overwriting the data.
Tips to Avoid File Deletion in Future
You may end up deleting files under any circumstances. However, you may use the methods explained in this blog to learn how to recover excel files that are accidentally deleted, crashed, or left unsaved. However, there is no point in overstating how better it is to safeguard the data and have a backup to avoid file deletion in the future. Here are some tips that may help you avoid file deletion:
- Stop using the device or drive from which you lost Excel files avoid data overwriting.
- Do not perform any hit-and-trial method to clean junk or unnecessarily delete files from your system.
- Take caution and be more attentive while using the Clean Disk utility or emptying the Recycle Bin.
- Keep the Antivirus program updated to prevent virus attacks on your system that may make Excel file recovery difficult.
- Avoid transferring data while your laptop is running short on battery.
- Always keep user-friendly data recovery software handy to recover lost Excel files.
Closing Thoughts
The process to recover unsaved Excel files may be quite tricky but isn’t impossible. First, look if you can find the files in the Recycle Bin. If the files are there, select them, and restore them to the original location. Recycle Bin doesn’t show deleted items? Use your data backup to retrieve deleted excel files.
However, if you have lost files permanently and run out of backup, use Stellar Data Recovery Free Edition to recover Excel files for free! The software can extract all types of data lost due to deletion, formatting, corruption, or malware attack.
FAQ
Where do permanently deleted files go?
When the files get deleted, it directly goes to recycle bin from where one can easily restore it. However, if you don’t find your excel file in the recycle bin, you can opt for Stellar data recovery for Windows to get your lost excel back.
How to Recover Deleted Worksheet in Excel?
- Open Excel, click “File” available on the menu bar and then click the “Info” tab.
- Now go to “Manage Workbook,” click on the drop-down icon and click on “Recover Unsaved Workbooks.”
- Now, you will redirect to unsavedfiles location, where you will see all the available unsaved files. Select the one and click on the “open” button.
About The Author
isha
Isha is a technical blogger and data recovery expert. She has experience in Windows data recovery. She writes about technical tips and tutorials.
Best Selling Products

Stellar Data Recovery Professional for Windows
Stellar Data Recovery has the right Windows Recovery tool for all your data recovery
Read More

Stellar Data Recovery Professional for Mac
Stellar Data Recovery for Mac program performs safe..
Read More

Stellar Photo Recovery
A comprehensive photo recovery software to restore photos, music & video files
Read More

Stellar Repair for Video
Powerful video repair tool for repairing corrupt or damaged MOV and other video files
Read More
Did you forget to save Excel files on a Windows PC? Follow the steps below to recover unsaved Excel files with simple clicks.
| Workable Solutions | Step-by-step Troubleshooting |
|---|---|
| Recover Unsaved Excel Workbooks | Open a new or an Excel workbook. Go to «File > Open»…Full steps |
| Recover Updated Excel Files | Open the Excel application, find «Recovered» and click «Show Recovered Files»…Full steps |
| Recover from Previous Versions | Open Excel, and click «File» > «Info» > «Manage Workbook»…Full steps |
| Recover Overwritten Excel Files | Enter the OneDrive official page and sign in to your account…Full steps |
| Other Effective Solutions | Restore from File History > Run Data Recovery Software…Full steps |
Common Reasons that Can Lead to the Loss of Your Excel File
Any business owner or manager knows that data is essential to the success of their enterprise. Without accurate, up-to-date information, it would be difficult to make informed decisions about where to allocate resources or how to set prices. Excel files are often used to store this vital data, as they offer a convenient way to organize and manipulate large amounts of information. However, excel data loss can occur for a variety of reasons.
01
Accidental Deletion:
One common cause is accidental deletion. This can happen if a user accidentally clicks the wrong button or deletes an Excel file without meaning to. But you can recover deleted Excel sheets if you have the right methods.
02
Unintentional Formatting:
Instead of manually deleting all files stored on a storage device, this error often happens all of a sudden and you can’t open the Excel file. Formatted files can almost always be recovered, but you must begin the recovery process promptly.
03
Excel Corruption:
Another common cause is corruption. This can happen if a file is damaged or corrupted during storage or transfer. You can repair corrupted Excel files if they are not heavily damaged. When it comes to a heavily corrupted file, the backup is a better choice.
04
Excel Overwritten:
Finally, Excel data loss can also occur if a file is simply overwritten or lost. Unlike the previous causes of Excel data loss, it is often impossible to recover overwritten Excel files. Especially if you’re not willing to spend some money on data recovery services.
Whatever the cause, Excel data loss can have serious consequences. Not only can it lead to lost productivity, but it can also result in lost revenue and customers. That’s why it’s so important to take steps to prevent Excel data loss from happening and recover unsaved Excel files if necessary.
How to Recover Unsaved Excel Files on Windows 11/10/8/7
We’ve all been there — we’re working on an important Excel file, and we accidentally close it without saving it. Or, worse yet, our computer crashes and we lose unsaved changes. Suddenly, all of our work seems like it’s gone for good. But there is hope! In many cases, it is possible to recover unsaved Excel files on Windows 10. Luckily, there are a few different methods you can try to recover your Excel documents.
Let’s take a look at those Excel recovery methods to see how they’re done.
Method 1. How to Recover Unsaved Excel Workbooks
You are working on a new Excel file and have never saved the file at all. If Excel crashes or your system crashes, you can still recover the unsaved Excel file.
- Notice:
- The method works only if Excel has enabled AutoSave and AutoRecover functionality. It’s enabled by default so you should be able to use the method to recover the files.
Follow the steps below to recover any Excel file that hasn’t been saved yet.
Step 1. Open a new or an Excel workbook.
Step 2. Go to «File > Open».
Step 3. Click the «Recent» option on the top left.
Step 4. Click the «Recover Unsaved Workbooks» button at the bottom.

Step 5. Scroll through the list of unsaved Workbooks and open the one you want.
Step 6. Hit the «Save As» button to recover the.
By default, Excel saves Excel temporary files — a copy of all the unsaved files at the following location:
C:Users[YourSystemName]AppDataLocalMicrosoftOfficeUnsavedFiles
In the above address, you need to replace [YourSystemName] with the name of your system. This folder saves copies of Excel files. You can also access this folder directly to perform unsaved Excel document recovery.
Method 2. How to Recover Updated Excel Files
This method would work if you have previously saved the file before Excel or the system crashed. You can have the previously saved file, but you lose the changes you made. Now, follow the steps below to recover the updated Excel file.
Step 1. Open the Excel application, find «Recovered» and click «Show Recovered Files».
Step 2. The «Document Recovery» pane will display the unsaved files. Open and save the Excel file you need.
Method 3. How to Recover Unsaved Excel from Previous Versions
This method applies to this situation — you have a saved Excel file and you update the data. But what you really want is the old version of the Excel file. If you are using Excel 2010 and versions after that, you can get the previous versions of Excel with the steps below.
Step 1. Open Excel, and click «File» > «Info» > «Manage Workbook».
Step 2. Click «Recover Unsaved Workbooks» from the drop-down menu.
Step 3. Click on the version you want to restore and click «Open».
Step 4. In the bar at the top of the file, click «Save As» to save the file.

You need to make sure that the AutoRecover option is enabled to make this method work.
Method 4. How to Recover Overwritten Excel Files
Storing important files in the cloud can help to prevent data loss in the event of a hardware failure or other catastrophe. OneDrive and DropBox are two popular cloud storage services that offer a convenient way to back up files and access them from anywhere.
How to Recover Overwritten Excel Files from OneDrive
When it comes to storing Excel files, OneDrive is a great option. It offers 2 GB of storage for free, and users can purchase additional storage if needed. It keeps track of prior versions of files, so users can restore an older version if necessary. To recover your unsaved Excel file from OneDrive, follow these steps:
Step 1. Enter the OneDrive official page and sign in to your account.

Step 2. Click on the folder you saved your file in (in our case, that’s Documents).
Step 3. Find the Excel document you’re looking for, and right-click it.
Step 4. Select «Version History». You can see all the previous versions of the file in the pane on the left.
Step 5. Find the one you’re looking for, and select «Restore» to overwrite the current version, or click «Download» to download a copy of that version.

How to Recover Overwritten Excel Files from DropBox
DropBox also offers 2 GB of storage for free, but it caps file sizes at 100 MB. As a result, users with large Excel files may need to upgrade to a paid plan. For users who need to recover overwritten Excel files, DropBox also offers a convenient and reliable solution. To get the previous version of the Excel file from DropBox, follow the steps below.
Step 1. Log into DropBox.

Step 2. Click on the three dots for the file for which you want to see the previous versions.
Step 3. Click the» Version History» option.

Step 4. Open and download the Excel data from DropBox.
No doubt, Microsoft OneDrive, and DropBox are great tools for storing and sharing files. You don’t have to worry if you regularly back up your office files to these powerful cloud services.
Method 5. Restoring Previous Versions of the Excel from File History
If you accidentally delete or make changes to an Excel file that you later regret, you can use File History to restore a previous version of the file. Make that you’ve enabled File History, and then restore Excel data with the steps.
Step 1. Navigate to your file in Windows Explorer.
Step 2. Right-click the file and select «Previous Versions».

Another window will appear, and you’ll see any previous versions that you can restore. If you haven’t turned on File History and haven’t created a restore point, you can’t retrieve any data.
Method 6. How to Retrieve Unsaved Excel Files with Data Recovery Software
Losing an unsaved Excel file can be frustrating, especially if you’ve spent a lot of time working on it. However, there is still hope — you may be able to recover XLSX/XLS files using data recovery software. Data recovery software can scan your hard drive for lost or deleted Office files and recover them if possible. EaseUS Data Recovery Wizard is one of the most popular data recovery programs available.
- It offers a variety of features that make it a valuable tool for anyone who needs to recover lost data.
- It supports a wide range of file types, making it possible to recover photos, videos, documents, and more.
- With it, you can perform Excel corrupted file recovery, undelete Excel files, and run Excel password recovery.
- The software also includes a preview feature that allows you to view recovered files before saving them.
Overall, EaseUS data recovery software is an excellent choice for anyone who needs to recover lost or deleted Excel files. Read on to carry out Excel recovery with EaseUS file recovery software.
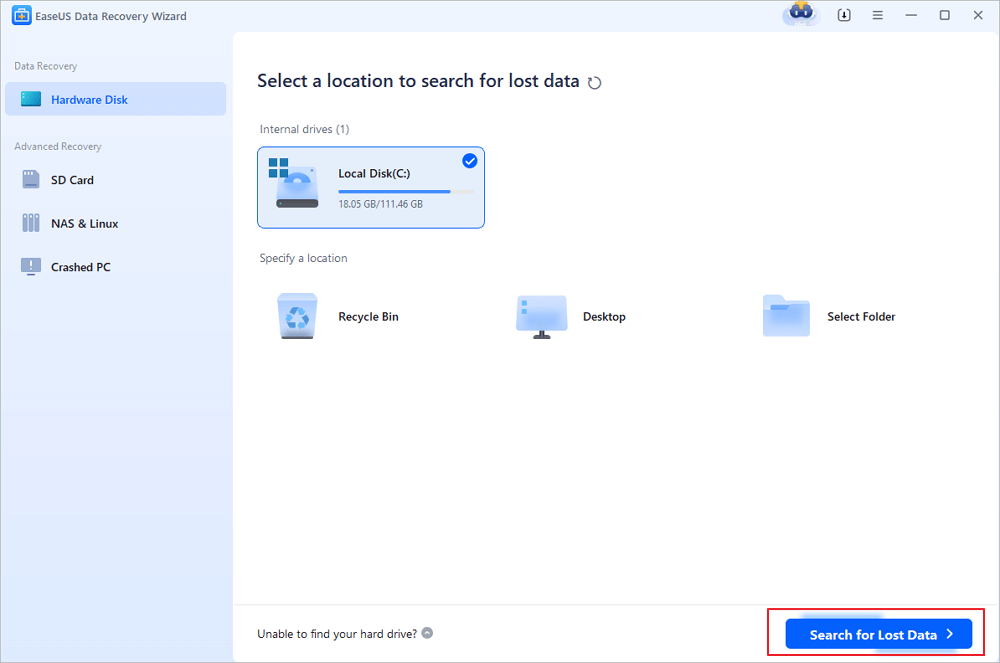
Step 1. Select location and click «Scan»
Choose the drive or a specific folder on Desktop or somewhere else where you lost the excel files, and click the «Scan» button.
Step 2. Locate your excel files
To quickly find the Excel files from the scan results, click the «Documents» option in the left panel. Choose «Excel», and click «Preview» to check if the Excel files are the wanted ones.
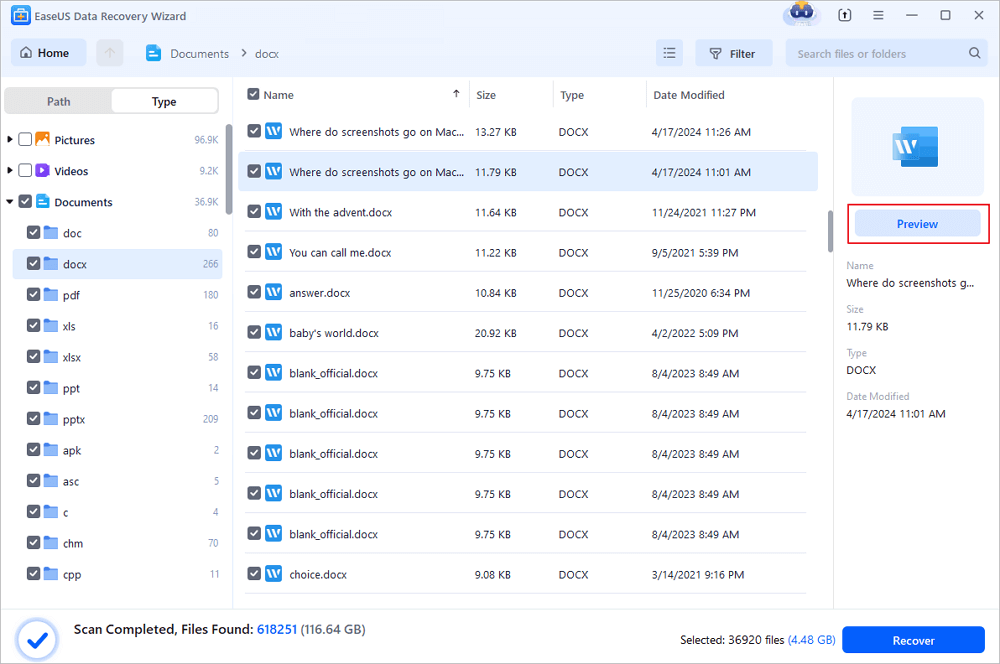
Step 3. Recover Excel files
Finally, select the desired Excel files and click the «Recover» button. Then, select a folder to save the Excel files to another location.
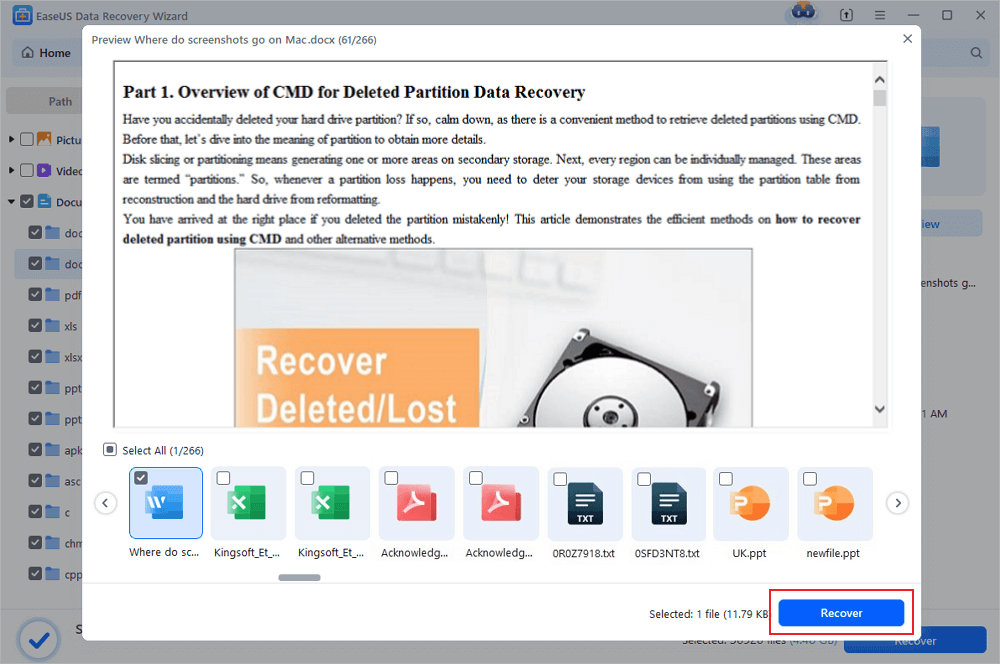
When it comes to a Mac user, things could be a little different. There are a few different ways that you can go about recovering an unsaved Excel file on Mac.
Method 1. Restore Unsaved Excel File from the Temporary Folder
The first thing to do is simply look for the file in the temporary folder. This folder should contain a list of all of the recently saved Office files.
- Go to «Applications» > «Utilities» > «Terminal».
- Type open $TMPDIR and press «Return» to open the Temporary files folder. Select the folder named «TemporaryItems».
- Find the unsaved Excel file under «TemporaryItems» and restore.
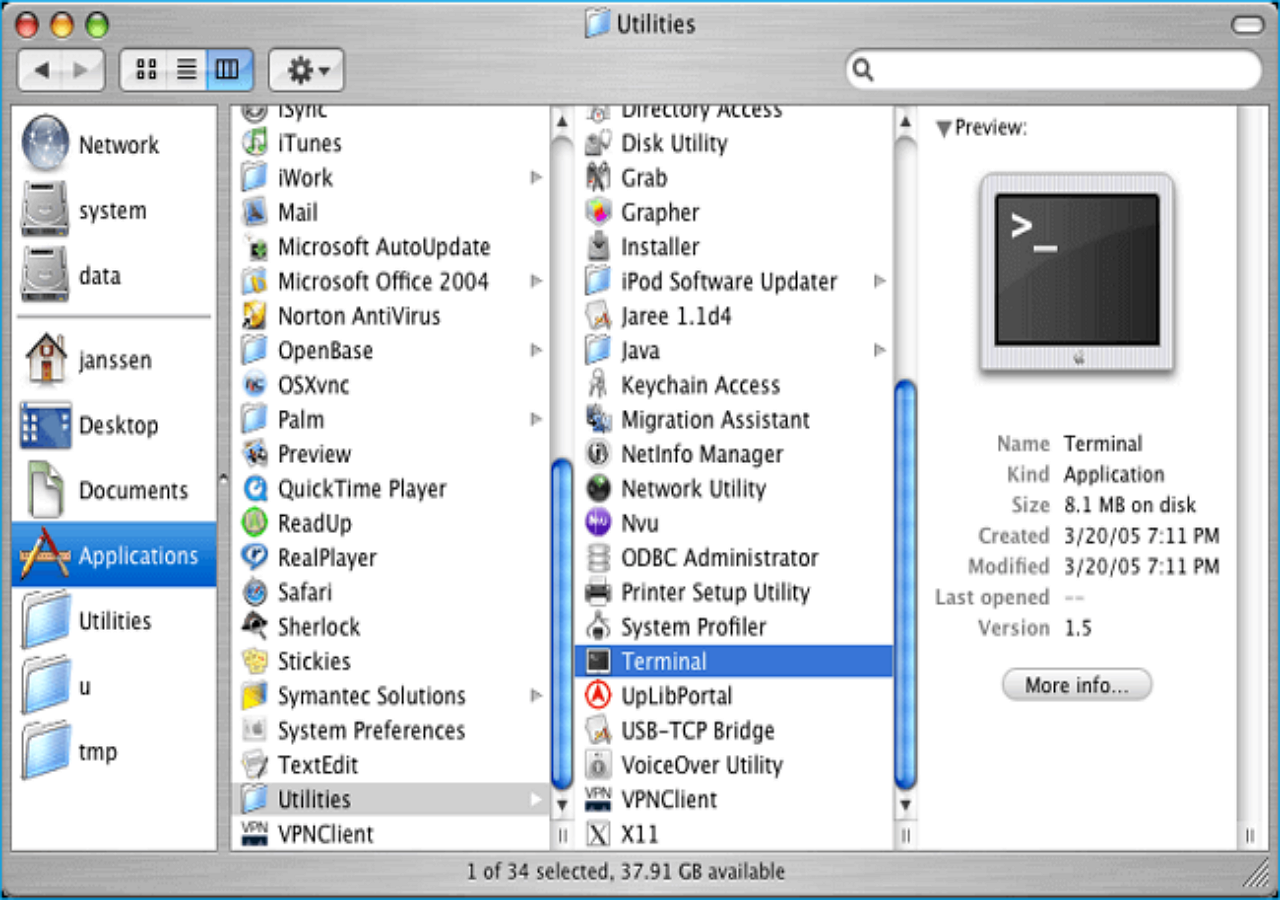
Method 2. Recover Lost or Unsaved Excel Files from AutoSave
If the file you’re looking for isn’t in the Temporary folder, then your next best bet is to try opening up the Microsoft Office AutoSave folder. From here, you should be able to locate the unsaved file and open it up.
- Go to «Applications» >» Utilities» > «Terminal».
- Type defaults write com.apple.Finder AppleShowAllFiles true.
- Click «Finder» > press «Return» on your Mac.
- Type /Users/username/Library/Containers/com.microsoft.Excel/Data/Library/Preferences/AutoRecovery and click «Go» to open Excel’s AutoRecovery folder.
- Find the unsaved spreadsheet files and recover them to another safe location on Mac.
If neither of these methods works, then your last resort would be to use Mac data recovery software to scan your hard drive for any lost or deleted Excel files.
Full Guide
Still have problems? Click here to learn how to recover unsaved excel files on Mac.
Precautions to Avoid Excel Data Loss — AutoSave
As anyone who has ever lost an important Excel spreadsheet can attest, data loss is a serious issue. Whether due to a power outage, system crash, or simply user error, the consequences of losing valuable data can be severe. This is why it is so important to enable Excel AutoSave.
Excel AutoSave automatically saves a copy of your workbook at regular intervals, ensuring that you will always have a backup in case of an unexpected event. To enable AutoSave, simply click the «File» tab and select «Options». In the Save category, check the box next to Save AutoRecover information every _ minutes.
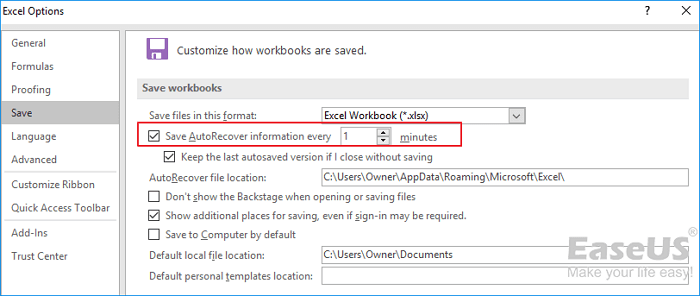
You can also choose how often you would like Excel to save your workbook by changing the number of minutes in the text box. In addition to enabling AutoSave, there are several other steps you can take to avoid Excel data loss.
1. Save your workbook regularly.
Even though Excel will save your workbook automatically, it’s always a good idea to save manually as well. This way, you can be sure that your latest changes are always saved.
2. Back up your workbook.
In addition to saving the workbook regularly, it’s also a good idea to back up your workbook periodically. This way, you’ll have an extra copy of your data in case something happens to your original file.
3. Avoid working files without first creating a backup.
This way, if something does happen to the file, you will still have a copy to fall back on.
4. Save Excel files in multiple formats
Finally, it’s always a good idea to save your files in multiple formats. If one Excel becomes corrupted or unreadable, you’ll still have access to your data in another format.
Conclusion
Excel is a powerful tool for organizing and analyzing data, but it’s also susceptible to data loss. If you accidentally close an unsaved Excel file, or if your computer crashes while you’re working on a file, you may be able to recover your work using Excel’s AutoRecover feature. To maximize your chances of recovering unsaved Excel work, make sure that AutoRecover is turned on and you know where the recovery files are stored. With a little luck, you should be able to get your work back.