
Transcribe is the ‘speech to text’ option in Microsoft Word. It lets you record live or upload an audio file and convert it into text. Here’s a complete guide to using Transcribe and dealing with its annoyances.
Record a speech, lecture or meeting then later get a written transcript from an audio file. Virtual meetings can be recorded and now that can become a written record as well.
In 2020, Transcribe was originally available in Word Online (aka Word for web) and later spread to OneNote for Windows. In February 2023, Transcribe appeared in Insiders releases of Word 365 for Windows. It was promised to Office Mobile apps before the end of 2020 but hasn’t appeared yet.
The limited availability isn’t a big problem. Make your transcription document with Word in a web browser then open the final document in any other Word software.
Update: Transcribe is now in OneNote for Windows and Word 365 for Windows.
Transcribe is mostly a cloud service and works the same for all apps.
- What you need
- Many Languages
- Uploading and converting to text
- Live recording
-
Difference between Dictate and Transcribe recording
- Dictate
- Transcribe
-
Editing a transcription
- Fixing or editing transcript
- Change all Speaker names.
- Playback
- Listen and edit
- Same speaker, over and over again
-
Copying to Word document
- Add all to document
-
Transcript problems
- Add section to document
- Reopening a document with a transcription
-
Transcribe requirements and limitations
- One Transcription per document
- Privacy
What you need
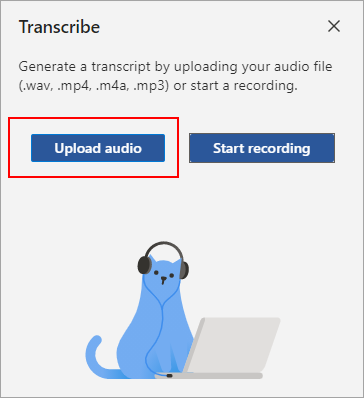
All you need to start is an audio file up to 200MB. Officially in .mp3 .m4a .mp4 or .wav format but we discovered Three extra audio formats that work with Microsoft 365’s Transcribe
The speech should be clear with little background noise or music to confuse the ‘speech to text’ system.
Transcribe can also record live, saving the audio file to OneDrive and offering a Word document of the text.
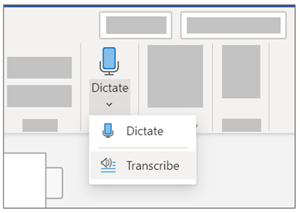
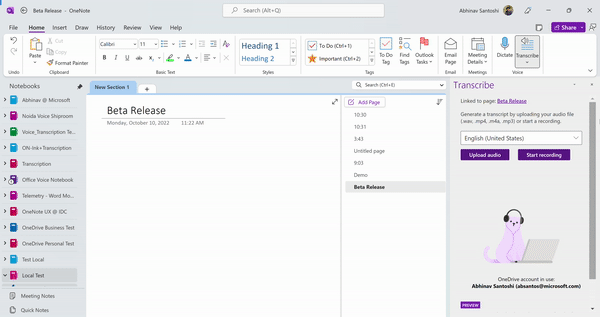
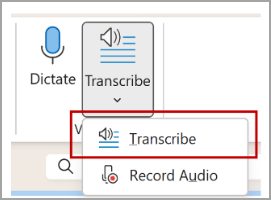
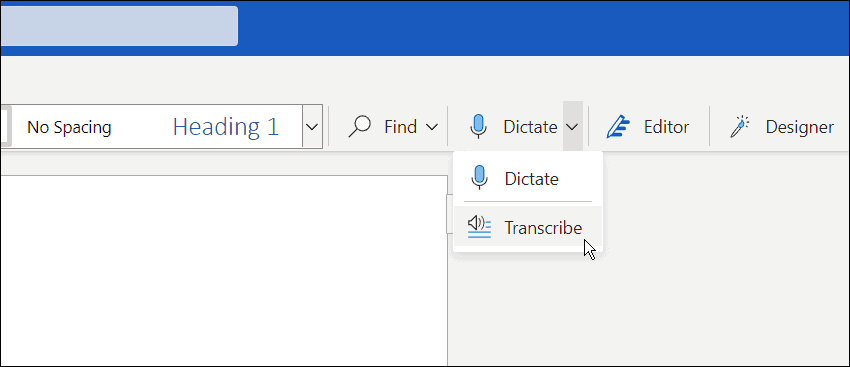
Start from Home tab, over on the right side under Dictate or microphone icon is now a Transcribe option.

If this is your first time with Dictate or Transcribe in Word Online you’ll be asked if the microphone can be connected to the browser. Here’s the prompt in Chrome. Choose ‘Allow’ to continue.

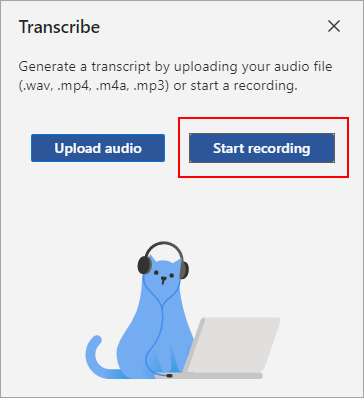
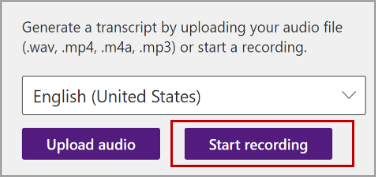
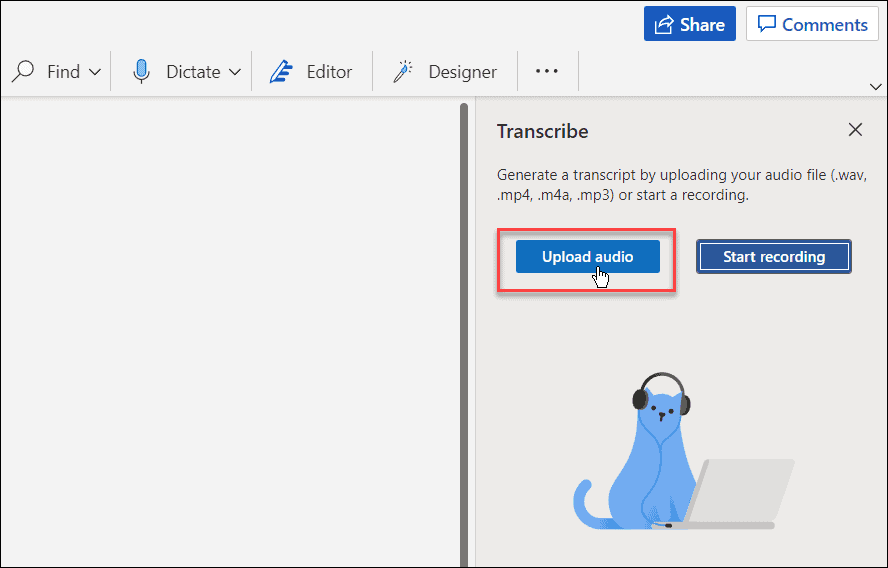
The Transcribe pane opens

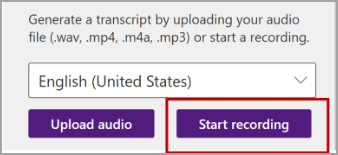
Upload audio – use an existing audio file, officially in .mp3 .wav .mp4 or .m4a format. In practice, there are three extra audio formats that work with Microsoft 365’s Transcribe
Start recording – records audio using the default microphone. That’s saved to your OneDrive account and converted to text.
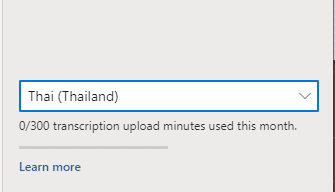
At the bottom is a note about the number of transcription minutes used that month.
Many Languages
At the bottom of the Transcribe pane is a language selector. A wide range of languages and dialects are listed, far larger than the twenty-ish that Microsoft 365’s Dictate supports.
Here’s Microsoft’s list of supported languages.

Tip: Transcribe might be the workaround, if you’re frustrated with your language not being listed in Word/Outlook Dictate.
Uploading and converting to text
Click ‘Upload Audio’ and select the file to transcribe.
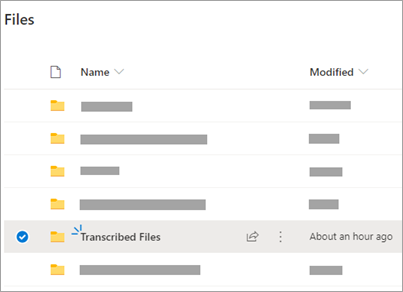
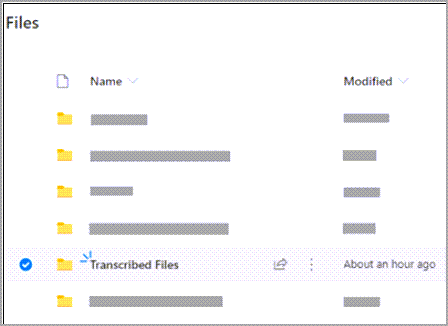
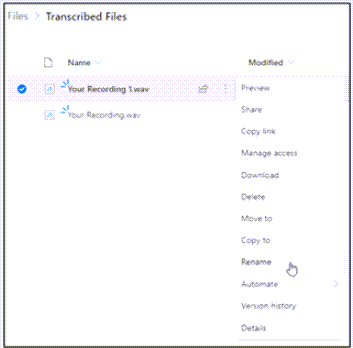
It’s strange that you can’t directly select an audio file on OneDrive. It has to be saved or synced to the local computer then uploaded again for Transcribe. Audio files are automatically saved to OneDrive in the /Transcribed Files folder.
Then wait while the audio is uploaded and converted to text.

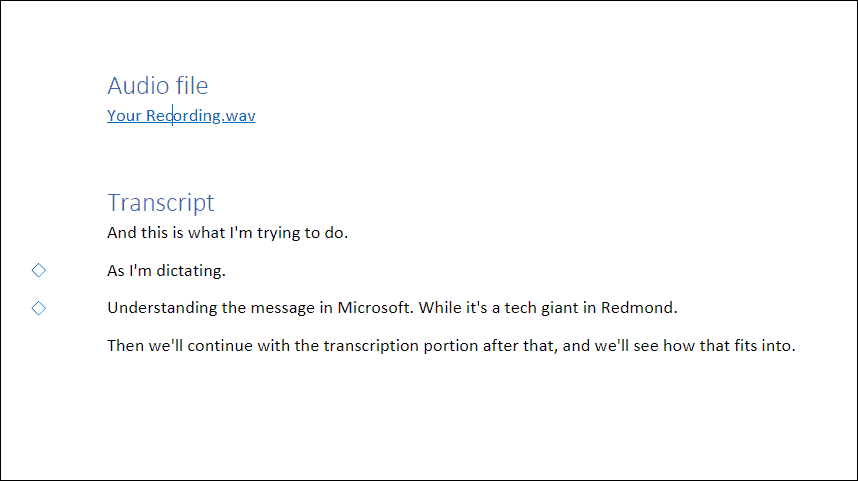
When it’s finished the recording and transcription text appears.

In this pane, there’s a lot more going on than first appears. See ‘Editing a Transcription’ below.
Live recording
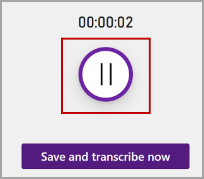
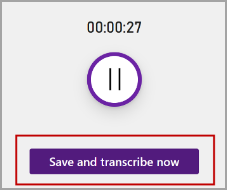
Clicking Start Recording then the mic icon turns on the default microphone. Start speaking and it’ll be recorded.

There’s a pause/record button available.
When you’re finished choose ‘Save and transcribe now’ to upload and convert the recording into text. See ‘Editing a Transcription’ below.
Difference between Dictate and Transcribe recording
At first, Dictate and Transcribe recording might seem the same. They are similar but there’s important differences.
Dictate
Dictate is live real-time conversion of text of what you say. Word and phrases appear in the document moments after you speak.
Different speakers aren’t marked in any way.
There’s no pause option (though we wish there was).
Voice commands like ‘New Paragraph’ work in Dictate.
What you say isn’t recorded for later playback.
Transcribe
Transcribe recording records your speech or meeting first. Then it’s uploaded and converted to text once the recording is over.
Different speakers are noted under separate headings.
There’s a Pause button.
Voice commands don’t work.
The transcription can be edited in the Transcribe pane.
The entire recording is saved in your OneDrive /Transcribed Files folder.
Editing a transcription
The transcribed text appears in the Transcribe pane and might seem simple but there’s a lot of useful features hiding here.

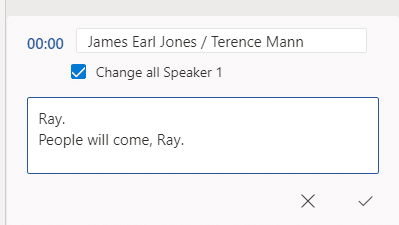
We tested Transcribe with a recording of James Earl Jones and his ‘People will Come’ speech from the movie ‘Field of Dreams’. Transcribe did a reasonable conversion job despite the music underlying the voices.
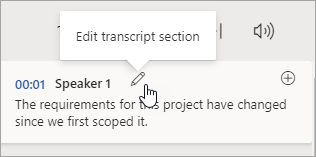
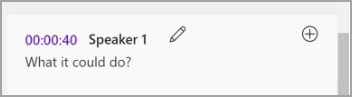
Fixing or editing transcript
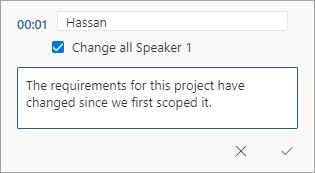
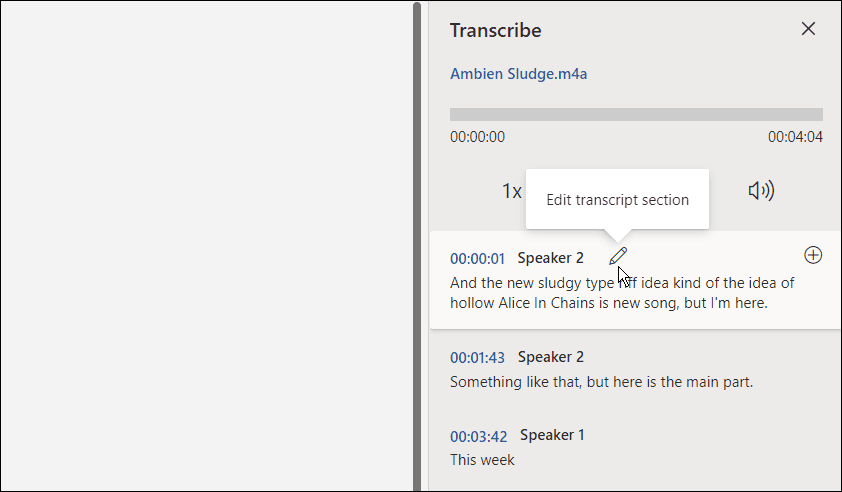
Look for the pencil icon and click to edit a section of the transcript.

Now you can change the name from Speaker n to a proper name.
And fix up the transcribed text …
Just like any text in a browser, you can select it, right-click and see what browser options are available like Copy or Search.

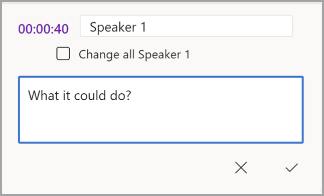
Change all Speaker names.
If you choose the ‘Change all Speaker …’ option in Edit a section, the name will be changed all through the transcript.

A speaker’s name can be changed once or throughout the transcription.
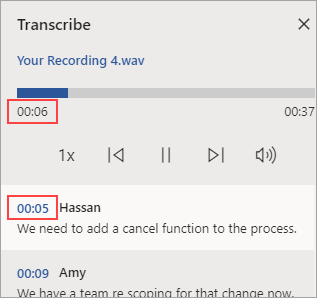
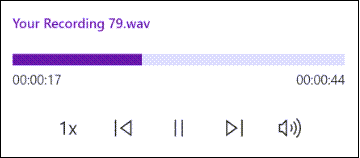
Playback
At the top of the pane are the usual Play, Pause, Forward, Back and Volume buttons.

Forward and Back jump to the next section of the transcript.
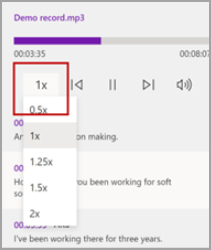
Playback speed
The nice addition is the speed controller on the left. Change the speed of playback from slow (half normal) up to twice normal to skip through the recording.

As you listen, the relevant part of the transcription is highlighted.
Listen and edit
Clicking on any time indicator will jump to that section of the recording.

If necessary, click the time stamp again to listen repeatedly and catch what was said.

Same speaker, over and over again
Transcribe makes separate sections for one speech. A single speech is broken up into (too many) separate sections.

It’s unclear if this is deliberate or a bug. Since it’s not been fixed for years, it appears to be deliberate .. Grrrr.
Perhaps the developers are ‘erring on the side of caution’ in case it’s not the same person talking? Separating the transcription lets the customer change the speaker name.
There’s no way to join sections together to make a large spoken block.
Copying to Word document
There are various way to copy some or all of a transcript to the Word document.
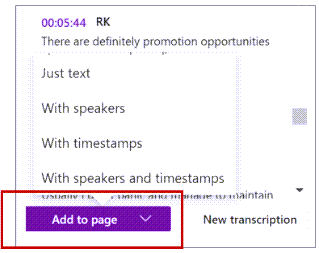
Add all to document
Most obvious is the ‘Add all to document’ button at the bottom of the Transcribe pane with some choices:

- Just Text
- With Speakers
- With timestamps
- With Speakers and timestamps
The transcription is copied to the document looking very plain, which is the polite way to say it.

Or with timestamps it looks like this:

The ‘Audio file’ and ‘Transcript’ lines use Heading 1 style. The rest is all in Normal style.
Transcript problems
There’s nothing to separate speakers names from the spoken words. It’s a shortsighted decision that makes it unnecessarily difficult to reformat the transcript.
Surely it would be better to use Heading 2 for speakers names? Then users could easily reformat the naming either by changing the look of Heading 2 or Replacing that style with another (e.g. ‘Speaker Name’).
At the least, transcribed words should have a separate style (e.g. ‘Transcript’ or ‘Spoken’), even if the initial style settings are the same as Normal? Ideally, each speakers words should be in a separate style (e.g. ‘Speaker 1 text’ etc.).
As Microsoft has done it, customers must manually go through the document reformatting it. Grrrr.
Question for Microsoft — What’s the point in having powerful and long-standing features in Word, if Microsoft itself won’t use them?
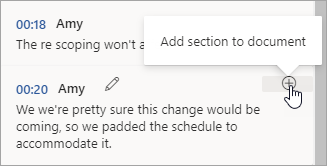
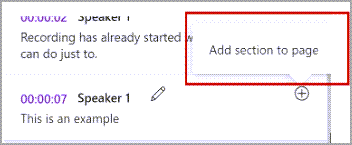
Add section to document
Or click the + icon to copy that section of transcript to the document.

Reopening a document with a transcription
Closing a document with a transcription, saves the document and the transcription.
If you reopen the document, go back to Home | Dictate | Transcribe. The Transcribe pane will open with the transcription there.
The audio file needs to remain in the OneDrive /Transcribed Files folder with the same name. It’s not saved in the Word document.
Of course, that only works with Word that supports Transcribe. Opening a transcribe document in another Word (like Word for Windows/Mac) can’t show the Transcribe pane (yet) but the transcription details are still in the .docx file.
Transcribe requirements and limitations
There are some requirements for Transcribe in Word:
- Microsoft 365 customers only – any plan, personal, education or corporate.
- Edge or Chrome browser for Word on the web.
- Many languages and dialects supported, see selector at bottom of Transcribe pane.
- Each uploaded file must be under 200MB.
- Audio formats: .wav .mp4 .m4a or .mp3.
- Apple’s .aac format is accepted see Three extra audio formats that work with Microsoft 365’s Transcribe
- NO limit on the transcription time but Microsoft might impose a limit in the future.
- There was a five hour limit – a total of 300 minutes of transcribing per month.
- Look at the bottom of the Transcribe pane to see how much time has been used.

One Transcription per document
Only one audio file or recording can be saved in a Word document.
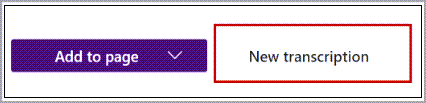
If you choose ‘New Transcription’ at the bottom of a current transcript, you’ll get this warning.

You can only store one transcript per document.
When you create a new transcript, the current transcript will be removed/deleted.
The workaround is to start a new Word document and do a separate Transcribe there.
This limitation appears to be linked to the way a transcription is saved within a Word document.
Transcripts can be copied between Word documents (just like any other text) to make a combined transcript document. Or even link/embed the transcription documents into another Word doc.
Privacy
According to Microsoft:
Your audio files will be sent to Microsoft and used only to provide you with this service. When the transcription is done your audio and transcription results are not stored by our service.
As usual, those assurances don’t tell the whole story.
Audio files are automatically saved to OneDrive in the /Transcribed Files folder. The transcribe text is normally saved to OneDrive, though that’s optional. Anything saved to OneDrive is subject to intrusion by Microsoft.
Microsoft can be compelled to hand over any customer data to government agencies in accordance with local law. That can happen without a warrant or notice to the affected customer.
Three extra audio formats that work with Microsoft 365’s Transcribe
Turn talk into text in Word 365 for Windows
Read Aloud in Word 365 and 2019 in depth
Read Aloud in Word for Mac
The full story on Dictate with Office 2013 & Office 2016

Note: This feature is currently only available on Word for the web.
The transcribe feature converts speech to a text transcript with each speaker individually separated. After your conversation, interview, or meeting, you can revisit parts of the recording by playing back the timestamped audio and edit the transcription to make corrections. You can save the full transcript as a Word document or insert snippets of it into existing documents.
You can transcribe speech in two ways:
-
Record directly in Word
-
Upload an audio file
Important: Users with Microsoft 365 subscriptions can transcribe unlimited minutes of uploaded audio using the transcribe feature. For more information, refer to Unlock unlimited upload minutes.
Note: Transcribe is not available for GCC/GCC-H/DOD customers.
You can record directly in Word while taking notes in the canvas and then transcribe the recording. Word transcribes in the background as you record; you won’t see text on the page as you would when dictating. You’ll see the transcript after you save and transcribe the recording.
-
Make sure you’re signed into Microsoft 365, using the new Microsoft Edge or Chrome.
-
Go to Home > Dictate > Transcribe.

-
In the Transcribe pane, select Start recording.
-
If it’s your first time to transcribe, give the browser permission to use your mic. There might be a dialog that pops up in the browser or you may have to go to the browser settings.
-
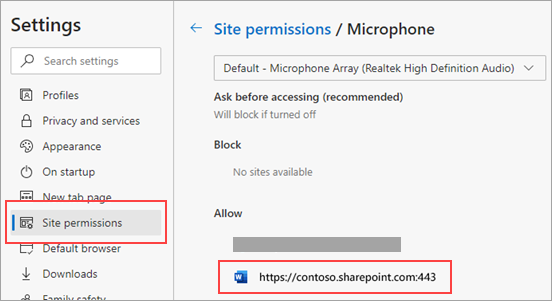
In the new Microsoft Edge: … > Settings > Site permissions > Microphone > Allow “https://[your company URL]…sharepoint.com”
-
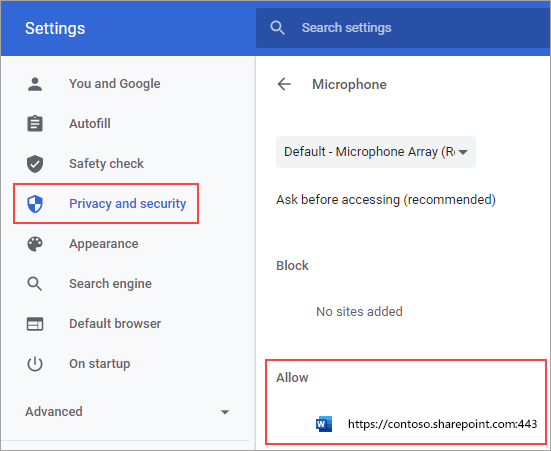
In Chrome: … > Settings > Privacy and security > Site settings > Microphone > Allow “https://[your company URL]…sharepoint.com”
Tips:
-
Be careful to set the correct microphone input on your device, otherwise results may be disappointing. For example, if your computer’s microphone input is set to your headset mic based on the last time you used it, it won’t work well for picking up an in-person meeting.
-
If you want to record and transcribe a virtual call, don’t use your headset. That way, the recording can pick up the sound coming out of your device.
-
-
-
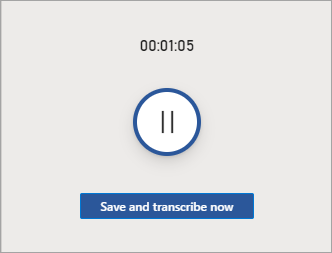
Wait for the pause icon to be outlined in blue and the timestamp to start incrementing to let you know that recording has begun.
-
Start talking or begin a conversation with another person. Speak clearly.
-
Leave the Transcribe pane open while recording.
-
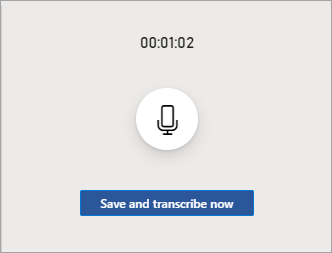
Pause recording by selecting the pause icon.
-
Resume recording by selecting the microphone icon.
-
When finished, select Save and transcribe now to save your recording to OneDrive and start the transcription process.
-
Transcription may take a while depending on your internet speed. Keep the Transcribe pane open while the transcription is being made. Feel free to do other work or switch browser tabs or applications and come back later.
You can upload a pre-recorded audio file and then transcribe the recording.
-
Make sure you’re signed into Microsoft 365, using the new Microsoft Edge or Chrome.
-
Go to Home > Dictate dropdown > Transcribe.
-
In the Transcribe pane, select Upload audio.
-
Choose an audio file from the file picker. Transcribe currently supports .wav, .mp4, .m4a, .mp3 formats.
-
Transcription may take a while depending on your internet speed, up to about the length of the audio file. Be sure to keep the Transcribe pane open while the transcription is happening, but feel free to do other work or switch browser tabs or applications and come back later.
Your transcript is associated with the document it’s attached to until you remove it. If you close and reopen the pane or close and reopen the document, the transcript remains saved with the document.
You can interact with the transcript in a few different ways.
Access the audio file
The audio file, whether recorded or uploaded, is saved to the Transcribed Files folder in OneDrive.
Play back the audio
Use the controls at the top of the Transcribe pane to play back your audio. The relevant transcript section highlights as it plays.
-
Select the timestamp of any transcript section to play that portion of audio.
-
Change the playback speed up to 2x.
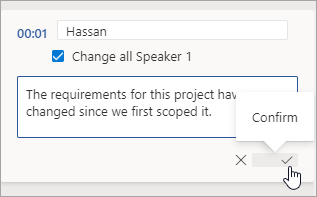
Relabel a speaker or edit a section
The transcription service identifies and separates different speakers and labels them «Speaker 1,» «Speaker 2,» etc. You can edit the speaker label and change all occurrences of it to something else. You can also edit the content of a section to correct any issues in transcription.
-
In the Transcribe pane, hover over a section you want to edit.
-
Select the Edit transcript section icon.
-
Edit the content or change the label. To change all instances of a label, select Change all Speaker [x].
-
To save your changes, select the Confirm icon.
Add a transcript to the document
Unlike Dictate, Transcribe doesn’t automatically add the audio to the document. Instead, from the Transcribe pane, you can add the entire transcript, or specific sections of it, to the document.
-
To add a specific transcript section, hover over the section and select the Add section to document icon.
-
To add the entire transcript to the document, select Add all to document.
-
To delete the transcript or create a new one, select New transcription. You can only store one transcript per document; if you create a new transcript for the document, the current transcript will be deleted. However, any transcript sections you’ve added to the document remain in the document, but not in the Transcribe pane.

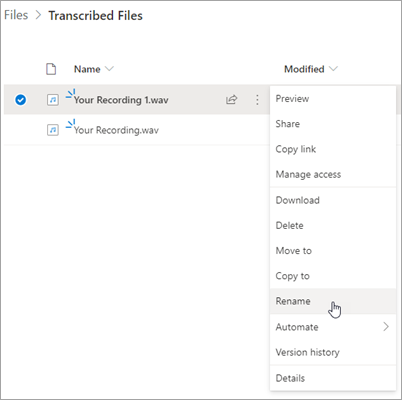
Rename a recorded audio file
You can rename an audio file that has been recorded.
-
Go to the Transcribed Files folder in OneDrive, or at the top of the Transcribe pane, click the name of the recording. When the audio player interface appears, close it to return to the Transcribed Files folder.
-
Find your recording, then select Actions > Rename and rename the recording file.
Note: TheTranscribed Files folder looks different depending on whether your OneDrive account is for a business or personal.
-
Close the Transcribe pane in Word and then reopen it to see the name update.
You can share the transcript with someone in two ways:
-
Select Add all to document to add the entire transcript to your document, then share the Word document as usual. The transcript will appear as regular text in the document and there will be a hyperlink to the audio file in the document.
-
Share the Word document as usual. The recipient can open the Transcribe pane to interact with the transcript. To protect your privacy, playback of the audio file is by default not available in the Transcribe pane for anyone that you share the Word document with.
You can also share the transcript and enable playback of the audio file in the Transcribe pane:
-
On your version of the Word document, click the filename at the top of the Transcribe pane to go to where the audio file is saved in OneDrive.
-
The Transcribed Files folder in OneDrive opens.
-
Find your recording, then select Actions > Share and add the email address of the person you want to share the recording with.
-
Share the Word document as usual.
-
The person that you shared both the Word document and audio file with will be able to open the Word document, open the Transcribe pane, and interact with both the transcript and audio file.
Now users with a Microsoft 365 subscription can transcribe unlimited minutes of uploaded audio using the transcribe feature. Previously, the limit was 300 minutes per month per user. There’s been no change for live recordings, and you can still transcribe unlimited minutes of live recordings.
Note: Unlimited transcription for uploaded audio is available to enterprise customers upon request.
How this change affects your organization
If you request access for your organization, unlimited transcription for uploaded audio is available to everyone in your organization as a preview experience. A limit for uploaded audio may be reintroduced in the future, with the option to purchase additional minutes based on your usage.
How to prepare
Fill out this uncapping upload minutes request form to enable the feature for your tenant. To learn more, email VoiceTransFC@microsoft.com.
Notes:
-
This is a preview experience and does not require any additional costs or technical changes and doesn’t have any negative performance impact for the end users.
-
After the preview period, there may be a cap for uploaded audio with the option to purchase additional minutes based on your usage. You will be notified well in advance of any pricing provisions so that you understand the implications and associated monetary costs and can make an informed decision.
-
As of now, this preview experience is not for individual users; it is only available at the tenant level. Everyone in the tenant will have access to it if it has been enabled.
System requirements are:
-
Transcribe only works on the new Microsoft Edge and Chrome.
-
Transcribe requires an Internet connection.
Transcribe experience works with 80+ locales:
-
Arabic (Bahrain), modern standard
-
Arabic (Egypt)
-
Arabic (Iraq)
-
Arabic (Jordan)
-
Arabic (Kuwait)
-
Arabic (Lebanon)
-
Arabic (Oman)
-
Arabic (Qatar)
-
Arabic (Saudi Arabia)
-
Arabic (Syria)
-
Arabic (United Arab Emirates)
-
Bulgarian (Bulgaria)
-
Catalan
-
Chinese (Cantonese, Traditional)
-
Chinese (Mandarin, Simplified)
-
Chinese (Taiwanese Mandarin)
-
Croatian (Croatia)
-
Czech (Czech Republic)
-
Danish (Denmark)
-
Dutch (Netherlands)
-
English (Australia)
-
English (Canada)
-
English (Hong Kong SAR)
-
English (India)
-
English (Ireland)
-
English (New Zealand)
-
English (Philippines)
-
English (Singapore)
-
English (South Africa)
-
English (United Kingdom)
-
English (United States)
-
Estonian (Estonia)
-
Finnish (Finland)
-
French (Canada)
-
French (France)
-
German (Germany)
-
Greek (Greece)
-
Gujarati (Indian)
-
Hindi (India)
-
Hungarian (Hungary)
-
Irish (Ireland)
-
Italian (Italy)
-
Japanese (Japan)
-
Korean (Korea)
-
Latvian (Latvia)
-
Lithuanian (Lithuania)
-
Maltese (Malta)
-
Marathi (India)
-
Norwegian (Bokmål, Norway)
-
Polish (Poland)
-
Portuguese (Brazil)
-
Portuguese (Portugal)
-
Romanian (Romania)
-
Russian (Russia)
-
Slovak (Slovakia)
-
Slovenian (Slovenia)
-
Spanish (Argentina)
-
Spanish (Bolivia)
-
Spanish (Chile)
-
Spanish (Colombia)
-
Spanish (Costa Rica)
-
Spanish (Cuba)
-
Spanish (Dominican Republic)
-
Spanish (Ecuador)
-
Spanish (El Salvador)
-
Spanish (Guatemala)
-
Spanish (Honduras)
-
Spanish (Mexico)
-
Spanish (Nicaragua)
-
Spanish (Panama)
-
Spanish (Paraguay)
-
Spanish (Peru)
-
Spanish (Puerto Rico)
-
Spanish (Spain)
-
Spanish (Uruguay)
-
Spanish (USA)
-
Spanish (Venezuela)
-
Swedish (Sweden)
-
Tamil (India)
-
Telugu (India)
-
Thai (Thailand)
-
Turkish (Turkey)
Note: This feature is currently available only on the Windows platform in OneNote for Microsoft 365.
Voice and Ink are a powerful combination. Together for the first time in Office, transcription and ink makes it easier than ever to take notes, focus on what’s important, and review your content later. With transcription on, you can record what you hear. You’re free to annotate, write notes, or highlight what’s important. When you’re ready to review, your ink will play back in lockstep with the recording. You can easily jump to a specific moment by tapping on any annotation to recall more context.
Note: Transcribe is not available for GCC/GCC-H/DoD customers.
You can transcribe speech in two ways:
-
Record directly in OneNote.
-
Upload an audio file.
Note: When you play back the audio, you can see the ink strokes that you made during the recording.
Important: Users with Microsoft 365 subscriptions can transcribe unlimited minutes of uploaded audio using the transcribe feature. For more information, refer to Unlock unlimited upload minutes.
You can record directly in OneNote while taking notes in the canvas and then transcribe the recording. OneNote transcribes in the background as you record; you won’t see text on the page as you would when dictating. You’ll see the transcript after you save and transcribe the recording. The ink strokes you make while recording it will be captured and replayed.
Make sure you’re signed into Microsoft 365 and using the latest version on OneNote.
Tips:
-
Be careful to set the correct microphone input on your device for the best result. For example, if your computer’s microphone input is set to your headset mic based on the last time you used it, it won’t work well for picking up an in-person meeting.
-
If you want to record and transcribe a virtual call, don’t use your headset. That way, the recording can pick up the sound coming out of your device.
Record
-
Go to Home > Transcribe > Transcribe.
-
In the Transcribe pane, select Start recording.
-
If it’s your first-time transcribing, give the OneNote app permission to use your mic: How to set up and test microphones in Windows (microsoft.com).
Tip: When the pause icon is outlined in purple and the timestamp starts to change, the recording has started and you can speak, have a conversation, or record a lecture. Speak clearly or make sure the incoming audio is clear.
-
Start talking or begin a conversation with another person. Speak clearly.
-
Leave the Transcribe pane open while recording.
-
Pause and resume recording as you need.
Pause the recording by selecting the pause icon.
Resume recording by selecting the microphone icon.
-
When finished, select Save and transcribe now to save your recording to OneDrive and start the transcription process.
-
Transcription may take a while depending on your internet speed. Keep the Transcribe pane open while the transcription is being made. Feel free to do other work or switch browser tabs or applications and come back later.

You can upload a pre-recorded audio file and then transcribe the recording. Make sure you’re signed into Microsoft 365 and using the latest version on OneNote.
-
Go to Home > Transcribe > Transcribe.
-
In the Transcribe pane, select Upload audio.
-
Choose an audio file from the file picker. Transcribe currently supports .wav, .mp4, .m4a, .mp3 formats.
Notes:
-
Transcription may take a while depending on your internet speed, up to the length of the audio file. Be certain to keep the Transcribe pane open while the transcription is happening, but feel free to do other work, switch browser tabs or applications, and come back later.
-
You can delete stored recordings in the Transcribed Files folder on OneDrive. Learn more about privacy at Microsoft.

You can do the inking on the canvas while the recording continues. Each movement is captured and played back in sync with the audio during playback.
Note: Inking strokes made during the paused state replay at the same time.
Your transcript is associated with the OneNote page it’s attached to, until you remove it from that document. If you close and reopen the pane or the document, the transcript remains saved with the document.
You can interact with the transcript these different ways.
Access the audio file
The audio file, whether it is recorded or uploaded, is stored in the Transcribed Files folder in OneDrive.
Play back the audio
Use the controls at the top of the Transcribe pane to play back your audio. The relevant transcript section highlights as it plays.
-
Select the timestamp of any transcript section to play that portion of audio.
-
Change the playback speed up to 2x.
Relabel a speaker or edit a section
The transcription service identifies and separates different speakers and labels them «Speaker 1,» «Speaker 2,» etc. You can edit the speaker label and change all occurrences of it to something else. You can also edit the content of a section to correct any issues in transcription.
-
In the Transcribe pane, hover over a section you want to edit.
-
Select the Edit transcript section icon.
-
Edit the content or change the label. To change all instances of a label, select Change all Speaker [x].
-
To save your changes, select the Confirm icon.

Add a transcript to the document
Unlike Dictate, Transcribe doesn’t automatically add audio to the document. Instead, from the Transcribe pane, you can add the entire transcript, or specific sections of it, to the document.
-
To add a specific transcript section, hover over the section and select the Add section to page icon.
-
To add the entire transcript to the document, select Add to page.
-
To delete the transcript or create a new one, select New transcription.
Note: You can only store one transcript per document; if you create a new transcript for the document, the current transcript will be deleted. However, any transcript sections you’ve added to the document remain in the document, but not in the Transcribe pane.
Rename a recorded audio file
You can rename an audio file that has been recorded.
-
Go to the Transcribed Files folder in OneDrive, or at the top of the Transcribe pane. Select the name of the recording. When the audio player interface appears, close it to return to the Transcribed Files folder.
-
Find your recording, then select Actions > Rename and rename the recording file.
-
Close the Transcribe pane in OneNote and then reopen it to see the name update.
Note: The Transcribed Files folder looks different depending on whether your OneDrive account is for a business or personal.
You can share the transcript with someone in two ways:
-
Select the Add all to document button to add the entire transcript to your OneNote page, then share the OneNote page as usual. The transcript displays as regular text in the page with a hyperlink to the audio file in the document.
-
Share the OneNote page as usual. The recipient can open the Transcribe pane to interact with the transcript. To protect your privacy, playback of the audio file is, by default, not available in the Transcribe pane for anyone that you share the OneNote page with.
You can also share the transcript and enable playback of the audio file in the Transcribe pane:
-
On your version of the OneNote page, click the filename at the top of the Transcribe pane to go to where the audio file is saved in OneDrive.
-
The Transcribed Files folder in OneDrive opens.
-
Find your recording, then select Actions > Share and add the email address of the person you want to share the recording with.
-
Also share the OneNote page as usual.
-
The person that you shared both the OneNote page and the audio file with will be able to open the OneNote page, open the Transcribe pane, and interact with both the transcript and audio file.
Now users with a Microsoft 365 subscription can transcribe unlimited minutes of uploaded audio using the transcribe feature. Previously, the limit was 300 minutes per month per user. There’s been no change for live recordings, and you can still transcribe unlimited minutes of live recordings.
Note: Unlimited transcription for uploaded audio is available to enterprise customers upon request.
How this change affects your organization
If you request access for your organization, unlimited transcription for uploaded audio is available to everyone in your organization as a preview experience. A limit for uploaded audio may be reintroduced in the future, with the option to purchase additional minutes based on your usage.
How to prepare
Fill out this uncapping upload minutes request form to enable the feature for your tenant. To learn more, email VoiceTransFC@microsoft.com.
Notes:
-
This is a preview experience and does not require any additional costs or technical changes and doesn’t have any negative performance impact for the end users.
-
After the preview period, there may be a cap for uploaded audio with the option to purchase additional minutes based on your usage. You will be notified well in advance of any pricing provisions so that you understand the implications and associated monetary costs and can make an informed decision.
-
As of now, this preview experience is not for individual users; it is only available at the tenant level. Everyone in the tenant will have access to it if it has been enabled.
System requirements are:
-
Transcribe + Ink only works on version 2211 Build 16.0.15819.20000 or later.
-
Transcribe + Ink requires an Internet connection.
Transcribe + Ink experience works with 80+ locales:
-
Arabic (Bahrain), modern standard
-
Arabic (Egypt)
-
Arabic (Iraq)
-
Arabic (Jordan)
-
Arabic (Kuwait)
-
Arabic (Lebanon)
-
Arabic (Oman)
-
Arabic (Qatar)
-
Arabic (Saudi Arabia)
-
Arabic (Syria)
-
Arabic (United Arab Emirates)
-
Bulgarian (Bulgaria)
-
Catalan
-
Chinese (Cantonese, Traditional)
-
Chinese (Mandarin, Simplified)
-
Chinese (Taiwanese Mandarin)
-
Croatian (Croatia)
-
Czech (Czech Republic)
-
Danish (Denmark)
-
Dutch (Netherlands)
-
English (Australia)
-
English (Canada)
-
English (Hong Kong SAR)
-
English (India)
-
English (Ireland)
-
English (New Zealand)
-
English (Philippines)
-
English (Singapore)
-
English (South Africa)
-
English (United Kingdom)
-
English (United States)
-
Estonian (Estonia)
-
Finnish (Finland)
-
French (Canada)
-
French (France)
-
German (Germany)
-
Greek (Greece)
-
Gujarati (Indian)
-
Hindi (India)
-
Hungarian (Hungary)
-
Irish (Ireland)
-
Italian (Italy)
-
Japanese (Japan)
-
Korean (Korea)
-
Latvian (Latvia)
-
Lithuanian (Lithuania)
-
Maltese (Malta)
-
Marathi (India)
-
Norwegian (Bokmål, Norway)
-
Polish (Poland)
-
Portuguese (Brazil)
-
Portuguese (Portugal)
-
Romanian (Romania)
-
Russian (Russia)
-
Slovak (Slovakia)
-
Slovenian (Slovenia)
-
Spanish (Argentina)
-
Spanish (Bolivia)
-
Spanish (Chile)
-
Spanish (Colombia)
-
Spanish (Costa Rica)
-
Spanish (Cuba)
-
Spanish (Dominican Republic)
-
Spanish (Ecuador)
-
Spanish (El Salvador)
-
Spanish (Guatemala)
-
Spanish (Honduras)
-
Spanish (Mexico)
-
Spanish (Nicaragua)
-
Spanish (Panama)
-
Spanish (Paraguay)
-
Spanish (Peru)
-
Spanish (Puerto Rico)
-
Spanish (Spain)
-
Spanish (Uruguay)
-
Spanish (USA)
-
Spanish (Venezuela)
-
Swedish (Sweden)
-
Tamil (India)
-
Telugu (India)
-
Thai (Thailand)
-
Turkish (Turkey)
Can’t find the Transcribe button
If you can’t see the button to start Transcription, make sure you’re signed in with an active Microsoft 365 subscription.
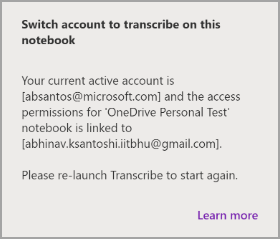
Switch accounts
Note: If you see the message “Switch account to transcribe on this notebook”, you need to switch your active account to the identity that has the required edit permissions. This message displays when you try to transcribe a page of the notebook where you don’t have the edit permission.
-
Select the user profile currently displayed on the top right corner.
-
Select the user profile that has edit permissions for that page.
About Transcribe
Transcribe is one of the Office Intelligent Services, bringing the power of the cloud to Office apps to help save you time and produce better results.
Your audio files are sent to Microsoft and used only to provide you with this service. When the transcription is done your audio and transcription results are not stored by our service. For more information see Connected Experiences in Office.
How often have you been assigned a task to listen to something and then put it down into text? Or has it happened to you that you were listening to an Audiobook and badly wanted to put it all down on paper but couldn’t?
Here’s a solution that will help you convert voice recording to a word document. Here we have listed the best audio to text online converter apps & websites! Yes! Something like this exists; crazy, right?
In Detail Speech Recognition, Natural & Technical Language Processing
This Blog will help you go through the details of these websites and give a list of websites to convert mp3 to text.
Before the list, let’s answer a few of the most asked questions for these apps and websites; this will help you understand the processing and help you choose the online tool to convert mp3 to text for yourself.
Best 20 Online Audio to Text Converters or Websites
Do you want to translate your audio, mp3, and voice notes into a word document? Now, you can do it more easily by using online transcribe audio to text converters that is listed below. Using the below tools, you can transcribe voice recordings, podcasts, speeches, dialogues, etc. Much powerful text to audio converter can automatically detect any language in your audio files and transcribe it to text in a single click. You just need to signup and upload your audio file. If you have a video file, convert it to audio and upload it.
Let’s see the list of best online sites to convert text to mp3.
- Notta – Notta is a speech to text converter
- GGLOT – Quickly transcribe audio to text online
- Otter.ai – Voice Meeting Notes & Real-time Transcription.
- Sonix.ai – Automated translation in 35+ languages
- Trint Software – Turn audio and video into searchable, editable and shareable content.
- Amberscript – Transform your audio and video to text and subtitles
- Sound Transcription – Transcription software for automated audio and video transcription
- Ebby – Convert video and audio to text in minutes
- Happy Scribe – Transcription & Subtitles all-in-one platform
- Sponken Data – Your Speech-to-Text all in Cloud
- VocalMatic – Automatically Transcribe Your Audio and Video into Text
- Transcribe – Customized Data Transcription for a Variety of Industries
- Go Transcribe – Fast, simple and affordable transcription
- Descript – Video editing, as easy as a doc
- Sonnant – Meet your content creation secret advantage
- Resemble AI – Generate AI Voices that sound real
- isLucid – From transcription to tasks.
- Awaken Translate – Real-time translations and transcriptions.
- Meetgeek.ai – Automatically record, take notes and share highlights.
- Grain – Turn video meetings into a library of knowledge.
- Maestra – Automatic Transcripts, Subtitles, and Voiceovers.
- Rewatch – Search all your video content.
What does an Audio to Text Converter or convert voice recording to a word document do?
A transcribe audio to text is an online tool that will grab your audio and translate it into a text itself, with the help of Artificial Intelligence and Speech Recognition. It has become possible for online websites to do this incredibly quickly. So, from your Legal Transcripts to your general Audiobook Transcripts, an Audio Text Converter can manage it all and boost your productivity, leaving you the time that you probably would have wasted constantly listening to the audio and putting every single word manually. Seems tough now.
Text to Speech Technology: How Voice Recognition Technology Works
Does an Audio to Text Converter come for free or paid?
An Audio to Text Converter is available both Free and Paid on multiple platforms. There is plenty of software that provides access to the cloud and gives additional services when paid for, but there is also plenty of audio to text converters that are Free of cost.
Free online audio to text converter is preferable when your requirement is for a short audio clip or if you want to get a feel and experience of the software for your perusal.
But if you’re someone who needs this service at a wider scale, then the paid option makes much more sense and becomes the favorable one. A Paid audio to text converter gives a plethora of features and modifications that help you use this particular technology to the fullest. A paid software can translate multiple languages in one place instead of roaming about through multiple free software. It also makes it possible for you to edit your script, such as; text editing, speaker identification, etc.
Now that you know about these transcribe audio converters, let’s begin with the list of this website. Many online tools with paid plans provide a free converter service with limited services. We will be walking you through the entire list:
New Technology Trends in Industrial Automation
1. Notta – Speech to text converter
Notta is a speech to text converter. You can access it from popular browsers like Safari, Chrome, Firefox. Or download the mobile app to access it anywhere.
2. Supported features fo Notta
- Record ongoing conversations and transcribe.
- Transcribe audio/video files.
- Transcribe online Zoom/Google Meet/Microsoft Teams Meeting.
3. Supported languages: 104.
4. Features:
- Supports translating 42 languages on mobile.
- Automatically skip silence when playing back the audio file.
- Can export the transcription to srt, txt, docx, pdf and xlxs format.
- Can export the audio.
- Can share to others via copying and pasting the sharing link.
- Up to 98.86% transcribing accuracy.
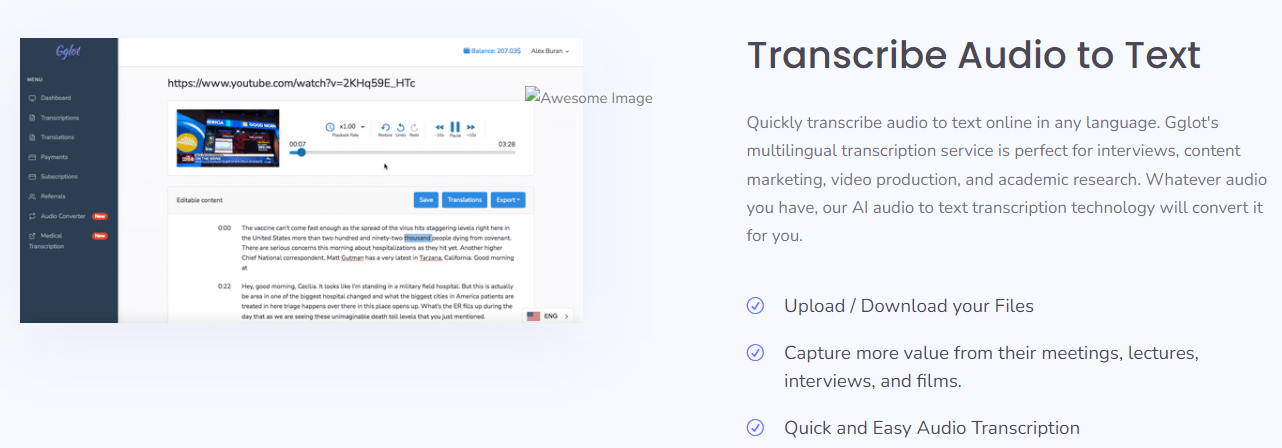
2. GGLOT – Multilingual Transcription Service
Gglot.com is here to help you save time spent in transcribing audio and video files.
Transcribe Audio to Text:
Quickly transcribe audio to text online in any language. Gglot’s multilingual transcription service is perfect for interviews, content marketing, video production, and academic research. Whatever audio you have, our AI audio to text transcription technology will convert it for you.
How It Works?
- Designed with simplicity and speed in mind,
Gglot.com converts audio to text in over 50 languages such as English, Spanish, French, Japanese, Russian, German, Dutch, Chinese, Korean for one low price.
Low, Flat Prices: Gglot has a free plan. Paid plans start at $9,90/ month.
Facts about GGLOT:
- 100+ languages are supported and growing
- Multiple speaker recognition
- Online text editor to make transcript changes
- Export to TXT, PDF, DOCS, XLSX, VVT, SBV, and SRT formats
- Credit card and PayPal payment support
- Low, low, low prices!
3. Otter.ai – Transcribe Audio to Text Free Online
An AI-powered enterprise-ready solution; Otter.ai. Otter, as a software, very smartly picks out the relevant and important data from your conversation and creates notes from it that the team can further utilize. Otter business is one of the smartest solutions that one can integrate in their regular operations and enjoy the benefits that it comes with.
4. Sonix.ai -Translate Voice to Text
Headquartered in San Francisco, Sonix is a Software as a Service (SaaS) company founded in 2017.
It automatically provides the user with access to upload their Audio and Video files to text. It even allows you to edit the transcribe, highlight it and even add time-stamps.
Sonix’s free services allow you to translate 30 minutes of audio and a video of 3 to 4 Minutes.
Sonix has an option for opting in 2 types of payment options. One is paid as you go for 10 US Dollars (USD) per hour of audio to text conversion, and then there is an option to switch to a Premium plan where the charge is 5 USD per hour, but with a charge of 22 USD per user.
5. Trint Software – Convert Audio to Text Online

Trint is another Audio converter that has its web-based and IOS Software. It uses Artificial Intelligence to translate audio to text and gives you the features of editing, time stamping, searching for specific texts, sharing files, and even exporting these files into multiple formats.
The founder of this is a Reporter/Journalist himself, and this software was created once he realized the need for it. Thus, it is one of the most flexible and easy-to-use software that gives you hoards of services in one single spot.
It gives you a free trial option, and paid services start at 40USD a month. The best part for Trint is that all of its payment plans have the option of unlimited audio transcriptions, making it a much more favorable option for users.
How to Make A Virtual Assistant App Like Siri
6. Amberscript – Transcribe Audio to Text Free
Amberscript is a young startup based out of Amsterdam. It has a SaaS-based software that helps in the audio to text translation and uses its Speech Recognition software to make it more smooth and more flexible. Their model is claimed to have the highest level of accuracy and has been widely accepted by multiple users. It has multiple languages to provide translation, time-stamping, editing, etc.
It offers hourly plans at 10 USD, a monthly plan at 40 USD, and a 1 USD per minute plan. There are enough options to choose from and adapt to as per the budget and overall requirements.
7. Sound Transcription – Mp4 to Text Converter Online Free
A new and very simple to use SaaS software has made work extremely easy and simple for the users. This software translates audio to text in minutes and sends it to you over mail.
It also has an Interactive Editing Tool that helps with reviews, editing, tagging, and categorizing the transcripts. This is one of the most costly Friendly tools you will encounter.
8. Ebby – Audio to Text Online Converter

Headquartered in Israel and founded in 2018. It provides the Automated Transcription, Voice Recognition, and Online Editing facility. It is a highly secure method of conversion and a budget-friendly option. They charge only 10 Cents for a Minute and provide all of its features in totality within the same plan. Surely a great choice. As for the Paid services, it has the feature of giving 3 trials of the entire service for free.
9. Happy Scribe – Transcribe Mp3 to Text
Created by 2 Irish Entrepreneurs, this company works and further curates the basis of the Problem and Solution technique. It was founded when they realized a need through a survey on Academic projects and have been modifying and curating through similar learnings. It is available in 119 languages and accepts multiple formats of files. Even though it is a completely software-based solution, it provides a feature of a “Human Proofreading” of the transcribes created. It gives you multiple options to edit, manage files, and even create individual dashboards.
50+ Best Apps for College Students
Happy Scribe Audio and Video to Text Online offers a pay-as-you-go plan for 12 Euros per hour of the conversion. Subscription plans start at 3 hours a month for 30 Euro, and they also offer a free trial for the first 30 minutes. It also has a few Referral plans as well.
10. Sponken Data – Online Audio to Text Converter
Sponken data is created by Replaywell, a well-known company based in the Czech Republic. Sponken is a secure and highly trusted brand for audio to text conversion. Even though the scope of services is more or less similar across multiple convertors, it provides the facility to customize the services.
The payment mechanism for this is as followers; First 60 minutes for free. Then a charge of 0.1 Euro a minute.
11. VocalMatic – Convert Voice Recording to Word Document
A product of Enactic Inc, a Canadian company, VocalMatic helps record audios online and transcribe and edit them. With VocalMatic, you can transcribe more than 110 languages and add variations.
Vocalmatic has a pay-as-you-go package that starts at 30 Minutes for 8 USD. It also has an Hourly paid plan starting at 3 hours for 36 USD and The first 30 minutes of its auto-transcription are free of cost.
12. Transcribe – Convert Audio to Text Online
A widely used and accepted software, this is a go-to for Journalists, Lawyers, Students and any other person you can think of who would need software like this. It is quick, easy, and adaptable to users’ needs, thus making it one of the topmost liked online tools.
It has a one-week free preview, and then it has a single plan at 20 USD per year with an addition of 6 USD for each hour of automatic audio to text conversion. You can also subscribe to the editor without automatic transcriptions at 20 USD on a yearly basis.
13. Go Transcribe – Text to Mp3 Free Online
Powered by Artificial Intelligence, Go transcribe is highly supported. The software works on any device and gives access to 17 different languages.
It also provides Team Management solutions as well within the same space.
Go Transcribe has a pay-as-you-go plan at 22 cents (USD) a minute. It also has a monthly subscription plan starting at 48 USD for 4 hours a month.
They also offer Free services for Audio and Video Translations for trial purposes.
14. Descript – Translate Voice to Text Online
Descrip is one of the most recommended and widely used tools for this. An all-in-one editor lets you record and translates smoothly under the same umbrella. It has a high rating and is widely used as well.
15. Sonnant – Convert Mp3 to Text
A SaaS Voice Content Management System Software is the perfect platform for Audio and Video Creators and Translators. Its AI helps in fast and appropriate Content planning, Voicing, Editing etc. With its SEO Embedding and recommendations, it makes the process of Content planning also very simple for the Creators, thus, making it a more likeable software by the users.
16. Resemble AI – Transcribe Audio to Text Free Online
Resemble AI is a Voice Technology company that has built a Niche in the Synthetic Voice space. Its real-time APIs and speech-to-text generators create a highly rewarding and good experience for the users. Making it a favorable software to use. The System helps you generate voices that sound Real and can be further customized.
17. isLucid – Audio to Text Converter Online
Another great tool that is widely used, isLucid is a personal AI software that works great with Microsoft Teams. With access to 20+ Languages and Dialects, it creates impressive and quick transcriptions for you. You can add tasks, including meetings, and keep bookmarks all in one space.
18. Awaken Translate – Free Audio to Text Converter
This is much different and unique software that allows you to enable your Customer services with the software. Through this, clients can communicate in their preferred language. This makes it a very smooth experience for the users, and as for the company, it also keeps track of the audio tracks, thus making it convenient for managers to audit and maintain the work.
19. Meetgeek.ai – Text to Audio Converter
Your one-stop solution is to record, transcribe, take notes, and even share key highlights for the calls. Their AI is so smart that it automatically takes notes of your conversations, analyses the important notes, and keeps track of them.
20. Grain – Transcribe Audio to Text Free
A software specifically helps you create short video highlight clips of Zoom recordings, transcribe calls, and take time-stamped notes. It takes time-stamped notes during meetings – Share the best parts of your meetings in bite-sized highlights and combine highlights into shareable stories.
21. Maestra – Convert Voice Recording to Word Document
Maestra is an automatic transcription, captioning, and voiceover platform for your daily needs. Its automatic AI processor will transcribe, caption, or voiceover your files and deliver the output in minutes. Even allows you to edit and modify your files at the same platform.
22. Rewatch – Text to Mp3 Free Online
Rewatch enables you to securely share, organize, and search your recordings and videos. Rewatch comprises and delivers the right information to you and your team, from all-hands meetings to project updates, making your meetings more fruitful and relevant for discussions and decision-making.
Transcribing recordings is a demanding task. It takes sharp ears, keen eyes, and deep understanding. However, no matter how much you want to manually transcribe recordings, more likely than not, you won’t have enough time to do so, especially if you’re a busy student or employee. What you can do instead is to automatically transcribe your recordings. There are various methods and tools that can help you ease the process of transcribing recordings into a Word document. From add-ins to apps to free transcription services, these things can help you in your transcribing duties.
5 ways you can automatically transcribe recordings
Install add-ins on Microsoft Word

(Image source: Dual Writer)
There are s couple of add-ins you can install on Microsoft Word to help you easily transcribe recordings and speech while you work on your document. An example is Speech Tools. Speech Tools is a complete transcription solution that works on Microsoft 2007, 2010, 2013 and 2016 running on Windows Vista, 7, 8 and Windows 10. Once installed, a new pane on Microsoft Word appears where you can play audio and video files, and use voice commands to control and listen to the recordings. To start transcribing, all you need to do is dictate the speech from the recording plus the appropriate punctuation.
Try Voice Typing on Google Docs
 Google Docs, Google’s free, cloud-based word processor has its very own audio-to-text software known as Voice Typing. Voice Typing allows you to speak (whether you’re repeating words from a recording or dictating your current thoughts), then it listens and transcribes everything you said into the document. This feature is fast, easy, and surprisingly accurate as it can correct misheard words right after you finish speaking a sentence, and knows the difference between usual homonyms such as “their” and “they’re”.
To try out Voice Typing, open up a blank document on Google Docs, click “Tools” from the menu, and select “Voice Typing”. You can also use the shortcut Control+Shift+S. A button will appear on the left side of the screen where you can record and speak into your device’s microphone. As you speak, the tool will transcribe.
Use AIs or virtual assistants
 Technological advancements made it possible for people to easily jot down notes and write thoughts. Now, you also have the choice to use AIs (artificial intelligence) or virtual assistants to help you transcribe.
For iOS devices, there’s Siri. Siri can perform several tasks including solving basic math problems, checking the weather, remembering your parking location, and of course, transcribing speech. Android users, on the other hand, can use Google Assistant. Google Assistant is considered as one of the most advanced and dynamic virtual assistants out there. It’s capable of various things such as checking in to your flights, sending messages, translating from one language to another, and transcribing audio.
Download transcription apps

There are also several transcription apps that are handy when it comes to impromptu writing sessions or transcription jobs. Some of the best transcriptions apps this 2019 are Dragon Anywhere, Speechnotes, Transcribe – Speech to Text, and Braina which recognizes most technical jargon. You can use these transcriptions apps to convert audio recordings to text and transfer them into your own Word document.
Use a free transcription service

You can also use a free transcription service to help you automatically transcribe a recording. FreeTranscriptions, for example, is a free transcription service that uses the best online audio-to-text conversion engine to generate accurate machine transcripts. Uploading is easy and the transcribing process only takes minutes. After it transcribes your recordings, you can view an interactive digital version of your transcript, and you can choose to download it as a PDF file or as a Word document.
These five ways can be the solution to your worries. Try these and see which one can best help you in automatically transcribing into a Word document.
Similarily to my post regarding exporting records to MS Excel, below is some sample code that illustrates how one can export data into a new Word document (in a table structure). The code determines the necessary rows and columns based on the table or query passed to it and then does the rest. You can easily from this simple example get into formatting fonts, etc…
'---------------------------------------------------------------------------------------
' Procedure : Export2DOC
' Author    : Daniel Pineault, CARDA Consultants Inc.
' Website   : http://www.cardaconsultants.com
' Purpose   : Export a recordset to a MS Word table in a new document
' Note      : Overwrites file if it already exists without any warning, so you may wish
'               to add a check prior to calling this function
' Copyright : The following is release as Attribution-ShareAlike 4.0 International
'             (CC BY-SA 4.0) - https://creativecommons.org/licenses/by-sa/4.0/
' Req'd Refs: Uses Late Binding, none required
'
' Input Variables:
' ~~~~~~~~~~~~~~~~
' sQuery        : Name of the Table or Query to Export the data from
' sFileName     : Path and Filename to save the Word Document as
' bOpenDocument : Leave the document open to the users or not (close after generating)
'
' Usage:
' ~~~~~~
' Export2DOC "Contacts", "C:Temptesting01.docx"
' Export2DOC "IncomingOrders", "C:Temporders.docx", True
'
' Revision History:
' Rev       Date(yyyy/mm/dd)        Description
' **************************************************************************************
' 1         2012-Apr-23             Initial Release
' 2         2020-04-08              Updated proc header
'                                   Added sFileName and bOpenDocument arguments
'                                   Added PageSetup.Orientation to proc
'                                   Fixed a bug in the table row count
'                                   Updated and expanded the error handler
'---------------------------------------------------------------------------------------
Function Export2DOC(sQuery As String, _
                    sFileName As String, _
                    Optional bOpenDocument As Boolean = False)
    Dim oWord                 As Object
    Dim oWordDoc              As Object
    Dim oWordTbl              As Object
    Dim bWordOpened           As Boolean
    Dim db                    As DAO.Database
    Dim rs                    As DAO.Recordset
    Dim iCols                 As Integer
    Dim iRecCount             As Integer
    Dim iFldCount             As Integer
    Dim i                     As Integer
    Dim j                     As Integer
    Const wdPrintView = 3
    Const wdWord9TableBehavior = 1
    Const wdAutoFitFixed = 0
    '    Const wdOrientPortrait = 0
    Const wdOrientLandscape = 1

    'Start Word
    On Error Resume Next
    Set oWord = GetObject("Word.Application")    'Bind to existing instance of Word

    If Err.Number <> 0 Then    'Could not get instance of Word, so create a new one
        Err.Clear
        On Error GoTo Error_Handler
        Set oWord = CreateObject("Word.application")
        bWordOpened = False
    Else    'Word was already running
        bWordOpened = True
    End If
    On Error GoTo Error_Handler
    oWord.Visible = False   'Keep Word hidden until we are done with our manipulation
    Set oWordDoc = oWord.Documents.Add   'Start a new document
    'Not strictly necessary, but for larger tables switching to Landscape can be very beneficial!
    '   so the next line demonstrates how that can easily be done
    oWordDoc.PageSetup.Orientation = wdOrientLandscape

    'Open our SQL Statement, Table, Query
    Set db = CurrentDb
    Set rs = db.OpenRecordset(sQuery, dbOpenSnapshot)
    With rs
        If .RecordCount <> 0 Then
            .MoveLast   'Ensure proper count
            iRecCount = .RecordCount    'Number of records returned by the table/query
            .MoveFirst
            iFldCount = .Fields.Count   'Number of fields/columns returned by the table/query

            'Switch to print preview mode (not req'd just a personal preference)
            oWord.ActiveWindow.View.Type = wdPrintView
            'Create the basic table
            oWord.ActiveDocument.Tables.Add oWord.selection.Range, _
                                            iRecCount + 1, _
                                            iFldCount, _
                                            wdWord9TableBehavior, _
                                            wdAutoFitFixed

            Set oWordTbl = oWordDoc.Tables(1)
            'Build our Header Row
            For i = 0 To iFldCount - 1
                oWordTbl.Cell(1, i + 1) = rs.Fields(i).Name
            Next i
            'Build our data rows
            For i = 1 To iRecCount
                For j = 0 To iFldCount - 1
                    oWordTbl.Cell(i + 1, j + 1) = Nz(rs.Fields(j).Value, "")
                Next j
                .MoveNext
            Next i
        Else
            MsgBox "There are no records returned by the specified queries/SQL statement.", _
                   vbCritical + vbOKOnly, "No data to generate an Word spreadsheet with"
            GoTo Error_Handler_Exit
        End If
    End With

    oWordDoc.SaveAs (sFileName)   'Save and close
    If bOpenDocument = False Then
        oWordDoc.Close

        '    Close Word if is wasn't originally running
        If bWordOpened = False Then
            oWord.Quit
        End If
    End If

Error_Handler_Exit:
    On Error Resume Next
    rs.Close
    Set rs = Nothing
    Set db = Nothing
    oWord.Visible = True   'Make Word visible to the user
    Set oWordTbl = Nothing
    Set oWordDoc = Nothing
    Set oWord = Nothing
    Exit Function

Error_Handler:
    If Err.Number = 5148 Then
        MsgBox "Your Table/Query contains a total of " & iFldCount & " fields/columns, but Word tables can only support a maximum of 63.  " & _
               "Please change your Table/Query to only supply a maximum of 63 fields/columns and try again.", _
               vbCritical Or vbOKOnly, "Operation Aborted"
    Else
        MsgBox "The following error has occurred" & vbCrLf & vbCrLf & _
               "Error Number: " & Err.Number & vbCrLf & _
               "Error Source: Export2DOC" & vbCrLf & _
               "Error Description: " & Err.Description & _
               Switch(Erl = 0, "", Erl <> 0, vbCrLf & "Line No: " & Erl) _
               , vbOKOnly + vbCritical, "An Error has Occurred!"
    End If
    Resume Error_Handler_Exit
End Function
You may also wish to review my MS Access Sample- Export Data to Excel and/or Word.
Readers like you help support MUO. When you make a purchase using links on our site, we may earn an affiliate commission. Read More.
We used a digital recorder to record a committee meeting and burn it to a CD. We need to turn this voice CD to a Word document to include it with the minutes of the meeting. These minutes need to me in great detail. It needs to turn the voice to the Word document to save time. Our minutes have to be in such great detail that it is taking time away from completing the research reviews. Please HELP, Thank you.

Microsoft debuted in August 2020 an audio transcription feature for the online version of Word that converts audio (recorded or uploaded from a file) directly to text, and even separates the text based on the speaker. Here’s how to use the feature.
To transcribe audio with Word, you must be a Microsoft 365 premium subscriber. If you have the free version and you try to use the feature, you’ll be met with a message asking you to subscribe.
RELATED: Microsoft Debuts an Audio Transcription Feature for Microsoft 365 Subscribers
Record and Transcribe Live Audio
You can have Word transcribe audio that you record directly within Word. Sign in to Microsoft 365, and open Word. In the “Home” tab, click the arrow next to “Dictate” and then select “Transcribe” from the menu that appears.

If this is your first time using the feature, you’ll need to give Microsoft permission to access your microphone.
The “Transcribe” pane will open in the right-hand side of the window. Select “Start Recording.”
Once selected, the timer will start. Now, you’ll want to begin speaking. You won’t see the transcription happen live as you’re speaking because Microsoft found that to be a bit too distracting during its testing.
After you’re finished, click the “Pause” button and then select “Save and Transcribe Now.”
It may take a few minutes for Word to finish transcribing the audio recording and uploading it to OneDrive.
Once this is done, you’ll see the transcription appear in the same pane you recorded the audio. Each section will have a timestamp, the speaker’s name, and the transcribed text. Microsoft automatically separates the text by the speaker.
If Word detects multiple speakers, you’ll see “Speaker 1,” Speaker 2,” and so on. If Word can’t detect multiple speakers, you’ll just see “Speaker.”
You might notice that the transcript doesn’t perfectly reflect the recorded audio accurately. You can edit a section of the transcript by hovering your mouse over the incorrect text and then selecting the pen icon.
Now you can edit the transcription found in this section. You can also edit the name of the speaker, as well as every instance where the speaker (i.e., Speaker 1 or Speaker 2) appears by ticking the box next to “Change All Speaker.” When you’re finished, click the checkmark.
If necessary, you can use the playback controls to revisit the audio recording. This is necessary if the transcript is long, and you can’t remember exactly who said what. Here’s the function of each button, from left to right:
- Playback speed
- Rewind
- Play/Pause
- Fast forward
- Volume
When you’re finished editing the transcript, you can add it to the document by selecting the “Add All To Document” button at the bottom of the pane.
Once selected, the audio recording and the content of the transcript will appear in the document.
Upload and Transcribe an Audio File
If you already have an audio file that you want to transcribe, you can upload it to Word. Sign in to Microsoft 365, and open Word. In the “Home” tab, click the arrow next to “Dictate” and then select “Transcribe” from the menu that appears.
The “Transcribe” pane will open in the right-hand side of the window. Select “Upload Audio.” You can upload these audio file types:
- WAV
- MP4
- M4A
- MP3
File Explorer (Finder for Mac) will open. Navigate to the location of the audio file, select it, and then click “Open.”
Microsoft will begin transcribing the audio file. Depending on the size of the file, this could take quite a bit of time.
Once Microsoft finishes transcribing the audio file, the text will appear in the pane.
If you face the same issue with your audio file, you can edit the text by hovering over the section and clicking the “Pen” icon. If you need to hear the audio again, you can do so by using the audio controls.
Next, edit the name of the speaker (and each instance that the speaker appears by ticking the “Change All Speaker” box) and the text from that section. When finished, click the “Checkmark.”
Once you’ve edited the content of the transcript, click “Add All To Document.”
The audio file and text of the transcript will be added to the Word document.
While not perfect, this feature can potentially save you a lot of time, especially if the speaker in the audio is speaking clearly.
READ NEXT
- › How to Dictate a Document in Microsoft Word
- › Voice Dictation Works Great, But Should You Use It?
- › BLUETTI Slashed Hundreds off Its Best Power Stations for Easter Sale
- › This New Google TV Streaming Device Costs Just $20
- › How to Adjust and Change Discord Fonts
- › The New NVIDIA GeForce RTX 4070 Is Like an RTX 3080 for $599
- › HoloLens Now Has Windows 11 and Incredible 3D Ink Features
- › Google Chrome Is Getting Faster
- Remove From My Forums
-
Вопрос
-
Is it possible to copy names and addresses from the Address Book into the text of a Word (2003) document. Help topics refer only to envelopes and labels. Workaround of adding an envelope and envelope to a document, copying the address block to
the letter and then deleting the envelope is too ugly for everyday use. I do not choose to upgrade to 0ffice 2010 unless I absolutely have to.Word Perfect handles address book entries elegantly; unfortunately it’s latest version has become to unstable and I have regretfully abandoned it everyday use.
Ответы
-
-
Помечено в качестве ответа
2 мая 2012 г. 9:16
-
Помечено в качестве ответа
-
-
Помечено в качестве ответа
William Zhou CHN
2 мая 2012 г. 9:17
-
Помечено в качестве ответа

Вы ищете простой способ транскрибировать аудио в текст в документе? Если вы являетесь подписчиком Microsoft 365, вы можете использовать Microsoft Word. Вот как.
Microsoft предоставляет услугу расшифровки аудио для подписчиков Microsoft 365 Premium. Эта функция позволяет вам диктовать файл в режиме реального времени и преобразовывать его в документ. Вы также можете взять существующий аудиофайл и транскрибировать его в документ Word. Эта функция пригодится, когда вам нужно расшифровать лекцию вашего профессора или важную презентацию вашего начальника или других коллег.
Примечание. Чтобы это работало, вам необходимо использовать онлайн-версию Microsoft Word и иметь действующую подписку на Microsoft 365.
Чтобы расшифровать аудиофайл, вам нужно иметь Word онлайн. Если вы попробуете бесплатную версию, вам будет предложено зарегистрировать премиум-аккаунт.
Для начала выполните следующие действия:
- Направляйтесь к Слово онлайн и войдите в систему, если вы еще этого не сделали.

- Откройте новый или существующий документ или создайте новый.
- Вы можете начать транскрипцию Microsoft Word, открыв вкладку «Главная», щелкнув стрелку раскрывающегося списка рядом с кнопкой «Диктовка» и нажав «Транскрипция».

- Появится расшифрованное сообщение. Вы можете загрузить существующую запись, чтобы начать расшифровку, или начать новую. Во-первых, мы рассмотрим создание новой записи.

- Нажмите кнопку Начать запись. Если вы впервые записываете сообщение, вам потребуется предоставить микрофону вашего ПК доступ к Word.

- Начните записывать свое сообщение, а когда закончите, нажмите кнопку «Пауза» — и нажмите «Сохранить и расшифровать сейчас».


Время, необходимое для завершения процесса расшифровки, зависит от объема имеющихся у вас данных. Но после завершения он будет загружен в OneDrive для последующего использования.
Управление транскрипциями в Microsoft Word
Если в расшифровке Microsoft Word присутствует более одного говорящего, они будут обозначены как «Говорящий 1», «Говорящий 2», «Говорящий 3» и т. д.

Также важно отметить, что вы можете редактировать транскрипции. Например, наведите указатель мыши на раздел, который необходимо отредактировать, и щелкните значок карандаша, чтобы отредактировать его.
Введите свое редактирование и нажмите кнопку «Подтвердить».

Когда вы будете готовы поместить транскрипцию в свой документ, нажмите кнопку «Добавить в документ» внизу.

Вот и все. Теперь сделанная вами аудиозапись появится в документе Word. Пользователь может щелкнуть и прослушать аудиоссылку. Однако любые изменения текста, которые вы делаете, будут просто текстом, а не звуком.
Как транскрибировать существующий аудиофайл в Word
Вы также можете сделать так, чтобы Word транскрибировал существующий аудиофайл, используя тот же инструмент.
Чтобы транскрибировать аудиофайл в Microsoft Word, выполните следующие действия:
- В Word Online перейдите на вкладку «Главная».
- Щелкните стрелку вниз рядом с надписью «Диктовка» и выберите «Транскрибировать».
- Далее нажмите Загрузить аудио. Обратите внимание, что Word поддерживает форматы аудиофайлов WAV, MP4, M4A и MP3. Если у вас есть FLAC, OGG или другие форматы, вам необходимо сначала преобразовать их.

- Перейдите к местоположению аудиофайла, который вы хотите использовать. Процесс расшифровки может занять несколько минут, поэтому не закрывайте окно до его завершения.

- Когда транскрипция будет завершена, вы получите текст на панели. Точно так же, как при диктовке вашего аудио, вы можете войти и отредактировать его, если хотите.

- После внесения необходимых правок транскрипция со ссылкой на аудио вернется в документ.


Работа с аудиофайлами в Microsoft Office
Хотя это не идеально, этот вариант может сэкономить много времени, если вам нужно транскрибировать звук в документ, особенно если у вас есть хороший микрофон, а динамик говорит четко и объявляет.
Вы можете делать и другие интересные вещи с приложениями Microsoft Office, например украшать свои презентации, добавляя звук в PowerPoint. Точно так же, когда вы транскрибируете аудиофайл в Microsoft Office, вы также можете записывать голос за кадром в PowerPoint. А если вы являетесь пользователем Google Docs, вы можете добавить звук в Google Slides.