
Закрепление файла в списке последних использованных документов
-
Откройте вкладку Файл.
-
Выберите пункт Открыть, чтобы просмотреть список последних использованных файлов.
-
Наведите указатель мыши на файл, который вы хотите закрепить, и выберите пункт Закрепить этот элемент в списке
 (справа от списка файлов).
Если файл закреплен в списке, значок булавки выглядит так: В более старых версиях Office он выглядит так:
Совет: Чтобы открепить файл, щелкните значок булавки еще раз.
Файлы, закрепленные в списке, выводятся в обратном хронологическом порядке (начиная с новых записей).
Удаление отдельного файла из списка недавно использовавшихся файлов
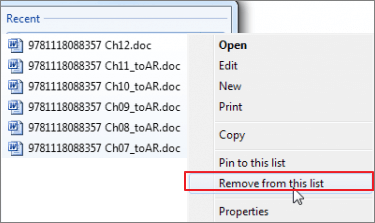
Если вы хотите удалить какие-либо файлы из списка, просто щелкните их правой кнопкой мыши и выберите команду Удалить из списка.
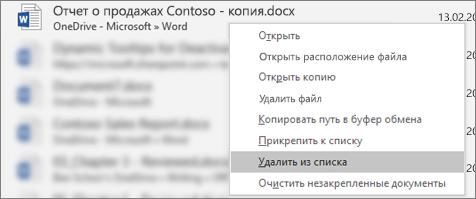
Внимание: Обязательно нажмите кнопку Удалить из списка, а не Удалить файл, если вы не хотите удалить сам файл из системы.
Изменение количества файлов, отображаемых в списке последних использованных файлов
-
Откройте вкладку Файл.
-
Выберите пункт Параметры.
-
Выберите пункт Дополнительно.
-
В группе Отображение в списке Число документов в списке последних файлов: выберите необходимое количество отображаемых файлов.
Совет: Чтобы не отображать файлы в списке последних использованных файлов, выберите в списке Число документов в списке последних файлов значение, равное нулю.
Удаление незакрепленных файлов из списка последних использованных файлов
-
Откройте вкладку Файл.
-
Нажмите кнопку Открыть.
-
Щелкните правой кнопкой мыши файл в списке и выберите команду Очистить незакрепленные документы.
-
Нажмите кнопку ДА, чтобы очистить список.
Почему в списке недавно использовавшихся файлов появились файлы, которые давно (или вообще) не открывались?
Начиная с Office 2013 список последних использовавшихся файлов синхронизируется с учетной записью Майкрософт. Это удобно, так как если вы используете несколько устройств (например, компьютер и ноутбук), в обоих списках будут одни и те же файлы.
Однако если у вас есть старый компьютер, который вы давно не включали, при его подключении к сети он может синхронизироваться, из-за чего некоторые документы их старого списка могут попасть в новый.
Кроме того, иногда это происходит, если кто-то другой — например, член вашей семьи — пользуется вашим компьютером. Если они вошли с вашей учетной записью, все документы, над которыми они работали, появятся в списке.
Лучший способ удалить такие файлы из списка — выполнить процедуру, описанную выше в разделе «Удаление отдельного файла из списка недавно использовавшихся файлов». Щелкните правой кнопкой мыши ненужные файлы и выберите команду Удалить из списка.
Закрепление файла в списке последних использованных документов
-
Откройте вкладку Файл.
-
Выберите пункт Последние, чтобы просмотреть список последних использованных файлов.
-
Щелкните правой кнопкой мыши файл, который вы хотите закрепить, а затем выберите команду Прикрепить к списку или щелкните значок булавки
.Когда файл закреплен в списке, значок булавки выглядит как приколотая булавка при взгляде сверху:
. -
Чтобы открепить файл, щелкните значок булавки еще раз.
-
Откройте вкладку Файл.
-
В группе Справка выберите команду Параметры.
-
Нажмите кнопку Дополнительно.
-
В группе Отображение в списке Число документов в списке последних файлов: выберите необходимое количество отображаемых файлов.
Примечание: Эти инструкции не относятся к InfoPath 2010.
-
Откройте вкладку Файл.
-
Выберите пункт Последние.
-
Установите флажок Число документов в списке последних файлов и укажите требуемое значение.
-
Ссылки в эти файлы будут отображаться над сведениями на панели навигации независимо от вашего местонахождения в представлении Backstage.
Примечание: Чтобы удалить список, снимите флажок.
-
Откройте вкладку Файл.
-
Выберите пункт Последние.
-
Щелкните правой кнопкой мыши файл в списке и выберите команду Очистить неприкрепленные элементы.
-
Нажмите кнопку Да, чтобы очистить список.
Примечание: Если задать количество последних использованных файлов равным нулю, список также будет очищен. Чтобы снова включить эту функцию, введите число, отличное от нуля. Обновите список, повторно открыв файлы и сбросив закрепленные элементы.
Отключение списка последних документов также довольно просто. Если Вы находитесь на главном экране Word, нажмите ссылку «Открыть другие документы» внизу слева.

Или, если у Вас уже открыт документ, щелкните меню «Файл».

Затем нажмите кнопку «Параметры» в левом нижнем углу.

В меню «Параметры Word» перейдите на вкладку «Дополнительно».

Справа прокрутите вниз до раздела «Экран». Отключите отображение последних документов, установив для параметра «Число документов в списке последних файлов» значение «0», а затем нажмите кнопку «ОК».
Теперь, когда Вы открываете Word (или используете команду «Открыть» в приложении), список последних документов должен быть пустым. Вы также не должны видеть недавний документ, указанный в кнопке на панели задач.
Если Вы хотите снова включить отображение последних документов в будущем, вернитесь к «Параметры Word» и установите количество последних документов, которые Вы хотите показать. 50 — это значение по умолчанию, но Вы можете выбрать любое число от 0 до 50. Просто помните, что при повторном включении отображения последних документов все ранее отображаемые документы будут показаны снова.
Excel-Office
Когда мы открываем какой-нибудь документ, после его закрытия, его название появляется в списке «Последние документы» (Недавние документы).
Как найти последний документ Word.
Список последних документов появляется при нажатии на кнопку «Пуск» — «Недавние документы». Или в открытом документе Word нажимаем на закладку «Файл» в разделе «Открыть» — «Последние документы».
  Как очистить «Последние документы» в Word.
Рассмотрим, как удалить из списка последних документов какой-нибудь документ, чтобы другие пользовали не видели, какой документ мы открывали.
Чтобы удалить документ их этого списка, нажимаем на его название правой мышкой. Появится диалоговое окно с функциями. Выбираем функцию «Удалить».
Внимание!
Если нажмем на функцию «Удалить», то документ удалится сразу, без дополнительного вопроса «Вы действительно хотите удалить безвозвратно этот файл?». Этого вопроса не будет. Отменить это действие невозможно.
Таким же способом можно удалить папку из списка последних документов. Не нужно нажимать на папку левой мышкой, т. к. она откроется. Нажимать на папку нужно правой мышкой, чтобы открылось диалоговое окно с функциями.
Список последних документов Word.
Можно настроить Word, чтобы установить количество показываемых документов, которые последними открывали или отключить эту функцию совсем.
Для этого заходим на закладку «Файл» в раздел «Параметры» (Параметры Word) и выбираем функцию «Дополнительно». В правой части диалогового окна в разделе «Экран» ставим нужную цифру в строке «Число документов в списке последних файлов».
Если нужно, чтобы в списке последних документов не отражался ни один документ, который открывали, ставим «нуль». Нажимаем кнопку «ОК». Выходим из окна параметров Word.
Работая с большим документом Word, нам, часто, приходится перемещаться по нему, искать нужные страницы, таблицы, т.д. В Word есть несколько способов найти быстро конкретный объект. Подробнее о разсных способах поиска и перемещения по документу, читайте в статье «Перемещение по документу Word».
Программы Microsoft Office отображают несколько документов, открытых в этой программе, чтобы можно было использовать эти ссылки для быстрого доступа к файлам. Эта функция по умолчанию включена, но вы можете самостоятельно отключать или включать ее, очищать список и настраивать количество отображаемых в нем файлов.
Если эта возможность была выключена и затем включена, то будут отображаться только файлы, открытые и сохраненные после ее включения.
Если закрыть файл, а затем переместить его (например, с помощью проводника), ссылка на него в программе, где он был создан, перестанет работать. Вам потребуется перейти к файлу и открыть его, выбрав Файл > Открыть. После открытия файла в новом расположении ссылка на него будет добавлена в список. Дополнительные сведения о том, как отрыть файл таким образом, см. в статье: Открытие файлов из меню «Файл»
Закрепление файла в списке последних использованных документов
Откройте вкладку Файл.
Выберите пункт Открыть, чтобы просмотреть список последних использованных файлов.
Наведите указатель мыши на файл, который вы хотите закрепить, и выберите пункт закрепить этот элемент в списке  (на правой стороне списка файлов).
Если файл закреплен в списке, значок PIN-кода выглядит следующим образом:  в более ранних версиях Office, он выглядит так:
Совет: Чтобы открепить файл, щелкните значок булавки еще раз.
Файлы, закрепленные в списке, выводятся в обратном хронологическом порядке (начиная с новых записей).
Удаление отдельного файла из списка недавно использовавшихся файлов
Если вы хотите удалить какие-либо файлы из списка, просто щелкните их правой кнопкой мыши и выберите команду Удалить из списка.
Внимание: Обязательно нажмите кнопку Удалить из списка, а не Удалить файл, если вы не хотите удалить сам файл из системы.
Изменение количества файлов, отображаемых в списке последних использованных файлов
Откройте вкладку Файл.
Выберите пункт Параметры.
Нажмите кнопку Дополнительно.
В группе Отображение в списке Число документов в списке последних файлов: выберите необходимое количество отображаемых файлов.
Совет: Чтобы не отображать файлы в списке последних использованных файлов, выберите в списке Число документов в списке последних файлов значение, равное нулю.
Удаление незакрепленных файлов из списка последних использованных файлов
Откройте вкладку Файл.
Нажмите кнопку Открыть.
Щелкните правой кнопкой мыши файл в списке и выберите команду Очистить незакрепленные документы.
Нажмите кнопку ДА, чтобы очистить список.
Почему в списке недавно использовавшихся файлов появились файлы, которые давно (или вообще) не открывались?
Начиная с Office 2013 список последних использовавшихся файлов синхронизируется с учетной записью Майкрософт. Это удобно, так как если вы используете несколько устройств (например, компьютер и ноутбук), в обоих списках будут одни и те же файлы.
Однако если у вас есть старый компьютер, который вы давно не включали, при его подключении к сети он может синхронизироваться, из-за чего некоторые документы их старого списка могут попасть в новый.
Кроме того, иногда это происходит, если кто-то другой — например, член вашей семьи — пользуется вашим компьютером. Если они вошли с вашей учетной записью, все документы, над которыми они работали, появятся в списке.
Лучший способ удалить такие файлы из списка — выполнить процедуру, описанную выше в разделе «Удаление отдельного файла из списка недавно использовавшихся файлов». Щелкните правой кнопкой мыши ненужные файлы и выберите команду Удалить из списка.
Закрепление файла в списке последних использованных документов
Откройте вкладку Файл.
Выберите пункт Последние, чтобы просмотреть список последних использованных файлов.
Щелкните правой кнопкой мыши файл, который вы хотите закрепить, а затем выберите команду Прикрепить к списку или щелкните значок булавки  .
.
Когда файл закреплен в списке, значок булавки выглядит как приколотая булавка при взгляде сверху: .
Чтобы открепить файл, щелкните значок булавки еще раз.
Откройте вкладку Файл.
В группе Справка выберите команду Параметры.
Нажмите кнопку Дополнительно.
В группе Отображение в списке Число документов в списке последних файлов: выберите необходимое количество отображаемых файлов.
Примечание: Эти инструкции не относятся к InfoPath 2010.
Откройте вкладку Файл.
Выберите пункт Последние.
Установите флажок Число документов в списке последних файлов и укажите требуемое значение.
Ссылки в эти файлы будут отображаться над сведениями на панели навигации независимо от вашего местонахождения в представлении Backstage.
Примечание: Чтобы удалить список, снимите флажок.
Откройте вкладку Файл.
Выберите пункт Последние.
Щелкните правой кнопкой мыши файл в списке и выберите команду Очистить неприкрепленные элементы.
Нажмите кнопку Да, чтобы очистить список.
Примечание: Если задать количество последних использованных файлов равным нулю, список также будет очищен. Чтобы снова включить эту функцию, введите число, отличное от нуля. Обновите список, повторно открыв файлы и сбросив закрепленные элементы.
Примечание: Эта страница переведена автоматически, поэтому ее текст может содержать неточности и грамматические ошибки. Для нас важно, чтобы эта статья была вам полезна. Была ли информация полезной? Для удобства также приводим ссылку на оригинал (на английском языке).
Многие сталкиваются с ситуацией когда при открытие Word или Exel появляется список последних открытых документов, а если я не хочу что бы кто то видел этот список, то сразу встает как убрать список последних документов или как удалить список последних документов. На этот случай я Вам покажу два варианта:
1- Если Вы хотите удалить последние открытые документы в Word и Excel
Вот путь где они лежат C:Documents and SettingsВаша учетаApplication DataMicrosoftOfficeПоследние файлы просто удаляете тут все и забываете о проблеме до следующего открытия документов, но если Вам это в напряг, то существует и второй способ который выключит ведение самого журнала открытых документов.
2- Отключить в настройках Office вывод списка открытых документов
Тут все на много проще, для этого сделайте все по инструкции:
- Откройте приложение где хотите отключить отображение последних документов (Word или Exel )
- Нажмите на кнопку Office(верхний левый угол круглая большая кнопка с изображением флаг Office)
- В открывшемся списке кликните правой кнопкой мыши в любом месте, что бы вылетело дополнительно меню и выберите «Настройка панели быстрого доступа»
- Перейдите на вкладку Дополнительно и найдите там группу Экран .
- И чуть ниже этого пункта будет параметр кол-во отображаемых документов, по умолчанию их там должно быть 17, а ВЫ ставьте столько сколько Вам нужно допустим 0.
Opening Recent Documents
- Click the “File” tab at the top of the Microsoft Word window.
- Click the “Recent” tab from the side menu.
- Click the recently closed document from the Recent Documents list to re-open it.
- Click “File” and select “Options.”
- Click the “Advanced” tab and scroll down to the “Display” section.
Contents
- 1 Why is word not showing recent documents?
- 2 Where are Microsoft Word recent documents stored?
- 3 What are three ways to open a recently opened document?
- 4 How do I turn on recent documents list?
- 5 How do I view recent documents in quick access?
- 6 How do I view all Word documents?
- 7 Where is my recent folder?
- 8 How do I find recent documents in Windows 10?
- 9 How do I see when a Word document was last saved?
- 10 How do I open recent files?
- 11 How do I find recently saved documents?
- 12 How do I find recently opened documents?
- 13 What happened to recent files in Windows 10?
- 14 Why does quick access not show recent documents?
- 15 How do I find the most recent files on my computer?
- 16 How many recent files do you have showing in the recent document list?
- 17 Where are recent files stored in the registry?
- 18 Where are Windows recent files stored?
- 19 How do I restore recent files in Windows 10?
- 20 How do I view folder history in Windows 10?
Why is word not showing recent documents?
Disable and re-enable Recent Documents feature. 1. Open Word 2013/2016, click File -> Options -> Advanced.Under Display, set “Show this number of Recent Documents” to “0” and uncheck the box of “Quickly access this number of Recent Documents”.
Where are Microsoft Word recent documents stored?
By default, that location is C:Documents and Settingsuser profileApplication DataMicrosoftOfficeRecent.
What are three ways to open a recently opened document?
You can open them one of three ways.
- Press “Win-E,” locate your Word document on your computer and double-click it to automatically open the document in Microsoft Word.
- Open Microsoft Word, press “Ctrl-O,” locate the file you want to open and double-click the file to open it from within Microsoft Word.
How do I turn on recent documents list?
Step 1: Open the Settings app. Navigate to Personalization > Start page. Step 2: Here, check if Show recently opened items in Jump Lists on Start or the taskbar option is turned on or off. If turned off, turn on the same.
How do I view recent documents in quick access?
Right-click ” Quick Access icon”< Click “Options” and click the “View” tab < Click “Reset Folders” and click “OK”. Open the File Explorer and type the following code in the Address Bar and Press “Enter”. This opens the Recent folders. Click “Pin to Quick access”, to pin it in the Quick access area.
How do I view all Word documents?
To open Word documents on your computer or device, first select the ‘Start’ icon, where all the apps and other tools on your device are listed. Scroll until you find the ‘Computer’ option and then click it. Next, all your files will show up on your screen.
Where is my recent folder?
The fastest way to access the all recent files folder is by pressing “Windows + R” to open the Run dialog and typing “recent”. You can then hit enter. The above step will open an Explorer window with all of your recent files. You can edit the options like any other search, as well as delete the recent files you want.
How do I find recent documents in Windows 10?
How to find a list of Recent Documents in Windows 10
- Press Windows Key + E.
- Under File Explorer, select Quick access.
- Now, you will find a section Recent files which will display all the recently viewed files/documents.
How do I see when a Word document was last saved?
Open the Office application that you were using. Click the File tab. Click Recent. Scroll to the bottom of your “Recent Documents” (Office 2013 only), then click “Recover Unsaved Documents” if you are in Word, “Recover Unsaved Workbooks” if you are in Excel, or “Recover Unsaved Presentations” if you are in PowerPoint.
How do I open recent files?
- Open the Run Dialog Box with the keyboard shortcut Windows Key+R.
- Enter shell:recent.
How do I find recently saved documents?
File Explorer has a convenient way to search recently modified files built right into the “Search” tab on the Ribbon. Switch to the “Search” tab, click the “Date Modified” button, and then select a range. If you don’t see the “Search” tab, click once in the search box and it should appear.
How do I find recently opened documents?
Recently Accessed Files
- Press “Windows-R.”
- Type “recent” into the run box and press “Enter” to open the list of recently visited files.
- View recently opened files from other users on the same computer by clicking inside the File Explorer location bar and replacing the current user’s name with a different user.
What happened to recent files in Windows 10?
#1 Check your newest files on the Recent Files section
On Windows 10, you can see the recently used files through File Explorer > Quick access > Recent files.
Why does quick access not show recent documents?
Hide recent files from quick access:
- Press “windows key + E” to open file explorer, and click the folder icon on your taskbar to open file explorer.
- Click on file at the top left and select “options”.
- Click “General Tab”, under privacy section, uncheck “show recently used files in quick access”.
How do I find the most recent files on my computer?
File Explorer has a convenient way to search recently modified files built right into the “Search” tab on the Ribbon. Switch to the “Search” tab, click the “Date Modified” button, and then select a range. If you don’t see the “Search” tab, click once in the search box and it should appear. That’s It!
How many recent files do you have showing in the recent document list?
This list is called the Recent Documents list, and most Word installations display up to 17 documents on this list. If you regularly deal with many different Word documents, you might want to see even more files on this list.
Where are recent files stored in the registry?
The list of “recent” documents is stored in the Windows registry in the key named HKEY_CURRENT_USERSoftwareMicrosoftOffice16.0WordUser MRULiveId_###File MRU (where ### represents a long hexadecimal number that identifies the user profile).
Where are Windows recent files stored?
Quick Access Popup Recent folders and Recent files are taken from the Windows virtual folder Recent items (C:Users[username]AppDataRoamingMicrosoftWindowsRecent or, using the appdata variable, %appdata%MicrosoftWindowsRecent).
How do I restore recent files in Windows 10?
Question
- Open Explorer.
- In the location bar, copy/paste the following location: %appdata%MicrosoftWindowsRecent.
- Go up ONE folder using your up-arrow, and you should see Recent with a few other folders.
- Right-click on Recent and add to Quick Access.
- You’re done.
How do I view folder history in Windows 10?
Open any folder by double-clicking its name. Click the Home tab on the Ribbon atop your folder; then click the History button. Clicking the History button, shown here, fetches the File History program, shown in the following figure. The program looks much like a plain old folder.
Control how many documents are displayed in your Recent Documents list
Updated on October 16, 2021
Microsoft Word 2016 in the Microsoft 365 suite gives you quick access to files you’ve recently worked on. Did you know you can change the number of documents that appear there? Here’s how to customize this list to make your word processing fast and efficient.
Your Recent Documents list is found under the File menu located in the top menu of Word. Click Open in the left bar that appears. Select Recent, and to the right, you will see a list of your recent documents. Simply click the document you want to open it. If you haven’t worked with any documents yet, this area will be empty.
Changing Recently Displayed Documents Setting
By default, Microsoft Word in the Microsoft 365 suite sets the number of recent documents to 25. You may change this number by following these simple steps:
-
Click on File in the top menu.
-
Select Options in the left bar to open the Word Options window.
-
Select Advanced in the left bar.
-
Scroll down to the Display subsection.
-
Next to «Show this number of Recent Documents» set your preferred number of recent documents to be displayed.
Using the Quick Access List
You’ll notice below this a checkbox item labeled «Quick access this number of Recent Documents.» By default, this box is unchecked and is set to four documents.
Checking this option will display a quick access list of your recent documents in the left bar immediately under the File menu, offering even faster access to past documents.
New Word 2016 Features
If you’re new to Microsoft Word 2016, take a quick five-minute walkthrough of what’s new.
Thanks for letting us know!
Get the Latest Tech News Delivered Every Day
Subscribe

When you open Microsoft Word, a list of recently-opened documents appears on the left side of the screen. You can clear documents from this list or, if you’d rather not see recent documents at all, disable the list entirely.
RELATED: How to Clear Recent Items from a Jump List in Windows
The recent documents list also shows up when you select the “Open” option from within Word, and on the jump list for the Word taskbar button. Clearing the list clears those documents out of the two locations within Word, but not on the jump list. You’ll have to clear the jump list separately. Disabling the recent documents view prevents them from showing up in any of these locations. Here’s how to do it.
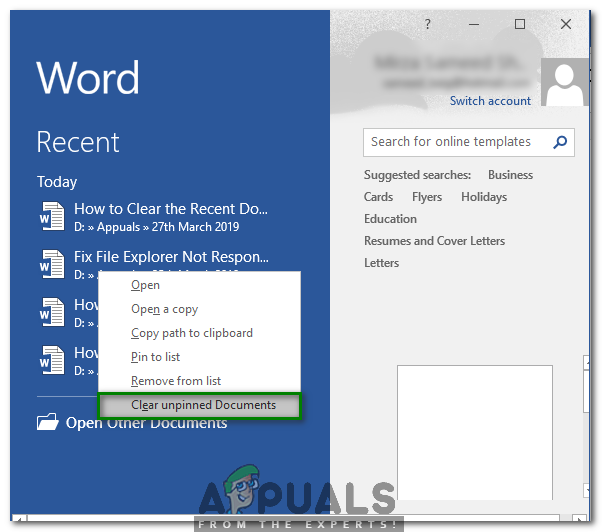
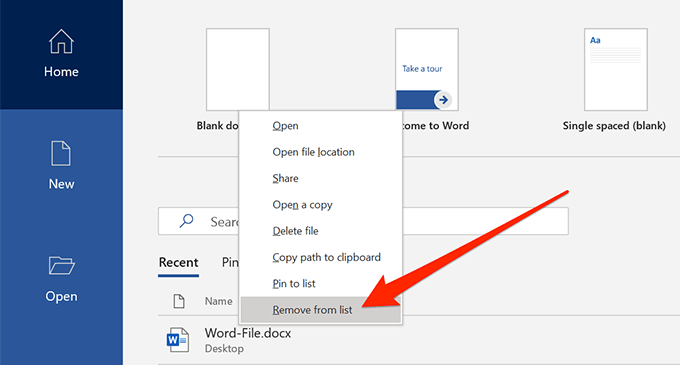
Clearing the recent documents list is simple. Whether you’re on Word’s opening splash screen or on the “Open” page when opening a document, right-click on any document in the recent list, and then choose the “Clear Unpinned Documents” option.
Update: In the latest versions of Word 2019 and Word for Office 365, you’ll need to click the “Open” icon on the left side of the Word home screen before right-clicking recent documents and selecting this option. This will then delete those recent documents from the Home screen. You can’t right-click and clear documents directly from the home screen for some reason.

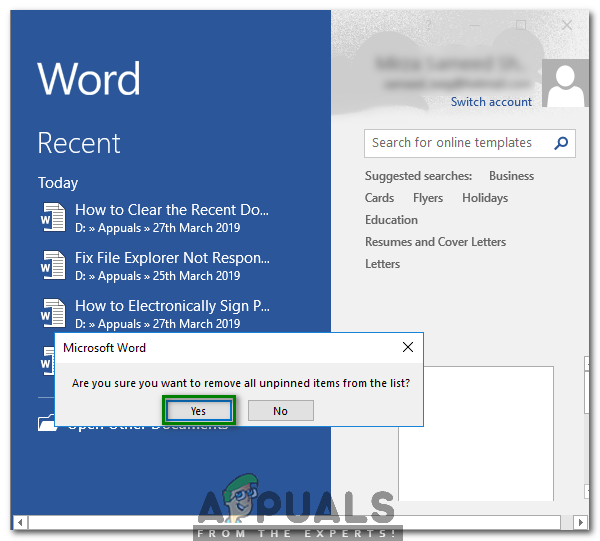
In the warning box that appears, click the “Yes” button.
This clears all documents from the recent list that you have not pinned as favorite documents.
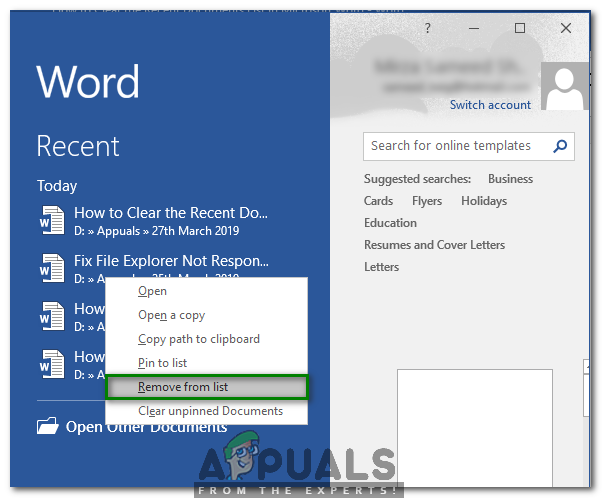
If you prefer, you can also select the “Remove From List” option on that menu to remove only the document you right-clicked.
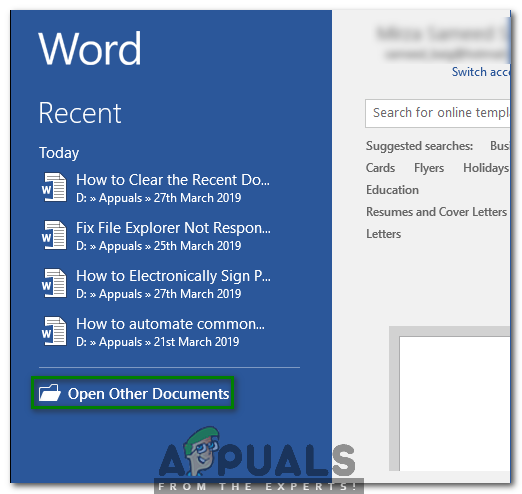
Disable the Recent Documents List
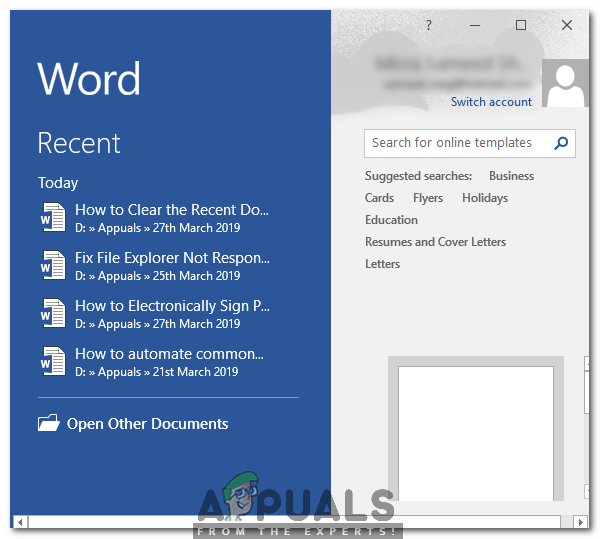
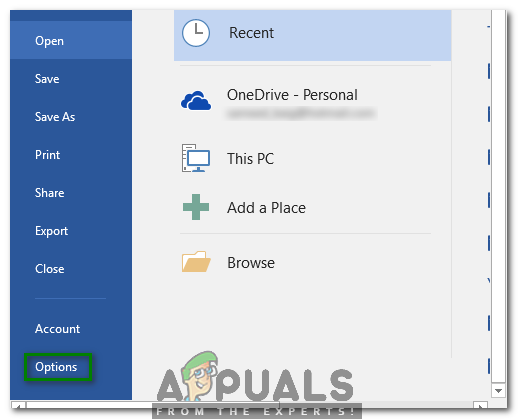
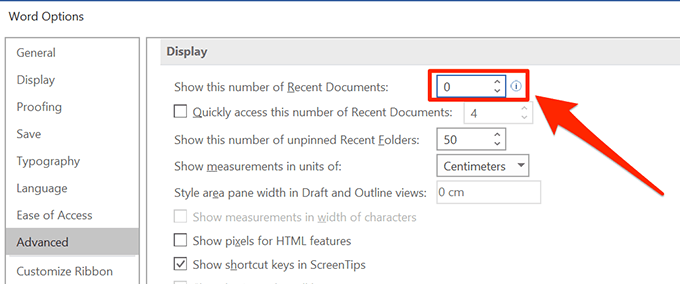
Disabling the recent documents list entirely is also pretty straightforward. If you’re on Word’s opening splash screen, click the “Open Other Documents” link at the bottom left.
Or, if you’ve already got a document open, click the “File” menu.
Next, click the “Options” command toward the bottom left.
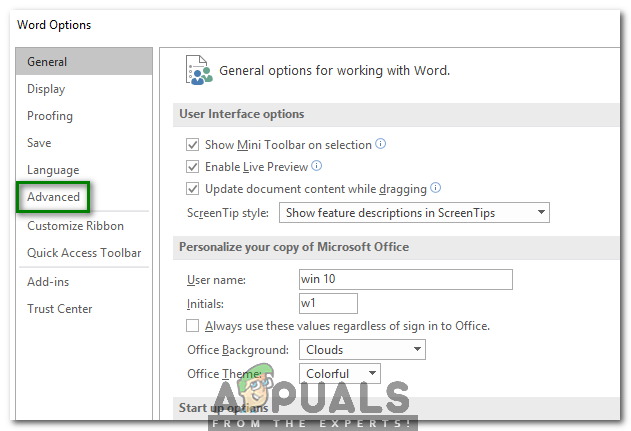
In the “Word Options” menu, switch to the “Advanced” tab.
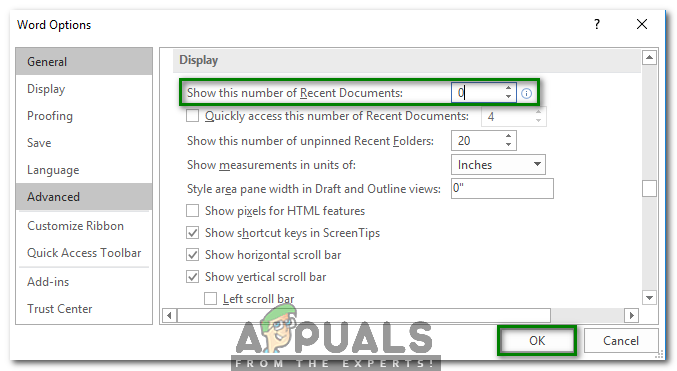
On the right, scroll down to the “Display” section. Disable the display of recent documents by setting the “Show this number of Recent Documents” option to zero, and then click the “OK” button.
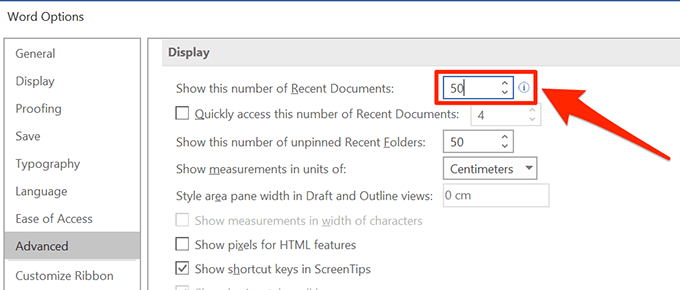
Now, when you open Word (or use the “Open” command within the app), the Recent Documents list should be empty. You should also no longer see recent document listed on the jumplist for the taskbar button.
If you want to re-enable the display of recent documents in the future, go back to that same “Word Options” window and set the number of recent documents you want shown. 50 is the default setting, but you can choose any number between 0 and 50. Just note that when you re-enable the recent document display, any previously-displayed documents will be shown again.
READ NEXT
- › HoloLens Now Has Windows 11 and Incredible 3D Ink Features
- › How Long Do CDs and DVDs Last?
- › Google Chrome Is Getting Faster
- › Liquid Metal vs. Thermal Paste: Is Liquid Metal Better?
- › How to Adjust and Change Discord Fonts
- › This New Google TV Streaming Device Costs Just $20
How-To Geek is where you turn when you want experts to explain technology. Since we launched in 2006, our articles have been read billions of times. Want to know more?
How do I find recent documents in Word
«The recent files list was always there whenever I open the File > Open option in Microsoft Office Word on Windows 10. However, not this time.
The Excel, Notepad, and PowerPoint are all fine, whereas the Word 2016 is not showing recent documents anymore. I don’t know what happened and I need help to restore the disappeared recent list so that I could continue using this function again.»
| Workable Solutions | Step-by-step Troubleshooting |
|---|---|
| Method 1. Sign In with MS Account | Open a blank Word file > Sign in with email > Enter your password…Full steps |
| Method 2. Disable and Re-enable Recent Documents | Disable Recent Documents > Open Advanced feature > Set the number…Full steps |
The Recent Documents option is regarded as quick access for Microsoft Office users to get their saved documents, excel, or powerpoint, etc. files. When you can’t find a Word document on your local PC drive, the Recent Documents option can also help you quickly locate and access it.
However, according to some MS Office Word users, the Recent Document option may not show up in the Word application. If you happen to have this incident on your Windows PC, don’t worry. In the following, you’ll learn the causes that make Word Recent Documents option disappeared and how to recover it in Word 2016/2013.
Why is recent documents list not showing in Word
To bring the missing recent documents back to its list in the Windows operating system, you must figure out the exact causes in the first place. Mostly, there are three reasons that may disable the recent documents list showing up in Word application:
# 1. Recent Word files were manually removed from the Recent Documents list
Microsoft Office allows users to remove an individual file from the recently used file list with the option «Remove from list». In fact, you don’t remove the file from your entire system unless you pressed «Delete».
If you have manually removed or deleted the recently opened or edited word documents from the Recent Documents list, you’ll have to find and open your Word files one by one on your local drive or external storage devices.
# 2. Microsoft Office Word is logged out with no MS account
Sometimes, if you used to sign in with a Microsoft Office account in Word 2013, 2016 while editing documents, the Word application would record all the operations and changes that you have made into your MS account.
As a result, when you sign out with your MS Account in MS Word, you may lose some recordings, such as the Recent Document list recordings.
# 3. The Recent Documents list was disabled
Usually, the MS Office Word Recent Document list was enabled by default. However, due to false operation or personal needs, some users may disable this feature to speed up Microsoft Office Word on their computers. If it’s so, the workarounds towards this issue are available in the next part to help.
Continue reading to check and apply a suitable solution to make the recent Word files re-appear in the list.
How to recover recent documents in Word on Windows 10/8/7
In this part, we’re going to illustrate some practical solutions that you can pick up to bring the disappeared Recent Documents list back on your Word 2013/2016. The provided methods can also be applied to other versions of Microsoft Office applications like MS Excel, PPT, Word 2010, etc.
Fix 1. Sign In with MS Account to Make Recent Documents Show Up in Word
If you are currently logged out of your MS account, you can retry to sign in with your Microsoft Office account to bring the disappeared Recent Document list show up:
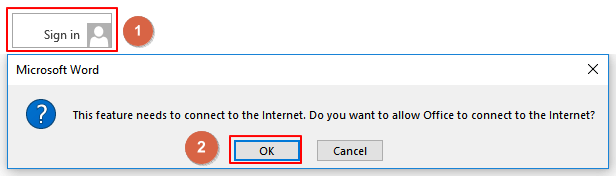
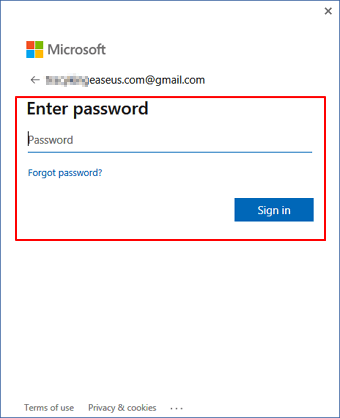
Step 1. Open a blank new Word file, click «Sign in» at the right top corner and select «Yes» to allow Office connect to the Internet.
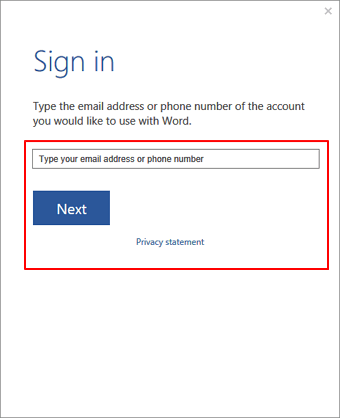
Step 2. Sign in with your email address or phone number, click «Next» to continue.
Step 3. Enter your password and click «Sign in» to log in to your MS account.
Step 4. Now, you can open a new Word file, go to File > Open > Check the Recent Document list under Open.
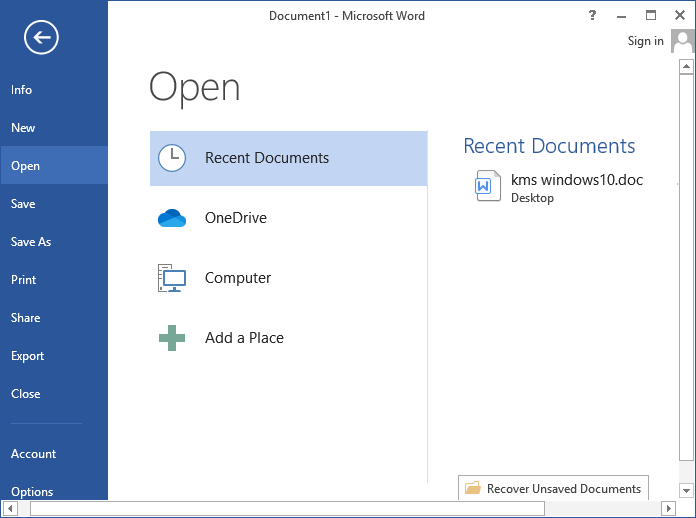
If the recent Word files show up on the list, congratulations. You can directly access and open these files through this list. If nothing appears, follow the next fix to enable the Recent Documents list feature.
Fix 2. Disable and re-enable Recent Documents feature
If the Recent Document feature is disabled, you won’t be able to view anything under the Open column in MS Word 2013, 2016. You can first try to disable this feature and then re-enable it with new settings in Word:
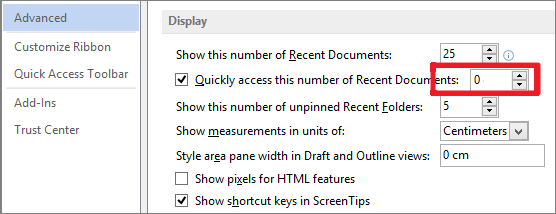
Step 1. Disable Recent Documents feature in Word
1. Open Word 2013/2016, click File -> Options -> Advanced.
2. Under Display, set «Show this number of Recent Documents» to «0» and uncheck the box of «Quickly access this number of Recent Documents».
Step 2. Re-enable Recent Documents in MS Word
1. Open Advanced feature in Word by opening a new Word file, go to File > Options > Advanced.
2. Set the number «0» to «10» «15» «25» or other numbers as you like next to «Show this number of Recent Documents». If this number is set to zero, undoubtedly, you don’t see a single recent document showing in this area.
3. Check the box of «Quickly access this number of Recent Documents» and change the number «0» to «10» «15» «25» or other numbers as you like.
Step 3. Click «OK» to keep all the changes, restart the Word application.
After this, you can open a new Word file, go to File > Open > Recent Documents to check your missing Word files from the list.
Bonus Tip: Restore Missing or Lost Word Documents
After making Word document files show up in the Recent Documents list, you can quickly access and open your files through this list. If MS Word doesn’t bring up your desired Word file, don’t worry. You can first try to search the document name on your PC, or check the Recycle Bin to see if you can find the file.
If nothing is found, the Word file is probably lost or missing. At this moment, reliable Office file recovery software is the best choice to bring your recently lost or missing documents back.
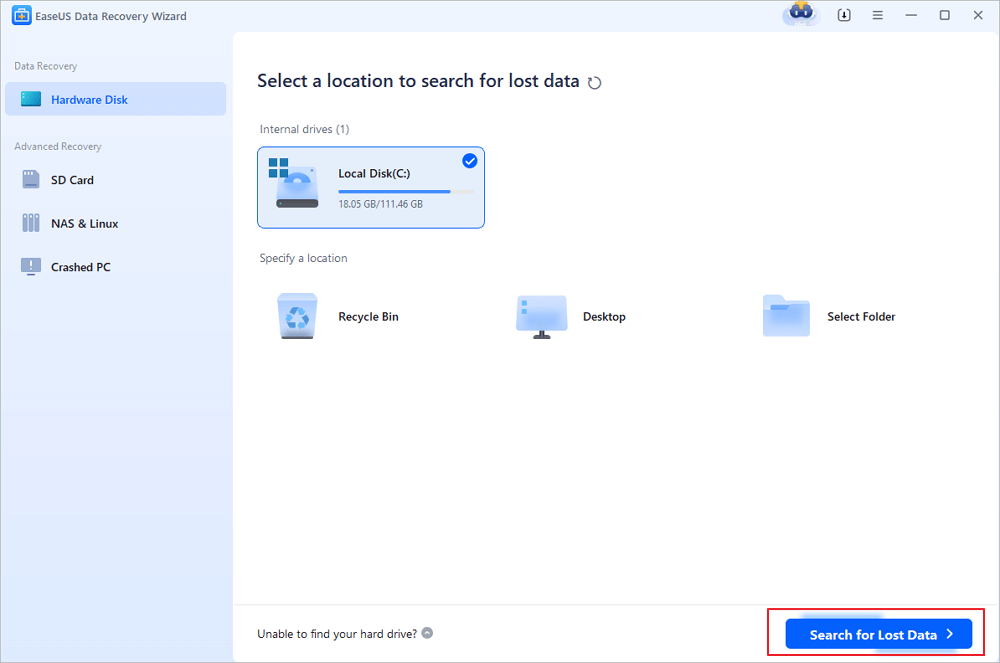
EaseUS Data Recovery Wizard is able to help. No matter how you lost your files, it takes only 3 steps to scan and bring your lost files back:
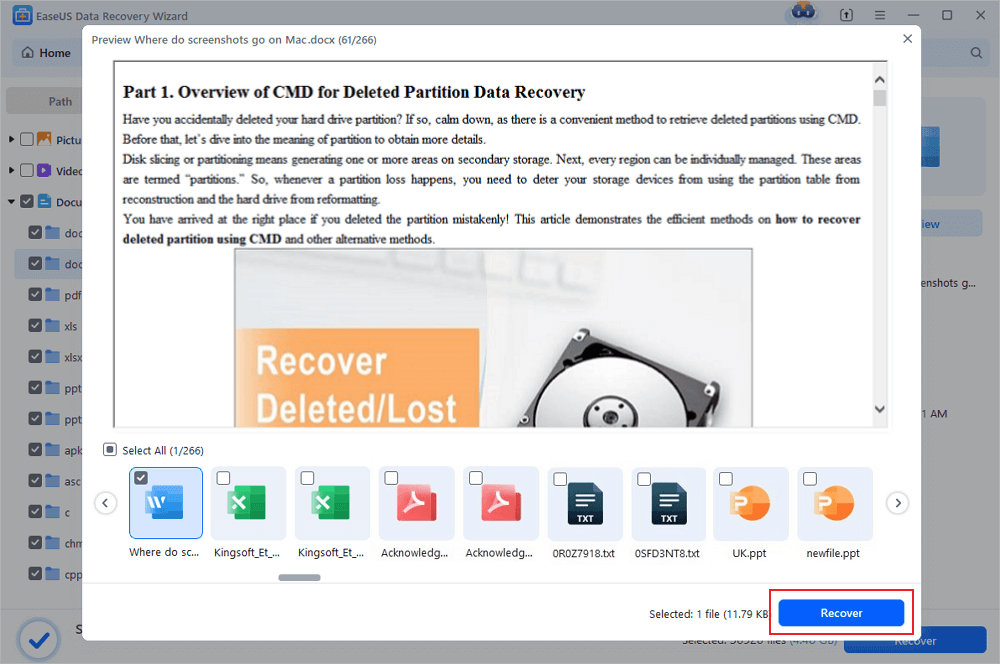
Step 1. Choose the Word file location
Choose the drive or a specific folder and click the «Scan» button.
Step 2. Locate your Word files
The software will start immediately scanning all lost data on the selected drive. After the scan, click the «Documents» option in the left panel. Choose «Word» from the category bar. Then, click «Preview».
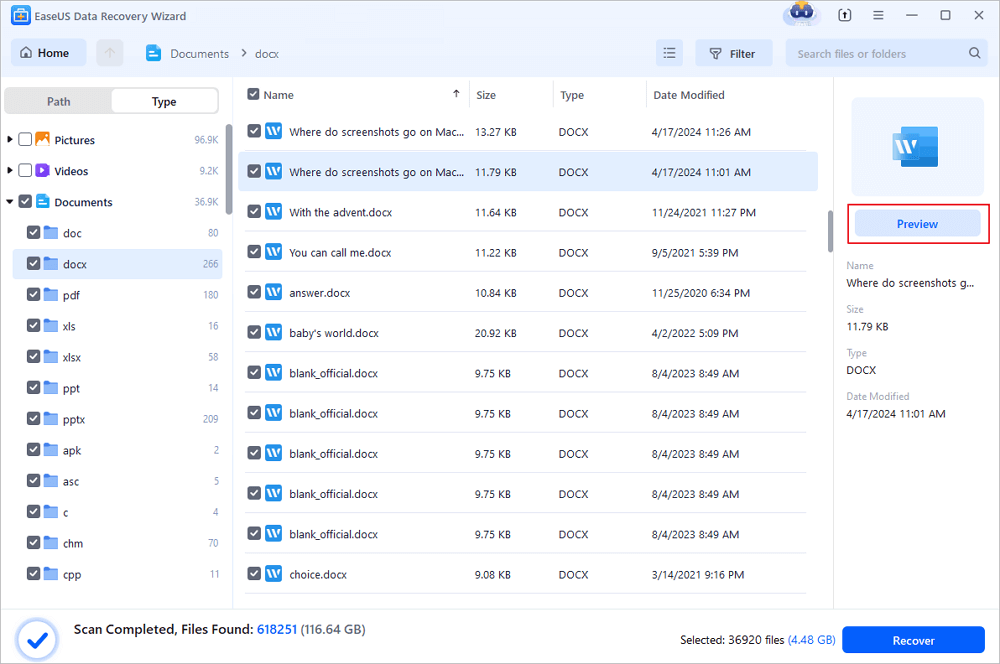
Step 3. Recover Word files
After previewing the lost Word files, select the desired Word files and click «Recover». Then, select a folder to store the Word files.
Further Word FAQs
On this page, we included two fixes of making Recent Documents show up in Word 2013, 2016. We also introduce a bonus tip to help you recover lost or deleted Word document on your computer.
Here, we also gathered some frequently asked questions about the MS Word document. If you are interested in one of them, continue reading and you may find a desired answer or satisfying solution toward your issues:
Question 1: How do I find my recent documents in Windows 10?
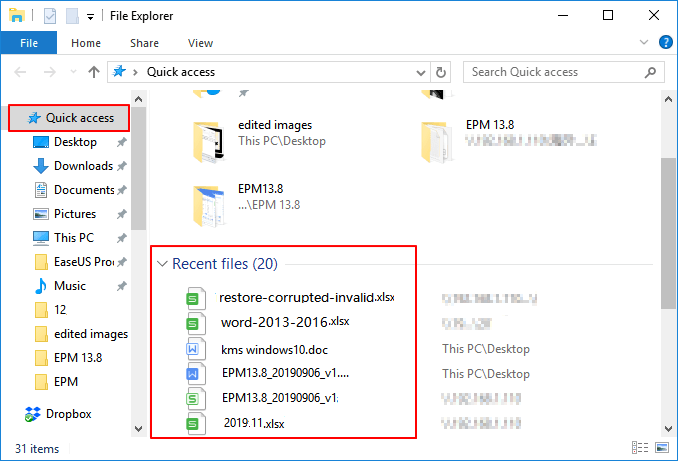
Answer: The recent documents option has been removed from Windows 10. However, you can still access all your recent files via Quick access on your PC.
Press Windows Key + E > Open File Explorer > Select «Quick access» > Check all your recently viewed files or documents under Recent files.
Question 2: How do I find recent documents in Word?
Answer: Your Recent Documents list is under the File menu in Word. To open it, you need to launch the Word application, go to File > Open > Click «Recent Documents» and then you will see a list of your recent documents.
You can simply click the document to open it. If you don’t see anything below the Recent Document list, try the provided solutions on this page to fix it.
Question 3. How do I recover an unsaved Word document?
Answer: Microsoft Office has added this feature to automatically keep the unsaved document when you accidentally closed the Word or Excel application. To restore the unsaved Word file, you can simply relaunch Word app > Go to File > Open > Click «Recover Unsaved Document» > Select the unsaved file and save it as .doc or .docx on another secure location.
If you have further questions on restoring lost or closed Word file without saving, refer to this link for more detailed solutions: 3 Ways to Recover Unsaved Word Document in Windows 10.
If you have more questions, try the Search options on our website (https://www.easeus.com) or go to the How-To tips page to find more solutions.
Microsoft Word is the most commonly used text editor for decades. It allows you to create and manage your documents efficiently. It has a tradition of monitoring the history of your documents and it always displays it whenever you launch Microsoft Word in order to provide you with quick access to your recently used documents. However, at times, people do not want Microsoft Word to keep track of their documents. In this article, we will explain to you the methods through which you can clear or disable the Recent Documents List in Microsoft Word.
How to Clear the Recent Documents List in Microsoft Word?
Whenever you clear the recent documents list or a single document in Microsoft Word, the said documents disappear temporarily until you reopen them again. As soon as you will reopen the same documents, they will immediately become a part of the recent documents list in Microsoft Word. In order to clear the Recent Documents List in Microsoft Word, you will need to perform the following steps:
- Type Microsoft Word in the search section of your taskbar and click on the search result to launch the Microsoft Word window. The newly opened Microsoft Word window is shown in the following image:
- Now right click on any document located under the Recent heading in order to launch a pop-up menu as shown in the image below:
- Select the Clear Unpinned Documents option from this menu as highlighted in the image shown above.
- As soon as you will click on this option, a warning message will appear on your screen. Click on the Yes button located on this warning message box as shown in the following image in order to clear the whole Recent Documents List in Microsoft Word.
- You can also choose to delete a single Microsoft Word Document. For doing that, right click on that specific document in order to launch a pop-up menu as shown in the image below:
- Finally, select the Remove from List option from this menu as highlighted in the image shown above.
How to Disable the Recent Documents List in Microsoft Word?
If you want to permanently stop Microsoft Word from keeping a track of your recent documents, then you will need to disable the recent documents list in Microsoft Word. Doing this will prevent Microsoft Word from displaying your recent documents list until you enable this feature again. In order to disable the Recent Documents List in Microsoft Word, you will need to perform the following steps:
- Type Microsoft Word in the search section of your taskbar and click on the search result to launch the Microsoft Word window. The newly opened Microsoft Word window is shown in the following image:
- Now click on the Open Other Documents option as highlighted in the image shown above.
- Click on the Options tab as highlighted in the image shown below:
- In the Word Options window, click on the Advanced tab as shown in the following image:
- Now scroll down to the Display section and select “0” from the dropdown list corresponding to the field saying, “Show this number of Recent Documents” as highlighted in the image shown below:
- Finally, click on the OK button in order to save your settings as highlighted in the image shown above.
In this way, you can easily clear or disable the Recent Documents List in Microsoft Word using the methods described in this article. These methods are quite simple and convenient to use and they will enable you to either clear the Recent Documents List temporarily or disable this feature permanently.

Kevin Arrows
Kevin Arrows is a highly experienced and knowledgeable technology specialist with over a decade of industry experience. He holds a Microsoft Certified Technology Specialist (MCTS) certification and has a deep passion for staying up-to-date on the latest tech developments. Kevin has written extensively on a wide range of tech-related topics, showcasing his expertise and knowledge in areas such as software development, cybersecurity, and cloud computing. His contributions to the tech field have been widely recognized and respected by his peers, and he is highly regarded for his ability to explain complex technical concepts in a clear and concise manner.
Back to top button
![]()
Download Article
![]()
Download Article
This article will guide you on how to disable or delete your recent document list in Microsoft Word or Excel. This will give you little security and safety from other users who may use your PC. They will not guess or know which files you were working on. The procedure is very easy to follow and implement.
-
1
Open your Microsoft Word or Excel and Click the «Office» icon.
-
2
Click the «Word Options» button.
Advertisement
-
3
From the left menu, click «Advanced».
-
4
Find the «Display» section. Here you can see the «Show the number of recent documents» option.
-
5
Set the counter to 0.
-
6
Click «OK».
-
7
Now you can see the recent document list is empty.


Advertisement
Add New Question
-
Question
How can I delete individual files?

Open all files, then hold the shift key and delete key until all of the files you want to delete have been selected.
Ask a Question
200 characters left
Include your email address to get a message when this question is answered.
Submit
Advertisement
Thanks for submitting a tip for review!
About This Article
Thanks to all authors for creating a page that has been read 205,366 times.
Is this article up to date?
wikiHow Tech Help:
Tech troubles got you down? We’ve got the tips you need
Subscribe
You’re all set!
When you launch the Microsoft Word program on your computer, you get quick access to several of its main features right on the home screen. One of these is the recently used files list for Microsoft Word. This option lets you quickly access the documents that you were recently working on, and clicking on any of these opens up the file in the program.
It’s a pretty quick way to get back to your work that you left unfinished the previous time. You actually save yourself from the hassle of manually finding the document wherever it’s saved on your computer. The software finds and displays that for you.
Although it’s a really useful feature, it may not be so for some users. If you’re someone who never uses this recently used files list in Word and you’d rather not have it there, you can actually disable it in the program. You can also remove specific documents from the list if you don’t want to disable it entirely.
Clear a Single Recently Used File In Microsoft Word
If it’s only a single or a few files that you’d like to remove from the recently used files list in MS Word, you can do it by right-clicking on the files and selecting an option. It removes your chosen files from the list and you can do it for as many files as you want.
- Launch the Microsoft Word program on your computer.
- When it opens, you’ll likely land on the home screen. On this screen, you’ll find the Recent section showing all of your recent files created in the program.
To remove a file from the list, right-click on the file and select Remove from list.
- The file will instantly be removed without any prompts.
The next file in the list will take up the removed file’s place.
Remove All The Recently Used Files In Microsoft Word
If you don’t want for any of your recent files to appear in the list, you can remove all the files from there by selecting a single option in Word. It’ll clear up the entire list and give you an empty section on the home screen.
These steps should work for the latest MS Word 2019/Office 365. If you’re an Office 2016 user, please skip to the next section.
- Open the MS Word software on your computer.
- Although the option to clear the entire recent list is built into Word, you’re not going to see it when you right-click on any file on the homescreen. You’ll first need to click on an option before the option is revealed.
Click on Open in the left sidebar of Word.
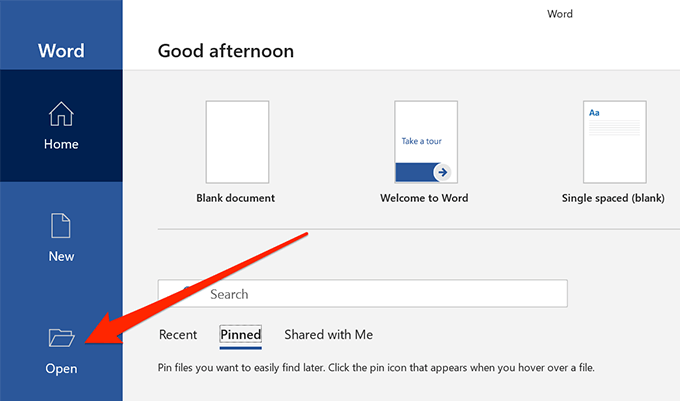
- Your recent files list will appear on the right-hand side pane. To clear all the entries from this list, right-click on any one of the documents in the list and select Clear unpinned items.
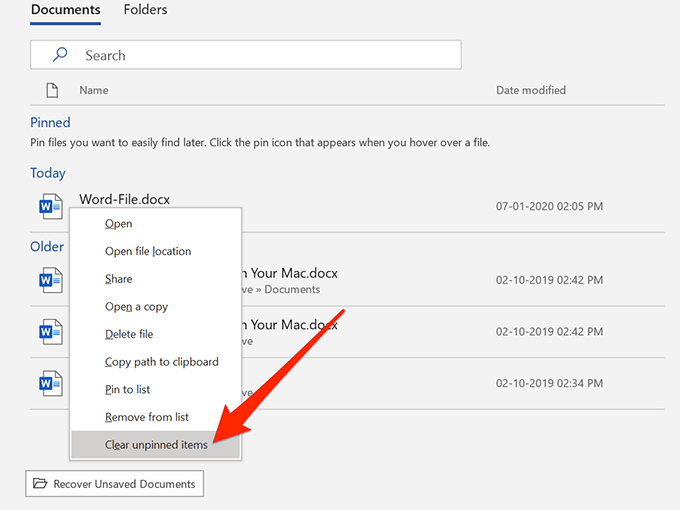
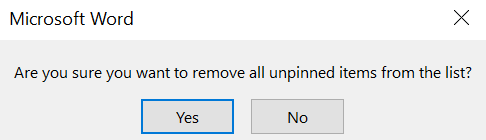
- A prompt will appear saying that all the items from the list will be removed. Click on the Yes button to continue.
You should find that your recent documents list is now empty.
Remove The Recently Used Documents In Word 2016
If you’re on Microsoft Word 2016, you can actually clear the entire recently used files list in Word without going to the Open menu.
While you’re on the home screen of the software, right-click on any of your recent documents and select Clear unpinned items. Hit Yes in the prompt that follows and your list will be cleared.
As you can see, there isn’t a huge difference between doing the task in Office 2019 and Office 2016 but it’s good to know exactly where the option is located in various versions of the software.
Disable The Recently Used Files Section In Microsoft Word
Recently used files section in Word may be helpful to many users, even with certain items removed from it. However, if you do not happen to use it at all and you find it taking unnecessary space on the Word’s home screen, you can actually get it removed from there.
The recent files section can be completely disabled and there’s a built-in option in the software to do it. Also, if you ever decide to get it back, you can do so by reversing the change you made to the settings.
- Open Microsoft Word on your computer.
- On the home screen, look for the option that says Options, usually located at the lower-left corner, and click on it to open it.
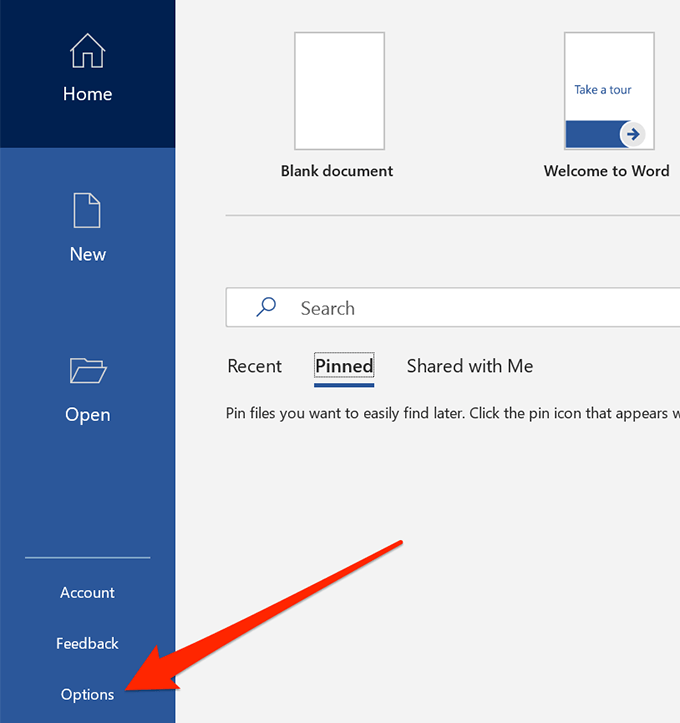
- A box will open on your screen letting you manage several settings for Word. You need to find the option that says Advanced in the left sidebar and click on it. The option you’re looking for is located there.
- When it opens, scroll down until you find the section that says Display. There’ll be an entry named Show this number of Recent Documents and then a number specified next to it. What you want to do is decrease the number from whatever it is right now to 0 (zero). You can also directly type 0 in the field.
- Click on the OK button at the bottom to save the changes.
- The next time you launch the program, you’ll find that there are no entries at all in the list.
What you actually did above was set the number of recent documents to zero and Word displayed zero (empty) entries on its home screen.
How To Bring Back The Recently Used Files List In Word
If you ever need to bring the recent documents list back, you can do so by opening the same Options panel and then clicking on Advanced.
Then enter the number of recent documents you want to see in the Display section’s first option and hit OK. Your list should be back.