
You can VBA Read file binary or text data using a couple of different approaches in Excel. VBA provides you a set of native statements like Open to open and ready files. However in this article aside from showing you these native approaches to reading files using Excel Macros you can read CSV files and other structured data schemas using Jet.OLEDB driver, Microsoft Queries or also the FileSystemObject.
Text/binary files are common ways of storing data as opposed to databases or regular Excel files. Looking at various resources I missed a single resource which would demonstrate the various methods for PROPERLY reading files in VBA.
It is important to remember that you shouldn’t read all files using the same approach. Be aware of the structure of the file. If it is a structured CSV use the ADODB connection, if you need to read only a couple of rows read the file row by row or by chunks, else read the whole file. If you want performance – always select the right approach.
Reading text files in VBA
VBA Read text files (line by line)
To read an entire text file line by line use the code below.
Dim fileName As String, textData As String, textRow As String, fileNo As Integer
fileName = "C:text.txt"
fileNo = FreeFile 'Get first free file number

Open fileName For Input As #fileNo
Do While Not EOF(fileNo)
   Line Input #fileNo, textRow
   textData = textData & textRow
Loop
Close #fileNo
VBA Read text files (read whole file)
To read an entire text file in one go (not line by line) use the code below.a
Dim fileName As String, textData As String, fileNo As Integer
fileName = "C:text.txt"
fileNo = FreeFile 'Get first free file number

Open fileName For Input As #fileNo
textData = Input$(LOF(fileNo), fileNo)
Close #fileNo
VBA Read specific number of lines from a text file
In cases when you want to read specific lines from a text file you can adapt the line by line read code as below. It allows you to read a certain number of lines (noLines) from a text file from a specific start line number (sLine). If you set noLines to 0 it will read all lines till end of the file.
Dim fileName As String, textData As String, textRow As String, fileNo As Integer
Dim lineCounter as Long, sLine as Long, noLines as Long
fileName = "C:text.txt"
sLine = 20 'number of the first line you want to read
noLines = 100 'number of lines you want to read
fileNo = FreeFile
Open fileName For Input As #fileNo
Do While Not EOF(fileNo)
Line Input #fileNo, textRow
If lineCount >= sLine and ((noLines > 0 and lineCount < noLines + sLine) or noLines = 0) then
textData = textData & textRow
End If
lineCount = lineCount + 1
Loop
Close #fileNo
Reading CSV files in VBA
Reading CSV files (read whole file and process each row)
Reading a text file line by line into a string:
'Assuming file looks like this. File path: C:test.csv
'"Col1", "Col2", "Col3"
'1     , 2     , 3

directory = "C:"
fileName = "test.csv" 'Assuming test.csv is in C: directory
Set rs = CreateObject("ADODB.Recordset")
strcon = "Provider=Microsoft.Jet.OLEDB.4.0;Data Source=" & directory & ";" _
& "Extended Properties=""text;HDR=Yes;FMT=Delimited"";"
strSQL = "SELECT * FROM " & fileName
rs.Open strSQL, strcon, 3, 3
rs.MoveFirst
Do
   col1 = rs("Col1")
   col2 = rs("Col2")
   col3 = rs("Col3")
   rs.MoveNext
Loop Until rs.EOF
Reading CSV files (whole file to Worksheet)
Read whole file to an Excel Worksheet:
Dim ws as Worksheet, destRng as Range, fileName as String
fileName = "C:text.txt"
Set destRng = Range("A1")
Set ws = ActiveSheet
With ws.QueryTables.Add(Connection:= "TEXT;" & fileName & "", Destination:=destRng)
    .FieldNames = True
    .RowNumbers = False
    .FillAdjacentFormulas = False
    .PreserveFormatting = True
    .RefreshOnFileOpen = False
    .RefreshStyle = xlInsertDeleteCells
    .SaveData = True
    .AdjustColumnWidth = True
    .RefreshPeriod = 0
    .TextFilePromptOnRefresh = False
    .TextFilePlatform = 852
    .TextFileStartRow = 1
    .TextFileParseType = xlDelimited
    .TextFileTextQualifier = xlTextQualifierDoubleQuote
    'Select your delimiter - selected below for Comma
    .TextFileConsecutiveDelimiter = False
    .TextFileTabDelimiter = False
    .TextFileSemicolonDelimiter = False
    .TextFileCommaDelimiter = True
    .TextFileSpaceDelimiter = False
    .TextFileTrailingMinusNumbers = True
    'This will refresh the query
End With
To refresh the CSV upload (in case the CSV was updated) simply run:
ws.QueryTables.Refresh BackgroundQuery:=False
Reading binary files in VBA
Dim fileName As String, fileNo As Integer, intVar As Integer
fileName = "C:text.bin"
fileNo = FreeFile

Open fileName For Binary Lock Read As #fileNo
Get #fileNo, , intVar
Close #fileNo
With Binary files often you will be using objects which are not of fixed byte length like Integers. For example you would want to read Strings from binary files together with other data types. In such cases use the Type object data type when writing to a file. Learn more here.
Below a simple example of reading a file to which a Type data type was saved to, including an Integer and String.
Type TestType
    intVar As Integer
    strVar As String
End Type

Sub ReadBinary()
    Dim fileName As String, fileNo As Integer, testVar As TestType
    fileName = "C:test.bin"

    fileNo = FreeFile
    Open fileName For Binary Lock Read As #fileNo
    Get #fileNo, , testVar
    Debug.Print testVar.intVar 'Print the Integer
    Debug.Print testVar.strVar 'Print the String
    Close #fileNo
End Sub
Reading XML files in VBA
XML files are basically text files which follow the XML taxonomy. You can try to read and process XML files similarly as text files shown above. However, given you will probably want to extract specific XML tag or attribute information I suggest reading my dedicated article below.
Functions needed to read files in VBA
| Function | Description |
|---|---|
| Open [path_to_file] For [Mode] [Access] [Lock] As [long_variable] | Opens the file for read/write and returns the # file number (needs to be type of long) into long_variable More info here. Parameters below:
|
| Close | Closes the file using the # file number. More info here. |
| FreeFile | Get next free file number available for the Open statement / FileOpen function. Using this function is important especially when operating on multiple files simultaneously. More info here. |
| BOF(fileNumber) | Returns true if you are at the beginning of the file described by the file number. More info here. |
| EOF(fileNumber) | Returns true if you have reached the end of the file described by the file number. More info here. |
| Loc(fileNumber) | Returns the current read/write position within an open file. More info here. |
| LOF(fileNumber) | Returns the size in bytes of the file represented by the file number. More info here. |
Above functions allow native upload of file data. However for more complicated scenario you will probably go for the FileSystemObject.
VBA Read File Summary
Reading files in VBA is not hard and requires just a few lines of code usually. It is, however, important to use the appropriate approach to read a file in VBA. Not all files need to be read line-by-line which is usually inefficient. Equally so you need not always read the entire file if you just need the first few / last rows. Working with XML files is also not a challenge if you read through my post on how to work with XML files.
Want to Write to files instead?
If you are looking to write to files instead using VBA, read my article on how to write to files using VBA.
Return to VBA Code Examples
This tutorial will demonstrate how to read content from text files and paste it into worksheets with VBA.
Read Text File Content into Worksheet
The simplest way of reading a text file’s content is to copy it into a worksheet’s cell.
Sub FSOPasteTextFileContent()
    Dim FSO As New FileSystemObject
    Set FSO = CreateObject("Scripting.FileSystemObject")
    Set FileToRead = FSO.OpenTextFile("C:TestTestFile.txt", ForReading) 'add here the path of your text file

    TextString = FileToRead.ReadAll

    FileToRead.Close

    ThisWorkbook.Sheets(1).Range("A1").Value = TextString 'you can specify the worksheet and cell where to paste the text file’s content

End Sub
The above code uses the FileSystemObject. In order to use it, you will need to set a reference to the VB script run-time library. See here for more information.
Without using FileSystemObject you can paste your text file’s content with the below code. If your text file contains line separator, it will be pasted line by line.
Sub PasteTextFileContent ()
    Dim wbExcel As Workbook, wbText As Workbook
    Dim wsExcel As Worksheet
    Set wbExcel = ThisWorkbook 'specify here which Excel file the text file’s content is to be pasted into
    Set wsExcel = wbExcel.Sheets(1) 'specify here which worksheet to use
    Set wbText = Workbooks.Open("C:TestTestFile.txt") 'add here the path of your text file

    wbText.Sheets(1).Cells.Copy wsExcel.Cells

    wbText.Close SaveChanges:=False

End Sub
Read Text File Content Line by Line, Column by Column
Your text file may have several rows and several elements listed in the rows separated by comma, semicolon, tab, space, etc.. In order to read and paste the text file’s content correctly, you may need this code below:
Sub PasteTextFileContentWithSeparators()
    Dim StrLine As String
    Dim FSO As New FileSystemObject
    Dim TSO as Object
    Dim StrLineElements As Variant
    Dim Index As Long
    Dim i As Long
    Dim Delimiter as String
    Set FSO = CreateObject("Scripting.FileSystemObject")
    Set TSO = FSO.OpenTextFile("C:TestTestFile.txt")

    Delimiter=", " 'the delimiter that is used in your text file
    Index = 1

    Do While TSO.AtEndOfStream = False
       StrLine = TSO.ReadLine
       StrLineElements = Split(StrLine, Delimiter)
       For i = LBound(StrLineElements) To UBound(StrLineElements)
           Cells(Index, i + 1).Value = StrLineElements(i) 'this code will start pasting the text file’s content from the active worksheet’s A1 (Cell(1,1)) cell
       Next i
       Index = Index + 1
    Loop

TSO.Close

End Sub
The delimiter that is used in your text file can be comma (“,”), comma with space (“, “), semicolon (“;”), semicolon with space (“; “), space (“ “), tab (change then Delimiter = vbTab) or in rare cases any other character.
Read Text Files into Arrays
If you need to read your text file’s content into an array and paste is line by line, column by column into your worksheet, you will need this code below:
Sub ReadDelimitedTextFileIntoArray()
    Dim Delimiter As String
    Dim TextFile As Integer
    Dim FilePath As String
    Dim FileContent As String
    Dim LineArray() As String
    Dim DataArray() As String
    Dim TempArray() As String
    Dim rw As Long, col As Long

    Delimiter = vbTab 'the delimiter that is used in your text file
    FilePath = "C:TestTestFileTab.txt"
    rw = 1

    TextFile = FreeFile
    Open FilePath For Input As TextFile
    FileContent = Input(LOF(TextFile), TextFile)
    Close TextFile

    LineArray() = Split(FileContent, vbNewLine) 'change vbNewLine to vbCrLf or vbLf depending on the line separator that is used in your text file
    For x = LBound(LineArray) To UBound(LineArray)
        If Len(Trim(LineArray(x))) <> 0 Then
           TempArray = Split(LineArray(x), Delimiter)
           col = UBound(TempArray)
 	   ReDim Preserve DataArray(col, rw)
           For y = LBound(TempArray) To UBound(TempArray)
 	       DataArray(y, rw) = TempArray(y)
 	       Cells(x + 1, y + 1).Value = DataArray(y, rw)  'this code will start pasting the text file’s content from the active worksheet’s A1 (Cell(1,1)) cell
           Next y
        End If
        rw = rw + 1
     Next x

End Sub
Line separators in your text file can be carriage return and linefeed combination (Chr(13)+Chr(10)) or linefeed (Chr(10)). Use vbCrLf or vbLf, accordingly. If you are not sure, use vbNewLine for indicating the line separator.
VBA Coding Made Easy
Stop searching for VBA code online. Learn more about AutoMacro — A VBA Code Builder that allows beginners to code procedures from scratch with minimal coding knowledge and with many time-saving features for all users!

Learn More!
VBA Program to read a Text file line by line (Sales Data) and places on a worksheet.
Sales Data in Text File: 5 Fields [ Product, Qtr 1, Qtr 2, Qtr 3 and Qtr 4 ] and 25 Records (Incl. header)
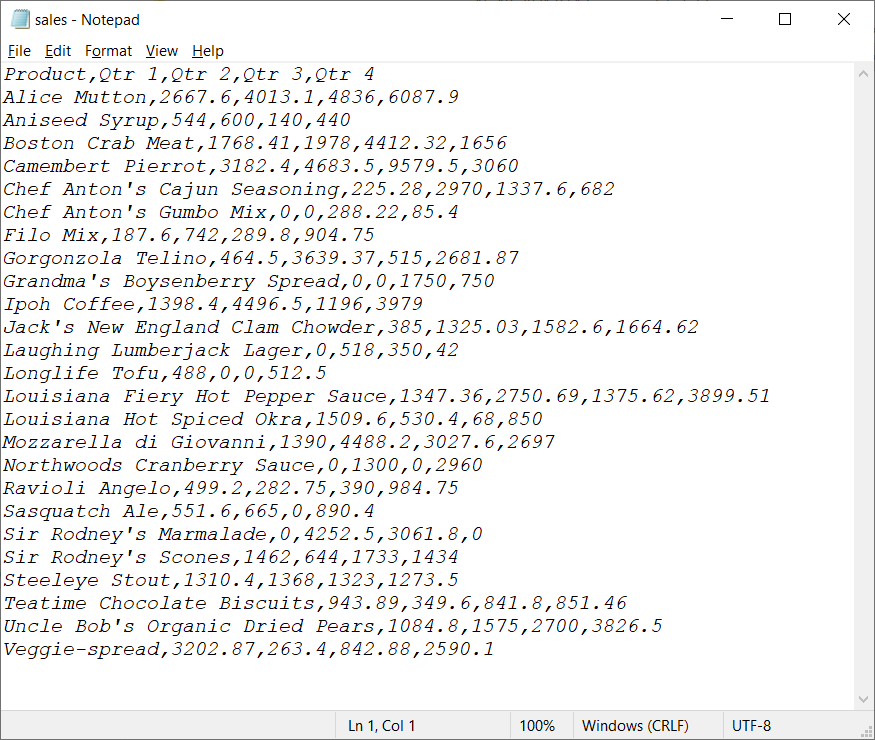
Sales data
VBA code will read a text file and places on worksheet cells as below

VBA Code:
- Declaring variables:
| Variables | Data Type | Comments |
|---|---|---|
| line | String | Read text file line by line |
| Filename | String | Input file name (Full path) |
| i | Integer | Iterator |
| valueArr() | String | split the sentence by comma and store it in an array variable of type String |
    'Variable declarations
    Dim line As String, Filename As String, i As Integer, valuesArr() As String
- Initialize “Filename” variable with full path and filename
    'Text file fullPath
    Filename = "D:ExcelReadTextFilesales.txt" 'update your full file path
    i = 1
- Open input file to read text
    'Open file
    Open Filename For Input As #2
- Read input file line by line
    'Read line by line - text file
    While Not EOF(2)
        Line Input #2, line
- Split by comma and store it in valueArr(). In our example, each line has 5 values concatenated with comma.
        'split the line by comma separated, assigned in an array
        valuesArr() = Split(line, ",")
- Add text to respective cells from valuesArr(). Read each item in an array by it’s index value
        Cells(i, "A").Value = valuesArr(0)
        Cells(i, "B").Value = valuesArr(1)
        Cells(i, "C").Value = valuesArr(2)
        Cells(i, "D").Value = valuesArr(3)
        Cells(i, "E").Value = valuesArr(4)
- Increment counter i, to move next line.
i = i + 1
- Close while loop
Wend
- Close file
'Close file
Close #2
Approach:
Step 1: Open Excel.
Step 2: Add a shape (Read Text File) to your worksheet .

Step 3: Right-click on “Read Text file” and “Assign Macro..”

Step 4: Select ReadTextFileLineByLine Macro

Step 5: Save your excel file as “Excel Macro-Enabled Workbook” *.xlsm

Step 6: Click “Read Text file”

Step 7: Adjust column width in your excel file.

Содержание
- VBA Read Text File (Read, Parse, and Import)
- Read Text File Content into Worksheet
- Read Text File Content Line by Line, Column by Column
- Read Text Files into Arrays
- VBA Coding Made Easy
- VBA Code Examples Add-in
- Read Data from Text File
- How to Read Data From Text File in Excel VBA?
- VBA Code:
- Read and Write to a Text File with VBA OpenTextFile
- The VBA Tutorials Blog
- FileSystemObject setup
- The TextStream class
- Reading a text file with VBA OpenTextFile
- Appending to text file with VBA OpenTextFile
- Writing to text file with VBA OpenTextFile
- OpenTextFile Application Ideas
VBA Read Text File (Read, Parse, and Import)
In this Article
This tutorial will demonstrate how to read content from text files and paste it into worksheets with VBA.
Read Text File Content into Worksheet
The simplest way of reading a text file’s content is to copy it into a worksheet’s cell.
The above code uses the FileSystemObject. In order to use it, you will need to set a reference to the VB script run-time library. See here for more information.
Without using FileSystemObject you can paste your text file’s content with the below code. If your text file contains line separator, it will be pasted line by line.
Read Text File Content Line by Line, Column by Column
Your text file may have several rows and several elements listed in the rows separated by comma, semicolon, tab, space, etc.. In order to read and paste the text file’s content correctly, you may need this code below:
The delimiter that is used in your text file can be comma (“,”), comma with space (“, “), semicolon (“;”), semicolon with space (“; “), space (“ “), tab (change then Delimiter = vbTab) or in rare cases any other character.
Read Text Files into Arrays
If you need to read your text file’s content into an array and paste is line by line, column by column into your worksheet, you will need this code below:
Line separators in your text file can be carriage return and linefeed combination (Chr(13)+Chr(10)) or linefeed (Chr(10)). Use vbCrLf or vbLf, accordingly. If you are not sure, use vbNewLine for indicating the line separator.
VBA Coding Made Easy
Stop searching for VBA code online. Learn more about AutoMacro — A VBA Code Builder that allows beginners to code procedures from scratch with minimal coding knowledge and with many time-saving features for all users!

VBA Code Examples Add-in
Easily access all of the code examples found on our site.
Simply navigate to the menu, click, and the code will be inserted directly into your module. .xlam add-in.
Источник
Read Data from Text File
Below we will look at a program in Excel VBA that reads data from a text file. This file contains some geographical coordinates we want to import into Excel.
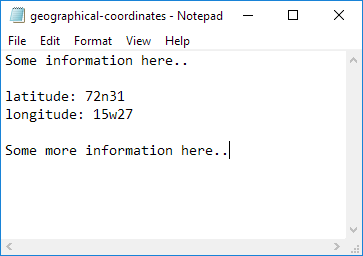
1. First, download the text file and add it to «C:test»
Place a command button on your worksheet and add the following code lines:
2. We declare four variables. myFile of type String, text of type String, textline of type String, posLat of type Integer, and posLong of type Integer.
3. We need to initialize the variable myFile with the full path and the filename.
use the GetOpenFilename method of the Application object to display the standard Open dialog box and select the file (without actually opening the file).
Note: the empty part between the brackets means we give Excel VBA nothing as input. Place your cursor on GetOpenFilename in the Visual Basic Editor and click F1 for help on the arguments.
4. Add the following code line:
Note: this statement allows the file to be read. We can refer to the file as #1 during the rest of our code.
5. Add the following code lines:
Note: until the end of the file (EOF), Excel VBA reads a single line from the file and assigns it to textline. We use the & operator to concatenate (join) all the single lines and store it in the variable text.
6. Close the file.
7. Next, we search for the position of the words latitude and longitude in the variable text. We use the Instr function.
8. We use these positions and the Mid function to extract the coordinates from the variable text and write the coordinates to cell A1 and cell A2.
Источник
How to Read Data From Text File in Excel VBA?
VBA Program to read a Text file line by line (Sales Data) and places on a worksheet.
Sales Data in Text File: 5 Fields [ Product, Qtr 1, Qtr 2, Qtr 3 and Qtr 4 ] and 25 Records (Incl. header)
VBA code will read a text file and places on worksheet cells as below
VBA Code:
- Declaring variables:
| Variables | Data Type | Comments |
|---|---|---|
| line | String | Read text file line by line |
| Filename | String | Input file name (Full path) |
| i | Integer | Iterator |
| valueArr() | String | split the sentence by comma and store it in an array variable of type String |
- Initialize “Filename” variable with full path and filename
- Open input file to read text
- Read input file line by line
- Split by comma and store it in valueArr(). In our example, each line has 5 values concatenated with comma.
- Add text to respective cells from valuesArr(). Read each item in an array by it’s index value
- Increment counter i, to move next line.
- Close while loop
- Close file
Approach:
Step 1: Open Excel.
Step 2: Add a shape (Read Text File) to your worksheet .
Step 3: Right-click on “Read Text file” and “Assign Macro..”
Step 4: Select ReadTextFileLineByLine Macro
Step 5: Save your excel file as “Excel Macro-Enabled Workbook” *.xlsm
Step 6: Click “Read Text file”
Step 7: Adjust column width in your excel file.
Источник
Read and Write to a Text File with VBA OpenTextFile
The VBA Tutorials Blog
You can use the FileSystemObject TextStream to open a text file in VBA by pairing it with the VBA OpenTextFile method. The VBA OpenTextFile method is a simple way to read, write, and append to text files.
In case you haven’t already done so, check out our VBA FSO introduction tutorial for background info on the scripting object used for opening text files in this tutorial.
In this tutorial we’ll show you how to read a text file using the FileSystemObject (FSO) and the methods of the VBA OpenTextFile method. We’ll start with the basic setup of a TextStream and explain the various methods for reading text content from it. Since we’ve already dealt extensively with how to create text files through VBA in our VBA CreateTextFile tutorial, we’ll mainly focus on the read, append and write methods of the of the OpenTextFile object here.
First, we’ll show you the basic setup of the FSO and then we’ll give a quick rundown of the TextStream class, as it contains the methods and properties you’ll be using when you’re working with text files through the OpenTextFile method. Next, we’ll present three examples of reading, appending and writing to a text file. Finally, we’ll briefly elaborate on some of the powerful application ideas related to the topic which we’ve already discussed in previous tutorials.
Now, let’s get started with the FSO setup!
FileSystemObject setup
Start by opening the Visual Basic Editor by pressing Alt+F11 and then go to Tools > References… and set a reference to the Microsoft Scripting Runtime (MSR) object library.
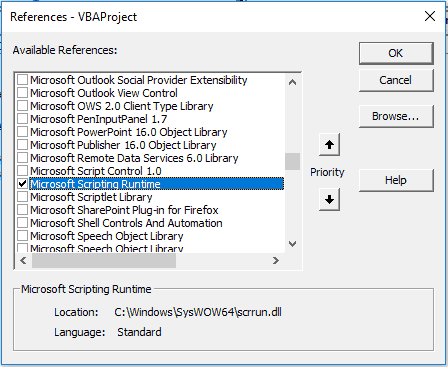
VBA Microsoft Scripting Runtime Reference
You’re now set up to start using the various scripting methods, such as reading and writing to text files. Before we discuss these methods, let’s take a closer look at the TextStream class.
The TextStream class
I encourage you to return to this table once you’ve finished reading the rest of this tutorial. This table describes a bunch of the methods of the VBA TextStream class that you may find useful when working with text files.
| Name | Type | Description |
|---|---|---|
| AtEndOfLine | Property | Read-only. Checks if the current position is the end of a line. |
| AtEndOfStream | Property | Read-only. Checks if the current position is the end of the TextStream. |
| Close | Method | Closes the TextStream object. |
| Column | Property | Read-only. Returns the column number of the character currently being read in the TextStream. |
| Line | Property | Read-only. Returns the row number of the character currently being read in the TextStream. |
| Read | Method | Reads a specified number of characters into a string. |
| ReadAll | Method | Reads all the content of the input text file into a string. This should be used with caution if you’re working with very large files. Example usage: str = tsTxtFile.ReadAll , where str is a String type variable and the tsTxtFile variable holds the TextStream object. |
| ReadLine | Method | Reads the content of a specified line of the TextStream into a string. Example usage: str = tsTxtFile.ReadLine , where str is a String type variable and the tsTxtFile variable holds the TextStream object. |
| Skip | Method | Ignore the specified number of characters. Typically part of a conditional statement, such as If .Line = 1 Then .Skip 10 . «If the line is the first of the TextStream, then skip 10 characters before performing some action». |
| SkipLine | Method | Same principle as the Skip method but ignores the entire line of characters instead and takes no parameter. |
The class contains three more methods, namely Write, WriteBlankLines and WriteLine, but we’ll deal with them in the append example later on.
Reading a text file with VBA OpenTextFile
We’re going to show you how to read a text file with the VBA OpenTextFile method, but to become a true file I/O expert, you should look at our comprehensive VBA File I/O Cheat Sheet filled with 50+ tips for working with files and over 30 file input/output macro examples.
Paste the code below into a standard code module:
Make powerful macros with our free VBA Developer Kit
This is actually pretty neat. If you have trouble understanding or remembering it, our free VBA Developer Kit can help. It’s loaded with VBA shortcuts to help you make your own macros like this one — we’ll send a copy, along with our Big Book of Excel VBA Macros, to your email address below.
The OpenTextFileRead procedure above will print all the lines of a text file to the immediate window in the Visual Basic Editor. Let’s explain in more detail how that works.
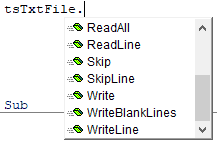
The TextStream object is used for creating the text file and we use the tsTxtFile variable to hold an instance of this object. Notice that we use early binding by means of the New operator, which allows us to view the methods and properties of the TextStream object at design time with the “Auto List Members” feature of the Visual Basic Editor.
VBA OpenTextFile Auto List Members
In the procedure above, we first set up the fso variable to hold an instance of the FileSystemObject. Next, we set up the tsTxtFile variable to hold the information of the text file we’re working with by means of the OpenTextFile method of the FileSystemObject.
The OpenTextFile method takes four parameters, the first one mandatory and the next three optional.

VBA OpenTextFile parameters
The first parameter, «C:testtest.txt» , is the full file path and name of the text file you’re working with and it should be self-evident why this parameter is mandatory. It’s hard to open a file if you don’t tell it which file to open!
The next three parameters do require more explaining, especially if you’re working with non-ASCII text files. (ASCII stands for American Standard Code for Information Interchange and is the most common format for text files in computers and on the Internet). These three optional parameters are described in the table below:
IOMode
ForReading
(1)
Format
TristateFalse
(0)
| Parameter | Option | Option data type | Value | Default value | Description |
|---|---|---|---|---|---|
| ForAppending | Long | 8 | Appends lines of text to the TextStream. | ||
| ForReading | Long | 1 | Reads lines of text from the TextStream. | ||
| ForWriting | Long | 2 | Writes lines of text to the TextStream. | ||
| Create | True/False | Boolean | True/False | False | Creates a text file in the specified path location, if no file by the specified name already exists in it. |
| TristateFalse | Long | 0 | Opens the file as an ASCII file. | ||
| TristateMixed | Long | -2 | Opens the file either as an ASCII file or a Unicode file. | ||
| TristateTrue | Long | -1 | Opens the file as a Unicode file. | ||
| TristateUseDefault | Long | -2 | Same as TristateMixed. |
The second parameter, IOMode , or Input-Output mode, is a class of the MSR object library and has three members, or “options”. You must choose which IOMode you want to use while processing the text file as you cannot both read and append or write to it simultaneously.
The third parameter, Create is only relevant if you set the second parameter, IOMode, to something other than ForReading . If you set this parameter to False and specify an invalid folder path in the first parameter, you will see the following error message at run-time:
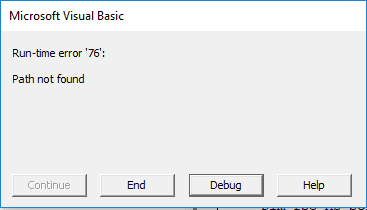
VBA Path does not exist run-time error 76
The fourth parameter, Format is a class of the MSR object library with four options. These four options are crucial to know if you’re working with text files in non-ASCII formats. Curiously, both the TristateMixed and TristateUseDefault constant have the value -2 and are therefore interchangeable! A possible explanation for this is that the one of these is a legacy option carried over from another variant of the VB language, such as VBScript, where the MSR object library and the FileSystemObject is used for similar purposes as in VBA. Selecting either of these two options means the OpenTextFile method will try to determine for you whether the file in question is an ASCII or Unicode file. This is extremely useful if you want to process a batch of text files from various sources and you’re unsure how they are encoded.
Conversely, if you choose the TristateFalse or TristateTrue option, you force the method to interpret the input text as ASCII or Unicode, respectively.
Finally, after looping all the lines of text, we close the TextStream with the .close command.
Now, let’s take a closer look at how you append content to a text file using the OpenTextFile method!
Appending to text file with VBA OpenTextFile
Paste the code below into a standard code module:
The setup is very similar to the OpenTextFileRead procedure, except we’ve changed the second parameter of the VBA OpenTextFile method to ForAppending . You’ll also notice that we’re appending with three different methods, so let’s explain these in more detail:
| Method | Description |
|---|---|
| .Write | Adds text to the end of the TextStream without adding a carriage return. |
| .WriteBlankLines | Adds a carriage return to the end of the TextStream. |
| .WriteLine | Adds a carriage return and then the specified text to the end of the TextStream. A shorthand for writing .WriteBlankLines 1 and .Write [text] in two separate lines of code. |
Note, it doesn’t matter whether or not the specified input text file actually contains any characters before you start appending to it. Even if it’s empty, the OpenTextFileAppend procedure will still work.
After appending to the TextStream, we close it with the .Close command. As we mentioned in our VBA CreateTextFile tutorial, this isn’t strictly necessary but if you’re working with very large files you probably want the memory used by the TextStream object to be released as quickly as possible.
Writing to text file with VBA OpenTextFile
We already described how to write to a text file with the VBA Print statement, but you may prefer to create files using FSO, instead.
To write to a text file with VBA OpenTextFile FSO, start by changing the parameters of the OpenTextFile method in the OpenTextFileAppend procedure to
Notice the ForWriting keyword. The procedure will now work exactly the same way as described in the appending section, except that it overwrites any existing content in the specified input text file! In other word, after you run the procedure the only content in the file will be what you just wrote to it.
OpenTextFile Application Ideas
VBA OpenTextFile is extremely powerful since it allows you to both create, read, write and append to text files. We’ve focused mainly on the three latter operations in this tutorial, since the former is covered in our VBA CreateTextFile tutorial. Rather than repeating our application ideas from that tutorial, let’s instead append to them (pun intended):
- Log files. When you’re creating log files you usually want to append to the end of them, rather than overwriting them or creating new separate files.
- Collection of data/data extraction. By modifying the procedures presented in this tutorial you can easily update or overwrite any existing data you’ve collected in text files.
- Data backup. If you’re creating personal backups in text files, you can now shrink the disk space required to do so even further by using incremental backups rather than full backups. This is pretty advanced stuff, but here’s the general idea. Let’s say you’ve created a master file (“full backup”) of sensitive information gathered from various sources. Every time crucial changes are made to this information, you could then append the changes to a separate JSON (Javascript Object Notation) text file containing key-value pairs specifying where the changes were made and what they are. This would allow you to roll back to any “configuration” or former state of the initial information without storing bloated and redundant backup copies on your disk.
That’s all for this tutorial. When you’re ready to take your VBA to the next level, subscribe using the form below.
Ready to do more with VBA?
We put together a giant PDF with over 300 pre-built macros and we want you to have it for free. Enter your email address below and we’ll send you a copy along with our VBA Developer Kit, loaded with VBA tips, tricks and shortcuts.
Before we go, I want to let you know we designed a suite of VBA Cheat Sheets to make it easier for you to write better macros. We included over 200 tips and 140 macro examples so they have everything you need to know to become a better VBA programmer.
This article was written by Michael H. Sorensen, a contributing writer for The VBA Tutorials Blog.
Источник
Чтение и запись в файл, открытый с помощью оператора Open. Операторы Input, Line Input, Write и функция EOF. Примеры использования в VBA Excel.
Операторы чтения и записи в файл
Оператор Input #
Оператор Input # считывает данные из открытого файла с последовательным доступом и присваивает эти данные переменным.
Оператор Input # используется только с файлами, открытыми в режиме Input или Binary. При прочтении стандартные строковые или числовые значения присваиваются переменным без изменения.
Синтаксис оператора Input #:
|
Input #Номер_файла, Переменные |
Компоненты оператора Input #:
- Номер_файла – обязательный параметр, представляющий из себя номер, присвоенный файлу при открытии с помощью оператора Open.
- Переменные – обязательный параметр, представляющий из себя список переменных, разделенных запятой, которым присваиваются значения, считанные из файла.
Особенности применения оператора Input #:
- Элементы данных в файле должны быть указаны в том же порядке, что и переменные в списке Переменные, и соответствовать им по типу данных. Если переменная числовая, а данные текстовые, этой переменной будет присвоено нулевое значение.
- Если при чтении данных достигнут конец файла, чтение прерывается и возникает ошибка. Для ее предупреждения в коде VBA Excel используется функция EOF.
- Чтобы данные из файла могли быть правильно прочитаны и записаны в переменные с помощью оператора Input #, они должны быть записаны в файл с помощью оператора Write #. Он обеспечивает правильное разделение каждого из полей (элементов) данных.
Оператор Line Input #
Оператор Line Input # считывает одну строку из открытого файла с последовательным доступом и присваивает ее значение строковой переменной.
Оператор Line Input # считывает из файла по одному символу до тех пор, пока не встретится символ возврата каретки (Chr(13)) или последовательность символа возврата каретки и перевода строки (Chr (13) + Chr(10)).
Синтаксис оператора Line Input #:
|
Line Input #Номер_файла, Переменная |
Компоненты оператора Line Input #:
- Номер_файла – обязательный параметр, представляющий из себя номер, присвоенный файлу при открытии с помощью оператора Open.
- Переменная – обязательный параметр, представляющий из себя имя переменной, объявленной как String или Variant, которой присваивается строка, считанная из файла.
Оператор Write #
Оператор Write # записывает данные в файл с последовательным доступом.
Синтаксис оператора Write #:
|
Write #Номер_файла, [Данные] |
Компоненты оператора Write #:
- Номер_файла – обязательный параметр, представляющий из себя номер, присвоенный файлу при открытии с помощью оператора Open.
- Данные – необязательный параметр, представляющий из себя одно или несколько числовых или строковых выражений, разделенных запятой, которые нужно записать в файл.
Особенности применения оператора Write #:
- Данные, записанные с помощью оператора Write #, считываются из файла с помощью оператора Input #.
- Если опустить параметр Данные и добавить запятую после Номер_файла, в файл будет добавлена пустая строка.
- Несколько выражений в списке Данные могут быть разделены точкой с запятой или запятой.
- Числовые данные всегда записываются с точкой в качестве разделителя целой и дробной части.
- Оператор Write # вставляет запятые между элементами и прямые парные кавычки вокруг строк при их записи в файл.
- После записи в файл последнего символа из параметра Данные оператор Write # вставляет символы возврата каретки и перевода строки (Chr (13) + Chr(10)).
Функция EOF
Функция EOF возвращает логическое значение True, когда достигнут конец файла, открытого для последовательного (Input) или произвольного (Random) доступа.
Синтаксис функции EOF:
Номер_файла – это номер, присвоенный файлу при открытии с помощью оператора Open.
Функция EOF используется для предупреждения ошибок, вызываемых попытками выполнить чтение после конца файла. Она возвращает значение False, пока не будет достигнут конец файла.
Примеры чтения и записи в файл
Пример 1
Открытие (или создание, если он не существует) текстового файла для чтения и записи и запись в него одной строки, состоящей из двух текстовых и одного числового значений. Файл с именем myFile1.txt будет создан в той же папке, где расположен файл Excel с кодом VBA.
|
Sub Test1() Dim ff As Integer ‘Получаем свободный номер для открываемого файла ff = FreeFile ‘Открываем (или создаем) файл для чтения и записи Open ThisWorkbook.Path & «myFile1.txt» For Output As ff ‘Записываем в файл одну строку Write #ff, «Дает корова молоко!», _ «Куда идет король?», 25.35847 ‘Закрываем файл Close ff ‘Открываем файл для просмотра ThisWorkbook.FollowHyperlink (ThisWorkbook.Path & «myFile1.txt») End Sub |
Строки и число можно предварительно присвоить переменным, объявленным с соответствующими типами данных, и использовать их для записи данных в файл (в строках кода с оператором Write #, как в этом и следующем примерах).
Пример 2
Открытие (или создание, если он не существует) файла без расширения для чтения и записи и запись в него трех строк: двух текстовых и одной в числовом формате. Файл с именем myFile2 будет создан в той же папке, где расположен файл Excel с кодом VBA.
Так как у файла нет расширения, Windows выведет диалоговое окно для выбора открывающей его программы. Выберите любой текстовый редактор или интернет-браузер.
|
Sub Test2() Dim ff As Integer ‘Получаем свободный номер для открываемого файла ff = FreeFile ‘Открываем (или создаем) файл для чтения и записи Open ThisWorkbook.Path & «myFile2» For Output As ff ‘Записываем в файл три строки Write #ff, «Дает корова молоко!» Write #ff, «Куда идет король?» Write #ff, 25.35847 ‘Закрываем файл Close ff ‘Открываем файл для просмотра ThisWorkbook.FollowHyperlink (ThisWorkbook.Path & «myFile2») End Sub |
Пример 3
Считываем строку, разделенную на отдельные элементы, из файла myFile1.txt и записываем в три переменные, по типу данных соответствующие элементам.
|
Sub Test3() Dim ff As Integer, str1 As String, _ str2 As String, num1 As Single ‘Получаем свободный номер для открываемого файла ff = FreeFile ‘Открываем файл myFile1.txt для чтения Open ThisWorkbook.Path & «myFile1.txt» For Input As ff ‘Считываем строку из файла и записываем в переменные Input #ff, str1, str2, num1 Close ff ‘Смотрим, что записалось в переменные MsgBox «str1 = « & str1 & vbNewLine _ & «str2 = « & str2 & vbNewLine _ & «num1 = « & num1 End Sub |
Попробуйте заменить в этом примере строку Input #ff, str1, str2, num1 сначала на строку Input #ff, str1, затем на строку Line Input #ff, str1, чтобы наглядно увидеть разницу между операторами Input # и Line Input #.
В следующих примерах (4 и 5) замена оператора Input # на Line Input # не приведет ни к каким изменениям, так как данные в строках файла myFile2 не разделены на элементы (поля).
Пример 4
Считываем поочередно три строки из файла myFile2 и записываем в три элемента массива, объявленного как Variant, так как в этот файл ранее были записаны две строки с текстом и одна с числом.
|
Sub Test4() Dim ff As Integer, a(2) As Variant, i As Byte ‘Получаем свободный номер для открываемого файла ff = FreeFile ‘Открываем файл myFile2 для чтения Open ThisWorkbook.Path & «myFile2» For Input As ff ‘Считываем строки из файла и записываем в элементы массива For i = 0 To 2 Input #ff, a(i) Next Close ff ‘Смотрим, что записалось в элементы массива MsgBox «a(0) = « & a(0) & vbNewLine _ & «a(1) = « & a(1) & vbNewLine _ & «a(2) = « & a(2) End Sub |
Пример 5
Считываем с помощью цикла Do While… Loop все строки из файла myFile2 и записываем построчно в переменную, объявленную как String (число из третьей строки запишется как текст). Для остановки цикла при достижении конца файла используем функцию EOF.
|
Sub Test5() Dim ff As Integer, a As Variant, b As String ‘Получаем свободный номер для открываемого файла ff = FreeFile ‘Открываем файл myFile2 для чтения Open ThisWorkbook.Path & «myFile2» For Input As ff ‘Считываем строки из файла и записываем в элементы массива Do While Not EOF(ff) Input #ff, a b = b & a & vbNewLine Loop Close ff ‘Смотрим, что записалось в переменную MsgBox b End Sub |
Предыдущая часть темы об открытии файла для ввода и вывода информации опубликована в статье: Оператор Open (синтаксис, параметры). Смотрите также связанную статью: Функция FreeFile.
Смотрите, как создавать и открывать текстовые файлы с помощью методов CreateTextFile и OpenTextFile. Чтение файла, запись и добавление информации с помощью объекта TextStream.
In this article I will explain how you can read data from a text file. You can download the workbook and code for this article here.
Jump To:
- Example 1, Opening a Text File and Reading the First Line
- Example 2, Closing the Text File After Using it
- Example 3, Reading All Lines of Text From a Text File
- Example 4, Selecting Text File With Dialog
- Example 5, Checking for Errors When Opening the Text File
–
Example 1, Opening a Text File and Reading the First Line:
In this example a text file with the path “D:test.txt” will be openend and the first line will be displayed in a message box. The text file has the following data in it:

This can be achieved by the code below:
Sub  Example1()

Dim  FilePath As  String

Dim  strFirstLine As  String


FilePath = "D:test.txt"

Open  FilePath For  Input  As  #1

Line  Input  #1, strFirstLine

MsgBox (strFirstLine)

End  Sub
Result:

The first line of code sets the value of FilePath to the full path of the text file:
FilePath = "D:test.txt"
The line below opens the file at the specified location and assigns the index “1” to it:
Open FilePath For Input As #1
FilePath:
The full path of the text file to to open
Input:
States that we are only going to use this text file for reading data.
1:
This would be the reference to the file we have opened. Instead of “1” we could have used any number between 1 and 511. Usually the number #1 is always used unless if we are attempting to read from multiple files at the same time.
The line below reads the first line of data from the file with the index “1” and assigns the value to the variable strFirstLine:
Line Input #1, strFirstLine
1:
The index of the file to read the first line from
strFirstLine:
The variable to assign the data from the first line of the text file to.
–
Example 2, Closing the Text File After Using It:
The problem with Example 1 was that it didn’t close the file after using it. If you try to run the code in example 1 a second time you will get the following error:

In order to prevent this error you would need to close the file after using it. This can be done by adding the following line to the code in Example 1:
Close #1
Close #1 closes the file with the “1′ index. Had we used another number while opening the file the same number should be used when closing the file:
Sub  Example2()

Dim  FilePath As  String

Dim  strFirstLine As  String

FilePath = "D:test.txt"

Open  FilePath For  Input  As  #1

Line  Input  #1, strFirstLine

MsgBox (strFirstLine)

Close  #1

End  Sub
Instead of using the index “1” we could have used the index “2”:
Sub  Example3()

Dim  FilePath As  String

Dim  strFirstLine As  String

FilePath = "D:test.txt"

Open  FilePath For  Input  As  #2

Line  Input  #2, strFirstLine

MsgBox (strFirstLine)

Close  #2

End  Sub
–
Example 3, Reading All Lines of Data in a Text File:
The following code opens the text file located at the path “D:test2.txt” and prints every line in a separate cell. The file test2.txt contains the following data:

The following code loops through all the lines in the text file and prints them in column A:
Sub  Example4()

Dim  FilePath As  String

Dim  strLine As  String

Dim  i As  Integer


FilePath = "D:test2.txt"

Open  FilePath For  Input  As  #1

i = 1

While  EOF(1) = False

    'read the next line of data in the text file

    Line  Input  #1, strLine

    'print the data in the current row

    Cells(i, 1) = strLine

    'increment the row counter

    i = i + 1

Wend

Close  #1

End  Sub
Result:

–
Example 4, Opening a Text File With a Dialog:
In the example below the text file is selected using an open file dialog. All the lines of data from the text file are read and printed in column A. For more information about the open file dialog please see Excel VBA Open File Dialog:
Sub  Example5()


Dim  strLine As  String

Dim  i As  Integer

Dim  intResult As  Integer

Dim  strPath As  String


Application.FileDialog(msoFileDialogOpen).AllowMultiSelect = False

intResult = Application.FileDialog(msoFileDialogOpen).Show

If  intResult <> 0 Then

    strPath = Application.FileDialog(msoFileDialogOpen).SelectedItems(1)

Open  strPath For  Input  As  #1

    i = 1

    While  EOF(1) = False

        'read the next line of data in the text file

        Line  Input  #1, strLine

        'print the data in the current row

        Cells(i, 1) = strLine

        'increment the row counter

        i = i + 1

    Wend

End If

Close  #1

End  Sub
The file chosen had the following data in it:

Result:

–
Example 5, Checking for Errors When Opening the Text File:
When opening a text file several things could go wrong which could cause the program to crash. It’s always a good idea to add an exception handler to handle such cases. For more information on this issue please see VBA, Check if Text File is Open. The code below asks the user to select a file to open. If the file is opened successfully all the data in the text file printed in column A. If there is an error while opening the file, a message box is displayed:
Sub  Example6()

Dim  strLine As  String

Dim  i As  Integer

Dim  intResult As  Integer

Dim  strPath As  String


Application.FileDialog(msoFileDialogOpen).AllowMultiSelect = False

intResult = Application.FileDialog(msoFileDialogOpen).Show

If  intResult <> 0 Then

    strPath = Application.FileDialog(msoFileDialogOpen).SelectedItems(1)

    On Error GoTo lblError:

    Open  strPath For  Input  As  #1

    i = 1

    While  EOF(1) = False

        'read the next line of data in the text file

        Line  Input  #1, strLine

        'print the data in the current row

        Cells(i, 1) = strLine

        'increment the row counter

        i = i + 1

    Wend

End If

Close  #1

Exit  Sub


lblError:

MsgBox ("There was an error opening the file. Implement the necessary actions")

Err.Clear

Close  #1

End  Sub
You can download the workbook and code for this article here.
See also:
- VBA Excel Open File Dialog
- VBA, Modify Existing Text File
- VBA Excel, Writing to a Text File
- VBA, Check if Text File is Open
- Find and List All Files and Folders in a Directory
If you need assistance with your code, or you are looking for a VBA programmer to hire feel free to contact me. Also please visit my website www.software-solutions-online.com
Below we will look at a program in Excel VBA that reads data from a text file. This file contains some geographical coordinates we want to import into Excel.
Situation:
1. First, download the text file and add it to «C:test»
Place a command button on your worksheet and add the following code lines:
2. We declare four variables. myFile of type String, text of type String, textline of type String, posLat of type Integer, and posLong of type Integer.
Dim myFile As String, text As String, textline As String, posLat As Integer, posLong As Integer
3. We need to initialize the variable myFile with the full path and the filename.
myFile = «C:testgeographical-coordinates.txt»
or
use the GetOpenFilename method of the Application object to display the standard Open dialog box and select the file (without actually opening the file).
myFile = Application.GetOpenFilename()
Note: the empty part between the brackets means we give Excel VBA nothing as input. Place your cursor on GetOpenFilename in the Visual Basic Editor and click F1 for help on the arguments.
4. Add the following code line:
Open myFile For Input As #1
Note: this statement allows the file to be read. We can refer to the file as #1 during the rest of our code.
5. Add the following code lines:
Do Until EOF(1)
Line Input #1, textline
text = text & textline
Loop
Note: until the end of the file (EOF), Excel VBA reads a single line from the file and assigns it to textline. We use the & operator to concatenate (join) all the single lines and store it in the variable text.
6. Close the file.
Close #1
7. Next, we search for the position of the words latitude and longitude in the variable text. We use the Instr function.
posLat = InStr(text, «latitude»)
posLong = InStr(text, «longitude»)
8. We use these positions and the Mid function to extract the coordinates from the variable text and write the coordinates to cell A1 and cell A2.
Range(«A1»).Value = Mid(text, posLat + 10, 5)
Range(«A2»).Value = Mid(text, posLong + 11, 5)
9. Test the program.
Result:

Text files are one of the simplest, lightest file types. This is the reason it is highly used in programming to store a lot of configuration-related data, logs and so many other necessary data which is used by programs more frequently.
If you browse your Program files folder in windows almost every program will have some text files for storing some configurations or logs etc. stored in it.
Did you Know?
XML Files are also text files. The only difference is that XML files are more structured than Text files. This is the reason XMLs are widely used for communication.
In this article I am going to teach you in detail – How to deal with Text Files in Excel VBA. As explained above, Text files are very useful while developing any tool or add-in in Excel where you want to store some configuration data – in order to run your program or add-in. Using Excel file to store such data will make the program very slow.
I don’t need to explain much – about why a Text file would be a better option, rather you will find it by yourself at the end of this article.
So let’s start then in a logical order… Opening a file… reading a file… writing into a file.. etc.
Topics covered in this Article
In this article, the following topics are covered. Click on the below links to directly jump to that section
1. Excel VBA to Open a Text File
2. Excel VBA to create a NEW Text File
3. VBA to write a Text file using Write Statement
4. VBA to write a Text file using Print Statement
5. VBA to Append to a Text File
5. What is FreeFile () function ?
How to read a file, will be covered in the next article.
Excel VBA Code to Open a Text File
Following is the code Syntax to open a Text file:
Open [file Path] For [mode] As [#FileNumber]
With the Above code Syntax, as you can see, there are 3 parameters. [file Path] [mode] and [#FileNumber]
So, lets discuss about these three parameters – who are they and what role do they play in opening the text file:
What is File Name
This is the path of the Text file which is going to be opened.
What is Mode in Open Text File VBA Code
As the name suggests, its the control which you want to specify before opening it. There are mainly 3 types of controls or modes possible – Input, Output and Append.
Lets discuss one by one these 3 modes
Input Mode
This mode is used for READ ONLY control. It means, if you open a Text file in Input mode, then you can not write anything in it. All you can do is – read all the content inside the text file. Therefore you can say.. this a read only mode.
Output Mode
If your text file is open in this mode, then you can write content in it. But what is important here to note is : In this mode, your existing file gets overwritten. This means, if there are content already in there in the text file then it will be replaced by the new data which you are trying to save. Therefore, be careful while choosing the mode of the file while opening it.
Now you must be thinking – Then how to append content in an existing text file without overwriting it. Therefore the next mode – Append Mode.
Append Mode
As the name suggests, this mode allow you to append the new content at the end of the text file. It does not overwrite the existing content in the text file.
So now we have an idea about all these 3 modes. It will be more clear when we use them in the below examples.
Now Let’s learn about our second parameter – #FileNumber
#FileNumber
When Text files are opened then windows recognize them by a unique integer value. Valid range of Integers for this parameter is between 1 to 511.
As I mentioned above, it should be a unique integer, it is challenging for you to give a fixed number here in case you are dealing with multiple text files. To overcome this challenge you can use a function called FreeFile()
What is FreeFile() Function?
FreeFile() function returns a unique integer value which represents the file number of the file you opened. This way always a unique (or a FREE File Number – which is not used already) file-Number is assigned automatically by this function.
Now you know about – How to open a Text file. Let’s see some examples and learn how to use it.
Sample VBA Code to Open a Text File
Sub OpenTextFile()
Dim sFilePath As String
Dim fileNumber As Integer
' Full path of the textFile which you want
' to open.
sFilePath = "C:UsersVishwaDesktopLEM.txt"

' Assign a unique file numner
fileNumber = FreeFile
' Below statement will open the
' above text file in output mode
Open sFilePath For Output As #fileNumber
End Sub
VBA code to create a new TextFile
If the file name provided in the File Path provided while writing Open statement, like above, does not exists, then Open statement, automatically creates a TextFile with the same name in the same directory.
Thus, using the same Open statement, you can create a new TextFile as well. You don’t have to use a different statement to create a new file.
Here is a sample code
Read the commented lines written inside the code. I have tried explaining them there as well.
Sub createANewtextFile()
Dim sFilePath As String
Dim fileNumber As Integer

' In the above path C:UsersVishwaDesktop - exists
' But on the desktop - LEM.txt file does not exist
sFilePath = "C:UsersVishwaDesktopLEM.txt"

' Assign a unique file numner
fileNumber = FreeFile

' in this case, below statement, will
' create a new file with name LEM.txt
' as soon as below statement gets executed
' And also, it is open to write something
Open sFilePath For Output As #fileNumber

End Sub
Note: Only File Name should not exists in order to create a new file. Directories or folders specified must exists. If not, file Not Found Error will be thrown.[/fusion_text]
VBA Code to Write content in to Text File
[fusion_text]Basically there are two statements using which you can write content in to a text file in excel VBA : Write or Print[/fusion_text][title size=”1″ content_align=”left” style_type=”none” sep_color=”” margin_top=”” margin_bottom=”” class=”” id=””]VBA to write in to Text Files using Write statement[/title][fusion_text]As I mentioned above, one can write in to text files using two statements Write or Print. First lets have a look on – how to write content in to a text file using Write statement.[/fusion_text]
Write #<fileNumber>, InputData 1, InputData 2, ….
[title size=”2″ content_align=”left” style_type=”none” sep_color=”” margin_top=”” margin_bottom=”” class=”” id=””]Where:[/title][fusion_text]
File Number : This is a nemeric value which represents the File. This must be a unique number assigned to each open text files. Text files are identified by these unique numbers assigned to them while opening them. refer the Open File statement to know more about FileNumber
Input Data1, 2, 3, …:
This is the data which you want to write in the Textfile. You can write many different kind of data in each line. Each of these data will be written in textfile in a single line separated by comma.
Important to note:
Based on the type of the data which you put in InputData 1, 2 etc. Write statement does some common changes while putting them in to TextFile.
If the data is Date Type: Then date value is closed within hash sign. Date – 2010-10-13 will be written in TextFile as #2010-10-13#
String type data: They are stored in double quotes. For example : Input Data – Vishwamitra Mishra will be stored as “Vishwamitra Mishra”.
Integer, Double, Long etc : They will be written as they are. There is not formatting done before they are written in text file.
Example:
Let’s take an example. Export the following table in excel to a Text file using Write statement.
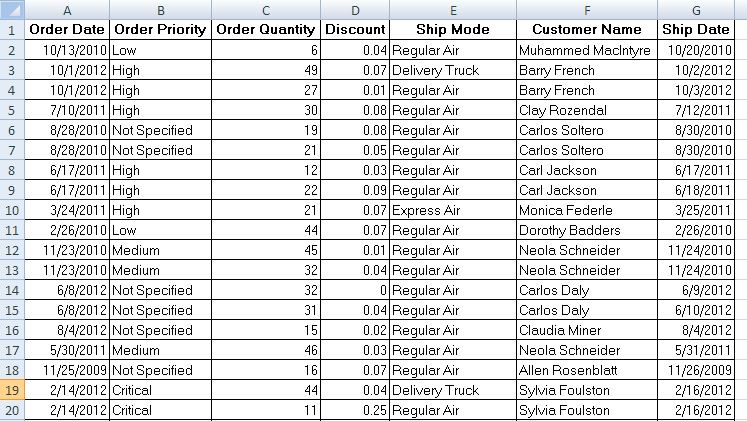
From the above excel cells, I will start reading one by one every column values of each row and write them in Text File.
VBA Code – To Write Text File – using Write Statement
Sub WriteTextFileUsingWriteStatement()

Dim sFilePath As String
Dim iRow As Integer

Dim OrderDate As Date
Dim OrderPriority As String
Dim OrderQuantity As Integer
Dim Discount As Double
Dim ShipMode As String
Dim CustomerName As String
Dim ShipDate As Date

iRow = 2
sFilePath = "C:UsersVishwaDesktopLEM.txt"

' unique file number to access the file uniquely
fileNumber = FreeFile

' to check if file name LEM.txt exists
' if not, end the program
If (VBA.Len(VBA.Dir(sFilePath))) = 0 Then MsgBox "File Does not exists": End

' Open the TextFile in Output mode
' in order to write in something
Open sFilePath For Output As #fileNumber

' Loop to read one by one every
' non empty row and write them
' in the text file
Do
With Sheets("Orders")
OrderDate = .Cells(iRow, 1).Value
OrderPriority = .Cells(iRow, 2).Value
OrderQuantity = .Cells(iRow, 3).Value
Discount = .Cells(iRow, 4).Value
ShipMode = .Cells(iRow, 5).Value
CustomerName = .Cells(iRow, 6).Value
ShipDate = .Cells(iRow, 7).Value
End With
' Now write these data in text file in next line
Write #fileNumber, OrderDate, OrderPriority, OrderQuantity, Discount, ShipMode, ShipDate

' go to the next row in Excel sheet
iRow = iRow + 1
Loop Until IsEmpty(Sheets("Orders").Cells(iRow, 1).Value)

' Close the file once all data
' is written in text file
Close #fileNumber
End Sub
Result : after Running the above code
After running the above code, Your text file will look something like this:
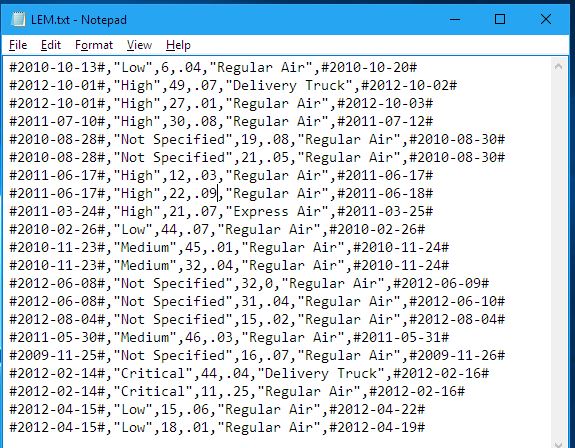
Now you can see, as explained above, dates are put under Hash marks (#) and string data is put under double quotes (” “).
Important points to note in above code:
1. I have used Dir$ function to check if TextFile already exists. Why I am thinking it is important to mention is because, if you do not put this check and by mistake your file name is not correct, then Open File statement will create a new TextFile in the same location with your provided name and write the content in that new file.
Note: Open file statement will create a new file only if directory exists. If directory itself does not exists, then Open File statement will through an error – Path Not found.
It will not create a directory in that case.
2. Instead of using a fixed number like #1, #2 etc. for FileNumber, I have used the function FreeFile() which always finds an available fileNumber which can be assigned to a textFile. It is always a good practise to use this function rather using a hardcoded File Number. This becomes very important when your program start dealing with multiple text files.
3. To read every line from Excel and write it in textFile, I have used Do..While loop with Until keyword for condition. You can read more about do.. while loop and Until keyword here.
4. Last but not the least – do not forget the Close the file by using the same fileNumber by using the simple statement Close #FileNumber as you can see in the above code.
How to write TextFile using Print Statement
Syntax remains exactly same as Write statement. Main difference between Write and Print statement is in the formatting of the Output in TextFile. You will see in detail. Let’s start with the Syntax:
Syntax of Print statement:
Print #<FileNumber>, InputData1, InputData2, ….
Where:
File Number : This is a numeric value which represents the File. It is exactly same as explained above in Write Statement.
Input Data 1, 2, 3, …:
This is the data which you want to write in the Textfile. You can write many different kind of data in each line. Each of these data will be written in textfile in a Proper formatting with proper spacing. TextFile which you get from Print statement is well formatted for printing purposes. That means spaces between columns are adjusted based on the values in those columns. You will see in the example below.
Important to note:
Unlike Write statement, this does not change any of the formatting of the data for Date or String type. It just put them as they are.
Values of difference columns are not separated by Comma. Rather they are separated by space(s) depending on how many spaces required to make the textfile in a printable format.
Example: To write Text File using PRINT Statement
Let’s take the same example as above. Now we will export the same table from excel to a Text file using Print statement.
Here is the code
Sub WriteTextFileUsingPrintStatement()

Dim sFilePath As String
Dim iRow As Integer

Dim OrderDate As Date
Dim OrderPriority As String
Dim OrderQuantity As Integer
Dim Discount As Double
Dim ShipMode As String
Dim CustomerName As String
Dim ShipDate As Date

iRow = 2
sFilePath = "C:UsersVishwaDesktopLEM.txt"

' unique file number to access the file uniquely
fileNumber = FreeFile

' to check if file name LEM.txt exists
' if not, end the program
If (VBA.Len(VBA.Dir(sFilePath))) = 0 Then MsgBox "File Does not exists": End

' Open the TextFile in Output mode
' in order to write in something
Open sFilePath For Output As #fileNumber

' Loop to read one by one every
' non empty row and write them
' in the text file
Do
With Sheets("Orders")
OrderDate = .Cells(iRow, 1).Value
OrderPriority = .Cells(iRow, 2).Value
OrderQuantity = .Cells(iRow, 3).Value
Discount = .Cells(iRow, 4).Value
ShipMode = .Cells(iRow, 5).Value
CustomerName = .Cells(iRow, 6).Value
ShipDate = .Cells(iRow, 7).Value
End With
' Now write these data in text file in next line
Print #fileNumber, OrderDate, OrderPriority, OrderQuantity, Discount, ShipMode, ShipDate

' go to the next row in Excel sheet
iRow = iRow + 1
Loop Until IsEmpty(Sheets("Orders").Cells(iRow, 1).Value)

' Close the file once all data
' is written in text file
Close #fileNumber
End Sub
Result : after Running the above code
After running the above code, Your text file will look something like this:
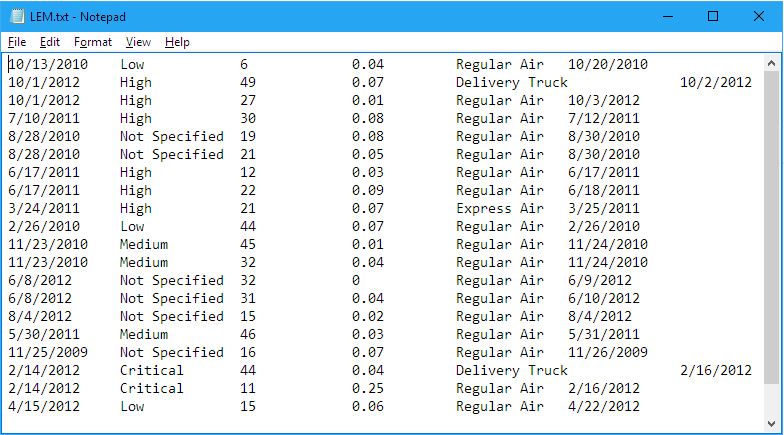
Now you can see, as explained above:
1. None of the data are formatted. They are, in fact, put as they are in Excel cells.
2. Spaces between columns are adjusted based on the data in each columns.
Important to know…
There is another – in fact important – difference between Write and Print statement. That you will realize while reading above two TextFiles –
1. Written using Write Statement
2. Written using Print Statement. This is a hint for now. It will be explained in detail in the next article, where we will be talking all about reading a TextFile.
[/fusion_text][fusion_text]In all the above examples of writing to a text box, I have used the File Open mode as Output. This means, every time you run the code, all the content of the text file will be replaced with the new one. Therefore, let’s take an example, of how can we append to the existing content in a text file using write or print statement.
VBA Code to Append to Text File
The whole trick lies in to the mode you open your text file during your VBA program. Why I say that, because you do not need to change anything else in the Write or Print statements in order to append and not to replace. Isn’t it simple? So the complete VBA code remains same as it is there for replacing the whole content – except changing the open mode – from Output to Append. What these modes are – They are explained in the beginning of the article.
Sub AppendToTextFile()

Dim sFilePath As String
Dim iRow As Integer

Dim OrderDate As Date
Dim OrderPriority As String
Dim OrderQuantity As Integer
Dim Discount As Double
Dim ShipMode As String
Dim CustomerName As String
Dim ShipDate As Date

    iRow = 2
    sFilePath = "C:UsersVishwaDesktopLEM.txt"

    ' unique file number to access the file uniquely
    fileNumber = FreeFile

    ' to check if file name LEM.txt exists
    ' if not, end the program
    If (VBA.Len(VBA.Dir(sFilePath))) = 0 Then MsgBox "File Does not exists": End

    ' Open the TextFile in Append mode
    ' in order to write in something
    Open sFilePath For Append As #fileNumber

    ' Loop to read one by one every
    ' non empty row and write them
    ' in the text file
    Do
    With Sheets("Orders")
        OrderDate = .Cells(iRow, 1).Value
        OrderPriority = .Cells(iRow, 2).Value
        OrderQuantity = .Cells(iRow, 3).Value
        Discount = .Cells(iRow, 4).Value
        ShipMode = .Cells(iRow, 5).Value
        CustomerName = .Cells(iRow, 6).Value
        ShipDate = .Cells(iRow, 7).Value
    End With
    ' Now write these data in text file in next line
    Write #fileNumber, OrderDate, OrderPriority, OrderQuantity, Discount, ShipMode, ShipDate

    ' go to the next row in Excel sheet
    iRow = iRow + 1
    Loop Until IsEmpty(Sheets("Orders").Cells(iRow, 1).Value)

    ' Close the file once all data
    ' is written in text file
    Close #fileNumber
End Sub
Note: All the new information gets appended at the end of the text file (from the first blank line)
Did you like this article? Then share it with your friends… spread knowledge…”
Learn All about interacting with Text Files in Excel VBA like opening, creating, writing, reading etc. from Text Files using Excel VBA code”