
In this article let’s discuss reading and writing excel files using readxl and writexl packages of the R programming language.
read_excel() method in readxl Package:
The Readxl package is used to read data from the excel files i.e. the files of format .xls and .xlsx. The Readxl package provides a function called read_excel() which is used to read the data from excel files. The read_excel() method accepts the excel file which needs to read the content from it. In order to use the read_excel() method, first readxl library needs to be imported.
Syntax
library(readxl)
data<-read_excel(‘excelFile’,sheet=1)Parameters
- excelFile – It specifies the excel file from which we read data.
- sheet – It specifies from which work sheet we need to read. It is an optional parameter.
Note:- To install the Readxl package in R, use install.packages(“readxl”) command.
Syntax to install and import the readxl package:
install.package('readxl')
library(readxl)
Example:
Here let’s look into how to read the data from an excel file using read_excel() method present in Readxl package.
Link to the used file:- link
R
library(readxl)
data <-read_excel('stats.xlsx')
print(data)
Output:
 Name    Age Runs   Wickets
1 Akhil    21 143    14
2 Mriganka 32 1020   NA
3 Avinash  30 2022   2
write_xlsx() method in writexl package:
The writexl package provides a method called write_xlsx() method which allows writing a data frame into an excel sheet i.e. the files of format .xls and .xlsx. The write_xlsx() method accepts a data frame and the name of the excel file in which the content of the data frame is copied into it. In order to use the write_xlsx() method, the first writexl library needs to be imported.
Syntax
library(writexl)
write_xlsx(dataframeName, “excelFile”, col_names=TRUE)
Parameters
- dataframeName – Name of the data frame that contains the data.
- excelFile – Name of the excel file into which we import from data frame.
- col_names – Write column names at the top of file if it set to True.
Syntax to install and import the writexl package:
install.package('writexl')
library(writexl)
Example:
In the below code we created a data frame named “data” and imported the data in that data frame into the “write.xlsx” excel file using write_xlsx() method.
Link to the used file:- link
R
library(writexl)
data <- data.frame(player=c('A', 'B', 'C', 'D'),
runs=c(100, 200, 408, NA),
wickets=c(17, 20, NA, 5))
write_xlsx(data, "write.xlsx")
Output

Introduction
Just like with all other types of files, you can use the Pandas library to read and write Excel files using Python as well. In this short tutorial, we are going to discuss how to read and write Excel files via DataFrames.
In addition to simple reading and writing, we will also learn how to write multiple DataFrames into an Excel file, how to read specific rows and columns from a spreadsheet, and how to name single and multiple sheets within a file before doing anything.
If you’d like to learn more about other file types, we’ve got you covered:
- Reading and Writing JSON Files in Python with Pandas
- Reading and Writing CSV Files in Python with Pandas
Reading and Writing Excel Files in Python with Pandas
Naturally, to use Pandas, we first have to install it. The easiest method to install it is via pip.
If you’re running Windows:
$ python pip install pandas
If you’re using Linux or MacOS:
$ pip install pandas
Note that you may get a ModuleNotFoundError or ImportError error when running the code in this article. For example:
ModuleNotFoundError: No module named 'openpyxl'
If this is the case, then you’ll need to install the missing module(s):
$ pip install openpyxl xlsxwriter xlrd
Writing Excel Files Using Pandas
We’ll be storing the information we’d like to write to an Excel file in a DataFrame. Using the built-in to_excel() function, we can extract this information into an Excel file.
First, let’s import the Pandas module:
import pandas as pd
Now, let’s use a dictionary to populate a DataFrame:
df = pd.DataFrame({'States':['California', 'Florida', 'Montana', 'Colorodo', 'Washington', 'Virginia'],
    'Capitals':['Sacramento', 'Tallahassee', 'Helena', 'Denver', 'Olympia', 'Richmond'],
    'Population':['508529', '193551', '32315', '619968', '52555', '227032']})
The keys in our dictionary will serve as column names. Similarly, the values become the rows containing the information.
Now, we can use the to_excel() function to write the contents to a file. The only argument is the file path:
df.to_excel('./states.xlsx')
Here’s the Excel file that was created:
Please note that we are not using any parameters in our example. Therefore, the sheet within the file retains its default name — «Sheet 1». As you can see, our Excel file has an additional column containing numbers. These numbers are the indices for each row, coming straight from the Pandas DataFrame.
We can change the name of our sheet by adding the sheet_name parameter to our to_excel() call:
df.to_excel('./states.xlsx', sheet_name='States')
Similarly, adding the index parameter and setting it to False will remove the index column from the output:
df.to_excel('./states.xlsx', sheet_name='States', index=False)
Now, the Excel file looks like this:
Writing Multiple DataFrames to an Excel File
It is also possible to write multiple dataframes to an Excel file. If you’d like to, you can set a different sheet for each dataframe as well:
income1 = pd.DataFrame({'Names': ['Stephen', 'Camilla', 'Tom'],
                   'Salary':[100000, 70000, 60000]})

income2 = pd.DataFrame({'Names': ['Pete', 'April', 'Marty'],
                   'Salary':[120000, 110000, 50000]})

income3 = pd.DataFrame({'Names': ['Victor', 'Victoria', 'Jennifer'],
                   'Salary':[75000, 90000, 40000]})

income_sheets = {'Group1': income1, 'Group2': income2, 'Group3': income3}
writer = pd.ExcelWriter('./income.xlsx', engine='xlsxwriter')

for sheet_name in income_sheets.keys():
    income_sheets[sheet_name].to_excel(writer, sheet_name=sheet_name, index=False)

writer.save()
Check out our hands-on, practical guide to learning Git, with best-practices, industry-accepted standards, and included cheat sheet. Stop Googling Git commands and actually learn it!
Here, we’ve created 3 different dataframes containing various names of employees and their salaries as data. Each of these dataframes is populated by its respective dictionary.
We’ve combined these three within the income_sheets variable, where each key is the sheet name, and each value is the DataFrame object.
Finally, we’ve used the xlsxwriter engine to create a writer object. This object is passed to the to_excel() function call.
Before we even write anything, we loop through the keys of income and for each key, write the content to the respective sheet name.
Here is the generated file:
You can see that the Excel file has three different sheets named Group1, Group2, and Group3. Each of these sheets contains names of employees and their salaries with respect to the date in the three different dataframes in our code.
The engine parameter in the to_excel() function is used to specify which underlying module is used by the Pandas library to create the Excel file. In our case, the xlsxwriter module is used as the engine for the ExcelWriter class. Different engines can be specified depending on their respective features.
Depending upon the Python modules installed on your system, the other options for the engine attribute are: openpyxl (for xlsx and xlsm), and xlwt (for xls).
Further details of using the xlsxwriter module with Pandas library are available at the official documentation.
Last but not least, in the code above we have to explicitly save the file using writer.save(), otherwise it won’t be persisted on the disk.
Reading Excel Files with Pandas
In contrast to writing DataFrame objects to an Excel file, we can do the opposite by reading Excel files into DataFrames. Packing the contents of an Excel file into a DataFrame is as easy as calling the read_excel() function:
students_grades = pd.read_excel('./grades.xlsx')
students_grades.head()
For this example, we’re reading this Excel file.
Here, the only required argument is the path to the Excel file. The contents are read and packed into a DataFrame, which we can then preview via the head() function.
Note: Using this method, although the simplest one, will only read the first sheet.
Let’s take a look at the output of the head() function:
Pandas assigns a row label or numeric index to the DataFrame by default when we use the read_excel() function.
We can override the default index by passing one of the columns in the Excel file as the index_col parameter:
students_grades = pd.read_excel('./grades.xlsx', sheet_name='Grades', index_col='Grade')
students_grades.head()
Running this code will result in:
In the example above, we have replaced the default index with the «Grade» column from the Excel file. However, you should only override the default index if you have a column with values that could serve as a better index.
Reading Specific Columns from an Excel File
Reading a file in its entirety is useful, though in many cases, you’d really want to access a certain element. For example, you might want to read the element’s value and assign it to a field of an object.
Again, this is done using the read_excel() function, though, we’ll be passing the usecols parameter. For example, we can limit the function to only read certain columns. Let’s add the parameter so that we read the columns that correspond to the «Student Name», «Grade» and «Marks Obtained» values.
We do this by specifying the numeric index of each column:
cols = [0, 1, 3]

students_grades = pd.read_excel('./grades.xlsx', usecols=cols)
students_grades.head()
Running this code will yield:
As you can see, we are only retrieving the columns specified in the cols list.
Conclusion
We’ve covered some general usage of the read_excel() and to_excel() functions of the Pandas library. With them, we’ve read existing Excel files and written our own data to them.
Using various parameters, we can alter the behavior of these functions, allowing us to build customized files, rather than just dumping everything from a DataFrame.
00:00
Reading and writing Excel files. Microsoft Excel is probably the most widely-used spreadsheet software. While older versions use binary .xls files, Excel 2007 introduced the new XML-based .xlsx file.
00:18
You can read and write Excel files in pandas similar to CSV files. However, you’ll need to install the following Python packages first: xlwt to write to .xls files, openpyxl or XlsxWriter to write to .xlsx files, xlrd to read Excel files.
00:42
You can install them using pip with a single command.
00:53
Please note that you don’t have to install all these packages, although doing so will allow you to get started with a minimum of fuss. For example, you don’t need both openpyxl and XlsxWriter, and if you’re only ever going to write .xlsx files, then you may want to just use XlsxWriter.
01:14
If you’re only going to work with the older binary Excel files, then you’ll want to use the appropriate packages depending on if you’ll be reading, writing, or both. Take some time to decide which packages are right for your project, and if you’re deploying an application, then only install the packages you’ll actually be using.
01:32
Once you have those packages installed, you can save your DataFrame in an Excel file with the .to_excel() method, as seen onscreen.
01:45
The argument 'data.xlsx' represents the target file and, optionally, its path. The statement you see onscreen should create the file data.xlsx in your current working directory. Opening it up in Excel, it should look like this.
02:03
The first column of the file contains the label of the rows, while the other columns store data. You can load data from Excel files with the read_excel() function.
02:23
read_excel() returns a new DataFrame that contains the values from data.xlsx.
02:33
You can also use read_excel() with OpenDocument spreadsheets or .ods files. You’ll learn more about working with Excel files later on in this course.
02:45
You can also check out Using Pandas to Read Large Excel Files in Python. In the next section of the course, you’ll take a deeper look at how pandas interacts with files, and work with more file types.
Microsoft Excel is the undisputed champion of the business world, powering every industry and informing decision-makers at the highest echelons of corporate structures. As a developer, it is not a matter of if we’ll have to deal with Excel spreadsheets, but a matter of when. Fret not! This post will look at the most straightforward way I’ve found reading and writing Excel spreadsheets using C# and the .NET runtime.
ExcelMapper
ExcelMapper is an MIT-licensed .NET OSS package that allows us to read and write Excel files using “Plain old C# objects (POCOs)”. The library works cross-platform using a purely managed NPOI library instead of the Jet database engine found exclusively on Windows devices. Those familiar with other data access libraries will find using ExcelMapper reminiscent of libraries like Entity Framework Core or Dapper. Users can also work with dynamic objects and records, allowing them to use the cutting edge in .NET features. ExcelMapper also supports Excel concepts like formulas, formatting, and sheets.
Reading From An An Excel File
Let’s say we have an Excel file that contains data about movies. The header column includes values for Id, Name, and StreamingService. ExcelMapper can create dynamic mappings based on our columns, so we only need to create a record that matches our column names.
public record Movie(
    int Id,
    string Name,
    string StreamingService
);
The next step is to create an instance of ExcelMapper and then call the FetchAsync method with our record type.
const string excelFile = "Movies.xlsx";
var excel = new ExcelMapper();
var movies = (await excel.FetchAsync<Movie>(excelFile)).ToList();
Now we can use our movies in a foreach loop.
foreach (var movie in movies)
{
    Console.WriteLine(movie);
}
Running our application, we can see the results in our console output.
Movie { Id = 2, Name = Ted, StreamingService = netflix }
Movie { Id = 5, Name = The Giver, StreamingService = netflix }
Movie { Id = 12, Name = Underworld: Awakening, StreamingService = netflix }
Movie { Id = 17, Name = The Boondock Saints, StreamingService = netflix }
Movie { Id = 24, Name = The Princess and the Frog, StreamingService = netflix }
Movie { Id = 30, Name = Let's Be Cops, StreamingService = netflix }
Movie { Id = 31, Name = We're the Millers, StreamingService = netflix }
Movie { Id = 34, Name = Saw III, StreamingService = netflix }
Movie { Id = 35, Name = The Imitation Game, StreamingService = netflix }
Movie { Id = 38, Name = Transformers: Age of Extinction, StreamingService = netflix }
Writing To An Excel File
Like reading from an Excel file, we’ll first need to create an instance of ExcelMapper. Let’s take our first example and alter the StreamingService column and then write it to a new sheet labeled disney+. Since we’re using C# 9 records, we’ll use the with keyword to create duplicate instances.
using System;
using System.Collections.Generic;
using System.Linq;
using Ganss.Excel;

const string excelFile = "Movies.xlsx";
var excel = new ExcelMapper();
var movies = (await excel.FetchAsync<Movie>(excelFile)).ToList();
var purchasedByDisney = new List<Movie>();
const string disney = "disney+";
foreach (var movie in movies)
{
    Console.WriteLine(movie);
    purchasedByDisney.Add(movie with
    {
        StreamingService = disney
    });
}

await excel.SaveAsync(
    excelFile,
    purchasedByDisney,
    sheetName: disney
);

public record Movie(
    int Id,
    string Name,
    string StreamingService
);
After executing our program, we can see we have a new sheet labeled disney+ in our favorite spreadsheet viewer.

Wow, it doesn’t get any easier than that!
Conclusion
ExcelMapper allows .NET developers to focus on data while still giving them access to the features that make Excel a great all-purpose tool. Read existing data into POCOs, manipulate rows, and write it back any way you like. In a few lines of C# 9, we can do all we want with minimal effort. That’ll keep the business folks in our lives that much happier.
Thanks for reading, and please leave a comment below. Also, follow me on Twitter at @buhakmeh to get the latest .NET news and tutorials.

Khalid is a developer advocate at JetBrains focusing on .NET technologies and tooling.
Read Next


About
In this code snippet, we’ll learn how to read and write excel files in PHP.
We will use the PHPSpreadsheet library to read/write Excel files and we’ll learn how to read cells, find a specific string in a row or column, write to cells, set cell styling and formatting(like setting the border, background color, etc) and we’ll see how to insert images.
Let’s see how to do it in the example below.
Installing PHPSpreadsheet:
Install PHPSpreadsheet using Composer by opening your project directory in cmd and running this:
composer require phpoffice/phpspreadsheet
If you don’t know what Composer is or how to use it check out this post I made.
Note:
You might have to enable the gd PHP extension for this to work. I first got this error:
Problem 1
– Root composer.json requires phpoffice/phpspreadsheet ^1.18 -> satisfiable by phpoffice/phpspreadsheet[1.18.0].
– phpoffice/phpspreadsheet 1.18.0 requires ext-gd * -> it is missing from your system. Install or enable PHP’s gd extension.
FIX: If you are using XAMPP like I am open up your php.ini file and add this: extension=gd to the bottom of it. Then save the file and restart the Apache webserver and try to install the package again.
Reading Excel Files Code:
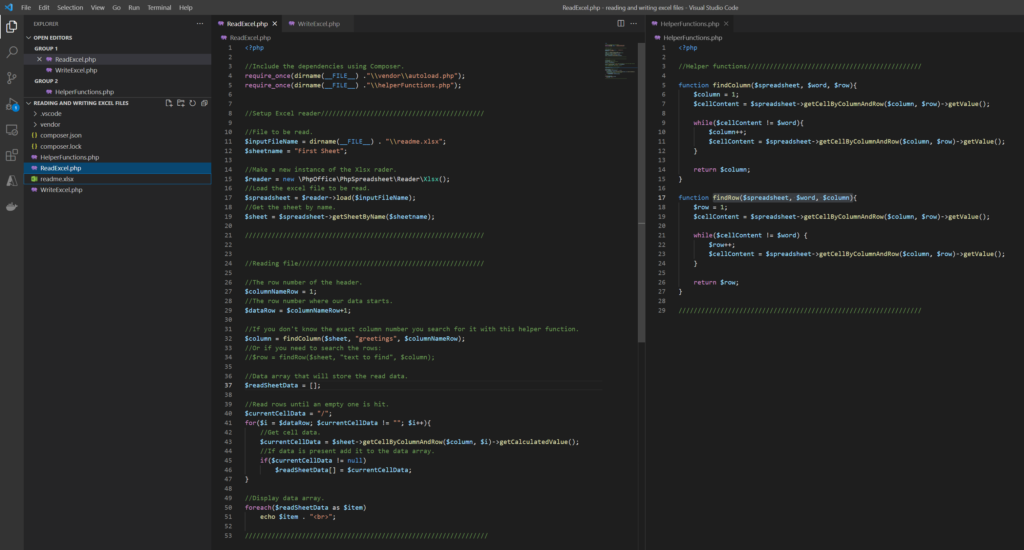
ReadExcel.php
<?php
//Include the dependencies using Composer.
require_once(dirname(__FILE__) ."\vendor\autoload.php");
require_once(dirname(__FILE__) ."\helperFunctions.php");
//Setup Excel reader///////////////////////////////////////////
//File to be read.
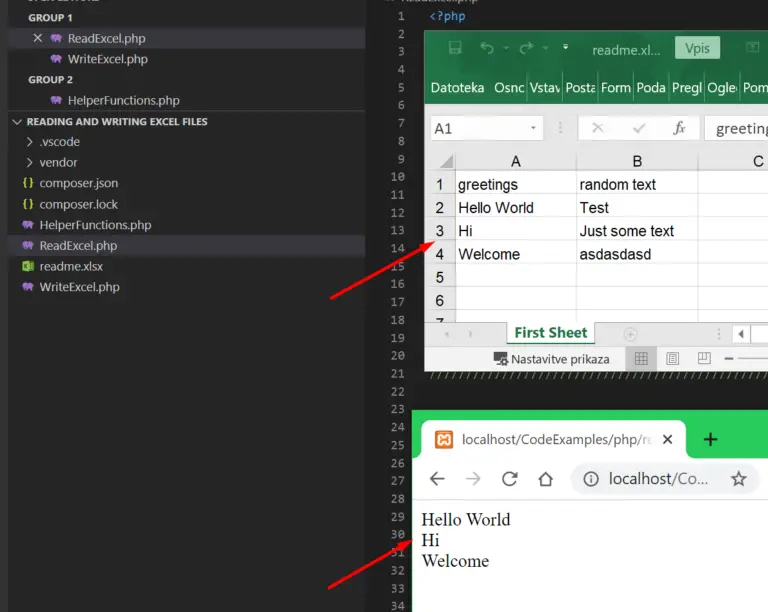
$inputFileName = dirname(__FILE__) . "\readme.xlsx";
$sheetname = "First Sheet";
//Make a new instance of the Xlsx rader.
$reader = new PhpOfficePhpSpreadsheetReaderXlsx();
//Load the excel file to be read.
$spreadsheet = $reader->load($inputFileName);
//Get the sheet by name.
$sheet = $spreadsheet->getSheetByName($sheetname);
///////////////////////////////////////////////////////////////
//Reading file/////////////////////////////////////////////////
//The row number of the header.
$columnNameRow = 1;
//The row number where our data starts.
$dataRow = $columnNameRow+1;
//If you don't know the exact column number you search for it with this helper function.
$column = findColumn($sheet, "greetings", $columnNameRow);
//Or if you need to search the rows:
//$row = findRow($sheet, "text to find", $column);
//Data array that will store the read data.
$readSheetData = [];
//Read rows until an empty one is hit.
$currentCellData = "/";
for($i = $dataRow; $currentCellData != ""; $i++){
//Get cell data.
$currentCellData = $sheet->getCellByColumnAndRow($column, $i)->getCalculatedValue();
//If data is present add it to the data array.
if($currentCellData != null)
$readSheetData[] = $currentCellData;
}
//Display data array.
foreach($readSheetData as $item)
echo $item . "<br>";
////////////////////////////////////////////////////////////////
HelperFunctions.php
<?php

//Helper functions//////////////////////////////////////////////

function findColumn($spreadsheet, $word, $row){
    $column = 1;
    $cellContent = $spreadsheet->getCellByColumnAndRow($column, $row)->getValue();

    while($cellContent != $word){
        $column++;
        $cellContent = $spreadsheet->getCellByColumnAndRow($column, $row)->getValue();
    }

    return $column;
}

function findRow($spreadsheet, $word, $column){
    $row = 1;
    $cellContent = $spreadsheet->getCellByColumnAndRow($column, $row)->getValue();

    while($cellContent != $word) {
        $row++;
        $cellContent = $spreadsheet->getCellByColumnAndRow($column, $row)->getValue();
    }

    return $row;
}

////////////////////////////////////////////////////////////////
Resulting Output:
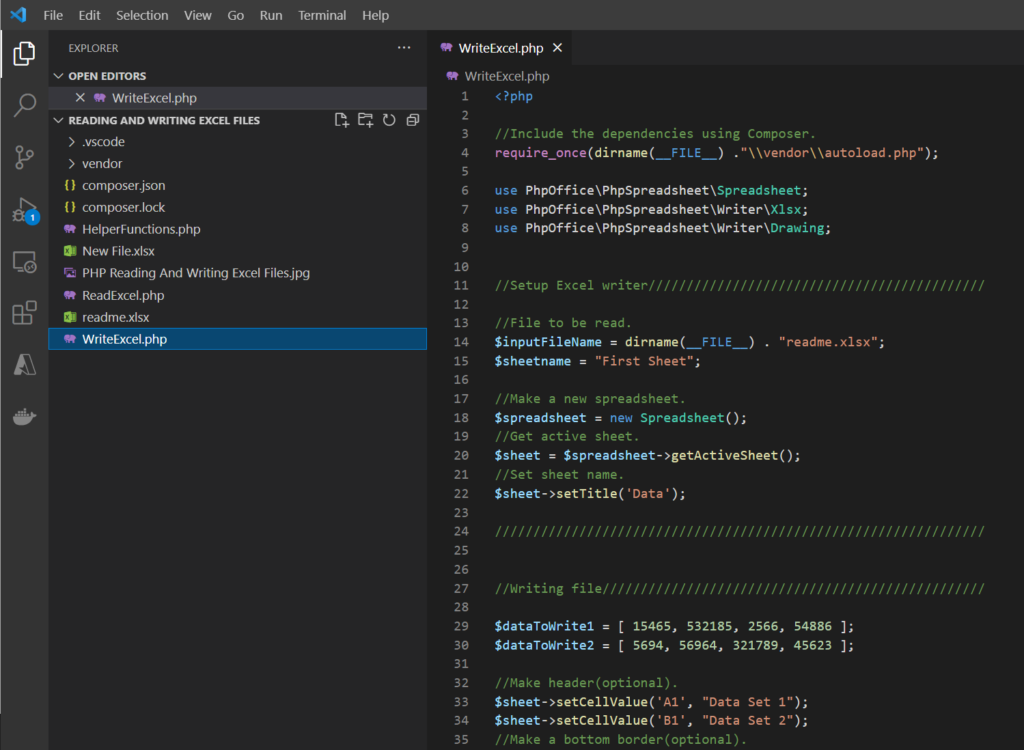
Writing Excel Files Code:
WriteExcel.php
<?php
//Include the dependencies using Composer.
require_once(dirname(__FILE__) ."\vendor\autoload.php");
use PhpOfficePhpSpreadsheetSpreadsheet;
use PhpOfficePhpSpreadsheetWriterXlsx;
use PhpOfficePhpSpreadsheetWriterDrawing;
//Setup Excel writer////////////////////////////////////////////
//File to be read.
$inputFileName = dirname(__FILE__) . "readme.xlsx";
$sheetname = "First Sheet";
//Make a new spreadsheet.
$spreadsheet = new Spreadsheet();
//Get active sheet.
$sheet = $spreadsheet->getActiveSheet();
//Set sheet name.
$sheet->setTitle('Data');
////////////////////////////////////////////////////////////////
//Writing file//////////////////////////////////////////////////
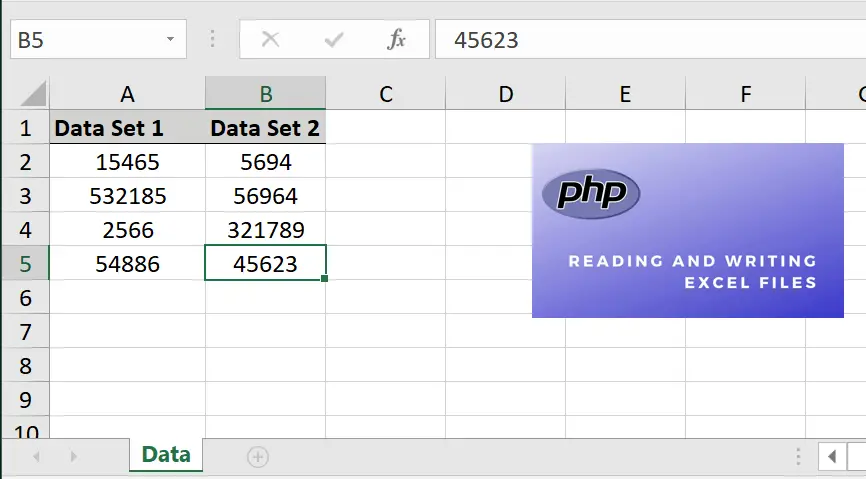
$dataToWrite1 = [ 15465, 532185, 2566, 54886 ];
$dataToWrite2 = [ 5694, 56964, 321789, 45623 ];
//Make header(optional).
$sheet->setCellValue('A1', "Data Set 1");
$sheet->setCellValue('B1', "Data Set 2");
//Make a bottom border(optional).
$sheet->getStyle('A1:B1')->getBorders()->getBottom()->setBorderStyle(PhpOfficePhpSpreadsheetStyleBorder::BORDER_THIN);
//Set header background color(optional).
$sheet->getStyle('A1:B1')->getFill()->setFillType(PhpOfficePhpSpreadsheetStyleFill::FILL_SOLID)->getStartColor()->setRGB('d2d3d1');
//Set text bold.
$sheet->getStyle("A1:B1")->getFont()->setBold(true);
//Set auto resize(optional).
$sheet->getColumnDimension('A')->setAutoSize(true);
//For more styling/formatting info. check out the official documentation: https://phpspreadsheet.readthedocs.io/en/latest/
//Write data 1.
$i = 2;
foreach($dataToWrite1 as $item){
//Write value into cell.
$sheet->setCellValue('A'.$i, $item);
//Set cell alignment(optional).
$sheet->getStyle('A'.$i)->getAlignment()->setHorizontal(PhpOfficePhpSpreadsheetStyleAlignment::HORIZONTAL_CENTER);
$i++;
}
//Write data 2.
$i = 2;
foreach($dataToWrite2 as $item){
//Write value into cell.
$sheet->setCellValue('B'.$i, $item);
//Set cell alignment(optional).
$sheet->getStyle('B'.$i)->getAlignment()->setHorizontal(PhpOfficePhpSpreadsheetStyleAlignment::HORIZONTAL_CENTER);
$i++;
}
//Adding an image.
//Create drawing.
$objDrawing = new PhpOfficePhpSpreadsheetWorksheetMemoryDrawing();
//Get image path.
$imgPathName = dirname(__FILE__) . "\PHP Reading And Writing Excel Files.jpg";
//Create gdImage from image.
$gdImage = imagecreatefromjpeg($imgPathName);
//Set gdImage as a property to drawing.
$objDrawing->setImageResource($gdImage);
//Set drawing properties.
$objDrawing->setName('Thumbnail');
$objDrawing->setDescription('PHP Reading And Writing Excel Files');
//Set file type.
$objDrawing->setRenderingFunction(PhpOfficePhpSpreadsheetWorksheetMemoryDrawing::RENDERING_JPEG);
$objDrawing->setMimeType(PhpOfficePhpSpreadsheetWorksheetMemoryDrawing::MIMETYPE_DEFAULT);
//Set position.
$objDrawing->setCoordinates('D1');
//Set position offset.
$objDrawing->setOffsetX(50);
$objDrawing->setOffsetY(50);
//Set width and height.
$objDrawing->setWidth(400);
$objDrawing->setHeight(100);
$objDrawing->setWorksheet($sheet);
//Write excel file.
$savePath = dirname(__FILE__);
$writer = new Xlsx($spreadsheet);
$writer->save($savePath . "\New File.xlsx");
////////////////////////////////////////////////////////////////
Resulting Output:
Related Posts:
Leave a Reply
In this Pandas tutorial, we will learn how to work with Excel files (e.g., xls) in Python. It will provide an overview of how to use Pandas to load xlsx files and write spreadsheets to Excel.
In the first section, we will go through, with examples, how to use Pandas read_excel to; 1) read an Excel file, 2) read specific columns from a spreadsheet, 3) read multiple spreadsheets, and combine them to one dataframe. Furthermore, we are going to learn how to read many Excel files, and how to convert data according to specific data types (e.g., using Pandas dtypes).
When we have done this, we will continue by learning how to use Pandas to write Excel files; how to name the sheets and how to write to multiple sheets. Make sure to check out the newer post about reading xlsx files in Python with openpyxl, as well.
- Read the How to import Excel into R blog post if you need an overview on how to read xlsx files into R dataframes.
How to Install Pandas
Before we continue with this Pandas read and write Excel files tutorial there is something we need to do; installing Pandas (and Python, of course, if it’s not installed). We can install Pandas using Pip, given that we have Pip installed, that is. See here how to install pip.
# Linux Users
pip install pandas

# Windows Users
python pip install pandasCode language: Bash (bash)
Note, if pip is telling us that there’s a newer version of pip, we may want to upgrade it. In a recent post, we cover how to upgrade pip to the latest version. Finally, before going on to the next section, you can use pip to install a certain version (i.e., older) of a packages usch as Pandas.
Installing Anaconda Scientific Python Distribution
Another great option is to consider is to install the Anaconda Python distribution. This is really an easy and fast way to get started with computer science. No need to worry about installing the packages you need to do computer science separately.
Both of the above methods are explained in this tutorial. Now, in a more recent blog post, we also cover how to install a Python package using pip, conda, and Anaconda. In that post, you will find more information about installing Python packages.
How to Read Excel Files to Pandas Dataframes:
Can Pandas read xlsx files? The short answer is, of course, “yes”. In this section, we are going to learn how to read Excel files and spreadsheets to Pandas dataframe objects. All examples in this Pandas Excel tutorial use local files. Note, that read_excel also can also load Excel files from a URL to a dataframe. As always when working with Pandas, we have to start by importing the module:
import pandas as pdCode language: Python (python)Now it’s time to learn how to use Pandas read_excel to read in data from an Excel file. The easiest way to use this method is to pass the file name as a string. If we don’t pass any other parameters, such as sheet name, it will read the first sheet in the index. In the first example, we are not going to use any parameters:
# Pandas read xlsx
df = pd.read_excel('MLBPlayerSalaries.xlsx')
df.head()Code language: Python (python)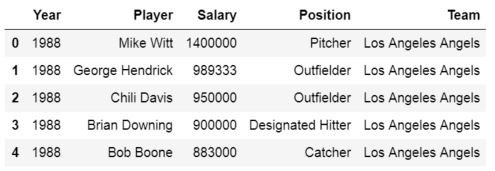
Here, Pandas read_excel method read the data from the Excel file into a Pandas dataframe object. We then stored this dataframe into a variable called df.
When using read_excel Pandas will, by default, assign a numeric index or row label to the dataframe, and as usual, when int comes to Python, the index will start with zero. We may have a reason to leave the default index as it is.
For instance, if your data doesn’t have a column with unique values that can serve as a better index. In case there is a column that would serve as a better index, we can override the default behavior.
Setting the Index Column when Reading xls File
This is done by setting the index_col parameter to a column. It takes a numeric value for setting a single column as index or a list of numeric values for creating a multi-index. In the example below, we use the column ‘Player’ as indices. Note, these are not unique and it may, thus, not make sense to use these values as indices.
df = pd.read_excel('MLBPlayerSalaries.xlsx', sheet_names='MLBPlayerSalaries', index_col='Player')Code language: Python (python)Now, if one or two of your columns, for instance, are objects you use Pandas to_datetime to convert a column, properly.
Importing an Excel File to Pandas in Two Easy Steps:
Time needed: 1 minute.
Here’s a quick answer to the How do you import an Excel file into Python using Pandas? Importing an Excel file into a Pandas dataframe basically only requires two steps, given that we know the path, or URL, to the Excel file:
- Import Pandas
In the script type import pandas as pd

- Use Pandas read_excel method
Next step is to type df = pd.read_excel(FILE_PATH_OR_URL)
Remember to change FILE_PATH_OR_URL to the path or the URL of the Excel file.


Now that we know how easy it is to load an Excel file into a Pandas dataframe we are going to continue with learning more about the read_excel method.
Reading Specific Columns using Pandas read_excel
When using Pandas read_excel we will automatically get all columns from an Excel file. If we, for some reason, don’t want to parse all columns in the Excel file, we can use the parameter usecols. Let’s say we want to create a dataframe with the columns Player, Salary, and Position, only. We can do this by adding 1, 3, and 4 in a list:
cols = [1, 2, 3]

df = pd.read_excel('MLBPlayerSalaries.xlsx', sheet_names='MLBPlayerSalaries', usecols=cols)
df.head()Code language: Python (python)
According to the read_excel documentation, we should be able to put in a string. For instance, cols=’Player:Position’ should give us the same results as above.
Handling Missing Data using Pandas read_excel
If our data has missing values in some cells and these missing values are coded in some way, like “Missing” we can use the na_values parameter.
Pandas Read Excel Example with Missing Data
In the example below, we are using the parameter na_values and we are putting in a string (i.e., “Missing’):
df = pd.read_excel('MLBPlayerSalaries_MD.xlsx', na_values="Missing", sheet_names='MLBPlayerSalaries', usecols=cols)
df.head()Code language: Python (python)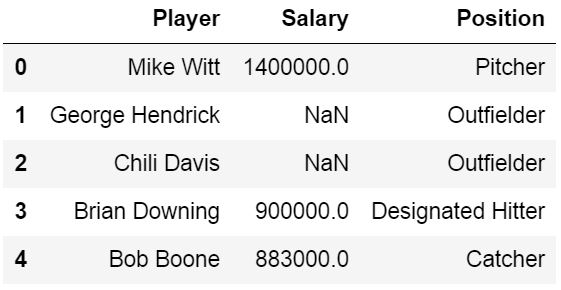
In the read excel examples above we used a dataset that can be downloaded from this page.
- Read the post Data manipulation with Pandas for three methods on data manipulation of dataframes, including missing data.
- Learn easy methods to clean data using Pandas and Pyjanitor
How to Skip Rows when Reading an Excel File
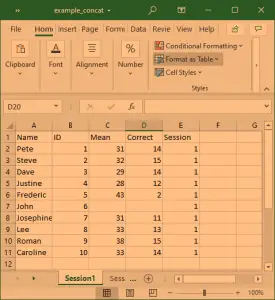
Now we will learn how to skip rows when loading an Excel file using Pandas. For this read excel example, we will use data that can be downloaded here.
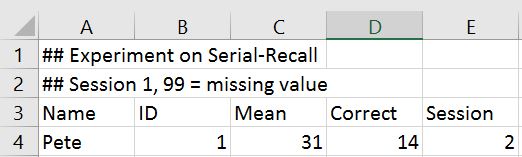
In the following Pandas read_excel example we load the sheet ‘session1’, which contains rows that we need to skip (these rows contain some information about the dataset).
We will use the parameter sheet_name=’Session1′ to read the sheet named ‘Session1’ (the example data contains more sheets; e.g., ‘Session2’ will load that sheet). Note, the first sheet will be read if we don’t use the sheet_name parameter. In this example, the important part is the parameter skiprow=2. We use this to skip the first two rows:
df = pd.read_excel('example_sheets1.xlsx', sheet_name='Session1', skiprows=2)
df.head()Code language: Python (python)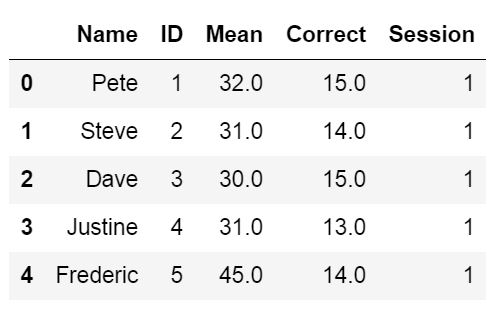
Another way to get Pandas read_excel to read from the Nth row is by using the header parameter. In the example Excel file, we use here, the third row contains the headers and we will use the parameter header=2 to tell Pandas read_excel that our headers are on the third row.
df = pd.read_excel('example_sheets1.xlsx', sheet_name='Session1', header=2)Code language: Python (python)Now, if we want Pandas read_excel to read from the second row, we change the number in the skiprows and header arguments to 2, and so on.
Reading Multiple Excel Sheets to Pandas Dataframes
In this section, of the Pandas read excel tutorial, we are going to learn how to read multiple sheets. Our Excel file, example_sheets1.xlsx’, has two sheets: ‘Session1’, and ‘Session2.’ Each sheet has data from an imagined experimental session. In the next example we are going to read both sheets, ‘Session1’ and ‘Session2’. Here’s how to use Pandas read_excel to read multiple sheets:
df = pd.read_excel('example_sheets1.xlsx',
    sheet_name=['Session1', 'Session2'], skiprows=2)Code language: Python (python)
By using the parameter sheet_name, and a list of names, we will get an ordered dictionary containing two dataframes:
dfCode language: Python (python)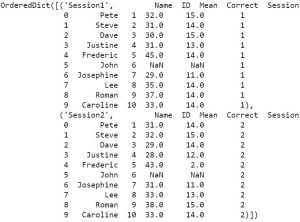
When working with Pandas read_excel we may want to join the data from all sheets (in this case sessions). Merging Pandas dataframes are quite easy; we just use the concat function and loop over the keys (i.e., sheets):
df2 = pd.concat(df[frame] for frame in data.keys())Code language: Python (python)Now in the example Excel file, there is a column identifying the dataset (e.g., session number). However, maybe we don’t have that kind of information in our Excel file. To merge the two dataframes and adding a column depicting which session we can use a for loop:
dfs = []
for framename in data.keys():
    temp_df = data[framename]
    temp_df['Session'] = framename
    dfs.append(temp_df)

df = pd.concat(dfs)Code language: Python (python)
In the code above, we start by creating a list and continue by looping through the keys in the list of dataframes. Finally, we create a temporary dataframe and take the sheet name and add it in the column ‘Session’.
Pandas Read Excel: How to Read All Sheets
Now, it is, of course, possible that when we want to read multiple sheets we also want to read all the sheets in the Excel file. That is, if we want to use read_excel to load all sheets from an Excel file to a dataframe it is possible. When reading multiple sheets and we want all sheets we can set the parameter sheet_name to None.
all_sheets_df = pd.read_excel('example_sheets1.xlsx', sheet_name=None)Code language: Python (python)Pandas Read Excel: Reading Many Excel Files
In this section, of the Pandas read excel tutorial, we will learn how to load many files into a Pandas dataframe because, in some cases, we may have a lot of Excel files containing data from, let’s say, different experiments. In Python, we can use the modules os and fnmatch to read all files in a directory. Finally, we use list comprehension to use read_excel on all files we found:
import os, fnmatch
xlsx_files = fnmatch.filter(os.listdir('.'), '*concat*.xlsx')

dfs = [pd.read_excel(xlsx_file) for xlsx_file in xlsx_files]Code language: Python (python)
If it makes sense we can, again, use the function concat to merge the dataframes:
df = pd.concat(dfs, sort=False)Code language: Python (python)There are other methods for reading many Excel files and merging them. We can, for instance, use the module glob together with Pandas concat to read multiple xlsx files:
import glob
list_of_xlsx = glob.glob('./*concat*.xlsx')
df = pd.concat(list_of_xlsx)Code language: Python (python)
Note, the files in this example, where we read multiple xlsx files using Pandas, are located here. They are named example_concat.xlsx, example_concat1.xlsx, and example_concat3.xlsx and should be added to the same directory as the Python script. Another option, of course, is to add the file path to the files. E.g., if we want to read multiple Excel files, using Pandas read_excel method, and they are stored in a directory called “SimData” we would do as follows:
import glob
list_of_xlsx = glob.glob('./SimData/*concat*.xlsx')
df = pd.concat(list_of_xlsx)Code language: Python (python)
Setting the Data Type for Data or Columns
If we need to, we can also, set the data type for the columns when reading Excel files using Pandas. Let’s use Pandas to read the example_sheets1.xlsx again. In the Pandas read_excel example below we use the dtype parameter to set the data type of some of the columns.
df = pd.read_excel('example_sheets1.xlsx',sheet_name='Session1',
                   header=1,dtype={'Names':str,'ID':str,
                                        'Mean':int, 'Session':str})Code language: Python (python)
We can use the method info to see the what data types the different columns have:
df.info()Code language: Python (python)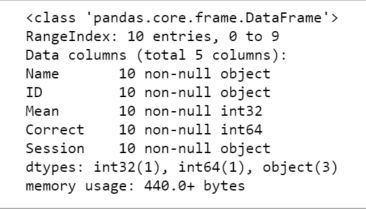
Writing Pandas Dataframes to Excel
Excel files can, of course, be created in Python using Pandas to_excel method. In this section of the post, we will learn how to create an excel file using Pandas. First, before writing an Excel file, we will create a dataframe containing some variables. Before that, we need to import Pandas:
import pandas as pdCode language: Python (python)The next step is to create the dataframe. We will create the dataframe using a dictionary. The keys will be the column names and the values will be lists containing our data:
df = pd.DataFrame({'Names':['Andreas', 'George', 'Steve',
'Sarah', 'Joanna', 'Hanna'],
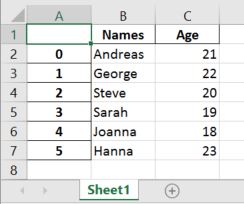
'Age':[21, 22, 20, 19, 18, 23]})Code language: Python (python)In this Pandas write to Excel example, we will write the dataframe to an Excel file using the to_excel method. Noteworthy, when using Pandas to_excel in the code chunk below, we don’t use any parameters.
df.to_excel('NamesAndAges.xlsx')Code language: Python (python)In the Excel file created when using Pandas to_excel is shown below. Evidently, if we don’t use the parameter sheet_name we get the default sheet name, ‘Sheet1’. Now, we can also see that we get a new column in our Excel file containing numbers. These are the index from the dataframe.
If we want our sheet to be named something else and we don’t want the index column we can add the following argument and parameters when we use Pandas to write to Excel:
df.to_excel('NamesAndAges.xlsx', sheet_name='Names and Ages', index=False)Code language: Python (python)Writing Multiple Pandas Dataframes to an Excel File:
In this section, we are going to use Pandas ExcelWriter and Pandas to_excel to write multiple Pandas dataframes to one Excel file. That is if we happen to have many dataframes that we want to store in one Excel file but on different sheets, we can do this easily. However, we need to use Pandas ExcelWriter now:
df1 = pd.DataFrame({'Names': ['Andreas', 'George', 'Steve',
                           'Sarah', 'Joanna', 'Hanna'],
                   'Age':[21, 22, 20, 19, 18, 23]})

df2 = pd.DataFrame({'Names': ['Pete', 'Jordan', 'Gustaf',
                           'Sophie', 'Sally', 'Simone'],
                   'Age':[22, 21, 19, 19, 29, 21]})

df3 = pd.DataFrame({'Names': ['Ulrich', 'Donald', 'Jon',
                           'Jessica', 'Elisabeth', 'Diana'],
                   'Age':[21, 21, 20, 19, 19, 22]})

dfs = {'Group1':df1, 'Group2':df2, 'Group3':df3}
writer = pd.ExcelWriter('NamesAndAges.xlsx', engine='xlsxwriter')

for sheet_name in dfs.keys():
    dfs[sheet_name].to_excel(writer, sheet_name=sheet_name, index=False)

writer.save()Code language: Python (python)
In the code above, we create 3 dataframes and then we continue to put them in a dictionary. Note, the keys are the sheet names and the cell names are the dataframes. After this is done we create a writer object using the xlsxwriter engine. We then continue by looping through the keys (i.e., sheet names) and add each sheet. Finally, the file is saved. Note, the final step is important as leaving this out will not give you the intended results.
Of course, there are other ways to store data. One of them is using JSON files. See the latest tutorial on how to read and write JSON files using Pandas to learn about one way to load and save data in the JSON format.
More resources on how to load data in different formats:
- How to read and write CSV files using Pandas
- How to read and write SPSS files using Python
Summary: How to Work With Excel Files using Pandas
That was it! In this post, we have learned a lot! We have, among other things, learned how to:
- Read Excel files and Spreadsheets using read_excel
- Load Excel files to dataframes:
- Read Excel sheets and skip rows
- Merging many sheets to a dataframe
- Loading many Excel files into one dataframe
- Load Excel files to dataframes:
- Write a dataframe to an Excel file
- Taking many dataframes and writing them to one Excel file with many sheets
Leave a comment below if you have any requests or suggestions on what should be covered next! Check the post A Basic Pandas Dataframe Tutorial for Beginners to learn more about working with Pandas dataframe. That is after you have loaded them from a file (e.g., Excel spreadsheets)

Today in this article, we shall see how to perform Read and Write Excel files in .NET Core-based application.
You must be wondering if there is an easy way to work on Excel in the .NET Core framework.
Here I am going to talk about a very simple approach of using OpenXML SDK from Microsoft (which is free and open-source).
The OpenXML SDK provides API for working with Office Word, Excel, and PowerPoint documents.
This SDK can be installed from NuGet as a package.
Today, in this article we shall cover below,
- You don’t need Microsoft Office
- Read the content of the excel file using OpenXML API
- Read Excel as JSON
- Read Excel with Empty cell values
- Export/Create/Write data to Excel using OpenXML
- Summary
You don’t need Microsoft Office
Please note that Read, and Create Excel(.xls, .xlsx) in C# is possible without installing Microsoft Office.
Yes, you don’t really need Microsoft Office to be installed on the machine.
Today we will see a few possible and easy-to-implement approaches.
If you are interested in a few more approaches like using EPPlus or NPOI library, kindly visit the below post for more details,
- Read/Write Excel files in .NET Core using EPPlus
- Read/Write Excel files in .NET Core using NPOI
Getting Started
Let’s create a .NET Core project, you can choose any project template, and this SDK works perfectly for all projects. Here to keep it simple I am using a Console .NET Core 3.1 C# application.
(Below logic works perfectly fine for older .NET Core 2.x or any new .NET 5 or 6 version)

The NuGet package name is DocumentFormat.OpenXml. Let’s install this package,
PM> Install-Package Open-XML-SDK -Version 2.9.0
Note: Please use the latest available version.
OR
Please install it from the Nuget package manager,

Once you install this NuGet package, you get full library support on Reading, Writing Excel (.xlsx), Word (.doc), or Powerpoint(.ppt) files using C# API.
Let’s look at an example, I have a simple Excel file with the below column and row details. Let’s try to read the file using our API,

Read the content of the excel file using OpenXML API
POC example as below. This ready to use API can be used in .NET Core console, or Test project or ASP.NET Core application or logic can be modified or improved as per your requirements.
Sample methods are as below,
  static void ReadExcelFile()
        {
            try
            {
                //Lets open the existing excel file and read through its content . Open the excel using openxml sdk
                using (SpreadsheetDocument doc = SpreadsheetDocument.Open("testdata.xlsx", false))
                {
                    //create the object for workbook part
                    WorkbookPart workbookPart = doc.WorkbookPart;
                    Sheets thesheetcollection = workbookPart.Workbook.GetFirstChild<Sheets>();
                    StringBuilder excelResult = new StringBuilder();

                    //using for each loop to get the sheet from the sheetcollection
                    foreach (Sheet thesheet in thesheetcollection)
                    {
                        excelResult.AppendLine("Excel Sheet Name : " + thesheet.Name);
                        excelResult.AppendLine("----------------------------------------------- ");
                        //statement to get the worksheet object by using the sheet id
                        Worksheet theWorksheet = ((WorksheetPart)workbookPart.GetPartById(thesheet.Id)).Worksheet;

                        SheetData thesheetdata = (SheetData)theWorksheet.GetFirstChild<SheetData>();
                        foreach (Row thecurrentrow in thesheetdata)
                        {
                            foreach (Cell thecurrentcell in thecurrentrow)
                            {
                                //statement to take the integer value
                                string currentcellvalue = string.Empty;
                                if (thecurrentcell.DataType != null)
                                {
                                    if (thecurrentcell.DataType == CellValues.SharedString)
                                    {
                                        int id;
                                        if (Int32.TryParse(thecurrentcell.InnerText, out id))
                                        {
                                            SharedStringItem item = workbookPart.SharedStringTablePart.SharedStringTable.Elements<SharedStringItem>().ElementAt(id);
                                            if (item.Text != null)
                                            {
                                                //code to take the string value
                                                excelResult.Append(item.Text.Text + " ");
                                            }
                                            else if (item.InnerText != null)
                                            {
                                                currentcellvalue = item.InnerText;
                                            }
                                            else if (item.InnerXml != null)
                                            {
                                                currentcellvalue = item.InnerXml;
                                            }
                                        }
                                    }
                                }
                                else
                                {
                                    excelResult.Append(Convert.ToInt16(thecurrentcell.InnerText) + " ");
                                }
                            }
                            excelResult.AppendLine();
                        }
                        excelResult.Append("");
                        Console.WriteLine(excelResult.ToString());
                        Console.ReadLine();
                    }
                }
            }
            catch (Exception)
            {

            }
        }
After executing the above logic, one can easily read all the Excel details.
- In the above example, I have used the file “testdata.xlsx” as input. I have kept this file in the output directory binDebug
- Also if needed you can keep the file locally for ex.
string strDoc = @”C:UsersPublicDocumentstestdata.xlsx” then use the method as below,
using (SpreadsheetDocument doc = SpreadsheetDocument.Open(strDoc, false))
I am showing the results on a console,
One can map the above output details to respective C# class objects using the mapping logic of their choice.
This way data can be transferred for further processing within the application if needed. For example for write operations, I have used a similar C# class UserDetails.
Read Excel as JSON
If you are interested to convert Excel as JSON it’s easy too. Please see here to know more about the same.
- Read Excel as JSON using OpenXML SDK
Read Excel with Empty cell values
If you are interested to export Excel in C# with empty cell values, please see here one approach to reading excel data appropriately.
- Read Excel with Empty cell values using OpenXML SDK
Export/Create/Write data to Excel using OpenXML
Let’s try now try to create or write the data to an Excel file.
Here is the sample data/object which we want to save as an Excel file.
Here we need to use the OpenXML Create () C# method as shown below,
I am creating a new Excel file in the same project folder to keep everything simple. (Excel file will get created in the ‘bin‘ folder of the project)
The complete logic can be found below,
 static void WriteExcelFile()
        {
            List<UserDetails> persons = new List<UserDetails>()
            {
                new UserDetails() {ID="1001", Name="ABCD", City ="City1", Country="USA"},
                new UserDetails() {ID="1002", Name="PQRS", City ="City2", Country="INDIA"},
                new UserDetails() {ID="1003", Name="XYZZ", City ="City3", Country="CHINA"},
                new UserDetails() {ID="1004", Name="LMNO", City ="City4", Country="UK"},
           };

            // Lets converts our object data to Datatable for a simplified logic.
            // Datatable is most easy way to deal with complex datatypes for easy reading and formatting.
            DataTable table = (DataTable)JsonConvert.DeserializeObject(JsonConvert.SerializeObject(persons), (typeof(DataTable)));

            using (SpreadsheetDocument document = SpreadsheetDocument.Create("TestNewData.xlsx", SpreadsheetDocumentType.Workbook))
            {
                WorkbookPart workbookPart = document.AddWorkbookPart();
                workbookPart.Workbook = new Workbook();

                WorksheetPart worksheetPart = workbookPart.AddNewPart<WorksheetPart>();
                var sheetData = new SheetData();
                worksheetPart.Worksheet = new Worksheet(sheetData);

                Sheets sheets = workbookPart.Workbook.AppendChild(new Sheets());
                Sheet sheet = new Sheet() { Id = workbookPart.GetIdOfPart(worksheetPart), SheetId = 1, Name = "Sheet1" };

                sheets.Append(sheet);

                Row headerRow = new Row();

                List<String> columns = new List<string>();
                foreach (System.Data.DataColumn column in table.Columns)
                {
                    columns.Add(column.ColumnName);

                    Cell cell = new Cell();
                    cell.DataType = CellValues.String;
                    cell.CellValue = new CellValue(column.ColumnName);
                    headerRow.AppendChild(cell);
                }

                sheetData.AppendChild(headerRow);

                foreach (DataRow dsrow in table.Rows)
                {
                    Row newRow = new Row();
                    foreach (String col in columns)
                    {
                        Cell cell = new Cell();
                        cell.DataType = CellValues.String;
                        cell.CellValue = new CellValue(dsrow[col].ToString());
                        newRow.AppendChild(cell);
                    }

                    sheetData.AppendChild(newRow);
                }

                workbookPart.Workbook.Save();
            }
        }
Once you execute this API ‘workbookPart.Workbook.Save()’ will save the file to the ‘bin’ folder location. You can modify the location of the generated file if needed.
After executing the above API, a new Excel file will be created with the above custom objects transformed into respective Excel Columns and Rows details as below,
That’s all, we just learned how to import and export data to/from excel in a simple way in .NET Core framework-based application.
Please visit the GitHub link for the complete code.
Other References :
EPPlus and EPOI for Reading and Writing of Excel file, kindly visit the below post for more details.
- Read/Write Excel file in .NET Core using EPPlus
- Read/Write Excel file in .NET Core using NPOI
If interested to know on how to download excel(.xlsx) file, please see the below article,
- Return or Download File in ASP.NET Core WebAPI
Please use the below Tutorial to use the above code and quickly get started,
This was very much basic while dealing with Excel in .NET Core which we covered today in this article.
Hope this helps you get started.
Are you dealing with any complex scenarios? Please let me know and sound off your comments below!
Summary
The Open XML SDK provides us full control to deal with Office Word, Excel, and PowerPoint documents. As this SDK is free and open-source from Microsoft, we don’t really need to use any other third-party tools/libraries. This SDK works best!
Please bookmark this page and share it with your friends. Please Subscribe to the blog to receive notifications on freshly published best practices and guidelines for software design and development.