Working in Microsoft Word has always been a breeze. It’s one of the world’s most widely used word processing program and almost everyone already knows how to use it. And with the many add-ins available through the Microsoft AppSource today, you can make the most out of Word. There are many add-ins that extend the functionality of Word, powering up its features and adding more so that you can do more. So when you are working on your document, you work better and faster. For one, if you are working on a long manuscript and you want to concentrate on what you’re typing, you don’t have to keep looking at the monitor because the Read My Document Add-in will read what you have typed.
Use the Read My Document Add-in in Word
Have you ever wanted your documents read to you in Word? Well, now you can. This is through Read My Document.
Read My Document is a Microsoft Word add-in that allows you to work faster and become more productive when you’re using Word. This is because instead of looking at your monitor as you type, which can distract you and make you lose precious time in the long run, you can have Word read your documents for you.
The Read My Document add-in makes your computer read what you have typed as you type it. This is very useful when it comes to writers who have to write long pages of text or those who are so into what they’re writing and they can concentrate better if they stayed focus on their task. Monitors often can be distracting because of desktop notifications and other things that may just pop up on the screen.
With Read My Document, you can stay focused on what you’re typing and work smoothly without distractions. Furthermore, having what you’ve typed read back to you can also let you know how your words sound together. It can help you figure if you have used the right words or have committed grammatical errors. Hearing back what you’ve typed can also let you see errors in construction, word choice. It can also help you track typographical errors.
Get Read My Document from Microsoft AppSource
You can get Read My Document for free from Microsoft AppSource. Just go to the AppSource portal and search Read My Document. Once you have found it, just click on the Get It Now button to start downloading it. Once you’re done, you will be prompted to open Word or other supported programs. The Read My Document add-in is also supported in Excel and PowerPoint, so the add-in is very versatile and useful.
Once you have installed the add-in in the program, you can then see the add-in from the Insert tab. Here, go to Add-Ins > My Add-ins. Then, you can click on Read My Document to activate it. Then, you will see the add-in pop up as a separate pane on the right-hand side of your program window.
There are many reasons to listen to a document, such as proofreading, multitasking, or increased comprehension and learning. Word makes listening possible by using the text-to-speech (TTS) ability of your device to play back written text as spoken words.
Listen with Read Aloud

-
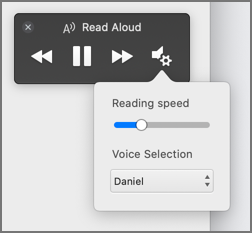
On the Review tab, select Read Aloud.
-
To play Read Aloud, select Play in in the controls.
-
To pause Read Aloud, select Pause.
-
To move from one paragraph to another, select Previous or Next.
-
To exit Read Aloud, select Stop (x).
Change Read Aloud settings
-
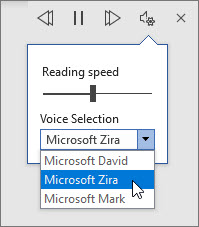
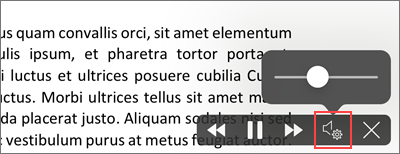
Select the gear icon in the controls at the top right.
-
Use the Reading speed slider to change the reading speed.
-
Under Voice Selection, select the voice you want.
-
Listen to selected text with Read Aloud.
Select the text to be read aloud.
Start Read Aloud from Review tab or shortcut or select play on Read Aloud UI.
Keyboard shortcuts
You can easily control Read Aloud using the following keyboard shortcuts in Windows:
|
CTRL + Alt + Space |
Start Read Aloud |
|
CTRL + Space |
Play or pause Read Aloud |
|
CTRL + Left Arrow |
Skip to start of current paragraph |
|
CTRL + Left Arrow + Left Arrow |
Skip to start of previous paragraph |
|
CTRL + Right Arrow |
Skip forward to start of next paragraph |
|
Alt + Left Arrow |
Decrease reading speed |
|
Alt + Right Arrow |
Increase reading speed |
Listen to your documents with Speak
Speak is a built-in feature of Word, Outlook, PowerPoint, and OneNote. Speak reads aloud only the text you select. Read Aloud reads the entire document starting from your cursor location like an audiobook.
To use Speak:
-
Select a word or block of text in your document.
-
In the Quick Access Toolbar, select the Speak selected text icon.
Supported languages
Read Aloud uses the proofing language set for the document. To change the language, see the help article Fix text-to-speech reading in wrong language.
Voices
Depending on your platform, text-to-speech (TTS) uses software that comes built into your device or through a Microsoft service. The voices available will differ between TTS services. If you’re using Immersive Reader, see the help article Download voices for Immersive Reader, Read Mode, and Read Aloud for more information.
Our team is working on making voices sound more natural, so keep looking for improvements.
Troubleshooting
If you don’t see Read Aloud available, make sure that you’re signed into your Microsoft 365 account, and then try restarting the Word app or logging out and back in.
If you are unable to access Neural Voices, make sure you have a stable internet connection and are signed into your Microsoft 365 account.
Privacy
Read Aloud doesn’t store your content or audio data. Microsoft uses your content only to provide you with audio results. For more information about experiences that analyze your content, see Connected Experiences in Office.
In MacOS you can listen to documents using Read Aloud or Speech.
Listen with Read Aloud for MacOS

-
On the Review tab, select Read Aloud.
-
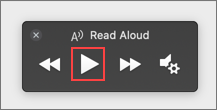
To play Read Aloud, select Play in in the controls.
-
To pause Read Aloud, select Pause.
-
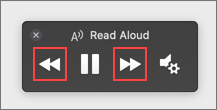
To skip from one paragraph to another, select Previous or Next.
-
To exit Read Aloud, select Stop (x).
Change Read Aloud settings
-
Select the gear icon in the controls to open the settings.
-
Use the Reading speed slider to change the voice speed.
-
Under Voice Selection, select the voice you want.
-
Listen to selected text with Read Aloud.
Select the text to be read aloud.
Start Read Aloud from Review tab or shortcut or select play on Read Aloud UI.
Keyboard shortcuts
You can easily control Read Aloud using the following keyboard shortcuts in MacOS:
|
CTRL + Option + Space |
Start Read Aloud |
|
Option + Space |
Play or pause Read Aloud |
|
Option + up arrow |
Skip to start of previous paragraph |
|
Option + down arrow |
Skip forward to start of next paragraph |
Listen to your documents with Speech
Speech is a built-in accessibility feature of MacOS. After you activate Speech for your Mac, you can select text and have it read by pressing a keyboard combination you’ve defined.
To activate Speech, do the following:
-
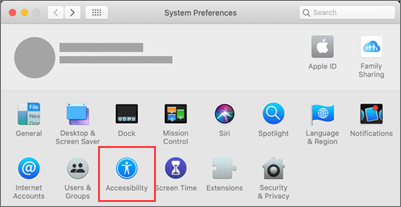
On the Apple menu, select System Preferences.
-
In the System Preferences window, select Accessibility.
-
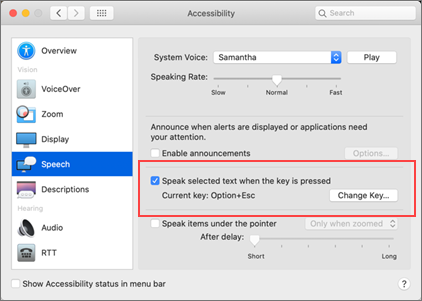
In the list, select Speech, and then select the check box next to Speak selected text when the key is pressed.
In the Speech settings, you can also change the keyboard combination, select a different system voice, and adjust the speaking rate.
Supported languages
Read Aloud uses the proofing language set for the document. To change the language, see the help article Fix text-to-speech reading in wrong language.
Voices
Depending on your platform, text-to-speech (TTS) uses software that comes built into your device or by a Microsoft service. The voices available will differ between TTS services. If you’re using Immersive Reader, see the help article Download voices for Immersive Reader, Read Mode, and Read Aloud for more information.
Our team is working on making voices sound more natural, so keep looking for improvements.
Troubleshooting
If you don’t see Read Aloud available, make sure that you’re signed in to your Microsoft 365 account, and then try restarting the Word app or logging out and back in.
If you are unable to access neural voices, please make sure you have a stable internet connections and are signed in to your Microsoft 365 account.
Privacy
Read Aloud doesn’t store your content or audio data. Microsoft uses your content only to provide you with audio results. For more information about experiences that analyze your content, see Connected Experiences in Office.
In Word for the Web, you can listen to your documents using Immersive Reader.
Using Immersive Reader
-
On the View tab, go to Document Views and select Immersive Reader.
-
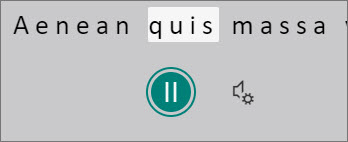
In Immersive Reader, select the Play button at the bottom.
-
To pause reading, select the Pause button at the bottom.
-
To exit Immersive Reader, select the arrow at the top left.
Change Immersive Reader settings
You can change the voice speed and selection for Immersive Reader.
-
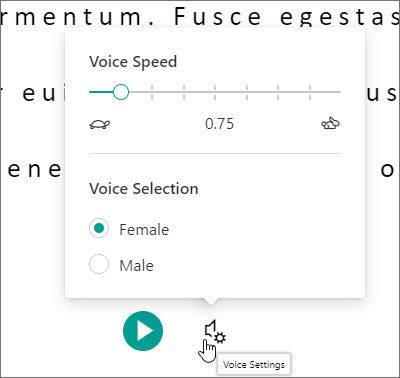
Select the gear icon at the bottom to open Voice Settings.
-
Use the Voice Speed slide to change the voice speed.
-
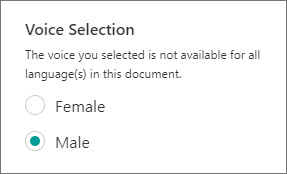
Select Female or Male for the voice. Note that some languages will be available in only one voice.
Voices
Depending on your platform, text-to-speech (TTS) uses software that comes built into your device or through a Microsoft service. The voices available will differ between TTS services. If you’re using Immersive Reader, see the help article Download voices for Immersive Reader, Read Mode, and Read Aloud for more information.
Our team is working on making voices sound more natural, so keep looking for improvements.
Troubleshooting
If you don’t see Read Aloud available, make sure that you’re signed in to your Microsoft 365 account, and then try restarting the Word app or logging out and back in.
Privacy
Read Aloud doesn’t store your content or audio data. Microsoft uses your content only to provide you with audio results. For more information about experiences that analyze your content, see Connected Experiences in Office.
Listen with Read Aloud in Word for iPad
-
Tap the menu icon at the top.
-
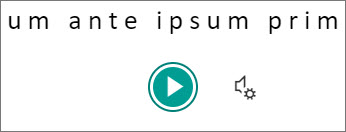
To play Read Aloud, tap Play in in the controls.
-
To pause Read Aloud, tap Pause.
-
To move from one paragraph to another, tap Previous or Next.
-
To exit Read Aloud, tap Stop (x).
-
Listen to selected text with Read Aloud.
Select the text to be read aloud.
Start Read Aloud from Review tab or overflow menu or select play on Read Aloud UI.
Change Read Aloud settings for iPad
-
In the Read Aloud controls, tap the gear icon.
-
Use the slider to increase or decrease the reading speed.
Listen with Read Aloud in Word for iPhone
-
Tap the pen icon at the top to open the ribbon.
-
Tap the Review tab.
-
Tap the gear icon, and then tap Read Aloud.
-
To play Read Aloud, tap Play.
-
To pause Read Aloud, tap Pause.
-
To move from one paragraph to another, tap Previous or Next.
-
To exit Read Aloud, tap Stop (x).
Change Read Aloud settings for iPhone
-
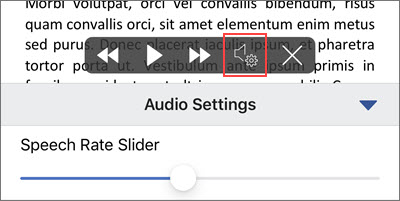
To change the speech rate, in the Read Aloud controls, tap the gear icon.
-
Under Audio Settings, user the Speech Rate Slider to increase or decrease the reading speed.
Supported languages
When you’re online, Read Aloud tries to detect the language of the text and can support multiple languages in a single document. For the full list of supported languages, see the help article Language and voice support for the Speech service.
Voices
Depending on your platform, text-to-speech (TTS) uses software that comes built into your device or through a Microsoft service. The voices available will differ between TTS services. If you’re using Immersive Reader, see the help article Download voices for Immersive Reader, Read Mode, and Read Aloud for more information.
Our team is working on making voices sound more natural, so keep looking for improvements.
Troubleshooting
If you don’t see Read Aloud available, make sure that you’re signed in to your Microsoft 365 account, and then try restarting the Word app or logging out and back in.
Privacy
Read Aloud doesn’t store your content or audio data. Microsoft uses your content only to provide you with audio results. For more information about experiences that analyze your content, see Connected Experiences in Office.
Listen with Read Aloud in Word for Android phone
-
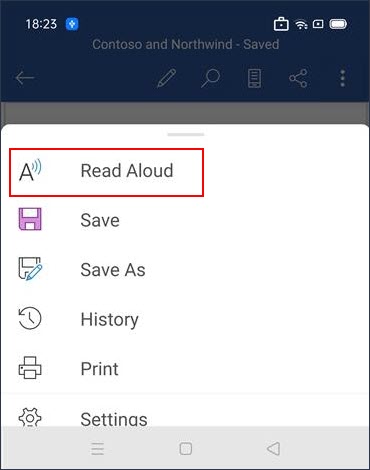
At the top, tap the menu icon.
-
Tap Read Aloud.
-
To play Read Aloud, tap Play.
-
To pause Read Aloud, tap Pause.
-
To move from one paragraph to another, tap Previous or Next.
-
To exit Read Aloud, tap Stop (x).
-
Listen to selected text with Read Aloud.
Select the text to be read aloud.
Start Read Aloud from Review tab or overflow menu or select play on Read Aloud UI.
Change Read Aloud settings for Android phone
-
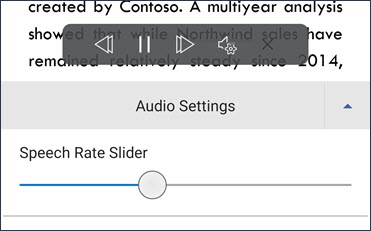
To change the speech rate, in the Read Aloud controls, tap the gear icon.
-
Under Audio Settings, adjust the Speech Rate Slider to increase or decrease the reading speed.
Supported languages
For the full list of supported languages, see the help article Language and voice support for the Speech service.
Voices
Depending on your platform, text-to-speech (TTS) uses software that comes built into your device or through a Microsoft service. The voices available will differ between TTS services. If you’re using Immersive Reader, see the help article Download voices for Immersive Reader, Read Mode, and Read Aloud for more information.
Our team is working on making voices sound more natural, so keep looking for improvements.
Troubleshooting
If you don’t see Read Aloud available, make sure that you’re signed in to your Microsoft 365 account, and then try restarting the Word app or logging out and back in.
Privacy
Read Aloud doesn’t store your content or audio data. Microsoft uses your content only to provide you with audio results. For more information about experiences that analyze your content, see Connected Experiences in Office.
Read documents online
Open and read documents online. This Document Reader provides professional quality rendering, fast thumbnail navigation and text search. Use it to view files on your mobile phone, tablet or laptop from anywhere. Our Document Viewer is easy to use and 100% free.
View documents online
Quickly open Word, PDF, Web or graphical files in a browser without installing any software. Your files will be processed and rendered online using powerful Aspose Cloud apps. Just upload a file you want to open and it will be instantly displayed at the highest quality.
Use the thumbnail navigation bar if you want to jump to a specific page in a document without scrolling. You can also search for text within your file and even convert it to another file format. Aspose online apps support reading and writing almost all standard document types, including PDF, DOCX, RTF, HTML, XML, JPG, PNG.
-
MiniTool
-
MiniTool News Center
- How To Make The Microsoft Word Read Aloud To You
By Sarah | Follow |
Last Updated August 16, 2022
Microsoft Word is a world-famous word processor contained in the Microsoft Office suite. You can create a document in Microsoft Word easily to save important information. Sometimes, you may want to change Word text to speech for different reasons like multitasking and time saving. How to get Word to read to you? 3 different ways will be introduced.
Can Microsoft Word Read out Loud
Microsoft Word, included in the Microsoft Office suite, is a great tool for word process and information storage. It’s pretty easy and safe to create a Word document and share it with others. However, people sometimes need to hear the information directly instead of reading it; they are asking can Word read to me. Sure, some features are built in it to make Microsoft Word read aloud possible. What are they? How to get Word to read to you? These questions will be answered later.
Tip: To protect the valuable information saved in a Word document, you need to enable the auto-save feature and start a regular backup plan. If a Word document is lost unexpectedly, you should get the following MiniTool software to help you recover it.
Free Download
Possible Reasons for Getting Word Read Aloud
- You need to proofread some content.
- You want to improve your understanding and your ability to learn.
- You have a lot of things to do, so you don’t have time to read a Word document.
- You want to share the content of a document with people who can’t see.
- Etc.
How to make Word read to you? You should just use the following tools built in Microsoft Word to read information out loud. Let’s take Windows 10 read text as an example.
#1. Read Aloud
The Read Aloud feature is able to read all or part of your document. But you should know that it’s only available for Office 2019 and Microsoft 365 users.
Read Microsoft Word with Read Aloud
How to make Microsoft Word read to you by using Read Aloud:
- Locate the Word document you want to read on your computer.
- Open it as you usually do.
- Put your cursor to the place where you want the reading aloud to begin.
- Shift to the Review tab in the opening Word.
- Click Read Aloud. The content will be read out loud.
Microsoft Word Won’t Open On Windows & Mac: How To Fix It.
A small control panel will appear in the top right corner to help you control the reading. The buttons from left to right are:
- Previous: go back to the start of the current/previous paragraph.
- Pause/Play: pause or continue the reading.
- Next: go forward a paragraph.
- Settings: modify the Reading speed and Voice Selection directly.
- Stop: exit Read Aloud.
#2. Speak
You can find the Speak feature in not only Word, but also Outlook, PowerPoint, and OneNote. It will only read the selected text for you. In contrast, the Read Aloud feature helps to read the entire document starting from your cursor location.
Read Word Using the Speak Button
How to have Microsoft Word read to you:
- Open the target Word document.
- Select the words or paragraphs you want the system to read.
- Click on the Speak selected text icon in the Quick Access Toolbar.
- Click on this icon again if you want to stop reading.
How to lock & protect a Word document?
Add the Speak Icon to Quick Access Toolbar
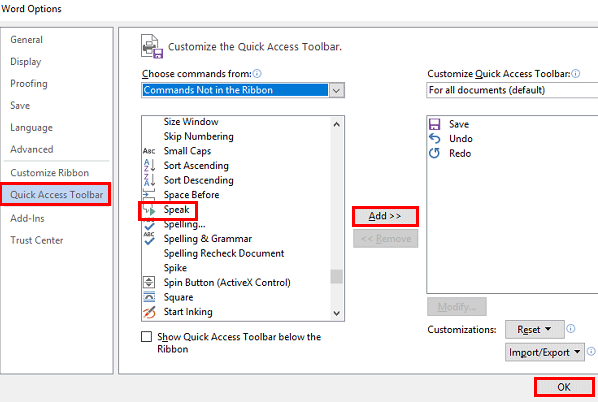
What if you can’t find the Speak selected text icon? You should add it to the Quick Access Toolbar manually.
- Click on the Customize down arrow on the right side of the Quick Access Toolbar.
- Select More Commands from the drop-down menu.
- Choose Quick Access Toolbar in the left pane of the Word Options window.
- Look for the Choose commands from box.
- Scroll down to find and select Speak.
- Click Add and then click OK to confirm the action.
You can open Control Panel -> Ease of Access -> Speech Recognition -> Text to Speech to change the Speak preferences.
#3. Narrator
This is a Windows Screen reader app that can read everything on your screen (text and user interfaces). It is not restricted to Microsoft Word.
Use Narrator in Windows 10 to Read
- Press Windows + Ctrl + Enter.
- Put your cursor onto the text you want the computer to read.
- Press Narrator key + Down arrow to start reading.
- Press Narrator to stop.
- Press Narrator key + Down arrow again to continue reading.
How to modify your Narrator:
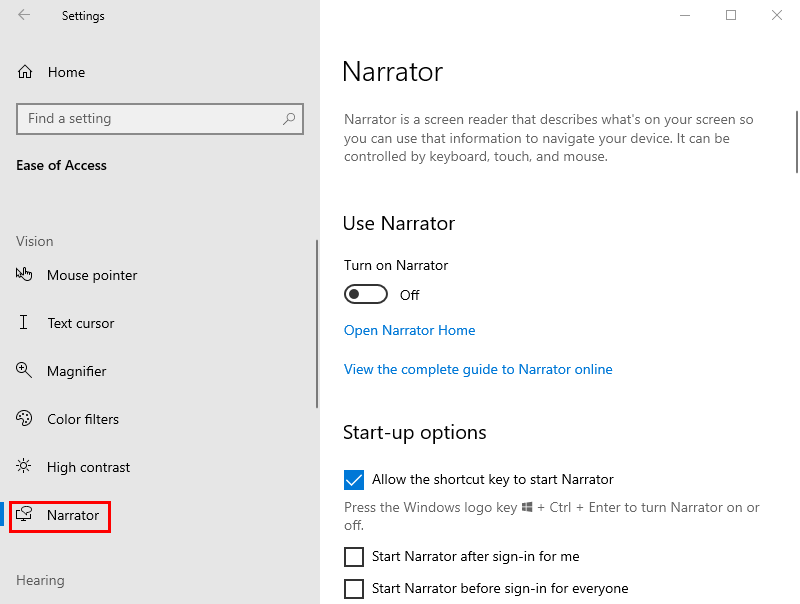
Press Windows + I -> select Ease of Access -> choose Narrator from the left sidebar.
That’s all about how to make your computer read to you.
Please read this page if you’d like to recover lost Word files on Mac.
About The Author
Position: Columnist
Sarah has been working as an editor at MiniTool since she graduated from university. Sarah aims at helping users with their computer problems such as disk errors and data loss. She feels a sense of accomplishment to see that users get their issues fixed relying on her articles. Besides, she likes to make friends and listen to music after work.
This post will talk about how to read Word Documents with Python. We’re going to cover three different packages – docx2txt, docx, and my personal favorite: docx2python.
The docx2txt package
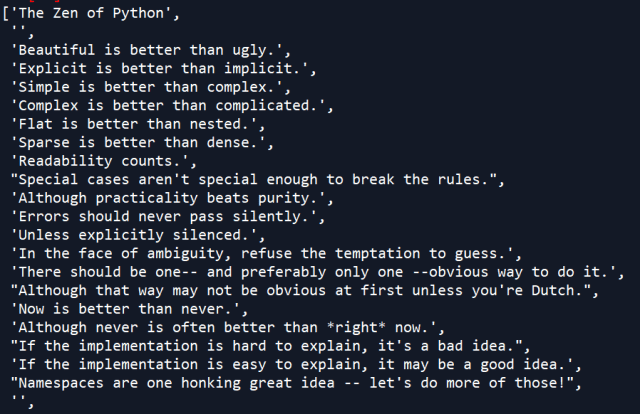
Let’s talk about docx2text first. This is a Python package that allows you to scrape text and images from Word Documents. The example below reads in a Word Document containing the Zen of Python. As you can see, once we’ve imported docx2txt, all we need is one line of code to read in the text from the Word Document. We can read in the document using a method in the package called process, which takes the name of the file as input. Regular text, listed items, hyperlink text, and table text will all be returned in a single string.
import docx2txt

# read in word file
result = docx2txt.process("zen_of_python.docx")
What if the file has images? In that case we just need a minor tweak to our code. When we run the process method, we can pass an extra parameter that specifies the name of an output directory. Running docx2txt.process will extract any images in the Word Document and save them into this specified folder. The text from the file will still also be extracted and stored in the result variable.
import docx2txt

result = docx2txt.process("zen_of_python_with_image.docx", "C:/path/to/store/files")
Sample Image
docx2txt will also scrape any text from tables. Again, this will be returned into a single string with any other text found in the document, which means this text can more difficult to parse. Later in this post we’ll talk about docx2python, which allows you to scrape tables in a more structured format.
The docx package
The source code behind docx2txt is derived from code in the docx package, which can also be used to scrape Word Documents. docx is a powerful library for manipulating and creating Word Documents, but can also (with some restrictions) read in text from Word files.
In the example below, we open a connection to our sample word file using the docx.Document method. Here we just input the name of the file we want to connect to. Then, we can scrape the text from each paragraph in the file using a list comprehension in conjunction with doc.paragraphs. This will include scraping separate lines defined in the Word Document for listed items. Unlike docx2txt, docx, cannot scrape images from Word Documents. Also, docx will not scrape out hyperlinks and text in tables defined in the Word Document.
import docx

# open connection to Word Document
doc = docx.Document("zen_of_python.docx")

# read in each paragraph in file
result = [p.text for p in doc.paragraphs]
The docx2python package
docx2python is another package we can use to scrape Word Documents. It has some additional features beyond docx2txt and docx. For example, it is able to return the text scraped from a document in a more structured format. Let’s test out our Word Document with docx2python. We’re going to add a simple table in the document so that we can extract that as well (see below).
docx2python contains a method with the same name. If we call this method with the document’s name as input, we get back an object with several attributes.
from docx2python import docx2python

# extract docx content
doc_result = docx2python('zen_of_python.docx')
Each attribute provides either text or information from the file. For example, consider that our file has three main components – the text containing the Zen of Python, a table, and an image. If we call doc_result.body, each of these components will be returned as separate items in a list.
# get separate components of the document
doc_result.body

# get the text from Zen of Python
doc_result[0]

# get the image
doc_result[1]

# get the table text
doc_result[2]
Scraping a word document table with docx2python
The table text result is returned as a nested list, as you can see below. Each row (including the header) gets returned as a separate sub-list. The 0th element of the list refers to the header – or 0th row of the table. The next element refers to the next row in the table and so on. In turn, each value in a row is returned as an individual sub-list within that row’s corresponding list.
We can convert this result into a tabular format using pandas. The data frame is still a little messy – each cell in the data frame is a list containing a single value. This value also has quite a few “t”‘s (which represent tab spaces).
pd.DataFrame(doc_result.body[1][1:])
Here, we use the applymap method to apply the lambda function below to every cell in the data frame. This function gets the individual value within the list in each cell and removes all instances of “t”.
import pandas as pd


pd.DataFrame(doc_result.body[1][1:]).
                            applymap(lambda val: val[0].strip("t"))
Next, let’s change the column headers to what we see in the Word file (which was also returned to us in doc_result.body).
df.columns = [val[0].strip("t") for val in doc_result.body[1][0]]
Extracting images
We can extract the Word file’s images using the images attribute of our doc_result object. doc_result.images consists of a dictionary where the keys are the names of the image files (not automatically written to disk) and the corresponding values are the images files in binary format.
type(doc_result.images) # dict

doc_result.images.keys() # dict_keys(['image1.png'])
We can write the binary-formatted image out to a physical file like this:
for key,val in doc_result.images.items():
    f = open(key, "wb")
    f.write(val)
    f.close()
Above we’re just looping through the keys (image file names) and values (binary images) in the dictionary and writing each out to file. In this case, we only have one image in the document, so we just get one written out.
Other attributes
The docx2python result has several other attributes we can use to extract text or information from the file. For example, if we want to just get all of the file’s text in a single string (similar to docx2txt) we can run doc_result.text.
# get all text in a single string
doc_result.text
In addition to text, we can also get metadata about the file using the properties attribute. This returns information such as the creator of the document, the created / last modified dates, and number of revisions.
doc_result.properties
If the document you’re scraping has headers and footers, you can also scrape those out like this (note the singular version of “header” and “footer”):
# get the headers
doc_result.header

# get the footers
doc_result.footer
Footnotes can also be extracted like this:
doc_result.footnotes
Getting HTML returned with docx2python
We can also specify that we want to get an HTML object returned with the docx2python method that supports a few types of tags including font (size and color), italics, bold, and underline text. We just need to specify the parameter “html = True”. In the example below we see The Zen of Python in bold and underlined print. Corresponding to this, we can see the HTML version of this in the second snapshot below. The HTML feature does not currently support table-related tags, so I would recommend using the method we went through above if you’re looking to scrape tables from Word documents.
doc_html_result = docx2python('zen_of_python.docx', html = True)
Hope you enjoyed this post! Please check out other Python posts of mine below or by clicking here.


