
![]()
Download Article
![]()
Download Article
Is your Word document opening in read-only mode? You’ll need to turn off this protected view mode before you can make changes to the file. Fortunately, this is really easy to do! This wikiHow article will walk you through changing a read-only Microsoft Word document into one that’s unlocked and ready to edit.
Things You Should Know
- Word files may be read-only due to Protected View, password protection, or file permissions in Windows or macOS.
- If you’re using Windows, right-click the file, select «Properties,» click the «Properties» tab, then remove the Read-only attribute.
- On a Mac, click the file, go to «File» > «Get Info» > «Sharing & Permissions,» and allow «Read & Write» permission.
-

1
Understand which documents are likely to be protected. Any Microsoft Word document which you download from the Internet (e.g., an email attachment or a file from a website) will have read-only protection assigned to it whenever you open it. You can disable this protection when first opening the document.
-
2
Open the Word document. Double-click the Word document for which you want to remove the read-only protection.
- If the Word document is currently open, close it and re-open it.
Advertisement
-
3
Look for a pale yellow banner. If you see a yellow banner with the phrase «Files from the Internet can contain viruses» written across the top of the Word document, your document qualifies to have its read-only status removed using this method.
- If you don’t see this banner even after closing and re-opening the Word document, try one of the other methods in this article.
-
4
Click Enable Editing. This button should be on the right side of the banner. Doing so will refresh the Word document and remove the read-only protection. You should now be able to edit the document.


Advertisement
-
1
Open the Word document. Double-click the Word document from which you want to remove the protection. It will open in Word.
-
2
Click the Review tab. This tab is in the upper-right corner of the Word window. Doing so opens the Review toolbar at the top of the Word window.
-
3
Click Restrict Editing. You’ll find this option on the far-right side of the Review toolbar. Clicking it prompts a pop-out menu to appear on the right side of the window.
-
4
Click Stop Protection. It’s at the bottom of the pop-out menu. You should see a pop-up window appear at this point.
- If you or another user on your computer’s account created the protection without a password, clicking Stop Protection will automatically remove the protection.
-
5
Enter the password when prompted. Type the document’s password into the «Password» text box, then click OK. This will immediately remove the Word document’s read-only lock if the password is correct.
- If you don’t know the password, you’ll have to copy and paste the file’s contents instead.
-
6
Save your changes. Press Ctrl+S (Windows) or ⌘ Command+S (Mac) to do so. From now on, the file won’t be read-only protected unless you re-enable editing protection.


Advertisement
-
1
Go to the Word document. Find the folder in which the Word document is stored.
- If the file isn’t actually on your computer (e.g., it’s on a flash drive or a CD), move the file onto your computer before proceeding.
-
2
Open the Word file’s properties. This will vary depending on your computer’s operating system:
- Windows — Click once the Word file, right-click the Word file, and click Properties in the drop-down menu.
- Mac — Click the Word file, click the File menu item in the top-left side of your Mac’s screen, and click Get Info.
-
3
Find the «Permissions» section. On a Windows computer, you’ll find the proper options in the «Attributes» section near the bottom of the Properties window.
- On a Mac, you’ll have to click the Sharing & Permissions heading near the bottom of the window.
-
4
Disable the read-only protection. Again, this process will differ depending on whether you’re using Windows or a Mac:
- Windows — Uncheck the «Read-only» box near the bottom of the window, click Apply, and click OK.
-
Mac — Click the Read option to the right of your name, then click Read & Write in the menu which appears.
- You may first have to click the lock in the bottom-left corner of the Get Info window and then enter your Mac’s password before you can do this.
- If this option is greyed out, unchecked, or otherwise not set to «Read-only», you’ll have to try copying and pasting instead.
-
5
Try to edit the file. Open the Word document by double-clicking it, then try to edit it. Keep in mind that you may first have to remove the online read-only lock before doing so.


Advertisement
-
1
Understand how this works. If your primary goal is to edit the Word document, you can copy the Word document’s text and paste it into a new Word document and then save the new document onto your computer. While doing this won’t remove the read-only protection from the original document, it will create an editable copy.
-
2
Open the protected Word document. Double-click the Word document to do so.
-
3
Click anywhere on the document. This will place your mouse cursor on the document’s page.
-
4
Select the whole document. Press either Ctrl+A (Windows) or ⌘ Command+A (Mac) to do so. You should see the entire document become highlighted.
-
5
Copy the selected text. Press either Ctrl+C (Windows) or ⌘ Command+C (Mac). This will copy the document’s text to your computer’s clipboard.
-
6
Open a new Word document. Click File in the upper-left side of the Word window, click New on the left side of the window, and click Blank document to open a blank Word document.
- On a Mac, click the File menu item, then click New Blank Document at the top of the drop-down menu.
-
7
Paste in the copied text. Press either Ctrl+V (Windows) or ⌘ Command+V (Mac) to paste the locked Word document’s text into the blank document.
- This may take a few seconds if the original document was particularly large or contained images.
-
8
Save the document as a new file. Press Ctrl+S (Windows) or ⌘ Command+S (Mac), then enter your document’s name and click Save. You’ll be able to edit the document you just created like usual.


Advertisement
Add New Question
-
Question
My documents are in Microsoft Office as PDF files and they are read only. How do I turn read only off?

Save it as a new document, delete the old one, and rename the new one. This should allow you to edit it.
Ask a Question
200 characters left
Include your email address to get a message when this question is answered.
Submit
Advertisement
Video
-
Another way to remove the read-only protection from a Microsoft Word document is by converting the Word document into a PDF with the SmallPDF online converter, downloading the converted PDF, and then converting the PDF back into a Word document with SmallPDF.
Thanks for submitting a tip for review!
Advertisement
-
It’s much easier to copy the protected document’s text and paste it into a new document than it is to try to crack Microsoft’s security.
Advertisement
About This Article
Article SummaryX
1. Open the document in Word.
2. Click Enable Editing.
Did this summary help you?
Thanks to all authors for creating a page that has been read 978,826 times.
Is this article up to date?
We review products independently, but we may earn affiliate commissions from buying links on this page. Terms of use.
Want to lock down an important Word document? Here’s how to add a password, make documents read-only, and tap into other tricks for protecting your most sensitive files.

If you have sensitive information in Microsoft Word, you can take steps to secure the document. Perhaps you want to make sure that only you and certain people can read or edit it. Maybe you want to restrict the types of modifications that someone can make. You may even want to ensure readers that this is the final version of the document. You can do all this and more if you know which tools to use in Word.
The latest versions of Microsoft Word serve up several options for securing your documents, including read-only mode, password protection, editing restrictions, and digital signatures. You can also mark a document as final so people know it hasn’t been changed since the last time you saved.
These options work in Word 2016, 2013, and 2010, but we will be using the Microsoft 365 version of Word for this guide. The ability to mark a document as final and read-only are two separate options in this version, but is combined in previous releases of Word.
About Lance Whitney

I’ve been working for PCMag since early 2016 writing tutorials, how-to pieces, and other articles on consumer technology. Beyond PCMag, I’ve written news stories and tutorials for a variety of other websites and publications, including CNET, ZDNet, TechRepublic, Macworld, Popular Science, Time, Fortune, US News & World Report, and AARP Magazine. I spent seven years writing breaking news for CNET as one of the site’s East Coast reporters. I’ve also written two books for Wiley & Sons—Windows 8: Five Minutes at a Time and Teach Yourself Visually LinkedIn.
More From Lance Whitney
- How to Record the Screen on Your Windows PC or Mac
- Watch Out: How to Stop Your Smart TV From Spying on You
- How to Wipe Your Hard Drive
- How to Manage, Sync, and Share Files in Microsoft OneDrive
- Keep Your Files: How to Back Up Your Mac With Time Machine
If you have written about secret info on Microsoft Word, you can take these solutions to secure the sensitive content to avoid anyone can modify or edit it. Most of the useful fixes are related to the built-in feature of Microsoft Word, which offers several options to restrict editing. You can try it on your preference.
5 Ways to Protect Word File from Editing (Windows)
For Windows users, you can choose 5 ways to protect word documents from editing and copying. Four of the methods are built-in functions of the software, of course, you can also try more convenient third-party software.
1 — Enforce Protection on Word Document
Step 1. Open your word file and go to the Review tab in the Word ribbon.
Step 2. Click Restrict Editing under the Protect section.

Step 3. Once the Restrict Editing pop up, move to the second option. Check Allow only this type if editing in the document, and select No changes (Read-only).
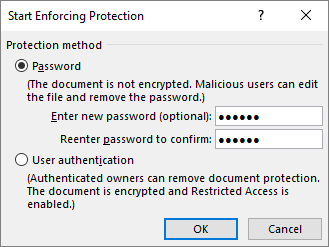
Step 4. Click Yes, Start Enforcing Protection.
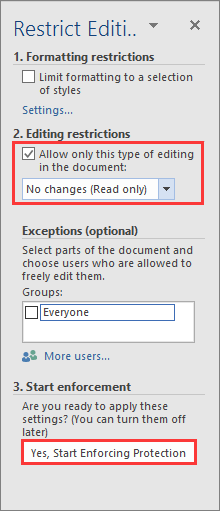
Step 5. Type a password and confirm it again.
2 — Use Word Document Protection Software
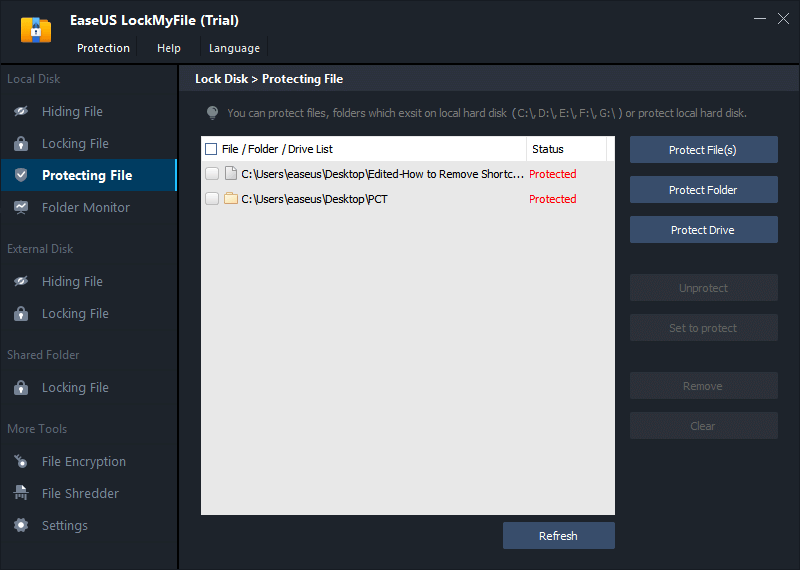
To protect your word document into Read-only mode, there is an easy and safe software, EaseUS LockMyFile, you can use this word file protection tool on PC to protect files from editing and copying. Nobody can rename, delete, and modify the word document.
Not only protect files, but this software also has many reliable functions you can try:
- Let your files, folders, and drives turn invisible and unsearchable.
- Lock your data with password in the local drives, external hard drive, USB flash drive.
- Use the AES encryption algorithm to encrypt files and folders.
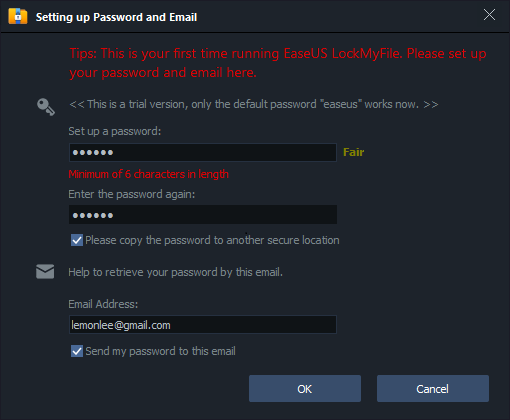
Step 1. Launch EaseUS LockMyFile, enter the valid email, and set password to register.
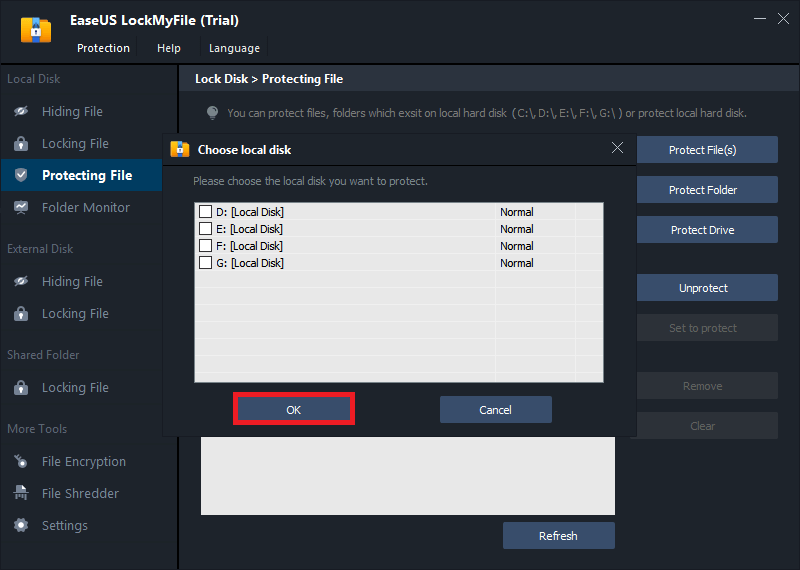
Step 2. Click Protecting File under the Local Disk. Select Protect File(s) ,Folder or drive from the right panel.
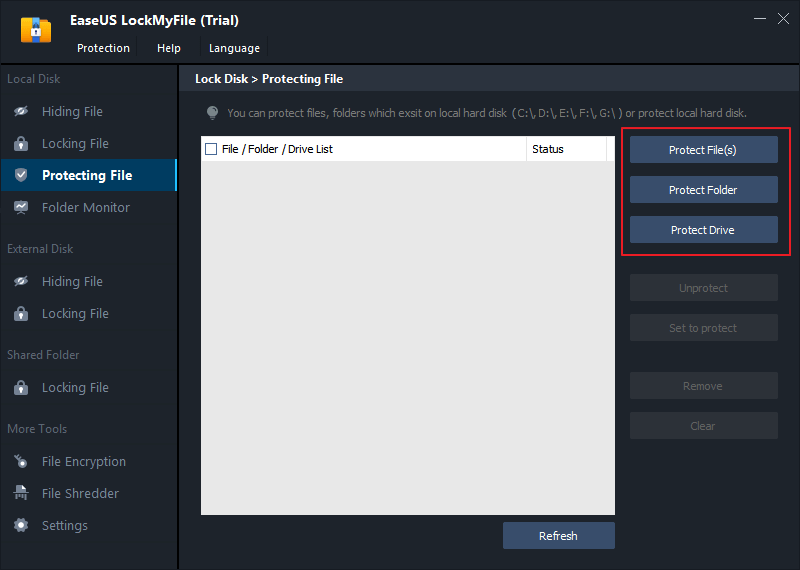
A. Add file(s) or folder from the specific location.
B. Click on the Protect Drive to add drive you want to protect. Select drive and click OK.
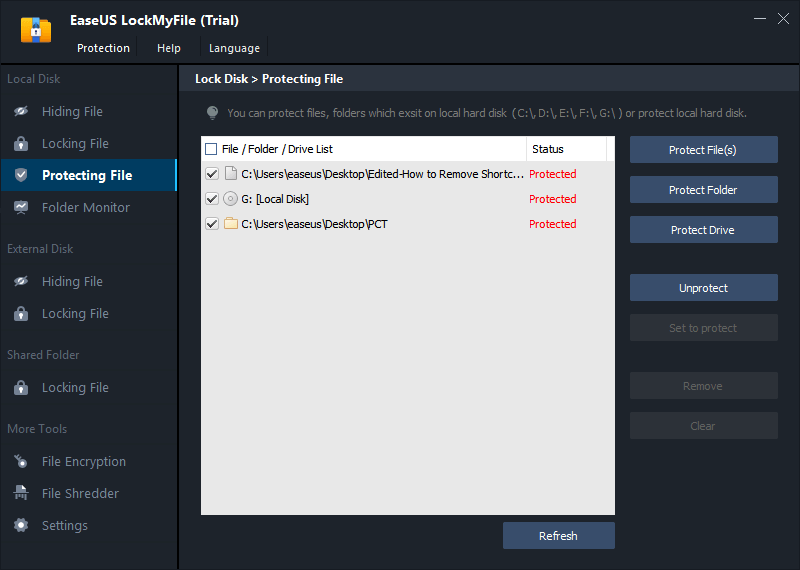
Step 3. Check and confirm the files, folder, and drive that you want to protect.
Notes:
If you want to unprotect the selected files, folder, or drive, tick the target data and click on the Unprotect button.
Download the software and follow the steps:
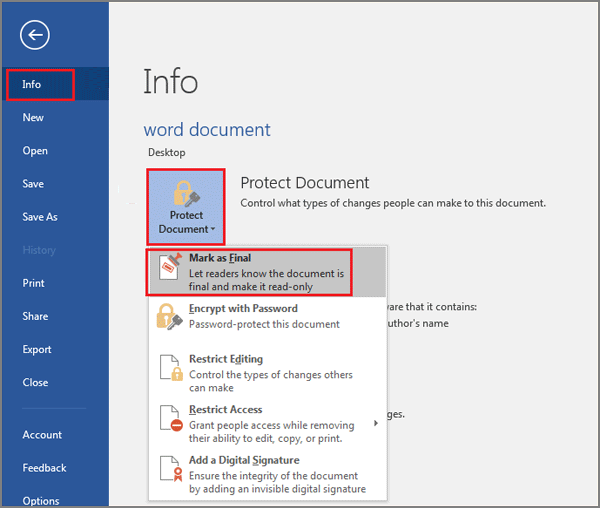
3 — Mark as Final
Step 1. Click File tab > Info.
Step 2. Click Protect Document and select Mark as Final.
4 — Enable Read-only Mode
Step 1. Open File tab > Info.
Step 2. Choose Protect Document and click Always Open Read-only.
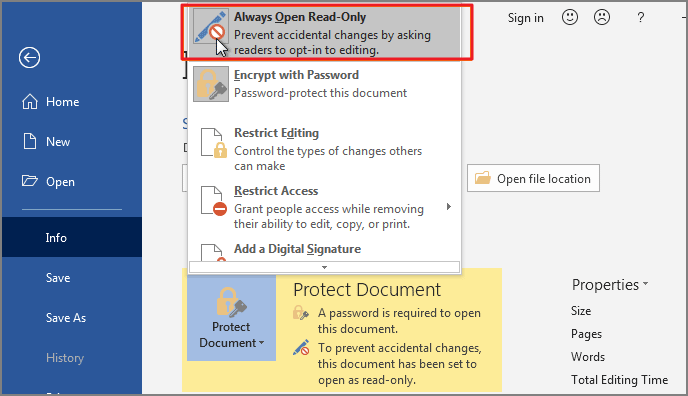
Step 3. Save the word file and re-open it again.
Note: To disable Read-only mode, open the file and click the File tab. Follow path: Info > Protect Document > Always Open Read-only.
5 — Encrypt with Password
Step 1. Move to File tab > Info.
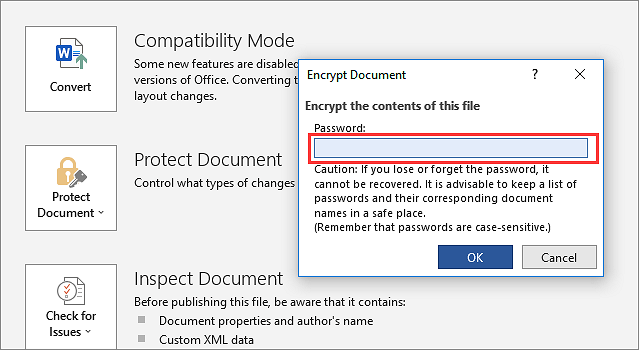
Step 2. Choose Protect Document and then click Encrypt with password from the options menu.
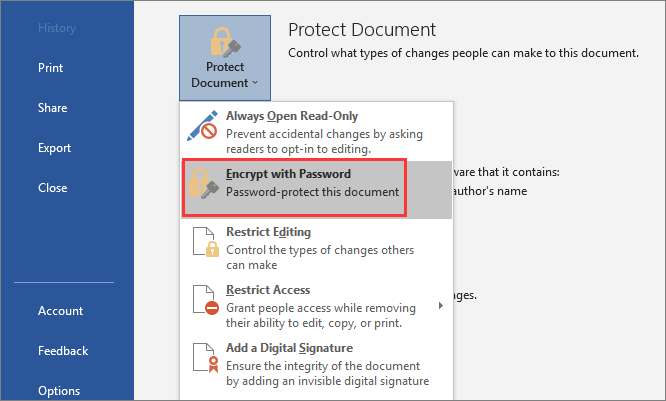
Step 3. Set your password and click OK.
How to Protect Word Document from Editing and Coping Mac
For Mac users, you can try 2 ways to limit the edit function.
1 — Click Always Open Read-Only Option
Step 1. Open the Microsoft Word for Mac and select the document you want to set Read-only mode.
Step 2. Click the File tab from the top menu bar.
Step 3. Choose Always Open Read-Only from the option list.
Step 4. Close the window and click Save in the pop-up window.
Open your word file again, your word file will be in Read-only mode.
2 — Encrypt Word Document
Step 1. Open Word files for Mac.
Step 2. Go to the Review tab > Move to Protect > Choose Protect Document.
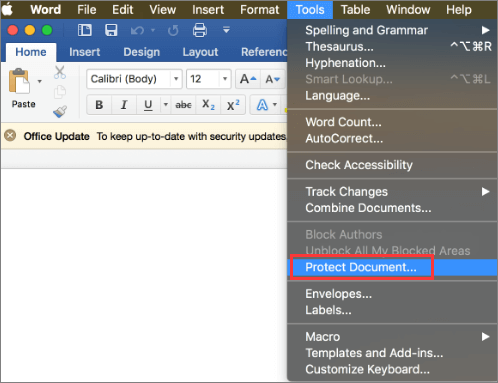
Step 3. In the Password Protection window, set a password to open or modify the document. (Use a password you can remember and save it in a safe location.)
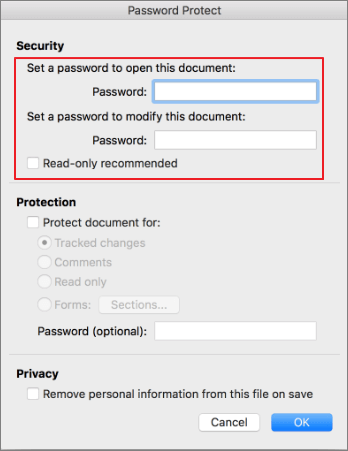
Step 4. Click OK.
Bonus Tip: How Do I Lock Certain Text in Word
What if you just want to lock a certain paragraph from being edited? Here the Restrict Editing function can allow you to set limited access for everyone.
1 — Restrict Formatting Style
Step 1. Click the File tab and choose Restrict Editing.
Step 2. Under Formatting restrictions, check Limit formatting to a selection of styles. And then click Settings.
Step 3. Select the styles you want to allow on your document. And click OK.
Step 4. Under Start enforcement, click Yes, Start Enforcing Protection.
Step 5. Enter the password and reenter the password to confirm.
2 — Use Editing Restrictions
Step 1. Open your file and click the Review tab, go to Editing restrictions.
Step 2. Check to Allow only this type of editing in the document and select No changes (Read-only).
Step 3. Choose the area (paragraph or page) that other users can edit. Check Everyone under the Exceptions (optional).
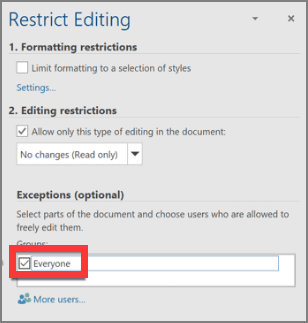
To confirm the Exceptions, click Yes, Start Enforcing Protection.
Step 4. Enter the password for protection.
Final Words
Have you finished text restriction on PC and Mac? Microsoft Word serves up several choices so that only you and specific people can change the whole part or certain section. Note: You’d better back up the sensitive text to another safe location. Double protection is good for your materials.
Document security is particularly important when critical or private data is involved in a Word document. There are several security options in Word that you can use to protect your documents, including password protection, read-only mode, editing restrictions, and partial protection. On the contrary, when the protection is no longer required, you may need to unprotect a Word document to improve work efficiency.
In this article, you will learn how to protect or unprotect Word documents in C++ using Spire.Doc for C++.
- Password Protect a Word Document in C++
- Restrict Editing of a Word Document in C++
- Protect Sections of a Word Document in C++
- Create Editable Regions in a Word Document in C++
- Remove Editable Regions from a Word Document in C++
- Remove Restrictions from a Word Document in C++
- Remove Password from a Password-Protected Word Document in C++
Install Spire.Doc for C++
There are two ways to integrate Spire.Doc for C++ into your application. One way is to install it through NuGet, and the other way is to download the package from our website and copy the libraries into your program. Installation via NuGet is simpler and more recommended. You can find more details by visiting the following link.
Integrate Spire.Doc for C++ in a C++ Application
Password Protect a Word Document in C++
Encrypting a document with a password makes sure that only you and certain people can read or edit it. The following are the steps to password protect a Word document using Spire.Doc for C++.
- Create a Document object.
- Load a Word document using Document->LoadFromFile() method.
- Encrypt the document with a password using Document->Eencrypt(LPCWSTR_S password) method.
- Save the document to another Word file using Document->SaveToFile() method.
- C++
#include "Spire.Doc.o.h";

using namespace Spire::Doc;

int main() {

    //Create a Document object
    Document* document = new Document();

    //Load a Word file
    document->LoadFromFile(L"C:\Users\Administrator\Desktop\sample.docx");

    //Encrypt the document with a password
    document->Encrypt(L"open-psd");

    //Save the document to another Word file
    document->SaveToFile(L"Output/Encryption.docx", FileFormat::Docx2013);
    document->Close();
    delete document;
}

Restrict Editing of a Word Document in C++
If you want to grant people permission to read your document but restrict the types of modifications that someone can make, you can protect your document with a specific protection type and a permission password.
| Protection Type | Description |
| AllowOnlyComments | Modification of comments in the document is allowed. |
| AllowOnlyFormFields | The user can only enter data in the form fields in the document. |
| AllowOnlyReading | The document is read-only. |
| AllowOnlyRevisions | The user can only add revision marks to the document. |
| NoProtection | The document is not protected. |
The following are the steps to restrict editing of a Word document using Spire.Doc for C++.
- Create a Document object.
- Load a Word document using Document->LoadFromFile() method.
- Protect the document by specifying the protection type and the permission password using Document->Protect(Spire::Doc::ProtectionType type, LPCWSTR_S password) method.
- Save the document to another Word file using Document->SaveToFile() method.
- C++
#include "Spire.Doc.o.h";

using namespace Spire::Doc;

int main() {

    //Create a Document object
    Document* document = new Document();

    //Load a Word file
    document->LoadFromFile(L"C:\Users\Administrator\Desktop\sample.docx");

    //Protect the document by specifying the protection type and the password
    document->Protect(ProtectionType::AllowOnlyReading, L"permission-psd");

    //Save the document to another Word file
    document->SaveToFile(L"Output/RestrictEditing.docx", FileFormat::Docx2013);
    document->Close();
    delete document;
}
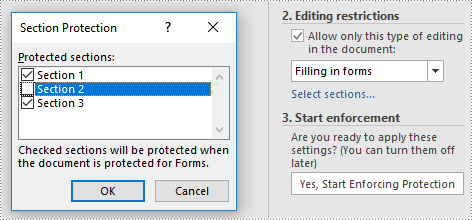
Protect Sections of a Word Document in C++
Word allows you to lock some sections of your Word document and leave the rest available for editing. The following are the steps to protect selected sections of a Word document using Spire.Doc for C++.
- Create a Document object.
- Load a Word document using Document->LoadFromFile() method.
- Set the protection type to AllowOnlyFormFields using Document->Protect() method.
- Unprotect a particular section by passing false as an argument to the Section->SetProtectForm() method. Other sections will continue to be protected.
- Save the document to another Word file using Document->SaveToFile() method.
- C++
#include "Spire.Doc.o.h";

using namespace Spire::Doc;

int main() {

    //Create a Document object
    Document* document = new Document();

    //Load a Word file
    document->LoadFromFile(L"C:\Users\Administrator\Desktop\sample.docx");

    //Set the protection type as "AllowOnlyFormFields"
    document->Protect(ProtectionType::AllowOnlyFormFields, L"permission-psd");

    //Unprotect section 2
    document->GetSections()->GetItem(1)->SetProtectForm(false);

    //Save the document to another Word file
    document->SaveToFile(L"Output/ProtectSections.docx", FileFormat::Docx2013);
    document->Close();
    delete document;
}
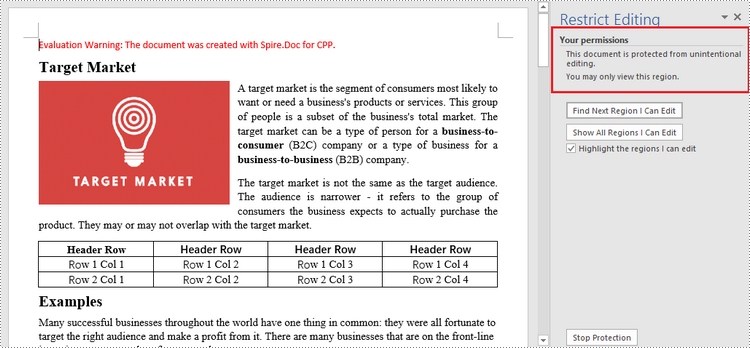
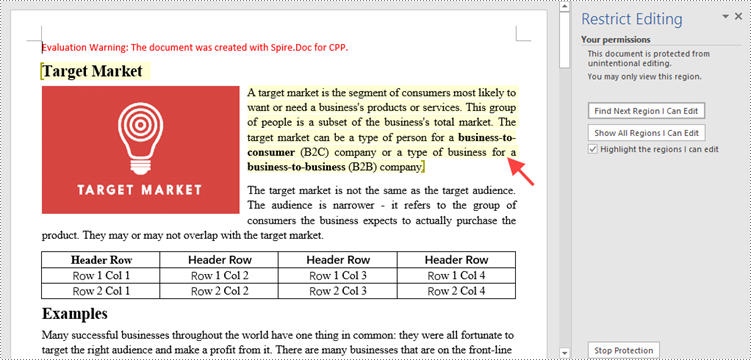
Create Editable Regions in a Word Document in C++
Aside from making certain sections editable, you can create editable regions based on text ranges in order to narrow down the scope of changes that users are able to make. The following are the steps to create editable regions in a read-only Word document using Spire.Doc for C++.
- Create a Document object.
- Load a Word file using Document->LoadFromFile() method.
- Set the protection type to AllowOnlyReading using Document->Protect() method.
- Create a PermissionStart object and a PermissionEnd object.
- Insert the PermissionStart object at the beginning of a paragraph using DocumentObjectCollection->Insert(int index, Spire::Doc::lDocumentObject *entity) method, which indicates the start of an editable region.
- Add the PermissionEnd object at the end of a paragraph using DocumentObjectCollection->Add(Spire::Doc::lDocumentObject *entity) method, which indicates the end of an editable region.
- Save the document to another Word file using Document->SaveToFile() method.
- C++
#include "Spire.Doc.o.h";

using namespace Spire::Doc;

int main() {

    //Create a Document object
    Document* document = new Document();

    //Load a Word file
    document->LoadFromFile(L"C:\Users\Administrator\Desktop\sample2.docx");

    //Set the protect type to AllowOnlyReading
    document->Protect(ProtectionType::AllowOnlyReading, L"permission-psd");

    //Create tags for permission start and end
    PermissionStart* start = new PermissionStart(document, L"regionOne");
    PermissionEnd* end = new PermissionEnd(document, L"regionOne");

    //Add the start and end tags to allow the selected paragraphs to be editable
    document->GetSections()->GetItem(0)->GetParagraphs()->GetItem(0)->GetChildObjects()->Insert(0, start);
    document->GetSections()->GetItem(0)->GetParagraphs()->GetItem(1)->GetChildObjects()->Add(end);

    //Save the document to another Word file
    document->SaveToFile(L"Output/SetEditableRegions.docx", FileFormat::Docx2013);
    document->Close();
    delete document;
}
Remove Editable Regions from a Word Document in C++
In order to remove the editable regions, you need to find the «PermissionStart» and «PermissionEnd» tags in the document and remove them. The following are the detailed steps.
- Create a Document object.
- Load a Word document containing editable regions using Document->LoadFromFile() method.
- Traverse through all the child objects in the document, and determine if a certain child object is an instance of PermissionStart class or PermissionEnd class. If yes, remove the child object from the paragraph using Paragraph->GetChildObjects()->Remove(Spire::Doc::IDocumentObject *entity) method.
- Save the document to another Word file using Document->SaveToFile() method.
- C++
#include "Spire.Doc.o.h";

using namespace Spire::Doc;

int main() {

    //Create a Document object
    Document* document = new Document();

    //Load a Word file
    document->LoadFromFile(L"C:\Users\Administrator\Desktop\SetEditableRegions.docx");

	//Find "PermissionStart" and "PermissionEnd" tags and remove them
	for (int i = 0; i < document->GetSections()->GetCount(); i++)
	{
		Section* section = document->GetSections()->GetItem(i);
		for (int j = 0; j < section->GetBody()->GetParagraphs()->GetCount(); j++)
		{
			Paragraph* para = section->GetBody()->GetParagraphs()->GetItem(j);
			for (int k = 0; k < para->GetChildObjects()->GetCount(); k++)
			{
				DocumentObject* obj = para->GetChildObjects()->GetItem(k);
				if (dynamic_cast<PermissionStart*>(obj) != nullptr || dynamic_cast<PermissionEnd*>(obj) != nullptr)
				{
					para->GetChildObjects()->Remove(obj);
				}
				else
				{
					k++;
				}
			}
		}
	}

    //Save the document to another Word file
    document->SaveToFile(L"Output/RemoveEditableRegions.docx", FileFormat::Docx2013);
    document->Close();
    delete document;
}
Remove Restrictions from a Word Document in C++
Spire.Doc for C++ allows you to remove editing restrictions without knowing the permission password. The following are the detailed steps.
- Create a Document object.
- Load a Word document containing editing restrictions using Document->LoadFromFile() method.
- Set the protection type to NoProtection using Document->Protect() method.
- Save the document to another Word file using Document->SaveToFile() method.
- C++
#include "Spire.Doc.o.h";

using namespace Spire::Doc;

int main() {

    //Create a Document object
    Document* document = new Document();

    //Load a Word file
    document->LoadFromFile(L"C:\Users\Administrator\Desktop\RestrictEditing.docx");

    //Set the protect type to NoProtection
    document->Protect(ProtectionType::NoProtection);

    //Save the document to another Word file
    document->SaveToFile(L"Output/RemoveRestrictions.docx", FileFormat::Docx2013);
    document->Close();
    delete document;
}
Remove Password from a Password-Protected Word Document in C++
The password of an encrypted Word document can be removed if it is no longer needed. The following are the detailed steps.
- Create a Document object.
- Load a password-protected Word document using Document->LoadFromFile((LPCWSTR_S fileName, Spire::Doc::FileFormat fileFormat, LPCWSTR_S password) method.
- Remove the password using Document->RemoveEncryption() method.
- Save the document to another Word file using Document->SaveToFile() method.
- C++
#include "Spire.Doc.o.h";

using namespace Spire::Doc;

int main() {

    //Create a Document object
    Document* document = new Document();

    //Load an encrypted Word file
    document->LoadFromFile(L"C:\Users\Administrator\Desktop\Encryption.docx", FileFormat::Docx, L"open-psd");

    //Remove the open password
    document->RemoveEncryption();

    //Save the document to another Word file
    document->SaveToFile(L"Output/RemovePassword.docx", FileFormat::Docx2013);
    document->Close();
    delete document;
}
Apply for a Temporary License
If you’d like to remove the evaluation message from the generated documents, or to get rid of the function limitations, please request a 30-day trial license for yourself.