
How to Convert Excel to XML – Step-by-Step Tutorial (2023)
We all know basic excel skills that help us work in excel spreadsheets with extensive data. But what if you need to transfer the excel file somewhere and change it into other formats?
The extensible markup language or XML comes in handy for this. Simply put, it is a markup language that helps store data in an excel spreadsheet and changes its format.
You can easily convert excel data into XML data – but how do you do that?
For that, download our FREE Exercise Workbook here and continue reading the article below. 😀
What is the XML file format?
The XML file format is a way to write text in a document using tags. These tags are customizable and represent the structure of the document.
It also tells how the XLS file can be converted to an XML file and transferred to another application.
XML format uses the DOM or Document Object Model as its basic structure and can help separate text in HTML.
For instance, XML data for a company employee might be:

The tags ‘Name, ID No., Post, Salary, and Status’ consist of the document’s data. You can customize the tags as we did here for an employee’s data.
Create the Excel File
To convert Excel to XML, you need to create an XLS file containing all the data. I have created an example below that lists the members of a company and their details.

Each field contains certain information about every employee.
How to Create the XML Schema?
The XML Schema will structure each spreadsheet field and its appearance in the XML file.
Our spreadsheet has five columns with different data types setting the base for our XML file.
1. To create the XML file, open any text editor and begin entering the standard XML elements.

Don’t fret just yet; We’ll explain all the alien-like items in this image one by one. 😄
The first line in the image is the standard XML line. It is used each time you create XML documents.
The version 1.0 encoding UTF specifies that it is an XML format.
The second line indicates the type of text. For example, this data was about employees of a company, hence <employee-data>. The remaining line is the default.
Since this statement starts with <employee-data>, it is the root element here. The remaining elements of the argument make up for the child element.

The third line, containing the record tag, indicates the beginning and end of a single field. It consists of the information in each field of the spreadsheet.
For instance, the first field is about Alice A. So it will include all the information about Alice on each tag.

The TAG NAME specifies the items in each column, whereas the data contains the corresponding value.
You don’t have to manually input the exact and each column name; they just need to be in the correct order. Excel can help us do the rest.

For the TAG NAME, say we want the first employee’s name.
So, we will write – <Name>Alice A.</Name> – Similarly, for her ID, we will write – <ID No.>2854</ID No.> – .
Pro Tip!
Must note the opening and closing tag identified by a forward slash (/).
These are to be used at the beginning and each of each statement. Also, the closing and opening tags must be in the correct order, as the data between the two tags make for the XML elements.

The last closing tag </employee-data> marks the end of the file. In the last step, save the XML data file as “employee-data.xml.”
Enable the Developer Tab
Now that your schema markup is prepared, let’s add it to Excel.
1. Make sure the developer tab is enabled on your Excel spreadsheet. If it is not visible, right-click on the ribbon and select Customize the ribbon.

2. A dialog box will appear on the screen. On the bottom right side, mark the develop option as shown and click ok.

3. Now, you should be able to view the developer’s tab on the ribbon like this:

That’s it – now what? Now we add the Schema file to Microsoft Excel. 😃
Open the XML Source Task Pane & Add XML Maps
1. Click on Developer from the ribbon, and you will see a number of options. Select the Source icon:

The XML source pane will appear on the Excel spreadsheet.
2. Click XML Maps at the bottom right corner.

It shows a dialog box that searches for the XML map in the workbook.
3. Click the add button and select the XML map stored on your desktop.
You will see a warning like this one below from Microsoft Excel upon adding the map.

There’s nothing to worry about.
4. Simply press ‘Ok’.
5. You will now see the XML map in the workbook.

6. Click ‘Okay’ and move to the XML source pane, which looks like this.

7. Now, mark the data on the XML Map.
Assign XML Elements
Now that you have the XML schema and the XLSX ready, mark the XML tags to the spreadsheets’ data.
All you need to do now is drag one XML element from the source pane. Then drop it on the corresponding spreadsheets’ column name.
For instance, I will drop the “Name” XML element on the “Name” column, and a blue table will appear.

Apply the same process to the remaining columns. If you have been successful till now, your spreadsheet will look like this:

If you’ve achieved this form, it means all your data is perfectly mapped with XML tags.
Now that we’ve come this far, it is only fair we export it. So, onto the next step.
Export the XML File
1. To convert Excel to XML file formats, open the developer tab and click the export command.

A dialog box will appear, asking the location to save the file. The file type should be set by default.
2. Select a location, enter the name and click export.
The file is now saved on your desktop with all your XML data. You can open the file from the XML section on a Wordpad or other apps.
The XML file will show up like this:

You might receive a warning from Microsoft office. Exporting the file may cause loss of pictures, formatting, or other non-XML objects.
That’s not an issue. Go ahead and hit ‘Ok’. 🙂
That’s it — Now What
Beginning to convert Excel to XML files can be challenging at the start. But once you get hold of it, you can do it with your eyes closed.
In the above article, we not only learned about creating an XML schema but also to convert an Excel file into XML format and export it.
But that’s only about creating and retaining your Excel file in different formats. There’s so much more to Excel that you’d still want to learn like the VLOOKUP, SUMIF and IF functions.
Want to learn them all? Click here to sign up for my free 30-minute email course to master these functions.
Kasper Langmann2023-01-19T12:23:02+00:00
Page load link
Содержание
- Процедура конвертации
- Способ 1: простое сохранение
- Способ 2: инструменты разработчика
- Вопросы и ответы
XML – это универсальный формат работы с данными. Его поддерживает множество программ, в том числе из сферы СУБД. Поэтому конвертация информации в XML важна именно с точки зрения взаимодействия и обмена данными между различными приложениями. Excel как раз входит в число программ, которые работают с таблицами, и даже может выполнять манипуляции с базами данных. Разберемся, как конвертировать файлы Эксель в XML.
Процедура конвертации
Конвертация данных в формат XML не такой уж простой процесс, так как в его ходе должна быть создана специальная схема (schema.xml). Впрочем, для преобразования информации в простейший файл данного формата достаточно иметь под рукой обычные инструменты сохранения в Excel, а вот для создания хорошо структурированного элемента придется основательно повозиться с составлением схемы и её подключением к документу.
Способ 1: простое сохранение
В Excel можно сохранить данные в формате XML, просто воспользовавшись меню «Сохранить как…». Правда, нет гарантии, что потом все программы будут корректно работать с файлом, который был создан таким способом. Да и не во всех случаях этот способ работает.
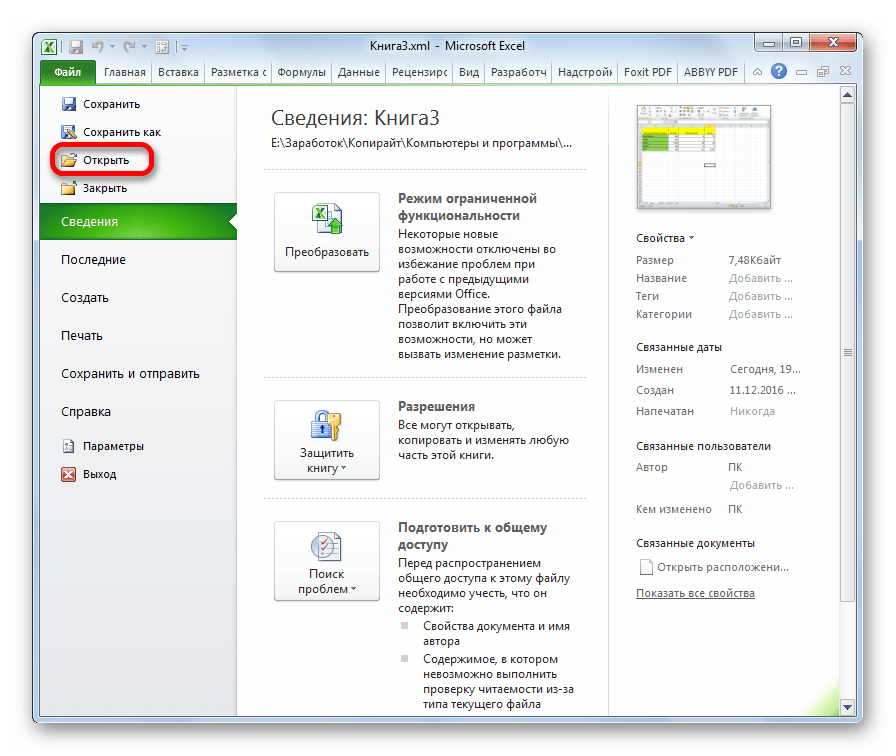
- Запускаем программу Excel. Для того, чтобы открыть элемент, подлежащий конвертации переходим во вкладку «Файл». Далее жмем по пункту «Открыть».
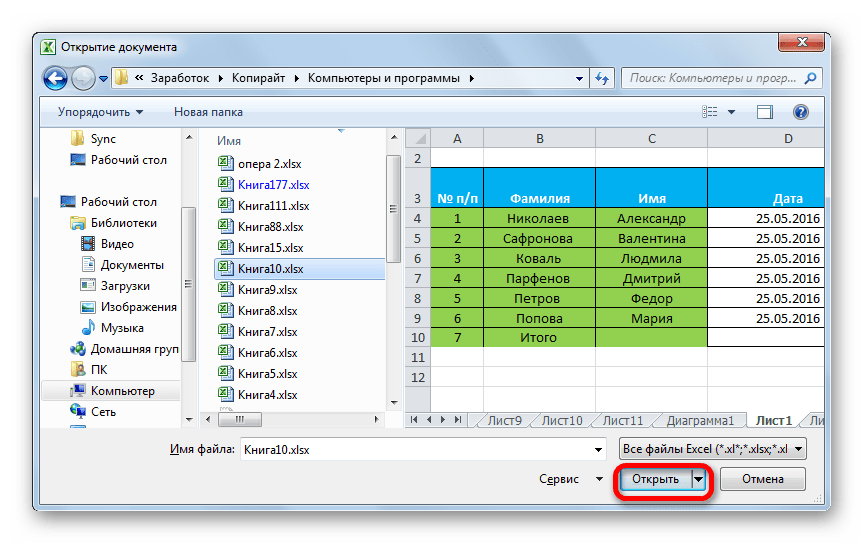
- Запускается окно открытия файлов. Переходим в директорию, где содержится файл, который нам нужен. Он должен быть в одном из форматов Эксель – XLS или XLSX. Выбираем его и жмем на кнопку «Открыть», расположенную в нижней части окна.
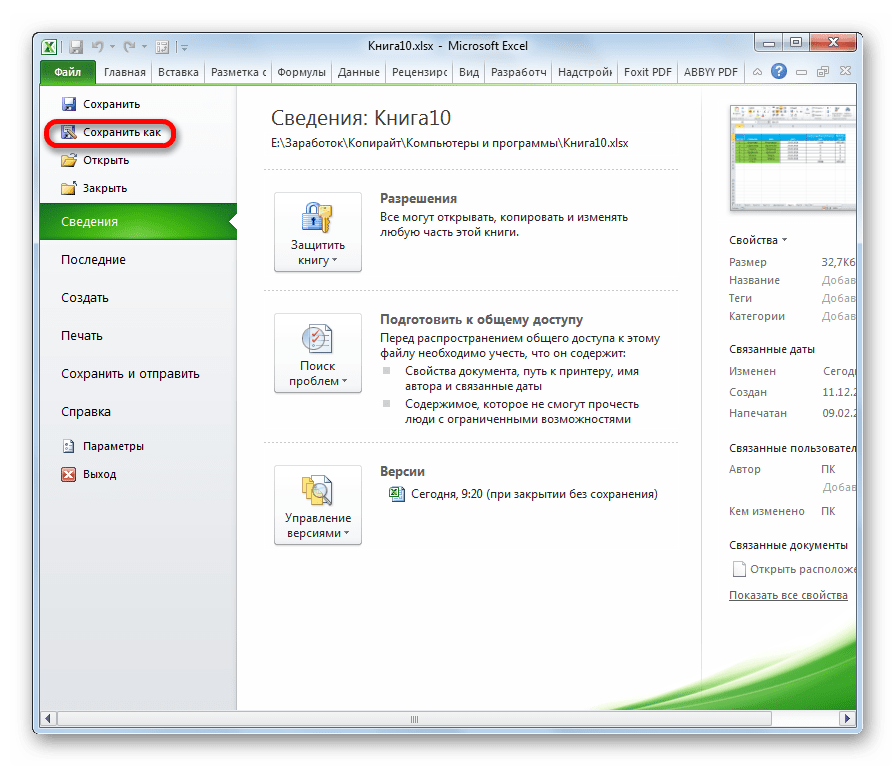
- Как видим, файл был открыт, а его данные отобразились на текущем листе. Опять переходим во вкладку «Файл».
- После этого переходим по пункту «Сохранить как…».
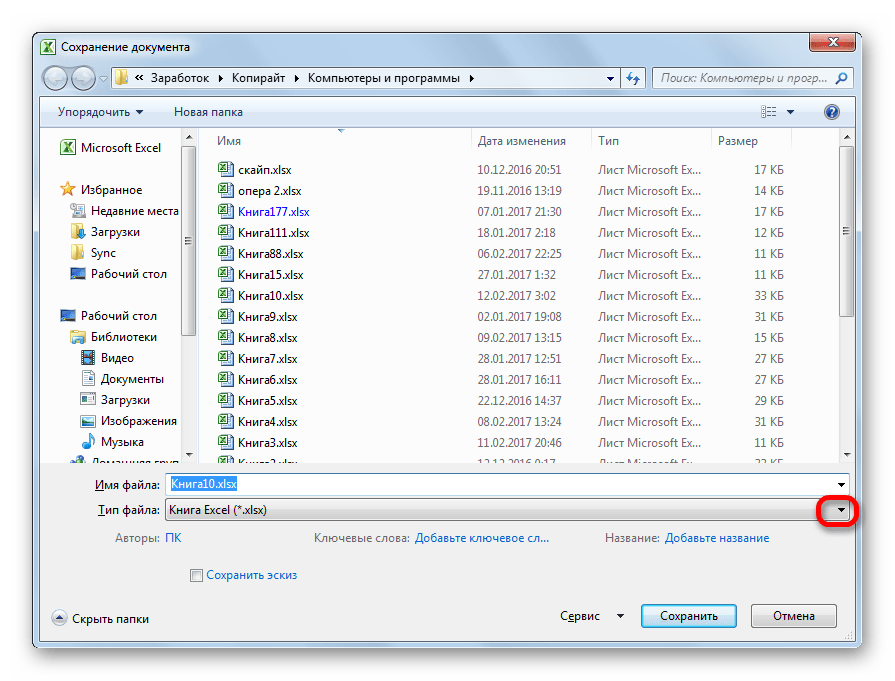
- Открывается окно сохранения. Переходим в ту директорию, в которой желаем, чтобы хранился конвертированный файл. Впрочем, можно оставить и директорию по умолчанию, то есть ту, что предложила сама программа. В этом же окне, если возникнет желание, можно изменить наименование файла. Но основное внимание нужно обратить на поле «Тип файла». Раскрываем перечень кликом по данному полю.

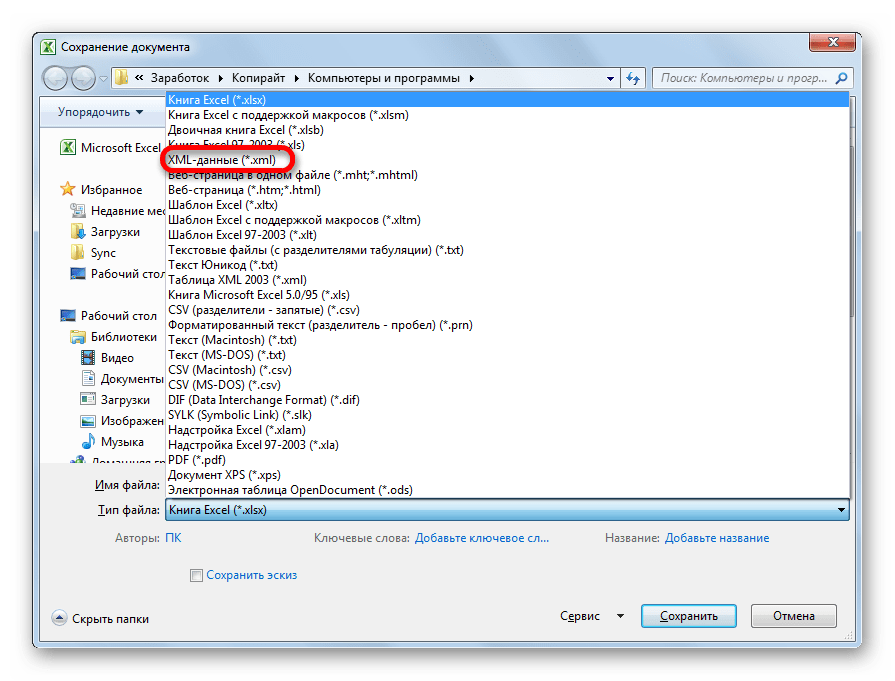
Среди вариантов сохранения ищем наименование «Таблица XML 2003» или «XML-данные». Выбираем один из этих пунктов.
- После этого жмем на кнопку «Сохранить».

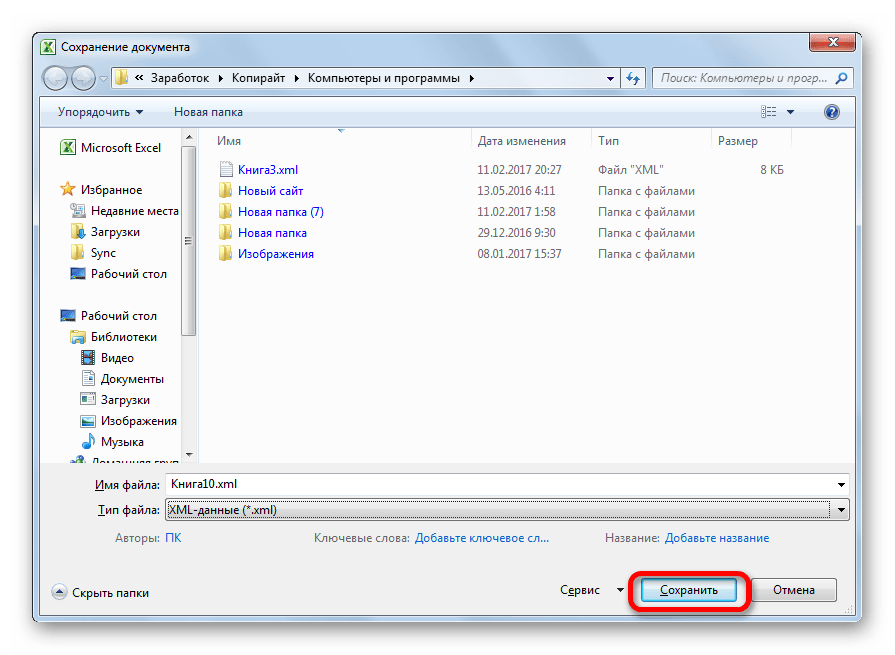
Таким образом, преобразование файла из формата Excel в XML будет совершено.
Способ 2: инструменты разработчика
Конвертировать формат Excel в XML можно с помощью инструментов разработчика на вкладке программы. При этом, если пользователь все выполнит правильно, то на выходе он получит, в отличие от предыдущего способа, полноценный XML-файл, который корректно будет восприниматься сторонними приложениями. Но сразу нужно сказать, что не каждому новичку может хватить знаний и умений сразу научиться конвертировать данные таким способом.
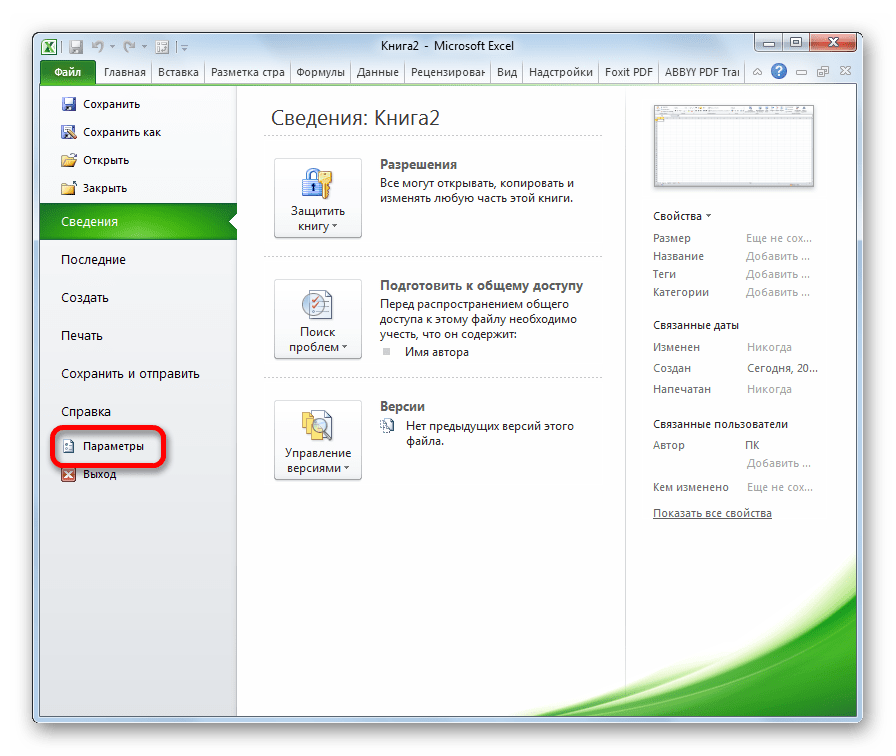
- По умолчанию вкладка инструментов разработчика отключена. Поэтому, прежде всего, нужно её активировать. Переходим во вкладку «Файл» и кликаем по пункту «Параметры».
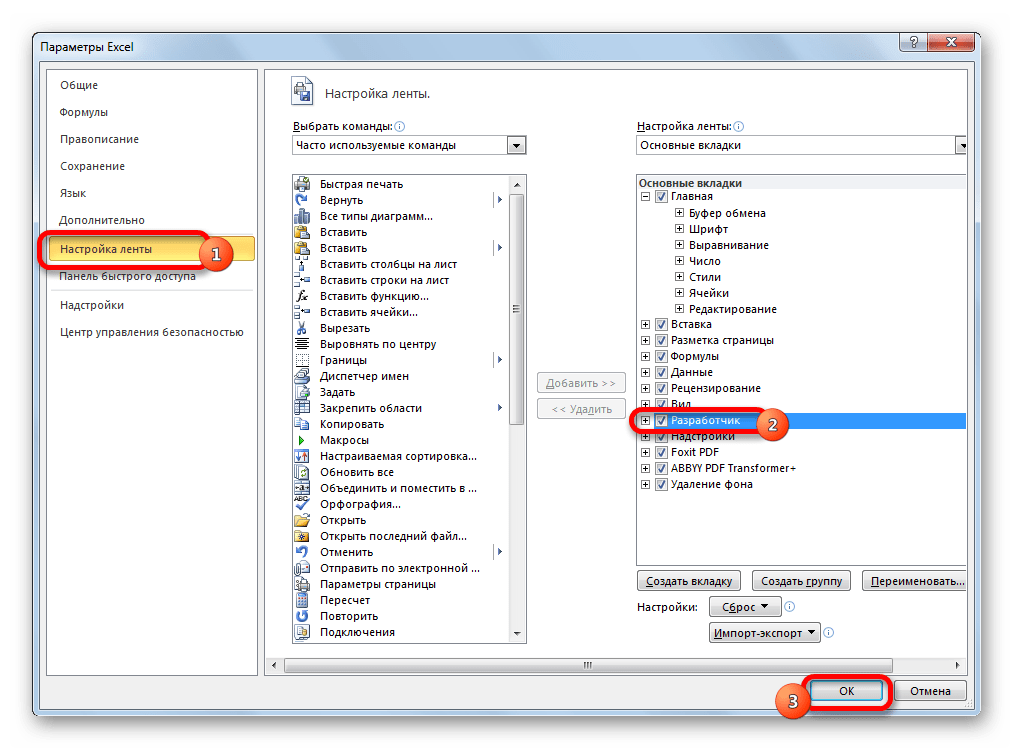
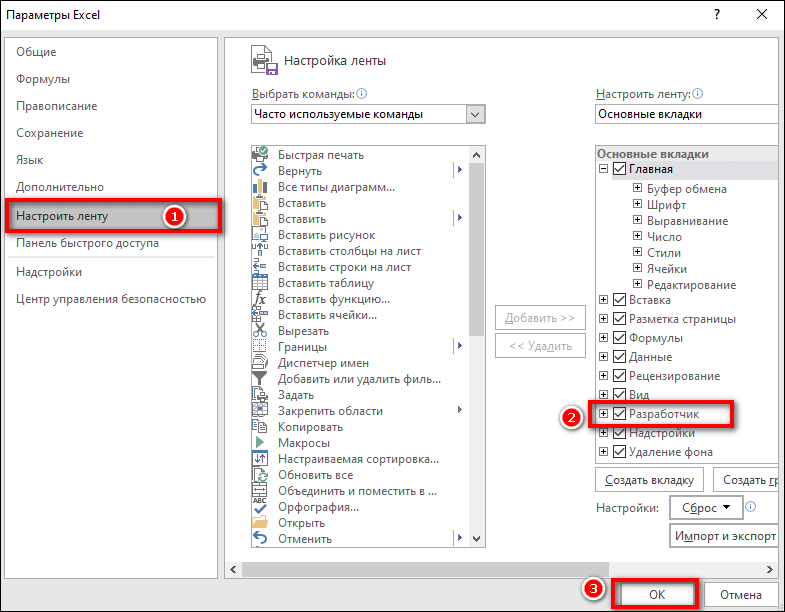
- В открывшемся окне параметров перемещаемся в подраздел «Настройка ленты». В правой части окна устанавливаем галочку около значения «Разработчик». После этого жмем на кнопку «OK», размещенную в нижней части окна. Вкладка инструментов разработчика теперь включена.
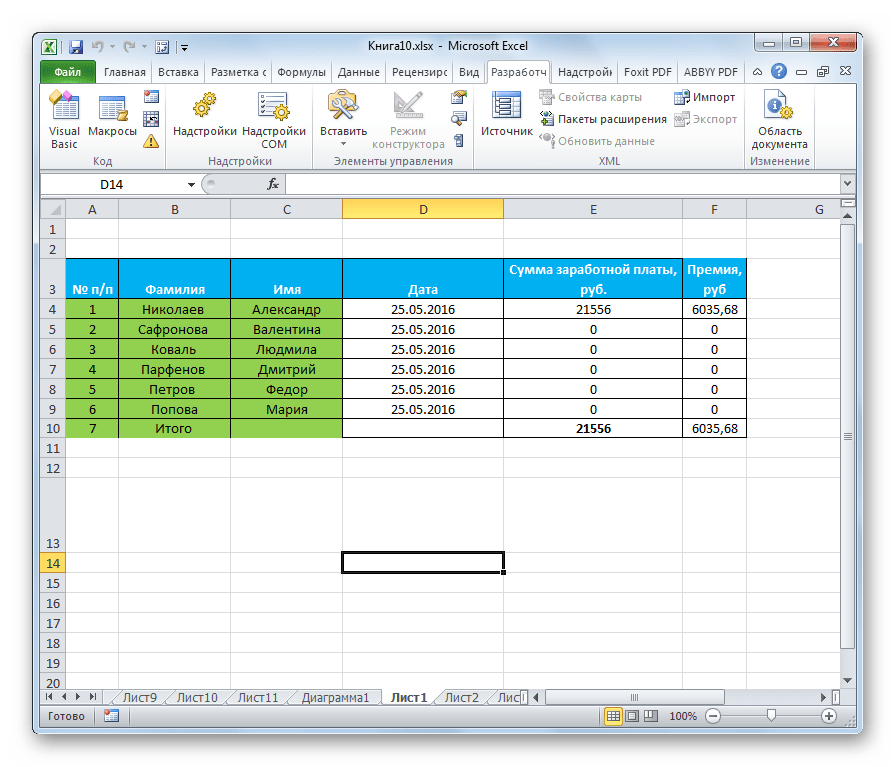
- Далее открываем таблицу Excel в программе любым удобным способом.
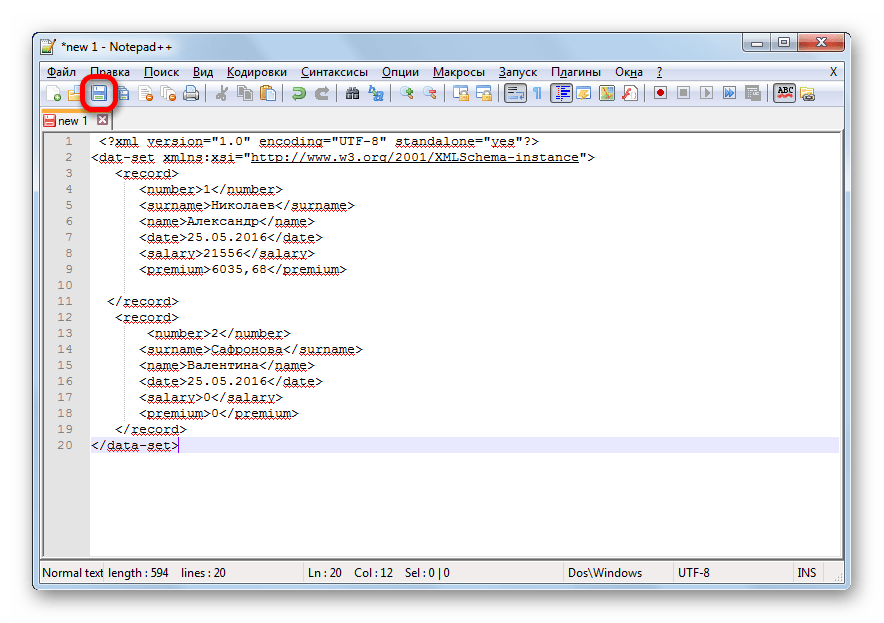
- На её основе нам предстоит создать схему, которая формируется в любом текстовом редакторе. Для этих целей можно использовать и обычный Блокнот Windows, но лучше применять специализированное приложение для программирования и работы с языками разметки Notepad++. Запускаем эту программу. В ней создаем схему. На нашем примере она будет выглядеть, как показано внизу на скриншоте окна Notepad++.

Как видим, открывающим и закрывающим тегом для документа в целом служит «data-set». В этой же роли для каждой строки выступает тег «record». Для схемы вполне будет достаточно, если мы возьмем всего две строки таблицы, а не будем переводить её всю вручную в XML. Название открывающего и закрывающего тега столбца может быть произвольным, но в данном случае для удобства мы предпочли просто перевести русскоязычные наименования колонок на английский язык. После того, как данные внесены, просто сохраняем их через функционал текстового редактора в любом месте на жестком диске в формате XML под названием «schema».
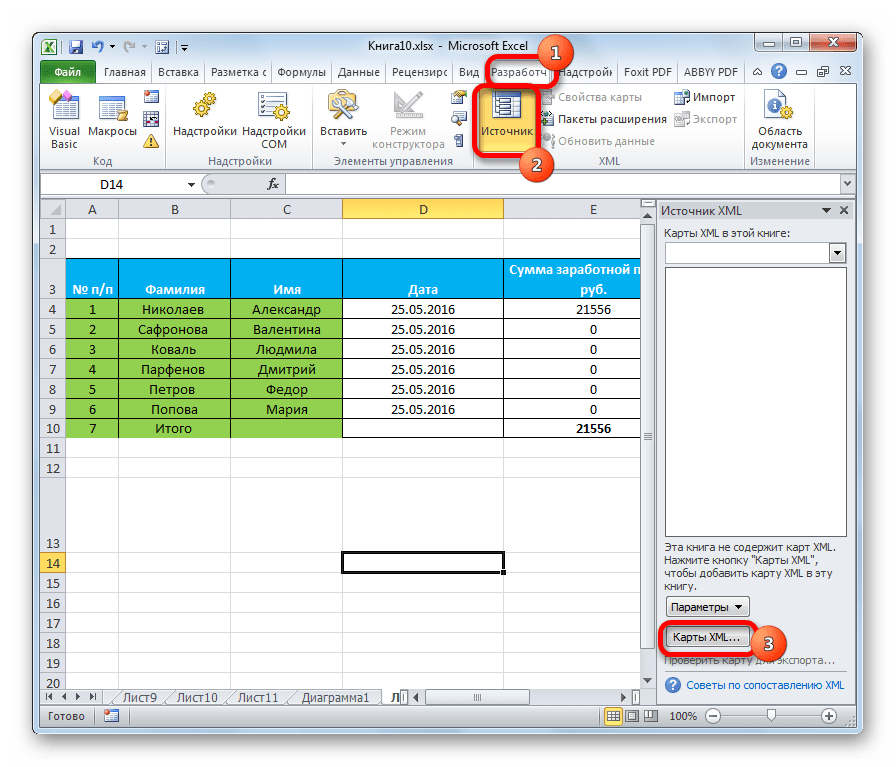
- Опять переходим к программе Excel с уже открытой таблицей. Перемещаемся во вкладку «Разработчик». На ленте в блоке инструментов «XML» кликаем по кнопке «Источник». В открывшемся поле в левой части окна жмем на кнопку «Карты XML…».
- В открывшемся окне кликаем по кнопке «Добавить…».
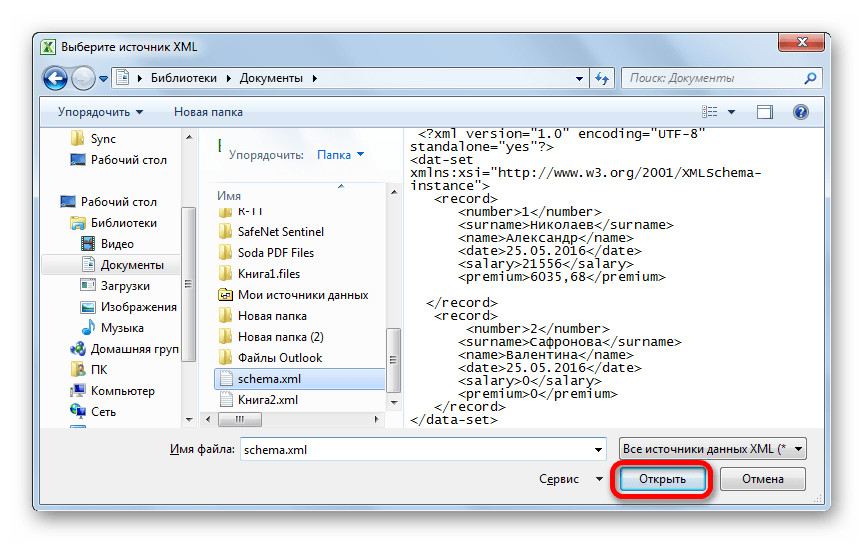
- Запускается окно выбора источника. Переходим в директорию расположения схемы составленной ранее, выбираем её и кликаем по кнопке «Открыть».
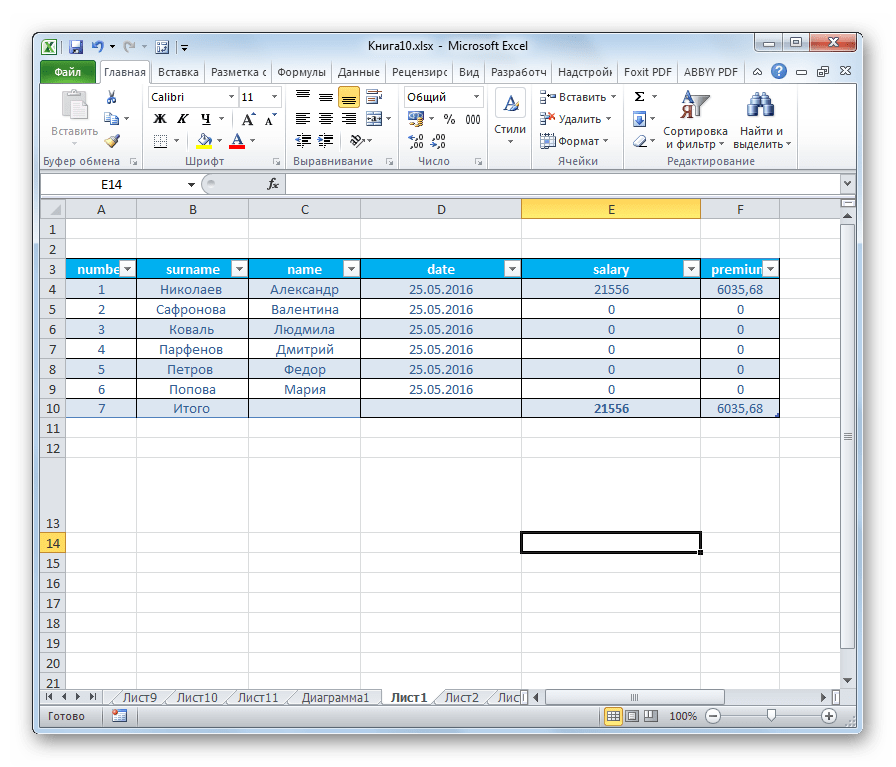
- После того, как элементы схемы появились в окне, перетаскиваем их с помощью курсора в соответствующие ячейки наименования столбцов таблицы.
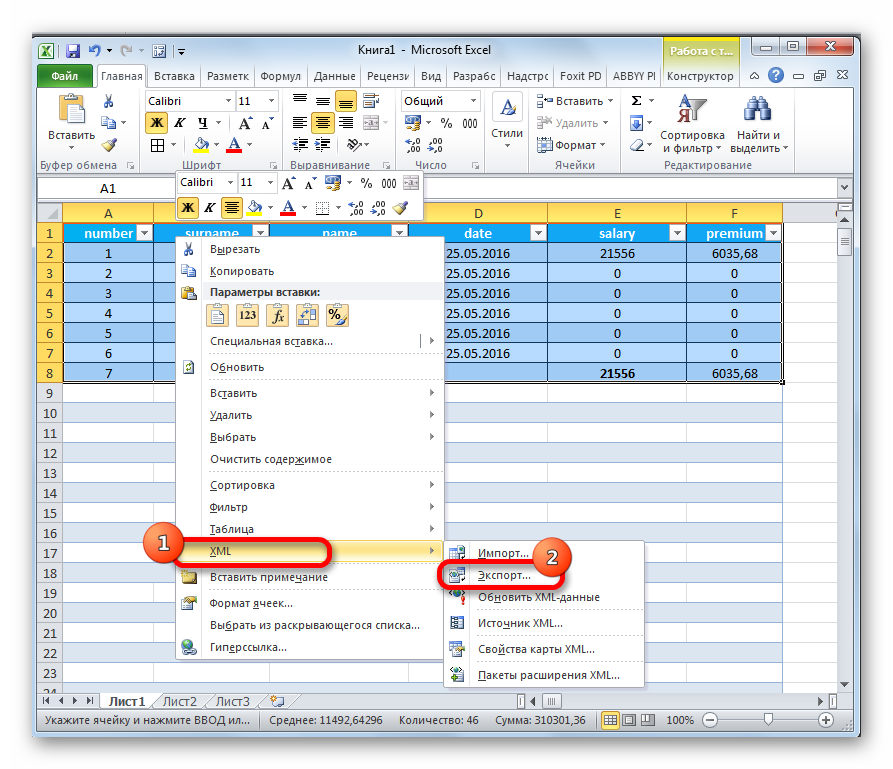
- Кликаем правой кнопкой мыши по полученной таблице. В контекстном меню последовательно переходим по пунктам «XML» и «Экспорт…». После этого сохраняем файл в любой директории.


Как видим, существуют два основных способа конвертации файлов XLS и XLSX в формат XML программой Microsoft Excel. Первый из них предельно простой и заключается в элементарной процедуре сохранения с заданным расширением через функцию «Сохранить как…». Простота и понятность данного варианта, несомненно, являются преимуществами. Но у него есть один очень серьезный недостаток. Преобразование выполняется без учета определенных стандартов, и поэтому файл, конвертируемый таким способом, сторонними приложениями может просто не распознаваться. Второй вариант предполагает составление карты XML. В отличие от первого способа, таблица, преобразованная по данной схеме, будет соответствовать всем стандартам качества XML. Но, к сожалению, не каждый пользователь сможет быстро разобраться с нюансами этой процедуры.
Еще статьи по данной теме:
Помогла ли Вам статья?
Excel spreadsheets are great for storing large amounts of data that would be unmanageable elsewhere. But what happens when you need to transfer that data somewhere else? What if you have hundreds or thousands of cells crammed with information? That would be a lot of data to manually re-type, especially if you need it in another format.
Extensible Markup Language, or XML, is an easy-to-use, read, and format document markup language. It can be used to store data in Excel files and help transfer them to other applications. It is a widely used format on the internet and in other applications.
In this guide, you’ll learn a quick and easy way to convert Excel to XML. All you need is an Excel spreadsheet, an XML schema, and a rudimentary understanding of Excel, which you can learn in this Excel training course for beginners.
Step 1: Create your Excel spreadsheet
The first thing you need is an Excel spreadsheet. Below is an example spreadsheet with six columns and seven rows of data. The columns separate the last names, first names, ages, majors (subject), GPAs (Grade Point Average), and school year of each student listed in the spreadsheet.

Step 2: Create your XML schema
After you have your Excel document set up, you need an XML schema. An XML schema is the document that defines an XML file’s structure. You can create an XML schema in Notepad, as it is a text file format. Here is a basic structure:
<?xml version="1.0" encoding="UTF-8" standalone="yes"?>
<student-data xmlns:xsi="http://www.w3.org/2001/XMLSchema-instance">
    <record>
       <TAGNAME>data</TAGNAME>
       <TAGNAME2>data</TAGNAME2>
       <TAGNAME3>data</TAGNAME3>
    </record>
</student-data>
The first line is a standard line. It identifies that it is an XML file, using the encoding UTF-8 and the XML version 1.0.
The second line identifies that the data is about “student-data”. If you simplify this line and the last line, you have:
<student-data>
</student-data>
The first line above opens the element, and the last line, which includes a “/”, ends this element. It is important that you have a closing tag for every opening tag, and that they are in the right order. Everything in between these lines is part of this element. In other words, it is “student-data”. Because this is the first element, it is also called the “root element”.
The “student-data” above includes a “record” element, which has three data elements, TAGNAME, TAGNAME2, and TAGNAME3.
You can change the name of the <TAGNAME> tags into the names of your columns. They do not have to be the exact name of the columns, as long as they’re in the correct order. You only need to fill out a few examples manually, but we can get Excel to do the rest for us later.
Here’s an example XML schema for our Excel spreadsheet:
<?xml version="1.0" encoding="UTF-8" standalone="yes"?>
<student-data xmlns:xsi="http://www.w3.org/2001/XMLSchema-instance">
    <record>
       <LastName>Takahashi</LastName>
       <FirstName>Jesse</FirstName>
       <Age>19</Age>
       <Major>Literature</Major>
       <GPA>3.8</GPA>
       <Year>Freshman</Year>
    </record>
    <record>
       <LastName>Nguyen</LastName>
       <FirstName>May</FirstName>
       <Age>23</Age>
       <Major>Chemistry</Major>
       <GPA>3.5</GPA>
       <Year>Senior</Year>
    </record>
</student-data>
As you can see, data elements have become <LastName> and <FirstName>, in line with the columns in our data set. You do not need to have the lines indented, but that aids readability.
Also take note of the <student-data> tags that hold the contents of each <record> tag. It should be renamed according to the name of your Excel spreadsheet. In this example, our Excel workbook is called student-data.xlsx, and so our root element tag is called <student-data>.
Don’t forget to name your XML schema with a .xml at the end. In this example, our schema is simply called schema.xml, if you’d like to follow along.
If you want to know more about XML documents, how they work, and what they’re useful for, check out this introduction to XML course. You can also get started with this beginners XML tutorial class.
Step 3: Enable the Developer tab
If the Developer tab is not available, you need to enable it. Click on File – Options, and then the “Customize Ribbon” page. In the column on the right is a list of tabs called Main Tabs with check marks.

Make sure that the check box next to the Developer tab is checked, then click OK. The Developer tab should now be visible in the main Excel window.
If you’re having trouble navigating Excel and its various options, it would be beneficial to take a basic Microsoft Office course for beginners and learn your way around the application.
If you want more advanced skills, then why not take advanced Excel training courses if you need experience with the more complicated elements of Excel.
Step 4: Open the XML Source pane
Now that you’ve brought up the Developer tab and clicked on it, you should see a number of sections called Code, Add-Ins, Controls, and XML.

In the XML section, click on the large button that reads Source. This will bring up the XML Source task pane to the right of the screen, where you’ll have the option to manage XML maps. That’s what we want to do next.
Step 5: Add an XML Map
In the XML Source task pane, click the XML Maps option at the very bottom right. A dialog box will appear. Click Add to add a new XML schema, find your schema.xml file in the browser, and click OK.

Now that your XML file is added, click OK again.
The computer may give you a warning – that’s fine.

Click OK and return to the XML Source task pane.
Step 6: Drag and drop the XML elements into your spreadsheet
Each of your columns should appear as a new element in the record tree created by the XML Source task pane. Drag each element individually into its appropriate column, starting at Row 1.

Converted columns become part of a table and should turn blue. Do this until all of your columns have been mapped to the XML elements.
Step 7: Export your XML data
Once you’ve finished converting each column into an XML element, you can either click on Developer – Export, or go to File – Save As, and change the File Type to “XML Data (*.xml).”

Save your XML file, and Excel will export it to XML. It may warn you that it will result in the loss of non-XML features, such as formatting, pictures, and objects. Again, that’s fine.

You can then open it in Notepad to see your results. Go to File – Open, and change the file type from “Text Files (*.txt)” to “All Files”:
<?xml version="1.0" encoding="UTF-8" standalone="yes"?>
<student-data xmlns:xsi="http://www.w3.org/2001/XMLSchema-instance">
	<record>
		<LastName>Takahashi</LastName>
		<FirstName>Jesse</FirstName>
		<Age>19</Age>
		<Major>Literature</Major>
		<GPA>3.8</GPA>
		<Year>Freshman</Year>
	</record>
	<record>
		<LastName>Nguyen</LastName>
		<FirstName>May</FirstName>
		<Age>23</Age>
		<Major>Chemistry</Major>
		<GPA>3.5</GPA>
		<Year>Senior</Year>
	</record>
	<record>
		<LastName>Johnson</LastName>
		<FirstName>Ori</FirstName>
		<Age>20</Age>
		<Major>Business</Major>
		<GPA>3.2</GPA>
		<Year>Junior</Year>
	</record>
	<record>
		<LastName>Kang</LastName>
		<FirstName>Han</FirstName>
		<Age>18</Age>
		<Major>Biology</Major>
		<GPA>3.9</GPA>
		<Year>Freshman</Year>
	</record>
	<record>
		<LastName>Jones</LastName>
		<FirstName>Raymond</FirstName>
		<Age>19</Age>
		<Major>Engineering</Major>
		<GPA>3.3</GPA>
		<Year>Sophomore</Year>
	</record>
	<record>
		<LastName>Akhtar</LastName>
		<FirstName>Ali</FirstName>
		<Age>19</Age>
		<Major>Literature</Major>
		<GPA>4.0</GPA>
		<Year>Freshman</Year>
	</record>
</student-data>
Excel was able to format all of this information automatically, so you didn’t have to.
This trick can come in handy with large data sets of over thousands of cells, so you can create multiple XML data files quickly. However, you can still save time and export XML more reliably with any amount of data.
This was a very simple example, though, and in the future, you might find yourself facing some tougher scenarios. If this happens, it will help if you have advanced Excel skills. If you want to learn how to handle these scenarios, take a look at this course about Pivot Tables, Power Query, Power Pivot, and DAX.
I hope that you have enjoyed this article. You’ve now successfully converted Excel to XML. Hopefully when you need to do it in your work, you will find it easy to do.
If you’re interested in learning more advanced Excel skills, let’s move on to learning how to use SQL in Excel.
Frequently Asked Questions
What is Excel XML format?
Excel can export data into XML (or Extensible Markup Language). It is based on an XML schema, which defines the structure of the file. You can create it in NotePad. To convert the data, go to the Developer tab – Source. You can then load your XML schema and match it to the data. You can then go to Developer – Export, or File – Save as – XML file.
How do I open an XML file in Excel?
To open an XML file in Excel, you should go to File – Open. On the PC, you should change the File Type from “All Excel Files (*.xl*)” to “XML file (*.xml).” You should then navigate to where the file is stored, click on it, and click OK. Your file will then be opened in Excel.
How do I view an XML file?
You can view an XML file in either Notepad or Excel. To view it in NotePad, go to File – Open, and change the File Type from “Text Documents (*.txt)” to “All Files (*.*)”. To view it in Excel, go to File – Open, and change the File Type to “XML Files (*.xml).”
После редактирования какой-либо таблицы часто возникает необходимость перевести Excel в xml. Не всем пользователям ПК, особенно начинающим, может быть понятно, как это правильно сделать. Сегодня покажу весь процесс наглядно в нескольких инструкциях.
Содержание
- Что такое форматы xls, xlsx и xml
- Microsoft Excel
- Простое сохранение
- Экспорт через панель разработчика
- Если строк меньше 65 536
- Если строк больше 65 536
- Онлайн-конвертеры
- Tableconvert
- Zamzar
- Onlineconvertfree
Что такое форматы xls, xlsx и xml
Документы Excel могут быть нескольких форматов: xls, xlsx, xlsm, xlstx, xlstm, xlsb и т. д. Самые популярные – xls и xlsx.
XML – это язык разметки, как html. Он создан для хранения и транспортировки каких-либо данных. Используется в том числе для создания таблиц Excel и веб-страниц. По своей сути xml-формат — это структурированная база данных. Файл с таким расширением можно открыть в любом текстовом редакторе. В нем вы увидите код, который и содержит те или иные данные.
Если в вашей таблице Excel встроена карта (схема) XML, вы без труда сможете экспортировать данные из нее в файл xml: с помощью стандартной функции приложения Эксель или за счет сторонних онлайн-конвертеров.
Microsoft Excel
Преобразовать xlsx в xml можно с помощью простого сохранения файла в новом формате, а также через кнопку «Экспорт» в специальном меню разработчика.
Но есть ограничение по количеству строк: при экспорте можно сохранить до 65 536 строк. Если в таблице больше данных, программа сможет обработать число строк, которое определяется формулой: ЧСТРОК ОСТАТ 65537. К примеру, если лист содержит 70 000 строк, Эксель сохранит 4464 (70000 ОСТАТ 65537). Если это ваш случай, данные таблицы придется экспортировать в два файла xml.
Простое сохранение
Самый легкий способ – воспользоваться меню «Сохранить как» и выбрать xml в качестве нового формата. Он подходит для небольших и более простых таблиц, так как есть риск, что потом все другие программы будут некорректно работать с созданным файлом. Тем не менее, метод стоит рассмотреть как один из возможных.
Как сохранить таблицу xls/xlsx в формате xml:
- Сначала откройте файл в программе Excel. Если она установлена в качестве приложения по умолчанию, просто найдите документ в «Проводнике Windows» и кликните по нему дважды.

- Также можете щелкнуть по документу правой кнопкой мыши, а затем выбрать «Открыть с помощью» и «Excel».

- Либо запустите пустую таблицу с помощью ярлыка Excel на рабочем столе или в меню «Пуск».

- Выберите документ в списке недавних либо нажмите «Открыть другие книги».

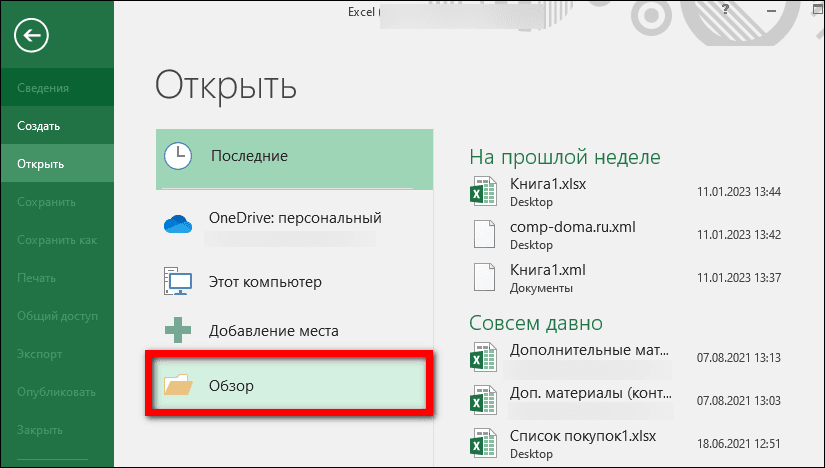
- Если у вас уже открыта какая-то таблица в Экселе, нажмите на вкладку «Файл». Зайдите в раздел «Открыть» и нажмите «Обзор». Выберите, собственно, сам документ в «Проводнике».

- Внесите какие-либо изменения в таблицу при необходимости. Снова нажмите «Файл».

- Откройте вкладку «Сохранить как». Выберите каталог в списке недавних либо щелкните «Обзор».

- В «Типе файла» укажите значение «XML-данные».

- Выберите папку, введите новое название при желании и нажмите «Сохранить».


Экспорт через панель разработчика
Этот способ увеличивает шансы, что созданный файл будет правильно восприниматься другими программами. Панель разработчика по умолчанию отключена в Экселе, поэтому сначала нужно ее включить в настройках, а затем запустить конвертацию.
В меню разработчика есть также функция «Импорт». Она помогает сделать обратную конвертацию – из xml в xls или xlsx. В нашем блоге есть отдельная статья, посвященная этой теме.
Если строк меньше 65 536
Как экспортировать данные таблицы в xml, если количество строк не выходит за рамки нормы:
- Сначала включите панель разработчика в настройках Экселя. Для этого кликните «Файл». Нажмите «Параметры».

- Зайдите в «Настроить ленту». Поставьте галочку «Разработчик» в списке справа. Нажмите «ОК» для сохранения настроек.

- Раскройте вкладку «Разработчик» в верхнем меню. Нажмите «Экспорт».

- Если в таблице несколько схем xml, дополнительно появится диалоговое окно. Выберите карту XML, которую вы хотите использовать, и кликните «ОК».
- В «Проводнике Windows» укажите новое имя документа при необходимости. Выберите папку для сохранения и подтвердите экспорт.


Если строк больше 65 536
Если таблица содержит больше 65 536 строк, придется создать два файла xml.
Вот как это сделать:
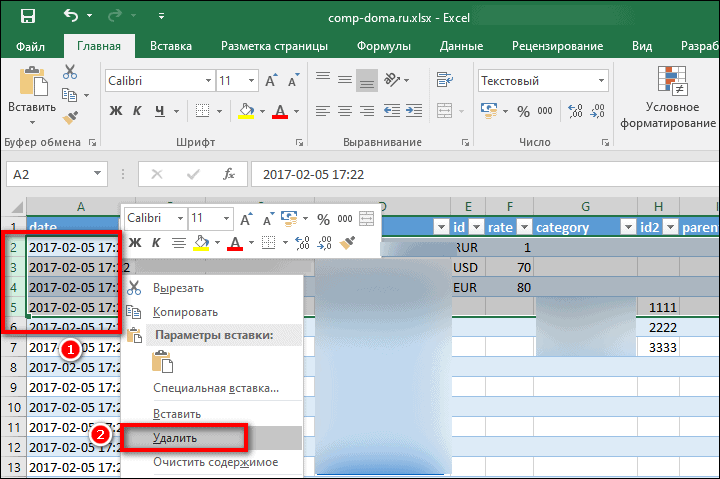
- Обозначьте для себя количество строк, которое идет после 65 537. Удалите это количество с начала листа Excel: выделите их, нажмите правой кнопкой мыши и выберите «Удалить».

- Далее экспортируйте данные таблицы в xml через меню разработчика, используя инструкцию выше.

- Нажмите «Закрыть» в правом верхнем углу (кнопка с крестиком).

- В новом окошке программа спросит, нужно ли сохранить изменения в файле (так как вы удалили определенное количество строк). Нажмите «Не сохранять». Таким образом, таблица останется в неизменном виде.

- После закрытия файла снова его откройте. Удалите все данные, которые идут после количества «лишних» строк (его вы определили на первом шаге). Снова экспортируйте таблицу в файл xml, используя руководство выше. Закройте документ, не сохранив изменения.


Таким образом, у вас на руках будет два файла xml. При необходимости их можно будет объединить для создания исходной таблицы.
Онлайн-конвертеры
Если программы Excel нет на вашем ПК или вам не удалось перевести xlsx в xml в этом приложении, воспользуйтесь онлайн-конвертером. Есть много сайтов, которые бесплатно преобразовывают таблицы в подобные документы. Расскажу лишь о нескольких из них.
Не переживайте о конфиденциальности: файлы будут доступны для скачивания только вам. А спустя сутки и вовсе будут удалены с серверов сайта.
Tableconvert
Tableconvert позволяет редактировать таблицу перед конвертацией. Самостоятельно создает для нее код, используя выбранный язык разметки и программирования: xml, html, sql и т. д. С помощью этого сервиса файлы также можно преобразовывать в jpg и pdf.
Сайт бесплатный. Можно по желанию оставить донат разработчикам.
Как пользоваться:
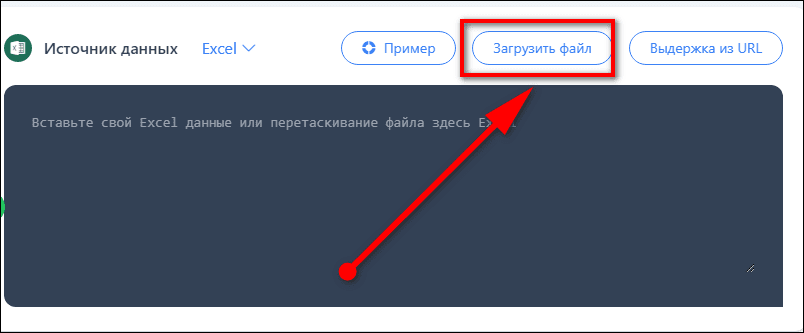
- Перейдите на сайт и загрузите таблицу с ПК с помощью специальной кнопки.

- Либо нажмите «Выдержка URL», вставьте ссылку на файл, опубликованный в интернете, и щелкните «Экстракт Excel».

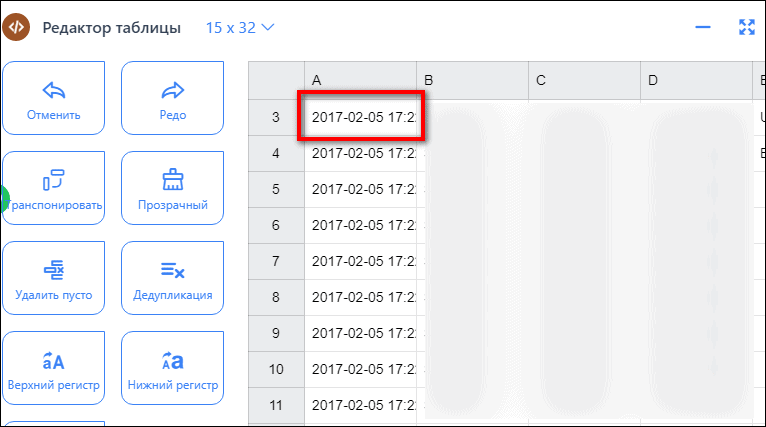
- При необходимости измените содержимое каких-либо ячеек в блоке «Редактор таблицы», который будет чуть ниже.

- Прокрутите страницу еще немного вниз. В разделе «Генератор таблицы» будет код xml. При желании поставьте галочку «Minify XML», чтобы сжать документ. Затем кликните «Скачать» либо «Скопировать в буфер обмена», чтобы затем вставить сгенерированный код в какой-либо текстовый редактор.


Zamzar
Zamzar предлагает несколько способов загрузки исходных файлов: с ПК, по ссылке в интернете, из облачных хранилищ (Box, Dropbox, Google Drive и OneDrive). И вообще в этом сервисе можно преобразовать множество форматов: аудио, видео, текстовые документы, электронные книги, изображения, архивы и т. д.
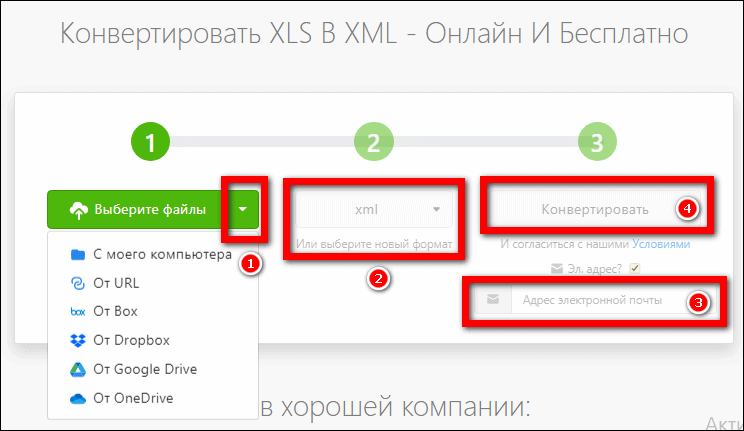
Одновременно можно сконвертировать несколько файлов. Схема та же: загружаете документы с таблицами, выбираете формат xml (если он не выбран по умолчанию) и нажимаете «Конвертировать».
Предварительно можно указать адрес электронной почты. На него придет ссылка для скачивания обработанного документа. Это на случай, если боитесь потерять страницу из виду.
Максимальный размер файла в бесплатной версии 50 Мб. Подписка стоит от 18$ до 70$ в зависимости от тарифа.
Onlineconvertfree
Onlineconvertfree похож во многом на Zamzar. Здесь тоже можно конвертировать разные файлы: фото, аудио, видео и т. д. По несколько штук за раз.

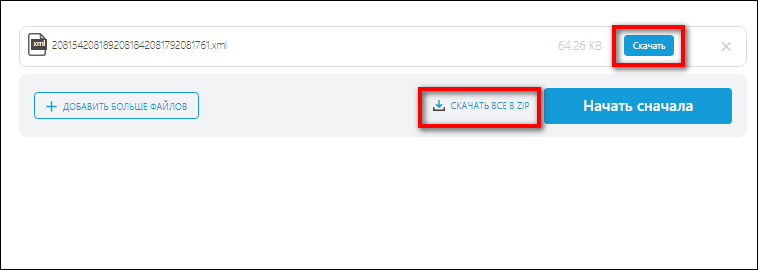
Скачать обработанные документы разрешается по отдельности или общим архивом.
Даже без регистрации на сайте вы получаете доступ к разделу «Мои файлы». В нем будут храниться документы, которые вы ранее обработали в сервисе – в течение суток.

В бесплатной версии есть реклама. Также есть лимит на количество одновременных конвертаций и размер файлов (до 100 Мб, но это больше, чем у Zamzar). Подписка стоит от 9$ до 20$ в зависимости от тарифа.
***
Если у вас установлен Microsoft Excel, сконвертировать таблицу в xml можно прямо в этой программе: с помощью обычного сохранения или функции «Экспорт» в меню разработчика. Если строк больше 65 536, придется создать два файла.
В иных случаях используйте онлайн-конвертеры. В Tableconvert можно предварительно отредактировать таблицу прямо на сайте, а затем скачать сгенерированный код xml. В Zamzar и Onlineconvertfree можно обработать сразу несколько файлов без регистрации в сервисе. Максимальный размер исходного документа должен быть не выше 50 Мб и 100 Мб соответственно.
Improve Article
Save Article
Like Article
Improve Article
Save Article
Like Article
Python proves to be a powerful language when the requirement is to convert a file from one format to the other. It supports tools that can be employed to easily achieve the functionality. In this article, we’ll find out how we will convert from an Excel file to Extensible terminology (XML) files with Python.
Modules needed
- OpenPyXL helps in interacting with Excel files. It can read and write to .xlsx and .xlsm files and can be installed as:
pip install openpyxl
- Yattag is a Python library for generating HTML or XML documents with Python in a very readable way. This Yattag Library is pretty simple and easy to use library. If you are searching for any library in order to more easily generate HTML or XML documents.
pip install yattag
Function needed
- To load the contents of the Excel file load_workbook() method of OpenPyXl is used.
- To iterate through loaded file and read data Iter_rows() with appropriate attributes is used
Syntax: Iter_rows(min_col, min_row, max_col, max_row, values_only)
Parameters:
- min_col (int) – smallest column value (1-based index)
- min_row (int) – smallest row value (1-based index)
- max_col (int) – largest column value (1-based index)
- Max_row (int) – largest row value (1-based index)
- values_only (bool) – whether only cell values should be returned
- The tagtext() method is a helper method that returns a triplet composed of:
- The Doc instance itself
- The tag method of the Doc instance
- The text method of the Doc instance
- The asis method appends a string to the document without any form of escaping.
- The tag method will accept any string as a tag name.
- The indent function takes a string representing an XML or HTML document and returns a well-indented version of this document.
Database in use: Click here
To convert Excel data to XML first, it needs to be read, the given program explains the mechanism for reading data.
Approach
- Import module
- Load Excel file
- Create sheet object
- Iterate through rows
Example
Python3
from openpyxl import load_workbook
wb = load_workbook("demo_database.xlsx")
ws = wb.worksheets[0]
for row in ws.iter_rows(min_row=1, max_row=2, min_col=1, max_col=6):
print([cell.value for cell in row])
Now, Once we are done with Reading data. Let’s Code how to convert Excel to XML format,
Approach:
- Import module
- Read data
- Create XML format page
- Append to file
- Save file
Example:
Python3
from openpyxl import load_workbook
from yattag import Doc, indent
wb = load_workbook("demo_database.xlsx")
ws = wb.worksheets[0]
doc, tag, text = Doc().tagtext()
xml_header = '<?xml version="1.0" encoding="UTF-8"?>'
doc.asis(xml_header)
doc.asis(xml_schema)
with tag('People'):
for row in ws.iter_rows(min_row=2, max_row=10, min_col=1, max_col=6):
row = [cell.value for cell in row]
with tag("Person"):
with tag("First_Name"):
text(row[0])
with tag("Last_Name"):
text(row[1])
with tag("Gender"):
text(row[2])
with tag("Country"):
text(row[3])
with tag("Age"):
text(row[4])
with tag("Date"):
text(row[5])
result = indent(
doc.getvalue(),
indentation=' ',
indent_text=True
)
with open("output.xml", "w") as f:
f.write(result)
Output: output.xml
Like Article
Save Article
Recipe Objective
In big data scenarios, converting data from Excel format to XML format using Python can be used to to exchange data between different applications. We process complex XML files into a relational format or a Big Data format such as Parquet/ORC . XML is user-readable and more commonly used in network communication, especially with the rise of REST-based web services. The tools needed to manage big data analytics, often in the form of NoSQL databases, only map over to XML in a partial sense. XML is considered to be at odds with relational schemas, which puts it in a camp with most of NoSQL technology
System requirements :
- Install Yattag python module as follows:
pip install yattag - Install OpenPyXL python module as follows:
pip install openpyxl - The below codes can be run in Jupyter notebook , or any python console
- In this example we are going to use the excel employee dataset
Table of Contents
- Recipe Objective
- System requirements :
- Step 1: Import the modules
- Step 2: Load the Workbook
- Step 3: Fill the headers with Yattags
- Step 4: Then create main Tag
- Step 5: Now start loop through the sheet
- Step 6: Adding the Yattag indent
Step 1: Import the modules
import openpyxl

import yattag

import load_workbook

import Doc, indent
Step 2: Load the Workbook
create a Yattag document using yattag module and load the workbook and the worksheet.
#load the excel file along with path where exists

wb = load_workbook("empdata.xlsx")

ws = wb.worksheets[0]
# Create Yattag doc, tag and text objects
doc, tag, text = Doc().tagtext()
Step 3: Fill the headers with Yattags
Fill the headers with Yattags asis() method which enables us to input any string as the next line
xml_header = ''
xml_schema = ''
doc.asis(xml_header)
doc.asis(xml_schema)
Step 4: Then create main Tag
create main tag Employees as below:
with tag('Employees'):
Step 5: Now start loop through the sheet
Now start loopthrough the sheet with the iter_rows method. The iter_rows method returns a generator with all the cells. We use a list comprehension to get all the values from the cells.
for row in ws.iter_rows(min_row=2, max_row=100, min_col=1, max_col=12):

        row = [cell.value for cell in row]

        with tag("Employee"):

            with tag("FirstName"):

                text(row[0])

            with tag("LastName"):

                text(row[1])

            with tag("Email"):

                text(row[10])

            with tag("Phone"):

                text(row[8])

            with tag("Company"):

                text(row[2])
Step 6: Adding the Yattag indent
Next, we are adding the Employees. When finished we indent our result with Yattags indent method.
 result = indent(

    doc.getvalue(),

    indentation = '    ',

    indent_text = True

)

print(result)

with open("employee1.xml", "w") as f:

    f.write(result)
The complete code looks as follows :
import openpyxl, yattag

from openpyxl import load_workbook

from yattag import Doc, indent
wb = load_workbook("empdata.xlsx")
ws = wb.worksheets[0]
# Create Yattag doc, tag and text objects
doc, tag, text = Doc().tagtext()
xml_header = ''
xml_schema = ''
doc.asis(xml_header)
doc.asis(xml_schema)
with tag('Employees'):
# Use ws.max_row for all rows
for row in ws.iter_rows(min_row=2, max_row=100, min_col=1, max_col=12):
row = [cell.value for cell in row]
with tag("Employee"):
with tag("FirstName"):
text(row[0])
with tag("LastName"):
text(row[1])
with tag("Email"):
text(row[10])
with tag("Phone"):
text(row[8])
with tag("Company"):
text(row[2])
result = indent(
doc.getvalue(),
indentation = ' ',
indent_text = True
)
print(result)
with open("employee.xml", "w") as f: #give path where you want to create
f.write(result)
Output of the above Code as follows :
Bookmark this app
Press Ctrl + D to add this page to your favorites or Esc to cancel the action.
Send the download link to
Send us your feedback
Oops! An error has occurred.
Invalid file, please ensure that uploading correct file
Error has been reported successfully.
You have successfully reported the error, You will get the notification email when error is fixed.
Click this link to visit the forums.
Immediately delete the uploaded & processed files.
Are you sure to delete the files?
Enter Url
Немного об Excel и XML
Итак, прежде чем узнать, как открыть, создать или перевести файл XML в Excel и обратно, давайте поближе познакомимся с типами этих файлов. Здесь нужно сразу отметить, что документы Excel имеют множество форматов, в то время, как XML — и есть формат файла. Поэтому не стоит путать эти два понятия.

Microsoft Excel является мощной программой для вычислений с множеством полезных функций
Программа Microsoft Excel является специальной утилитой, предназначенной для создания и редактирования таблиц. С ними вы уже можете делать всё что угодно: создавать базы, диаграммы, формулы и другие типы данных. Это очень мощный инструмент, поэтому все его возможности мы обсуждать не будем. Сегодня наша цель несколько другая, и мы не станем отходить от темы сегодняшней дискуссии.
Файлы XML, для более простого понимания, предназначены для хранения, обмена различных данных между утилитами. Особенно часто пользуются этим языком разметки при передаче информации через интернет. И когда вам нужно перенести табличные данные из Экселя на сайт, например, то вам нужно будет преобразовать свой документ, чтобы он правильно отображался. Поэтому давайте не будем оттягивать момент истины и сразу приступим к выполнению операции.
Как преобразовать Excel в XML
Дорогие друзья, на самом деле преобразование файлов является достаточно простым занятием. Однако, у некоторых пользователей могут возникнуть проблемы при переносе данных, поэтому сегодня мы с вами рассмотрим несколько способов для осуществления нашего замысла. Поэтому набираемся терпения и приступаем к действиям:
- Самый простой способ, который может не сработать в некоторых случаях, это сохранение файла в нужном формате в самой программе Microsoft Excel. Для этого откройте необходимый документ в этом приложении. Затем нажмите на кнопку «Файл» (рассматривается на примере Office 2013, в других версиях процесс сохранения может несколько отличаться) в верхнем левом углу окна Экселя, затем пункт «Сохранить как», после чего выберите место сохранения документа, дайте ему имя и во вкладке типа файла укажите «XML данные». После этого проверьте, правильно ли всё у вас получилось. Если нет, то пробуем следующие способы.
- Итак, если возникает ошибка в предыдущем случае, то, возможно, в вашей копии программы не предусмотрена поддержка и соответствующие надстройки. Чтобы их установить, скачайте и инсталлируйте этот файл к себе на компьютер или ноутбук. Это плагин XML Tools Add-in. Далее, запустите программу Microsoft Excel и нажмите на большую цветную кнопку в левом верхнем углу окна приложения (здесь мы уже смотрим пример на версии 2007-го года). В появившемся блоке кликните по параметрам, слева от выхода из утилиты. Теперь зайдите в пункт надстроек и нажмите на кнопку «Перейти» напротив пункта «Управление». Выскочит диалоговое окно, где нужно кликнуть по обзору и найти документ, который вы скачали с сайта Майкрософта ранее. Теперь кликаем ОК и переходим в основное окно программы, где у вас теперь есть вкладка XML Tools — с помощью него теперь вы спокойно можете создать файл XML из существующей таблицы. Сохранять его нужно аналогично предыдущему пункту.
- Если вам совсем не хочется загружать и себя, и свой компьютер такой информацией, то можете прибегнуть к помощи специальных утилит-конвертеров или онлайн-версий этих программ. К примеру, вы можете загрузить приложение Format Factory, которое позволит вам совершить все необходимые действия. Но стоит помнить, что сохранённые и преобразованные таким образом файлы не всегда работают в дальнейшем. То есть во время операции могут повредиться сектора или области в памяти документа, что негативно скажется на нём — он попросту может не открыться в XML-редакторе, например. Поэтому рекомендуется использовать либо профессиональные программы, либо сам Microsoft Excel.

Как перевести XML в Excel
Прежде чем перевести XML в Excel, нужно его для начала открыть. Рассмотрим весь этот непродолжительный процесс ниже. Итак, приступаем:
- Запустите программу Microsoft Excel с помощью ярлыка на рабочем столе или через меню проводника.
- Нажмите на «Открыть другие книги» внизу главной страницы, если вы используете Office В других версиях процесс может несколько отличаться.
- Далее, нажимаем на «Компьютер» или другое место, где расположен ваш XML-файл, затем кликните «Обзор» и смените в появившемся окне тип данных на «Файлы XML».
- Теперь ищем необходимый файл и открываем его в нашей программе с помощью одноимённой кнопки.
- Далее, обсудим то, как преобразовать наш документ. Перейдите во вкладку разработчика, затем нажмите на кнопку импорта.
- В открывшемся окне нужно будет снова найти и выбрать наш документ, над которым вы и хотите произвести действие, затем кликаем на кнопку «Импорт».
- Затем настраиваете всё под себя: область для импорта, место сохранения и другие параметры. После чего вы получите таблицу, которую позже можно сохранить в нужном для вас формате. Как видите, ничего сложного нет.
Подведём итоги
Дорогие читатели, сегодня мы с вами узнали не только как преобразовать файлы XML в Excel и обратно, но и как создать и открыть их при несовместимости версий. Надеемся, что у вас всё получилось и больше не осталось никаких вопросов. Не забываем делиться в комментариях своим мнением и опытом: возможно, вы знаете простой способ конвертации. Расскажите другим пользователям, получилось ли у вас перевести один тип документа. Если сработало, то поделитесь тем, каким способом воспользовались вы.