
read-excel-file
Read small to medium *.xlsx files in a browser or Node.js. Parse to JSON with a strict schema.
Demo
Also check out write-excel-file for writing simple *.xlsx files.
Install
npm install read-excel-file --save
If you’re not using a bundler then use a standalone version from a CDN.
Use
Browser
<input type="file" id="input" />
import readXlsxFile from 'read-excel-file'

// File.
const input = document.getElementById('input')
input.addEventListener('change', () => {
  readXlsxFile(input.files[0]).then((rows) => {
    // `rows` is an array of rows
    // each row being an array of cells.
  })
})

// Blob.
fetch('https://example.com/spreadsheet.xlsx')
  .then(response => response.blob())
  .then(blob => readXlsxFile(blob))
  .then((rows) => {
    // `rows` is an array of rows
    // each row being an array of cells.
  })

// ArrayBuffer.
// https://developer.mozilla.org/en-US/docs/Web/JavaScript/Reference/Global_Objects/ArrayBuffer
//
// Could be obtained from:
// * File
// * Blob
// * Base64 string
//
readXlsxFile(arrayBuffer).then((rows) => {
  // `rows` is an array of rows
  // each row being an array of cells.
})
Note: Internet Explorer 11 requires a Promise polyfill. Example.
Node.js
const readXlsxFile = require('read-excel-file/node')

// File path.
readXlsxFile('/path/to/file').then((rows) => {
  // `rows` is an array of rows
  // each row being an array of cells.
})

// Readable Stream.
readXlsxFile(fs.createReadStream('/path/to/file')).then((rows) => {
  // `rows` is an array of rows
  // each row being an array of cells.
})

// Buffer.
readXlsxFile(Buffer.from(fs.readFileSync('/path/to/file'))).then((rows) => {
  // `rows` is an array of rows
  // each row being an array of cells.
})
Web Worker
const worker = new Worker('web-worker.js')

worker.onmessage = function(event) {
  // `event.data` is an array of rows
  // each row being an array of cells.
  console.log(event.data)
}

worker.onerror = function(event) {
  console.error(event.message)
}

const input = document.getElementById('input')

input.addEventListener('change', () => {
  worker.postMessage(input.files[0])
})
web-worker.js
import readXlsxFile from 'read-excel-file/web-worker'

onmessage = function(event) {
  readXlsxFile(event.data).then((rows) => {
    // `rows` is an array of rows
    // each row being an array of cells.
    postMessage(rows)
  })
}
JSON
To read spreadsheet data and then convert it to an array of JSON objects, pass a schema option when calling readXlsxFile(). In that case, instead of returning an array of rows of cells, it will return an object of shape { rows, errors } where rows is gonna be an array of JSON objects created from the spreadsheet data according to the schema, and errors is gonna be an array of errors encountered while converting spreadsheet data to JSON objects.
Each property of a JSON object should be described by an «entry» in the schema. The key of the entry should be the column’s title in the spreadsheet. The value of the entry should be an object with properties:
property— The name of the object’s property.required— (optional) Required properties can be marked asrequired: true.validate(value)— (optional) Cell value validation function. Is only called on non-empty cells. If the cell value is invalid, it should throw an error with the error message set to the error code.type— (optional) The type of the value. Defines how the cell value will be parsed. If notypeis specified then the cell value is returned «as is»: as a string, number, date or boolean. Atypecould be a:- Built-in type:
StringNumberBooleanDate
- «Utility» type exported from the library:
IntegerEmailURL
- Custom type:
- A function that receives a cell value and returns a parsed value. If the value is invalid, it should throw an error with the error message set to the error code.
- Built-in type:
Sidenote: When converting cell values to object properties, by default, it skips all null values (skips all empty cells). That’s for simplicity. In some edge cases though, it may be required to keep all null values for all the empty cells. For example, that’s the case when updating data in an SQL database from an XLSX spreadsheet using Sequelize ORM library that requires a property to explicitly be null in order to clear it during an UPDATE operation. To keep all null values, pass includeNullValues: true option when calling readXlsxFile().
errors
If there were any errors while converting spreadsheet data to JSON objects, the errors property returned from the function will be a non-empty array. An element of the errors property contains properties:
error: string— The error code. Examples:"required","invalid".- If a custom
validate()function is defined and it throws anew Error(message)then theerrorproperty will be the same as themessagevalue. - If a custom
type()function is defined and it throws anew Error(message)then theerrorproperty will be the same as themessagevalue.
- If a custom
reason?: string— An optional secondary error code providing more details about the error. Currently, it’s only returned for «built-in»types. Example:{ error: "invalid", reason: "not_a_number" }fortype: Numbermeans that «the cell value is invalid because it’s not a number«.row: number— The row number in the original file.1means the first row, etc.column: string— The column title.value?: any— The cell value.type?: any— The schematypefor this column.
An example of using a schema
// An example *.xlsx document:
// -----------------------------------------------------------------------------------------
// | START DATE | NUMBER OF STUDENTS | IS FREE | COURSE TITLE |    CONTACT     |  STATUS   |
// -----------------------------------------------------------------------------------------
// | 03/24/2018 |         10         |   true  |  Chemistry   | (123) 456-7890 | SCHEDULED |
// -----------------------------------------------------------------------------------------

const schema = {
  'START DATE': {
    // JSON object property name.
    prop: 'date',
    type: Date
  },
  'NUMBER OF STUDENTS': {
    prop: 'numberOfStudents',
    type: Number,
    required: true
  },
  // Nested object example.
  // 'COURSE' here is not a real Excel file column name,
  // it can be any string — it's just for code readability.
  'COURSE': {
    // Nested object path: `row.course`
    prop: 'course',
    // Nested object schema:
    type: {
      'IS FREE': {
        prop: 'isFree',
        type: Boolean
      },
      'COURSE TITLE': {
        prop: 'title',
        type: String
      }
    }
  },
  'CONTACT': {
    prop: 'contact',
    required: true,
    // A custom `type` can be defined.
    // A `type` function only gets called for non-empty cells.
    type: (value) => {
      const number = parsePhoneNumber(value)
      if (!number) {
        throw new Error('invalid')
      }
      return number
    }
  },
  'STATUS': {
    prop: 'status',
    type: String,
    oneOf: [
      'SCHEDULED',
      'STARTED',
      'FINISHED'
    ]
  }
}

readXlsxFile(file, { schema }).then(({ rows, errors }) => {
  // `errors` list items have shape: `{ row, column, error, reason?, value?, type? }`.
  errors.length === 0

  rows === [{
    date: new Date(2018, 2, 24),
    numberOfStudents: 10,
    course: {
      isFree: true,
      title: 'Chemistry'
    },
    contact: '+11234567890',
    status: 'SCHEDULED'
  }]
})
Tips and Features
Custom type example.
{
  'COLUMN_TITLE': {
    // This function will only be called for a non-empty cell.
    type: (value) => {
      try {
        return parseValue(value)
      } catch (error) {
        console.error(error)
        throw new Error('invalid')
      }
    }
  }
}
Ignoring empty rows.
By default, it ignores any empty rows. To disable that behavior, pass ignoreEmptyRows: false option.
readXlsxFile(file, {
  schema,
  ignoreEmptyRows: false
})
How to fix spreadsheet data before schema parsing. For example, how to ignore irrelevant rows.
Sometimes, a spreadsheet doesn’t exactly have the structure required by this library’s schema parsing feature: for example, it may be missing a header row, or contain some purely presentational / irrelevant / «garbage» rows that should be removed. To fix that, one could pass an optional transformData(data) function that would modify the spreadsheet contents as required.
readXlsxFile(file, {
  schema,
  transformData(data) {
    // Add a missing header row.
    return [['ID', 'NAME', ...]].concat(data)
    // Remove irrelevant rows.
    return data.filter(row => row.filter(column => column !== null).length > 0)
  }
})
The function for converting data to JSON objects using a schema is exported from this library too, if anyone wants it.
import convertToJson from "read-excel-file/schema"

// `data` is an array of rows, each row being an array of cells.
// `schema` is a "to JSON" convertion schema (see above).
const { rows, errors } = convertToJson(data, schema)
A React component for displaying errors that occured during schema parsing/validation.
import { parseExcelDate } from 'read-excel-file'

function ParseExcelError({ children }) {
  const { type, value, error, reason, row, column } = children

  // Error summary.
  return (
    <div>
      <code>"{error}"</code>
      {reason && ' '}
      {reason && <code>("{reason}")</code>}
      {' for value '}
      <code>{stringifyValue(value)}</code>
      {' in column '}
      <code>"{column}"</code>
      {' in row '}
      <code>{row}</code>
      {' of spreadsheet'}
    </div>
  )
}

function stringifyValue(value) {
  // Wrap strings in quotes.
  if (typeof value === 'string') {
    return '"' + value + '"'
  }
  return String(value)
}
JSON (mapping)
Same as above, but simpler: without any parsing or validation.
Sometimes, a developer might want to use some other (more advanced) solution for schema parsing and validation (like yup). If a developer passes a map option instead of a schema option to readXlsxFile(), then it would just map each data row to a JSON object without doing any parsing or validation. Cell values will remain «as is»: as a string, number, date or boolean.
// An example *.xlsx document:
// ------------------------------------------------------------
// | START DATE | NUMBER OF STUDENTS | IS FREE | COURSE TITLE |
// ------------------------------------------------------------
// | 03/24/2018 |         10         |   true  |  Chemistry   |
// ------------------------------------------------------------

const map = {
  'START DATE': 'date',
  'NUMBER OF STUDENTS': 'numberOfStudents',
  'COURSE': {
    'course': {
      'IS FREE': 'isFree',
      'COURSE TITLE': 'title'
    }
  }
}

readXlsxFile(file, { map }).then(({ rows }) => {
  rows === [{
    date: new Date(2018, 2, 24),
    numberOfStudents: 10,
    course: {
      isFree: true,
      title: 'Chemistry'
    }
  }]
})
Multiple Sheets
By default, it reads the first sheet in the document. If you have multiple sheets in your spreadsheet then pass either a sheet number (starting from 1) or a sheet name in the options argument.
readXlsxFile(file, { sheet: 2 }).then((data) => {
  ...
})
readXlsxFile(file, { sheet: 'Sheet1' }).then((data) => {
  ...
})
By default, options.sheet is 1.
To get the names of all sheets, use readSheetNames() function:
readSheetNames(file).then((sheetNames) => {
  // sheetNames === ['Sheet1', 'Sheet2']
})
Dates
XLSX format originally had no dedicated «date» type, so dates are in almost all cases stored simply as numbers (the count of days since 01/01/1900) along with a «format» description (like "d mmm yyyy") that instructs the spreadsheet viewer software to format the date in the cell using that certain format.
When using readXlsx() with a schema parameter, all schema columns having type Date are automatically parsed as dates. When using readXlsx() without a schema parameter, this library attempts to guess whether a cell contains a date or just a number by examining the cell’s «format» — if the «format» is one of the built-in date formats then such cells’ values are automatically parsed as dates. In other cases, when date cells use a non-built-in format (like "mm/dd/yyyy"), one can pass an explicit dateFormat parameter to instruct the library to parse numeric cells having such «format» as dates:
readXlsxFile(file, { dateFormat: 'mm/dd/yyyy' })
Trim
By default, it automatically trims all string values. To disable this feature, pass trim: false option.
readXlsxFile(file, { trim: false })
Transform
Sometimes, a spreadsheet doesn’t exactly have the structure required by this library’s schema parsing feature: for example, it may be missing a header row, or contain some purely presentational / empty / «garbage» rows that should be removed. To fix that, one could pass an optional transformData(data) function that would modify the spreadsheet contents as required.
readXlsxFile(file, {
  schema,
  transformData(data) {
    // Add a missing header row.
    return [['ID', 'NAME', ...]].concat(data)
    // Remove empty rows.
    return data.filter(row => row.filter(column => column !== null).length > 0)
  }
})
Limitations
Performance
There have been some reports about performance issues when reading very large *.xlsx spreadsheets using this library. It’s true that this library’s main point have been usability and convenience, and not performance when handling huge datasets. For example, the time of parsing a file with 2000 rows / 20 columns is about 3 seconds. So, for reading huge datasets, perhaps use something like xlsx package instead. There’re no comparative benchmarks between the two, so if you’ll be making one, share it in the Issues.
Formulas
Dynamically calculated cells using formulas (SUM, etc) are not supported.
TypeScript
I’m not a TypeScript expert, so the community has to write the typings (and test those). See example index.d.ts.
CDN
One can use any npm CDN service, e.g. unpkg.com or jsdelivr.net
<script src="https://unpkg.com/read-excel-file@5.x/bundle/read-excel-file.min.js"></script>

<script>
  var input = document.getElementById('input')
  input.addEventListener('change', function() {
    readXlsxFile(input.files[0]).then(function(rows) {
      // `rows` is an array of rows
      // each row being an array of cells.
    })
  })
</script>
TypeScript
This library comes with TypeScript «typings». If you happen to find any bugs in those, create an issue.
References
Uses xmldom for parsing XML.
GitHub
On March 9th, 2020, GitHub, Inc. silently banned my account (erasing all my repos, issues and comments, even in my employer’s private repos) without any notice or explanation. Because of that, all source codes had to be promptly moved to GitLab. The GitHub repo is now only used as a backup (you can star the repo there too), and the primary repo is now the GitLab one. Issues can be reported in any repo.
License
MIT
How to work with Javascript read excel file
In this page we will see using how we can read excel file using Javascript.
Javascript based test automation tools are becoming more and more popular. This has created a need of expert automation engineers with exposure towards Javascript.
Reading and writing excel files is one of the most important part of test automation as we tend to store our input/output data in the excel files.
Read further to know how Javascript read excel file operations can be performed. On this page we have a list of functions for read capability of Excel files using Javascript such as Get Data from Excel, Get Row count from an Excel sheet, Get Header data of an Excel sheet etc. using JavaScript.
How to get Data from Excel — Javascript example code
How to get row count of Excel — Javascript example code
How to get Excel header data — Javascript example code
How to get Excel Column data — Javascript example code
Node.js is an open-source and cross-platform JavaScript runtime environment that can also be used to read from a file and write to a file which can be in txt, ods, xlsx, docx, etc format.
The following example covers how an excel file(.xlsx) file is read from an excel file and then converted into JSON and also to write to it. It can be achieved using a package called xlsx to achieve our goal.
Module Installation: You can install xlsx module using the following command:
npm install xlsx
Note: For the following example, text.xlsx is a dummy data file that has been used.
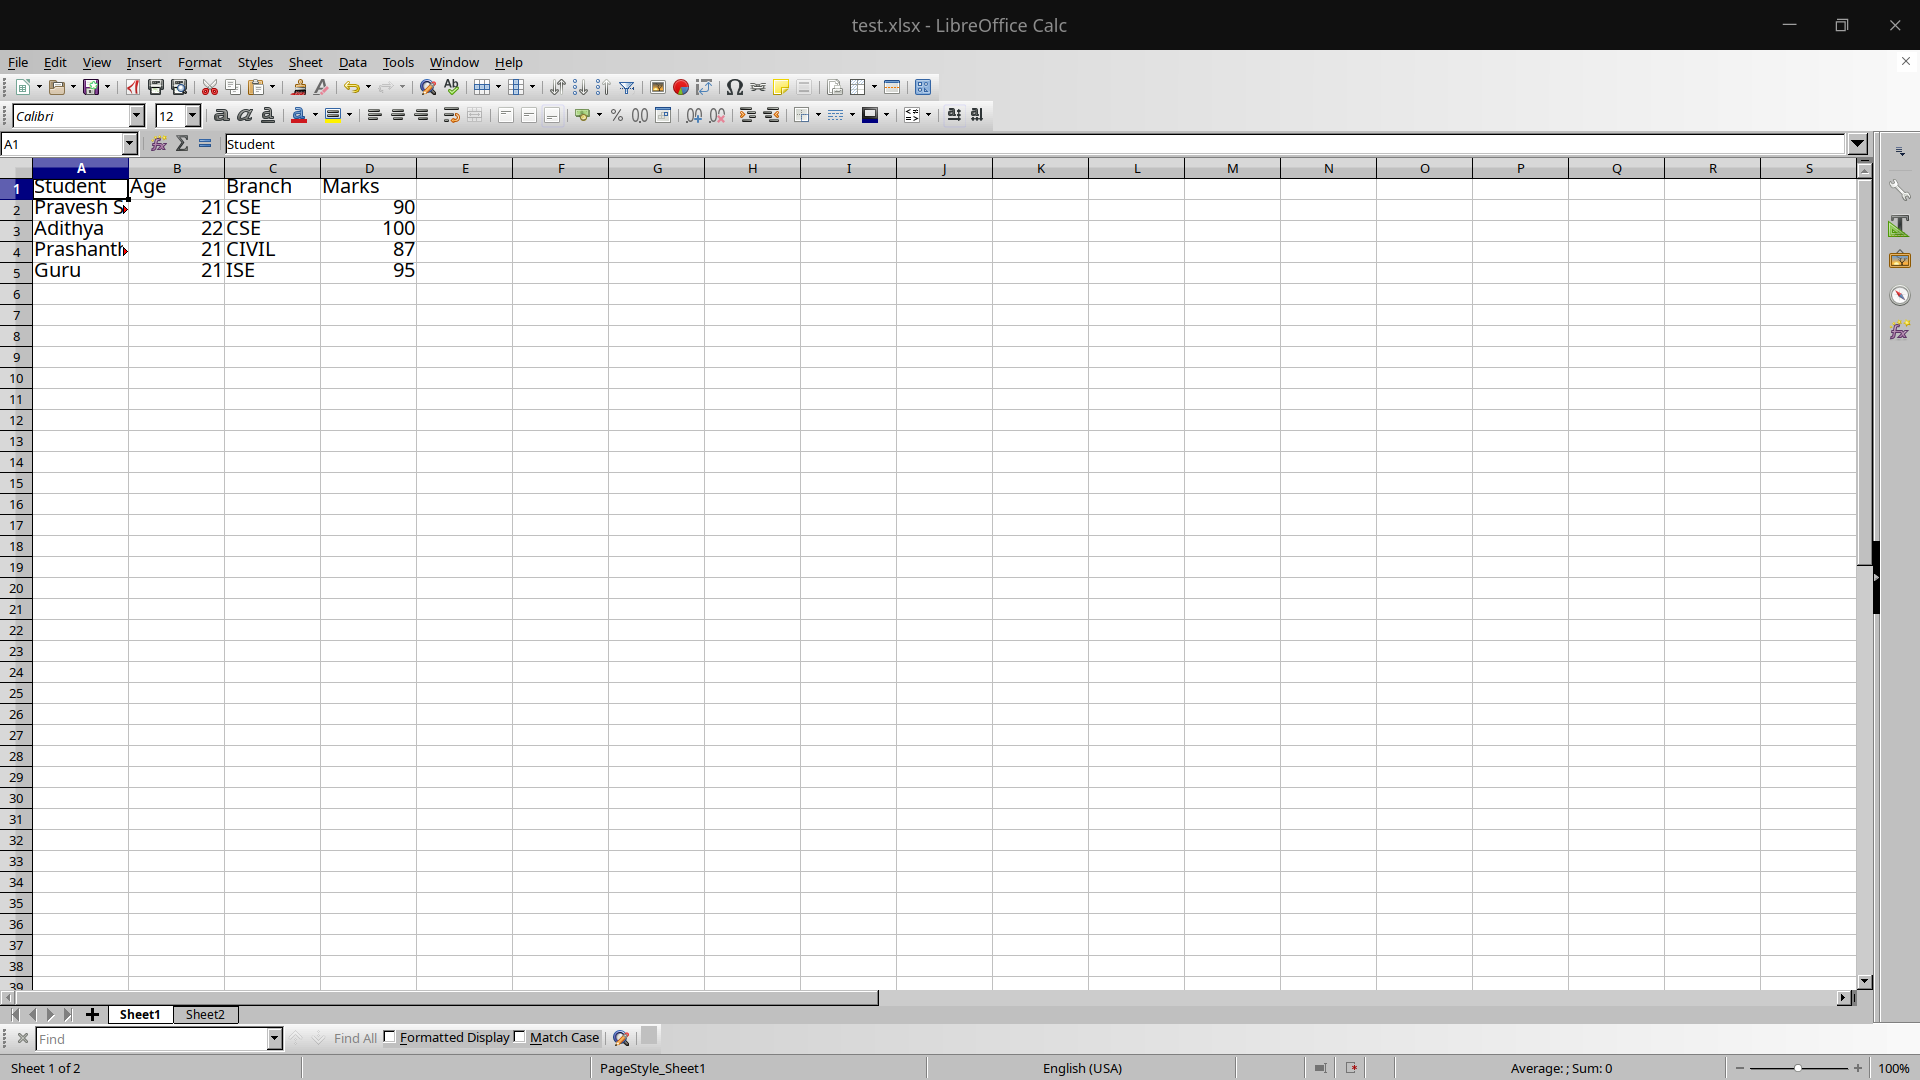
Filename: test.xlsx
Sheet 1:
Sheet 2:
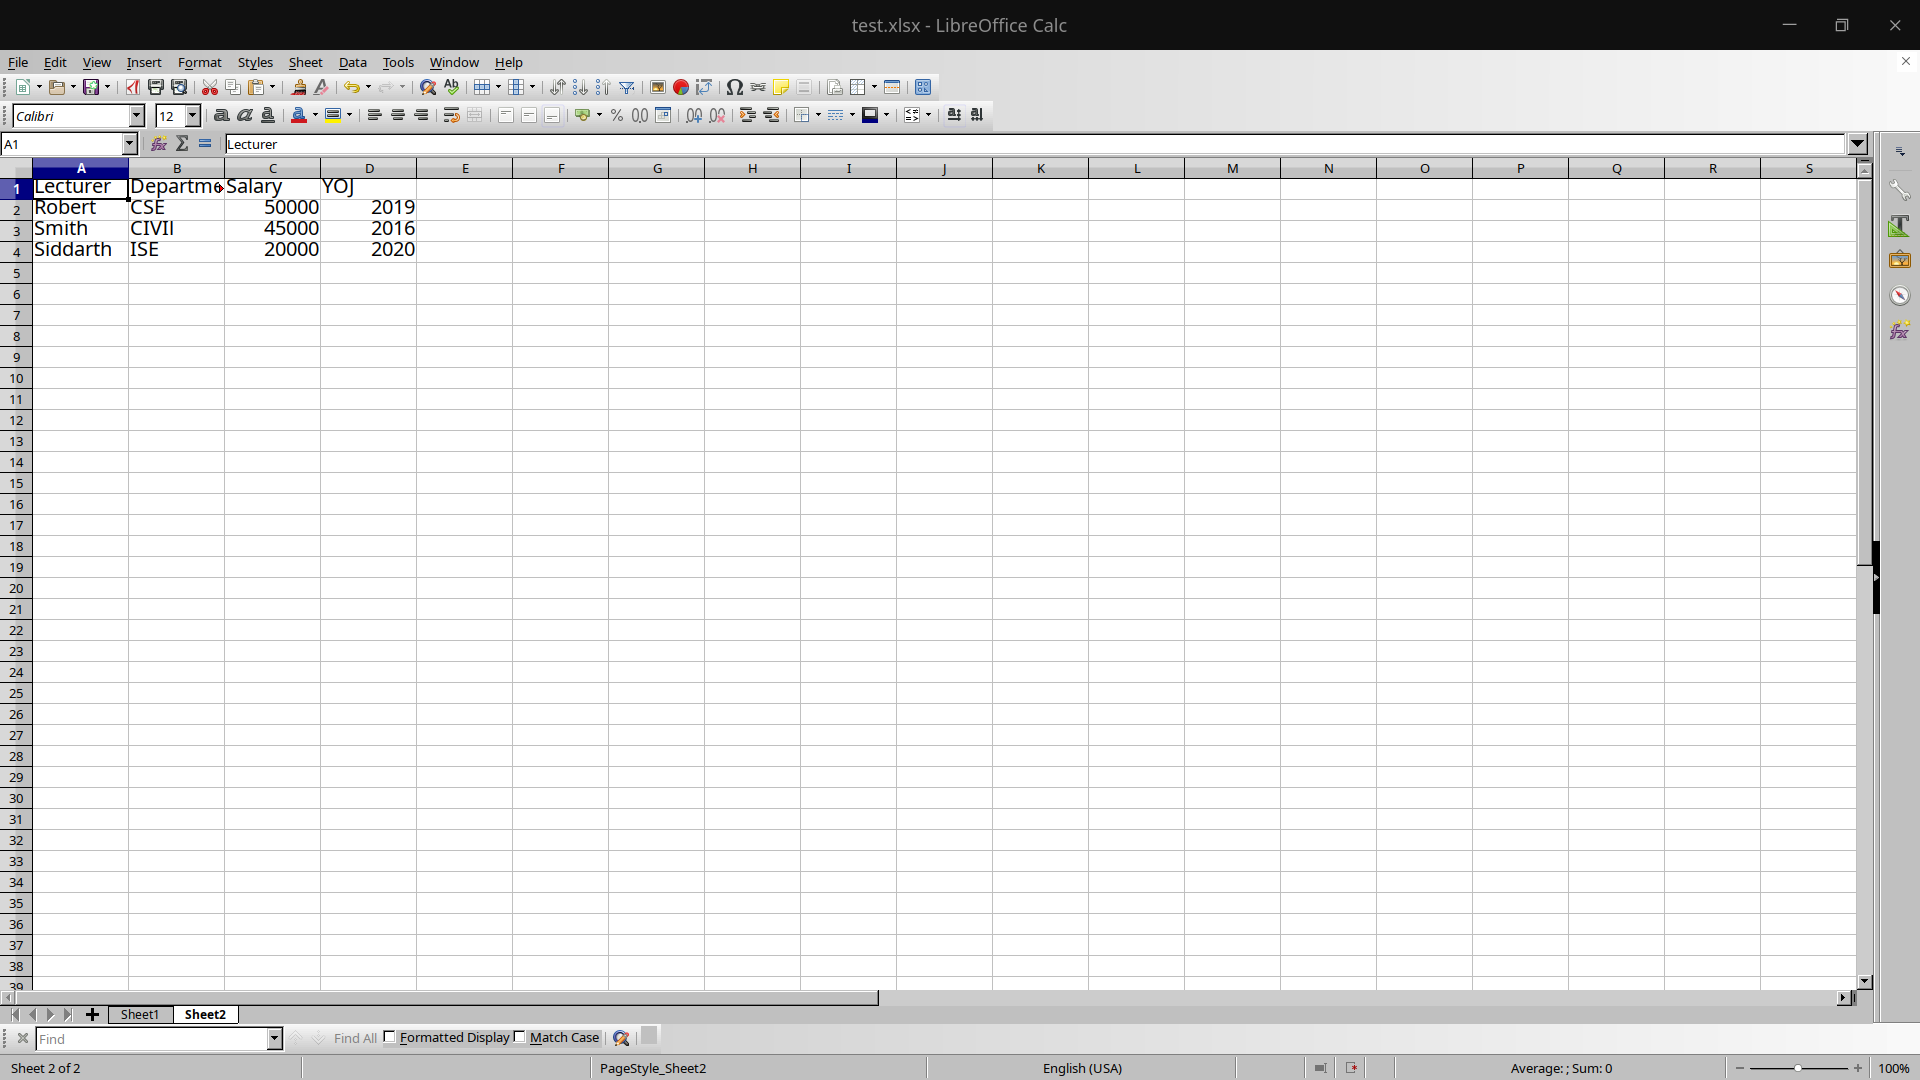
So the excel file test.xlsx has 2 sheets, one having Student details and another having lecturer details.
Read Operation Filename: read.js
Javascript
const reader = require('xlsx')
const file = reader.readFile('./test.xlsx')
let data = []
const sheets = file.SheetNames
for(let i = 0; i < sheets.length; i++)
{
const temp = reader.utils.sheet_to_json(
file.Sheets[file.SheetNames[i]])
temp.forEach((res) => {
data.push(res)
})
}
console.log(data)
Explanation: First, the npm module is included in the read.js file and then the excel file is read into a workbook i.e constant file in the above program.
The number of files in that particular excel file is available in the SheetNames property of the workbook. It can be accessed as follows:
const sheets = file.SheetNames // Here the value of the sheets will be 2
A for loop is run until the end of the excel file starting from the first page. One of the most important functions used in the code above is the sheet_to_json() function present in the utils module of the xlsx package. It accepts a worksheet object as a parameter and returns an array of JSON objects.
There is a forEach loop which iterates through every JSON object present in the array temp and pushes it into a variable data which would contain all the data in JSON format.
Finally, the data is printed or any other modification can be performed on the array of JSON objects.
Step to run the application:
Run the read.js file using the following command:
node read.js
Output:

Write Operation In the following example, we will convert an array of JSON objects into an excel sheet and append it to the file.
Filename: write.js
Javascript
const reader = require('xlsx')
const file = reader.readFile('./test.xlsx')
let student_data = [{
Student:'Nikhil',
Age:22,
Branch:'ISE',
Marks: 70
},
{
Student:'Amitha',
Age:21,
Branch:'EC',
Marks:80
}]
const ws = reader.utils.json_to_sheet(student_data)
reader.utils.book_append_sheet(file,ws,"Sheet3")
reader.writeFile(file,'./test.xlsx')
Explanation: Here we have an array of JSON objects called student_data. We use two main functions in this program i.e json_to_sheet() which accepts an array of objects and converts them into a worksheet and another function is the book_append_sheet() to append the worksheet into the workbook.
Finally, all the changes are written to the test.xlsx file using writeFile() function which takes a workbook and a excel file as input parameter.
Step to run the application:
Run the read.js file using the following command:
node write.js
Output: The final test.xlsx file would look something like this:
Sheet 1:

Sheet 2:

Sheet 3: We can see sheet 3 is appended into the test.xlsx as shown below:

Recently there was a requirement in one of my projects to parse Excel files (with xls/xlsx extensions) in the browser (using javascript ofcourse). So I looked around a bit on the internet and found these two useful libraries:
– js-xls
– js-xlsx
Lets see how to work with each of them.
What’s the one thing every developer wants? More screens! Enhance your coding experience with an external monitor to increase screen real estate.
JS-XLS
Installing it is very easy. For usage in the browser grab this script file and load it using the script tags:
<!-- https://github.com/SheetJS/js-xls/blob/master/xls.js -->
<script src="/path/to/xls.js"></script>
For Node.js, just install via NPM:
$ npm install xlsjs
$ node
> require('xlsjs').readFile('excel_file.xls');
Then we can simply use the code that they provide in their index.html file for parsing and converting XLS files to JSON, CSV or a Formulae based output.
function get_radio_value( radioName ) {
  var radios = document.getElementsByName( radioName );
  for( var i = 0; i < radios.length; i++ ) {
    if( radios[i].checked ) {
      return radios[i].value;
    }
  }
}

function to_json(workbook) {
  var result = {};
  workbook.SheetNames.forEach(function(sheetName) {
    var roa = XLS.utils.sheet_to_row_object_array(workbook.Sheets[sheetName]);
    if(roa.length > 0){
      result[sheetName] = roa;
    }
  });
  return result;
}

function to_csv(workbook) {
  var result = [];
  workbook.SheetNames.forEach(function(sheetName) {
    var csv = XLS.utils.make_csv(workbook.Sheets[sheetName]);
    if(csv.length > 0){
      result.push("SHEET: " + sheetName);
      result.push("");
      result.push(csv);
    }
  });
  return result.join("n");
}

function to_formulae(workbook) {
  var result = [];
  workbook.SheetNames.forEach(function(sheetName) {
    var formulae = XLS.utils.get_formulae(workbook.Sheets[sheetName]);
    if(formulae.length > 0){
      result.push("SHEET: " + sheetName);
      result.push("");
      result.push(formulae.join("n"));
    }
  });
  return result.join("n");
}

var tarea = document.getElementById('b64data');
function b64it() {
  var cfb = XLS.CFB.read(tarea.value, {type: 'base64'});
  var wb = XLS.parse_xlscfb(cfb);
  process_wb(wb);
}

function process_wb(wb) {
  var output = "";
  switch(get_radio_value("format")) {
    case "json":
      output = JSON.stringify(to_json(wb), 2, 2);
      break;
    case "form":
      output = to_formulae(wb);
      break;
    default:
      output = to_csv(wb);
  }
  if(out.innerText === undefined) out.textContent = output;
  else out.innerText = output;
}

var drop = document.getElementById('drop');
function handleDrop(e) {
  e.stopPropagation();
  e.preventDefault();
  var files = e.dataTransfer.files;
  var i,f;
  for (i = 0, f = files[i]; i != files.length; ++i) {
    var reader = new FileReader();
    var name = f.name;
    reader.onload = function(e) {
      var data = e.target.result;
      var cfb = XLS.CFB.read(data, {type: 'binary'});
      //var arr = String.fromCharCode.apply(null, new Uint8Array(data));
      //var cfb = XLS.CFB.read(btoa(arr), {type: 'base64'});
      var wb = XLS.parse_xlscfb(cfb);
      process_wb(wb);
    };
    reader.readAsBinaryString(f);
    //reader.readAsArrayBuffer(f);
  }
}

function handleDragover(e) {
  e.stopPropagation();
  e.preventDefault();
  e.dataTransfer.dropEffect = 'copy';
}

if(drop.addEventListener) {
  drop.addEventListener('dragenter', handleDragover, false);
  drop.addEventListener('dragover', handleDragover, false);
  drop.addEventListener('drop', handleDrop, false);
}
The JS code is quite easy to understand, it uses the native HTML5 drag and drop API to allow us to upload files and then read them as binary strings. The binary is then directly passed to the library and further parsed using this code:
var cfb = XLS.CFB.read(data, {type: 'binary'});
var wb = XLS.parse_xlscfb(cfb);
Eventually the wb (Workbook) object is processed and converted to the required format (JSON, CSV or Excel Formulas). This same code without the HTML5 Drag and Drop and File Reader API pieces can be used in Node.js.
Note: This module does not support XLSX. To overcome this limitation we can use another package by the same author called js-xlsx.
JS-XLSX
Again, installing and using is almost same as the previous section. For use in browser, load the jszip.js and xlsx files:
<!-- https://github.com/SheetJS/js-xlsx/blob/master/jszip.js -->
<script src="/path/to/jszip.js"></script>
<!-- https://github.com/SheetJS/js-xlsx/blob/master/xlsx.js -->
<script src="/path/to/xlsx.js"></script>
Node.js installation and usage is like this:
$ npm install xlsx
$ node
> require('xlsx').readFile('excel_file.xlsx');
We can again use the code provided in the project’s index.html and convert the XLSX to JSON, CSV or Formulae based output.
function get_radio_value( radioName ) {
	var radios = document.getElementsByName( radioName );
	for( var i = 0; i < radios.length; i++ ) {
		if( radios[i].checked ) {
			return radios[i].value;
		}
	}
}

function to_json(workbook) {
	var result = {};
	workbook.SheetNames.forEach(function(sheetName) {
		var roa = XLSX.utils.sheet_to_row_object_array(workbook.Sheets[sheetName]);
		if(roa.length > 0){
			result[sheetName] = roa;
		}
	});
	return result;
}

function to_csv(workbook) {
	var result = [];
	workbook.SheetNames.forEach(function(sheetName) {
		var csv = XLSX.utils.sheet_to_csv(workbook.Sheets[sheetName]);
		if(csv.length > 0){
			result.push("SHEET: " + sheetName);
			result.push("");
			result.push(csv);
		}
	});
	return result.join("n");
}

function to_formulae(workbook) {
	var result = [];
	workbook.SheetNames.forEach(function(sheetName) {
		var formulae = XLSX.utils.get_formulae(workbook.Sheets[sheetName]);
		if(formulae.length > 0){
			result.push("SHEET: " + sheetName);
			result.push("");
			result.push(formulae.join("n"));
		}
	});
	return result.join("n");
}

var tarea = document.getElementById('b64data');
function b64it() {
	var wb = XLSX.read(tarea.value, {type: 'base64'});
	process_wb(wb);
}

function process_wb(wb) {
	var output = "";
	switch(get_radio_value("format")) {
		case "json":
		output = JSON.stringify(to_json(wb), 2, 2);
			break;
		case "form":
			output = to_formulae(wb);
			break;
		default:
		output = to_csv(wb);
	}
	if(out.innerText === undefined) out.textContent = output;
	else out.innerText = output;
}

var drop = document.getElementById('drop');
function handleDrop(e) {
	e.stopPropagation();
	e.preventDefault();
	var files = e.dataTransfer.files;
	var i,f;
	for (i = 0, f = files[i]; i != files.length; ++i) {
		var reader = new FileReader();
		var name = f.name;
		reader.onload = function(e) {
			var data = e.target.result;
			//var wb = XLSX.read(data, {type: 'binary'});
			var arr = String.fromCharCode.apply(null, new Uint8Array(data));
			var wb = XLSX.read(btoa(arr), {type: 'base64'});
			process_wb(wb);
		};
		//reader.readAsBinaryString(f);
		reader.readAsArrayBuffer(f);
	}
}

function handleDragover(e) {
	e.stopPropagation();
	e.preventDefault();
	e.dataTransfer.dropEffect = 'copy';
}

if(drop.addEventListener) {
	drop.addEventListener('dragenter', handleDragover, false);
	drop.addEventListener('dragover', handleDragover, false);
	drop.addEventListener('drop', handleDrop, false);
}
Props to the author for writing these projects that makes our task so much more easier. That’s all! If you’ve any questions, feel free to ask them in the comments.
Recommended from our users: Dynamic Network Monitoring from WhatsUp Gold from IPSwitch. Free Download
![]()