
Excel is the most popular spreadsheet software used to store tabular data. So, it’s important to be able to efficiently import and export data from these files.
R’s xlsx package makes it easy to read, write, and format excel files.
The xlsx Package
The xlsx package provides necessary tools to interact with both .xls or .xlsx format files from R.
In order to get started you first need to install and load the package.
# Install and load xlsx package
install.packages("xlsx")
library("xlsx")
Read an Excel file
Suppose you have the following Excel file.

You can read the contents of an Excel worksheet using the read.xlsx() or read.xlsx2() function.
The read.xlsx() function reads the data and creates a data frame.
# Read the first excel worksheet
library(xlsx)
mydata <- read.xlsx("mydata.xlsx", sheetIndex=1)
mydata
  name age       job     city
1  Bob  25   Manager  Seattle
2  Sam  30 Developer New York
3  Amy  20 Developer  Houston
read.xlsx() vs read.xlsx2()
Both the functions work exactly the same except, read.xlsx() is slow for large data sets (worksheet with more than 100 000 cells).
On the contrary, read.xlsx2() is faster on big files.
Specify a File Name
When you specify the filename only, it is assumed that the file is located in the current folder. If it is somewhere else, you can specify the exact path that the file is located at.
Remember! While specifying the exact path, characters prefaced by (like n r t etc.) are interpreted as special characters.
You can escape them using:
- Changing the backslashes to forward slashes like:
"C:/data/myfile.xlsx" - Using the double backslashes like:
"C:\data\myfile.xlsx"
# Specify absolute path like this
mydata <- read.csv("C:/data/mydata.xlsx")

# or like this
mydata <- read.csv("C:\data\mydata.xlsx")
Specify Worksheet
When you use read.xlsx() function, along with a filename you also need to specify the worksheet that you want to import data from.
To specify the worksheet, you can pass either an integer indicating the position of the worksheet (for example, sheetIndex=1) or the name of the worksheet (for example, sheetName="Sheet1" )
The following two lines do exactly the same thing; they both import the data in the first worksheet (called Sheet1):
mydata <- read.xlsx("mydata.xlsx", sheetIndex = 1)

mydata <- read.xlsx("mydata.xlsx", sheetIndex = "Sheet1")
Import the Data as is
The read.xlsx() function automatically coerces character data into a factor (categorical variable). You can see that by inspecting the structure of your data frame.
# By default, character data is coerced into a factor
mydata <- read.xlsx("mydata.xlsx", sheetIndex = 1)
str(mydata)
'data.frame':	3 obs. of  4 variables:
 $ name: Factor w/ 3 levels "Amy","Bob","Sam": 2 3 1
 $ age : num  25 30 20
 $ job : Factor w/ 2 levels "Developer","Manager": 2 1 1
 $ city: Factor w/ 3 levels "Houston","New York",..: 3 2 1
If you want your data interpreted as string rather than a factor, set the stringsAsFactors parameter to FALSE.
# Set stringsAsFactors parameter to TRUE to interpret the data as is
mydata <- read.xlsx("mydata.xlsx",
                    sheetIndex = 1,
                    stringsAsFactors = FALSE)
str(mydata)
'data.frame':	3 obs. of  4 variables:
 $ name: chr  "Bob" "Sam" "Amy"
 $ age : num  25 30 20
 $ job : chr  "Manager" "Developer" "Developer"
 $ city: chr  "Seattle" "New York" "Houston"
Read Specific Range
If you want to read a range of rows, specify the rowIndex argument.
# Read first three lines of a file
mydata <- read.xlsx("mydata.xlsx",
                    sheetIndex = 1,
                    rowIndex = 1:3)
mydata
  name age       job     city
1  Bob  25   Manager  Seattle
2  Sam  30 Developer New York
If you want to read a range of columns, specify the colIndex argument.
# Read first two columns of a file
mydata <- read.xlsx("mydata.xlsx",
                    sheetIndex = 1,
                    colIndex = 1:2)
mydata
  name age
1  Bob  25
2  Sam  30
3  Amy  20
Specify Starting Row
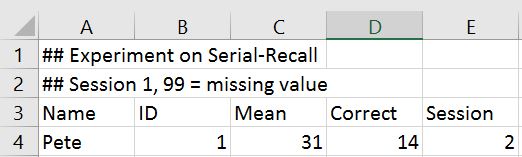
Sometimes the excel file (like the file below) may contain notes, comments, headers, etc. at the beginning which you may not want to include.
To start reading data from a specified row in the excel worksheet, pass startRow argument.

# Read excel file from third row
mydata <- read.xlsx("mydata.xlsx",
                    sheetIndex = 1,
                    startRow = 3)
mydata
  name age       job     city
1  Bob  25   Manager  Seattle
2  Sam  30 Developer New York
3  Amy  20 Developer  Houston
Write Data to an Excel File
To write to an existing file, use write.xlsx() method and pass the data in the form of matrix or data frame.
# Export data from R to an excel workbook
df
  name age       job     city
1  Bob  25   Manager  Seattle
2  Sam  30 Developer New York
3  Amy  20 Developer  Houston

write.xlsx(df, file = "mydata.xlsx")

Notice that the write.xlsx() function prepends each row with a row name by default. If you don’t want row labels in your excel file, set row.names to FALSE.
# Remove row labels while writing an excel File
write.xlsx(df, file="mydata.xlsx",
           row.names = FALSE)
To set the name of the current worksheet, specify sheetName argument.
# Rename current worksheet
write.xlsx(df, file="mydata.xlsx",
           row.names = FALSE,
           sheetName = "Records")

Add Multiple Datasets at once
To add multiple data sets in the same Excel workbook, you have to set the append argument to TRUE.
# Write the first data set
write.xlsx(iris, file = "mydata.xlsx",
           sheetName = "IRIS", append = FALSE)

# Add a second data set
write.xlsx(mtcars, file = "mydata.xlsx",
           sheetName = "CARS", append = TRUE)

# Add a third data set
write.xlsx(Titanic, file = "mydata.xlsx",
           sheetName = "TITANIC", append = TRUE)

Create and Format an Excel Workbook
Sometimes you may wish to create a .xlsx file with some formatting. With the help of xlsx package, you can edit titles, borders, column width, format data table, add plot and much more.
The following example shows how to do so:
Step 1. Create a new excel workbook
You can create a new workbook using the createWorkbook() function.
# create new workbook
wb <- createWorkbook()
Step 2. Define cell styles for formatting the workbook
In R, using the CellStyle() function you can create your own cell styles to change the appearance of, for example:
- The sheet title
- The row and column names
- Text alignment for the columns
- Cell borders around the columns
# define style for title
title_style <- CellStyle(wb) +
  Font(wb, heightInPoints = 16,
       isBold = TRUE)

# define style for row and column names
rowname_style <- CellStyle(wb) +
  Font(wb, isBold = TRUE)
colname_style <- CellStyle(wb) +
  Font(wb, isBold = TRUE) +
  Alignment(wrapText = TRUE, horizontal = "ALIGN_CENTER") +
  Border(color = "black",
         position =c("TOP", "BOTTOM"),
         pen =c("BORDER_THIN", "BORDER_THIN"))
Step 3. Create worksheet and add title
Before you add data, you have to create an empty worksheet in the workbook. You can do this by using the creatSheet() function.
# create a worksheet named 'Data'
ws <- createSheet(wb, sheetName = "Data")
Step 4. Add sheet title
Here’s how you can add a title.
# create a new row
rows <- createRow(ws, rowIndex = 1)

# create a cell in the row to contain the title.
sheetTitle <- createCell(rows, colIndex = 1)

# set the cell value
setCellValue(sheetTitle[[1,1]], "Vapor Pressure of Mercury")

# set the cell style
setCellStyle(sheetTitle[[1,1]], title_style)
Step 5. Add a table into a worksheet
With the addDataframe() function, you can add the data table in the newly created worksheet.
Below example adds built-in pressure dataset on row #3.
# add data table to worksheet
addDataFrame(pressure, sheet = ws, startRow = 3, startColumn = 1,
             colnamesStyle = colname_style,
             rownamesStyle = rowname_style,
             row.names = FALSE)
Step 6. Add a plot into a worksheet
You can add a plot in the worksheet using the addPicture() function.
# create a png plot
png("plot.png", height=900, width=1600, res=250, pointsize=8)
plot(pressure, xlab = "Temperature (deg C)",
     ylab = "Pressure (mm of Hg)",
     main = "pressure data: Vapor Pressure of Mercury",
     col="red", pch=19, type="b")
dev.off()

# Create a new sheet to contain the plot
sheet <-createSheet(wb, sheetName = "plot")

# Add the plot created previously
addPicture("plot.png", sheet, scale = 1, startRow = 2,
           startColumn = 1)

# Remove the plot from the disk
res<-file.remove("plot.png")
Step 7. Change column width
Now change the column width to fit the contents.
# change column width of first 2 columns
setColumnWidth(sheet = ws, colIndex = 1:2, colWidth = 15)
Step 8. Save the workbook
Finally, save the workbook with the saveWorkbook() function.
# save workbook
saveWorkbook(wb, file = "mydata.xlsx")
Step 9. View the result


In this tutorial, we will learn how to work with Excel files in R statistical programming environment. It will provide an overview of how to use R to load xlsx files and write spreadsheets to Excel.
In the first section, we will go through, with examples, how to use R read an Excel file. More specifically, we are going to learn how to;
- read specific columns from a spreadsheet ,
- import multiple spreadsheets and combine them to one dataframe,
- read many Excel files,
- import Excel datasets using RStudio
Furthermore, in the last part we are going to focus on how to export dataframes to Excel files. More specifically, we are going to learn how to write;
- Excel files, rename the sheet
- to multiple sheets,
- multiple dataframes to a Excel file
How to Install R Packages
Now, before we continue with this Excel in R tutorial we are going to learn how to install the needed packages. In this post, we are going to use tidyverses readxl and the xlsx package to read xlsx files to dataframes.
Note, we are mainly using xlsx, in this post, because readxl cannot write Excel files, only import them into R.
# Install tidyverse
install.packages("tidyverse")

# or just readxl
install.packages("readxl")

# how to install xlsx
install.packages("xlsx")Code language: R (r)
Now, Tidyverse comes with a lot of useful packages. For example, using the package dplyr (part of Tidyverse) you can remove duplicates in R, and rename a column in R’s dataframe.
How to install RStudio
In the final example, we are going to read xlsx files in R using the interactive development environment RStudio. Now, RStudio is quite easy to install. In this post, we will cover two methods for installing RStudio.
Here’s two steps for installing RStudio:
- Download RStudio here
- Click on the installation file and follow the instructions
Now, there’s another option to get both R statistical programming environment and the great general-purpose language of Python. That is, to install the Anaconda Python distribution.
Note, RStudio is a great Integrated Development Environment for carrying out data visualization and analysis using R. RStudio is mainly for R but we can also use other programming languages ( e.g., Python). That is, we typically don’t use RStudio for importing xlsx files only.
How to Read Excel Files to R Dataframes
Can R read xlsx files? In this section, we are going to find out that the answer is, of course, “yes”. We are going to learn how to load Excel files using Tidyverse (e.g., readxl).
More specifically, in this section, we are going to learn how to read Excel files and spreadsheets to dataframes in R. In the read Excel examples we will read xlsx files from both the hard drive and URLs.
How to Import an Excel file in R using read_excel
First, we are going to load the r-package(s) we need. How do I load a package in R? It can be done either by using the library or require functions. In the next code chunk, we are going to load readxl so we can use the read_excel function to read Excel files into R dataframes.
require(readxl)Code language: R (r)If we look at the documentation for the function, read_excel, that we are going to use in this tutorial we can see that it takes a range of arguments.

Now it’s time to learn how to use read_excel to read in data from an Excel file. The easiest way to use this method is to pass the file name as a character. If we don’t pass any other parameters, such as sheet name, it will read the first sheet in the index. In the first example we are not going to use any parameters:
df <- read_excel("example_sheets2.xlsx")
head(df)Code language: R (r)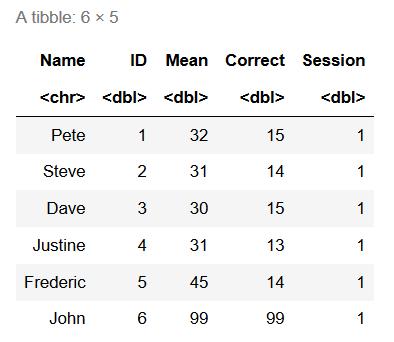
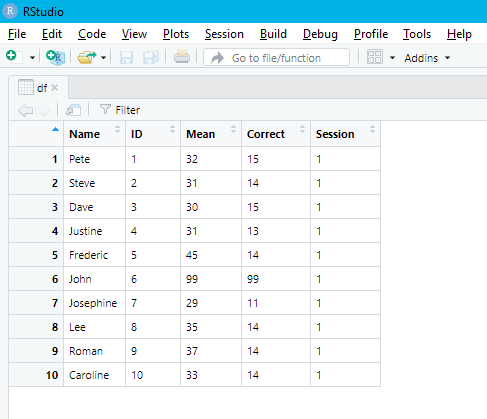
Here, the read_excel function reads the data from the Excel file into a tibble object. We can if we want to, change this tibble to a dataframe.
df <- as.data.frame(df)Code language: R (r)Now, after importing the data from the Excel file you can carry on with data manipulation if needed. It is, for instance, possible to remove a column, by name and index, with the R-package dplyr. Furthermore, if you installed tidyverse you will have a lot of tools that enable you to do descriptive statistics in R, and create scatter plots with ggplot2.
Importing an Excel File to R in Two Easy Steps:
Time needed: 1 minute.
Here’s a quick answer to the question how do I import Excel data into R?? Importing an Excel file into an R dataframe only requires two steps, given that we know the path, or URL, to the Excel file:
- Load the readxl package
First, you type library(readxl) in e.g. your R-script

- Import the XLSX file
Second, you can use read_excel function to load the .xlsx (or .xls) file


We now know how to easily load an Excel file in R and can continue with learning more about the read_excel function.
Reading Specific Columns using read_excel
In this section, we are going to learn how to read specific columns from an Excel file using R. Note, here we will also use the read.xlsx function from the package xlsx.
- How to use %in% in R: 7 Example Uses of the Operator
- Learn How to Transpose a Dataframe or Matrix in R with the t() Function
Loading Specific Columns using read_excel in R
In this section, we are going to learn how to read certain columns from an Excel sheet using R. Reading only some columns from an Excel sheet may be good if we, for instance, have large xlsx files and we don’t want to read all columns in the Excel file. When using readxl and the read_excel function we will use the range parameter together with cell_cols.
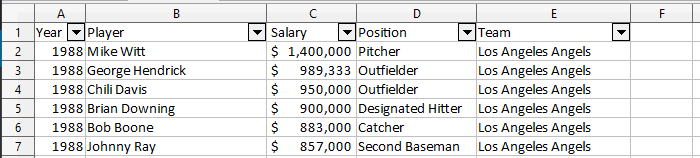
When using read.xlsx, to import Excel in R, we can use the parameter colIndex to select specific columns from the sheet. For example, if want to create a dataframe with the columns Player, Salary, and Position, we can accomplish this by adding 1, 3, and 4 in a vector:
require(xlsx)
cols <-  c(1, 2, 3)

df <- read.xlsx('MLBPlayerSalaries.xlsx',
                   sheetName='MLBPlayerSalaries', colIndex=cols)
head(df)Code language: R (r)
Handling Missing Data when we Import Excel File(s) in R
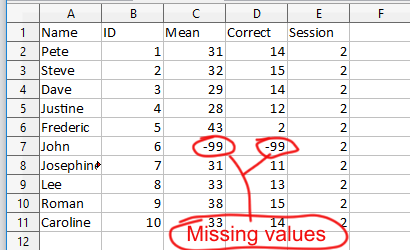
If someone has coded the data and used some kind of value to represent missing values in our dataset, we need to tell r, and the read_excel function, what these values are. In the next, R read Excel example, we are going to use the na parameter of the read_excel function. Here “-99” is what is codes as missing values.
Read Excel Example with Missing Data
In the example below, we are using the parameter na and we are putting in a character (i.e., “-99”):
df <- read_excel('SimData/example_sheets2.xlsx', 'Session2',
           na = '-99')

head(df, 6)Code language: R (r)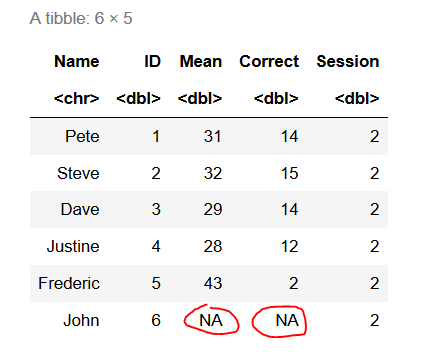
The example datasets we’ve used in the how to use R to read Excel files tutorial can be found here and here.
How to Skip Rows when Importing an xlsx File in R
In this section, we will learn how to skip rows when loading an Excel file into R. Here’s a link to the example xlsx file.
In the following, read xlsx in R examples we are going to use both read_excel and read.xlsx to read a specific sheet. Furthermore, we are also going to skip the first 2 rows in the Excel file.
Skip Rows using read_excel
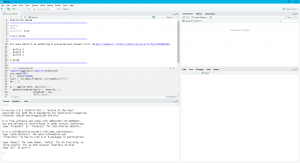
Here, we will use the parameter sheet and put the characters ‘Session1’ to read the sheet named ‘Session1’. In a previous example, we just added the character ‘Session2’ to read that sheet.
Note, the first sheet will be read if we don’t use the sheet_name parameter. In this example, the important part is the parameter skiprow=2. We use this to skip the first two rows:
df <- read_excel('SimData/example_sheets.xlsx',
                 sheet='Session1', skip = 2)

head(df, 4)Code language: R (r)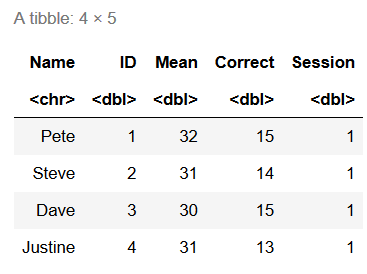
How to Skip Rows when Reading Excel Files in R using read.xlsx
When working with read.xlsx we use the startRow parameter to skip the first 2 rows in the Excel sheet.
df <- read.xlsx('SimData/example_sheets.xlsx',
                   sheetName='Session1', startRow=3)Code language: HTML, XML (xml)
Reading Multiple Excel Sheets in R
In this section of the R read excel tutorial, we are going to learn how to read multiple sheets into R dataframes.
There are two sheets: ‘Session1’, and ‘Session2, in the example xlsx file (example_sheets2.xlsx). In this file, each sheet has data from two experimental sessions.
We are now learning how to read multiple sheets using readxl. More specifically, we are going to read the sheets ‘Session1’ and ‘Session2’. First, we are going to use the function excel_sheets to print the sheet names:
xlsx_data <- "SimData/example_sheets.xlsx"

excel_sheets(path = xlsx_data)Code language: R (r)![]()
Now if we want to read all the existing sheets in an Excel document we create a variable, called sheet_names.
After we have created this variable we use the lapply function and loop through the list of sheets, use the read_excel function, and end up with the list of dataframes (excel_sheets):
sheet_names <- excel_sheets(path = xlsx_data)

excel_sheets <- lapply(sheet_names , function(x) read_excel(path = xlsx_data, sheet = x))

str(excel_sheets)Code language: R (r)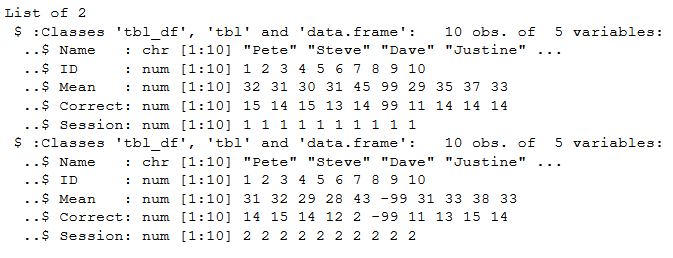
When working with Pandas read_excel w may want to join the data from all sheets (in this case sessions). Merging Pandas dataframes are quite easy. We just use the concat function and loop over the keys (i.e., sheets):
df <- do.call("rbind", excel_sheets)

head(df)Code language: R (r)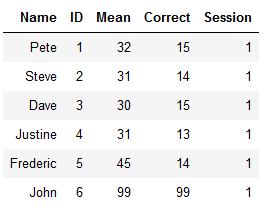
Again, there might be other tasks that we need to carry out. For instance, we can also create dummy variables in R.
Reading Many Excel Files in R
In this section of the R read excel tutorial, we will learn how to load many files into an R dataframe.
For example, in some cases, we may have a bunch of Excel files containing data from different experiments or experimental sessions. In the next example, we are going to work with read_excel, again, together with the lapply function.

However, this time we just have a character vector with the file names and then we also use the paste0 function to paste the subfolder where the files are.
xlsx_files <- c("example_concat.xlsx",
"example_concat1.xlsx",
"example_concat3.xlsx")
dataframes <- lapply(xlsx_files, function(x)
read_excel(path = paste0("simData/", x)))Code language: R (r)Finally, we use the do.call function, again, to bind the dataframes together to one. Note, if we want, we can also use, the bind_cols function from the r-package dplyr (part of tidyverse).
df <- do.call("rbind", dataframes)

tail(df)Code language: R (r)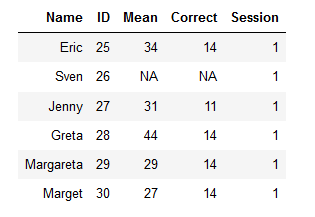
Note, if we want, we can also use, the bind_cols function from the r-package dplyr (part of tidyverse).
dplyr::bind_rows(dataframes)Code language: R (r)Reading all Files in a Directory in R
In this section, we are going to learn how to read all xlsx files in a directory. Knowing this may come in handy if we store every xlsx file in a folder and don’t want to create a character vector, like above, by hand. In the next example, we are going to use R’s Sys.glob function to get a character vector of all Excel files.
xlsx_files <- Sys.glob('./simData/*.xlsx')Code language: R (r)
After we have a character vector with all the file names that we want to import to R, we just use lapply and do.call (see previous code chunks).
Setting the Data type for data or columns
We can also, if we like, set the data type for the columns. Let’s use Pandas to read the example_sheets1.xlsx again. In the Pandas read_excel example below we use the dtype parameter to set the data type of some of the columns.
df <- read_excel('SimData/example_sheets2.xlsx',
                 col_types=c("text", "text", "numeric",
                            "numeric", "text"),
                   sheet='Session1')

str(df)Code language: R (r)
Importing Excel Files in RStudio
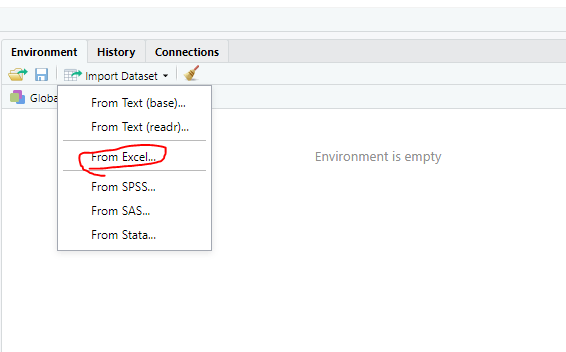
Before we continue this Excel in R tutorial, we are going to learn how to load xlsx files to R using RStudio. This is quite simple, open up RStudio, click on the Environment tab (right in the IDE), and then Import Dataset. That is, in this section, we will answer the question of how do I import an Excel file into RStudio?
Now we’ll get a dropdown menu and we can choose from different types of sources. As we are going to work with Excel files we choose “From Excel…”:
In the next step, we klick “Browse” and go to the folder where our Excel data is located.
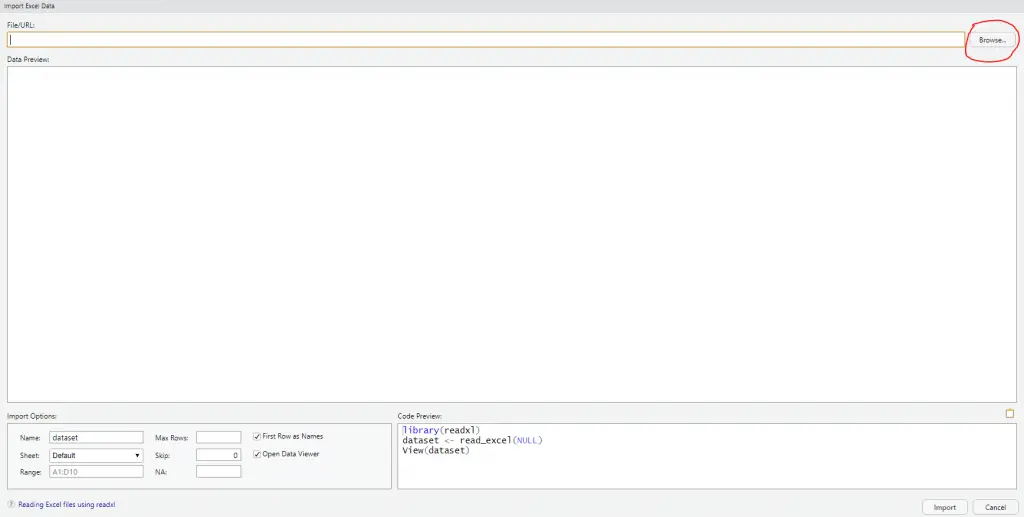
Now we get some alternatives. For instance, we can change the name of the dataframe to “df”, if we want (see image below). Furthermore, before we import the Excel file in RStudio we can also specify how the missing values are coded as well as rows to skip.
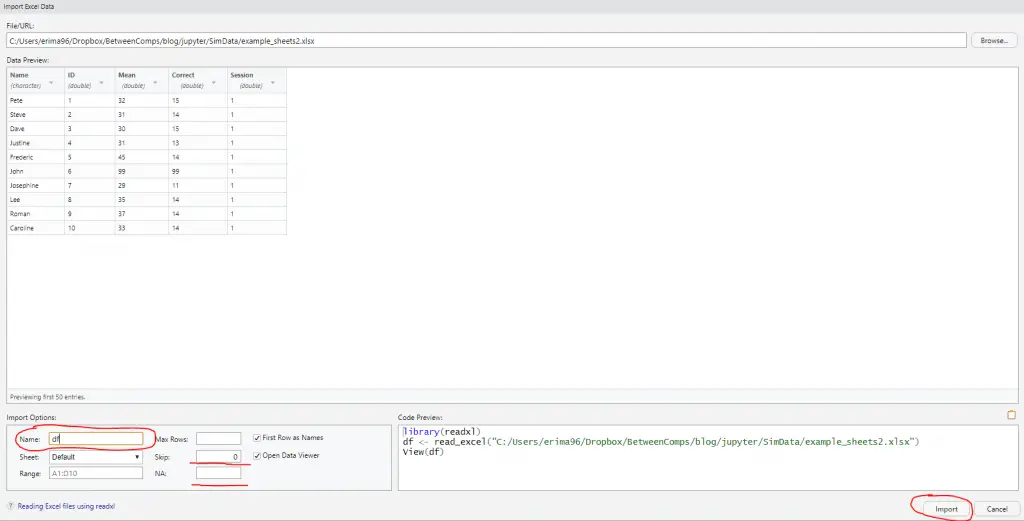
Finally, when we have set everything as we want we can hit the Import button in RStudio to read the datafile.
Writing R Dataframes to Excel
Excel files can, of course, be created in R. In this section, we will learn how to write an Excel file using R. As for now, we have to use the r-package xlsx to write .xlsx files. More specifically, to write to an Excel file we will use the write.xlsx function:

We will start by creating a dataframe with some variables.
df <- data.frame("Age" = c(21, 22, 20, 19, 18, 23), "Names" = c("Andreas", "George", "Steve",
                           "Sarah", "Joanna", "Hanna"))


str(df)Code language: R (r)
Now that we have a dataframe to write to xlsx we start by using the write.xlsx function from the xlsx package.
library(xlsx)
write.xlsx(df, 'names_ages.xlsx',
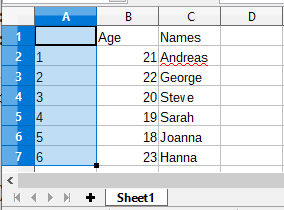
sheetName = "Sheet1"Code language: R (r)In the output below the effect of not using any parameters is evident. If we don’t use the parameter sheetName we get the default sheet name, ‘Sheet1’.
As can be noted in the image below, the Excel file has column (‘A’) containing numbers. These are the index from the dataframe.
In the next example we are going to give the sheet another name and we will set the row.names parameter to FALSE.
write.xlsx(df, 'names_ages.xlsx',
           sheetName = "Names and Ages",
          row.names=FALSE)Code language: R (r)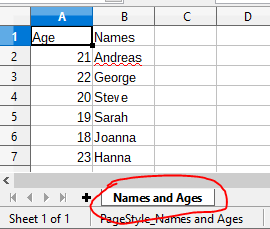
As can be seen, in the image above, we get a new sheet name and we don’t have the indexes as a column in the Excel sheet. Note, if you get the error ‘could not find function “write.xlsx”‘ it may be that you did not load the xlsx library.
Writing Multiple Pandas Dataframes to an Excel File:
In this section, we are going to learn how to write multiple dataframes to one Excel file. More specifically, we will use R and the xlsx package to write many dataframes to multiple sheets in an Excel file.
First, we start by creating three dataframes and add them to a list.
df1 <-data.frame('Names' = c('Andreas', 'George', 'Steve',
'Sarah', 'Joanna', 'Hanna'),
'Age' = c(21, 22, 20, 19, 18, 23))
df2 <- data.frame('Names' = c('Pete', 'Jordan', 'Gustaf',
'Sophie', 'Sally', 'Simone'),
'Age' = c(22, 21, 19, 19, 29, 21))
df3 <- data.frame('Names' = c('Ulrich', 'Donald', 'Jon',
'Jessica', 'Elisabeth', 'Diana'),
'Age' = c(21, 21, 20, 19, 19, 22))
dfs <- list(df1, df2, df3)Code language: R (r)Next, we are going to create a workbook using the createWorkbook function.
wb <- createWorkbook(type="xlsx")Code language: R (r)Finally, we are going to write a custom function that we are going to use together with the lapply function, later. In the code chunk below,
add_dataframes <- function(i){

    df = dfs[i]
    sheet_name = paste0("Sheet", i)
    sheet = createSheet(wb, sheet_name)

    addDataFrame(df, sheet=sheet, row.names=FALSE)
}Code language: R (r)
It’s time to use the lapply function with our custom R function. On the second row, in the code chunk below, we are writing the workbook to an xlsx file using the saveWorkbook function:
lapply(seq_along(dfs), function(x) multiple_dataframe(x))saveWorkbook(wb, 'multiple_Sheets.xlsx')Code language: R (r)Summary: How to Work With Excel Files in R
In this working with Excel in R tutorial we have learned how to:
- Read Excel files and Spreadsheets using read_excel and read.xlsx
- Load Excel files to dataframes:
- Import Excel sheets and skip rows
- Merging many sheets to a dataframe
- Reading many Excel files into one dataframe
- Load Excel files to dataframes:
- Write a dataframe to an Excel file
- Creating many dataframes and writing them to an Excel file with many sheets
In this article let’s discuss reading and writing excel files using readxl and writexl packages of the R programming language.
read_excel() method in readxl Package:
The Readxl package is used to read data from the excel files i.e. the files of format .xls and .xlsx. The Readxl package provides a function called read_excel() which is used to read the data from excel files. The read_excel() method accepts the excel file which needs to read the content from it. In order to use the read_excel() method, first readxl library needs to be imported.
Syntax
library(readxl)
data<-read_excel(‘excelFile’,sheet=1)Parameters
- excelFile – It specifies the excel file from which we read data.
- sheet – It specifies from which work sheet we need to read. It is an optional parameter.
Note:- To install the Readxl package in R, use install.packages(“readxl”) command.
Syntax to install and import the readxl package:
install.package('readxl')
library(readxl)
Example:
Here let’s look into how to read the data from an excel file using read_excel() method present in Readxl package.
Link to the used file:- link
R
library(readxl)
data <-read_excel('stats.xlsx')
print(data)
Output:
 Name    Age Runs   Wickets
1 Akhil    21 143    14
2 Mriganka 32 1020   NA
3 Avinash  30 2022   2
write_xlsx() method in writexl package:
The writexl package provides a method called write_xlsx() method which allows writing a data frame into an excel sheet i.e. the files of format .xls and .xlsx. The write_xlsx() method accepts a data frame and the name of the excel file in which the content of the data frame is copied into it. In order to use the write_xlsx() method, the first writexl library needs to be imported.
Syntax
library(writexl)
write_xlsx(dataframeName, “excelFile”, col_names=TRUE)
Parameters
- dataframeName – Name of the data frame that contains the data.
- excelFile – Name of the excel file into which we import from data frame.
- col_names – Write column names at the top of file if it set to True.
Syntax to install and import the writexl package:
install.package('writexl')
library(writexl)
Example:
In the below code we created a data frame named “data” and imported the data in that data frame into the “write.xlsx” excel file using write_xlsx() method.
Link to the used file:- link
R
library(writexl)
data <- data.frame(player=c('A', 'B', 'C', 'D'),
runs=c(100, 200, 408, NA),
wickets=c(17, 20, NA, 5))
write_xlsx(data, "write.xlsx")
Output

Excel is a spreadsheet developed by Microsoft, which allows you to manage data in a very simple way. Until 2007, the XLS was the main file extension. However, in the 2007 release the XLSX (XML-based) extension was introduced to become the default workbook format. In this tutorial you will learn how to read Excel files into R and RStudio with several packages.
- 1 How to import Excel files into R?
- 1.1 Import Excel data into RStudio from the menu
- 1.2 Read XLSX without JAVA in R: readxl and openxlsx
- 1.2.1 readxl package
- 1.2.2 openxlsx package
- 1.3 The xlsx package
- 1.4 XLConnect package
- 2 Convert XLSX files to CSV in R
How to import Excel files into R?
If you need to read an Excel in R, you will need to use a specific package to achieve it. There are several options, but the best packages for reading Excel files could be openxlsx and readxl, as they don’t depend on JAVA (unlike xlsx and XLConnect packages) nor Perl (gdata package).
Note that external dependencies can cause errors when loading the packages, but for huge datasets they should be faster than the other alternatives.
If you are using RStudio you can go to File → Import Dataset → From Excel.... Then, you can browse your Excel file and customize the output (the name of the variable, the sheet, cells range, …). You can also see a preview of the code that will be executed in the backend and of the data that will be loaded:


Note that, with this approach, you will need to have installed the readxl package.
Read XLSX without JAVA in R: readxl and openxlsx
readxl package
The readxl package is part of the tidyverse package, created by Hadley Wickham (chief scientist at RStudio) and his team. This package supports XLS via the libxls C library and XLSX files via the RapidXML C++ library without using external dependencies.
The package provides some Excel (XLS and XLSX) files stored in the installation folder of the package, so in order to create a reproducible example, in the following examples we are going to use the clippy.xlsx file, which first sheet is as follows:

In order to load the path of the sample Excel file you can make use of the readxl_example function. Once loaded, or once you have the path of your own Excel file, you can use the excel_sheets function to check the Excel file sheet names, if needed.
# install.packages("readxl")
library(readxl)

# Get the path of a sample XLSX dataset of the package
file_path <- readxl_example("clippy.xlsx")

# Check the Sheet names of the Excel file
excel_sheets(file_path) # "list-column" "two-row-header"
The generic function of the package to read Excel files into R is the read_excel function, which guesses the file type (XLS or XLSX) depending on the file extension and the file itself.
read_excel(file_path)# A tibble: 4 x 2
name value
<chr> <chr>
1 Name Clippy
2 Species paperclip
3 Approx date of death 39083
4 Weight in grams 0.9 The sheet argument allows you to specify the sheet you want to load, passing its name or the corresponding number of the tab. Note that, by default, the function loads the first Excel sheet.
# Selecting the other sheet of the Excel file
read_excel(file_path, sheet = "two-row-header")
read_excel(file_path, sheet = 2) # Equivalent
# A tibble: 2 x 4
name species death weight
<chr> <chr> <chr> <chr>
1 (at birth) (office supply type) (date is approximate) (in grams)
2 Clippy paperclip 39083 0.9 You can also skip rows with the skip argument of the function:
# Skip first row
read_excel(file_path, skip = 1)
# A tibble: 3 x 2
Name Clippy
<chr> <chr>
1 Species paperclip
2 Approx date of death 39083
3 Weight in grams 0.9 Note that you could also specify a range of cells to be selected with the range argument. In this case, the skip argument won’t be taken into account if you specify it.
read_excel(file_path, range = "B1:B5")# A tibble: 4 x 1
value
<chr>
1 Clippy
2 paperclip
3 39083
4 0.9 In addition, if you want to avoid reading the column names, you can set the col_names argument to FALSE:
read_excel(file_path, col_names = FALSE)New names:
* `` -> ...1
* `` -> ...2
...1 ...2
1 name value
2 Name Clippy
3 Species paperclip
4 Approx date of death 39083
5 Weight in grams 0.9However, you may have noticed that the output is of class tibble (a modern type of data frame). If you want the output to be of class data.frame you will need to use the as.data.frame function as follows:
data <- read_excel(file_path, skip = 1)
as.data.frame(data)
Name Clippy
1 Species paperclip
2 Approx date of death 39083
3 Weight in grams 0.9Recall that the read_excel function guesses the file extension. Nonetheless, if you know the file extension you are going to read you can use the corresponding function of the following to avoid guessing:
# If you know the extension of your Excel file
# use one of these functions instead

# For XLS files
read_xls()

# For XLSX files
read_xlsx()
openxlsx package
The openxlsx package uses Rcpp and, as it doesn’t depend on JAVA, it is an interesting alternative to to the readxl package to read an Excel file in R. The differences respect to the previous package are that the output is of class data.frame by default instead of tibble and that its main use is not just importing Excel files, as it also provides a wide variety of functions to write, style and edit Excel files.
The function to read XLSX files is named read.xlsx:
# install.packages("openxlsx")
library(openxlsx)

read.xlsx(file_path)
name value
1 Name Clippy
2 Species paperclip
3 Approx date of death 39083
4 Weight in grams 0.9As in the function of the previous package, there are several arguments you can customize, as sheet, skip or colNames. If you want to select specific cells you can make use of the rows and cols arguments. Recall to type ?read.xlsx or help(read.xlsx) for additional information.
read.xlsx(file_path, cols = 1:2, rows = 2:3) Name Clippy
1 Species paperclipThe xlsx package
Although this package requires JAVA installed on your computer it is very popular. The main functions to import Excel files are the read.xlsx and read.xlsx2. The second has slightly differences in the default arguments and it does more work in JAVA, achieving better performance.
# install.packages("xlsx")
library(xlsx)

read.xlsx(file_path)
read.xlsx2(file_path)
You can customize several arguments as sheetIndex, sheetName, header, rowIndex, colIndex, among others. Run ?read.xlsx or help(read.xlsx) for additional details.
XLConnect package
An alternative to the xlsx package is XLConnect, which allows writing, reading and formatting Excel files. In order to load an Excel file into R you can use the readWorksheetFromFile function as follows. We recommend you to type ??XLConnect to look for additional information of the arguments of each function of the package.
# install.packages("XLConnect")
library(XLConnect)

data <- readWorksheetFromFile(file_path, sheet = "list-column",
                              startRow = 1, endRow = 5,
                              startCol = 1, endCol = 2)
In case you want to load multiple sheets, it is recommended to use the loadWorkbook function and then load each sheet with the readWorksheet function:
load <- loadWorkbook(file_path)

data <- readWorksheet(load, sheet = "list-column",
                      startRow = 1, endRow = 5,
                      startCol = 1, endCol = 2)

data2 <- readWorksheet(load, sheet = "two-row-header",
                       startRow = 1, endRow = 3,
                       startCol = 1, endCol = 4)
Moreover, this package provides a function to load Excel named regions. Analogous to the previous example, you can import just a region with the readNamedRegionFromFile, specifying the file name (if the file is in your working directory) or the file path and the region name.
data <- readNamedRegionFromFile(file, # File path
                                name, # Region name
                                ...)  # Arguments of readNamedRegion()
If you want to load multiple named regions you can load the workbook with the loadWorkbook function and then import each region with the readNamedRegion function.
load <- loadWorkbook(file_path)

data <- readNamedRegion(load, name_Region_1, ...)
data2 <- readNamedRegion(load, name_Region_2, ...)
It is worth to mention that if you are experiencing issues with the packages that require JAVA you can get and set the path of JAVA in R with the following codes:
# Prints the path of JAVA Home in R
Sys.getenv("JAVA_HOME")

# Sets the path of JAVA
Sys.setenv(JAVA_HOME = "path_to_jre_java_folder")
Note that you will need to specify the path to the jre folder inside the Java folder of your computer, which you should find inside Program Files.
Convert XLSX files to CSV in R
Finally, you could also convert your Excel files into a CSV format and read the CSV file in R. For this purpose, you can use the convert function of the rio package. An alternative would be saving directly the Excel file as CSV with the menu of Microsoft Excel.
# install.packages("rio")
library(rio)

convert(file_path, "file.csv")- Install and load xlsx package
- Read an Excel file
- Write data to an Excel file
- Simple R function to export quickly multiple data sets to the same Excel workbook
- Create and format a nice Excel workbook
- Step 1/5. Create a new Excel workbook
- Step 2/5. Define some cell styles for formating the workbook
- Step 3/5. Write data and plots into the workbook
- Create a new sheet in the workbook
- Add a title into a worksheet
- Add a table into a worksheet
- Add a plot into an Excel worksheet
- Step 4/5. Save the Excel workbook to the disk
- Step 5/5. Open and view the resulting Excel workbook
- The complete R script to create a nice Excel report
- Infos
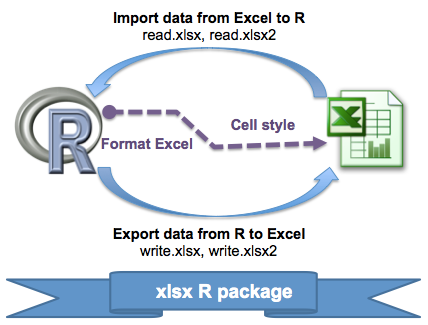
There are many solutions to import and export Excel files using R software. The different ways to connect R and Excel has been already discussed in our previous article [R Excel essentials : Read, write and format Excel files using R].
xlsx package is one of the powerful R packages to read, write and format Excel files. It is a java-based solution and it is available for Windows, Mac and Linux. It works for both Excel 2007 and Excel 97/2000/XP/2003 file formats (xls and xlsx file formats).
Unfortunately the xlsx package is not especially well documented.
This article is a quick start guide to manipulate Excel files in R using xlsx package .
In this tutorial, you will learn how to use xlsx package to :
- Read and write Excel files
- Add data sets and images (or plots) into an Excel worksheet
- Format the appearance of the Excel worksheet by setting data formats, fonts, colors and borders
Install and load xlsx package
install.packages("xlsx")
library("xlsx")
Note that, xlsx packages depends on rJava and xlsxjars R packages.
Read an Excel file
The R functions read.xlsx() and read.xlsx2() can be used to read the contents of an Excel worksheet into an R data.frame.
The difference between these two functions is that :
read.xlsxpreserves the data type. It tries to guess the class type of the variable corresponding to each column in the worksheet. Note that, read.xlsx function is slow for large data sets (worksheet with more than 100 000 cells).read.xlsx2is faster on big files compared to read.xlsx function.
The simplified formats of these two functions are:
read.xlsx(file, sheetIndex, header=TRUE, colClasses=NA)
read.xlsx2(file, sheetIndex, header=TRUE, colClasses="character")- file : the path to the file to read
- sheetIndex : a number indicating the index of the sheet to read; e.g : use sheetIndex=1 to read the first sheet
- header : a logical value. If TRUE, the first row is used as the names of the variables
- colClasses : a character vector that represents the class of each column
Examples :
library(xlsx)
file <- system.file("tests", "test_import.xlsx", package = "xlsx")
res <- read.xlsx(file, 1)  # read first sheet
head(res[, 1:6])
NA. Population Income Illiteracy Life.Exp Murder
1 Alabama 3615 3624 2.1 69.05 15.1
2 Alaska 365 6315 1.5 69.31 11.3
3 Arizona 2212 4530 1.8 70.55 7.8
4 Arkansas 2110 3378 1.9 70.66 10.1
5 California 21198 5114 1.1 71.71 10.3
6 Colorado 2541 4884 0.7 72.06 6.8Note that read.xlsx and read.xlsx2 functions can be used to read both .xls and .xlsx file formats.
Write data to an Excel file
The R functions write.xlsx() and write.xlsx2() can be used to export data from R to an Excel workbook. Note that write.xlsx2 achieves better performance compared to write.xlsx for very large data.frame (with more than 100 000 cells).
The simplified formats of these two functions are:
write.xlsx(x, file, sheetName="Sheet1",
  col.names=TRUE, row.names=TRUE, append=FALSE)
write.xlsx2(x, file, sheetName="Sheet1",
col.names=TRUE, row.names=TRUE, append=FALSE)- x : a data.frame to be written into the workbook
- file : the path to the output file
- sheetName : a character string to use for the sheet name.
- col.names, row.names : a logical value specifying whether the column names/row names of x are to be written to the file
- append : a logical value indicating if x should be appended to an existing file.
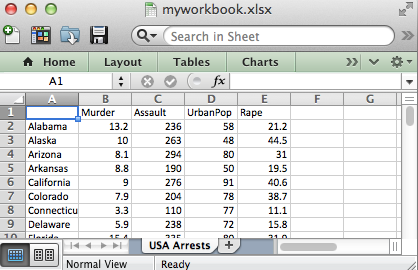
Examples :
library(xlsx)
write.xlsx(USArrests, file="myworkbook.xlsx",
           sheetName="USA Arrests")
Note that, the above code saves the Excel file in your current working directory.
To add multiple data sets in the same Excel workbook, you have to use the argument append = TRUE. This is illustrated in the following R code :
# Write the first data set in a new workbook
write.xlsx(USArrests, file="myworkbook.xlsx",
      sheetName="USA-ARRESTS", append=FALSE)
# Add a second data set in a new worksheet
write.xlsx(mtcars, file="myworkbook.xlsx", sheetName="MTCARS",
           append=TRUE)
# Add a third data set
write.xlsx(Titanic, file="myworkbook.xlsx", sheetName="TITANIC",
           append=TRUE)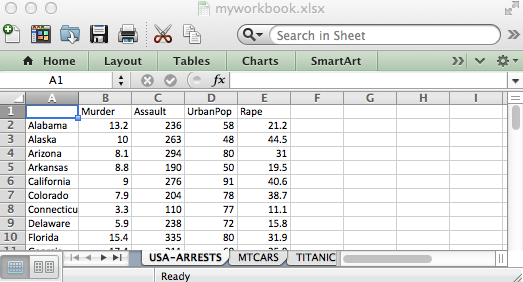
As you can see from the image above, it’s possible to add multiple data sets in the same Excel file. However, the method is very repetitive. You will find in the next section a simple function to add different types of data in a single call.
Simple R function to export quickly multiple data sets to the same Excel workbook
This section provides an R function to easily export multiple R objects to an Excel Workbook in a single call. The different objects (data) are written in different worksheets from the same Excel workbook. The object names are used for naming the different sheets.
The R code of the function is :
#+++++++++++++++++++++++++++
# xlsx.writeMultipleData
#+++++++++++++++++++++++++++++
# file : the path to the output file
# ... : a list of data to write to the workbook
xlsx.writeMultipleData <- function (file, ...)
  {
    require(xlsx, quietly = TRUE)
    objects <- list(...)
    fargs <- as.list(match.call(expand.dots = TRUE))
    objnames <- as.character(fargs)[-c(1, 2)]
    nobjects <- length(objects)
    for (i in 1:nobjects) {
        if (i == 1)
            write.xlsx(objects[[i]], file, sheetName = objnames[i])
        else write.xlsx(objects[[i]], file, sheetName = objnames[i],
            append = TRUE)
    }
  }
This function is inspired from the one published on statmethods website
The function xlsx.writeMultipleData works for data frames, matrices, time series, and tables.
Example of usage :
Use the R code below to save mtcars (a data frame), Titanic (a table), AirPassengers (a time series) and state.x77 (a matrix) :
xlsx.writeMultipleData("myworkbook.xlsx",
        mtcars, Titanic, AirPassengers, state.x77)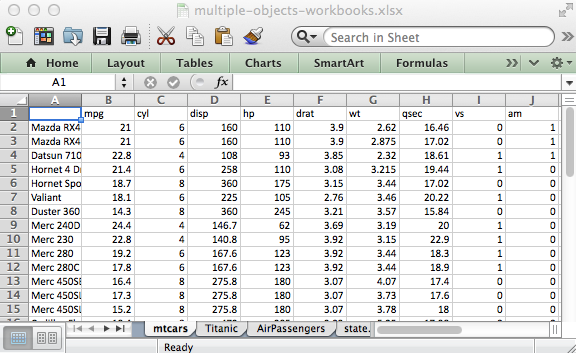
Create and format a nice Excel workbook
The function write.xlsx() is useful when you want just to write a data.frame to an xlsx file. The goal of this section is to show you how to create a nice Excel report containing a formatted data table and plots.
The following steps are required :
- Create a workbook
- Define some cell styles : Font color and size, text alignment, border and data format, …
- Write a table into an Excel spreadsheet using the defined styles in step 2.
- Save the workbook to a file
- Open and view the resulting workbook
In the next sections, I will show you step by step how to change the appearance of Excel worksheet in R. Note that, formatting Excel worksheets using xlsx R package requires some hard coding. This is why, I recently implemented the r2excel package which depends on xlsx package and it provides an easy to use functions to quickly import data from Excel files and to create a nice Excel report. r2excel package is described in my previous post : R Excel essentials : Read, write and format Excel files using R
Step 1/5. Create a new Excel workbook
The function createWorkbook() can be used. It works for both .xls and .xlsx file formats.
# create a new workbook for outputs
# possible values for type are : "xls" and "xlsx"
wb<-createWorkbook(type="xlsx")
Step 2/5. Define some cell styles for formating the workbook
We’ll define some cell styles to change :
- the appearance of the sheet title
- the appearance of the row and column names of the data table
- the text alignment for the table column names
- the cell borders around the column names
The R function CellStyle() can be used to create cell styles. A simplified format of the function is :
CellStyle(wb, dataFormat=NULL, alignment=NULL,
border=NULL, fill=NULL, font=NULL)- wb : a workbook object as returned by createWorkbook or loadWorkbook.
- dataFormat : a DataFormat object
- alignment : a Alignment object
- border : a Border object
- font : a Font object
# Define some cell styles
#++++++++++++++++++++
# Title and sub title styles
TITLE_STYLE <- CellStyle(wb)+ Font(wb,  heightInPoints=16,
                            color="blue", isBold=TRUE, underline=1)
SUB_TITLE_STYLE <- CellStyle(wb) +
                    Font(wb,  heightInPoints=14,
                          isItalic=TRUE, isBold=FALSE)
# Styles for the data table row/column names
TABLE_ROWNAMES_STYLE <- CellStyle(wb) + Font(wb, isBold=TRUE)
TABLE_COLNAMES_STYLE <- CellStyle(wb) + Font(wb, isBold=TRUE) +
    Alignment(wrapText=TRUE, horizontal="ALIGN_CENTER") +
    Border(color="black", position=c("TOP", "BOTTOM"),
pen=c("BORDER_THIN", "BORDER_THICK")) - wb : a workbook object as returned by
createWorkbookorloadWorkbook. - The main arguments for Font() function :
- color : font color
- heightInPoints : font size. Usual values are 10, 12, 14, etc
- isBold, isItalic : a logical indicating whether the font should be bold or italic
- underline : an integer specifying the thickness of the underline. Possible values are 0, 1, 2.
- name : the font to use; e.g: “Courier New”.
- The main arguments for Alignment() function :
- wrapText : a logical indicating whether the text should be wrapped.
- horizontal : the horizontal alignment. Possible values are : “ALIGN_CENTER”, “ALIGN_JUSTIFY”, “ALIGN_LEFT”, “ALIGN_RIGHT”.
- vertical : the vertical alignment. Possible values are : “VERTICAL_BOTTOM”, “VERTICAL_CENTER”, “VERTICAL_JUSTIFY”, “VERTICAL_TOP”
- rotation : a numerical value specifying the degrees you want to rotate the text in the cell. Default value is 0.
- The main arguments for Border() function :
- color : the border color; e.g : color=“red” or color =“#FF0000”
- position : the border position. Allowed values are : “BOTTOM”, “LEFT”, “TOP”, “RIGHT”
- pen : the pen style. Allowed values are : “BORDER_DASH_DOT”, “BORDER_DASH_DOT_DOT”, “BORDER_DASHED”, “BORDER_DOTTED”, “BORDER_DOUBLE”, “BORDER_HAIR”, “BORDER_MEDIUM”, “BORDER_MEDIUM_DASH_DOT”, “BORDER_MEDIUM_DASH_DOT_DOT”, “BORDER_MEDIUM_DASHED”, “BORDER_NONE”, “BORDER_SLANTED_DASH_DOT”, “BORDER_THICK”, “BORDER_THIN”.
Step 3/5. Write data and plots into the workbook
Create a new sheet in the workbook
To add data, the first step is to create a sheet in the workbook to contain the data. This can be done using the function creatSheet() :
# Create a new sheet in the workbook
sheet <- createSheet(wb, sheetName = "US State Facts")
Add a title into a worksheet
To add a title, the procedure is :
- create a new row
- create a cell in this row to contain the title.
- set the cell value.
To simplify the R code, I wrote a helper function for adding a title :
#++++++++++++++++++++++++
# Helper function to add titles
#++++++++++++++++++++++++
# - sheet : sheet object to contain the title
# - rowIndex : numeric value indicating the row to
  #contain the title
# - title : the text to use as title
# - titleStyle : style object to use for title
xlsx.addTitle<-function(sheet, rowIndex, title, titleStyle){
  rows <-createRow(sheet,rowIndex=rowIndex)
  sheetTitle <-createCell(rows, colIndex=1)
  setCellValue(sheetTitle[[1,1]], title)
  setCellStyle(sheetTitle[[1,1]], titleStyle)
}
Copy and paste the code of the function xlsx.addTitle into your R console before continuing.
# Add title
xlsx.addTitle(sheet, rowIndex=1, title="US State Facts",
      titleStyle = TITLE_STYLE)
# Add sub title
xlsx.addTitle(sheet, rowIndex=2,
      title="Data sets related to the 50 states of USA.",
      titleStyle = SUB_TITLE_STYLE)
Add a table into a worksheet
The function addDataframe() can be used to add the table in the new sheet.
state.x77 data table is used in the following example :
head(state.x77) Population Income Illiteracy Life Exp Murder HS Grad Frost Area
Alabama 3615 3624 2.1 69.05 15.1 41.3 20 50708
Alaska 365 6315 1.5 69.31 11.3 66.7 152 566432
Arizona 2212 4530 1.8 70.55 7.8 58.1 15 113417
Arkansas 2110 3378 1.9 70.66 10.1 39.9 65 51945
California 21198 5114 1.1 71.71 10.3 62.6 20 156361
Colorado 2541 4884 0.7 72.06 6.8 63.9 166 103766# Add a table
addDataFrame(state.x77, sheet, startRow=3, startColumn=1,
colnamesStyle = TABLE_COLNAMES_STYLE,
rownamesStyle = TABLE_ROWNAMES_STYLE)
# Change column width
setColumnWidth(sheet, colIndex=c(1:ncol(state.x77)), colWidth=11)- Arguments for addDataFrame() function :
- startRow, startColumn : a numeric value indicating the starting row and column
- colnameStyle, rownameStyle : A CellStyle object to customize the table header and row names
- Arguments for setColumnWidth() function :
- colIndex : a numeric vector indicating the columns you want to change the size.
- colWidth : the width of the column
Add a plot into an Excel worksheet
# create a png plot
png("boxplot.png", height=800, width=800, res=250, pointsize=8)
boxplot(count ~ spray, data = InsectSprays,
         col = "blue")
dev.off()
# Create a new sheet to contain the plot
sheet <-createSheet(wb, sheetName = "boxplot")
# Add a title to the sheet
xlsx.addTitle(sheet, rowIndex=1,
              title="Box plot using InsectSprays data",
              titleStyle = TITLE_STYLE)
# Add the plot created previously
addPicture("boxplot.png", sheet, scale = 1, startRow = 4,
          startColumn = 1)
# Remove the plot from the disk
res<-file.remove("boxplot.png")
Step 4/5. Save the Excel workbook to the disk
# Save the workbook to a file
saveWorkbook(wb, "r-xlsx-report-example.xlsx")
The complete R script to create a nice Excel report
The complete R script to create the workbook above is :
library(xlsx)
# create a new workbook for outputs
#++++++++++++++++++++++++++++++++++++
# possible values for type are : "xls" and "xlsx"
wb<-createWorkbook(type="xlsx")
# Define some cell styles
#++++++++++++++++++++++++++++++++++++
# Title and sub title styles
TITLE_STYLE <- CellStyle(wb)+ Font(wb,  heightInPoints=16,
                                   color="blue", isBold=TRUE, underline=1)
SUB_TITLE_STYLE <- CellStyle(wb) +
  Font(wb,  heightInPoints=14,
       isItalic=TRUE, isBold=FALSE)
# Styles for the data table row/column names
TABLE_ROWNAMES_STYLE <- CellStyle(wb) + Font(wb, isBold=TRUE)
TABLE_COLNAMES_STYLE <- CellStyle(wb) + Font(wb, isBold=TRUE) +
  Alignment(wrapText=TRUE, horizontal="ALIGN_CENTER") +
  Border(color="black", position=c("TOP", "BOTTOM"),
         pen=c("BORDER_THIN", "BORDER_THICK"))
# Create a new sheet in the workbook
#++++++++++++++++++++++++++++++++++++
sheet <- createSheet(wb, sheetName = "US State Facts")
#++++++++++++++++++++++++
# Helper function to add titles
#++++++++++++++++++++++++
# - sheet : sheet object to contain the title
# - rowIndex : numeric value indicating the row to
  #contain the title
# - title : the text to use as title
# - titleStyle : style object to use for title
xlsx.addTitle<-function(sheet, rowIndex, title, titleStyle){
  rows <-createRow(sheet,rowIndex=rowIndex)
  sheetTitle <-createCell(rows, colIndex=1)
  setCellValue(sheetTitle[[1,1]], title)
  setCellStyle(sheetTitle[[1,1]], titleStyle)
}
# Add title and sub title into a worksheet
#++++++++++++++++++++++++++++++++++++
# Add title
xlsx.addTitle(sheet, rowIndex=1, title="US State Facts",
      titleStyle = TITLE_STYLE)
# Add sub title
xlsx.addTitle(sheet, rowIndex=2,
      title="Data sets related to the 50 states of USA.",
      titleStyle = SUB_TITLE_STYLE)
# Add a table into a worksheet
#++++++++++++++++++++++++++++++++++++
addDataFrame(state.x77, sheet, startRow=3, startColumn=1,
             colnamesStyle = TABLE_COLNAMES_STYLE,
             rownamesStyle = TABLE_ROWNAMES_STYLE)
# Change column width
setColumnWidth(sheet, colIndex=c(1:ncol(state.x77)), colWidth=11)
# Add a plot into a worksheet
#++++++++++++++++++++++++++++++++++++
# create a png plot
png("boxplot.png", height=800, width=800, res=250, pointsize=8)
boxplot(count ~ spray, data = InsectSprays,
         col = "blue")
dev.off()
# Create a new sheet to contain the plot
sheet <-createSheet(wb, sheetName = "boxplot")
# Add title
xlsx.addTitle(sheet, rowIndex=1, title="Box plot using InsectSprays data",
      titleStyle = TITLE_STYLE)
# Add the plot created previously
addPicture("boxplot.png", sheet, scale = 1, startRow = 4,
           startColumn = 1)
# remove the plot from the disk
res<-file.remove("boxplot.png")
# Save the workbook to a file...
#++++++++++++++++++++++++++++++++++++
saveWorkbook(wb, "r-xlsx-report-example.xlsx")
Infos
This analysis has been performed using R (ver. 3.1.0).
Enjoyed this article? I’d be very grateful if you’d help it spread by emailing it to a friend, or sharing it on Twitter, Facebook or Linked In.
Show me some love with the like buttons below… Thank you and please don’t forget to share and comment below!!
Avez vous aimé cet article? Je vous serais très reconnaissant si vous aidiez à sa diffusion en l’envoyant par courriel à un ami ou en le partageant sur Twitter, Facebook ou Linked In.
Montrez-moi un peu d’amour avec les like ci-dessous … Merci et n’oubliez pas, s’il vous plaît, de partager et de commenter ci-dessous!
This tutorial explains how to read Excel files in R. More precisely, I will show you how to:
- Read an xlsx File with the read.xlsx Function of the xlsx Package (Example 1)
- Read an xlsx File with the read_excel Function of the readxl Package (Example 2)
- Read an xlsx File with the read.xlsx Function of the openxlsx Package (Example 3)
- Read a Specific Sheet of an Excel File (Example 4)
- Read Multiple Excel Files (Example 5)
- Read an xls File (Example 6)
So without further ado, let’s move on to the examples!
Example 1: Read xlsx File with read.xlsx Function (xlsx Package)
Before we can start with the examples, we need to create some example data and store it as xlsx Excel file on our computer.
The following R code loads the iris data set to RStudio:
data("iris")                                                     # Load iris data to RStudio
head(iris)                                                       # Print first 6 rows of iris
In order to write this data as xlsx file to our computer, we need to install and load the xlsx R package:
install.packages("xlsx")                                         # Install xlsx R package
library("xlsx")                                                  # Load xlsx R package to RStudio
The xlsx package includes the write.xlsx R function, which allows us to write Excel files to a working directory on our computer as follows:
xlsx::write.xlsx(iris,                                           # Write example Excel xlsx file
           "C:/ ... Your Path ... /iris.xlsx",
           row.names = FALSE)
After running the previous R syntax, you should find an xlsx file at the path that you have specified within the write.xlsx function. When you open the xlsx table it should look as follows:

Figure 1: Iris Data Set Exported as xlsx Excel File.
Finally, we are set up to read an xlsx Excel file to R!
The xlsx package, which we have just used to write an xlsx file to our PC, also provides the read.xlsx R function. We can use the function to load our Excel file to R as follows:
data1 <- xlsx::read.xlsx("C:/ ... Your Path ... /iris.xlsx",     # Read xlsx file with read.xlsx
                   sheetIndex = 1)
Call the data object data1 in your RStudio. You will see that it contains the iris data set that we have exported above.
In my personal opinion, the xlsx package is the package to go if you have to deal with xlsx files in R. However, there are several alternatives available and depending on your specific situation, you might prefer one of the other solutions.
In Examples 2 and 3 I’m going to explain two alternative packages for importing xlsx files (Tidyverse included). Keep on reading!
Example 2: Read xlsx File with read_excel Function (readxl Package)
The most popular alternative to the xlsx package (shown in Example 1) is the readxl package. The readxl package is part of the Tidyverse and therefore highly compatible with Tidyverse’s family of R packages (e.g. ggplot2 or dplyr).
First, we need to install and load the readxl package to R:
install.packages("readxl")                                       # Install readxl R package
library("readxl")                                                # Load readxl R package to RStudio
Now, we can use the read_excel function to load our example xlsx table into R:
data2 <- readxl::read_excel("C:/ ... Your Path ... /iris.xlsx") # Read xlsx file with read_excel
If you print the data object data2 to your RStudio console, you will see the following output:

Figure 2: Screenshot of Tibble in R.
As you can see, the read_excel command returns a tibble instead of a data frame (as read.xlsx did in Example 1).
Tibbles are the typical data representation of the Tidyverse and there have been hundreds of discussions whether tibbles are preferable to data frames.
However, in case you are working a lot with the dplyr or other packages of the Tidyverse environment, you might prefer read_excel instead of read.xlsx. In the end, it’s a matter of taste!
Example 3: Read xlsx File with read.xlsx Function (openxlsx Package)
I’m showing you the third example due to two reasons:
- The openxlsx package is also fairly popular among R users.
- The openxlsx and the xlsx package often lead to confusion, since both packages contain a function that is called read.xlsx.
Let’s have a look at the R syntax!
First, we need to install and load the openxlsx package in R…
install.packages("openxlsx")                                     # Install openxlsx R package
library("openxlsx")                                              # Load openxlsx R package to R
…and then we can apply the read.xlsx function as follows:
data3 <- openxlsx::read.xlsx("C:/ ... Your Path ... /iris.xlsx") # Read with read.xlsx of openxlsx
Note: I had to specify explicitly that I want to use the openxlsx package (by typing openxlsx::) instead of the xlsx package, since both packages contain a read.xlsx function.
The basic R output of both functions is the same. However, openxlsx and xlsx provide different additional specifications for the read.xlsx functions.
There are even more packages and functions that enable the import of Excel files to R (e.g. gdata, XLConnect, RODBC, xlsReadWrite [not on CRAN anymore], or the read.table function which is available in base R).
However, I think we covered the most important ones and for that reason I’m now going to move on to some more complex situations.
Let’s dive in!
Example 4: Read Specific Sheet of Excel File in R
Excel files often contain several worksheets in one file. This can lead to problems, since each data matrix is usually stored in a single data object in R.
Fortunately, we are able to load only one specific worksheet from an Excel file – And that’s what I’m going to show you in this example.
Let’s first extent our previously created example file (i.e. the iris data set) with another sheet. The following R code loads the mtcars data set to R:
data("mtcars")                                                   # Load mtcars data to RStudio
head(mtcars)                                                     # Print first 6 rows of mtcars
Now we can append this data set to our already existing Excel file as follows:
xlsx::write.xlsx(mtcars,                                         # Write second sheet to Excel file
                 "C:/ ... Your Path ... /iris.xlsx",
                 row.names = FALSE,
                 append = TRUE,                                  # Specify that data gets appended
                 sheetName = "mtcars")
If you have a look at our Excel file, you will see that the file now contains a second sheet:

Figure 3: Excel File with Two Sheets.
Now let’s assume that we only want to import the second sheet (i.e. the mtcars data frame) into R. Then we can simply specify that with the sheetName option of the read.xlsx function of the xlsx package:
data_sh2 <- xlsx::read.xlsx("C:/ ... Your Path ... /iris.xlsx",  # Read second sheet of Excel file
                            sheetName = "mtcars")
If you now have a look at data_sh2, you will se that it contains the mtcars data set.
Example 5: Import Multiple Excel Files to R
Reading every Excel file on your computer one by one might be time consuming, depending on the amount of Excel files you want to import. But no worries, R allows to load multiple Excel files at the same time.
First, let’s create a second Excel file in our currently used working directory:
xlsx::write.xlsx(mtcars,                                         # Write mtcars as separate Excel file
                 "C:/ ... Your Path ... /mtcars.xlsx",
                 row.names = FALSE)
If we want to read both our example files (i.e. iris.xlsx and mtcars.xlsx), we first need to extract the names of all files. Of course we could do that manually, but using the list.files function as in the following R code is much quicker:
all_file_names <- list.files(pattern = "*.xlsx")                 # Grab list of all xlsx files
all_file_names                                                   # Print list of xlsx files
# "iris.xlsx"   "mtcars.xlsx"
The vector all_file_names includes all xlsx file names as character string.
Now we can combine lapply and the read_excel function of the readxl package to store the content of all Excel files in a list:
data_list <- lapply(all_file_names, read_excel)                  # Read multiple excel files
data_list                                                        # Print list of data.frames
Note that all data were stored as tibbles, since we are using the readxl package:

Figure 4: Importing Multiple Excel Files to R.
Example 6: Read xls File in R
Old but gold?! To be honest, I’m not really using the xls file format anymore.
However, if you have some xls files that you need to read into R, you might be asking yourself how you could do this. For that reason, I’m going to show you in this example how to read an xls file to R.
First; let’s create an example xls file on our PC. Similarly as in the previous examples, we can use the write.xlsx function of the xlsx package. We simply need to change the file extension from xlsx to xls:
xlsx::write.xlsx(iris,                                           # Write xls Excel file
                 "C:/ ... Your Path ... /iris.xls",
                 row.names = FALSE)
Now we can load this xls file to R as follows:
data_xls <- xlsx::read.xlsx("C:/ ... Your Path ... /iris.xls",   # Read xls Excel file
                            sheetIndex = 1)
Exactly the same as in Example 1, just with xls instead of xlsx.
Tutorial Video & Further Resources for the Handling of Excel Files
Still have problems on this topic? Check out the video below where I explain the steps of this article more detailed:
At this point, I have shown you basically all I know about reading Excel tables into R. However, it wouldn’t be the R programming language if there would not be more interesting stuff to learn.
If you want to deepen your knowledge about the handling of Excel files from within R, I can recommend the following YouTube video of the MarinStatsLectures – R Programming & Statistics channel. The video explains how to deal with Excel files in R in a more general manner, also including csv and txt files.
Furthermore, you might also want to have a look at the other R tutorials of this website. I am publishing new articles on a regular basis:
- How to Export Data from R to Excel
- Save & Load RData Workspace Files
- List of Useful R Functions
- The R Programming Language
I hope I was able to teach you how to read Excel files into R. However, in case you have any further questions, don’t hesitate to let me know in the comments!
.xlsx – это расширение документа Excel, который может хранить большой объем данных в табличной форме. Более того, в электронной таблице Excel можно легко выполнять многие виды арифметических и логических вычислений.
Иногда программистам требуется прочитать данные из документа Excel. В Python для этого есть множество различных библиотек, например, xlrd, openpyxl и pandas. Сегодня мы поговорим о том, как читать excel-файлы (xlsx) при помощи Python, и рассмотрим примеры использования различных библиотек для этих целей.
Для начала
Для проверки примеров этого руководства потребуется какой-нибудь файл Excel с расширением .xlsx, содержащий какие-либо исходные данные. Вы можете использовать любой существующий файл Excel или создать новый. Мы создадим новый файл с именем sales.xlsx со следующими данными:
sales.xlsx
| Sales Date | Sales Person | Amount |
|---|---|---|
| 12/05/18 | Sila Ahmed | 60000 |
| 06/12/19 | Mir Hossain | 50000 |
| 09/08/20 | Sarmin Jahan | 45000 |
| 07/04/21 | Mahmudul Hasan | 30000 |
Этот файл мы и будем читать с помощью различных библиотек Python в следующей части этого руководства.
Чтение Excel-файла с помощью xlrd
Библиотека xlrd не устанавливается вместе с Python по умолчанию, так что ее придется установить. Последняя версия этой библиотеки, к сожалению, не поддерживает Excel-файлы с расширением .xlsx. Поэтому устанавливаем версию 1.2.0. Выполните следующую команду в терминале:
pip install xlrd == 1.2.0
После завершения процесса установки создайте Python-файл, в котором мы будем писать скрипт для чтения файла sales.xlsx с помощью модуля xlrd.
Воспользуемся функцией open_workbook() для открытия файла xlsx для чтения. Этот файл Excel содержит только одну таблицу. Поэтому функция workbook.sheet_by_index() используется в скрипте со значением аргумента 0.
Затем используем вложенный цикл for. С его помощью мы будем перемещаться по ячейкам, перебирая строки и столбцы. Также в скрипте используются две функции range() для определения количества строк и столбцов в таблице.
Для чтения значения отдельной ячейки таблицы на каждой итерации цикла воспользуемся функцией cell_value() . Каждое поле в выводе будет разделено одним пробелом табуляции.
import xlrd

# Open the Workbook
workbook = xlrd.open_workbook("sales.xlsx")

# Open the worksheet
worksheet = workbook.sheet_by_index(0)

# Iterate the rows and columns
for i in range(0, 5):
    for j in range(0, 3):
        # Print the cell values with tab space
        print(worksheet.cell_value(i, j), end='t')
    print('')
Запустим наш код и получим следующий результат.

Чтение Excel-файла с помощью openpyxl
Openpyxl – это еще одна библиотека Python для чтения файла .xlsx, и она также не идет по умолчанию вместе со стандартным пакетом Python. Чтобы установить этот модуль, выполните в терминале следующую команду:
pip install openpyxl
После завершения процесса установки можно начинать писать код для чтения файла sales.xlsx.
Как и модуль xlrd, модуль openpyxl имеет функцию load_workbook() для открытия excel-файла для чтения. В качестве значения аргумента этой функции используется файл sales.xlsx.
Объект wookbook.active служит для чтения значений свойств max_row и max_column. Эти свойства используются во вложенных циклах for для чтения содержимого файла sales.xlsx.
Функцию range() используем для чтения строк таблицы, а функцию iter_cols() — для чтения столбцов. Каждое поле в выводе будет разделено двумя пробелами табуляции.
import openpyxl

# Define variable to load the wookbook
wookbook = openpyxl.load_workbook("sales.xlsx")

# Define variable to read the active sheet:
worksheet = wookbook.active

# Iterate the loop to read the cell values
for i in range(0, worksheet.max_row):
    for col in worksheet.iter_cols(1, worksheet.max_column):
        print(col[i].value, end="tt")
    print('')
Запустив наш скрипт, получим следующий вывод.

Чтение Excel-файла с помощью pandas
Если вы не пользовались библиотекой pandas ранее, вам необходимо ее установить. Как и остальные рассматриваемые библиотеки, она не поставляется вместе с Python. Выполните следующую команду, чтобы установить pandas из терминала.
pip install pandas
После завершения процесса установки создаем файл Python и начинаем писать следующий скрипт для чтения файла sales.xlsx.
В библиотеке pandas есть функция read_excel(), которую можно использовать для чтения .xlsx-файлов. Ею мы и воспользуемся в нашем скрипте для чтения файла sales.xlsx.
Функция DataFrame() используется для чтения содержимого нашего файла и преобразования имеющейся там информации во фрейм данных. После мы сохраняем наш фрейм в переменной с именем data. А дальше выводим то, что лежит в data, в консоль.
import pandas as pd

# Load the xlsx file
excel_data = pd.read_excel('sales.xlsx')
# Read the values of the file in the dataframe
data = pd.DataFrame(excel_data, columns=['Sales Date', 'Sales Person', 'Amount'])
# Print the content
print("The content of the file is:n", data)
После запуска кода мы получим следующий вывод.

Результат работы этого скрипта отличается от двух предыдущих примеров. В первом столбце печатаются номера строк, начиная с нуля. Значения даты выравниваются по центру. Имена продавцов выровнены по правому краю, а сумма — по левому.
Заключение
Программистам довольно часто приходится работать с файлами .xlsx. Сегодня мы рассмотрели, как читать excel-файлы при помощи Python. Мы разобрали три различных способа с использованием трех библиотек. Все эти библиотеки имеют разные функции и свойства.
Надеемся, теперь у вас не возникнет сложностей с чтением этих файлов в ваших скриптах.
17 авг. 2022 г.
читать 1 мин
Самый простой способ импортировать файл Excel в R — использовать функцию read_excel() из пакета readxl .
Эта функция использует следующий синтаксис:
read_excel (путь, лист = NULL)
куда:
- path: Путь к файлу xls/xlsx
- лист: Лист для чтения. Это может быть имя листа или положение листа. Если это не указано, читается первый лист.
В этом руководстве представлен пример использования этой функции для импорта файла Excel в R.
Пример: импорт файла Excel в R
Предположим, у меня есть файл Excel, сохраненный в следующем месте:
C:UsersБобРабочий столdata.xlsx
Файл содержит следующие данные:
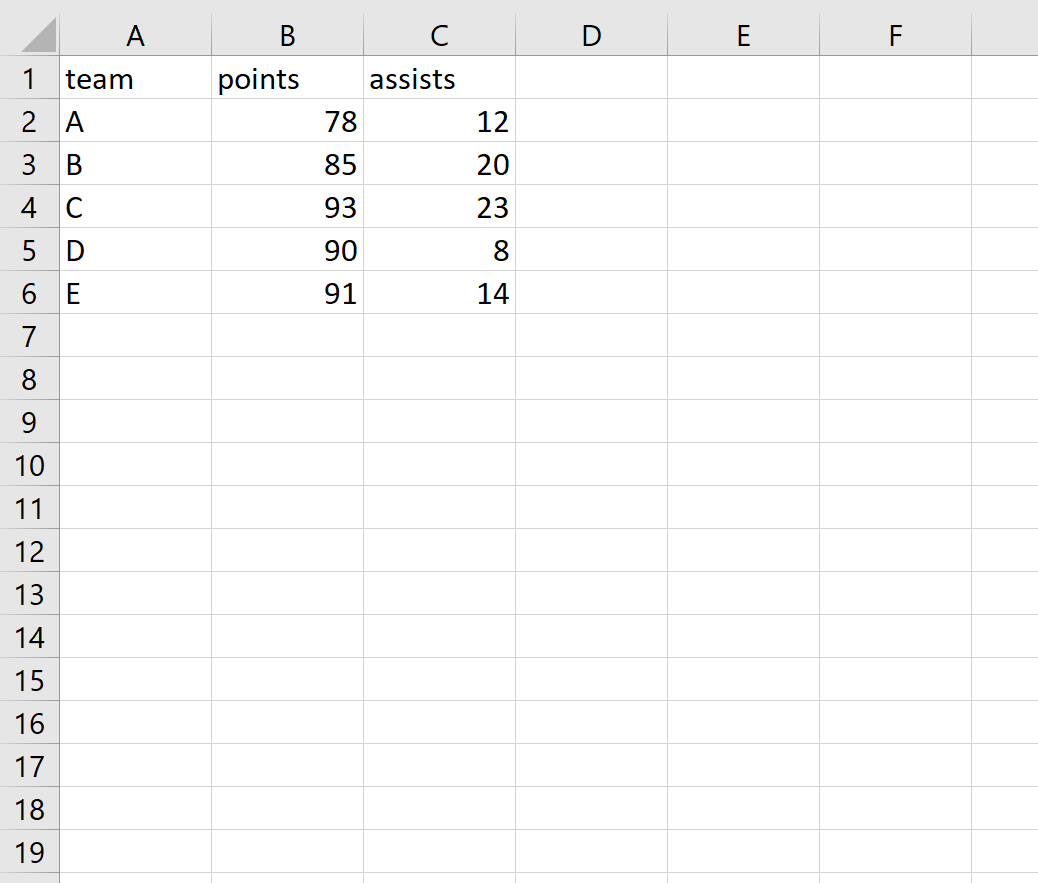
В следующем коде показано, как импортировать этот файл Excel в R:
#install and load readxl package
install.packages('readxl')
library (readxl)

#import Excel file into R
data <- read_excel('C:\Users\Bob\Desktop\data.xlsx')
Обратите внимание, что мы использовали двойную обратную косую черту () в пути к файлу, чтобы избежать следующей распространенной ошибки:
Error: 'U' used without hex digits in character string starting ""C:U"
Мы можем использовать следующий код для быстрого просмотра данных:
#view entire dataset
data

#A tibble: 5 x 3
 team points assists
 <chr> <dbl> <dbl>
1 A 78 12
2 B 85 20
3 C 93 23
4 D 90 8
5 E 91 14
Мы видим, что R импортировал файл Excel и автоматически определил, что команда является строковой переменной, а очки и передачи — числовыми переменными.
Дополнительные ресурсы
В следующих руководствах объясняется, как импортировать другие типы файлов в R:
Как импортировать файлы CSV в R
Как импортировать файлы SAS в R
Как вручную вводить необработанные данные в R
Написано
![]()
Замечательно! Вы успешно подписались.
Добро пожаловать обратно! Вы успешно вошли
Вы успешно подписались на кодкамп.
Срок действия вашей ссылки истек.
Ура! Проверьте свою электронную почту на наличие волшебной ссылки для входа.
Успех! Ваша платежная информация обновлена.
Ваша платежная информация не была обновлена.