
In this article I will explain with an example, how to read (import) Excel file in ASP.Net Core MVC.
The uploaded Excel file data will be read using OLEDB library and the read data will be inserted into SQL Server database using SqlBulkCopy class in ASP.Net Core MVC.
Database
I have made use of the following table Customers with the schema as follows. CustomerId is an Auto-Increment (Identity) column.
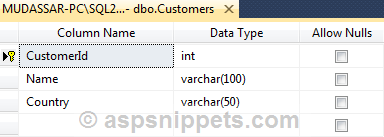
Note: You can download the database table SQL by clicking the download link below.
Downloading System.Data.OleDb Package from NuGet
You will need to install the System.Data.OleDb package using the following command.
Install-Package System.Data.OleDb -Version 4.7.1
Downloading and installing Microsoft.ACE.OLEDB.12.0 provider
You will need to download and install the Microsoft.ACE.OLEDB.12.0 provider using the following link.
Connection Strings in AppSettings.json file
The connection string to the Database and Excel file are saved in the AppSettings.json file.
The DataSource property has been assigned a Placeholder {0}, which will be replaced by actual path of the File.
{
«ConnectionStrings»: {
«constr»: «Data Source=.\SQL2017;Initial Catalog=AjaxSamples;Integrated Security=true»,
«ExcelConString»: «Provider=Microsoft.ACE.OLEDB.12.0;Data Source={0};Extended Properties=’Excel 8.0;HDR=YES'»
}
}
Namespaces
You will need to import the following namespaces.
using System.IO;
using System.Data;
using System.Data.OleDb;
using System.Data.SqlClient;
using Microsoft.AspNetCore.Hosting;
using Microsoft.AspNetCore.Http;
using Microsoft.AspNetCore.Mvc;
using Microsoft.Extensions.Configuration;
Controller
The Controller consists of two Action methods.
Action method for handling GET operation
Inside this Action method, simply the View is returned.
Action method for handling POST operation for uploading and reading Excel file
This Action method gets called when the Excel File is selected and the Import Button is clicked, and it gets the uploaded file in the IFormFile parameter.
The uploaded Excel file is saved to a folder named Uploads and then connection string is read from the Web.Config file and Placeholder is replaced by the path of the Excel file.
Using the fetched Sheet name, a SELECT statement is executed and all the records from the Excel sheet are fetched into a DataTable.
Note: I am considering all Excel files with the first row as the Header Row containing the names of the columns, you can set HDR=’No’ if your excel file does not have a Header Row.
Now a connection is established with the database and the SqlBulkCopy object is initialized and I have specified the name of the Table using the DestinationTableName property.
Finally the columns are mapped and all the rows from the DataTable are inserted into the SQL Server table.
Note: The mapping of columns of the DataTable and the SQL Server table is optional and you need to do only in case where your DataTable and/or the SQL Server Table do not have same number of columns or the names of columns are different.
public class HomeController : Controller
{
private IHostingEnvironment Environment;
private IConfiguration Configuration;
public HomeController(IHostingEnvironment _environment, IConfiguration _configuration)
{
Environment = _environment;
Configuration = _configuration;
}
public IActionResult Index()
{
return View();
}
[HttpPost]
public IActionResult Index(IFormFile postedFile)
{
if (postedFile != null)
{
//Create a Folder.
string path = Path.Combine(this.Environment.WebRootPath, «Uploads»);
if (!Directory.Exists(path))
{
Directory.CreateDirectory(path);
}
//Save the uploaded Excel file.
string fileName = Path.GetFileName(postedFile.FileName);
string filePath = Path.Combine(path, fileName);
using (FileStream stream = new FileStream(filePath, FileMode.Create))
{
postedFile.CopyTo(stream);
}
//Read the connection string for the Excel file.
string conString = this.Configuration.GetConnectionString(«ExcelConString»);
DataTable dt = new DataTable();
conString = string.Format(conString, filePath);
using (OleDbConnection connExcel = new OleDbConnection(conString))
{
using (OleDbCommand cmdExcel = new OleDbCommand())
{
using (OleDbDataAdapter odaExcel = new OleDbDataAdapter())
{
cmdExcel.Connection = connExcel;
//Get the name of First Sheet.
connExcel.Open();
DataTable dtExcelSchema;
dtExcelSchema = connExcel.GetOleDbSchemaTable(OleDbSchemaGuid.Tables, null);
string sheetName = dtExcelSchema.Rows[0][«TABLE_NAME»].ToString();
connExcel.Close();
//Read Data from First Sheet.
connExcel.Open();
cmdExcel.CommandText = «SELECT * From [« + sheetName + «]»;
odaExcel.SelectCommand = cmdExcel;
odaExcel.Fill(dt);
connExcel.Close();
}
}
}
//Insert the Data read from the Excel file to Database Table.
conString = this.Configuration.GetConnectionString(«constr»);
using (SqlConnection con = new SqlConnection(conString))
{
using (SqlBulkCopy sqlBulkCopy = new SqlBulkCopy(con))
{
//Set the database table name.
sqlBulkCopy.DestinationTableName = «dbo.Customers»;
//[OPTIONAL]: Map the Excel columns with that of the database table.
sqlBulkCopy.ColumnMappings.Add(«Id», «CustomerId»);
sqlBulkCopy.ColumnMappings.Add(«Name», «Name»);
sqlBulkCopy.ColumnMappings.Add(«Country», «Country»);
con.Open();
sqlBulkCopy.WriteToServer(dt);
con.Close();
}
}
}
return View();
}
}
View
The View consists of an HTML Form with following ASP.Net Tag Helpers attributes.
asp-action – Name of the Action. In this case the name is Index.
asp-controller – Name of the Controller. In this case the name is Home.
method – It specifies the Form Method i.e. GET or POST. In this case it will be set to POST.
The Form consists of an HTML FileUpload element and a Submit Button.
@addTagHelper*, Microsoft.AspNetCore.Mvc.TagHelpers
@{
Layout = null;
}
<!DOCTYPE html>
<html>
<head>
<meta name=»viewport» content=»width=device-width»/>
<title>Index</title>
</head>
<body>
<form asp-controller=»Home» asp-action=»Index» method=»post» enctype=»multipart/form-data»>
<input type=»file» name=»postedFile»/>
<input type=»submit» value=»Import»/>
</form>
</body>
</html>
Screenshots
The Excel File
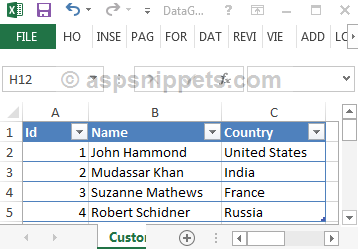
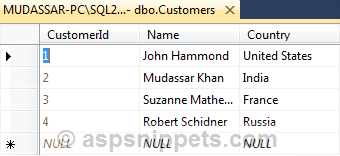
Table containing the data from the Excel file
Downloads

In this article we will implement Excel import and Export in ASP.Net Core 5
You can also watch the full Video on Youtube
And you can find the full source code on GitHub:
https://github.com/mohamadlawand087/v27-ExcelImportExport
Ingredients
Visual Studio Code (https://code.visualstudio.com/)
.Net 5 SDK (https://dotnet.microsoft.com/download)
The first thing we are going to do is check the dotnet version installed
dotnet --version
Enter fullscreen mode
Exit fullscreen mode
Now we need to create our application
dotnet new mvc -n "SampleExcel"
Enter fullscreen mode
Exit fullscreen mode
Now let us open our source code
The first thing we are going to do is build the application and run it so we can see that everything is running as it should be.
dotnet run
Enter fullscreen mode
Exit fullscreen mode
The next step is for us to install the excel package that we want to utilise and for this we are going to be using EPP
dotnet add package EPPlus.Core --version 1.5.4
Enter fullscreen mode
Exit fullscreen mode
Once the package is installed we are going to create our Model which will handle the information output.
In the root directory inside that folder let us create a new class called User
public class User
{
    public string Name { get; set; }
    public string Email { get; set; }
    public string Phone { get; set; }
}
Enter fullscreen mode
Exit fullscreen mode
Now let us create a new controller which will be responsible to handle the excel import and export, inside the controllers folder lets create a new Controller called UsersController and will add the export to excel functionality
public class UsersController : Controller
{
    private readonly ILogger<UsersController> _logger;

    public UsersController(ILogger<UsersController> logger)
    {
        _logger = logger;
    }

    public IActionResult Index()
    {
        var users = GetlistOfUsers();

        return View(users);
    }

    public IActionResult ExportToExcel()
    {
        // Get the user list
        var users = GetlistOfUsers();

        var stream = new MemoryStream();
        using (var xlPackage = new ExcelPackage(stream))
        {
            var worksheet = xlPackage.Workbook.Worksheets.Add("Users");
            var namedStyle = xlPackage.Workbook.Styles.CreateNamedStyle("HyperLink");
            namedStyle.Style.Font.UnderLine = true;
            namedStyle.Style.Font.Color.SetColor(Color.Blue);
            const int startRow = 5;
            var row = startRow;

            //Create Headers and format them
            worksheet.Cells["A1"].Value = "Sample";
            using (var r = worksheet.Cells["A1:C1"])
            {
                r.Merge = true;
                r.Style.Font.Color.SetColor(Color.White);
                r.Style.HorizontalAlignment = OfficeOpenXml.Style.ExcelHorizontalAlignment.CenterContinuous;
                r.Style.Fill.PatternType = OfficeOpenXml.Style.ExcelFillStyle.Solid;
                r.Style.Fill.BackgroundColor.SetColor(Color.FromArgb(23, 55, 93));
            }

            worksheet.Cells["A4"].Value = "Name";
            worksheet.Cells["B4"].Value = "Email";
            worksheet.Cells["C4"].Value = "Phone";
            worksheet.Cells["A4:C4"].Style.Fill.PatternType = ExcelFillStyle.Solid;
            worksheet.Cells["A4:C4"].Style.Fill.BackgroundColor.SetColor(Color.FromArgb(184, 204, 228));
            worksheet.Cells["A4:C4"].Style.Font.Bold = true;

            row = 5;
            foreach (var user in users)
            {
                    worksheet.Cells[row, 1].Value = user.Name;
                    worksheet.Cells[row, 2].Value = user.Email;
                    worksheet.Cells[row, 3].Value = user.Phone;

                    row++;
            }

            // set some core property values
            xlPackage.Workbook.Properties.Title = "User List";
            xlPackage.Workbook.Properties.Author = "Mohamad Lawand";
            xlPackage.Workbook.Properties.Subject = "User List";
            // save the new spreadsheet
            xlPackage.Save();
            // Response.Clear();
        }
        stream.Position = 0;
        return File(stream, "application/vnd.openxmlformats-officedocument.spreadsheetml.sheet", "users.xlsx");
    }

    // Mimic a database operation
    private List<User> GetlistOfUsers()
    {
        var users = new List<User>()
        {
            new User {
                Email = "mohamad@email.com",
                Name = "Mohamad",
                Phone = "123456"
            },
            new User {
                Email = "donald@email.com",
                Name = "donald",
                Phone = "222222"
            },
            new User {
                Email = "mickey@email.com",
                Name = "mickey",
                Phone = "33333"
            }
        };

        return users;
    }
}
Enter fullscreen mode
Exit fullscreen mode
Now let us update the views inside the Views folder let us create a new folder called Users and inside the Users folder we will create a new file Index.cshtml
@model List<SampleExcel.Models.User>

<div class="row">
    <div class="col-md-16">
        <a asp-action="ExportToExcel" asp-controller="Users" class="btn btn-primary">Export to Excel</a>
    </div>
    <div class="col-md-16">
        <a asp-action="BatchUserUpload" asp-controller="Users" class="btn btn-primary">Import from Excel</a>
    </div>
</div>

<div class="row">
    <div class="col-md-12">
        <table class="table">
            <thead>
                <tr>
                    <th>Name</th>
                    <th>Email</th>
                    <th>Phone</th>
                </tr>
            </thead>
            <tbody>
                @foreach (var item in Model)
                {
                    <tr>
                        <td>@item.Name</td>
                        <td>@item.Email</td>
                        <td>@item.Phone</td>
                    </tr>
                }
            </tbody>
        </table>
    </div>
</div>
Enter fullscreen mode
Exit fullscreen mode
Now let us update the controller with an import functionality
[HttpGet]
public IActionResult BatchUserUpload()
{
    return View();
}

[HttpPost]
[ValidateAntiForgeryToken]
public IActionResult BatchUserUpload(IFormFile batchUsers)
{

    if (ModelState.IsValid)
    {
        if (batchUsers?.Length > 0)
        {
            var stream = batchUsers.OpenReadStream();
            List<User> users = new List<User>();
            try
            {
                using (var package = new ExcelPackage(stream))
                {
                    var worksheet = package.Workbook.Worksheets.First();//package.Workbook.Worksheets[0];
                    var rowCount = worksheet.Dimension.Rows;

                    for (var row = 2; row <= rowCount; row++)
                    {
                        try
                        {

                            var name = worksheet.Cells[row, 1].Value?.ToString();
                            var email = worksheet.Cells[row, 2].Value?.ToString();
                            var phone = worksheet.Cells[row, 3].Value?.ToString();

                            var user = new User()
                            {
                                Email = email,
                                Name = name,
                                Phone = phone
                            };

                            users.Add(user);

                        }
                        catch(Exception ex)
                        {
                            Console.WriteLine("Something went wrong");
                        }
                    }
                }

                return View("Index", users);

            }
            catch(Exception e)
            {
                return View();
            }
        }
    }

    return View();
}
Enter fullscreen mode
Exit fullscreen mode
As well we need to update the view inside the Views ⇒ Users folders we need to create a new file called BatchUserUpload.cshtml and add the following
<div class="row">
    <div class="col-md-12">
        <form asp-action="BatchUserUpload" asp-controller="Users" method="post" id="create-form" enctype="multipart/form-data">
            <div class="form-group">
                <label class="control-label">
                        Upload File:
                </label>
                <input id="batchUsers" name="batchUsers" class="form-control" type="file" tabindex="14">
                <span class="form-text text-muted">Allowed file types:  xlsx, xls.</span>
            </div>
            <div class="card-footer">
                <center>
                    <button type="submit" class="btn btn-primary mr-2">Upload Users</button>
                    <a asp-action="Index" asp-controller="Users" class="btn btn-secondary">Cancel</a>
                </center>
            </div>
        </form>
    </div>
</div>
Enter fullscreen mode
Exit fullscreen mode
Thank you for reading, please ask your questions in the comments.

Today in this article, we shall see how to perform Read and Write Excel files in .NET Core-based application.
You must be wondering if there is an easy way to work on Excel in the .NET Core framework.
Here I am going to talk about a very simple approach of using OpenXML SDK from Microsoft (which is free and open-source).
The OpenXML SDK provides API for working with Office Word, Excel, and PowerPoint documents.
This SDK can be installed from NuGet as a package.
Today, in this article we shall cover below,
- You don’t need Microsoft Office
- Read the content of the excel file using OpenXML API
- Read Excel as JSON
- Read Excel with Empty cell values
- Export/Create/Write data to Excel using OpenXML
- Summary
You don’t need Microsoft Office
Please note that Read, and Create Excel(.xls, .xlsx) in C# is possible without installing Microsoft Office.
Yes, you don’t really need Microsoft Office to be installed on the machine.
Today we will see a few possible and easy-to-implement approaches.
If you are interested in a few more approaches like using EPPlus or NPOI library, kindly visit the below post for more details,
- Read/Write Excel files in .NET Core using EPPlus
- Read/Write Excel files in .NET Core using NPOI
Getting Started
Let’s create a .NET Core project, you can choose any project template, and this SDK works perfectly for all projects. Here to keep it simple I am using a Console .NET Core 3.1 C# application.
(Below logic works perfectly fine for older .NET Core 2.x or any new .NET 5 or 6 version)

The NuGet package name is DocumentFormat.OpenXml. Let’s install this package,
PM> Install-Package Open-XML-SDK -Version 2.9.0
Note: Please use the latest available version.
OR
Please install it from the Nuget package manager,

Once you install this NuGet package, you get full library support on Reading, Writing Excel (.xlsx), Word (.doc), or Powerpoint(.ppt) files using C# API.
Let’s look at an example, I have a simple Excel file with the below column and row details. Let’s try to read the file using our API,

Read the content of the excel file using OpenXML API
POC example as below. This ready to use API can be used in .NET Core console, or Test project or ASP.NET Core application or logic can be modified or improved as per your requirements.
Sample methods are as below,
  static void ReadExcelFile()
        {
            try
            {
                //Lets open the existing excel file and read through its content . Open the excel using openxml sdk
                using (SpreadsheetDocument doc = SpreadsheetDocument.Open("testdata.xlsx", false))
                {
                    //create the object for workbook part
                    WorkbookPart workbookPart = doc.WorkbookPart;
                    Sheets thesheetcollection = workbookPart.Workbook.GetFirstChild<Sheets>();
                    StringBuilder excelResult = new StringBuilder();

                    //using for each loop to get the sheet from the sheetcollection
                    foreach (Sheet thesheet in thesheetcollection)
                    {
                        excelResult.AppendLine("Excel Sheet Name : " + thesheet.Name);
                        excelResult.AppendLine("----------------------------------------------- ");
                        //statement to get the worksheet object by using the sheet id
                        Worksheet theWorksheet = ((WorksheetPart)workbookPart.GetPartById(thesheet.Id)).Worksheet;

                        SheetData thesheetdata = (SheetData)theWorksheet.GetFirstChild<SheetData>();
                        foreach (Row thecurrentrow in thesheetdata)
                        {
                            foreach (Cell thecurrentcell in thecurrentrow)
                            {
                                //statement to take the integer value
                                string currentcellvalue = string.Empty;
                                if (thecurrentcell.DataType != null)
                                {
                                    if (thecurrentcell.DataType == CellValues.SharedString)
                                    {
                                        int id;
                                        if (Int32.TryParse(thecurrentcell.InnerText, out id))
                                        {
                                            SharedStringItem item = workbookPart.SharedStringTablePart.SharedStringTable.Elements<SharedStringItem>().ElementAt(id);
                                            if (item.Text != null)
                                            {
                                                //code to take the string value
                                                excelResult.Append(item.Text.Text + " ");
                                            }
                                            else if (item.InnerText != null)
                                            {
                                                currentcellvalue = item.InnerText;
                                            }
                                            else if (item.InnerXml != null)
                                            {
                                                currentcellvalue = item.InnerXml;
                                            }
                                        }
                                    }
                                }
                                else
                                {
                                    excelResult.Append(Convert.ToInt16(thecurrentcell.InnerText) + " ");
                                }
                            }
                            excelResult.AppendLine();
                        }
                        excelResult.Append("");
                        Console.WriteLine(excelResult.ToString());
                        Console.ReadLine();
                    }
                }
            }
            catch (Exception)
            {

            }
        }
After executing the above logic, one can easily read all the Excel details.
- In the above example, I have used the file “testdata.xlsx” as input. I have kept this file in the output directory binDebug
- Also if needed you can keep the file locally for ex.
string strDoc = @”C:UsersPublicDocumentstestdata.xlsx” then use the method as below,
using (SpreadsheetDocument doc = SpreadsheetDocument.Open(strDoc, false))
I am showing the results on a console,
One can map the above output details to respective C# class objects using the mapping logic of their choice.
This way data can be transferred for further processing within the application if needed. For example for write operations, I have used a similar C# class UserDetails.
Read Excel as JSON
If you are interested to convert Excel as JSON it’s easy too. Please see here to know more about the same.
- Read Excel as JSON using OpenXML SDK
Read Excel with Empty cell values
If you are interested to export Excel in C# with empty cell values, please see here one approach to reading excel data appropriately.
- Read Excel with Empty cell values using OpenXML SDK
Export/Create/Write data to Excel using OpenXML
Let’s try now try to create or write the data to an Excel file.
Here is the sample data/object which we want to save as an Excel file.
Here we need to use the OpenXML Create () C# method as shown below,
I am creating a new Excel file in the same project folder to keep everything simple. (Excel file will get created in the ‘bin‘ folder of the project)
The complete logic can be found below,
 static void WriteExcelFile()
        {
            List<UserDetails> persons = new List<UserDetails>()
            {
                new UserDetails() {ID="1001", Name="ABCD", City ="City1", Country="USA"},
                new UserDetails() {ID="1002", Name="PQRS", City ="City2", Country="INDIA"},
                new UserDetails() {ID="1003", Name="XYZZ", City ="City3", Country="CHINA"},
                new UserDetails() {ID="1004", Name="LMNO", City ="City4", Country="UK"},
           };

            // Lets converts our object data to Datatable for a simplified logic.
            // Datatable is most easy way to deal with complex datatypes for easy reading and formatting.
            DataTable table = (DataTable)JsonConvert.DeserializeObject(JsonConvert.SerializeObject(persons), (typeof(DataTable)));

            using (SpreadsheetDocument document = SpreadsheetDocument.Create("TestNewData.xlsx", SpreadsheetDocumentType.Workbook))
            {
                WorkbookPart workbookPart = document.AddWorkbookPart();
                workbookPart.Workbook = new Workbook();

                WorksheetPart worksheetPart = workbookPart.AddNewPart<WorksheetPart>();
                var sheetData = new SheetData();
                worksheetPart.Worksheet = new Worksheet(sheetData);

                Sheets sheets = workbookPart.Workbook.AppendChild(new Sheets());
                Sheet sheet = new Sheet() { Id = workbookPart.GetIdOfPart(worksheetPart), SheetId = 1, Name = "Sheet1" };

                sheets.Append(sheet);

                Row headerRow = new Row();

                List<String> columns = new List<string>();
                foreach (System.Data.DataColumn column in table.Columns)
                {
                    columns.Add(column.ColumnName);

                    Cell cell = new Cell();
                    cell.DataType = CellValues.String;
                    cell.CellValue = new CellValue(column.ColumnName);
                    headerRow.AppendChild(cell);
                }

                sheetData.AppendChild(headerRow);

                foreach (DataRow dsrow in table.Rows)
                {
                    Row newRow = new Row();
                    foreach (String col in columns)
                    {
                        Cell cell = new Cell();
                        cell.DataType = CellValues.String;
                        cell.CellValue = new CellValue(dsrow[col].ToString());
                        newRow.AppendChild(cell);
                    }

                    sheetData.AppendChild(newRow);
                }

                workbookPart.Workbook.Save();
            }
        }
Once you execute this API ‘workbookPart.Workbook.Save()’ will save the file to the ‘bin’ folder location. You can modify the location of the generated file if needed.
After executing the above API, a new Excel file will be created with the above custom objects transformed into respective Excel Columns and Rows details as below,
That’s all, we just learned how to import and export data to/from excel in a simple way in .NET Core framework-based application.
Please visit the GitHub link for the complete code.
Other References :
EPPlus and EPOI for Reading and Writing of Excel file, kindly visit the below post for more details.
- Read/Write Excel file in .NET Core using EPPlus
- Read/Write Excel file in .NET Core using NPOI
If interested to know on how to download excel(.xlsx) file, please see the below article,
- Return or Download File in ASP.NET Core WebAPI
Please use the below Tutorial to use the above code and quickly get started,
This was very much basic while dealing with Excel in .NET Core which we covered today in this article.
Hope this helps you get started.
Are you dealing with any complex scenarios? Please let me know and sound off your comments below!
Summary
The Open XML SDK provides us full control to deal with Office Word, Excel, and PowerPoint documents. As this SDK is free and open-source from Microsoft, we don’t really need to use any other third-party tools/libraries. This SDK works best!
Please bookmark this page and share it with your friends. Please Subscribe to the blog to receive notifications on freshly published best practices and guidelines for software design and development.
Opening Excel files in code has been a painful experience long before .NET Core came along. In many cases, you actually needed the Excel application installed on the target/users machine to be able to open excel files via code. If you’ve ever had to use those “OLE DB Jet ” queries before, you know it’s not a great experience. Luckily there are some pretty good open source solutions now that don’t require excel on the target machine. This is good for Windows users so that you don’t have to install excel on a target users machine or web server, but also for people hosting .NET Core applications on Linux (And even Mac/ARM) – where Excel is obviously no where to be seen!
My methodology for this article is pretty simple. Create a standardized excel workbook with a couple of sheets, couple of formulas, and a couple of special formatting cases. Read the same data out in every single library and see which one works the best for me. Simple! Let’s get going!
Create Spreadsheet Magic with IronXL – Read, Write and Create in C# .NET
Having helped Lego and NASA with their spreadsheet woes – IronXL provides for your spreadsheet needs by validating, converting, saving, and modifying Excel files. IronXL reads, writes, and creates workbook excel files in C# .NET Core in just a few lines of code. IronXL works with many excel formats such as XLS/XLSX/CSV/TSV. Test and share your project straightaway with IronXL 30-day free trial key or experience licensing benefits starting from $399 with 24-hour engineer support.
Note On CSV Formats
I should note that if you are reading a CSV, or more so a single excel sheet that doesn’t have formulas or anything “excel” specific on the sheet, you should instead just parse it using standard CSV technique. We have a great article here on parsing CSV in C# .NET that you should instead follow. CSV parsers are great for taking tabular data and deserializing it into objects and should be used where they can.
Example Data
I figure the best way to compare the different libraries on offer is to create a simple spreadsheet to compare the different ways we can read data out. The spreadsheet will have two “sheets”, where the second sheet references the first.
Sheet 1 is named “First Sheet” and looks like so :

Notice that cell A2 is simply the number “1”. Then in column B2, we have a reference to cell A2. This is because we want to check if the libraries allow us to not only get the “formula” from the cell, but also what the computed value should be.
We are also styling cell A2 with a font color of red, and B2 has a full border (Although hard to see as I’m trying to show the fomula). We will try and extract these styling elements out later.
Sheet 2 is named “Second Sheet” and looks like so :

So we are doing a simple “SUM” formula and referencing the first sheet. Again, this is so we can test getting both the formula and the computed value, but this time across different sheets. It’s not complicated for a person used to working with Excel, but let’s see how a few libraries handle it.
In general, in my tests I’m looking for my output to always follow the same format of :
Sheet 1 Data
Cell A2 Value   :
Cell A2 Color   :
Cell B2 Formula :
Cell B2 Value   :
Cell B2 Border  :

Sheet 2 Data
Cell A2 Formula :
Cell A2 Value   :
That way when I show the code, you can pick the library that makes the most sense to you.
EPPlus
When I first started hunting around for parsing excel in .NET Core, I remembered using EPPlus many moons ago for some very lightweight excel parsing. The nuget package can be found here : https://www.nuget.org/packages/EPPlus/. It’s also open source so you can read through the source code if that’s your thing here : https://github.com/JanKallman/EPPlus
The code to read our excel spreadsheet looks like so :
static void Main(string[] args)
{
    using(var package = new ExcelPackage(new FileInfo("Book.xlsx")))
    {
        var firstSheet = package.Workbook.Worksheets["First Sheet"];
        Console.WriteLine("Sheet 1 Data");
        Console.WriteLine($"Cell A2 Value   : {firstSheet.Cells["A2"].Text}");
        Console.WriteLine($"Cell A2 Color   : {firstSheet.Cells["A2"].Style.Font.Color.LookupColor()}");
        Console.WriteLine($"Cell B2 Formula : {firstSheet.Cells["B2"].Formula}");
        Console.WriteLine($"Cell B2 Value   : {firstSheet.Cells["B2"].Text}");
        Console.WriteLine($"Cell B2 Border  : {firstSheet.Cells["B2"].Style.Border.Top.Style}");
        Console.WriteLine("");

        var secondSheet = package.Workbook.Worksheets["Second Sheet"];
        Console.WriteLine($"Sheet 2 Data");
        Console.WriteLine($"Cell A2 Formula : {secondSheet.Cells["A2"].Formula}");
        Console.WriteLine($"Cell A2 Value   : {secondSheet.Cells["A2"].Text}");
    }
}
Honestly what can I say. This was *super* easy and worked right out of the box. It picks up formulas vs text perfectly! The styles on our first sheet was also pretty easy to get going. The border is slightly annoying because you have to check the “Style” of the border, and if it’s a style of “None”, then it means there is no border (As opposed to a boolean for “HasBorder” or similar). But I think I’m just nit picking, EPPlus just works!
NPOI
NPOI is another open source option with a Github here : https://github.com/tonyqus/npoi and Nuget here : https://www.nuget.org/packages/NPOI/. It hasn’t had a release in over a year which isn’t that bad because it’s not like Excel itself has tonnes of updates throughout the year, but the Issues list on Github is growing a bit with a fair few bugs so keep that in mind.
The code to read our data using NPOI looks like so :
…..
…Actually you know what. I blew a bunch of time on this to try and work out the best way to use NPOI and the documentation is awful. The wiki is here : https://github.com/tonyqus/npoi/wiki/Getting-Started-with-NPOI but it has a few samples but most/all of them are about creating excel workbooks not reading them. I saw they had a link to a tutorial on how to read an Excel file which looked promising, but it was literally reading the spreadsheet and then dumping the text out.
After using EPPlus, I just didn’t see any reason to continue with this one. Almost every google answer will lead you to StackOverflow with people using NPOI with such specific use cases that it never really all pieced together for me.
ExcelDataReader
ExcelDataReader appeared in a couple of stackoverflow answers on reading excel in .NET Core. Similar to others in this list, it’s open source here : https://github.com/ExcelDataReader/ExcelDataReader and on Nuget here : https://www.nuget.org/packages/ExcelDataReader/
I wanted to make this work but…. It just doesn’t seem intuitive at all. ExcelDataReader works on the premise that you are reading “rows” and “columns” sequentially in almost a CSV fashion. That sort of works but if you are looking for a particular cell, it’s rough as hell.
Some example code :
static void Main(string[] args)
{
    System.Text.Encoding.RegisterProvider(System.Text.CodePagesEncodingProvider.Instance);
    using (var stream = File.Open("Book.xlsx", FileMode.Open, FileAccess.Read))
    {
        using (var reader = ExcelReaderFactory.CreateReader(stream))
        {
            do
            {
                while (reader.Read()) //Each ROW
                {
                    for (int column = 0; column < reader.FieldCount; column++)
                    {
                        //Console.WriteLine(reader.GetString(column));//Will blow up if the value is decimal etc.
                        Console.WriteLine(reader.GetValue(column));//Get Value returns object
                    }
                }
            } while (reader.NextResult()); //Move to NEXT SHEET

        }
    }
}
The first line in particular is really annoying (Everything blows up without it). But you’ll notice that we are moving through row by row (And sheet by sheet) trying to get values. Ontop of that, calling things like “GetString” doesn’t work if the value is a decimal (Implicit casts would have been better IMO). I also couldn’t find any way to get the actual formula of the cell. The above only returns the computed results.
I was going to slog my way through and actually get the result we were looking for, but it’s just not a library I would use.
Syncfusion
Syncfusion is one of those annoying companies that create pay-to-use libraries, upload them to nuget, and then in small print say you need to purchase a license or else. Personally, I would like to see Microsoft not allow paid libraries into the public Nuget repo. I’m going to include them here but their licensing starts at $995 per year, per developer, so I don’t see much reason to use it for the majority of use cases. The nuget page can be found here https://www.nuget.org/packages/Syncfusion.XlsIO.Net.Core/
The code looks like :
static void Main(string[] args)
{
    ExcelEngine excelEngine = new ExcelEngine();
    using (var stream = File.Open("Book.xlsx", FileMode.Open, FileAccess.Read))
    {
        var workbook = excelEngine.Excel.Workbooks.Open(stream);

        var firstSheet = workbook.Worksheets["First Sheet"];
        Console.WriteLine("Sheet 1 Data");
        Console.WriteLine($"Cell A2 Value   : {firstSheet.Range["A2"].DisplayText}");
        Console.WriteLine($"Cell A2 Color   : {firstSheet.Range["A2"].CellStyle.Font.RGBColor.Name}");
        Console.WriteLine($"Cell B2 Formula : {firstSheet.Range["B2"].Formula}");
        Console.WriteLine($"Cell B2 Value   : {firstSheet.Range["B2"].DisplayText}");
        Console.WriteLine($"Cell B2 Border  : {firstSheet.Range["B2"].CellStyle.Borders.Value}");
        Console.WriteLine("");

        var secondSheet = workbook.Worksheets["Second Sheet"];
        Console.WriteLine($"Sheet 2 Data");
        Console.WriteLine($"Cell A2 Formula : {secondSheet.Range["A2"].Formula}");
        Console.WriteLine($"Cell A2 Value   : {secondSheet.Range["A2"].DisplayText}");
    }
}
So not bad. I have to admit, I fiddled around trying to understand how it worked out borders (As the above code doesn’t work), but gave up. The font color also took some fiddling where the library returns non standard objects as the color. Some of the properties for the actual data are also a bit confusing where you have value, text, displaytext etc. All returning slightly different things so you sort of have to just spray and pray and see which one works.
If EPPlus didn’t exist, and Syncfusion wasn’t fantastically overpriced, this library would actually be pretty good.
TL;DR;
Use EPPlus. https://github.com/JanKallman/EPPlus
In this article we will implement Excel import and Export in ASP.Net Core 5
You can also watch the full Video on Youtube
And you can find the full source code on GitHub:
Ingredients
Visual Studio Code (code.visualstudio.com)
.Net 5 SDK (dotnet.microsoft.com/download)
The first thing we are going to do is check the dotnet version installed
dotnet --version
Now we need to create our application
dotnet new mvc -n "SampleExcel"
Now let us open our source code
The first thing we are going to do is build the application and run it so we can see that everything is running as it should be.
dotnet run
The next step is for us to install the excel package that we want to utilise and for this we are going to be using EPP
dotnet add package EPPlus.Core --version 1.5.4
Once the package is installed we are going to create our Model which will handle the information output.
In the root directory inside that folder let us create a new class called User
public class User
{
    public string Name { get; set; }
    public string Email { get; set; }
    public string Phone { get; set; }
}
Now let us create a new controller which will be responsible to handle the excel import and export, inside the controllers folder lets create a new Controller called UsersController and will add the export to excel functionality
public class UsersController : Controller
{
    private readonly ILogger<UsersController> _logger;

    public UsersController(ILogger<UsersController> logger)
    {
        _logger = logger;
    }

    public IActionResult Index()
    {
        var users = GetlistOfUsers();

        return View(users);
    }

    public IActionResult ExportToExcel()
    {
        // Get the user list
        var users = GetlistOfUsers();

        var stream = new MemoryStream();
        using (var xlPackage = new ExcelPackage(stream))
        {
            var worksheet = xlPackage.Workbook.Worksheets.Add("Users");
            var namedStyle = xlPackage.Workbook.Styles.CreateNamedStyle("HyperLink");
            namedStyle.Style.Font.UnderLine = true;
            namedStyle.Style.Font.Color.SetColor(Color.Blue);
            const int startRow = 5;
            var row = startRow;

            //Create Headers and format them
            worksheet.Cells["A1"].Value = "Sample";
            using (var r = worksheet.Cells["A1:C1"])
            {
                r.Merge = true;
                r.Style.Font.Color.SetColor(Color.White);
                r.Style.HorizontalAlignment = OfficeOpenXml.Style.ExcelHorizontalAlignment.CenterContinuous;
                r.Style.Fill.PatternType = OfficeOpenXml.Style.ExcelFillStyle.Solid;
                r.Style.Fill.BackgroundColor.SetColor(Color.FromArgb(23, 55, 93));
            }

            worksheet.Cells["A4"].Value = "Name";
            worksheet.Cells["B4"].Value = "Email";
            worksheet.Cells["C4"].Value = "Phone";
            worksheet.Cells["A4:C4"].Style.Fill.PatternType = ExcelFillStyle.Solid;
            worksheet.Cells["A4:C4"].Style.Fill.BackgroundColor.SetColor(Color.FromArgb(184, 204, 228));
            worksheet.Cells["A4:C4"].Style.Font.Bold = true;

            row = 5;
            foreach (var user in users)
            {
                    worksheet.Cells[row, 1].Value = user.Name;
                    worksheet.Cells[row, 2].Value = user.Email;
                    worksheet.Cells[row, 3].Value = user.Phone;

                    row++;
            }

            // set some core property values
            xlPackage.Workbook.Properties.Title = "User List";
            xlPackage.Workbook.Properties.Author = "Mohamad Lawand";
            xlPackage.Workbook.Properties.Subject = "User List";
            // save the new spreadsheet
            xlPackage.Save();
            // Response.Clear();
        }
        stream.Position = 0;
        return File(stream, "application/vnd.openxmlformats-officedocument.spreadsheetml.sheet", "users.xlsx");
    }

    // Mimic a database operation
    private List<User> GetlistOfUsers()
    {
        var users = new List<User>()
        {
            new User {
                Email = "mohamad@email.com",
                Name = "Mohamad",
                Phone = "123456"
            },
            new User {
                Email = "donald@email.com",
                Name = "donald",
                Phone = "222222"
            },
            new User {
                Email = "mickey@email.com",
                Name = "mickey",
                Phone = "33333"
            }
        };

        return users;
    }
}
Now let us update the views inside the Views folder let us create a new folder called Users and inside the Users folder we will create a new file Index.cshtml
@model List<SampleExcel.Models.User>

<div class="row">
    <div class="col-md-16">
        <a asp-action="ExportToExcel" asp-controller="Users" class="btn btn-primary">Export to Excel</a>
    </div>
    <div class="col-md-16">
        <a asp-action="BatchUserUpload" asp-controller="Users" class="btn btn-primary">Import from Excel</a>
    </div>
</div>

<div class="row">
    <div class="col-md-12">
        <table class="table">
            <thead>
                <tr>
                    <th>Name</th>
                    <th>Email</th>
                    <th>Phone</th>
                </tr>
            </thead>
            <tbody>
                @foreach (var item in Model)
                {
                    <tr>
                        <td>@item.Name</td>
                        <td>@item.Email</td>
                        <td>@item.Phone</td>
                    </tr>
                }
            </tbody>
        </table>
    </div>
</div>
Now let us update the controller with an import functionality
[HttpGet]
public IActionResult BatchUserUpload()
{
    return View();
}

[HttpPost]
[ValidateAntiForgeryToken]
public IActionResult BatchUserUpload(IFormFile batchUsers)
{

    if (ModelState.IsValid)
    {
        if (batchUsers?.Length > 0)
        {
            var stream = batchUsers.OpenReadStream();
            List<User> users = new List<User>();
            try
            {
                using (var package = new ExcelPackage(stream))
                {
                    var worksheet = package.Workbook.Worksheets.First();//package.Workbook.Worksheets[0];
                    var rowCount = worksheet.Dimension.Rows;

                    for (var row = 2; row <= rowCount; row++)
                    {
                        try
                        {

                            var name = worksheet.Cells[row, 1].Value?.ToString();
                            var email = worksheet.Cells[row, 2].Value?.ToString();
                            var phone = worksheet.Cells[row, 3].Value?.ToString();

                            var user = new User()
                            {
                                Email = email,
                                Name = name,
                                Phone = phone
                            };

                            users.Add(user);

                        }
                        catch(Exception ex)
                        {
                            Console.WriteLine("Something went wrong");
                        }
                    }
                }

                return View("Index", users);

            }
            catch(Exception e)
            {
                return View();
            }
        }
    }

    return View();
}
As well we need to update the view inside the Views ⇒ Users folders we need to create a new file called BatchUserUpload.cshtml and add the following
<div class="row">
    <div class="col-md-12">
        <form asp-action="BatchUserUpload" asp-controller="Users" method="post" id="create-form" enctype="multipart/form-data">
            <div class="form-group">
                <label class="control-label">
                        Upload File:
                </label>
                <input id="batchUsers" name="batchUsers" class="form-control" type="file" tabindex="14">
                <span class="form-text text-muted">Allowed file types:  xlsx, xls.</span>
            </div>
            <div class="card-footer">
                <center>
                    <button type="submit" class="btn btn-primary mr-2">Upload Users</button>
                    <a asp-action="Index" asp-controller="Users" class="btn btn-secondary">Cancel</a>
                </center>
            </div>
        </form>
    </div>
</div>
Thank you for reading, please ask your questions in the comments.
This post shows how to import and export .xls or .xlsx (Excel files) in ASP.NET Core. And when thinking about dealing with excel with .NET, we always look for third-party libraries or component. And one of the most popular .net library that reads and writes Excel 2007/2010 files using the Open Office Xml format (xlsx) is EPPlus. However, at the time of writing this post, this library is not updated to support .NET Core. But there exists an unofficial version of this library EPPlus.Core which can do the job of import and export xlsx in ASP.NET Core. This works on Windows, Linux and Mac.
If you are looking to import export excel using NPOI and ASP.NET Core 2.0, visit here
So let’s create a new ASP.NET Core WEB API application and install EPPlus.Core. To install EPPlus.Core, run the following command in the Package Manager Console:
PM> Install-Package EPPlus.Core
Or you can also use Nuget Package Manager UI to install it.
Let’s add a new Web API controller and name it ImportExportController. Once added, let’s first create export method.
Export xlsx in ASP.NET Core
For the demo, we will be creating the xlsx file in the wwwroot folder. To get wwwroot folder path, we need to inject IHostingEnvironment dependency in the constructor. Read how to Get application base and wwwroot path in ASP.NET Core.
public class ImportExportController : Controller
{
    private readonly IHostingEnvironment _hostingEnvironment;

    public ImportExportController(IHostingEnvironment hostingEnvironment)
    {
        _hostingEnvironment = hostingEnvironment;
    }
}
ExcelPackage class, available in OfficeOpenXml namespace will be used for reading and writing xlsx. Define a new web api action method named “Export” which returns the URL of generated xlsx file. So here is the complete code for exporting data to xlsx.
[HttpGet]
[Route("Export")]
public string Export()
{
    string sWebRootFolder = _hostingEnvironment.WebRootPath;
    string sFileName = @"demo.xlsx";
    string URL = string.Format("{0}://{1}/{2}", Request.Scheme, Request.Host, sFileName);
    FileInfo file = new FileInfo(Path.Combine(sWebRootFolder, sFileName));
    if (file.Exists)
    {
        file.Delete();
        file = new FileInfo(Path.Combine(sWebRootFolder, sFileName));
    }
    using (ExcelPackage package = new ExcelPackage(file))
    {
        // add a new worksheet to the empty workbook
        ExcelWorksheet worksheet = package.Workbook.Worksheets.Add("Employee");
        //First add the headers
        worksheet.Cells[1, 1].Value = "ID";
        worksheet.Cells[1, 2].Value = "Name";
        worksheet.Cells[1, 3].Value = "Gender";
        worksheet.Cells[1, 4].Value = "Salary (in $)";

        //Add values
        worksheet.Cells["A2"].Value = 1000;
        worksheet.Cells["B2"].Value = "Jon";
        worksheet.Cells["C2"].Value = "M";
        worksheet.Cells["D2"].Value = 5000;

        worksheet.Cells["A3"].Value = 1001;
        worksheet.Cells["B3"].Value = "Graham";
        worksheet.Cells["C3"].Value = "M";
        worksheet.Cells["D3"].Value = 10000;

        worksheet.Cells["A4"].Value = 1002;
        worksheet.Cells["B4"].Value = "Jenny";
        worksheet.Cells["C4"].Value = "F";
        worksheet.Cells["D4"].Value = 5000;

        package.Save(); //Save the workbook.
    }
    return URL;
}
That’s all. Now when you run this application and call export method. Once finished, visit the wwwroot folder of your application. You should see “demo.xlsx” created on the system. And when you open it, you should see following.
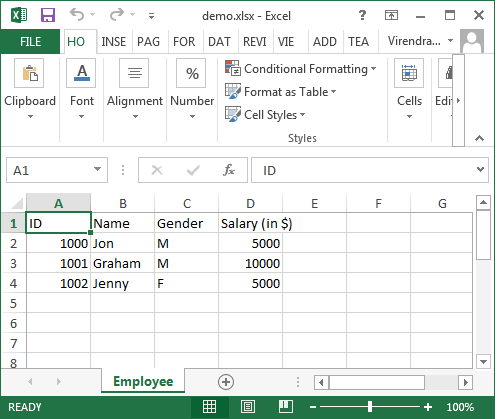
You can also format the excel cells. Following code will apply light-Gray color and bold font style to the header row.
using (var cells = worksheet.Cells[1, 1, 1, 4])
{
    cells.Style.Font.Bold = true;
    cells.Style.Fill.PatternType = ExcelFillStyle.Solid;
    cells.Style.Fill.BackgroundColor.SetColor(Color.LightGray);
}
To apply styles to excel cells, you need to include namespace OfficeOpenXml.Style.
Simple, isn’t it? All the features of the EPPlus library are supported by this unofficial port called EPPlus.Core
Import xlsx in ASP.NET Core
Real world import functionality is complex and it involves validations, applying business rules and finally saving it in database. But for the demo, let’s import the same file created via Export API and print its content. Import API will read the file and returns the file content in a formatted string. Here is the complete code for import API to read the xlsx, create a formatted string of file content and returns the same.
[HttpGet]
[Route("Import")]
public string Import()
{
    string sWebRootFolder = _hostingEnvironment.WebRootPath;
    string sFileName = @"demo.xlsx";
    FileInfo file = new FileInfo(Path.Combine(sWebRootFolder, sFileName));
    try
    {
        using (ExcelPackage package = new ExcelPackage(file))
        {
            StringBuilder sb = new StringBuilder();
            ExcelWorksheet worksheet = package.Workbook.Worksheets[1];
            int rowCount = worksheet.Dimension.Rows;
            int ColCount = worksheet.Dimension.Columns;
            bool bHeaderRow = true;
            for (int row = 1; row <= rowCount; row++)
            {
                for (int col = 1; col <= ColCount; col++)
                {
                    if (bHeaderRow)
                    {
                        sb.Append(worksheet.Cells[row, col].Value.ToString() + "t");
                    }
                    else
                    {
                        sb.Append(worksheet.Cells[row, col].Value.ToString() + "t");
                    }
                }
                sb.Append(Environment.NewLine);
            }
            return sb.ToString();
        }
    }
    catch (Exception ex)
    {
        return "Some error occured while importing." + ex.Message;
    }
}
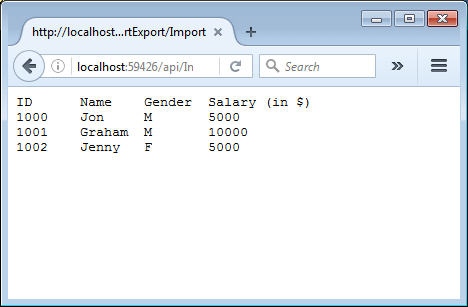
Import API gets the row and column count and then loops through them to create a formatted string. That’s all. Now when you run call to import API, you should see following in the browser.
That’s it. I hope it helped you.
Thank you for reading. Keep visiting this blog and share this in your network. Please put your thoughts and feedback in the comments section.
PS: If you found this content valuable and want to return the favour, then

In this post, we are going to discuss and learn how we can import Excel file with ASP.NET Core project and save the data into our database. It is very simple and easy to import Excel files in ASP.NET Core. First of all, if you have not created your project you can create your ASP.NET Core 3-tier Application following this.
Tools:
- Visual Studio Community 2019
- Windows 10 OS
Let’s get started:
Before starting our procedure we have to create a table into our database so that we can store our read data into that table. To create a table we are using the code-first approach.
we will create a Model/Class.
public class Student
{
    public Guid Id { get; set; }
    public string Name { get; set; }
    public string Class { get; set; }
    public string Roll_No { get; set; }
}
After Creating our class we will add a reference to this class in our “ApplicationDbContext.cs” Class.
public DbSet<Student> Students { get; set; }Now Run migration.
Add-migrationNow we will update our database.
update-databaseWe have to install this NuGet Package into our project.
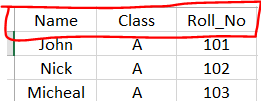
Install-Package ClosedXML -Version 0.95.4Our Excel file looks like this.
To read this file and save records into our database we will deal with rows and cells. we will show you the code example first then we will elaborate code in detail.
public async Task<ResponseViewModel<object>> UploadData(IFormFile file)
{
  try
  {
     var fileextension = Path.GetExtension(file.FileName);
     var filename = Guid.NewGuid().ToString() + fileextension;
     var filepath = Path.Combine(Directory.GetCurrentDirectory(), "wwwroot","files", filename);
     using (FileStream fs = System.IO.File.Create(filepath))
     {
          file.CopyTo(fs);
     }
     int rowno = 1;
     XLWorkbook workbook = XLWorkbook.OpenFromTemplate(filepath);
     var sheets = workbook.Worksheets.First();
     var rows = sheets.Rows().ToList();
     foreach (var row in rows)
     {
        if (rowno != 1)
        {
           var test = row.Cell(1).Value.ToString();
           if (string.IsNullOrWhiteSpace(test) || string.IsNullOrEmpty(test))
           {
              break;
           }
           Student student;
           student = _context.Students.Where(s => s.Name == row.Cell(1).Value.ToString()).FirstOrDefault();
           if (student == null)
           {
               student = new Student();
           }
           student.Name = row.Cell(1).Value.ToString();
           student.Class = row.Cell(2).Value.ToString();
           state.Roll_No = row.Cell(3).Value.ToString();
           if (student.Id == Guid.Empty)
               _context.Students.Add(student);
           else
               _context.Students.Update(student);
        }
        else
        {
           rowno = 2;
        }
     }
     _context.SaveChanges();
     return new ResponseViewModel<object>
     {
         Status = true,
         Message = "Data Updated Successfully",
         StatusCode = System.Net.HttpStatusCode.OK.ToString()
      };
 }
 catch (Exception e)
 {
    throw e;
  }
}
The above method that we have mentioned is receiving an Excel file as an argument. The method is saving the file in “wwwroot” and reading data. After reading the record we have applied foreach loop on rows. We are ignoring the first row intentionally because the first row will always be a header row. we check if there is a record that already exists in our database if it already exists we will update it and if it doesn’t we add this into our database. We have also initialized the test variable at the beginning that will break the loop when all records will be added and an empty cell will come.
Conclusion:
Try this tutorial “How to import Excel file with ASP.NET Core” and if you do not understand anything or face any issue while applying this method. Do not hesitate to comment below. My Code Bit team will try to respond ASAP.
See Also:
Send Emails in ASP.NET Core 5 Using Gmail API
What Is File Size Upload Limit In NFT Minting? Solution
Email Confirmation with ASP.NET Core Identity
How to Implement JWT Authentication in Asp.Net Core Web API
How to Send Emails ASP.NET Core 5 Using SMTP