
Name already in use
A tag already exists with the provided branch name. Many Git commands accept both tag and branch names, so creating this branch may cause unexpected behavior. Are you sure you want to create this branch?
1
branch
0
tags
Code
-
Use Git or checkout with SVN using the web URL.
-
Open with GitHub Desktop
-
Download ZIP
Latest commit
![]()
Files
Permalink
Failed to load latest commit information.
Type
Name
Latest commit message
Commit time
ReactHTMLTableToExcel
Provides a client side generation of Excel (.xls) file from HTML table element.

No additional dependencies
Installation
npm install --save react-html-table-to-excel
Features
- Download HTML table as Excel file in .xls format
- No server side code
- Set desired .xls filename and sheet
- Set desired class name and id for styling
- Supported IE 11
Options
A list of available properties can be found below. These must be passed to the containing ReactHTMLTableToExcel component.
| Property | Type | Description |
|---|---|---|
| table | string | ID attribute of HTML table element. |
| filename | string | Name of Excel file. |
| sheet | string | Name of Excel sheet. |
| id | string | ID attribute of button element. |
| className | string | Class attribute of button element. |
| buttonText | string | Button text. |
Example
import React, {Component} from 'react';
import ReactHTMLTableToExcel from 'react-html-table-to-excel';

class Test extends Component {

    constructor(props) {
        super(props);
    }

    render() {

        return (
            <div>
                <ReactHTMLTableToExcel
                    id="test-table-xls-button"
                    className="download-table-xls-button"
                    table="table-to-xls"
                    filename="tablexls"
                    sheet="tablexls"
                    buttonText="Download as XLS"/>
                <table id="table-to-xls">
                    <tr>
                        <th>Firstname</th>
                        <th>Lastname</th>
                        <th>Age</th>
                    </tr>
                    <tr>
                        <td>Jill</td>
                        <td>Smith</td>
                        <td>50</td>
                    </tr>
                    <tr>
                        <td>Eve</td>
                        <td>Jackson</td>
                        <td>94</td>
                    </tr>
                </table>

            </div>
        );
    }
}

export default Test
Join the DZone community and get the full member experience.
Join For Free
Introduction
In this article, we will learn how to export data in Excel using ReactJS. In this demo, we will use the react-html-table-to-excel library to export data in an Excel sheet.
Prerequisites
- We should have basic knowledge of React.js and Web API.
- Visual Studio and Visual Studio Code IDE should be installed on your system.
- SQL Server Management Studio
- Basic knowledge of Bootstrap and HTML
Create ReactJS project
Now, let’s first create a React application with the following command.
Open the newly created project in Visual Studio and install react-html-table-to-excel library using the following command.
Now install Bootstrap by using the following commands.
Now, open the index.js file and add import Bootstrap.
Now Install the Axios library by using the following command. Learn more about Axios here.
Now go to the src folder and add a new component, named «ExportExcel.js.»
Now open ExportExcel.js component and import following reference.
Add the following code in this component.
Add a reference of this component in app.js file, add the following code in app.js file.
Our React.js project is created. Now create a database table and web API project to show data in a table.
Create a Table in The Database
Open SQL Server Management Studio, create a database named «Employee,» and in this database, create a table. Give that table a name like «Employee.»
Now add demo data in this table.
Create a New Web API Project
Open Visual Studio and create a new project.

Change the name to MatUITable.

Choose the template as «Web API.»

Right-click the Models folder from Solution Explorer and go to Add >> New Item >> data.

Click on the «ADO.NET Entity Data Model» option and click «Add».

Select EF Designer from the database and click the «Next» button. 
Add the connection properties and select database name on the next page and click OK.

Check the «Table» checkbox. The internal options will be selected by default. Now, click OK.

Now, our data model is successfully created.
Right-click on the Controllers folder and add a new controller. Name it «Employee controller» and add the following namespace in the Employee controller.
Now add a method to fetch data from the database.
Complete Employee controller code:
Now, let’s enable CORS. Go to Tools, open NuGet Package Manager, search for CORS, and install the «Microsoft.Asp.Net.WebApi.Cors» package. Open Webapiconfig.cs and add the following lines
Now go to Visual Studio Code and run the project using npm start command.
Click on the «Export Excel» button. Once Excel downloads, open, and check.
Further Reading
Data (computing)
Database
Opinions expressed by DZone contributors are their own.
Trending
-
NoSQL vs SQL: What, Where, and How
-
What Are Microservices Architecture and How Do They Work?
-
How To Use Epics in Jira
-
Tackling the Top 5 Kubernetes Debugging Challenges
Содержание
- Экспорт данных в Excel с React
- Пример проекта
- Предварительная подготовка
- Создание заголовка
- Создание таблицы Customers
- Передача данных из компонента App
- Реализация функции экспорта
- Функция экспорта с ThirdParty или NPM lib
- How to export data to excel using react libraries
- 2 Answers 2
- EdisonJpp/react-export-table-to-excel
- Sign In Required
- Launching GitHub Desktop
- Launching GitHub Desktop
- Launching Xcode
- Launching Visual Studio Code
- Latest commit
- Git stats
- Files
- README.md
- About
- react-html-table-to-excel
- Small react component for converting and downloading HTML table to Excel file For more information about how to use this package see README
- Ensure you’re using the healthiest npm packages
- Package Health Score
- Explore Similar Packages
- Security
- Security and license risk for significant versions
- Is your project affected by vulnerabilities?
- Popularity
- Weekly Downloads (8,561)
- Direct Usage Popularity
- Community
- Embed Package Health Score Badge
- Maintenance
- Commit Frequency
- Экспорт данных в Excel с React
- Пример проекта
- Предварительная подготовка
- Создание заголовка
- Создание таблицы Customers
- Передача данных из компонента App
- Реализация функции экспорта
- Функция экспорта с ThirdParty или NPM lib
Экспорт данных в Excel с React
В React есть два способа реализации функции экспорта: с помощью любой сторонней библиотеки или с помощью создания компонента. Рассмотрим оба способа ниже.
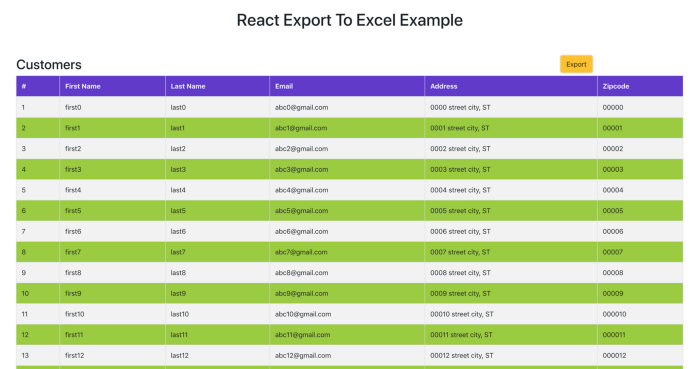
Пример проекта
Возьмем простое приложение с данными в таблице и кнопкой экспорта в правом верхнем углу. При нажатии на кнопку данные из таблицы загружаются в таблицу Excel.
Проект можно импортировать отсюда и запустить напрямую.
Предварительная подготовка
Создайте проект React с помощью create-react-app и установите пакеты npm xslx, bootstrap и file-saver .
Добавьте таблицы стилей из библиотеки React Bootstrap в index.html .
Создание заголовка
Создаем заголовок для приложения. Это не обязательный шаг для реализации функции экспорта, однако с ним приложение выглядит лучше.
Создание таблицы Customers
Создаем компонент таблицы Customer. Это презентационный компонент, который принимает массив customers в качестве props и отображает в виде таблицы.
Передача данных из компонента App
Нам нужно передать данные, отображаемые в таблице, из компонента app, а также импортировать компоненты Customers и Header для использования в функции render.
Приложение должно выглядеть следующим образом:
Реализация функции экспорта
Создаем компонент ExportCSV , принимающий данные в качестве props и осуществляющий функцию экспорта. В данном примере содержится компонент с методом exportToCSV , который обрабатывает все функции загрузки excel с помощью xlxs и file-saver .
Это презентационный компонент, который принимает данные для загрузки и название файла в качестве props. Метод exportToCSV вызывается при нажатии кнопки экспорта.
Теперь нужно импортировать этот компонент в компонент App.
Ниже представлен финальный скриншот со всеми функциями!
Функция экспорта с ThirdParty или NPM lib
react-csv — это сторонняя библиотека, которую можно использовать прямо из коробки. Нужно только передать данные и fileName, а обо всем остальном библиотека позаботится сама.
Сначала установите react-csv , а затем импортируйте его в компонент ExportCSV.
Импортируйте CSVLink из react-csv и передайте необходимые данные и fileName ссылке, указанной ниже.
В компоненте App импортируйте ExportReactCSV вместо ExportCSV .
Источник
How to export data to excel using react libraries
I am using react-html-to-excel to convert my table to excel but what I want is to not to export the first column to excel i.e the first column should not exported to excel i have gone through the documentation of this library i am using but haven’t found any thing
If it is not supported in this library then I am open to use any other library which do these kind of stuff.

2 Answers 2
I can propose the following two modules since I have already used them successfully in production (with custom columns also):
And a third one, after a quick search, which looks promising (I haven’t used it though)
- react-export-excel —>It does not support TypeScript
The library that you are currently using does not support the removal of columns in the excel file according to this issue, which also proposes a fourth option:
EDIT: Ok, I have created two examples. The first can be found here and uses my 2 nd proposal, react-csv
The second is the following, which uses my 3 rd proposal, react-export-excel
2 nd EDIT: I have updated both examples, the columns now are defined from your object’s structure, and two ways of removing the unwanted column are proposed (by key-value firstname or by index — the 1 st one).
Please take into account that the above methods will work successfully if the objects’ structure is consistent in your data (each entry should have the same columns).
The camelCase method that I have used in both examples was taken from here.
Источник
EdisonJpp/react-export-table-to-excel
Use Git or checkout with SVN using the web URL.
Work fast with our official CLI. Learn more.
Sign In Required
Please sign in to use Codespaces.
Launching GitHub Desktop
If nothing happens, download GitHub Desktop and try again.
Launching GitHub Desktop
If nothing happens, download GitHub Desktop and try again.
Launching Xcode
If nothing happens, download Xcode and try again.
Launching Visual Studio Code
Your codespace will open once ready.
There was a problem preparing your codespace, please try again.
Latest commit
Git stats
Files
Failed to load latest commit information.
README.md
Provides a client side generation of Excel (.xls) file from HTML table element.

No additional dependencies
- Download HTML table as Excel file in .xls format
- No server side code
- Set desired .xls filename and sheet
- Hook to export to excel
- Component to export to excel
- Method to export to excel
A list of available properties can be found below. These must be passed to the containing DownloadTableExcel component.
| Property | Type | Description |
|---|---|---|
| filename | string | Name of Excel file. |
| sheet | string | Name of Excel sheet. |
| children | ReactElement | component that will obtain the onClick event to export to excel (the most common is a button). |
| currentTableRef | HTMLElement | the current of the table reference. |
Export excel
>
| Firstname | Lastname | Age |
|---|---|---|
| Edison | Padilla | 20 |
| Alberto | Lopez | 94 |
A list of available properties can be found below. These must be passed to the containing useDownloadExcel hook.
| Property | Type | Description |
|---|---|---|
| filename | string | Name of Excel file. |
| sheet | string | Name of Excel sheet. |
| currentTableRef | HTMLElement | the current of the table reference. |
Export excel
>
| Firstname | Lastname | Age |
|---|---|---|
| Edison | Padilla | 20 |
| Alberto | Lopez | 94 |
A list of available properties can be found below. These must be passed to the downloadExcel method.
| Property | Type | Description |
|---|---|---|
| filename | string | Name of Excel file. |
| sheet | string | Name of Excel sheet. |
| tablePayload | object | payload to download excel. |
About
It allows you to export an HTML table just by sending the table reference and the name with which you want the file to be saved. It gives you two options; a hook and a component . you use whichever one best suits your goal
Источник
react-html-table-to-excel
Small react component for converting and downloading HTML table to Excel file For more information about how to use this package see README
![]()
Ensure you’re using the healthiest npm packages
Snyk scans all the packages in your projects for vulnerabilities and provides automated fix advice
Get started free
Package Health Score
Explore Similar Packages
Security
Security and license risk for significant versions
Is your project affected by vulnerabilities?
Scan your projects for vulnerabilities. Fix quickly with automated fixes. Get started with Snyk for free.
Popularity
Weekly Downloads (8,561)
Direct Usage Popularity
The npm package react-html-table-to-excel receives a total of 8,561 downloads a week. As such, we scored react-html-table-to-excel popularity level to be Small.
Based on project statistics from the GitHub repository for the npm package react-html-table-to-excel, we found that it has been starred 95 times.
Downloads are calculated as moving averages for a period of the last 12 months, excluding weekends and known missing data points.
This project has seen only 10 or less contributors.
We found a way for you to contribute to the project! Looks like react-html-table-to-excel is missing a Code of Conduct.
Embed Package Health Score Badge
Maintenance
Commit Frequency
Further analysis of the maintenance status of react-html-table-to-excel based on released npm versions cadence, the repository activity, and other data points determined that its maintenance is Inactive.
An important project maintenance signal to consider for react-html-table-to-excel is that it hasn’t seen any new versions released to npm in the past 12 months, and could be considered as a discontinued project, or that which receives low attention from its maintainers.
In the past month we didn’t find any pull request activity or change in issues status has been detected for the GitHub repository.
Источник
Экспорт данных в Excel с React

В React есть два способа реализации функции экспорта: с помощью любой сторонней библиотеки или с помощью создания компонента. Рассмотрим оба способа ниже.
Пример проекта
Возьмем простое приложение с данными в таблице и кнопкой экспорта в правом верхнем углу. При нажатии на кнопку данные из таблицы загружаются в таблицу Excel.
Проект можно импортировать отсюда и запустить напрямую.
Предварительная подготовка
Создайте проект React с помощью create-react-app и установите пакеты npm xslx, bootstrap и file-saver .
Добавьте таблицы стилей из библиотеки React Bootstrap в index.html .
Создание заголовка
Создаем заголовок для приложения. Это не обязательный шаг для реализации функции экспорта, однако с ним приложение выглядит лучше.
Создание таблицы Customers
Создаем компонент таблицы Customer. Это презентационный компонент, который принимает массив customers в качестве props и отображает в виде таблицы.
Передача данных из компонента App
Нам нужно передать данные, отображаемые в таблице, из компонента app, а также импортировать компоненты Customers и Header для использования в функции render.
Приложение должно выглядеть следующим образом:
Реализация функции экспорта
Создаем компонент ExportCSV , принимающий данные в качестве props и осуществляющий функцию экспорта. В данном примере содержится компонент с методом exportToCSV , который обрабатывает все функции загрузки excel с помощью xlxs и file-saver .
Это презентационный компонент, который принимает данные для загрузки и название файла в качестве props. Метод exportToCSV вызывается при нажатии кнопки экспорта.
Теперь нужно импортировать этот компонент в компонент App.
Ниже представлен финальный скриншот со всеми функциями!
Функция экспорта с ThirdParty или NPM lib
react-csv — это сторонняя библиотека, которую можно использовать прямо из коробки. Нужно только передать данные и fileName, а обо всем остальном библиотека позаботится сама.
Сначала установите react-csv , а затем импортируйте его в компонент ExportCSV.
Импортируйте CSVLink из react-csv и передайте необходимые данные и fileName ссылке, указанной ниже.
В компоненте App импортируйте ExportReactCSV вместо ExportCSV .
Источник
Adblock
detector
| Version | Vulnerabilities | License Risk |
|---|---|---|
| 2.0.0 | | | 05/2017 |
В React есть два способа реализации функции экспорта: с помощью любой сторонней библиотеки или с помощью создания компонента. Рассмотрим оба способа ниже.

Пример проекта
Возьмем простое приложение с данными в таблице и кнопкой экспорта в правом верхнем углу. При нажатии на кнопку данные из таблицы загружаются в таблицу Excel.
Проект можно импортировать отсюда и запустить напрямую.
// clone the project
git clone https://github.com/bbachi/react-exportexcel-example.git

// install and start the project
npm install
npm start
Предварительная подготовка
Создайте проект React с помощью create-react-app и установите пакеты npm xslx, bootstrap и file-saver.
// generate react project
create-react-app react-exportexcel-example

// install bootstrap
npm install react-bootstrap bootstrap --save

// install xsls and file-saver
npm install xlsx file-saver --save
Добавьте таблицы стилей из библиотеки React Bootstrap в index.html.
<!DOCTYPE html>
<html lang="en">
  <head>
    <meta charset="utf-8" />
    <link rel="shortcut icon" href="%PUBLIC_URL%/favicon.ico" />
    <!-- Bootstrap stylesheet link -->
    <link
      rel="stylesheet"
      href="https://maxcdn.bootstrapcdn.com/bootstrap/4.3.1/css/bootstrap.min.css"
      integrity="sha384-ggOyR0iXCbMQv3Xipma34MD+dH/1fQ784/j6cY/iJTQUOhcWr7x9JvoRxT2MZw1T"
      crossorigin="anonymous"
    />
    <meta name="viewport" content="width=device-width, initial-scale=1" />
    <meta name="theme-color" content="#000000" />

    <title>React App</title>
  </head>
  <body>
    <noscript>You need to enable JavaScript to run this app.</noscript>
    <div id="root"></div>
  </body>
</html>
Создание заголовка
Создаем заголовок для приложения. Это не обязательный шаг для реализации функции экспорта, однако с ним приложение выглядит лучше.
import React from 'react'

export const Header = () => {
    return (
        <div className="header">
            <h1>React Export To Excel Example</h1>
        </div>
    )
}
Создание таблицы Customers
Создаем компонент таблицы Customer. Это презентационный компонент, который принимает массив customers в качестве props и отображает в виде таблицы.
import React from 'react'
import Table from 'react-bootstrap/Table';

export const Customers = ({customers}) => {

    const CustomerRow = (customer,index) => {

        return(
              <tr key = {index} className='even'>
                  <td> {index + 1} </td>
                  <td>{customer.firstName}</td>
                  <td>{customer.lastName}</td>
                  <td>{customer.email}</td>
                  <td>{customer.address}</td>
                  <td>{customer.zipcode}</td>
              </tr>
          )
      }

      const CustomerTable = customers.map((cust,index) => CustomerRow(cust,index))

      const tableHeader = <thead className='bgvi'>
                            <tr>
                                <th>#</th>
                                <th>First Name</th>
                                <th>Last Name</th>
                                <th>Email</th>
                                <th>Address</th>
                                <th>Zipcode</th>
                            </tr>
                        </thead>

    return (
        <Table striped bordered hover>
            {tableHeader}
            <tbody>
                {CustomerTable}
            </tbody>
        </Table>
    )
}
Передача данных из компонента App
Нам нужно передать данные, отображаемые в таблице, из компонента app, а также импортировать компоненты Customers и Header для использования в функции render.
import React from 'react';
import './App.css';
import { Customers } from './Customers'
import { Header } from './Header'

class App extends React.Component {

  customers = () => {
    let custs = []
    for (let i = 0; i <= 25; i++) {
      custs.push({firstName: `first${i}`, lastName: `last${i}`,
      email: `abc${i}@gmail.com`, address: `000${i} street city, ST`, zipcode: `0000${i}`});
    }
    return custs;
  }

  render() {

    return (
      <div className="App">
        <Header />
        <Customers customers={this.customers()}/>
      </div>
    );
  }
}

export default App;
Приложение должно выглядеть следующим образом:

Реализация функции экспорта
Создаем компонент ExportCSV, принимающий данные в качестве props и осуществляющий функцию экспорта. В данном примере содержится компонент с методом exportToCSV, который обрабатывает все функции загрузки excel с помощью xlxs и file-saver.
import React from 'react'
import Button from 'react-bootstrap/Button';
import * as FileSaver from 'file-saver';
import * as XLSX from 'xlsx';

export const ExportCSV = ({csvData, fileName}) => {

    const fileType = 'application/vnd.openxmlformats-officedocument.spreadsheetml.sheet;charset=UTF-8';
    const fileExtension = '.xlsx';

    const exportToCSV = (csvData, fileName) => {
        const ws = XLSX.utils.json_to_sheet(csvData);
        const wb = { Sheets: { 'data': ws }, SheetNames: ['data'] };
        const excelBuffer = XLSX.write(wb, { bookType: 'xlsx', type: 'array' });
        const data = new Blob([excelBuffer], {type: fileType});
        FileSaver.saveAs(data, fileName + fileExtension);
    }

    return (
        <Button variant="warning" onClick={(e) => exportToCSV(csvData,fileName)}>Export</Button>
    )
}
Это презентационный компонент, который принимает данные для загрузки и название файла в качестве props. Метод exportToCSV вызывается при нажатии кнопки экспорта.
Теперь нужно импортировать этот компонент в компонент App.
// removed for brevity
render() {

    return (
      <div className="App">
        <Header />
        <div className="row">
            <div className="col-md-8">
                <h2>Customers</h2>
            </div>
            <div className="col-md-4 center">
                <ExportCSV csvData={this.state.customers} fileName={this.state.fileName} />
            </div>
        </div>
        <Customers customers={this.customers()}/>
      </div>
    );
  }
Ниже представлен финальный скриншот со всеми функциями!
Функция экспорта с ThirdParty или NPM lib
react-csv — это сторонняя библиотека, которую можно использовать прямо из коробки. Нужно только передать данные и fileName, а обо всем остальном библиотека позаботится сама.
Сначала установите react-csv, а затем импортируйте его в компонент ExportCSV.
npm install react-csv --save
Импортируйте CSVLink из react-csv и передайте необходимые данные и fileName ссылке, указанной ниже.
import React from 'react'
import { CSVLink } from 'react-csv'
import Button from 'react-bootstrap/Button';

export const ExportReactCSV = ({csvData, fileName}) => {
    return (
        <Button variant="warning">
            <CSVLink data={csvData} filename={fileName}>Export</CSVLink>
        </Button>
    )
}
В компоненте App импортируйте ExportReactCSV вместо ExportCSV.
import { ExportReactCSV } from './ExportReactCSV'

    // removed code for the brevity

    <div className="col-md-4 center">
        <ExportReactCSV csvData={this.state.customers} fileName={this.state.fileName} />
    </div>

  }
}

export default App;
Вывод:
- Для реализации функции экспорта в React нужны библиотеки
xslsиfile-saver. - Есть несколько способов реализовать логику экспорта в React: использование собственной логики или использование любой сторонней библиотеки.
- Реализуйте логику экспорта с отдельным компонентом для повторного использования.
Читайте также:
- React Native vs Flutter
- Реализация жизненных циклов React с помощью Reason React Hooks
- Как развернуть React-приложение в Netlify
Перевод статьи Bhargav Bachina: Exporting Data to Excel with React
ReactHTMLTableToExcel
Provides a client side generation of Excel (.xls) file from HTML table element.


No additional dependencies
Installation
npm install --save react-html-table-to-excel
Features
- Download HTML table as Excel file in .xls format
- No server side code
- Set desired .xls filename and sheet
- Set desired class name and id for styling
- Supported IE 11
Options
A list of available properties can be found below. These must be passed to the containing ReactHTMLTableToExcel component.
| Property | Type | Description |
|---|---|---|
| table | string | ID attribute of HTML table element. |
| filename | string | Name of Excel file. |
| sheet | string | Name of Excel sheet. |
| id | string | ID attribute of button element. |
| className | string | Class attribute of button element. |
| buttonText | string | Button text. |
Example
import React, {Component} from 'react';

import ReactHTMLTableToExcel from 'react-html-table-to-excel';
class Test extends Component {
constructor(props) {
super(props);
}
render() {
return (
<div>
<ReactHTMLTableToExcel
id="test-table-xls-button"
className="download-table-xls-button"
table="table-to-xls"
filename="tablexls"
sheet="tablexls"
buttonText="Download as XLS"/>
<table id="table-to-xls">
<tr>
<th>Firstname</th>
<th>Lastname</th>
<th>Age</th>
</tr>
<tr>
<td>Jill</td>
<td>Smith</td>
<td>50</td>
</tr>
<tr>
<td>Eve</td>
<td>Jackson</td>
<td>94</td>
</tr>
</table>
</div>
);
}
}
export default Test