

В React есть два способа реализации функции экспорта: с помощью любой сторонней библиотеки или с помощью создания компонента. Рассмотрим оба способа ниже.

Пример проекта
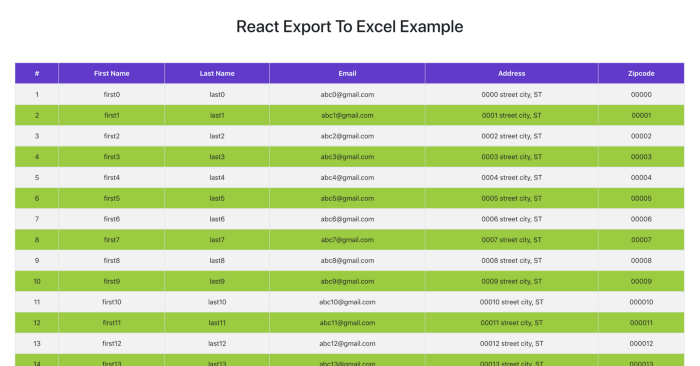
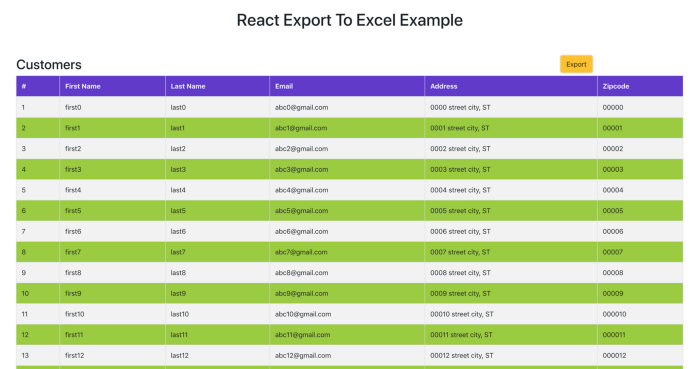
Возьмем простое приложение с данными в таблице и кнопкой экспорта в правом верхнем углу. При нажатии на кнопку данные из таблицы загружаются в таблицу Excel.
Проект можно импортировать отсюда и запустить напрямую.
// clone the project
git clone https://github.com/bbachi/react-exportexcel-example.git

// install and start the project
npm install
npm start
Предварительная подготовка
Создайте проект React с помощью create-react-app и установите пакеты npm xslx, bootstrap и file-saver.
// generate react project
create-react-app react-exportexcel-example

// install bootstrap
npm install react-bootstrap bootstrap --save

// install xsls and file-saver
npm install xlsx file-saver --save
Добавьте таблицы стилей из библиотеки React Bootstrap в index.html.
<!DOCTYPE html>
<html lang="en">
  <head>
    <meta charset="utf-8" />
    <link rel="shortcut icon" href="%PUBLIC_URL%/favicon.ico" />
    <!-- Bootstrap stylesheet link -->
    <link
      rel="stylesheet"
      href="https://maxcdn.bootstrapcdn.com/bootstrap/4.3.1/css/bootstrap.min.css"
      integrity="sha384-ggOyR0iXCbMQv3Xipma34MD+dH/1fQ784/j6cY/iJTQUOhcWr7x9JvoRxT2MZw1T"
      crossorigin="anonymous"
    />
    <meta name="viewport" content="width=device-width, initial-scale=1" />
    <meta name="theme-color" content="#000000" />

    <title>React App</title>
  </head>
  <body>
    <noscript>You need to enable JavaScript to run this app.</noscript>
    <div id="root"></div>
  </body>
</html>
Создание заголовка
Создаем заголовок для приложения. Это не обязательный шаг для реализации функции экспорта, однако с ним приложение выглядит лучше.
import React from 'react'

export const Header = () => {
    return (
        <div className="header">
            <h1>React Export To Excel Example</h1>
        </div>
    )
}
Создание таблицы Customers
Создаем компонент таблицы Customer. Это презентационный компонент, который принимает массив customers в качестве props и отображает в виде таблицы.
import React from 'react'
import Table from 'react-bootstrap/Table';

export const Customers = ({customers}) => {

    const CustomerRow = (customer,index) => {

        return(
              <tr key = {index} className='even'>
                  <td> {index + 1} </td>
                  <td>{customer.firstName}</td>
                  <td>{customer.lastName}</td>
                  <td>{customer.email}</td>
                  <td>{customer.address}</td>
                  <td>{customer.zipcode}</td>
              </tr>
          )
      }

      const CustomerTable = customers.map((cust,index) => CustomerRow(cust,index))

      const tableHeader = <thead className='bgvi'>
                            <tr>
                                <th>#</th>
                                <th>First Name</th>
                                <th>Last Name</th>
                                <th>Email</th>
                                <th>Address</th>
                                <th>Zipcode</th>
                            </tr>
                        </thead>

    return (
        <Table striped bordered hover>
            {tableHeader}
            <tbody>
                {CustomerTable}
            </tbody>
        </Table>
    )
}
Передача данных из компонента App
Нам нужно передать данные, отображаемые в таблице, из компонента app, а также импортировать компоненты Customers и Header для использования в функции render.
import React from 'react';
import './App.css';
import { Customers } from './Customers'
import { Header } from './Header'

class App extends React.Component {

  customers = () => {
    let custs = []
    for (let i = 0; i <= 25; i++) {
      custs.push({firstName: `first${i}`, lastName: `last${i}`,
      email: `abc${i}@gmail.com`, address: `000${i} street city, ST`, zipcode: `0000${i}`});
    }
    return custs;
  }

  render() {

    return (
      <div className="App">
        <Header />
        <Customers customers={this.customers()}/>
      </div>
    );
  }
}

export default App;
Приложение должно выглядеть следующим образом:
Реализация функции экспорта
Создаем компонент ExportCSV, принимающий данные в качестве props и осуществляющий функцию экспорта. В данном примере содержится компонент с методом exportToCSV, который обрабатывает все функции загрузки excel с помощью xlxs и file-saver.
import React from 'react'
import Button from 'react-bootstrap/Button';
import * as FileSaver from 'file-saver';
import * as XLSX from 'xlsx';

export const ExportCSV = ({csvData, fileName}) => {

    const fileType = 'application/vnd.openxmlformats-officedocument.spreadsheetml.sheet;charset=UTF-8';
    const fileExtension = '.xlsx';

    const exportToCSV = (csvData, fileName) => {
        const ws = XLSX.utils.json_to_sheet(csvData);
        const wb = { Sheets: { 'data': ws }, SheetNames: ['data'] };
        const excelBuffer = XLSX.write(wb, { bookType: 'xlsx', type: 'array' });
        const data = new Blob([excelBuffer], {type: fileType});
        FileSaver.saveAs(data, fileName + fileExtension);
    }

    return (
        <Button variant="warning" onClick={(e) => exportToCSV(csvData,fileName)}>Export</Button>
    )
}
Это презентационный компонент, который принимает данные для загрузки и название файла в качестве props. Метод exportToCSV вызывается при нажатии кнопки экспорта.
Теперь нужно импортировать этот компонент в компонент App.
// removed for brevity
render() {

    return (
      <div className="App">
        <Header />
        <div className="row">
            <div className="col-md-8">
                <h2>Customers</h2>
            </div>
            <div className="col-md-4 center">
                <ExportCSV csvData={this.state.customers} fileName={this.state.fileName} />
            </div>
        </div>
        <Customers customers={this.customers()}/>
      </div>
    );
  }
Ниже представлен финальный скриншот со всеми функциями!
Функция экспорта с ThirdParty или NPM lib
react-csv — это сторонняя библиотека, которую можно использовать прямо из коробки. Нужно только передать данные и fileName, а обо всем остальном библиотека позаботится сама.
Сначала установите react-csv, а затем импортируйте его в компонент ExportCSV.
npm install react-csv --save
Импортируйте CSVLink из react-csv и передайте необходимые данные и fileName ссылке, указанной ниже.
import React from 'react'
import { CSVLink } from 'react-csv'
import Button from 'react-bootstrap/Button';

export const ExportReactCSV = ({csvData, fileName}) => {
    return (
        <Button variant="warning">
            <CSVLink data={csvData} filename={fileName}>Export</CSVLink>
        </Button>
    )
}
В компоненте App импортируйте ExportReactCSV вместо ExportCSV.
import { ExportReactCSV } from './ExportReactCSV'

    // removed code for the brevity

    <div className="col-md-4 center">
        <ExportReactCSV csvData={this.state.customers} fileName={this.state.fileName} />
    </div>

  }
}

export default App;
Вывод:
- Для реализации функции экспорта в React нужны библиотеки
xslsиfile-saver. - Есть несколько способов реализовать логику экспорта в React: использование собственной логики или использование любой сторонней библиотеки.
- Реализуйте логику экспорта с отдельным компонентом для повторного использования.
Читайте также:
- React Native vs Flutter
- Реализация жизненных циклов React с помощью Reason React Hooks
- Как развернуть React-приложение в Netlify
Перевод статьи Bhargav Bachina: Exporting Data to Excel with React
React-Export-Excel

A export to excel library built with and for React.
Installation
With yarn:
yarn add react-export-excel
With npm:
npm install react-export-excel --save
Code Examples
- Simple Excel Export
- Excel Export with Dataset
- Excel Export with Custom Download Button
- Excel Export with custom cells style
Excel Props
| Prop | Type | Default | Required | Description |
|---|---|---|---|---|
| hideElement | bool |
false | false |
To hide the button & directly download excel file |
| filename | string |
Download | false |
Excel file name to be downloaded |
| fileExtension | string |
xlsx | false |
Download file extension [xlsx] |
| element | HTMLElement |
<button> |
false |
Element to download excel file |
| children | Array<ExcelSheet> |
null |
true |
ExcelSheet Represents data |
ExcelSheet Props
| Prop | Type | Default | Required | Description |
|---|---|---|---|---|
| name | string |
"" |
true |
Sheet name in file |
| data | array<object> |
null |
false |
Excel Sheet data |
| dataSet | array<ExcelSheetData> |
null |
false |
Excel Sheet data |
| children | ExcelColumn |
null |
false |
ExcelColumns |
Note: In ExcelSheet props dataSet has precedence over data and children props.
For further types and definitions Read More
Cell Style
Cell styles are specified by a style object that roughly parallels the OpenXML structure. The style object has five
top-level attributes: fill, font, numFmt, alignment, and border.
| Style Attribute | Sub Attributes | Values |
|---|---|---|
| fill | patternType | "solid" or "none" |
| fgColor | COLOR_SPEC |
|
| bgColor | COLOR_SPEC |
|
| font | name | "Calibri" // default |
| sz | "11" // font size in points |
|
| color | COLOR_SPEC |
|
| bold | true or false |
|
| underline | true or false |
|
| italic | true or false |
|
| strike | true or false |
|
| outline | true or false |
|
| shadow | true or false |
|
| vertAlign | true or false |
|
| numFmt | "0" // integer index to built in formats, see StyleBuilder.SSF property |
|
"0.00%" // string matching a built-in format, see StyleBuilder.SSF |
||
"0.0%" // string specifying a custom format |
||
"0.00%;\(0.00%\);\-;@" // string specifying a custom format, escaping special characters |
||
"m/dd/yy" // string a date format using Excel’s format notation |
||
| alignment | vertical | "bottom" or "center" or "top" |
| horizontal | "bottom" or "center" or "top" |
|
| wrapText | true or false |
|
| readingOrder | 2 // for right-to-left |
|
| textRotation | Number from 0 to 180 or 255 (default is 0) |
|
90 is rotated up 90 degrees |
||
45 is rotated up 45 degrees |
||
135 is rotated down 45 degrees |
||
180 is rotated down 180 degrees |
||
255 is special, aligned vertically |
||
| border | top | { style: BORDER_STYLE, color: COLOR_SPEC } |
| bottom | { style: BORDER_STYLE, color: COLOR_SPEC } |
|
| left | { style: BORDER_STYLE, color: COLOR_SPEC } |
|
| right | { style: BORDER_STYLE, color: COLOR_SPEC } |
|
| diagonal | { style: BORDER_STYLE, color: COLOR_SPEC } |
|
| diagonalUp | true or false |
|
| diagonalDown | true or false |
COLOR_SPEC: Colors for fill, font, and border are specified as objects, either:
{ auto: 1}specifying automatic values{ rgb: "FFFFAA00" }specifying a hex ARGB value{ theme: "1", tint: "-0.25"}specifying an integer index to a theme color and a tint value (default 0){ indexed: 64}default value forfill.bgColor
BORDER_STYLE: Border style is a string value which may take on one of the following values:
thinmediumthickdottedhairdashedmediumDasheddashDotmediumDashDotdashDotDotmediumDashDotDotslantDashDot
Borders for merged areas are specified for each cell within the merged area. So to apply a box border to a merged area of 3×3 cells, border styles would need to be specified for eight different cells:
- left borders for the three cells on the left,
- right borders for the cells on the right
- top borders for the cells on the top
- bottom borders for the cells on the left
Dependencies
This library uses file-saver and xlsx and using json-loader will do the magic for you.
///webpack.config.js
vendor: [
        .....
        'xlsx',
        'file-saver'
],
.....
node: {fs: 'empty'},
externals: [
    {'./cptable': 'var cptable'},
    {'./jszip': 'jszip'}
 ]
Introduction
In this article, we will learn how to export data in Excel using ReactJS. In this demo, we will use react-html-table-to-excel library to export data in an Excel sheet.
Prerequisites
- We should have basic knowledge of React.js and Web API.
- Visual Studio and Visual Studio Code IDE should be installed on your system.
- SQL Server Management Studio
- Basic knowledge of Bootstrap and HTML
Create ReactJS project
Now, let’s first create a React application with the following command.
- npx create-react-app matform
Open the newly created project in Visual Studio and install react-html-table-to-excel library using the following command.
- npm install —save react-html-table-to-excel
Now install Bootstrap by using the following commands.
- npm install —save bootstrap
Now, open the index.js file and add import Bootstrap.
- import ‘bootstrap/dist/css/bootstrap.min.css’;
Now Install the Axios library by using the following command. Learn more about Axios
- npm install —save axios
Now go to the src folder and add a new component, named ‘ExportExcel.js’.
Now open ExportExcel.js component and import following reference.
- import ReactHTMLTableToExcel from ‘react-html-table-to-excel’;
Add the following code in this component.
- import React, { Component } from ‘react’
- import axios from ‘axios’;
- import ReactHTMLTableToExcel from ‘react-html-table-to-excel’;
- export class ExportExcel extends Component {
- constructor(props) {
- super(props)
- this.state = {
- ProductData: []
- }
- }
- componentDidMount() {
- axios.get(‘http://localhost:51760/Api/Emp/employee’).then(response => {
- console.log(response.data);
- this.setState({
- ProductData: response.data
- });
- });
- }
- render() {
- return (
- <div>
- <table id=«emp» class=«table»>
- <thead>
- <tr>
- <th>Id</th>
- <th>Name</th>
- <th>Age</th>
- <th>Address</th>
- <th>City</th>
- <th>ContactNum</th>
- <th>Salary</th>
- <th>Department</th>
- </tr>
- </thead>
- <tbody> {
- this.state.ProductData.map((p, index) => {
- return <tr key={index}>
- <td>
- {p.Id}
- </td>
- <td >{p.Name}</td>
- <td >{p.Age}</td>
- <td >{p.Address}</td>
- <td >{p.City}</td>
- <td >{p.ContactNum}</td>
- <td >{p.Salary}</td>
- <td style={{ paddingRight: «114px» }} >{p.Department}</td>
- </tr>
- })
- }
- </tbody>
- </table>
- <div>
- <ReactHTMLTableToExcel
- className=«btn btn-info»
- table=«emp»
- filename=«ReportExcel»
- sheet=«Sheet»
- buttonText=«Export excel» />
- </div>
- </div>
- )
- }
- }
- export default ExportExcel
Add a reference of this component in app.js file, add the following code in app.js file.
- import React from ‘react’;
- import logo from ‘./logo.svg’;
- import ‘./App.css’;
- import ExportExcel from ‘./ExportExcel’
- function App() {
- return (
- <div className=«App»>
- <ExportExcel/>
- </div>
- );
- }
- export default App;
Our Reactjs project is created, now create a database table and web API project, to show data in a table.
Create a table in the database
Open SQL Server Management Studio, create a database named «Employee», and in this database, create a table. Give that table a name like «Employee».
- CREATE TABLE [dbo].[Employee](
- [Id] [int] IDENTITY(1,1) NOT NULL,
- [Name] [varchar](50) NULL,
- [Age] [int] NULL,
- [Address] [varchar](50) NULL,
- [City] [varchar](50) NULL,
- [ContactNum] [varchar](50) NULL,
- [Salary] [decimal](18, 0) NULL,
- [Department] [varchar](50) NULL,
- CONSTRAINT [PK_Employee] PRIMARY KEY CLUSTERED
- (
- [Id] ASC
- )WITH (PAD_INDEX = OFF, STATISTICS_NORECOMPUTE = OFF, IGNORE_DUP_KEY = OFF, ALLOW_ROW_LOCKS = ON, ALLOW_PAGE_LOCKS = ON) ON [PRIMARY]
- ) ON [PRIMARY]
- GO
Now add a demo data in this table.
Create a new Web API project
Open Visual Studio and create a new project.

Change the name to MatUITable.

Choose the template as Web API.

Right-click the Models folder from Solution Explorer and go to Add >> New Item >> data.

Click on the «ADO.NET Entity Data Model» option and click «Add».

Select EF Designer from the database and click the «Next» button.

Add the connection properties and select database name on the next page and click OK.

Check the «Table» checkbox. The internal options will be selected by default. Now, click OK

Now, our data model is successfully created.
Right-click on the Controllers folder and add a new controller. Name it as «Employee controller» and add the following namespace in the Employee controller.
- using MatUITable.Models;
Now add a method to fetch data from the database.
- [HttpGet]
- [Route(«employee»)]
- public object Getrecord()
- {
- var emp = DB.Employees.ToList();
- return emp;
- }
Complete Employee controller code
- using System;
- using System.Collections.Generic;
- using System.Linq;
- using System.Net;
- using System.Net.Http;
- using System.Web.Http;
- using MatUITable.Models;
- namespace MatUITable.Controllers
- {
- [RoutePrefix(«Api/Emp»)]
- public class EmployeeController : ApiController
- {
- EmployeeEntities DB = new EmployeeEntities();
- [HttpGet]
- [Route(«employee»)]
- public object Getrecord()
- {
- var emp = DB.Employees.ToList();
- return emp;
- }
- }
- }
Now, let’s enable CORS. Go to Tools, open NuGet Package Manager, search for CORS, and install the «Microsoft.Asp.Net.WebApi.Cors» package. Open Webapiconfig.cs and add the following lines
- EnableCorsAttribute cors = new EnableCorsAttribute(«*», «*», «*»);
- config.EnableCors(cors);
Now go to visual studio code and run the project using ‘npm start’ command.

Click on ‘Export Excel’ button. Once excel downloads, open and check.
Summary
In this article, we learned how we to Export data to an Excel sheet in ReactJS.

UPDATED version of this tutorial available here
CREATE AND INSTALL
Create new react project
npx create-react-app react-data-to-excel
Enter fullscreen mode
Exit fullscreen mode
Now start project
npm start
Enter fullscreen mode
Exit fullscreen mode

Project successfully created.
Lets dive into installing neccassry libraries for our project. Install these three libraries.
npm install xlsx file-saver axios --save-dev
Enter fullscreen mode
Exit fullscreen mode
👉xlsx — library for parsing and writing various spreadsheet formats
👉file-saver — library for saving files on the client-side
👉axios — promise based HTTP client for the browser and node.js. We will use it for fetching data from server
UI AND LOGIC
Create a component namely ExportToExcel.js
import React from 'react'
import * as FileSaver from "file-saver";
import * as XLSX from "xlsx";

export const ExportToExcel = ({ apiData, fileName }) => {
  const fileType =
    "application/vnd.openxmlformats-officedocument.spreadsheetml.sheet;charset=UTF-8";
  const fileExtension = ".xlsx";

  const exportToCSV = (apiData, fileName) => {
    const ws = XLSX.utils.json_to_sheet(apiData);
    const wb = { Sheets: { data: ws }, SheetNames: ["data"] };
    const excelBuffer = XLSX.write(wb, { bookType: "xlsx", type: "array" });
    const data = new Blob([excelBuffer], { type: fileType });
    FileSaver.saveAs(data, fileName + fileExtension);
  };

  return (
    <button onClick={(e) => exportToCSV(apiData, fileName)}>Export</button>
  );
};
Enter fullscreen mode
Exit fullscreen mode
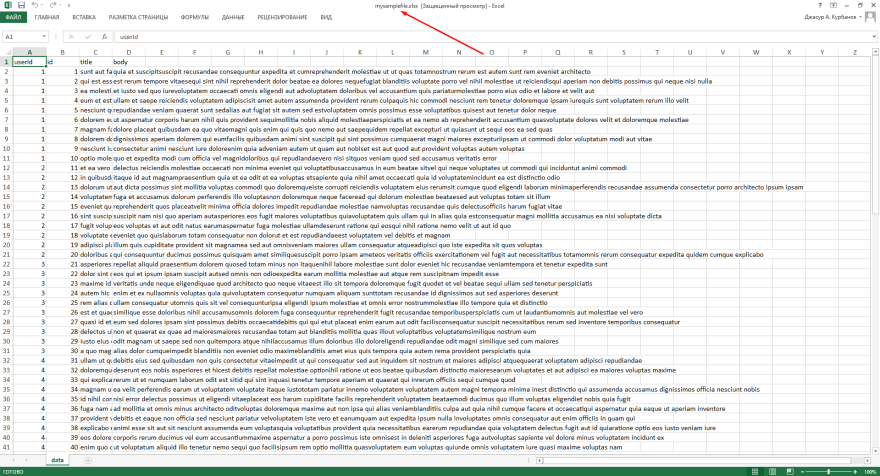
Sample data we will get from https://jsonplaceholder.typicode.com/posts
App.js
import React from 'react'
import axios from 'axios'
import './App.css';

import {ExportToExcel} from './ExportToExcel'

function App() {
  const [data, setData] = React.useState([])
  const fileName = "myfile"; // here enter filename for your excel file

  React.useEffect(() => {
    const fetchData = () =>{
     axios.get('https://jsonplaceholder.typicode.com/posts').then(r => setData(r.data) )
    }
    fetchData()
  }, [])

  return (
    <div className="App">
      <ExportToExcel apiData={data} fileName={fileName} />
    </div>
  );
}

export default App;
Enter fullscreen mode
Exit fullscreen mode
Start project
npm start
Enter fullscreen mode
Exit fullscreen mode
Once it successfully started. You can see one button. By pressing this button you download excel file with data filled from https://jsonplaceholder.typicode.com/posts
Output

Excel File
Github repo for this project link
Not so long ago, I was tasked with adding an export-array-to-excel button to some pages of a React application. The criteria given for this button was:
- It had to be reusable, so it can be imported into any page and used as needed
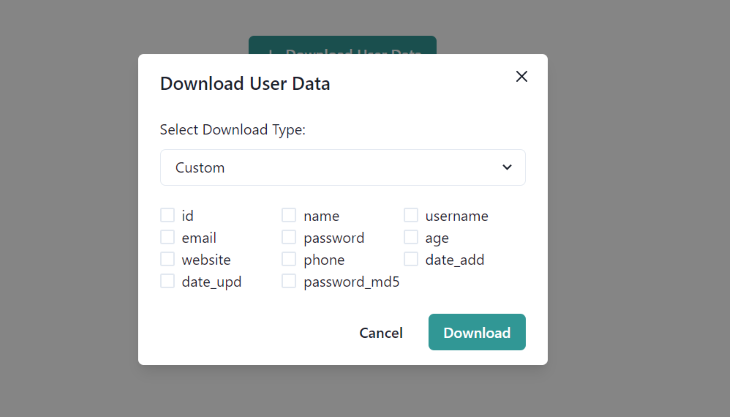
- When clicked, it should open up a modal that lets users choose between downloading all columns (all properties from each individual object of the array) or selected columns (only selected properties from individual objects of the array)
- The modal should contain a download button that will download a JSON API response array directly into a spreadsheet file based on the columns selected
I found out that this is a common feature request (maybe with a little variation) given to developers, especially those who work on admin dashboard-like projects, and that is why I’m writing this article.
This article assumes that you have a fair knowledge of JavaScript and React. In this article, I will first show you the fundamental concepts involved in exporting an array of objects into an Excel sheet. Then, based on that, create the reusable export-array-to-excel component shown above, using Chakra UI as the component library of choice.
The first thing that needs to be figured out is how to prompt a download on the browser.
In plain HTML, creating a button to prompt a download in the browser is pretty straightforward using an anchor tag and its download attribute. Simply pass the URL or file path of the file to be downloaded to the href attribute:
<a href="/files/excel-sheet-to-download.xls" download=”customer-list”>
       <button> Download to excel </button>
</a>
The download attribute is part of the HTML5 spec, and it specifies that the target should be downloaded when the link is clicked. The value passed to the download attribute specifies the filename for the downloaded file.
Unfortunately, the solution above won’t exactly work for our use case because there isn’t a pre-existing Excel file to link to.
We’ll have to perform four tasks spontaneously when the download button is clicked:
- Get the API response array and convert it to a table
- Embed the table into a spreadsheet XML template
- Programmatically create a file URL for the spreadsheet template using the
BlobandURL.createObjectURL()methods - Finally, assign the created URL to the
hrefof an anchor tag with a download attribute, then programmatically click the anchor tag to prompt a download
Let’s go over each step and write the necessary code for it. But first, we need to set up a React app and Chakra UI.
Setting up a React application
To set up a demo React app, use Create React App. Make sure you have Node >= 8.10 and npm >= 5.6 installed:
npx create-react-app export-array-demo
cd export-array-demo
npm start
Next, install Chakra UI:
npm i @chakra-ui/react @emotion/react @emotion/styled framer-motion
npm i @chakra-ui/icons
Chakra UI is an open-source component library for React that provides a set of simple, modular, and accessible components that make it easier to build the UI of applications. It will be used to quickly assemble UI elements that will be needed.
For Chakra UI to work correctly, you need to set up the ChakraProvider (which is the library’s context provider using the React Context API) in index.js:
import React from 'react';
…………
import {ChakraProvider} from "@chakra-ui/react"

ReactDOM.render(
  <React.StrictMode>
    <ChakraProvider>
      <App />
    </ChakraProvider>
  </React.StrictMode>,
  document.getElementById('root')
);
That’s all the initial setup needed. Next up, is to write functions to take care of the array to Excel export.
Write ArrayToExcel
To keep the core array-to-excel logic separated, create a Components/ArrayToExcel folder in src. Inside this folder, create two files ArrayToExcel.js which will contain the function that’ll take care of the conversion and download, and ArrayToExcelButton.js, which will house the button, modal, and other necessary UI elements.
In ArrayToExcel.js, copy the code here, which I’ll now go over in bits:
export const arrayToExcel = (function () {
....
})();
First, all functions are wrapped in an IIFE to make sure that variables scoping will always be protected.
Then there is the convertArrayToTable method returned from the arrayToExcel function:
convertArrayToTable : async (apiArray, fileName) => {
   //use keys from the first array object to form table column headers
   const tableHeaders = `<tr>${Object.keys(apiArray[0]).map(key =>   `<td>${key}</td>`).join('')}</tr>`;
   //now loop through all array objects to form table rows
   const tableRows = apiArray.map(obj =>
      [`<tr>
         ${Object.keys(obj).map(key => `<td>${obj[key] === null ||    obj[key] === '' ? '' : obj[key]}</td>`).join('')}
      <tr/>`]).join('');
   const table = `<table>${tableHeaders}${tableRows}</table>`.trim();


   const xmlTable = createXMLTable(table, fileName);
   const downloadURL = createFileUrl(xmlTable);
   downloadFile(downloadURL, fileName);
}
The convertArrayToTable function receives a JSON API response array (which is an array of objects) as a parameter and loops through the keys of the first object to form the first row, which will represent the table headers or columns. It also loops through each object and uses its values to create rows. Every map function returns an array, which then join method that converts into a string. Then using template literals, concatenate tableHeader and tableRows to form a complete table and pass it into createXMLTable:
const createXMLTable = (table, fileName) => {
  const xmlTable = `
        <html xmlns:o="urn:schemas-microsoft-com:office:office xmlns:x="urn:schemas-microsoft-com:office:excel"
       xmlns="http://www.w3.org/TR/REC-html40"
        >
           <meta http-equiv="content-type" content="application/vnd.ms-excel; charset=UTF-8"/>
           <head>
              <xml>
                <x:ExcelWorkbook>
                    <x:ExcelWorksheets>
                        <x:ExcelWorksheet>
                            <x:Name>${fileName}</x:Name>
                            <x:WorksheetOptions><x:DisplayGridlines/></x:WorksheetOptions>
                        </x:ExcelWorksheet>
                    </x:ExcelWorksheets>
                </x:ExcelWorkbook>
              </xml>
           </head>
           <body>
             ${table}
           </body>
        </html> `
        return xmlTable;
    }
The createXMLTable function uses the SpreadsheetDataXML specification by Microsoft to describe how a spreadsheet file should be structured. In the XML template, you’re instructing that the file should be a workbook with worksheets and that the particular worksheet which displays the table should have a title of whatever the fileName parameter is, and should display grid lines.
XML is a markup language mainly used to transfer data between different programs. In our case, between the web and a .xls (file extension for spreadsheet files) file.
You can write inline CSS here to style how the exported spreadsheet table should look.
Next is the createXMLTable function which returns an Excel file template that is passed to createFileUrl:
const createFileUrl = (xmlTable) => {
        const tableBlob = new Blob([xmlTable], {type: 'application/vnd.ms-excel;base64,' });
        const downloadURL = URL.createObjectURL(tableBlob);
        return downloadURL;
    }
To programmatically create a file URL for the Excel template, you’ll need to convert it into a file or a file-like object using the blob method. The blob method takes in an array and a MIME type as arguments. The blob method returns a blob object, which is passed into the createObjectURL method to create a unique file URL which can then be passed to an a tag.
The downloadFile function takes in the resulting URL from createFileUrl, and finally starts the download:
const downloadFile = (downloadURL, fileName) => {
        const downloadLink = document.createElement('a');
        document.body.appendChild(downloadLink);
        downloadLink.download = fileName;
        downloadLink.href = downloadURL;
        downloadLink.click();
    }
The downloadFile function passes the file URL to the href of the anchor tag which is created programmatically, and then invokes the click method on the link to trigger the download process. The fileName parameter assigned to the download will be the name of the file.
And that’s all you need to do, to take care of downloading an array of objects into an Excel file.
Next, let’s set up our array-to-excel component with UI elements from Chakra UI and also import arrayToExcel.
Assembling UI elements with Chakra UI
To build out the export-array-to-excel component as shown in the beginning, you’ll need a button, modal, select input, and checkbox UI elements.
In ArrayToExcelButton.js import these elements from Chakra UI:
import React, { useState } from "react";
import {
    Button,
    Modal,
    ModalOverlay,
    ModalContent,
    ModalHeader,
    ModalFooter,
    ModalBody,
    ModalCloseButton,
    Select,
    Checkbox,
} from "@chakra-ui/react"
import { DownloadIcon } from '@chakra-ui/icons'
Chakra exports those seven modal-based components to help you create any type of modal dialog.
Remember, from the workflow stated in the beginning, when the main button is clicked, it should open up a modal that lets users choose between downloading all columns or some selected columns (i.e. select properties from each object of the array):
const ArrayToExcelButton = ({ apiArray, fileName, buttonTitle }) => {

    const [showDownloadModal, setShowDownloadModal] = useState(false);
    const [columnsType, setColumnsType] = useState("1");
    const [selectedColumns, setSelectedColumns] = useState([]);

    return (
        <>
            <Button leftIcon={<DownloadIcon />} colorScheme="teal" onClick={() => setShowDownloadModal(true)}>
                {buttonTitle}
            </Button>
            {showDownloadModal &&
                <Modal isOpen={showDownloadModal} onClose={() =>    setShowDownloadModal(false)}>
                    <ModalOverlay />
                    <ModalContent>
                        <ModalHeader>{buttonTitle}</ModalHeader>
                        <ModalCloseButton />
                        <ModalBody>
                            <p style={{marginBottom:"10px" }}>
                              Select Download Type:
                            </p>
                            <Select onChange={(e) => setColumnsType(e.target.value)}>
                                <option value="1">All Columns</option>
                                <option value="2">Custom</option>
                            </Select>
                            {columnsType === "1" &&
                                <p style={{marginTop:"20px" }}>
                                    {Object.keys(apiArray[0]).map((key, index) => {
                                        return (
                                            <span key={index}>{(key)}, </span>
                                        )
                                    })}
                                </p>
                            }
                            {columnsType === "2" &&
                                <div style={{ display: "flex", flexWrap: "wrap", width: "100%", marginTop:"20px" }}>
                                    {Object.keys(apiArray[0]).map((key, index) => {
                                        return (
                                            <div key={index} style={{ display: "flex", alignItems: "center", width:"33.3%"}}>
                                                <Checkbox
                                                    id={key}
                                                    onChange={(e) =>       updateSelectedColumns(e, key)}
                                                >
                                                   {key}
                                                </Checkbox>

                                            </div>
                                        )
                                    })}
                                </div>
                            }

                        </ModalBody>

                        <ModalFooter>
                            <Button variant="ghost" mr={3} onClick={() => setShowDownloadModal(false)}>
                                Cancel
                            </Button>
                            <Button colorScheme="teal" onClick={() => apiArrayToExcel()}>
                                Download
                            </Button>
                        </ModalFooter>
                    </ModalContent>
                </Modal>
            }
        </>
    )
}

export default ArrayToExcelButton;
The main button which receives a buttonTitle prop, toggles opening, and closing of the download modal using the showDownloadModal state.
Inside ModalBody, there is a Select element that toggles the type of download to perform, “All Columns” or “Custom” using setColumnsType. If “All Column” is selected, loop through the first object of apiArray and list out all object properties in a paragraph. If “Columns” is selected, also loop through the first object of apiArray and list out each object properties alongside a checkbox.
To keep track of checked checkboxes we’ll use the updateSelectedColumns function:
const ArrayToExcelButton = ({ apiArray, fileName, buttonTitle }) => {

   ...

    const updateSelectedColumns = (e, column) => {
        if (e.target.checked) {
            setSelectedColumns([...selectedColumns, column]);
        } else {
            setSelectedColumns(selectedColumns.filter(value => value !== column));
        }
    }

   ...
When a checkbox is clicked, updateSelectedColumns either adds or removes the target object property from the selectedColumns state array.
Lastly, clicking on the modal’s download button triggers the array-to-excel download with the apiArrayToExcel function:
import React, { useState } from "react";
...
import {arrayToExcel} from "./ArrayToExcel";
import cloneDeep from "lodash.clonedeep";

const ArrayToExcelButton = ({ apiArray, fileName, buttonTitle }) => {

   ....
    const apiArrayToExcel = () => {
        if (columnsType === "1") {
           arrayToExcel.convertArrayToTable(apiArray, fileName)
        } else {
            const customArray = cloneDeep(apiArray);
            customArray.map(obj => Object.keys(obj).forEach((key) => {
                if (!selectedColumns.includes(key)) {
                    delete obj[key];
                }
            }))
            arrayToExcel.convertArrayToTable(customArray, fileName)
            setSelectedColumns([]);
        }
    }

....
If the value of the download type selected is “All Columns”, the apiArrayToExcel function simply calls the convertArrayToTable method from arrayToExcel passing in apiArray and fileName props as arguments. Else, if the value is Custom, it duplicates the apiArray array using cloneDeep from lodash, and loops through individual objects in customArray deleting object keys (alongside their corresponding values) that are not present in the selectedColumns array.
More great articles from LogRocket:
- Don’t miss a moment with The Replay, a curated newsletter from LogRocket
- Learn how LogRocket’s Galileo cuts through the noise to proactively resolve issues in your app
- Use React’s useEffect to optimize your application’s performance
- Switch between multiple versions of Node
- Discover how to animate your React app with AnimXYZ
- Explore Tauri, a new framework for building binaries
- Compare NestJS vs. Express.js
Because JavaScript arrays are reference types, simply assigning apiArray to a new variable will only create a shallow copy and any changes made to customArray will affect apiArray. To avoid that, deep clone the array using cloneDeep. The lodash cloneDeep method creates a deep clone of an array:
npm i --save lodash.clonedeep
With that, the export-array-to-excel component is ready!
Note, I added some inline styling to keep things simple and together. Ideally, you should keep styles separate.
To test our array-to-excel component, let’s make a mock API fetch call in App.js:
import React, { useState, useEffect } from "react";
import ArrayToExcelButton from "./Components/ArrayToExcel/ArrayToExcelButton"

const App =()=> {

  const [userData, setUserData] = useState([]);
  const [loading, setLoading] = useState(true);

  const fetchJsonArray = async () => {
    try {
      const response = await fetch('https://jsonfy.com/users');
      let jsonArray = await response.json();
      setUserData(jsonArray);
      setLoading(false);
    } catch (error) {
      console.log(error.message);
      setLoading(false);
    }
  }

  useEffect(() => {
    fetchJsonArray();
  }, [])

  return (
    <div className="App">
      {loading ?
        <p>Loading</p> :
        <ArrayToExcelButton apiArray={userData} fileName={"UserData.xls"} buttonTitle={"Download User Data"} />
      }
    </div>
  );
}

export default App;
Import ArrayToExcelButton and pass userData into it as props. Start up the application with npm run start and check that the button works fine.
The full code for this demo project can be found on my GitHub.
Conclusion
Congratulations! You’ve just learned how to export an array of objects to an Excel file using a reusable React component. As I mentioned before, this is a feature request you’re likely to encounter occasionally as a developer especially if you’re working on admin dashboard projects. Now, go on and build something great 🙂
LogRocket: Full visibility into your production React apps
Debugging React applications can be difficult, especially when users experience issues that are hard to reproduce. If you’re interested in monitoring and tracking Redux state, automatically surfacing JavaScript errors, and tracking slow network requests and component load time,
try LogRocket.


LogRocket
combines session replay, product analytics, and error tracking – empowering software teams to create the ideal web and mobile product experience. What does that mean for you?
Instead of guessing why errors happen, or asking users for screenshots and log dumps, LogRocket lets you replay problems as if they happened in your own browser to quickly understand what went wrong.
No more noisy alerting. Smart error tracking lets you triage and categorize issues, then learns from this. Get notified of impactful user issues, not false positives. Less alerts, way more useful signal.
The LogRocket Redux middleware package adds an extra layer of visibility into your user sessions. LogRocket logs all actions and state from your Redux stores.
Modernize how you debug your React apps —
start monitoring for free.