
| title | keywords | f1_keywords | ms.prod | api_name | ms.assetid | ms.date | ms.localizationpriority |
|---|---|---|---|---|---|---|---|
|
Range.Paste method (Word) |
vbawd10.chm157155449 |
vbawd10.chm157155449 |
word |
Word.Range.Paste |
06621016-de31-c61b-a9d0-6544b2d7e0a4 |
06/08/2017 |
medium |
Range.Paste method (Word)
Inserts the contents of the Clipboard at the specified range.
Syntax
expression.Paste
expression Required. A variable that represents a Range object.
Remarks
If you don’t want to replace the contents of the range, use the Collapse method before using this method.
When you use this method with a Range object, the range expands to include the contents of the Clipboard.
Example
This example copies and pastes the first table in the active document into a new document.
If ActiveDocument.Tables.Count >= 1 Then
 ActiveDocument.Tables(1).Range.Copy
 Documents.Add.Content.Paste
End If
This example copies the selection and pastes it at the end of the document.
If Selection.Type <> wdSelectionIP Then
 Selection.Copy
 Set Range2 = ActiveDocument.Content
 Range2.Collapse Direction:=wdCollapseEnd
 Range2.Paste
End If
See also
Range Object
[!includeSupport and feedback]
Вставка таблицы Excel в документ Word с помощью кода VBA Excel. Метод Selection.PasteExcelTable: синтаксис, параметры, пример использования.
Работа с Word из кода VBA Excel
Часть 6. Вставка таблицы Excel в документ Word
[Часть 1] [Часть 2] [Часть 3] [Часть 4] [Часть 5] [Часть 6]
Метод Selection.PasteExcelTable
Метод Range.Paste, использующийся в VBA Word для вставки в документ таблиц, скопированных в буфер обмена из другого документа Word, не применим для вставки в документ таблиц, скопированных из книги Excel. Для этих целей используется метод Selection.PasteExcelTable.
Selection.PasteExcelTable — это метод, предназначенный для вставки Excel-таблицы из буфера обмена в документ Word и ее форматирования в соответствии с заданными параметрами.
Синтаксис
|
Expression.PasteExcelTable(LinkedToExcel, WordFormatting, RTF) |
Expression — переменная, представляющая объект Selection. В том числе, это может быть курсор или закладка.
Параметры
Все параметры метода Selection.PasteExcelTable логического типа и являются обязательными.
| Параметр | Описание |
|---|---|
| LinkedToExcel | True — вставленная таблица связывается с исходным файлом Excel, чтобы изменения, внесенные в файл Excel, отображались в Microsoft Word. False — связь между вставленной таблицей и таблицей в исходном файле не устанавливается. |
| WordFormatting | True — вставленная таблица будет отформатирована как таблица документа Word. False — вставленная таблица будет отформатирована в соответствии с исходным файлом Excel. |
| RTF | True — Excel-таблица будет вставлена в расширенном текстовом формате (RTF). False — Excel-таблица будет вставлена в формате HTML-таблицы. |
Допустим, у нас есть таблица Excel, начинающаяся с ячейки A1 (или с любой другой), и нам необходимо скопировать эту таблицу в существующий документ Word, вставив ее на место закладки «Закладка1».
Решение:
|
Sub Primer() Dim myWord As New Word.Application, myDoc As Word.Document ‘Открываем существующий документ Word Set myDoc = myWord.Documents.Open(«C:ТестоваяДокумент1.docx») ‘Копируем таблицу на активном листе в буфер обмена ‘Вместо ячейки Range(«A1») можно указать любую другую, расположенную внутри таблицы Range(«A1»).CurrentRegion.Copy ‘Вставляем таблицу из буфера обмена на место закладки myDoc.Bookmarks(«Закладка1»).Range.PasteExcelTable False, False, False ‘Отображаем программу Word myWord.Visible = True ‘Очищаем переменные Set myWord = Nothing Set myDoc = Nothing End Sub |
Если необходимо таблицу вставить в конец документа, строку
|
myDoc.Bookmarks(«Закладка1»).Range.PasteExcelTable False, False, False |
следует заменить на
|
With myDoc ‘Переводим курсор в конец документа .Range(.Range.Characters.Count — 1, .Range.Characters.Count — 1).Select ‘Добавляем перенос строки, если необходимо .ActiveWindow.Selection.InsertAfter vbCr ‘Переводим курсор в конец документа .Range(.Range.Characters.Count — 1, .Range.Characters.Count — 1).Select ‘Вставляем таблицу из буфера обмена .ActiveWindow.Selection.PasteExcelTable False, False, False End With |
|
2006 г. Word и его объекты
|

This tutorial explains how you can copy content from one word document and paste it to another word document with VBA. This is one of the most common ask from stakeholder when you need to create a new MS word document daily or weekly which is a subset of the master document. If you do it manually, it’s a tedious task and chances of having error would be high. In the automated world we aim to automate our repetitive tasks as much as possible. As a request it looks easy but it’s a bit complex as you need to handle MS word from Excel and need to give instructions to system via VBA about the changes and interactivity you want to implement.

Table of Contents
Copy all headings to another document
The program below copies each text which is formatted in Heading 1 style and paste to a new word document. You need to make changes in the lines of code highlighted in red.
Sub CopyfromWord()

   ' Objects
    Dim wrdApp, objWord As Object
    Dim wrdDoc, newwrdDoc As Object
    Dim myPath As String, myPath1 As String
    Dim numberStart As Long
    Dim Rng, srchRng As Word.Range

   ' Close MS Word if it's already opened
    On Error Resume Next
     Set objWord = GetObject(, "Word.Application")
     If Not objWord Is Nothing Then
            objWord.Quit SaveChanges:=0
            Set objWord = Nothing
    End If

    'Open MS Word
    Set wrdApp = CreateObject("Word.Application")
        wrdApp.Visible = True

    ' Folder Location
    myPath = "C:UsersDELLDocumentsTest"

    ' Input File
    Set wrdDoc = wrdApp.Documents.Open(myPath & "PD Calibration.docx")

    ' Output File
    Set newwrdDoc = wrdApp.Documents.Add
    myPath1 = myPath & "newdoc1.docx"

    ' Text you want to search
    Dim FindWord As String
    Dim result As String
    FindWord = ""

    'Style
    mystyle = "Heading 1"

    'Defines selection for Word's find function
    wrdDoc.SelectAllEditableRanges

    ' Find Functionality in MS Word
    With wrdDoc.ActiveWindow.Selection.Find
        .Text = FindWord
        .Replacement.Text = ""
        .Forward = True
        .Wrap = 1
        .Format = False
        .MatchCase = False
        .MatchWholeWord = False
        .MatchWildcards = False
        .MatchSoundsLike = False
        .MatchAllWordForms = False
        If mystyle <> "" Then
        .Style = mystyle
        End If
    End With

    ' Execute find method
    wrdDoc.ActiveWindow.Selection.Find.Execute

    ' Store Selected text
    result = wrdDoc.ActiveWindow.Selection.Text

    ' Check if result contains non-blank text
    If Len(result) > 1 Then

    ' -------------------------------------------------------------
    ' Loop through multiple find content (Find All functionality)
    ' -------------------------------------------------------------

    While wrdDoc.ActiveWindow.Selection.Find.Found
    wrdDoc.ActiveWindow.Selection.Copy

    'Activate the new document
    newwrdDoc.Activate

    'New Word Doc
    Set Rng = newwrdDoc.Content
    Rng.Collapse Direction:=wdCollapseEnd
    Rng.Paste

   'Word Document
   wrdDoc.Activate
   wrdDoc.ActiveWindow.Selection.Find.Execute

   Wend

   ' If style not found
    Else
        MsgBox "Text Not Found"
    End If

    'Close and don't save application
    wrdDoc.Close SaveChanges:=False

    'Save As New Word Document
    newwrdDoc.SaveAs myPath1
    newwrdDoc.Close SaveChanges:=False

    'Close all word documents
    wrdApp.Quit SaveChanges:=0

    'Message when done
    MsgBox "Task Accomplished"
End Sub
How to use the above program
- Open Excel Workbook
- Press ALT + F11 shortcut key to open visual basic editor (VBE)
- To insert a module, go to Insert > Module
- Paste the complete VBA script below
- Specify the path of folder in
myPathvariable. It is the folder location where your input word document file is stored. Make sure to mention backward slash at the end.myPath = "C:UsersDELLDocumentsTest" - Specify file name of your input MS Word document
Set wrdDoc = wrdApp.Documents.Open(myPath & "PD Calibration.docx") - File name you wish to have in your output file. New word doc will be saved with this name.
myPath1 = myPath & "newdoc1.docx" - Type word(s) you want to seach in Find box. Keep it blank if you want to search by style only.
FindWord = "". - Specify style specific to your word document in
mystyle = "Heading 1".

How this program works
In this section we broken down the code into multiple snippets to make you understand how it works.
1. First we are closing word documents if any of them is already opened. It is to avoid conflict interacting Excel with Word. This is a useful technique in terms of error handling in the code as sometimes code may crash because of multiple word documents being opened at the same time.
    On Error Resume Next
     Set objWord = GetObject(, "Word.Application")
     If Not objWord Is Nothing Then
            objWord.Quit SaveChanges:=0
            Set objWord = Nothing
    End If
2. In this section of code we are opening the input word document.
    'Open MS Word
    Set wrdApp = CreateObject("Word.Application")
        wrdApp.Visible = True

    ' Folder Location
    myPath = "C:UsersDELLDocumentsTest"

    ' Input File
    Set wrdDoc = wrdApp.Documents.Open(myPath & "PD Calibration.docx")
3. Here we are adding a new word document in which we want to copy the content.
    Set newwrdDoc = wrdApp.Documents.Add
    myPath1 = myPath & "newdoc1.docx"
4. User need to mention the word or style he/she wants MS Word to look for.
    ' Text you want to search
    Dim FindWord As String
    Dim result As String
    FindWord = ""

    'Style
    mystyle = "Heading 1"
5. This part of the VBA code refers to Find feature in MS Word. Many of us enable this functionality by hitting CTRL + F shortcut key. While ... Wend is an alternative of Do While Loop. Here it is used to find all the words which are formatted as ‘Heading 1’ style. It is to find all the searched results in iterative manner. After copying the text it goes to the last filled content in the output doc and then paste the content after that.
    With wrdDoc.ActiveWindow.Selection.Find
        .Text = FindWord
        .Replacement.Text = ""
        .Forward = True
        .Wrap = 1
        .Format = False
        .MatchCase = False
        .MatchWholeWord = False
        .MatchWildcards = False
        .MatchSoundsLike = False
        .MatchAllWordForms = False
        If mystyle <> "" Then
        .Style = mystyle
        End If
    End With

    ' Execute find method selects the found text if found
    wrdDoc.ActiveWindow.Selection.Find.Execute

    While wrdDoc.ActiveWindow.Selection.Find.Found
    wrdDoc.ActiveWindow.Selection.Copy

    'Activate the new document
    newwrdDoc.Activate

    'New Word Doc
    Set Rng = newwrdDoc.Content
    Rng.Collapse Direction:=wdCollapseEnd
    Rng.Paste

   'Word Document
   wrdDoc.Activate
   wrdDoc.ActiveWindow.Selection.Find.Execute

   Wend
6. Last thing which is extremely important is to save the files and close MS Word application. We are closing the input file without saving any changes but the output file is saved with all the changes we made.
    'Close and don't save application
    wrdDoc.Close SaveChanges:=False

    'Save As New Word Document
    newwrdDoc.SaveAs myPath1
    newwrdDoc.Close SaveChanges:=False

    'Close all word documents
    wrdApp.Quit SaveChanges:=0
Copy text from one word document to already created word document
Suppose you don’t want to create a new word document. Instead you wish to save it in the existing word doc you have. Assuming name of the output file is newdoc1.docx.
Replace this line of code Set newwrdDoc = wrdApp.Documents.Add with the code below.
Set newwrdDoc = wrdApp.Documents.Open(myPath & "newdoc1.docx")
If you wish to save the file with the new name you can change in this line of code.
myPath1 = myPath & "newdoc1_updated.docx"
Find specific text and then copy the next 3 words or characters
Specify the word(s) you want to find in FindWord = "Text you wish to search" and make style blank in
mystyle = ""
Replace this line of code wrdDoc.ActiveWindow.Selection.Copy with the code below.
Next 3 words
    lngStart = wrdDoc.ActiveWindow.Selection.End
    wrdDoc.ActiveWindow.Selection.MoveRight Unit:=wdWord, Count:=3, Extend:=wdExtend
    wrdDoc.ActiveWindow.Selection.Collapse Direction:=wdCollapseEnd
    lngEnd = wrdDoc.ActiveWindow.Selection.Start
    wrdDoc.Range(lngStart, lngEnd).Copy
    wrdDoc.ActiveWindow.Selection.EndOf
Next 3 Characters
   lngStart = wrdDoc.ActiveWindow.Selection.End
    wrdDoc.Range(lngStart, lngStart + 3).Copy
If there are some spaces you may find the code extracts only 2 characters (or words) rather than 3 so you can increase the number from 3 to 4 in the code above
Copy text between two words
Suppose you wish to pull all the text between two words (or headings). In the code below you can specify the words in FindWord1 and FindWord2 variables.
Sub CopyBetweenTexts()

   ' Objects
    Dim wrdApp, objWord As Object
    Dim wrdDoc, newwrdDoc As Object
    Dim myPath As String, myPath1 As String
    Dim numberStart As Long
    Dim Rng, srchRng As Word.Range

   ' Close MS Word if it's already opened
    On Error Resume Next
     Set objWord = GetObject(, "Word.Application")
     If Not objWord Is Nothing Then
            objWord.Quit SaveChanges:=0
            Set objWord = Nothing
    End If

    'Open MS Word
    Set wrdApp = CreateObject("Word.Application")
        wrdApp.Visible = True

    ' Folder Location
    myPath = "C:UsersDELLDocumentsTest"

    ' Input File
    Set wrdDoc = wrdApp.Documents.Open(myPath & "PD Calibration.docx")

    ' Output File
    Set newwrdDoc = wrdApp.Documents.Add
    myPath1 = myPath & "newdoc1.docx"

    ' Text you want to search
    Dim FindWord1, FindWord2 As String
    Dim result As String
    FindWord1 = "Steps : PD Calibration"
    FindWord2 = "Test2 Steps : PD Calibration"

    'Style
    mystyle = ""

    'Defines selection for Word's find function
    wrdDoc.SelectAllEditableRanges

     ' Move your cursor to the start of the document
    wrdDoc.ActiveWindow.Selection.HomeKey unit:=wdStory

    'Find Functionality in MS Word
    With wrdDoc.ActiveWindow.Selection.Find
        .Text = FindWord1
        .Replacement.Text = ""
        .Forward = True
        .Wrap = 1
        .Format = False
        .MatchCase = False
        .MatchWholeWord = False
        .MatchWildcards = False
        .MatchSoundsLike = False
        .MatchAllWordForms = False
        If mystyle <> "" Then
        .Style = mystyle
        End If
             If .Execute = False Then
            MsgBox "'Text' not found.", vbExclamation
            Exit Sub
        End If

        ' Locate after the ending paragraph mark (beginning of the next paragraph)
        ' wrdDoc.ActiveWindow.Selection.Collapse Direction:=wdCollapseEnd

        ' Starting character position of a selection
        lngStart = wrdDoc.ActiveWindow.Selection.End 'Set Selection.Start to include searched word
        .Text = FindWord2
        .Replacement.Text = ""
        .Forward = True
        .Wrap = 1
        .Format = False
        .MatchCase = False
        .MatchWholeWord = False
        .MatchWildcards = False
        .MatchSoundsLike = False
        .MatchAllWordForms = False
        .Style = mystyle
        If .Execute = False Then
            MsgBox "'Text2' not found.", vbExclamation
            Exit Sub
        End If
        lngEnd = wrdDoc.ActiveWindow.Selection.Start 'Set Selection.End to include searched word
    End With

  'Copy Selection
  wrdDoc.Range(lngStart, lngEnd).Copy

    'Activate the new document
    newwrdDoc.Activate

    'New Word Doc
    Set Rng = newwrdDoc.Content
    Rng.Collapse Direction:=wdCollapseEnd
    Rng.Paste

   'Word Document
   wrdDoc.Activate
   wrdDoc.ActiveWindow.Selection.Find.Execute

    'Close and don't save application
    wrdDoc.Close SaveChanges:=False

    'Save As New Word Document
    newwrdDoc.SaveAs myPath1
    newwrdDoc.Close SaveChanges:=False

    'Close all word documents
    wrdApp.Quit SaveChanges:=0

    'Message when done
    MsgBox "Task Accomplished"

End Sub
Find multiple different texts and copy in loop
If you wish to extract content between a couple of texts in iterative manner and then copy them one by one in another word document.
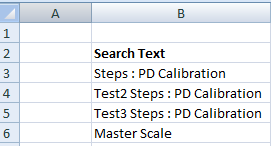
Here we assume texts are stored in column B starting from cell B3. See the image below.
Sub CopyBetweenTexts2()

   ' Objects
    Dim wrdApp, objWord As Object
    Dim wrdDoc, newwrdDoc As Object
    Dim myPath As String, myPath1 As String
    Dim numberStart As Long
    Dim Rng, srchRng As Word.Range

   ' Close MS Word if it's already opened
    On Error Resume Next
     Set objWord = GetObject(, "Word.Application")
     If Not objWord Is Nothing Then
            objWord.Quit SaveChanges:=0
            Set objWord = Nothing
    End If

    'Open MS Word
    Set wrdApp = CreateObject("Word.Application")
        wrdApp.Visible = True

    ' Folder Location
    myPath = "C:UsersDELLDocumentsTest"

    ' Input File
    Set wrdDoc = wrdApp.Documents.Open(myPath & "PD Calibration.docx")

    ' Output File
    Set newwrdDoc = wrdApp.Documents.Add
    myPath1 = myPath & "newdoc1.docx"

    ' Text you want to search
    Dim FindWord1, FindWord2 As String
    Dim result As String

    ' Find last used cell in column B
    Dim last As Double
    With ActiveSheet
        last = .Cells(.Rows.Count, "B").End(xlUp).Row
    End With

    ' Loop through column B
    j = last - 2
    For i = 1 To j

    FindWord1 = Cells(2 + i, 2).Value
    FindWord2 = Cells(3 + i, 2).Value

    'Style
    mystyle = ""

    'Defines selection for Word's find function
    wrdDoc.SelectAllEditableRanges

     ' Move your cursor to the start of the document
    wrdDoc.ActiveWindow.Selection.HomeKey unit:=wdStory

    'Find Functionality in MS Word
    With wrdDoc.ActiveWindow.Selection.Find
        .Text = FindWord1
        .Replacement.Text = ""
        .Forward = True
        .Wrap = 1
        .Format = False
        .MatchCase = False
        .MatchWholeWord = False
        .MatchWildcards = False
        .MatchSoundsLike = False
        .MatchAllWordForms = False
        If mystyle <> "" Then
        .Style = mystyle
        End If
             If .Execute = False Then
            MsgBox "'Text' not found.", vbExclamation
            Exit Sub
        End If

        ' Locate after the ending paragraph mark (beginning of the next paragraph)
        ' wrdDoc.ActiveWindow.Selection.Collapse Direction:=wdCollapseEnd

        ' Starting character position of a selection
        lngStart = wrdDoc.ActiveWindow.Selection.End 'Set Selection.Start to include searched word
        .Text = FindWord2
        .Replacement.Text = ""
        .Forward = True
        .Wrap = 1
        .Format = False
        .MatchCase = False
        .MatchWholeWord = False
        .MatchWildcards = False
        .MatchSoundsLike = False
        .MatchAllWordForms = False
        .Style = mystyle
        If .Execute = False Then
            MsgBox "'Text2' not found.", vbExclamation
            Exit Sub
        End If
        lngEnd = wrdDoc.ActiveWindow.Selection.Start 'Set Selection.End to include searched word
    End With

  If (i = j) Then
  wrdDoc.ActiveWindow.Selection.EndOf
  wrdDoc.ActiveWindow.Selection.EndKey unit:=wdStory
  lngEnd = wrdDoc.ActiveWindow.Selection.End
  End If

  'Copy Selection
  wrdDoc.Range(lngStart, lngEnd).Copy

    'Activate the new document
    newwrdDoc.Activate

    'New Word Doc
    Set Rng = newwrdDoc.Content
    Rng.Collapse Direction:=wdCollapseEnd
    Rng.Paste
    Next i

   'Word Document
   wrdDoc.Activate
   wrdDoc.ActiveWindow.Selection.Find.Execute

    'Close and don't save application
    wrdDoc.Close SaveChanges:=False

    'Save As New Word Document
    newwrdDoc.SaveAs myPath1
    newwrdDoc.Close SaveChanges:=False

    'Close all word documents
    wrdApp.Quit SaveChanges:=0

    'Message when done
    MsgBox "Task Accomplished"

End Sub
Find Text and Replace All
Suppose you want to find a specific text and replace it with some text. If a text has more than 1 occurence, it should be dealt with. In other words, Replace All functionality should be enabled. Here we are replacing it in the output document after copying from input word document. Add the code below after line Next i . Specify text in .Text = and .Replacement.Text =
   'Replace All Name
    newwrdDoc.Activate
    With newwrdDoc.ActiveWindow.Selection.Find
        .Text = "Text 1"
        .Replacement.Text = "Text 2"
        .Forward = True
        .Wrap = 1
        .Format = False
        .MatchCase = False
        .MatchWholeWord = False
        .MatchWildcards = False
        .MatchSoundsLike = False
        .MatchAllWordForms = False
    End With
    newwrdDoc.ActiveWindow.Selection.Find.Execute Replace:=wdReplaceAll
About Author:

Deepanshu founded ListenData with a simple objective — Make analytics easy to understand and follow. He has over 10 years of experience in data science. During his tenure, he has worked with global clients in various domains like Banking, Insurance, Private Equity, Telecom and Human Resource.
In this Article
- VBA PDF (Free Downloads)
- Word VBA Examples “CheatSheet”
- Select / Go To
- Bookmarks
- Document
- Columns
- Font
- Insert
- Loops
- Paragraph
- Word VBA Macro Tutorial
- Simple Word Macro Example
- Word Macro Basics
- Word Document Object
- Application
- Documents
- Document Methods
- Range, Selection, Paragraphs
- Range
- Selection
- Paragraphs
- Word VBA Tutorial Conclusion
- Word Macro Examples
- Word VBA FAQs
Welcome to our Word VBA / Macros Mega-Guide!
This page contains:
-
- Word VBA Tutorial PDF (Free Download)
- Word VBA “Cheat Sheet” containing a list of the most commonly used Word VBA code snippets
- Full Word VBA / Macro tutorial.
- Searchable list of all of our Word VBA Macro Tutorials
You might also be interested in our Interactive VBA Tutorial for Excel. While some of the examples / exercises are specific to Excel VBA, much of the content is generic to all VBA and you may find it useful to learn concepts like If Statements, Loops, MessageBoxes, and more.
VBA PDF (Free Downloads)
Download our free Microsoft Word VBA Tutorial! Or VBA Tutorials for other Office Programs!

Download
Word VBA Examples “CheatSheet”
Below you will find simple VBA code examples for working with Microsoft Word.
Select / Go To
Backspace
Selection.TypeBackspace
Select Entire Document
Selection.HomeKey Unit:=wdStory
Selection.Extend
Delete
Selection.Delete Unit:=wdCharacter, Count:=1
Insert After
Selection.InsertAfter “text”
Beginning of Line
Selection.HomeKey Unit:=wdLine
End of Line
Selection.EndKey Unit:=wdLine
Select All
Selection.WholeStory
Select Entire Line
Selection.EndKey Unit:=wdLine, Extend:=wdExtend
Move Up Paragraph
Selection.MoveUp Unit:=wdParagraph, Count:=1
Move Right One Character
Selection.MoveRight Unit:=wdCharacter, Count:=1
Move Right One Cell in Table
Selection.MoveRight Unit:=wdCell
Go To Start of Doc
Selection.HomeKey Unit:=wdStory
Go To End of Doc
Selection.EndKey Unit:=wdStory
Go To Page 1
Selection.GoTo What:=wdGoToPage, Which:=wdGoToNext, Name:=”1″
Go To Top of Page
Selection.GoTo What:=wdGoToBookmark, Name:=”Page”
Selection.MoveLeft Unit:=wdCharacter, Count:=1
Return to Top
Bookmarks
Add
With ActiveDocument.Bookmarks
.Add Range:=Selection.Range, Name:=”Name”
.DefaultSorting = wdSortByName
.ShowHidden = False
End With
Count
Dim n as Integer
n = ActiveDocument.Bookmarks.Count
Delete
ActiveDocument.Bookmarks(“BookmarkName”).Delete
Exists?
If ActiveDocument.Bookmarks.Exists(“BookmarkName”) = True then
‘Do something
End If
Go To
Selection.GoTo What:=wdGoToBookmark, Name:=”BookmarkName”
Select
ActiveDocument.Bookmarks(“BookmarkName”).Select
Replace Text
Selection.GoTo What:=wdGoToBookmark, Name:=”BookmarkName”
Selection.Delete Unit:=wdCharacter, Count:=1
Selection.InsertAfter “New Text”
ActiveDocument.Bookmarks.Add Range:=Selection.Range, _
Name:=”BookmarkName”
Return to Top
Document
Activate
Documents(“Example.doc”).Activate
Add to Variable
Dim doc As Document
Set doc = Documents.Add
Add (From Another Doc)
Documents.Add Template:=”C:FormsFormDoc.doc”, _
NewTemplate:=False
Close
Documents(“Example.doc”).Close
Close – Save Changes
Documents(“Example.doc”).Close SaveChanges:=wdSaveChanges
Close – Do Not Save
Documents(“Example.doc”).Close SaveChanges:=wdDoNotSaveChanges
Close – Prompt to Save
Documents(“Example.doc”).Close SaveChanges:=wdPromptToSaveChanges
Return to Top
Columns
Save As
Documents(“Example.doc”).SaveAs (“C:ExampleExample.doc”)
Save
Documents(“Example.doc”).Save
Protect
Documents(“Example.doc”).Protect Password:=”password”
Unprotect
Documents(“Example.doc”).UnProtect Password:=”password”
Number of Pages
Dim varNumberPages as Variant
varNumberPages = _
ActiveDocument.Content.Information(wdActiveEndAdjustedPageNumber)
Documents(“Example.doc”).Print
Return to Top
VBA Coding Made Easy
Stop searching for VBA code online. Learn more about AutoMacro — A VBA Code Builder that allows beginners to code procedures from scratch with minimal coding knowledge and with many time-saving features for all users!

Learn More
Font
Size
Selection.Font.Size = 12
Bold
Selection.Font.Bold = True
Italics
Selection.Font.Italic = True
Underline
Selection.Font.Underline = wdUnderlineSingle
All Caps
Selection.Font.AllCaps = True
Color
Selection.Font.TextColor = vbRed
Name
Selection.Font.Name = “Abadi”
Subscript
Selection.Font.Subscript = True
SuperScript
Selection.Font.Superscript = True
Highlight Color
Selection.Range.HighlightColorIndex = wdYellow
Style
Selection.Style = ActiveDocument.Styles(“Normal”)
Return to Top
Insert
Insert AutoText
Selection.TypeText Text:=”a3″
Selection.Range.InsertAutoText
Insert File
Selection.InsertFile (“C:DocsSomething.doc”)
Insert Page Break
Selection.InsertBreak Type:=wdPageBreak
Insert Paragraph Symbol
Selection.TypeText Text:=Chr$(182)
Insert Tab
Selection.TypeText Text:=vbTab
Insert Text
Selection.TypeText Text:=”Any Text”
Insert Type Paragraph
Selection.TypeParagraph
Insert Paragraph
Selection.InsertParagraph
Return to Top
Loops
Do Until End of Doc
Do Until ActiveDocument.Bookmarks(“Sel”) = ActiveDocument.Bookmarks(“EndOfDoc”)
‘Do Something
Sub
For Each Doc in Docs
Dim doc As Document
ForEach doc In Documents
‘Do Something
Next doc
Loop Through Paragraphs
Sub through Paragraphs
Dim i As Long, iParCount As Long
iParCount = ActiveDocument.Paragraphs.CountFori = 1 To iParCount
ActiveDocument.Paragraphs(i).Alignment = wdAlignParagraphLeft
Next i
Return to Top
VBA Programming | Code Generator does work for you!
Paragraph
KeepLinesTogether
Selection.ParagraphFormat.KeepTogether = True
KeepWithNext
Selection.ParagraphFormat.KeepWithNext = True
Space After
Selection.ParagraphFormat.SpaceAfter = 12
Space Before
Selection.ParagraphFormat.SpaceBefore = 0
Align Center
Selection.ParagraphFormat.Alignment = wdAlignParagraphCenter
Align Right
Selection.ParagraphFormat.Alignment = wdAlignParagraphRight
Align Left
Selection.ParagraphFormat.Alignment = wdAlignParagraphLeft
Left Indent
Selection.ParagraphFormat.LeftIndent = InchesToPoints(3.75)
Right Indent
Selection.ParagraphFormat.RightIndent = InchesToPoints(1)
Line Spacing
With Selection.ParagraphFormat
.LineSpacingRule = wdLineSpaceExactly
.LineSpacing = 12
End With
Loop Through All Paragraphs
Sub through Paragraphs
Dim i As Long, iParCount As Long
iParCount = ActiveDocument.Paragraphs.CountFori = 1 To iParCount
ActiveDocument.Paragraphs(i).Alignment = wdAlignParagraphLeft
Next i
Return to Top
Word VBA Macro Tutorial
This is a tutorial for using VBA with Microsoft Word. This tutorial will teach you how to write a simple Macro and interact with Documents, Ranges, Selections, and Paragraphs.
Note: If you’re brand new to Macros / VBA you might also find this article useful: How to write VBA Macros from Scratch.
VBA is the programming language used to automate Microsoft Office programs including Word, Excel, Outlook, PowerPoint, and Access.
Macros are blocks of VBA code that perform specific tasks.
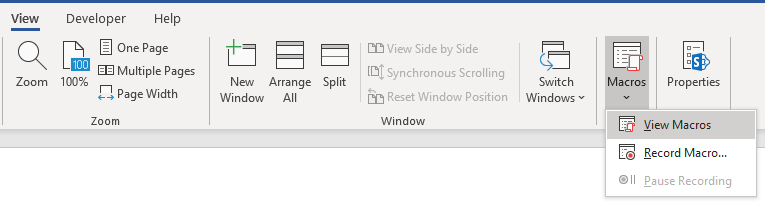
When you Record a Macro, Word will write VBA code into a Macro, allowing you to repeat your actions. You can see a list of all available Macros from View > Macros.
After recording a Macro, you will be able to edit the Macro from the Macro List:
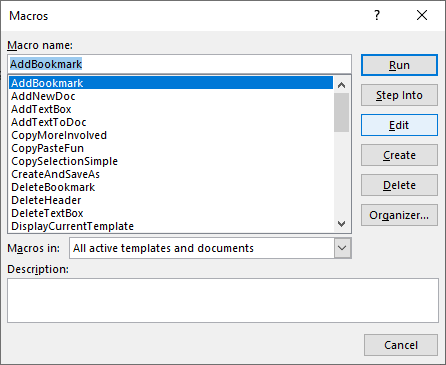
When you click Edit, you open the VBA Editor. Using the VBA Editor you can edit recorded Macros or write a Word Macro from scratch. To access the VBA Editor use the shortcut ALT + F11 or click Visual Basic from the Developer Ribbon.

Simple Word Macro Example
This is a simple example of a Word VBA Macro. It performs the following tasks:
- Opens a Word Document
- Writes to Document
- Closes and Saves the Word Document.
Sub WordMacroExample()

    'Open Doc & Assign to Variable
    Dim oDoc As Document
    Set oDoc = Documents.Open("c:UserssomeoneNewDocument.docx")

    'Write To Doc
    Selection.TypeText "www.automateexcel.com"
    Selection.TypeParagraph

    'Save and Close Doc
    oDoc.Save
    oDoc.Close

End Sub
Word Macro Basics
All VBA code must be stored within procedures like this. To create a procedure in VBA type “Sub WordMacroExample” (Where “WordMacroExample” is your desired Macro name) and press ENTER. VBA will automatically add the parenthesis and End Sub.
Word Document Object
When interacting with Microsoft Word in VBA, you will frequently reference Word “Objects”. The most common objects are:
Application Object – Microsoft Word itself
Document Object – A Word document
Range Object – A part of a Word document
Selection Object – A selected range or cursor location.
AutoMacro | Ultimate VBA Add-in | Click for Free Trial!
Application
Application is the “top-level” object. All other objects in Word can be reached through it.
In addition to accessing other Word objects, there are “application-level” settings that can be applied:
Application.Options.AllowDragAndDrop = TrueThis is an example of accessing the “Selection” of “Windows(1)” with in the Application:
Application.Windows(1).Selection.Characters.CountHowever, the most common Word objects can be accessed directly, without typing the full hierarchy. So instead, you can (and should) just type:
Selection.Characters.CountDocuments
ActiveDocument
Often, you will have two or more documents opened in Word and you will need specify which specific Word Document to interact with. One way to specify which document is to use ActiveDocument. For example:
ActiveDocument.PrintOut…would print the ActiveDocument. The ActiveDocument is the document in Word which “has focus”
To switch the ActiveDocument, use the Activate command:
Documents("Example.docx").ActivateThisDocument
Instead of using ActiveDocument to reference the active document, you can use ThisDocument to reference the document where the macro is stored. ThisDocument will never change.
ThisDocument.PrintOutDocument Variables
However, for more complicated macros, it can be hard to keep track of the Active Document. It can also be frustrating to switch back and forth between documents.
Instead, you can use Document variables.
This macro will assign the ActiveDocument to a variable and then print the document using the variable:
Sub VarExample()
    Dim oDoc As Document
    Set oDoc = ActiveDocument
    oDoc.PrintOut
End Sub
Document Methods
Open Document
To Open a Word Document:
Documents.Open "c:UsersSomeOneDesktopTest PM.docx"We recommend always assigning a Document to a variable upon opening it:
Dim oDoc as Document
Set oDoc = Documents.Open("c:UsersSomeOneDesktopTest PM.docx")
Create New Document
To create a new Word Document:
Documents.AddWe can instruct Word to create a new doc based on some template:
Documents.Add Template:="C:Program FilesMicrosoft OfficeTemplatesMyTemplate.dotx"As always, it is useful and huge problem saver to assign document to variable upon creating or opening:
Dim oDoc as Document
Set oDoc = Documents.Add (Template:="C:Program FilesMicrosoft OfficeTemplatesMyTemplate.dotx")
Save Document
To save a document:
ActiveDocument.Saveor SaveAs:
ActiveDocument.SaveAs FileName:= c:UsersSomeOneDesktoptest2.docx", FileFormat:=wdFormatDocumentClose Document
To close a Document and save changes:
ActiveDocument.Close wdSaveChangesor without saving changes:
ActiveDocument.Close wdDoNotSaveChangesPrint Document
This will print the active Document:
ActiveDocument.PrintOutRange, Selection, Paragraphs
Range and Selection are probably the most important objects in Word VBA, certainly the most used.
Range refers to some portion of document, usually, but not necessarily, text.
Selection refers to selected text (or other object like pictures) or, if nothing is selected, an insertion point.
Paragraphs represent paragraphs in document. Its less important than it sounds, because you can’t directly access paragraph text (you need to access particular paragraph range to make modifications).
AutoMacro | Ultimate VBA Add-in | Click for Free Trial!
Range
Range can be any part of document, including entire document:
Dim oRange As Range
Set oRange = ActiveDocument.Content
or it can be small as one character.
Another example, this range would refer to first word in document:
Dim oRange As Range
Set oRange = ActiveDocument.Range.Words(1)
Usually, you would want to get range which refers to specific part of document and then modify it.
In the following example we will make the first word of second paragraph bold:
Dim oRange As Range
Set oRange = ActiveDocument.Paragraphs(2).Range.Words(1)
oRange.Bold = True
Set Range Text
To set the text value of a Range:
Dim oRange As Range
Set oRange = ActiveDocument.Paragraphs(2).Range.Words(1)
oRange.Text = “Hello ”
(Tip: Note the space after “Hello”. Because word object includes space after word, with just “hello” we would get “Hellonext word”)
There are hundreds of things which you can do with ranges. Just a few examples (these assume you are already made object variable oRange referring to range of interest):
Change font
oRange.Font.Name = "Arial"Display in message box number of characters in particular range
MsgBox oRange.Characters.CountInsert some text before it
oRange.InsertBefore "this is inserted text "Add a footnote to range
ActiveDocument.Footnotes.Add Range:=oRange, _
Text:="Read more at automateexcel.com."
Copy it to clipboard
oRange.Copy
Often you need to change to what is particular range referring. So you can start it’s start and end
oRange.Start = 5
oRange.End = 50
After above code, oRange would refer to text starting with fifth and ending with 50th character in document.
Selection
Selection is even more widely used than Range, because it is easier to work with Selections than Ranges, IF your macro ONLY interacts with the ActiveDocument.
First select the desired part of your document. For example select the second paragraph in active document:
ActiveDocument.Paragraphs(2).Range.SelectThen you can use the Selection Object to type some text:
Selection.TypeText "Some text"We can type some paragraphs bellow “Some text”:
Selection.TypeText "Some text"
Selection.TypeParagraph
Often, it’s necessary to know if some text is selected or we have just a insertion point:
If Selection.Type <> wdSelectionIP Then
    Selection.Font.Bold = True
Else
    MsgBox "You need to select some text."
End If
When working with Selection object we want to place insertion point to particular place, and issue commands starting from this point.
Beginning of document:
Selection.HomeKey Unit:=wdStory, Extend:=wdMoveBeginning of current line:
Selection.HomeKey Unit:=wdLine, Extend:=wdMoveThe Extend parameter wdMove moves the insertion point. Instead, you could use wdExtend which will select all text between the current insertion point.
Selection.HomeKey Unit:=wdLine, Extend:=wdExtendMove Selection
The most useful method for changing position of insertion point is Move. To move Selection two characters forward:
Selection.Move Unit:=wdCharacter, Count:=2to move it backwards, use negative number for Count parameter:
Selection.Move Unit:=wdCharacter, Count:=-2Unit parameter can be wdCharacter, wdWord, wdLine, or more (use Word VBA help to see others).
To move words instead:
Selection.Move unit:=wdWord, Count:=2Selection is easier to work with (compared to ranges) because it is like a robot using Word, mimicking human user. Where Insertion point is – some action would take place. But, this means that you must take care where insertion point is! This is not easy after many steps in code. Otherwise, Word would change text in not desired place.
In the case you need some property or method not available in Selection object you can always easily obtain range associated with selection:
Set oRange = Selection.RangeTIP: Using Selection is often easier than using ranges, but also it’s way slower (important when you deal with big documents)
Paragraphs
You can’t directly use Paragraphs object to change text:
ActiveDocument.Paragraphs(1).Text = "No, it wouldn't work"Above wouldn’t work (actually it will throw an error). You need to first obtain range associated with particular paragraph:
ActiveDocument.Paragraphs(1).Range.Text = "It works now :)"But you can directly change its style:
ActiveDocument.Paragraphs(1).Style = "Normal"or change its paragraph level formatting:
ActiveDocument.Paragraphs(1).LeftIndent = 10or maybe you want to keep this paragraph on the same line with next paragraph:
ActiveDocument.Paragraphs(1).KeepWithNext = TrueMake paragraph centered:
ActiveDocument.Paragraphs(1).Alignment = wdAlignParagraphCenterIt is VERY useful to assign a particular paragraph to object variable. If we assign particular paragraph to variable we don’t have to worry if the first paragraph becomes the second because we inserted one paragraph before it:
dim oPara as Paragraph
Set oPara = Selection.Paragraphs(1) ‘here we assign first paragraph of current selection to variable
Here is an example where we insert a paragraph above the first paragraph, but we can still reference the old first paragraph because it was assigned to a variable:
Sub ParagraphExample()
    Dim oPara As Paragraph
    Set oPara = ActiveDocument.Paragraphs(1)
    MsgBox oPara.Range.Text
    oPara.Range.InsertParagraphBefore 'Insert Paragraph
    MsgBox oPara.Range.Text
End Sub
Paragraph object is very frequently used in loops:
Sub LoopThroughParagraphs()

    Dim oPara As Paragraph
    For Each oPara In ActiveDocument.Paragraphs
        'do something with it. We will just display
        'paragraph text if its style is "Heading 4"
        If oPara.Style = "Heading 4" Then
            MsgBox oPara.Range.Text
        End If
    Next oPara

End Sub
Word VBA Tutorial Conclusion
This tutorial covered the basics of Word VBA. If you’re new to VBA, you should also review our general VBA Tutorial to learn more about Variables, Loops, MessageBoxes, Settings, Conditional Logic and much more.
AutoMacro | Ultimate VBA Add-in | Click for Free Trial!
Word Macro Examples
Word VBA FAQs
What is a Word Macro?
A Macro is a general term that refers to a set of programming instructions that automates tasks. Word Macros automate tasks in Word using the VBA programming language.
Does word have VBA?
Yes, Microsoft Word has the VBA Editor. It can be accessed with by pressing ALT + F11 or by navigating to Developer > Visual Basic.
How do I use VBA in Word?
1. Open the VBA Editor (ALT + F11 or Developer > Visual Basic)
2. Go to Insert > Module to create a Code Module
3. Type ‘Sub HelloWorld’ and press Enter
4. In between the lines ‘Sub HelloWorld’ and ‘End Sub’, type ‘MsgBox “Hello World!’
5. You’ve created a Macro!
6. Now press ‘F5’ to run the Macro